RaptorAero - Bike rack Yakima - Free user manual and instructions
Find the device manual for free RaptorAero Yakima in PDF.
| Product Type | Roof bike rack |
| Brand | Yakima |
| Model | RaptorAero |
| Number of Bikes | 2 |
| Maximum Total Load | 75 kg (165 lb) |
| Maximum Weight per Bike | 14 kg (30 lb) |
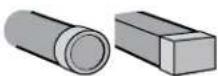
| Bar Compatibility | Factory bars, round bars or square bars |
| Attachment | MightyMount adapters (factory bars) or SnapAround collars (round/square bars) |
| Clamping System | Adjustable jaws with red knob |
| Security | Wheel straps with red lever, optional SKS locks |
| Maintenance | Lubricate bolts with non-water soluble lubricant; clean plastic with cloth and mild soap |
| Warranty | Limited \"As long as our love story lasts\" warranty |
| Contact | (888) 925-4621, www.yakima.com |
| Manual | User guide available in PDF |
| Not compatible with | Baby seats, panniers, wheel covers, full cover, motor |
Frequently Asked Questions - RaptorAero Yakima
User questions about RaptorAero Yakima
0 question about this device. Answer the ones you know or ask your own.
Ask a new question about this device
Download the instructions for your Bike rack in PDF format for free! Find your manual RaptorAero - Yakima and take your electronic device back in hand. On this page are published all the documents necessary for the use of your device. RaptorAero by Yakima.
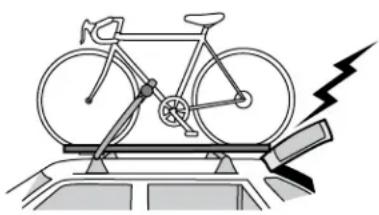
USER MANUAL RaptorAero Yakima
2 bikes = MAXIMUM LOAD
EACH BIKE = 30 lbs./14 kg
(do not exceed rack weight limit)
FACTORY BARS
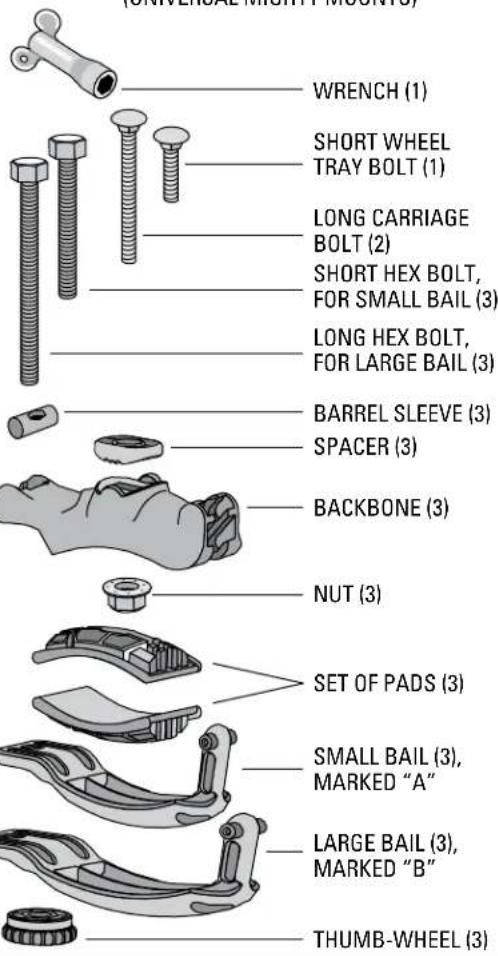
ATTACHMENT HARDWARE
(UNIVERSAL MIGHTY MOUNTS)

IMPORTANT WARNING: IT IS CRITICAL THAT ALL YAKIMA RACKS AND ACCESSORIES BE PROPERLY AND SECURELY
ATTACHED TO YOUR VEHICLE. IMPROPER ATTACHMENT COULD RESULT IN AN AUTOMOBILE ACCIDENT, AND COULD
CAUSE SERIOUS BODILY INJURY OR DEATH TO YOU OR TO OTHERS. YOU ARE RESPONSIBLE FOR SECURING THE RACKS
AND ACCESSORIES TO YOUR CAR, CHECKING THE ATTACHMENTS PRIOR TO USE, AND PERIODICALLY INSPECTING THE
PRODUCTS FOR ADJUSTMENT, WEAR, AND DAMAGE. THEREFORE, YOU MUST READ AND UNDERSTAND ALL OF THE INSTRUCTIONS AND CAUTIONS SUPPLIED WITH YOUR YAKIMA PRODUCT PRIOR TO INSTALLATION OR USE. IF YOU DO NOT UNDERSTAND ALL OF THE INSTRUCTIONS AND CAUTIONS, OR IF YOU HAVE NO MECHANICAL EXPERIENCE AND ARE NOT THOROUGHLY FAMILIAR WITH THE INSTALLATION PROCEDURES, YOU SHOULD HAVE THE PRODUCT INSTALLED BY A PROFESSIONAL INSTALLER SUCH AS A QUALIFIED GARAGE OR AUTO BODY SHOP.
Part #1033402 Rev.A
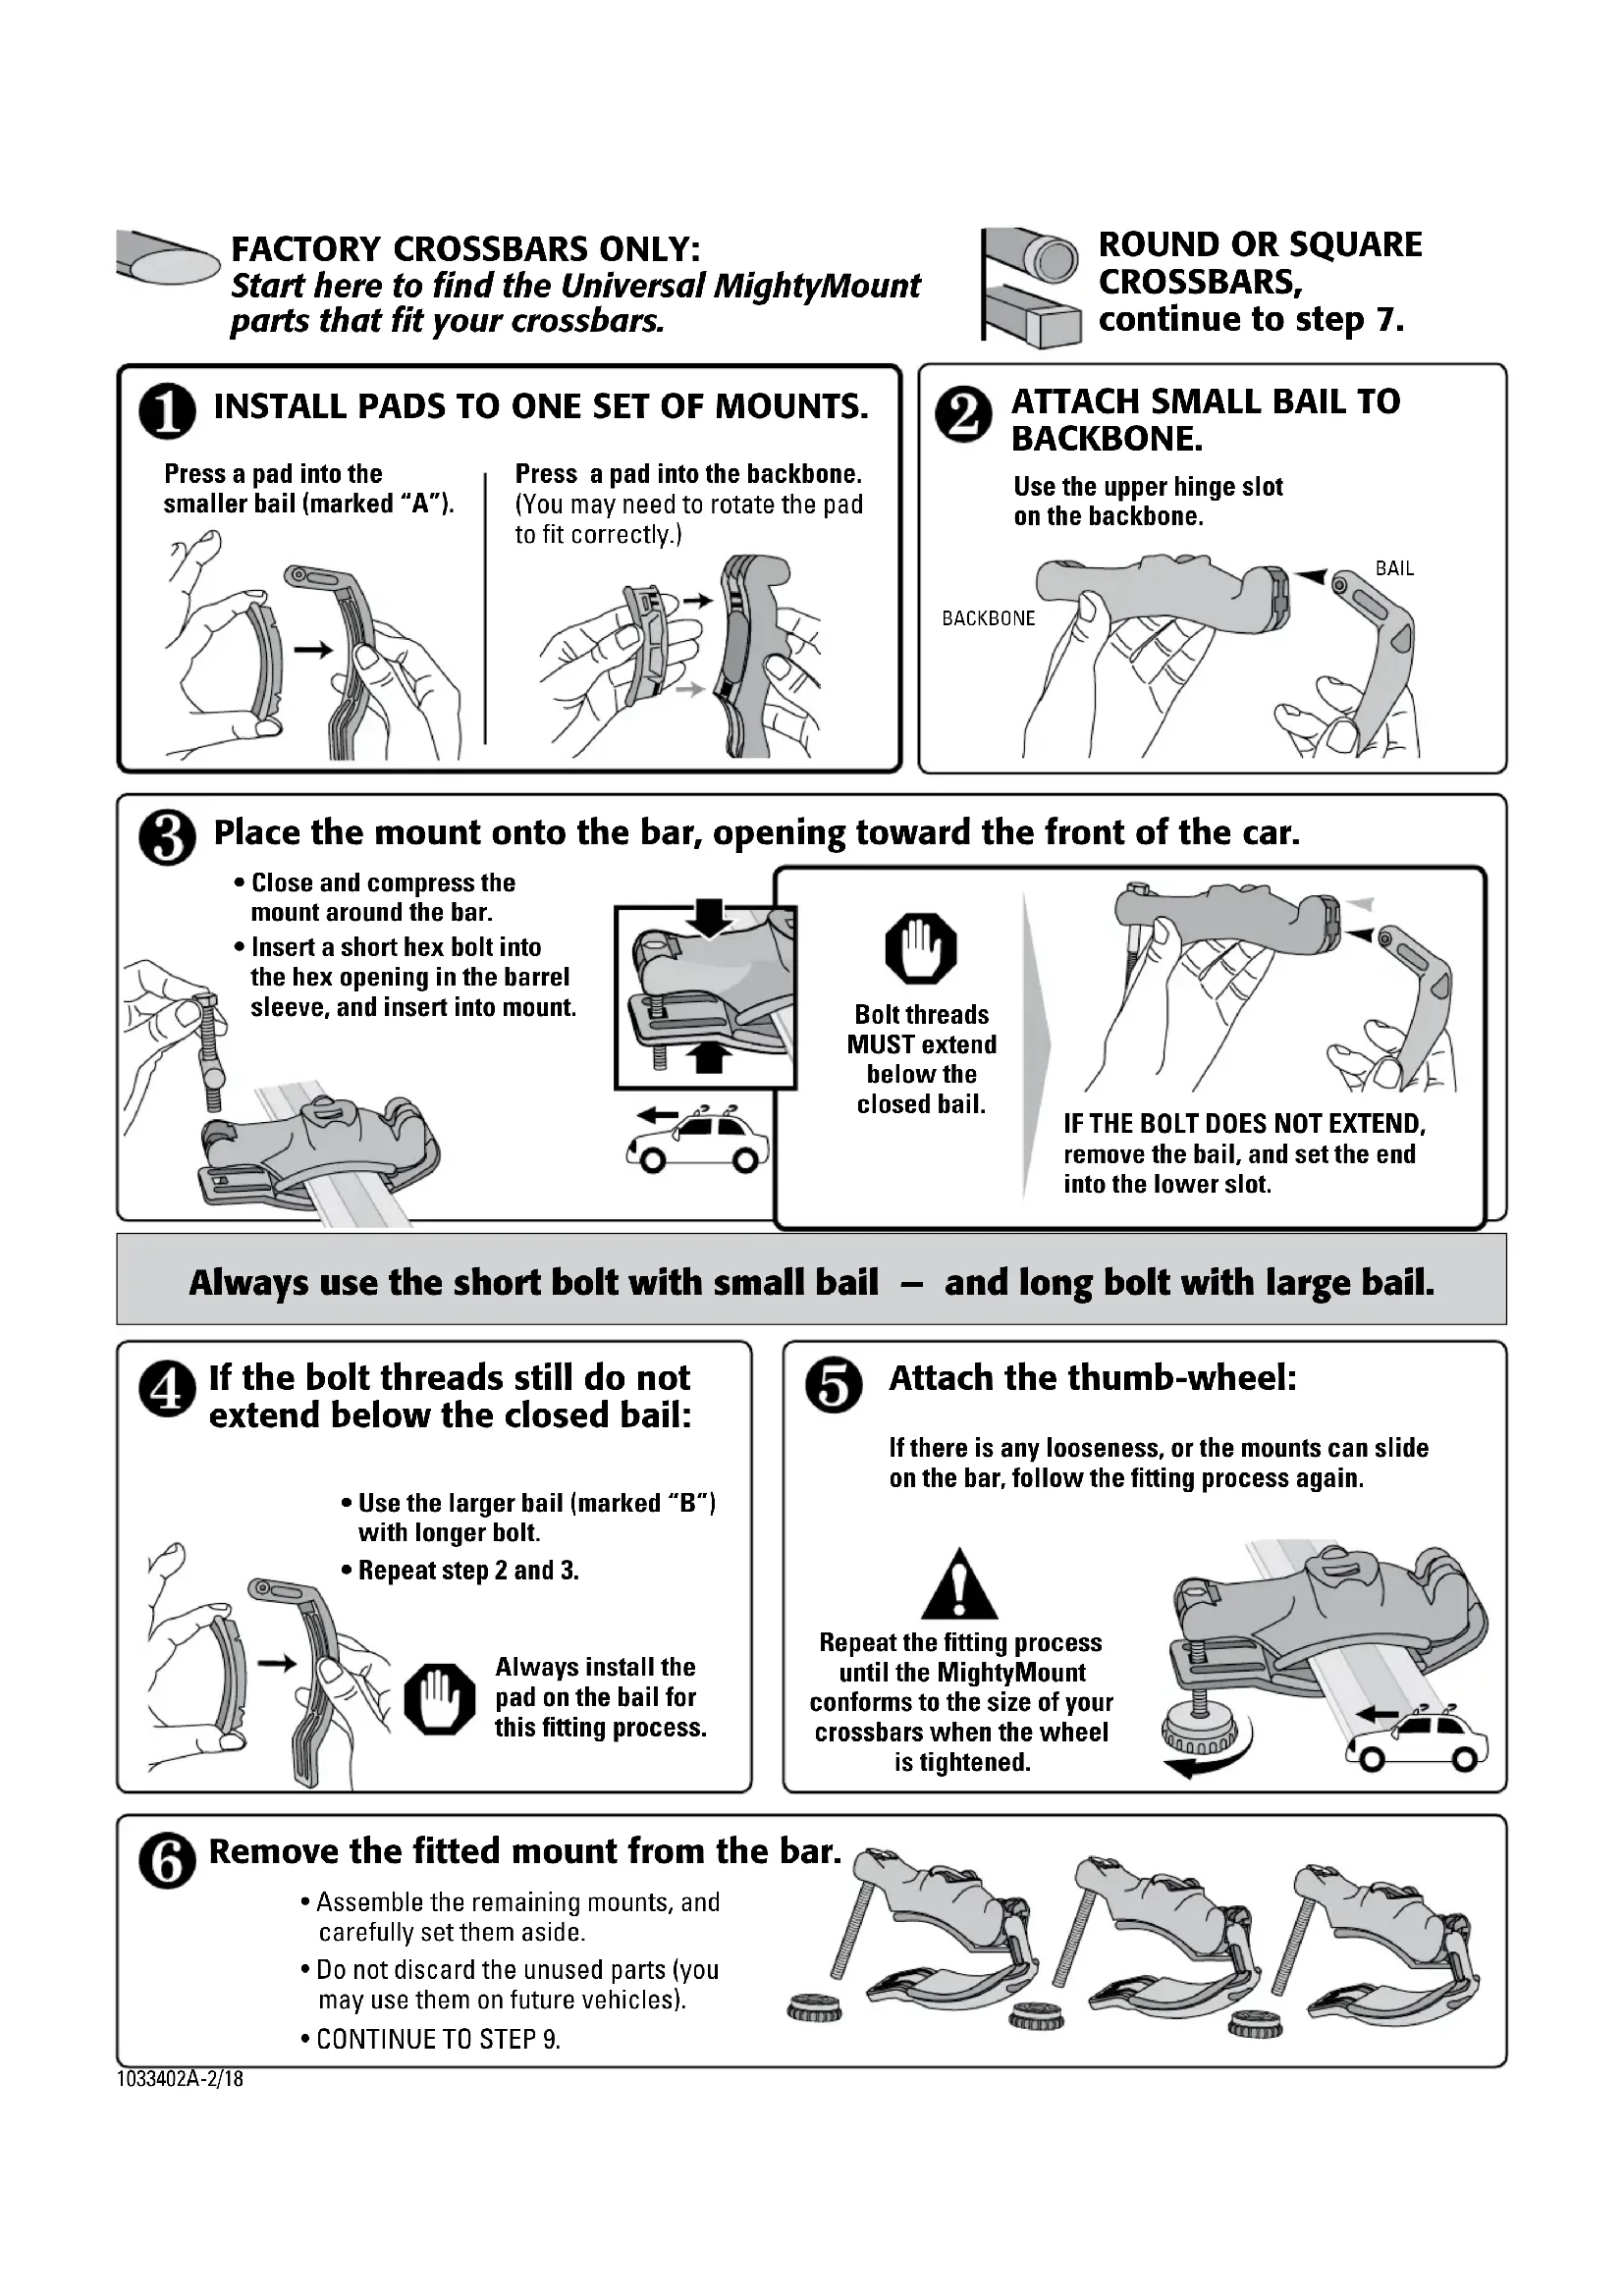
FACTORY CROSSBARS ONLY: Start here to find the Universal MightyMount parts that fit your crossbars.

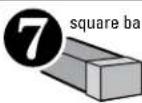
ROUND OR SQUARE CROSSBARS, continue to step 7.
1 INSTALL PADS TO ONE SET OF MOUNTS.
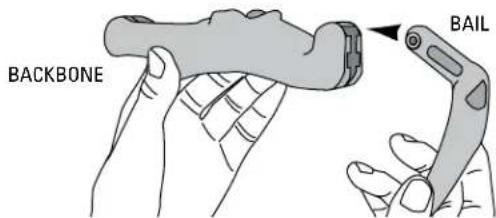
Press a pad into the smaller bail (marked "A").
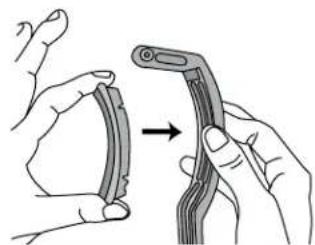
Press a pad into the backbone. (You may need to rotate the pad to fit correctly.)
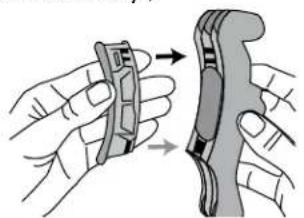

ATTACH SMALL BAIL TO BACKBONE.
Use the upper hinge slot on the backbone.
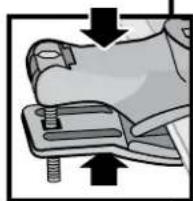
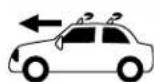
Place the mount onto the bar, opening toward the front of the car.
- Close and compress the mount around the bar.
- Insert a short hex bolt into the hex opening in the barrel sleeve, and insert into mount.
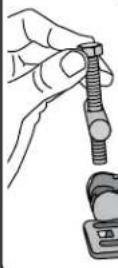


Bolt threads
MUST extend below the closed bail.
IF THE BOLT DOES NOT EXTEND, remove the bail, and set the end into the lower slot.
Always use the short bolt with small bail - and long bolt with large bail.
4 If the bolt threads still do not extend below the closed bail:
- Use the larger bail (marked "B") with longer bolt.
Repeat step 2 and 3.

Always install the pad on the bail for this fitting process.
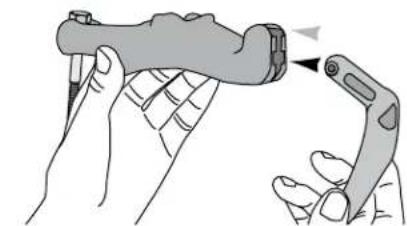
5 Attach the thumb-wheel:
If there is any looseness, or the mounts can slide on the bar, follow the fitting process again.

Repeat the fitting process until the MightyMount conforms to the size of your crossbars when the wheel is tightened.
6 Remove the fitted mount from the bar.
- Assemble the remaining mounts, and carefully set them aside.
- Do not discard the unused parts (you may use them on future vehicles).
CONTINUE TO STEP 9.
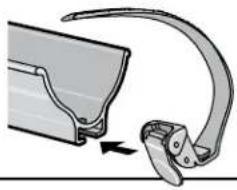
ROUND OR SQUARE BARS: Install the SnapArounds.
-DO NOT INSTALL Universal MightyMounts on round or square bars!
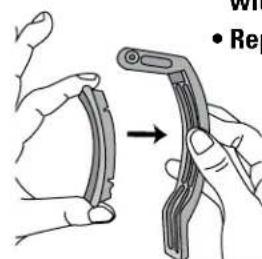
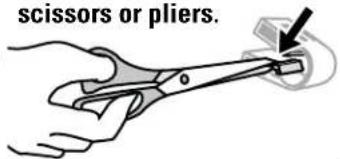
Loosen the tabs by bending them repeatedly.

Remove the tabs with scissors or pliers.
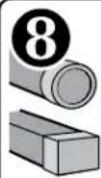
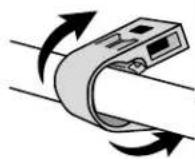
Attach 2 SnapArounds on the front crossbar, and 1 on the rear crossbar.
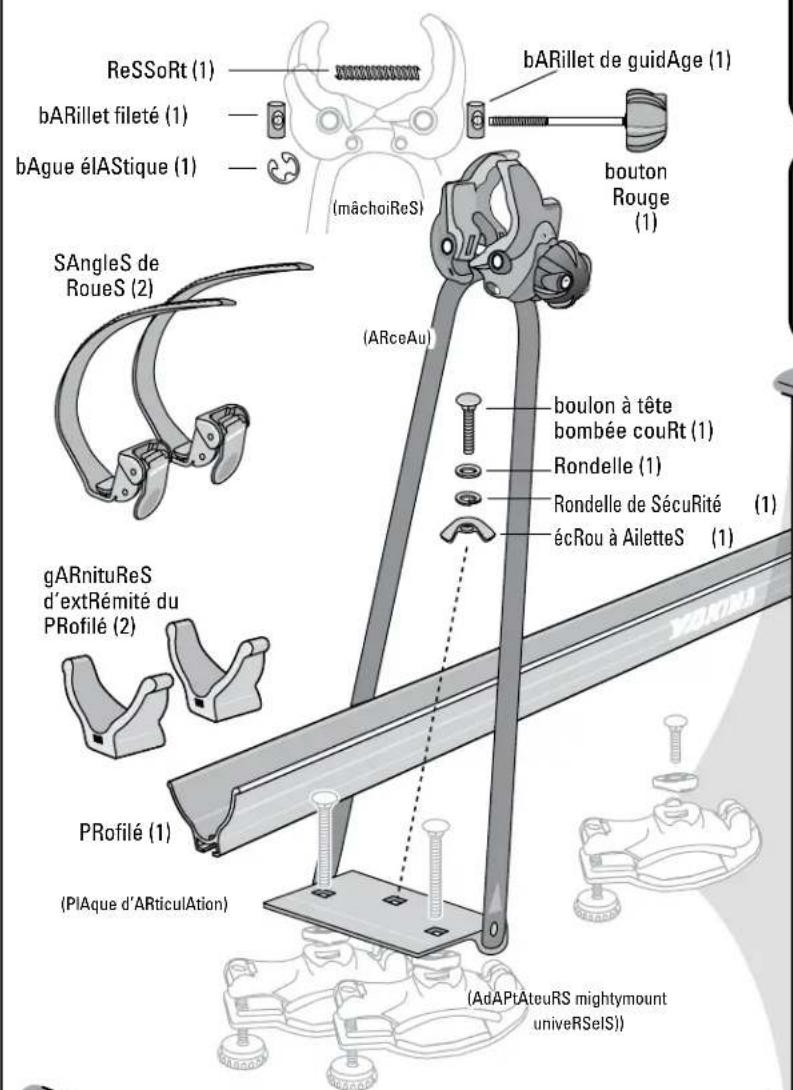
JAW ASSEMBLY (Round, Square, or Factory Crossbars)
9
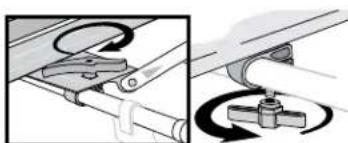
INSTALL RED KNOB
- Choose access from passenger or driver side.
Red knob should face you when the Raptor Aero is attached to wheel tray.
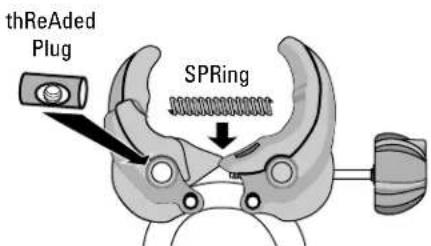
thReAded Plug
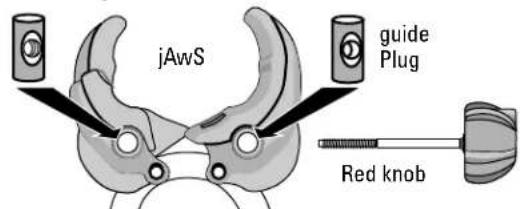

- Place the GUIDE PLUG into the hole on one side of the jaws.
- Slide the red knob's bolt threads through the guide plug.
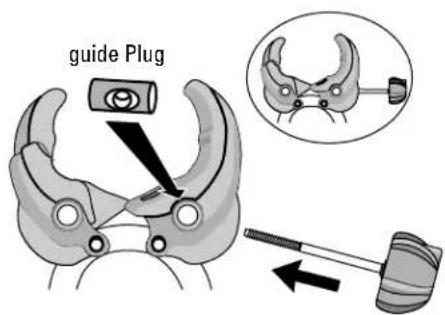

- Insert the Threaded Plug into the other hole.
- Place spring between guide plug and threaded plug.
- Slide knob through spring and into threaded plug.

Turn the red knob clockwise to engage the threaded plug.
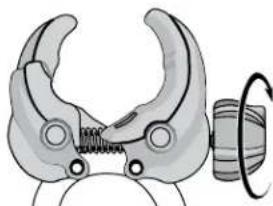

Tighten knob completely until threaded end is exposed.

Slide the "E"clip into groove on end.
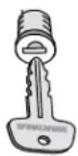
A coin or a key may provide added leverage.
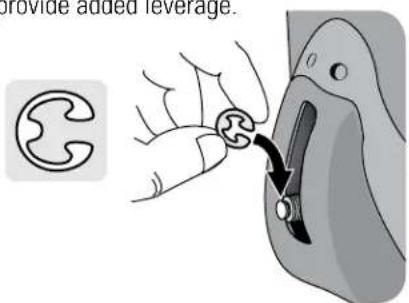

Open red knob completely.
SKS® Lock Cores are optional.
To install SKS® Lock Cores, refer to lock instructions.
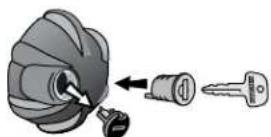
NOTE: If not using lock, leave plug in place.

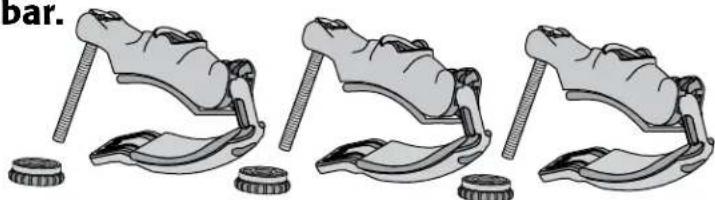
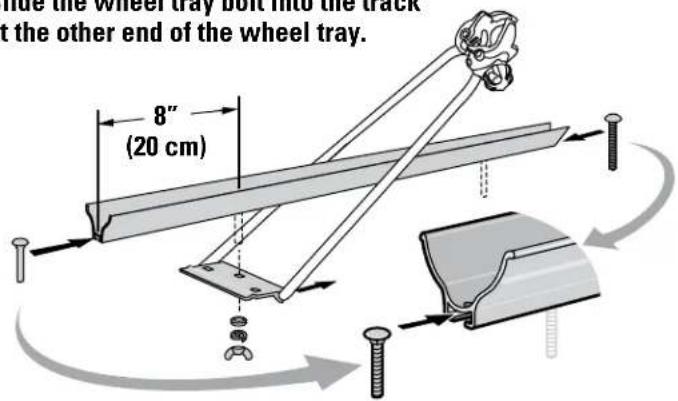
ATTACH WHEEL TRAY TO HOOP ASSEMBLY
- Insert baseplate bolt head 8" into slot in wheel tray.
- Use the washers and wing nut to attach the hoop baseplate onto this bolt.
- Slide the wheel tray bolt into the track at the other end of the wheel tray.
ON SOME SMALLER BIKES
If the wheel straps need to be between the crossbars, slide them onto the wheel tray now.

STANDARD BIKES:
Install wheel straps outside the crossbars after steps 18 or 19.
SMALLER BIKES ONLY: Slide the open wheel straps onto the wheel tray with the red buttons towards you.

FACTORY CROSSBARs ONLY:
Combine tray/hoop assembly with Universal MightyMounts
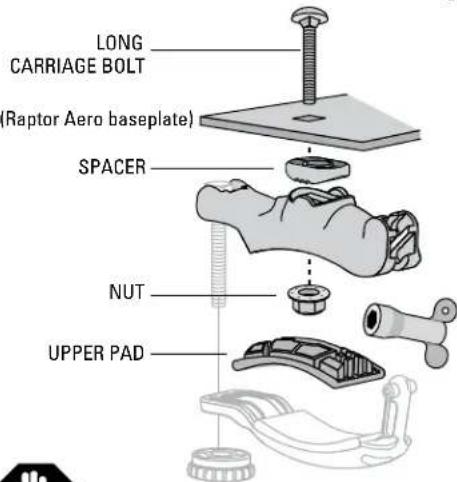
Remove the upper pads before continuing.
- Insert a long carriage bolt through the Raptor's baseplate.
- Add the spacer to the Universal MightyMount and secure with nut.
- Tighten with supplied wrench.
- Reattach the upper pad

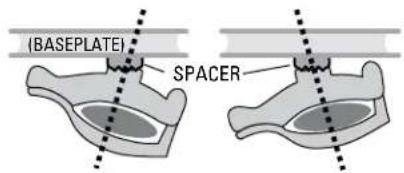
SPACER POSITIONING
If your factory bars are angled, and the spacer is not flat against the baseplate, loosen the carriage bolt and rotate the spacer as needed.
You will need to remove the pad. Be sure to replace it once the bolt is tightened.
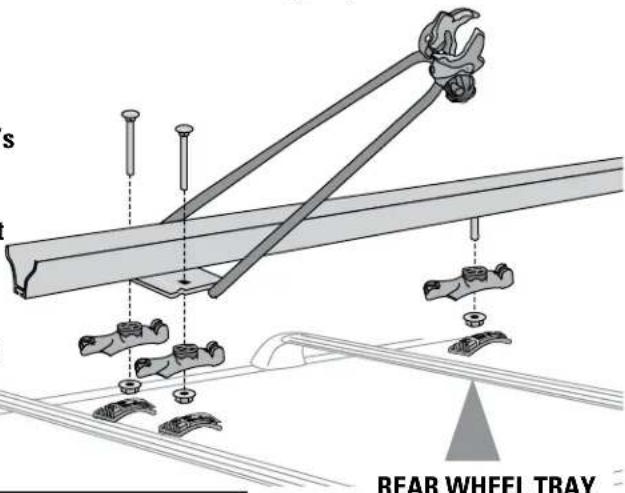
REAR WHEEL TRAY
requires the short carriage bolt.
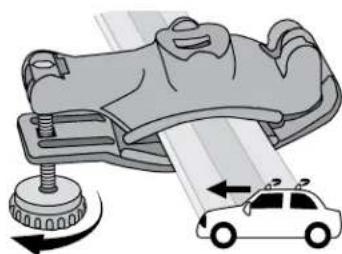
ROUND OR SQUARE CROSSBARs: Set tray/hoop assembly onto crossbars.
- Insert two baseplate bolts up through the SnapArounds and baseplate.
- Secure with elongated hex keys.
- Insert the wheel tray bolt through the SnapAround on the other crossbar.
- Secure with short hex key.
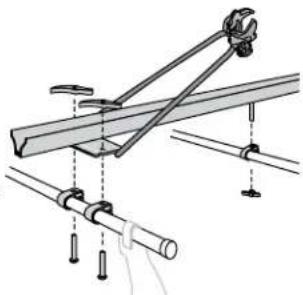
Tighten all 3 hex keys firmly onto all SnapArounds.
NOTE: Hoop must rest horizontally on tray while turning the hex keys. When hoop is raised the hex keys cannot be turned.

install Wheel straps
(if not installed earlier)
Slide the open wheel straps onto the wheel tray with the red buttons towards you.

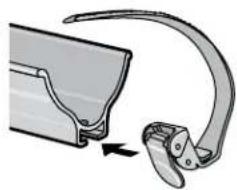
Install tRaY end caps

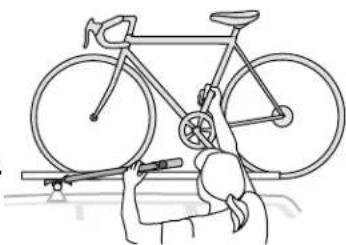
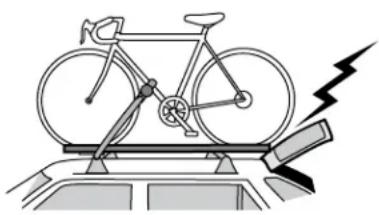
load and secuRe YouR blke - (blke Weight lImlt Is 30 lbs.)

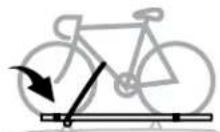
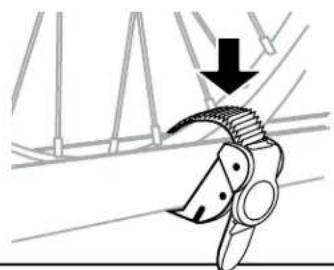
Set your bicycle in the wheel tray with the hoop lying flat between the wheels.
NOTE:
The front wheel of the bicycle must rest inside the hoop.

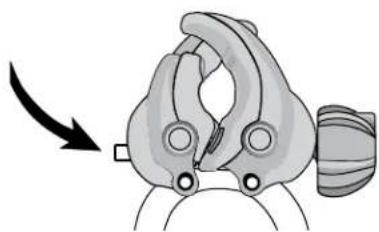
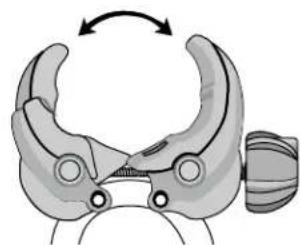
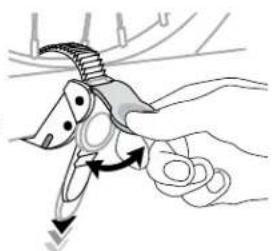
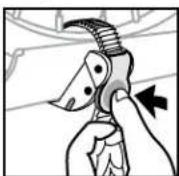
Raise hoop and roll bicycle forward as jaws meet the down tube.
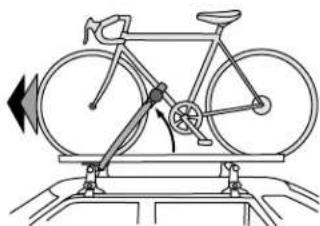

IN THE OPEN POSITION, JAWS SHOULD CLEAR THE BIKE FRAME.
Raptor can mount above or below most attachments, such as waterbottles.
To avoid paint wear, clean contact points on frame before tightening Jaws.
SOME attachments on the down tube must be removed if the jaws cannot attach above or below them.

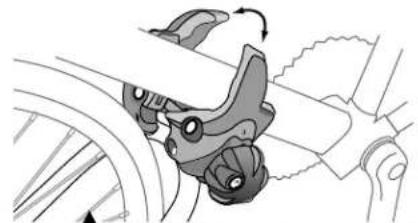
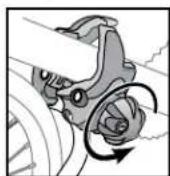
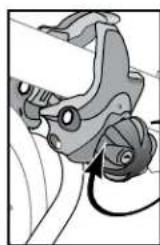
tighten Red knob
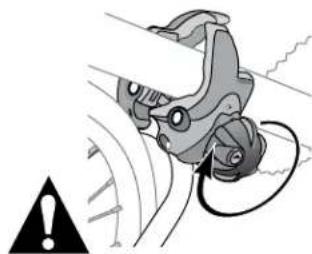
Do not overtighten!

Pull the strap through wheel spokes on the front and rear wheels.
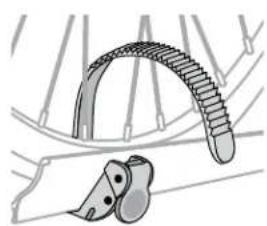
Do not let the strap push against the valve stem.

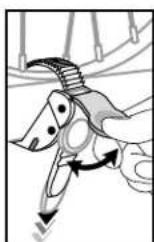
close the stRaps
- Insert the strap end behind the red tab.
TIGHTEN the strap by repeatedly lifting the red tab.

Do not overtighten the strap!

- If the wheel is still loose in the tray slide the strap in the tray until it rests against the rim.
TIGHTEN AGAIN.

unloading bcYcle:
Release the strap by pushing the red button.
Unscrew red knob and roll bicycle out of hoop.

beforedRiving aWay
- Check the knob.
- Check both wheel straps.
TIGHTEN IF NECESSARY.

Do not overtighten!
Off-road driving is not recommended and could result in damage to your vehicle or your bike.
DO NOT TRANSPORT BICYCLES WITH attached baby seats, panniers, wheel covers, full bike covers or motors.

WEIGHT LIMITS
- Follow the YAKIMA Fit List for your rack's weight limit. (Do not exceed the weight limit of your vehicle's racks.)
Maximum weight is 165 lbs. (75 kg) unless otherwise noted.
Maximum bicycle weight is 30 lbs. (14 kg).
Universal MightyMounts (factory crossbars only)
reMoving your raptor aero
Unscrew the wheels, carefully remove your accessory from the car.
re-installing raptor aero
- Carefully tighten the thumb-wheels after every reinstallation.
FOLLOW SAFETY CHECKS IN ACCESSORY INSTRUCTIONS EVERY INSTALLATION.
FOR ADDED SECURITY:
Accessory locks can lock the Universal MightyMounts to the racks
Yakima Accessory Lock Housings purchased separately (part #07220)
- There must be adequate clearance for installing accessory locks.
- If the accessory lock housing comes in contact with the vehicle, even after loading the rack, do not install them.
REAR HATCH
Some longer loads may prevent the rear hatch from fully opening.
ALWAYS USE CAUTION WHEN OPENING YOUR HATCH.
ANTENNA
Antenna on the roof may need to be removed to prevent interference with long loads.
WARNING: BE SURE ALL HARDWARE IS SECURED ACCORDING TO INSTRUCTIONS. ATTACHMENT HARDWARE CAN LOOSEN OVER TIME. CHECK BEFORE EACH USE, AND TIGHTEN IF NECESSARY.
MAINTENANCE: Use non-water soluble lubricant on screws. Use a soft cloth with water and mild detergent to clean plastic parts.
REMOVE ACCESSORY BEFORE ENTERING AN AUTOMATIC CAR WASH.
TECHNICAL ASSISTANCE OR REPLACEMENT PARTS
Contact your dealer or call (888)925-4621
Monday through Friday, 7:00 AM to 5:00 PM, PST

This product is covered by YAKIMA's "Love It Till You Leave It" Limited Lifetime Warranty To obtain a copy of this warranty, go online to www. yakima.com or email us at yakwarranty@yakima.com or call (888) 925-4621
KEEP THESE INSTRUCTIONS!
YAKIMA RaptorAeroFR
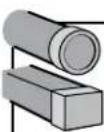
diSPoSitifS d'ARRimAge SuR BARRES RONDES ET CARREES

distanCe entre lesbarres transversales :
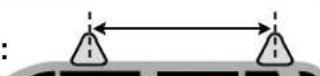
1 ou 2 velos...mini. 41 cm (16 po) - maxi. 97 cm (38 po)
PluS de 2 veloS SuR bARREs RondeS ou cARRReS Soulement:
3 velos et + ...mini. 46 cm (18 po) - maxi. 97 cm (38 po)
TOUJOURS OUVRIR LE HAYON AVEC PRUDENCE.