
DoubleDown - Bike rack Yakima - Free user manual and instructions
Find the device manual for free DoubleDown Yakima in PDF.
| Product type | Hitch-mounted bike rack |
| Brand | Yakima |
| Model | DoubleDown |
| Capacity | Up to 4 bikes (DoubleDown 4 model) |
| Maximum weight | 54 kg (120 lb) |
| Hitch type | Class 1 and above, 1.25" or 2" receiver |
| Hitch adapter | Removable for conversion from 2" to 1.25" |
| Vehicle attachment | Bolt, lock washer, safety pin |
| Folding arms | Yes, with release lever and lock |
| Adjustable cradles | Yes, sliding along the carrying arms |
| Safety straps | Included, one per bike |
| Locking options | DeadLock lock optional |
| Compatible accessories | TubeTop (for step-through bikes), HitchSki (ski rack) |
| Required tools | Adjustable wrench, hex key included |
| Maintenance | Non-water-soluble lubricant on metal parts; gentle cleaning for rubber |
| Safety | Check hardware before each use; do not use with extension |
| Warranty | Limited lifetime Yakima |
Frequently Asked Questions - DoubleDown Yakima
User questions about DoubleDown Yakima
0 question about this device. Answer the ones you know or ask your own.
Ask a new question about this device
Download the instructions for your Bike rack in PDF format for free! Find your manual DoubleDown - Yakima and take your electronic device back in hand. On this page are published all the documents necessary for the use of your device. DoubleDown by Yakima.
USER MANUAL DoubleDown Yakima
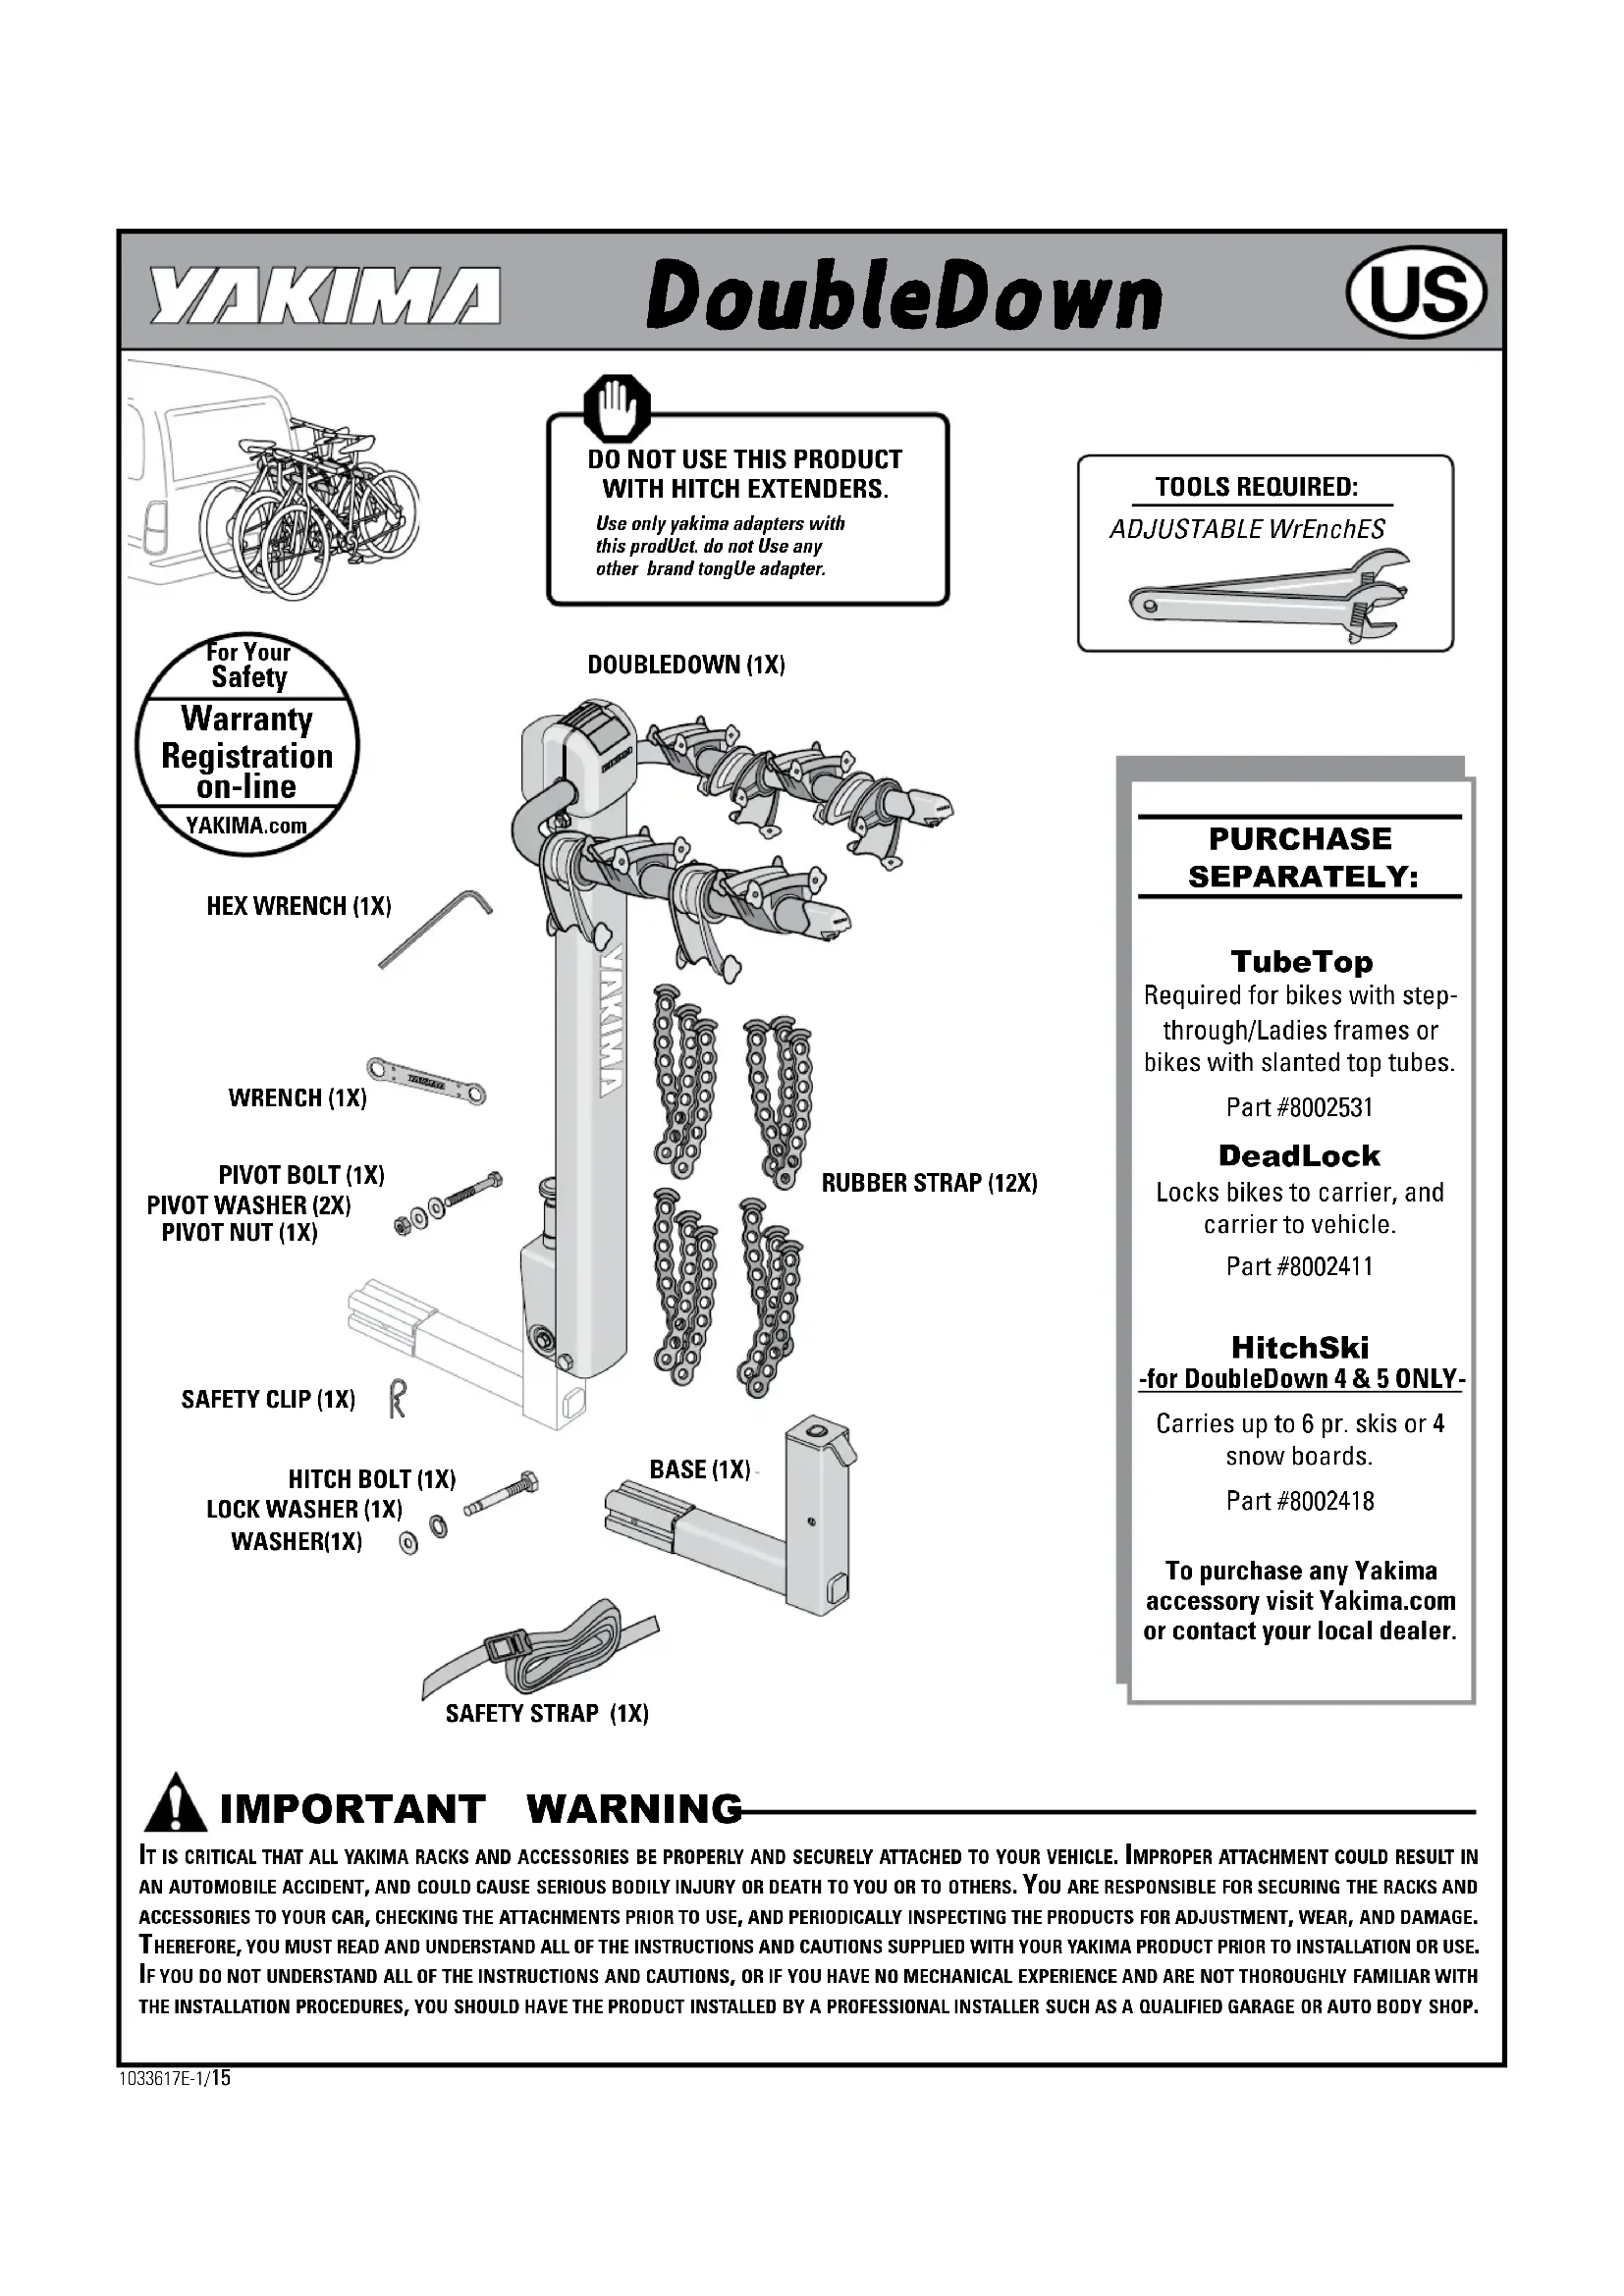
DO NOT USE THIS PRODUCT WITH HITCH EXTENDERS.
Use only yakima adapters with this product do not Use any other brand tongue adapter.

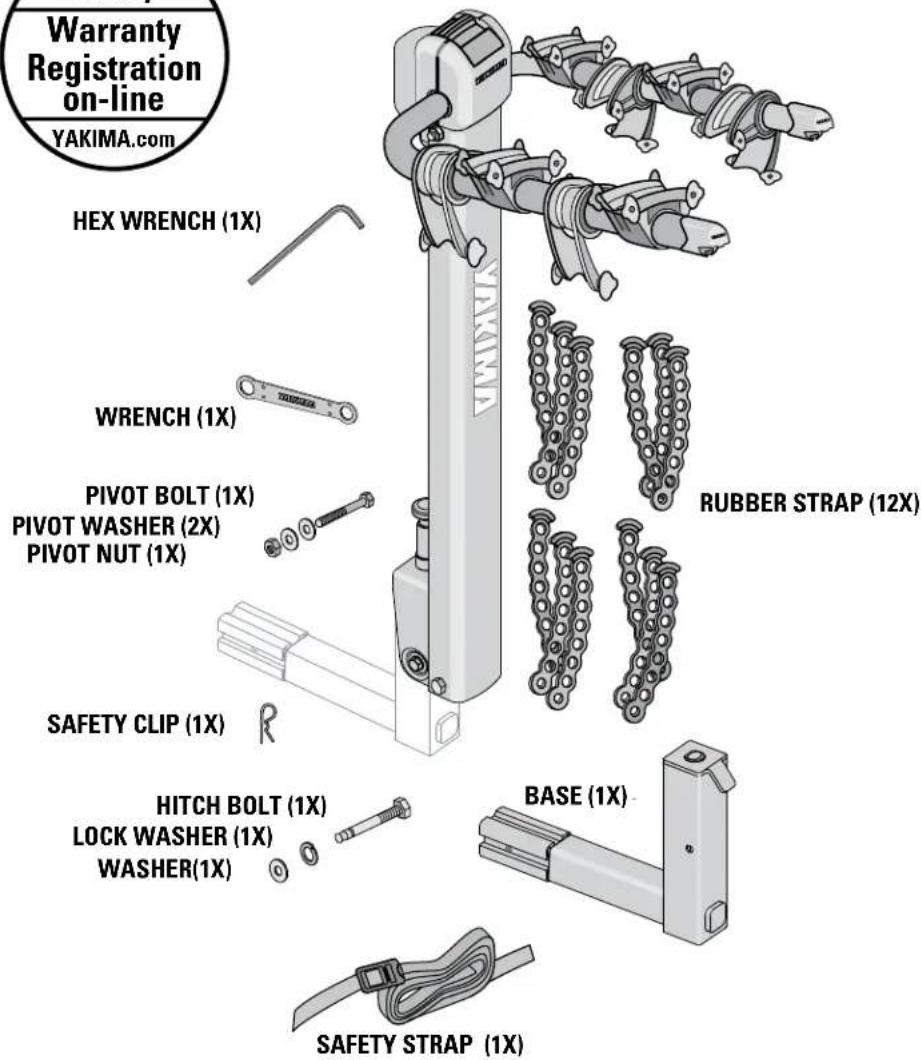
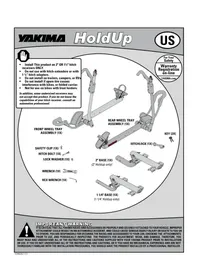
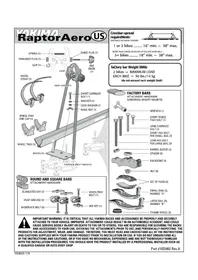
DOUBLEDOWN (1X)

TOOLS REQUIRED:
PURCHASE SEPARATELY:
TubeTop
Required for bikes with stepthrough/Ladies frames or bikes with slanted top tubes.
Part#8002531
DeadLock
Locks bikes to carrier, and carrier to vehicle.
Part #8002411
HitchSki
-for DoubleDown 4 & 5 ONLY-
Carries up to 6 pr. skis or 4 snow boards.
Part #8002418
To purchase any Yakima accessory visit Yakima.com or contact your local dealer.

IMPORTANT WARNING
IT IS CRITICAL THAT ALL YAKIMA RACKS AND ACCESSORIES BE PROPERLY AND SECURELY ATTACHED TO YOUR VEHICLE. IMPROPER ATTACHMENT COULD RESULT IN AN AUTOMOBILE ACCIDENT, AND COULD CAUSE SERIOUS BODILY INJURY OR DEATH TO YOU OR TO OTHERS. YOU ARE RESPONSIBLE FOR SECURING THE RACKS AND ACCESSORIES TO YOUR CAR, CHECKING THE ATTACHMENTS PRIOR TO USE, AND PERIODICALLY INSPECTING THE PRODUCTS FOR ADJUSTMENT, WEAR, AND DAMAGE. THEREFORE, YOU MUST READ AND UNDERSTAND ALL OF THE INSTRUCTIONS AND CAUTIONS SUPPLIED WITH YOUR YAKIMA PRODUCT PRIOR TO INSTALLATION OR USE. IF YOU DO NOT UNDERSTAND ALL OF THE INSTRUCTIONS AND CAUTIONS, OR IF YOU HAVE NO MECHANICAL EXPERIENCE AND ARE NOT THOROUGHLY FAMILiar WITH THE INSTALLATION PROCEDURES, YOU SHOULD HAVE THE PRODUCT INSTALLED BY A PROFESSIONAL INSTALLER SUCH AS A QUALIFIED GARAGE OR AUTO BODY SHOP.

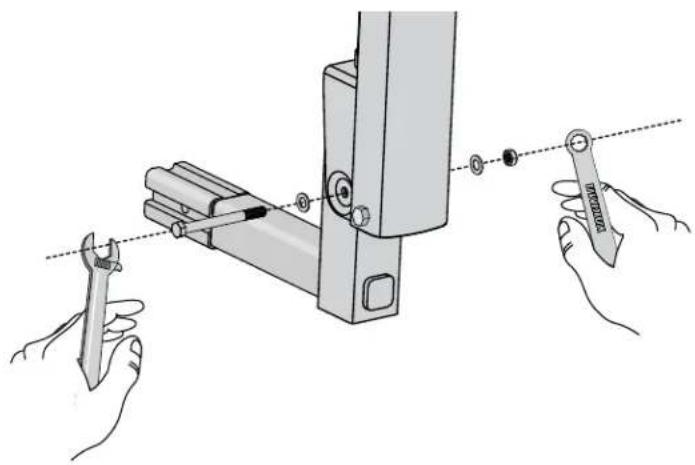
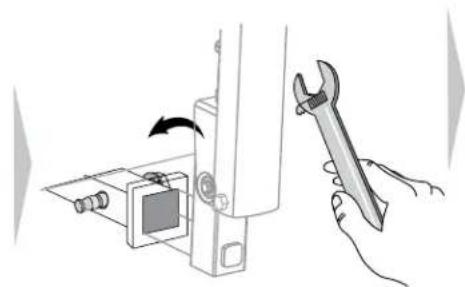
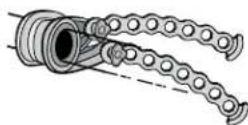
INSTALL TONGUE. Push the tongue into the hitch plate, aligning the holes.
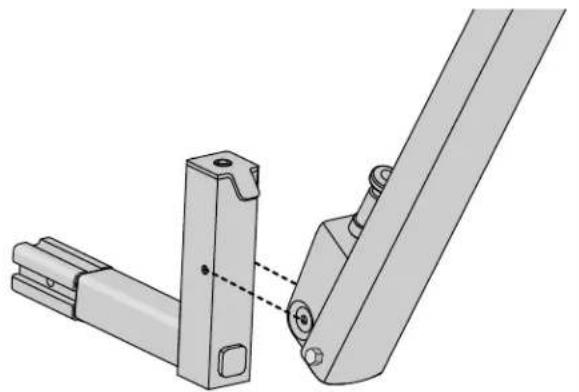

Install hex bolt and a flat washer.
- Add a second washer, attach a nut.

IF YOUR VEHICLE'S HITCH IS 1 1/4": REMOVE THE 2" HITCH ADAPTER, AND THE PLASTIC SLEEVE.

FOR 2" HITCHES: PROCEED TO NEXT STEP.
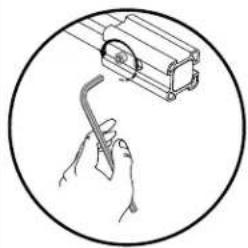

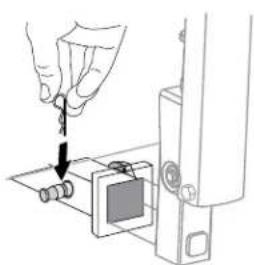
Remove the bolt from the adapter using the hex wrench.

INSERT TONGUE INTO VEHICLE'S HITCH.

IF SPARE TIRE CAUSES INTERFERENCE,DO NOT USE THIS PRODUCT!

Align the holes in the receiver to the holes in the tongue.

INSTALL LARGE BOLT, LOCK-WASHER, AND WASHER.
- Install bolt, lock-washer, and washer from right side of receiver.
Install safety pin.
NOTE: Flat washer may be discarded on some 1-1/4" receivers if there are clearance issues with receiver.


Washer must be used on 2" receivers!
TIGHTEN with adjustable wrench.

EXTEND ARMS.
Pull the lever to release the arms fromlocked-down position.

CAUTION
Keep fingers away from ALL moving parts!

RAISE ARMS COMPLETELY.
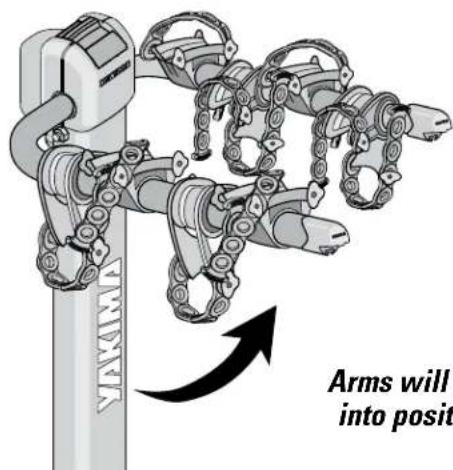
Arms will lock into position.

PREPARE STRAPS FOR LOADINGg.

Unhook one end of each rubber strap as shown.

CRADLE POSITIONING
To slide cradles along the carrier arms, close cradle and stabilizer.
Close cradles while loading bikes.


LOAD HEAViest BIKE FIRST.
- Always load first bike with chain away from vehicle.
- Expand the cradle against the bike.


Always use the cradles closest to the vehicle.
A Yakima
TubeTop (see cover page) may be required to carry your bike safely.

Failure to load bikes properly can result in property damage, personal injury, or death.
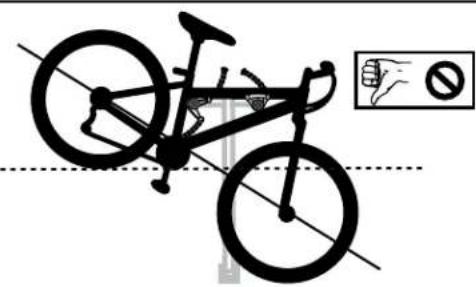

Bikes should be as level as possible to avoid ground clearance issues and possible ejections

Stabilize the bike frame in the cradle.
Arrange bikes for best stabilization.
Pull straps tightly over bike frame, and hook onto cradle.

The straps can be routed under the cables.

Load remaining bikes.
Alternate bike directions to avoid interference.
Stabilize bike, secure with straps.
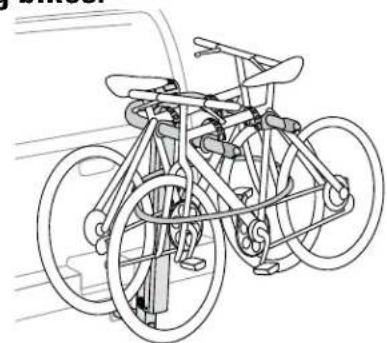
Use the included safety strap to secure your bikes to the carrier. Route the strap through each wheel, around the carrier. Feed the strap through the buckle, tighten it down, and secure the loose end.

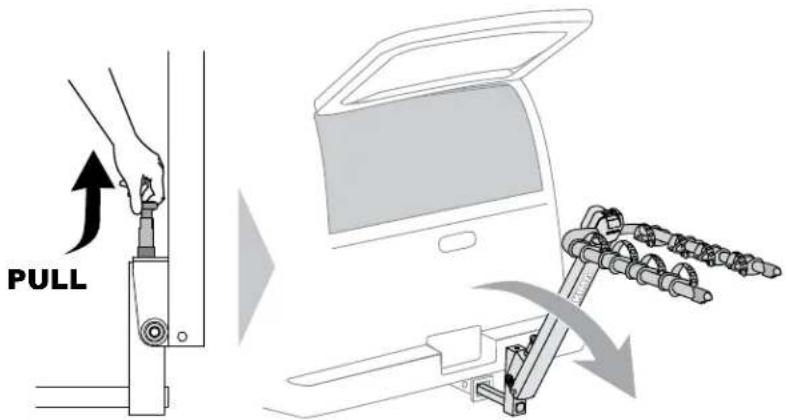
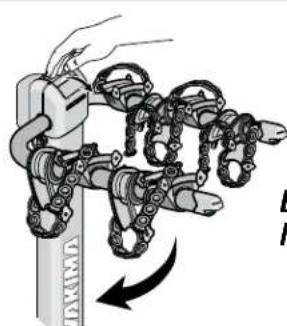
Fold mast down to Access the rear:
- Unload the bikes.
Pull release knob upward. - Fold mast down.
- When finished be sure to bring mast back to the upright and locked position.

CAUTION: Keep fingers away from ALL moving parts!

CAUTION: NEVER OPERATE VEHICLE WITH DOUBLEDOWN IN FOLDED POSITION!

Fold carrier arms when not in use.
- Pull release lever forward.
- Pull up slightly on arms while pulling lever.
- Fold arms.


Be sure arms lock in down position.

PERFORM SAFETY CHECKS
- Mast must be locked into place when operating vehicle.
- Be sure the straps are hooked securely over the bike frames.
- Replace straps if cracked or worn.
- Be sure all hardware is secured according to instructions.
- Do not let bicycle tires hang near vehicle's hot exhaust.

IF YOUR VEHICLE HAS A REAR HATCH:
On some vehicles, hatch interference is unavoidable. Use caution when opening your hatch.

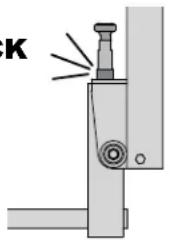
DoubleDown mast must be locked in place before loading bikes or moving vehicle!
CLICK
MAINTENANCE
Use non-water soluble lubricant on moving metal parts. Use a soft cloth with water and mild detergent to clean rubber parts.

IMPORTANT LOAD LIMITS
DoubleDown 4 - Total weight, 120 lbs./54kg
USE
- Off-road driving is not permitted and could result in damage to your vehicle, hitch receiver, or your bikes.
- Do not transport bicycles with attached baby seats, panniers, wheel covers, full bike covers or motors.
- Not for use with tandems and recumbents.
INSTALLATION
- Do not install if spare tire causes interference.
- Do not install onto trailers, campers, or recreational vehicles.
- Remove this rack before entering an automatic car wash, and when not in use.

NOTE: DOUBLEDOWN IS DESIGNED FOR A HITCH RECEIVER, CLASS 1 OR GREATER. SOME CLASS 1 HITCH RECEIVERS HAVE WEIGHT RESTRICTIONS. IF YOU DO NOT KNOW THE CAPABILITIES OF YOUR HITCH RECEIVER, CONSULT AN AUTOMOTIVE PROFESSIONAL.

WARNING
Attachment hardware can loosen over time. Check before each use, and tighten if necessary. Failure to perform safety checks can result in property damage, personal injury, or death.
TECHNICAL ASSISTANCE OR REPLACEMENT PARTS:
Contact your dealer or call
(888) 925-4621
Monday through Friday
7:00 AM to 5:00 PM PST

This product is covered by YAKIMA's
"Love It Till You Leave It" Limited Lifetime Warranty
To obtain a copy of this warranty, go online to www.yakima.com
or email us at yakwarranty@yakima.com
or call (888) 925-4621
KEEP THESE INSTRUCTIONS!
YAKIMA
DoubleDown
FR

NE PAS UTILISER CE PRODUIT AVEC DES RALLONgES D'ATTELAgE.

- DO NOT USE THIS PRODUCT WITH HITCH EXTENDERS.
- PURCHASE SEPARATELY:
- TubeTop
- DeadLock
- HitchSki
- IMPORTANT WARNING
- INSTALL TONGUE. Push the tongue into the hitch plate, aligning the holes.
- IF YOUR VEHICLE'S HITCH IS 1 1/4": REMOVE THE 2" HITCH ADAPTER, AND THE PLASTIC SLEEVE.
- FOR 2" HITCHES: PROCEED TO NEXT STEP.
- INSERT TONGUE INTO VEHICLE'S HITCH.
- INSTALL LARGE BOLT, LOCK-WASHER, AND WASHER.
- EXTEND ARMS.
- RAISE ARMS COMPLETELY.
- PREPARE STRAPS FOR LOADINGg.
- CRADLE POSITIONING
- LOAD HEAViest BIKE FIRST.
- Stabilize the bike frame in the cradle.
- Load remaining bikes.
- Alternate bike directions to avoid interference.
- Fold mast down to Access the rear:
- CAUTION: Keep fingers away from ALL moving parts!
- CAUTION: NEVER OPERATE VEHICLE WITH DOUBLEDOWN IN FOLDED POSITION!
- Fold carrier arms when not in use.
- PERFORM SAFETY CHECKS
- IF YOUR VEHICLE HAS A REAR HATCH:
- MAINTENANCE
- IMPORTANT LOAD LIMITS
- USE
- INSTALLATION
- WARNING
- YAKIMA
- DoubleDown
- FR
- NE PAS UTILISER CE PRODUIT AVEC DES RALLONgES D'ATTELAgE.
Brand : Yakima
Model : DoubleDown
Category : Bike rack