
FrontLoader - Bike rack Yakima - Free user manual and instructions
Find the device manual for free FrontLoader Yakima in PDF.
| Product Type | Roof bike rack |
| Brand | Yakima |
| Model | FrontLoader |
| Product Weight | 5.9 kg (13 lb) |
| Maximum load per bike | 18 kg (40 lb) |
| Number of bikes | 1 |
| Attachment | On crossbars (roof) |
| Bar compatibility | Round, square, factory bars |
| Minimum crossbar spacing | 3.8 cm (1.5 in) |
| Front wheel | Adjustable hoop with tightening knob |
| Rear wheel | Ratchet strap with reversible clamp |
| Compatible wheel size | Road and MTB (setting visible on hoop) |
| Security | Optional lock (sold separately) |
| Anti-theft cable | Integrated in front hoop |
| Adjustments | Adjustable front/rear jaws, reversible rear clamp |
| Material | Aluminum, reinforced plastic |
| Maintenance | Clean with a damp cloth, check fastenings regularly |
| Warranty | See leaflet provided with the product |
| Spare parts | Locks (ref. 8007202), special adapter for rear wheel |
| Repairability | Customer service available at 888-925-4621 |
Frequently Asked Questions - FrontLoader Yakima
User questions about FrontLoader Yakima
0 question about this device. Answer the ones you know or ask your own.
Ask a new question about this device
Download the instructions for your Bike rack in PDF format for free! Find your manual FrontLoader - Yakima and take your electronic device back in hand. On this page are published all the documents necessary for the use of your device. FrontLoader by Yakima.
USER MANUAL FrontLoader Yakima
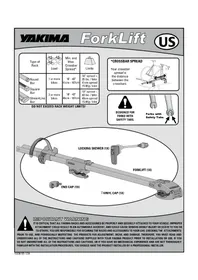
Your crossbar spread is the distance between the crossbars.

If you have factory crossbars, be sure you have at least 1 - 1 / 2'' (3.8 cm) of clearance between the bottom of the crossbar and the vehicle roof.


IMPORTANT WARNING
IT IS CRITICAL THAT ALL YAKIMA RACKS AND ACCESSORIES BE PROPERLY AND SECURELY ATTACHED TO YOUR VEHICLE. IMPROPER ATTACHMENT COULD RESULT IN AN AUTOMOBILE ACCIDENT, AND COULD CAUSE SERIOUS BODILY INJURY OR DEATH TO YOU OR TO OTHERS. YOU ARE RESPONSIBLE FOR SECURING THE RACKS AND ACCESSORIES TO YOUR CAR, CHECKING THE ATTACHMENTS PRIOR TO USE, AND PERIODICALLY INSPECTING THE PRODUCTS FOR ADJUSTMENT, WEAR, AND DAMAGE. THEREFORE, YOU MUST READ AND UNDERSTAND ALL OF THE INSTRUCTIONS AND CAUTIONS SUPPLIED WITH YOUR YAKIMA PRODUCT PRIOR TO INSTALLATION OR USE. IF YOU DO NOT UNDERSTAND ALL OF THE INSTRUCTIONS AND CAUTIONS, OR IF YOU HAVE NO MECHANICAL EXPERIENCE AND ARE NOT THOROUGHLY FAMILIAR WITH THE INSTALLATION PROCEDURES, YOU SHOULD HAVE THE PRODUCT INSTALLED BY A PROFESSIONAL INSTALLER.

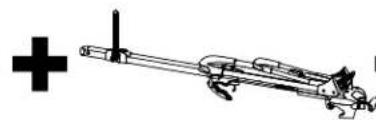
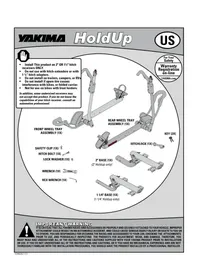
Place FrontLoader onto crossbars.

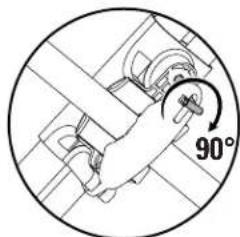
Open the front clamp. Turn the front knob counter clockwise to open the front the clamp.
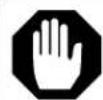
Open the rear clamp.
It may be necessary to turn the t-bolt to allow it to pass through the slot in the clamp.
Lower the front clamp into place over front crossbar.


Use caution to avoid damaging roof's finish. A towel placed on the roof prior to installation can help avoid scratches.


Tighten clamps.

Tighten the front clamp.
Turn the knob clockwise to completely tighten the front clamp around crossbar.
Tighten the rear clamp.
Close rear clamp around rear crossbar.
Pass the t-bolt through the opening in bail. Rotate t-bolt to rest in slot in bail.
Turn the knob clockwise to completely tighten the rear clamp.
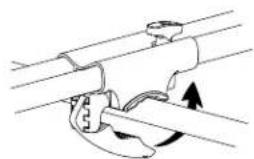
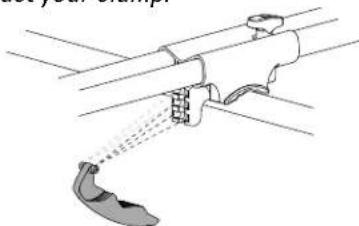
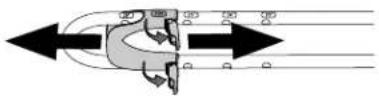
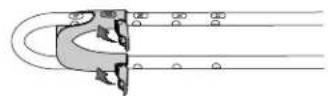
Adjust clamp if necessary.
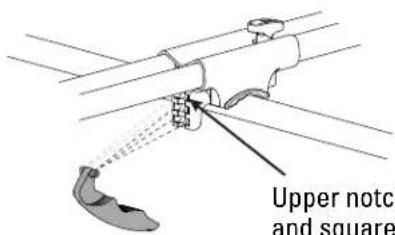
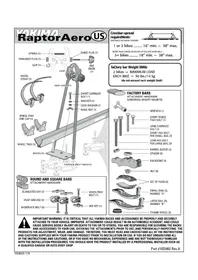
Upper notch for round and square bars.

If you don't get a secure grip with your factory bars adjust your clamp.
For factory bars choose the best position for most secure grip.

The rear clamp is configured for typical installations. In some situations adjustment may be necessary if the wheel makes contact with the rear knob, or if the wheeltray cannot reach the wheel.
OPTION A
Wheel behind rear crossbar.

OPTION B
Wheel ahead of rear crossbar.
If changing the orientation of the rear clamp still results in the rear wheel contacting the knob, please contact our customer service team (888-925-4621) for a free, corrective adapter.
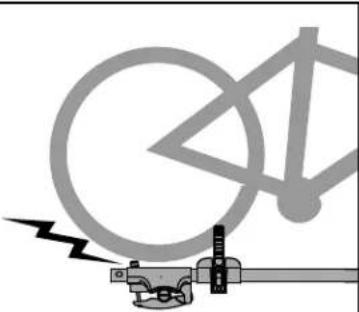
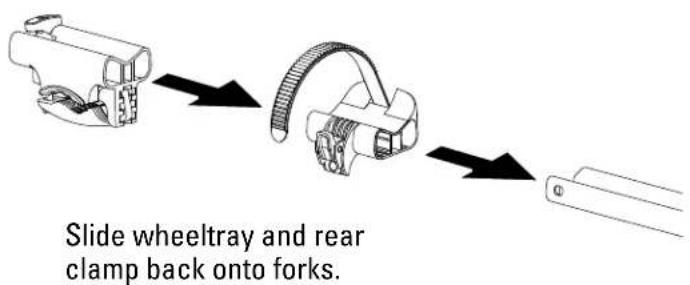
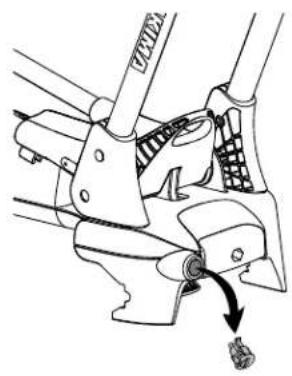
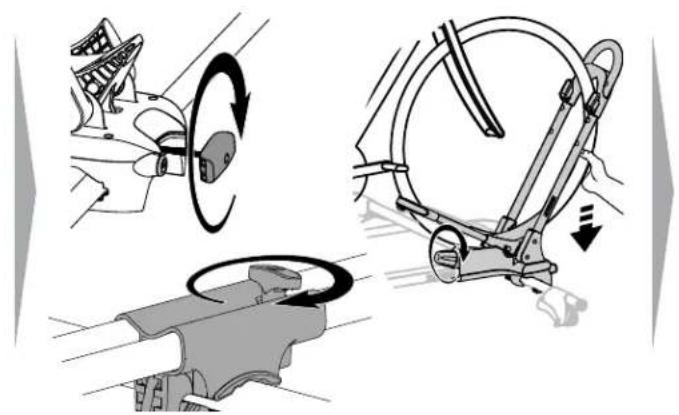
Press the release tabs on the end cap and remove it.


Flip orientation of rear clamp 180^ .

NOTE: You can flip the wheeltray or rear clamp independently as needed. For instance if you needed the buckle on the opposite side you could flip the wheeltray as shown.


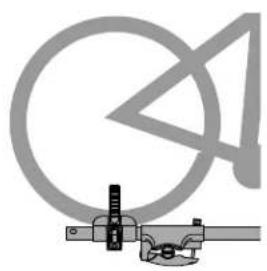
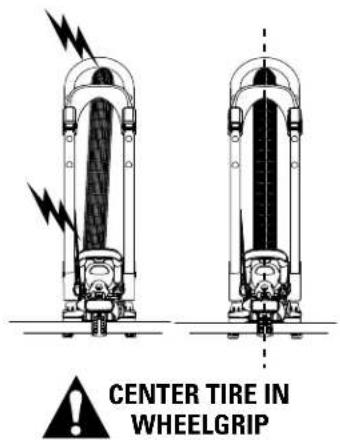
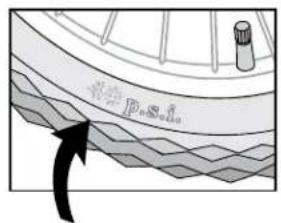
Wheel Setting
Look at your bike's tire to find your wheel size. Open the red levers on the wheel hoop to adjust wheel grip height.

Slide the wheel grip until the number matching your wheel size is visible through the window.

CLOSE RED LEVERS.
IMPORTANT: Make sure to check your bike tire sidewall for your tire size. The larger tire size settings have markings for both road and mountain bike tire size ranges. Always use the size range setting that corresponds with your tire size.

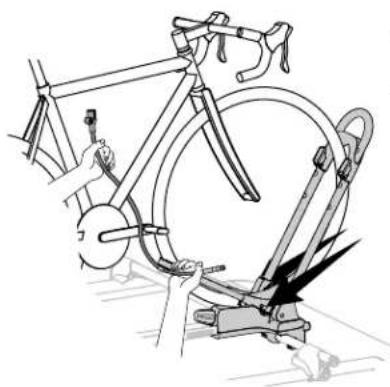
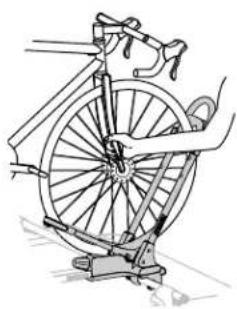
Load bike.

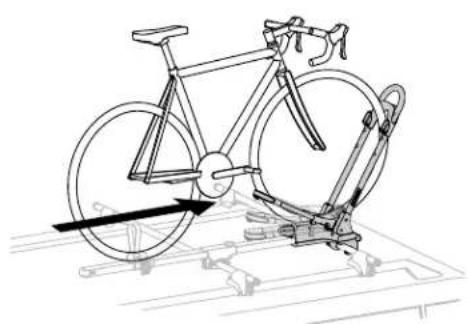
Lift your bike up and align front wheel with hoop while rolling forward. The small hoop will lever up.
Pull down on wheel while turning the knob clockwise to tighten hoop.

Do not use this product If your bike has fenders that prevent the hoops from direct contact with the tire.

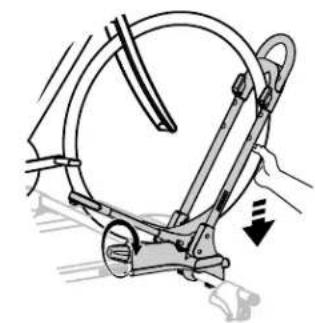
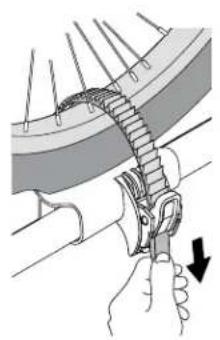
Secure rear wheel.
- Thread strap through spokes, and insert it into the slot in the wheeltray.
- Do not let strap push against valve stem.
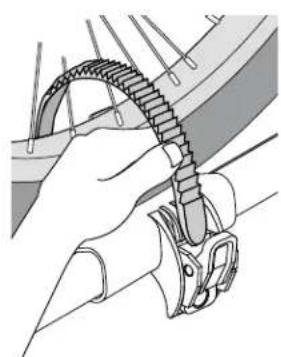

Pull hard to tighten.

Lock your bike.

INSTALL OPTIONAL LOCK CORES (sold separately).
If you have purchased locks, follow your lock core instructions to install. To purchase lock cores (Yakima Part Number 8007202) (2-pack) visit www.yakima.com or visit your local Yakima dealer.
Follow the instructions that came with your lock cores to remove the lock plug and install your lock cores.
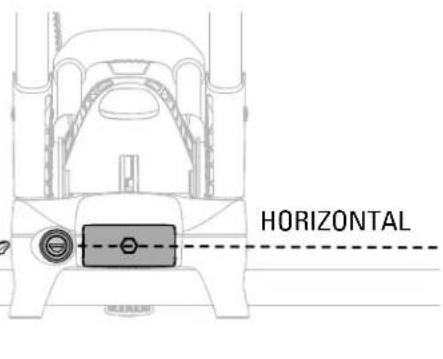
NOTE: Front knob must be in horizontal position to lock.
Follow the instructions that came with your lock cores to remove the lock plug and install your lock cores.
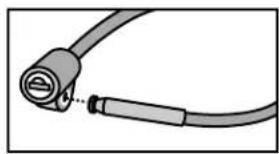
Access the built-in lock cable on either side of the small hoop. Store cable here when not in use.
Thread the cable through your bike frame, and insert silver post into lock housing.
Turn the key counter-clockwise to lock.

NOTE: For bikes with a slack head tube angle, long-travel suspension fork, and a large frame size/long wheelbase, the FrontLoader's lock cable may not reach all the way around the down tube of the frame. For the vast majority of bikes, this is NOT an issue. If your cable doesn't reach, then adjust the front wheel hoop to the 29" wheel.

BEFORE DRIVING AWAY
- CHECK REAR WHEEL.
Tighten the strap if needed.
PERIODICALLY CHECK THAT KNOBS ARE ADEQUATELY TIGHTENED.
- CHECK THAT FRONT WHEEL IS SECURE.
Continued on next page...
...before driving away.
CHECK FRONT WHEEL ATTACHMENT TO BICYCLE FRAME.

MAKE SURE YOUR TIRES ARE FILLED TO RECOMMENDED PRESSURE FOUND ON THE TIRE.

Be sure to read all the warnings and warranty information contained in the insert accompanying these instructions!

IF YOU REMOVE CARRIER, FOLLOW INSTRUCTIONS TO REINSTALL. Follow safety checks after every installation.

WARNING: BE SURE ALL HARDWARE IS SECURED ACCORDING TO INSTRUCTIONS. ATTACHMENT HARDWARE CAN LOOSEN OVER TIME. CHECK BEFORE EACH USE, AND TIGHTEN IF NECESSARY.
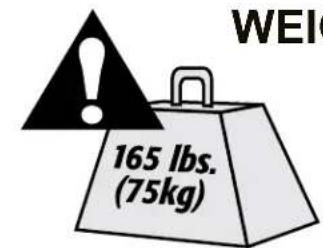
WEIGHT LIMITS
Follow the YAKIMA Fit List or check online at Yakima.com for your rack's weight limit. Do not exceed the weight limit of your vehicle's rack.

RACK
THIS PRODUCT (13 lbs. / 5.9 kg)

Not more than 165 lbs. (75 kg) unless otherwise noted.
*Some vehicles will be rated lower than 165 lbs. (75kg)
YAKIMA
FrontLoader
FR
| Distance entre les barres transversales* | Limit |
| 41cm - 46cm | 13.6kg/vélo x2 max NE PAS DÉPASSER LA LIMITE DE CHARGE DU PORTE-BAGAGE ! |
| 46cm - 122cm | 18.1kg/vélo NE PAS DÉPASSER LA LIMITE DE CHARGE DU PORTE-BAGAGE ! |
*DISTANCE ENTRE LES BARRES TRANSVERSALES
*(Some vehicles will be rated lower than 165 lbs. (75 kg))
CONSERVER CES INSTRUCTIONS !
YAKIMA
FrontLoader
ES
PORTAEQUIPAJE ESTE PRODUCTO (13 lb/5.9 kg)

CARGA (40 lb/18 kg maximo)

- IMPORTANT WARNING
- Place FrontLoader onto crossbars.
- Open the rear clamp.
- Tighten clamps.
- Tighten the front clamp.
- Tighten the rear clamp.
- Adjust clamp if necessary.
- Wheel Setting
- Load bike.
- Secure rear wheel.
- Lock your bike.
- INSTALL OPTIONAL LOCK CORES (sold separately).
- BEFORE DRIVING AWAY
- - CHECK REAR WHEEL.
- Tighten the strap if needed.
- PERIODICALLY CHECK THAT KNOBS ARE ADEQUATELY TIGHTENED.
- - CHECK THAT FRONT WHEEL IS SECURE.
- YAKIMA
- FrontLoader
- FR
- *DISTANCE ENTRE LES BARRES TRANSVERSALES
- ES
Brand : Yakima
Model : FrontLoader
Category : Bike rack