
Sonicrafter WX671.2 - Multitools WORX - Free user manual and instructions
Find the device manual for free Sonicrafter WX671.2 WORX in PDF.
| Product type | Oscillating multi-tool |
| Brand | Worx |
| Model | Sonicrafter WX671.2 |
| Power supply | Mains 220-240 V ~ 50/60 Hz |
| Rated power | 250 W |
| Oscillation speed | 11,000 - 20,000 oscillations/min |
| Oscillation angle | 3.2° |
| Weight | 1.4 kg |
| Sound pressure level | 85 dB(A) |
| Sound power level | 96 dB(A) |
| Vibration (total value) | 5.42 m/s² (K=1.5 m/s²) |
| Double insulation | Yes |
| Main functions | Saw, sand, scrape, polish, cut off |
| Compatible materials | Wood, plastic, plaster, non-ferrous metals, soft wall tiles |
| Included accessories | Wood saw blade, universal blade, HSS blade, abrasive paper, Fein/Bosch adapters, Allen key |
| Speed adjustment | Variable by dial |
| Maintenance | Clean with a dry cloth; no lubrication needed |
| Safety | On/Off switch, insulated gripping surfaces, wear ear protection and goggles |
Frequently Asked Questions - Sonicrafter WX671.2 WORX
User questions about Sonicrafter WX671.2 WORX
0 question about this device. Answer the ones you know or ask your own.
Ask a new question about this device
Download the instructions for your Multitools in PDF format for free! Find your manual Sonicrafter WX671.2 - WORX and take your electronic device back in hand. On this page are published all the documents necessary for the use of your device. Sonicrafter WX671.2 by WORX.
USER MANUAL Sonicrafter WX671.2 WORX
natural_image
Completely black image with no visible content, text, or symbols.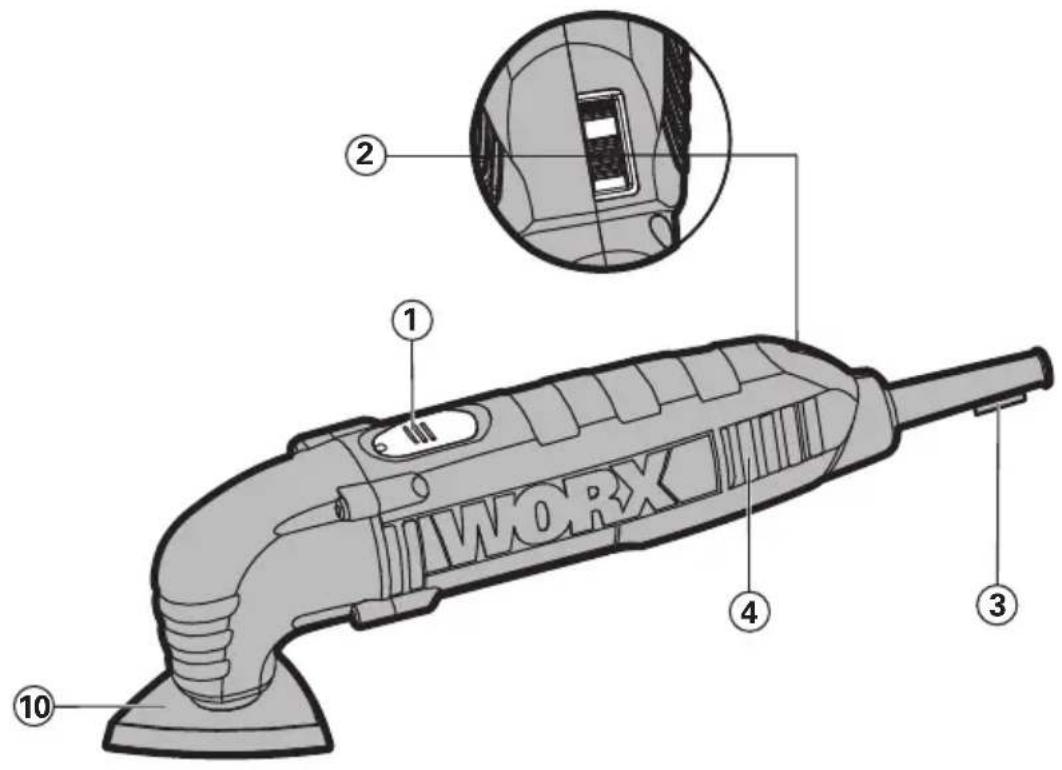

A1
natural_image
Technical illustration of a mechanical device with a screw and handle, showing no text or symbolsA2
A3
natural_image
Mechanical tool with a triangular tip and circular base, no visible text or symbolsB1B2C1
natural_image
Mechanical component diagram showing a tool interacting with a triangular workpiece (no text or symbols)natural_image
Diagram showing a mechanical component being processed into a multi-layered cylindrical structure (no text or symbols present)(一) AD = BD = 1
natural_image
Technical illustration of a mechanical component with a cylindrical part inserted, showing a downward arrow indicating assembly (no text or symbols present)C2D1
natural_image
Exploded view diagram of a mechanical assembly showing internal components and assembly (no text or labels)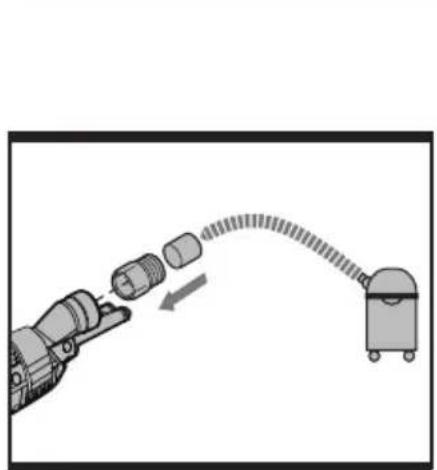
natural_image
Diagram of a robotic arm connecting two cylindrical components to a small robotic device (no text or symbols present)D2
natural_image
3D illustration of a robotic arm gripping a square base (no text or symbols)E
natural_image
Mechanical assembly diagram showing a cylindrical component with a curved housing and internal components (no text or symbols)C3
natural_image
Diagram showing a robotic arm connecting to a device via a cable or wire (no text or symbols present)D2

natural_image
Completely black image with no visible content, text, or symbols.- ON/OFF SWITCH
- VARIABLE SPEED CONTROL (WX671 WX671.1 WX671.2 WX671.3 WX671.4 WX671.5 WX671.6 WX671.7 WX671.8 WX671.11)
- KEY STORAGE
- VENTING SLOTS
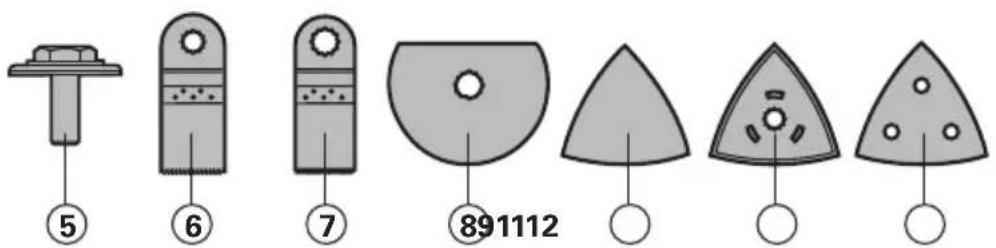
- FASTENING PIECE
- PRECISION WOOD CUTTING BLADE
- UNIVERSAL END CUT BLADE
- HSS SEMICIRCLE SAW BLADE
- SANDING SHEET (UNPERFORATED)*
- SANDING PAD (UNPERFORATED)*
- SANDING PAD (PERFORATED)*
- SANDING SHEET (PERFORATED)*
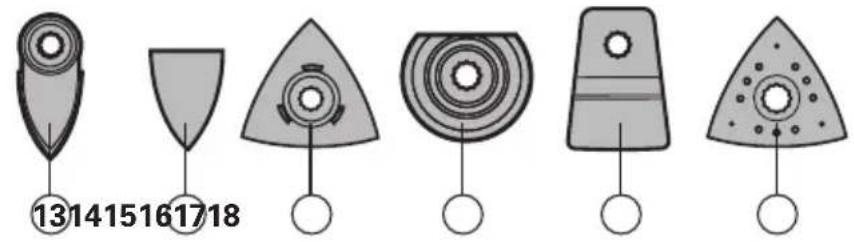
- SANDING FINGER PAD*
- SANDING FINGER SHEET*
- TRIANGULAR CARBIDE RASP*
- CARBIDE GRIT SEGMENT SAW BLADE*
- RIGID SCRAPING BLADE*
- FELT POLISHING PAD*
- ADAPTER (ADAPTER FOR OTHER BRANDS OF ACCESSORIES (FEIN®, BOSCH®))
- DUST EXTRACTION DEVICE*
- ALLEN KEY
TECHNICAL DATA
Type wX671 wX671.1 wX671.2 wX671.3 wX671.4 wX671.5 wX671.6 wX671.7 wX671.8 wX671.11 (6-designation of machinery, representative of high frequency oscillation tool)
| Voltage 220-240V~50/60Hz |
| Power input 250W |
| Oscillation speed 11000-20000/min |
| Oscillation angle 3.2° |
| Protection class |
| Machine weight 1.4kg |
NOISE INFORMATION
| A weighted sound pressure L | _pA : 85dB(A) |
| A weighted sound power L | _wA : 96dB(A) |
| K_pA & K_wA | 3.0dB(A) |
| Wear ear protection when sound pressure is over 80dB(A) | |
 | |
VIBRATION INFORMATION
| Vibration total values (triax vector sum) determined according to EN 60745: | |
| Typical weighted vibration | Vibration emission value a_h = 5.42m/s^2 |
| Uncertainty K = 1.5m/s2 | |

WARNING: The vibration emission value during actual use of the power tool can differ from the declared value depending on the ways in which the tool is used dependant on following examples and other variations on how the tool is used:
How the tool is used and the materials being drilled.
The tool being in good condition and well maintained.
The use the correct accessory for the tool and ensuring it is sharp and in good condition.
The tightness of the grip on the handles and if any anti vibration accessories are used.
And the tool is being used as intended by its design and these instructions.
This tool may cause hand-arm vibration syndrome if its use is not adequately managed.

wWARNING: To be accurate, an estimation of exposure level in the actual conditions of use should also take account of all parts of the operating cycle such as the times when the tool is switched off and when it is running idle but not actually doing the job. This may significantly reduce the exposure level over the total working period.
Helping to minimize your vibration exposure risk.
ALWAYS use sharp chisels, drills and blades.
Maintain this tool in accordance with these instructions and keep well lubricated (where appropriate).
If the tool is to be used regularly then invest in anti vibration accessories.
Avoid using tools in temperatures of 10^ C or less.
Plan your work schedule to spread any high vibration tool use across a number of days.
ACCESSORIES
We recommend that you only purchase accessories from recommended WORX stockists. Use good quality accessories marked with a well-known brand name. Choose the type according to the work you intend to undertake. Refer to the accessory packaging for further details. Store personnel can assist you and offer advice.
SAFETY INSTRUCTION FOR CUTTING
-
Hold power tool by insulated gripping surfaces, when performing an operation where the cutting accessory may contact hidden wiring or its own cord. Cutting accessory contacting a "live" wire may make exposed metal parts of the power tool "live" and could give the operator an electric shock.
-
Always wear a dust mask.
SYMBOLS

To reduce the risk of injury, user must read instruction manual

Warning

Double insulation

Wear eye protection

Wear ear protection

Wear dust mask

Waste electrical products should not be disposed of with household waste. Please recycle where facilities exist. Check with your Local Authority or retailer for recycling advice.
OPERATION INSTRUCTIONS

NOTE: Before using the tool, read the instruction book carefully.
INTENDED USE
The power tool is intended for sawing and separating wooden materials, plastic, plaster, non-ferrous metals and fasteners (e.g. nails and clamps) as well as for working on soft wall tiles and for dry grinding of small surfaces. It is especially suitable for working close to edges and for flush cutting.

WARNING: Before working your tool make sure that no power cords
will be damaged. Unplug your tools before mounting or replacing accessories.
Do not touch the gear box after long working time, because it could be hot.
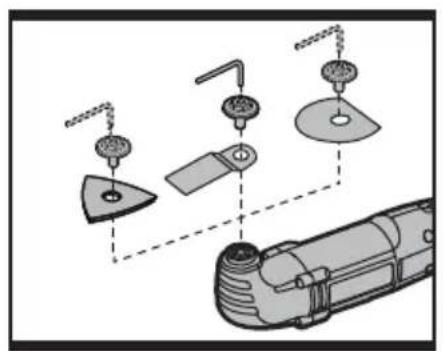
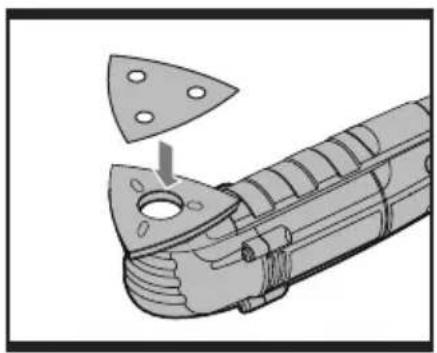
1. MOUNTING THE TOOL (See Fig. A1, A2)

CAUTION: For all work or when
changing application tools, always wear protective gloves. Avoid danger of injury from the sharp edges of the application tools.
Application tools can become very hot while working, presenting danger of burns!

WARNING: To reduce the risk of injury, do not let the Universal end blades or any segment saw blades back toward the user's hand.
Unscrew the fastening piece (5).
Clean the tool holder, the application tool and the fastening piece (5).
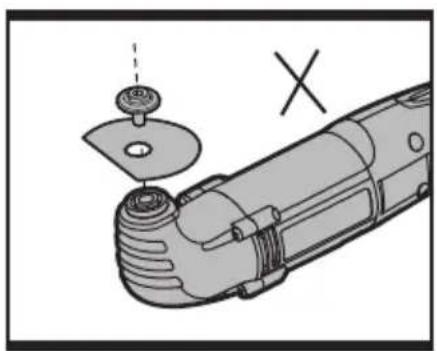
Place the application tool exactly onto the hex-shaped tool holder. Note that the application tool has a flush fit.
Reposition the fastening piece (5) using the supplied Allen key.
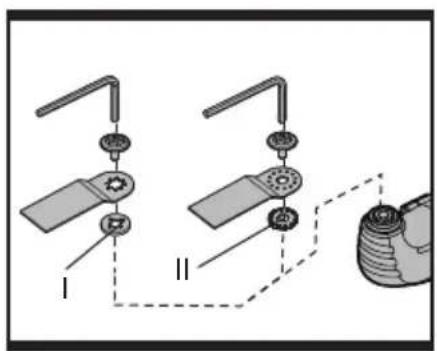
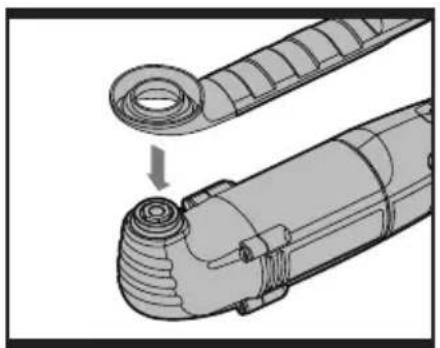
2. USING ADAPTER (19) (See Fig. A3)
Accessories of other brands( Fein ^® , Bosch ^® ) can be fitted onto the Sonicrafter ^® brand tool using the adapter.
NOTE: Fein is a registered trademark of C. & E. Fein GmbH. Bosch is a registered trademark of Robert Bosch GmbH.
1) Use the allen key (21) to unscrew the fastening piece (5) and then remove it from
the tool holder.
2) Clean the tool holder, the adapter the application tool and the fastening piece.
3) Fit the adapter onto the tool holder, then place the application tool onto the adapter. Make sure that the tool holder, the adaptor, and the application tool share a flush fit.
4) Reposition the fastening piece onto the application tool and tighten with the allen key.
NOTE: Make sure the adapter matches the application tool. The adapter (I) is matched to the application tool of Fein®. The adapter (II) is matched to the application tool of Bosch®. (See Fig. A3)
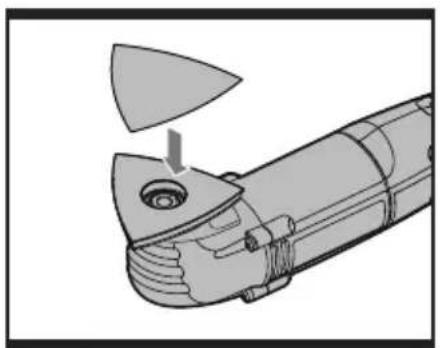
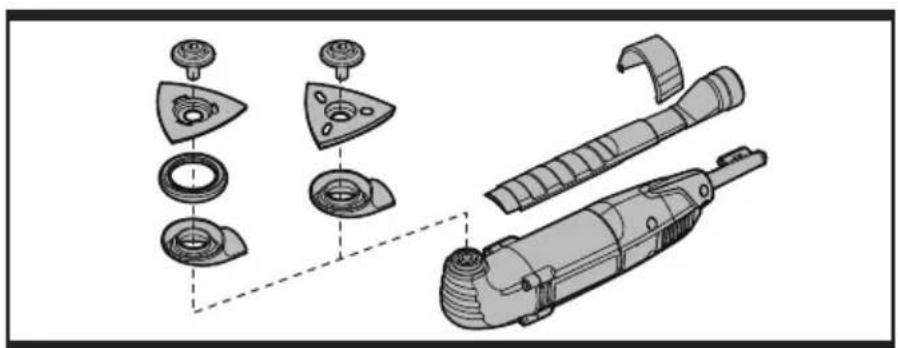
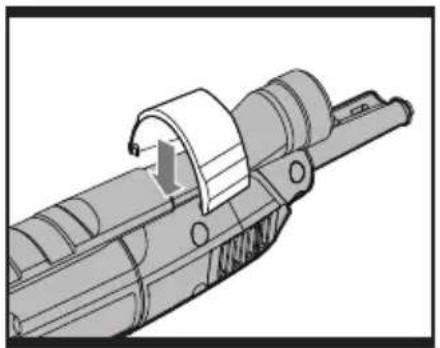
3. MOUNTING/CHANGING THE SANDING SHEET (See Fig. B1,B2)
Align the sanding sheet and press it onto the sanding pad by hand.
Firmly press the power tool with the sanding sheet against a flat surface and briefly switch the power tool on. This provides for good adhesion and prevents premature wear.
If one point has become worn, pull off the sanding sheet, turn it 120^ and place it on again.
To start the machine, push the On/Off switch (1) forward so that the "I" is indicated on the switch.
To switch off the machine, push the On/Off switch (1) toward the rear so that the "0" is indicated on the switch.
5. USING THE VARIABLE SPEED CONTROL (WX671 WX671.1 WX671.2 WX671.3 WX671.4 WX671.5 WX671.6 WX671.7 WX671.8 WX671.11)
Select oscillation frequency (speed) while the motor is running.
The variable speed control (2) can be used to set the optimum oscillating frequency according to the accessories used and the respective application.
High oscillation frequency:
Sanding, sawing, rasping and polishing stone and metal.
Low oscillation frequency:
Polishing varnishes.
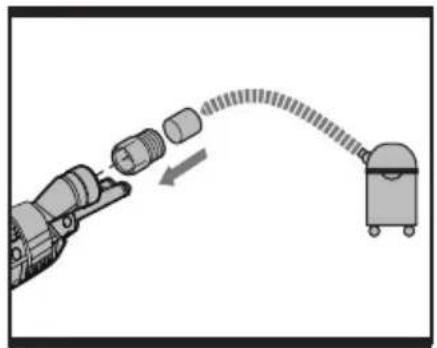
6. MOUNTING THE SUCTION DEVICE (See Fig. C,D)
When vacuuming, mount the suction device as shown in C1-D2.
NOTE: Using the sanding pad perforated. You can only do the vacuuming after fitting the dust collector.
7. SANDING
Typical application: wood, metal; small areas, especially corners, edges and places difficult to access.
Select high oscillation frequency.
Sand with a constant movement and light pressure.
Heavy pressure does not increase the removal – The sanding sheet merely wears faster.
8. SAWING WITH THE SEGMENT SAW BLADE
Typical application: wood, plastics, sheet metal.
Select high oscillation frequency.
The saw blade lasts longer if the wear is distributed evenly. To ensure an even distribution, loosen the saw blade, rotate it and retighten firmly.
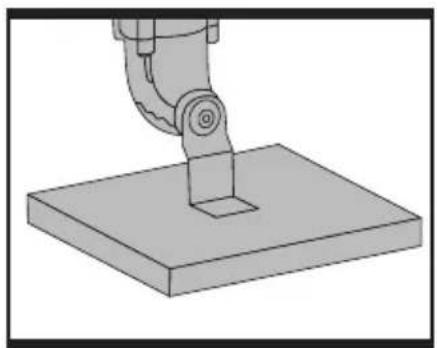
9. SAWING WITH THE UNIVERSAL END CUT SAW BLADE (See Fig. E)

WARNING: The sawing teeth are very sharp. Do not touch during ting and application.
The workpiece must be inserted firmly or clamped tightly before it is cut.
Typical application: wood, metal (e. g. nails), plaster board and soft plastics.
When plunging and sawing use a slight pendulum motion, to allow sufficient chip removal.
10. SCRAPING
Typical application: Scraping off old varnish or adhesives, removing glued carpeting, e. g. on stairs or other small to medium-sized surfaces.
Select medium/high oscillation frequency (for variable speed models).
WORKING HINTS FOR YOUR TOOL
If your power tool becomes too hot, especially when used at low speed, set the speed to maximum and run it with no load for 2-3 minutes to cool the motor. Avoid prolonged usage at very low speeds. Always keep the blade sharp.
Always ensure the workpiece is firmly held or clamped to prevent movement.
Any movement of the material may affect the quality of the cutting or sanding finish.
Start your tool before working and turn it off only after you stop working.
Do not start sanding without having the sandpaper fitted.
Do not allow the sandpaper to wear away, it will damage the sanding pad. The guarantee does not cover sanding pad wear and tear.
Use coarse grit paper to sand rough surfaces, medium grit for smooth surfaces and fine grit for finishing surfaces. If necessary, first make a test run on scrap material.
Excessive force will reduce the working efficiency and cause motor overload.
Replacing the accessory regularly will maintain optimum working efficiency.
MAINTENANCE
Remove the plug from the socket before carrying out any adjustment, servicing or maintenance.
Your power tool requires no additional lubrication or maintenance. There are no user serviceable parts in your power tool. Never use water or chemical cleaners to clean your power tool. Wipe clean with a dry cloth. Always store your power tool in a dry place. Keep the motor ventilation slots clean. Keep all working controls free of dust. Occasionally you may see sparks through the ventilation slots. This is normal and will not damage your power tool.
If the supply cord is damaged, it must be replaced by the manufacturer, its service agent or similarly qualified persons in order to avoid a hazard.
ENVIRONMENTAL PROTECTION

Waste electrical products should not be disposed of with household waste. Please recycle where facilities exist.
Check with your Local Authority or retailer for recycling advice.
PLUG REPLACEMENT (UK & IRELAND ONLY)
If you need to replace the fitted plug then follow the instructions below.
IMPORTANT
The wires in the mains lead are colored in accordance with the following code:
BLUE = NEUTRAL
Brown = Live
As the colors of the wires in the mains lead of this appliance may not correspond with the colored markings identifying the terminals in your plug, proceed as follows. The wire which is colored blue must be connected to the terminal which is marked with N. The wire which is colored brown must be connected to the terminal which is marked with L.
WARNING: Never connect live or neutral wires to the earth terminal of the plug. Only fit an approved 13ABS1363/A plug and the correct rated fuse.
NOTE: If a moulded plug is fitted and has to be removed take great care in disposing of the plug and severed cable, it must be destroyed to prevent engaging into a socket.

DECLARATION OF CONFORMITY
We,
POSITEC Germany GmbH
Declare that the product,
Description WORX High frequency
multi-function tool
Type WX671 WX671.1 WX671.2
WX671.3 WX671.4 WX671.5 WX671.6
WX671.7 WX671.8 WX671.11
(6-designation of machinery,
representative of high frequency oscillation tool)
Function Sanding, Sawing and scraping
Complies with the following directives,
Machinery directive 2006/42/EC
Electromagnetic compatibility directive
2004/108/EC
RoHS directive 2011/65/EU
Standards conform to
EN 55014-1
EN 55014-2
EN 61000-3-2
EN 61000-3-3
EN 60745-1
EN 60745-2-4
The person authorized to compile the technical file,
Name Russell Nicholson
Address Positec Power Tools (Europe)
Ltd, PO Box 152, Leeds, LS10 9DS, UK
$$ \text {ko.yue} $$

2013/06/05
Leo Yue
POSITEC Quality Manager
Typ WX671 WX671.1 WX671.2 WX671.3
WX671.4 WX671.5 WX671.6 WX671.7
Ltd, PO Box 152, Leeds, LS10 9DS, UK
keo.yue
CE
2013/06/05
Leo Yue
-
COMMUTATEUR MARCHE/ARRÊT
-
COMMANDE DE VITESSE VARIABLE (WX671 WX671.1 WX671.2 WX671.3
WX671.4 WX671.5 WX671.6 WX671.7 WX671.8 WX671.11))
-
ENTREPOSAGE DE LA CLE HEXAGONALE
-
OUÏES DE VENTILATION
-
KIT DE FIXATION
-
LAME DE COUPE DE PRÉCISION
-
LAME UNIVERSELLE
-
LAME DE SCIE SEGMENTÉE HSS
-
PAPIERS DE VERRE*
-
SEMELLE À PONCER*
-
PATIN DE PONÇAGE*
-
PAPIER À PONCER PERFORÉ*
-
TAMPON À PONCER*
-
FEUILLE À PONCER*
-
RÂPE TRIANGULAIRE*
-
LAME EN CARBURE À COUPE GROSSIÈRE*
-
RACLOIR RIGIDE*
-
TAMPON À POLIR EN FEUTRE*
-
ADAPTATEUR
-
ACCESSOIRE D'EXTRACTION DE LA POUSSIÈRE*
-
CLEF ALLEN
INFORMATIONS RELATIVES AU BRUIT
INFORMATIONS RELATIVES AUX VIBRATIONS
MISES EN GARDE POUR LA COUPE
5. UTILISATION DE L'INTERRUPTEUR DE VARIATION DE VITESSE (WX671 WX671.1 WX671.2 WX671.3 WX671.4 WX671.5 WX671.6 WX671.7 WX671.8 WX671.11)
WX671.3 WX671.4 WX671.5 WX671.6
Directive RoHS 2011/65/EU
Et conforme aux normes
EN 55014-1
EN 55014-2
EN 61000-3-2
EN 61000-3-3
EN 60745-1
EN 60745-2-4
Ltd, PO Box 152, Leeds, LS10 9DS, UK
$$ \text {leo.yue} $$

2013/06/05
Leo Yue
5. UTILIZZO DEL COMANDO DI VELOCITÀ VARIABILE (WX671 WX671.1 WX671.2 WX671.3 WX671.4 WX671.5 WX671.6 WX671.7 WX671.8 WX671.11)
Codice WX671 WX671.1 WX671.2
WX671.3 WX671.4 WX671.5 WX671.6
WX671.7 WX671.8 WX671.11
Ltd, PO Box 152, Leeds, LS10 9DS, UK


2013/06/05
Leo Yue
Modelo WX671 WX671.1 WX671.2 WX671.3 WX671.4 WX671.5 WX671.6
5. USAR EL VARIADOR DE VELOCIDAD (WX671 WX671.1 WX671.2 WX671.3 WX671.4 WX671.5 WX671.6 WX671.7 WX671.8 WX671.11)
Modelo WX671 WX671.1 WX671.2
WX671.3 WX671.4 WX671.5 WX671.6
WX671.7 WX671.8 WX671.11
Ltd, PO Box 152, Leeds, LS10 9DS, UK
$$ \text {leo.yue} $$

2013/06/05
Leo Yue
-
INTERRUPTOR ON/OFF
-
CONTROLO DA VELOCIDADE (WX671 WX671.1 WX671.2 WX671.3 WX671.4
WX671.5 WX671.6 WX671.7 WX671.8 WX671.11)
-
ÁREA PARA ARMAZENAMENTO DA CHAVE HEXAGONAL
-
ABERTURAS DE VENTILAÇÃO
-
PEÇA DE FIXAÇÃO
-
LÂMINA DE CORTE DE PRECISÃO PARA MADEIRA
-
LÂMINA DE CORTE UNIVERSAL
-
LAMINA DE SERRA DE SEGMENTO HSS
-
FOLHA DE LIXA*
-
PLACA DA LIXADORA*
-
PLATAFORMA DE LIXAGEM PERFURADA*
-
FOLHA DE LIXA PERFURADA*
-
PLATAFORMA DE LIXAR ESTREITA*
-
FOLHA DE LIXAR ESTREITA*
-
RASPADOR DE CARBONETO*
-
LÂMINA SEMICIRCULAR ABRASIVA DE CARBONETO*
-
ESPÁTULA*
-
PLATAFORMA DE POLIR COM FELTRO*
-
ADAPTADOR
-
PEÇA PARA EXTRACÇÃO DE PÓ*
-
CHAVE ALLEN
5. USANDO O BOTÃO DE VELOCIDADE VARIÁVEL (WX671 WX671.1 WX671.2 WX671.3 WX671.4 WX671.5 WX671.6 WX671.7 WX671.8 WX671.11)
WX671 WX671.1 WX671.2 WX671.3
WX671.4 WX671.5 WX671.6 WX671.7
WX671.8 WX671.11
Endereço Positec Power Tools (Europe) Ltd, PO Box 152, Leeds, LS10 9DS, UK


2013/06/05
Leo Yue
Gestor de Qualidade POSITEC
- AAN/UIT-SCHAKELAAR
- VARIABELE SNELHEIDSCONTROLE (WX671 WX671.1 WX671.2 WX671.3
WX671.4 WX671.5 WX671.6 WX671.7 WX671.8 WX671.11) - OPSLAGPLAATS VOOR INBUSSLEUTEL
- VENTILATIEOPENINGEN
- BIJBEHORENDE BEVESTIGINGSKIT
- PRECISIE-HOUTSNIJBLAD
- UNIVERSEEL BLAD
- HSS SEGMENTZAAGBLAD
- SCHUURPAPIER*
- SCHUURVLAK*
- SCHUURBLOK*
- GEPERFOREERD SCHUURPAPIER*
- VINGERVORMIGE SCHUURSCHIJF*
- VINGERVORMIG SCHUURPAPIER*
- DRIEHOEKIGE RASP*
- BLAD MET CARBIDEKORRELS*
- STIJVE SCHRAPER*
- VILTEN POLIJSTSCHIJF*
- DAPTER
- STOFAFUIGSTUK*
- ALLEN SLEUTEL
TECHNISCHE GEGEVENS
Type WX671 WX671.1 WX671.2 WX671.3 WX671.4 WX671.5 WX671.6
5. DE VARIABELE SNELHEIDS SCHAKERLAAR GEBRUIKEN (WX671 WX671.1 WX671.2 WX671.3 WX671.4 WX671.5 WX671.6 WX671.7 WX671.8 WX671.11)
TIPS VOOR HET WERKEN MET UW APPARAAT
Type WX671 WX671.1 WX671.2
WX671.3 WX671.4 WX671.5 WX671.6
WX671.7 WX671.8 WX671.11(6-
WX671.1 WX671.2 WX671.3 WX671.4 WX671.5 WX671.6 WX671.7 WX671.8 WX671.11)
Type WX671 WX671.1 WX671.2
WX671.3 WX671.4 WX671.5 WX671.6
WX671.7 WX671.8 WX671.11 (6-
Ltd, PO Box 152, Leeds, LS10 9DS, UK


2013/06/05
Leo Yue
Chef for kvalitetskontrollen hos POSITEC
- KÄYNNISTYS-/PYSÄYTYSKYTKIN
- PORTAATON NOPEUDEN SÄÄTÖ (WX671 WX671.1 WX671.2 WX671.3
WX671.4 WX671.5 WX671.6 WX671.7 WX671.8 WX671.11) - KUUSIOKULMA-AVAIMEN SÄILYTYS
- TUULETUSAUKOT
- KIINNITYSKAPPALE
- PUUN TARKKUUSLEIKKUUTERÄ
- YLEISPÄÄN LEIKKUUTERÄ
- HSS SEGMENTTISAHANTERÄ
- SANDER PAPER*
- HIONTA-ALUSTA*
- REI'ITETTY HIOMA-ALUSTA*
- REI'ITETTY HIOMAPAPERI*
- HIONTAKÄPÄLÄALUSTA*
- HIONTAKÄPÄLÄARKKI*
- REI'ITETTY KARBIDIRASPI*
- KARBIDIHIOTTU PUOLIYMPYRÄ SAHANTERÄ*
- RAAPPA*
- HUOPAKIILLOTUSALUSTA*
- SOVITTIMELLA
- PÖLYNPOISTOLAITE*
- KUUSIOKOLOAVAIN
TEKNISET TIEDOT
5. PORTAATTOMAN NOPEUSSÄÄTIMEN KÄYTTÖ (WX671 WX671.1 WX671.2 WX671.3 WX671.4 WX671.5 WX671.6 WX671.7 WX671.8 WX671.11)
WX671.3 WX671.4 WX671.5 WX671.6
WX671.7 WX671.8 WX671.11
5. BRUKE HASTIGHETSHJULET (WX671 WX671.1 WX671.2 WX671.3 WX671.4 WX671.5 WX671.6 WX671.7 WX671.8 WX671.11)
Velg svingingsfrekvensen (hastighet) mens
motoren kjører.
Type WX671 WX671.1 WX671.2
WX671.3 WX671.4 WX671.5 WX671.6
Ltd, PO Box 152, Leeds, LS10 9DS, UK
$$ \text {leo.yue} $$

2013/06/05
Leo Yue
WX671.1 WX671.2 WX671.3 WX671.4 WX671.5 WX671.6 WX671.7 WX671.8 WX671.11)
ARBETSTIPPS FÖR DIT VERKTYG
WX671 WX671.1 WX671.2 WX671.3
WX671.4 WX671.5 WX671.6
WX671.7 WX671.8 WX671.11
Ltd, PO Box 152, Leeds, LS10 9DS, UK


2013/06/05
Leo Yue
WX671.2 WX671.3 WX671.4 WX671.5 WX671.6 WX671.7 WX671.8 WX671.11)
WX671 WX671.1 WX671.2 WX671.3
WX671.4 WX671.5 WX671.6 WX671.7
WX671.8 WX671.11(6-makine
Ilgi Positec Power Tools (Europe) Ltd,
PO Box 152, Leeds, LS10 9DS, UK


2013/06/05
Leo Yue
WX671 WX671.1 WX671.2 WX671.3
WX671.4 WX671.5 WX671.6 WX671.7
5. РЕГУЛИРУЕМАЯ СКОРОСТЬ (WX671 WX671.1 WX671.2 WX671.3 WX671.4 WX671.5 WX671.6 WX671.7 WX671.8 WX671.11)
WX671 WX671.1 WX671.2 WX671.3
WX671.4 WX671.5 WX671.6 WX671.7
Ltd, PO Box 152, Leeds, LS10 9DS, UK


2013/06/05
Leo Yue
natural_image
Completely black image with no visible content, text, or symbols.


- TECHNICAL DATA
- NOISE INFORMATION
- VIBRATION INFORMATION
- ACCESSORIES
- SAFETY INSTRUCTION FOR CUTTING
- SYMBOLS
- OPERATION INSTRUCTIONS
- INTENDED USE
- WARNING: Before working your tool make sure that no power cords
- MOUNTING THE TOOL (See Fig. A1, A2)
- WARNING: To reduce the risk of injury, do not let the Universal end blades or any segment saw blades back toward the user's hand.
- USING ADAPTER (19) (See Fig. A3)
- MOUNTING/CHANGING THE SANDING SHEET (See Fig. B1,B2)
- USING THE VARIABLE SPEED CONTROL (WX671 WX671.1 WX671.2 WX671.3 WX671.4 WX671.5 WX671.6 WX671.7 WX671.8 WX671.11)
- MOUNTING THE SUCTION DEVICE (See Fig. C,D)
- SANDING
- SAWING WITH THE SEGMENT SAW BLADE
- SAWING WITH THE UNIVERSAL END CUT SAW BLADE (See Fig. E)
- WARNING: The sawing teeth are very sharp. Do not touch during ting and application.
- SCRAPING
- WORKING HINTS FOR YOUR TOOL
- MAINTENANCE
- Remove the plug from the socket before carrying out any adjustment, servicing or maintenance.
- ENVIRONMENTAL PROTECTION
- PLUG REPLACEMENT (UK & IRELAND ONLY)
- IMPORTANT
- BLUE = NEUTRAL
- Brown = Live
- DECLARATION OF CONFORMITY
- INFORMATIONS RELATIVES AU BRUIT
- INFORMATIONS RELATIVES AUX VIBRATIONS
- MISES EN GARDE POUR LA COUPE
- UTILISATION DE L'INTERRUPTEUR DE VARIATION DE VITESSE (WX671 WX671.1 WX671.2 WX671.3 WX671.4 WX671.5 WX671.6 WX671.7 WX671.8 WX671.11)
- UTILIZZO DEL COMANDO DI VELOCITÀ VARIABILE (WX671 WX671.1 WX671.2 WX671.3 WX671.4 WX671.5 WX671.6 WX671.7 WX671.8 WX671.11)
- USAR EL VARIADOR DE VELOCIDAD (WX671 WX671.1 WX671.2 WX671.3 WX671.4 WX671.5 WX671.6 WX671.7 WX671.8 WX671.11)
- USANDO O BOTÃO DE VELOCIDADE VARIÁVEL (WX671 WX671.1 WX671.2 WX671.3 WX671.4 WX671.5 WX671.6 WX671.7 WX671.8 WX671.11)
- TECHNISCHE GEGEVENS
- DE VARIABELE SNELHEIDS SCHAKERLAAR GEBRUIKEN (WX671 WX671.1 WX671.2 WX671.3 WX671.4 WX671.5 WX671.6 WX671.7 WX671.8 WX671.11)
- TIPS VOOR HET WERKEN MET UW APPARAAT
- TEKNISET TIEDOT
- PORTAATTOMAN NOPEUSSÄÄTIMEN KÄYTTÖ (WX671 WX671.1 WX671.2 WX671.3 WX671.4 WX671.5 WX671.6 WX671.7 WX671.8 WX671.11)
- BRUKE HASTIGHETSHJULET (WX671 WX671.1 WX671.2 WX671.3 WX671.4 WX671.5 WX671.6 WX671.7 WX671.8 WX671.11)
- WX671.1 WX671.2 WX671.3 WX671.4 WX671.5 WX671.6 WX671.7 WX671.8 WX671.11)
- ARBETSTIPPS FÖR DIT VERKTYG
- WX671.2 WX671.3 WX671.4 WX671.5 WX671.6 WX671.7 WX671.8 WX671.11)
- РЕГУЛИРУЕМАЯ СКОРОСТЬ (WX671 WX671.1 WX671.2 WX671.3 WX671.4 WX671.5 WX671.6 WX671.7 WX671.8 WX671.11)
Brand : WORX
Model : Sonicrafter WX671.2
Category : Multitools