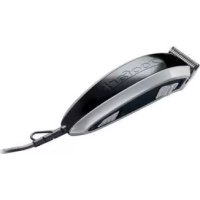
IAN 273605 - Lawn mower ZOOFARI - Free user manual and instructions
Find the device manual for free IAN 273605 ZOOFARI in PDF.



User questions about IAN 273605 ZOOFARI
0 question about this device. Answer the ones you know or ask your own.
Ask a new question about this device
Download the instructions for your Lawn mower in PDF format for free! Find your manual IAN 273605 - ZOOFARI and take your electronic device back in hand. On this page are published all the documents necessary for the use of your device. IAN 273605 by ZOOFARI.
USER MANUAL IAN 273605 ZOOFARI
Operating instructions
NL BE
DIERENTONDEUSE
Gebruiksaanwijzig
CZ
ZASTRIHOVAC ZVIRECI SRSTI
Návod k obsluze
DE AT CH
Before reading, unfold the page containing the illustrations and familiarise yourself with all functions of the device.
FR BE
GB/IE Operating instructions Page 9
KOMPERNASS HANDELS GMBH
BURGSTRASSE 21
DE-44867 BOCHUM
DEUTSCHLAND
www.kompernass.com
Contents
Introduction. 10
Intended use 10
Items supplied. 10
Description of the appliance 10
Technical Data. 10
Safety instructions 11
Operation 14
Cleaning and Care 14
Disposal. 15
Congratulations on the purchase of your new appliance.
You have clearly decided in favour of a quality product. These operating instructions are a part of this product. They contain important information in regard to safety, use and disposal. Before using the product, familiarise yourself with all of these operating and safety instructions. Use the product only as described and only for the specified areas of application. In addition, pass these documents on, together with the product, to any future owner.
Intended use
These animal clippers are intended exclusively for the cutting and trimming of animal hair in domestic households. This appliance is not intended for use in commercial/industrial applications. Usage other than as described here is not permitted and may cause damage or injury. For damage resulting from misuse or improper handling, the use of force or unauthorized modification, no liability will be assumed.
Items supplied
Pet Hair Clippers with blade guard
- 6 Trimming guides
- Cleaning brush
- Blade oil
This operating manual
Description of the appliance
Appliance (Fig. A)
Cutting head
Suspension loop
On/Off switch
Adjustment switch "Cutting length"
Trimming guides and accessories (Fig. B)
1 / 8'' (3 mm Cutting length)
② 1 / 4'' (6 mm Cutting length)
3 / 8'' (9 mm Cutting length)
④ 1 / 2'' (13 mm Cutting length)
⑤ Trimming guide for side step cut (right)
⑥ Trimming guide for side step cut (left)
⑦ Blade cover
⑧ Cleaning brush
⑨ Blade oil
Technical Data
Power supply: 100 - 240V (alternating current), 50 / 60Hz
Power consumption: 10 W
Protection class: II / (double insulation)
Operating
temperature: +5^ C - +40^ C
Storage
temperature: 0^ C + 40^ C
Safety instructions

- Connect the appliance only to correctly installed and earthed mains sockets that are easily accessible. Ensure that the rating of the local power supply tallies completely with the details given on the rating plate of the device.
- Ensure that the power cable does not become damaged. Protect the power cable from sources of heat and ensure that it cannot be damaged.
- To avoid risks, arrange for defective plugs and/or cables to be replaced at once by qualified technicians or our Customer Service Department.
- Do not use the appliance in the close vicinity of a bath/shower or a sink filled with water. The proximity of moisture presents a danger, even when the appliance is switched off.
- Never immerse the appliance in water or other liquids when it is connected!
- Should the appliance be dropped into water, ABSOLUTELY disconnect the plug from the mains socket before extracting the appliance.
After use or when cleaning it, ALWAYS remove the plug from the mains power socket. Do not pull on the power cable directly, pull the plug.
The appliance is suitable for use only in dry areas. - Attention! Keep the appliance dry.
- Do not use the unit whilthe animal is being bathed or when the fur is wet.
WARNING! RISK OF INJURY!
- Hair trimmers for animals may be used by children aged 3 and above if they are supervised.
- Hair trimmers for animals may be used by children aged 8 and above and persons with limited physical, sensory or mental capabilities or lack of experience and knowledge, provided that they are under supervision or have been told how to use the appliance safely and are aware of the potential risks.
Do not allow children to play with the appliance. - Cleaning and maintenance may not be carried out by unsupervised children.
- Use only the original accessory parts for this device.
- Check the cutting head for proper function before using the appliance.
- Never use the appliance with a damaged or broken trimming guide. The absence of teeth on the trimming guide can lead to injury.
- Switch the appliance off before you put it down.
RISK OF INJURY!

Swallowing the supplied oil can have serious consequences!
If swallowed: Call a POISON CONTROL CENTRE or a doctor immediately.
Wash out mouth with water.
Do NOT induce vomiting.
Store locked up.
- Do not eat, drink or smoke while using the product.
- Seek medical advice/attention if you feel unwell.
RISK OF INJURY!
In case of skin contact: Wash the affected area immediately with plenty of soap and water and rinse thoroughly. If persistent skin irritations occur, seek medical attention.
In case of contact with the eyes: Rinse the open eye for several minutes in fresh running water. If symptoms persist, consult a doctor.
- Dispose of the oil and oil container in accordance with local rules and regulations!
CAUTION! PROPERTY DAMAGE!
These animal clippers are intended exclusively for the cutting and trimming of animal hair.
Operation
The fur to be cut must be dry and clean. Brush the fur through to remove any knots.
1) Remove the blade guard ⑦ from the cutting head 1.
2) Place the required trimming guide (1 - 6) with the prongs facing upwards on the cutting head ① and thereby press the flap of the trimming guide (1 - 6) down firmly onto the lower metal edge of the cutting head ① (see illustration).
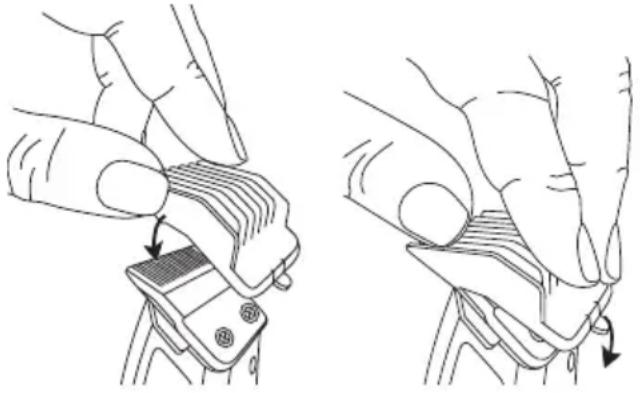
Ensure that the trimming guide1-6) has properly engaged and is secured before starting to cut/trim the fur.
NOTE
It is advisable to first trim a small area so as to test the individual comb attachments (1 - 6). Start with a comb attachment for long hair (1/2" 4 or 3/8" 3) and, if necessary, use a shorter one. The comb attachments (1 - 6) permit cutting lengths from 3 to 13 mm.
3) Switch the appliance on by sliding the On/Off switch 3 to the position "ON".
4) Slowly run the appliance through the fur against the direction of hair growth. Hold the appliance so that the trimming guide (1 - 6) is as flat as possible against the animal.
In addition, with the adjustment switch 4 the cutting length of the cutter head 1 can be adjusted in steps (up to 2mm ) without having to exchange the comb attachment (1 - 6) To do this, slide the adjustment switch 4 backwards to increase the cutting length in steps. With this the cutting length of the respectively attached comb attachment is also increased by up to 2mm
Slide the adjustment switch 4 forward again to reduce the cutting length or to bring the comb attachment (1 - 6) back into its original position.
- Through removal of the individual trimming guide (1 - 6), i.e. using only the cutting head ① itself, you can cut clean contours.
5) After use, switch the appliance off by sliding the On/Off switch 3 to the position "OFF".
Cleaning and Care
Before cleaning, remove the plug from the mains power socket.
CAUTION! PROPERTY DAMAGE!
NEVER submerse the appliance in water or other liquids.
Take the respective trimming guide (1) - (6) , if fitted, off.
Using exclusively the cleaning brus, remove the hairs from the cutting head 1. Wipe off the cutting head 1 with a damp cloth. After this, dry the cutting head 1 off with a dry cloth. We recommend that you occasionally clean the cutting head 1 with medicinal alcohol.
If in regular use, the cutting head 1 should be oiled occasionally. For this, use the supplied blade oil 9.
Remove excess oil with a dry cloth.
Clean the housing with a soft, dry lint-free cloth. In cases of stubborn soiling, clean the housing using a damp cloth and then dry it off with a dry cloth.
Clean the trimming guides1-6) in warm water. Add a little mild detergent. Dry all parts well before re-use.
Store the appliance in a dry and dust free location. When it is in storage, place the blade guard ⑦ on the cutting head ①.
Disposal
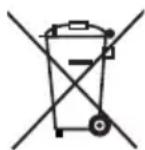
Do not dispose of the device in your normal domestic waste. This product is subject to the provisions of European Directive 2019/19/EU.
Dispose of the appliance over a registered waste disposal firm or at your local community waste disposal facility. Observe the currently applicable regulations. In case of doubt, please contact your waste disposal centre.

Your local community or municipal authorities can provide information on how to dispose of the worn-out product.

Dispose of all packaging materials in an environmentally friendly manner.

Note the labelling on the packaging and separate the packaging material components for disposal if necessary. The packaging material is labelled
with abbreviations (a) and numbers (b) with the following meanings: 1-7: Plastics, 20-22: Paper and cardboard, 80-98: Composites.
This appliance has a 3-year warranty valid from the date of purchase. If this product has any faults, you, the buyer, have certain statutory rights. Your statutory rights are not restricted in any way by the warranty described below.
Warranty conditions
The validity period of the warranty starts from the date of purchase. Please keep your original receipt in a safe place. This document will be required as proof of purchase.
If any material or production fault occurs within three years of the date of purchase of the product, we will either repair or replace the product for you at our discretion. This warranty service is dependent on you presenting the defective appliance and the proof of purchase (receipt) and a short written description of the fault and its time of occurrence.
If the defect is covered by the warranty, your product will either be repaired or replaced by us. The repair or replacement of a product does not signify the beginning of a new warranty period.
Warranty period and statutory claims for defects
The warranty period is not prolonged by repairs effected under the warranty. This also applies to replaced and repaired components. Any damage and defects present at the time of purchase must be reported immediately after unpacking. Repairs carried out after expiry of the warranty period shall be subject to a fee.
Scope of the warranty
This appliance has been manufactured in accordance with strict quality guidelines and inspected meticulously prior to delivery.
The warranty covers material faults or production faults. The warranty does not extend to product parts subject to normal wear and tear or fragile parts such as switches, batteries, baking moulds or parts made of glass.
The warranty does not apply if the product has been damaged, improperly used or improperly maintained. The directions in the operating instructions for the product regarding proper use of the product are to be strictly followed. Uses and actions that are discouraged in the operating instructions or which are warned against must be avoided.
This product is intended solely for private use and not for commercial purposes. The warranty shall be deemed void in cases of misuse or improper handling, use of force and modifications/repairs which have not been carried out by one of our authorised Service centres.
Warranty claim procedure
To ensure quick processing of your case, please observe the following instructions:
Please have the till receipt and the item number (e.g. IAN 12345) available as proof of purchase.
- You will find the item number on the type plate, an engraving on the front page of the instructions (bottom left), or as a sticker on the rear or bottom of the appliance.
If functional or other defects occur, please contact the service department listed either by telephone or by e-mail.
You can return a defective product to us free of charge to the service address that will be provided to you. Ensure that you enclose the proof of purchase (fill receipt) and information about what the defect is and when it occurred.

You can download these instructions along with many other manuals, product videos and software on www.lidl-service.com.
Service
GB Service Great Britain
Tel.: 0800 404 7657
E-Mail: kompernass@lidl.co.uk
IE Service Ireland
Tel.: 1890 930 034
(0,08 EUR/Min., (peak))
(0,06 EUR/Min., (off peak))
E-Mail: kompernass@lidl.ie
IAN315533
Importer
Please note that the following address is not the service address. Please use the service address provided in the operating instructions.
KOMPERNASS HANDELS GMBH
BURGSTRASSE 21
DE-44867 BOCHUM
GERMANY
www.kompernass.com
Table des matieres
Introduction. 18
Puisance absorbee: 10 W
Classe de protection: II / [double isolation]
Température
de service: +5^ C + 40^ C
Température
Chere cliente, cher client,
KOMPERNASS HANDELS GMBH
BURGSTRASSE 21
DE-44867 BOCHUM
ALLEMAGNE
www.kompernass.com
Inhoud
Inleiding. 26
Voedingsspanning: 100 - 240 V ~ (wisselsroom), 50/60 Hz
Vermogen: 10 W
WAARSCHUWING! LICHAMELIJK GEVAAR!
KOMPERNASS HANDELS GMBH
BURGSTRASSE 21
DE-44867 BOCHUM
DUITSLAND
www.kompernass.com
Spistresci
Wstep. 34
KOMPERNASS HANDELS GMBH
BURGSTRASSE 21
DE-44867 BOCHUM
NIEMCY
www.kompernass.com
Obsah
Zastrihovac zviireci srsti 42
Ucelpouziti 42
Rozsah dodávky. 42
Popis pristroje. 42
Technické udaje 42
Bezpečnost 43
Obsluha. 46
Cisteni a udrzba 46
Likvidace 47
KOMPERNASS HANDELS GMBH
BURGSTRASSE 21
DE-44867 BOCHUM
NEMECKO
www.kompernass.com
Obsah
Uvod 50
Použivanie primerané učelu 50
Obsah dodávky 50
Opis pristroja 50
Technické udaje 50
KOMPERNASS HANDELS GMBH
BURGSTRASSE 21
DE-44867 BOCHUM
NEMECKO
www.kompernass.com
KOMPERNASS HANDELS GMBH
BURGSTRASSE 21
DE-44867 BOCHUM
GERMANY
www.kompernass.com