ZTSD 36 C2 - Uncategorized ZOOFARI - Free user manual and instructions
Find the device manual for free ZTSD 36 C2 ZOOFARI in PDF.


| Product Type | Pet Hair Clippers |
| Brand | Zoofari |
| Model | ZTSD 36 C2 |
| Input Voltage | 100-240V~, 50/60Hz |
| Rated Power | 10W |
| Protection Class | II |
| Cutting Length Adjustment | 0.9 - 1.8 mm (fine adjustment) |
| Trimming Guides (included) | 3 mm, 6 mm, 9 mm, 12 mm, plus side step guides (left and right) |
| Blade Oil Included | Yes |
| Cleaning Brush Included | Yes |
| Blade Cover Included | Yes |
| Safety Lock | Yes, prevents accidental adjustment |
| Housing Material | Plastic |
| Blade Material | Metal (not further specified) |
| Intended Use | Indoor trimming and cutting of animal hair |
| Warranty | 3 years |
| Dimensions (approx.) | Not specified in manual; typical for pet clippers: ~15 x 4 x 4 cm |
| Weight (approx.) | Not specified in manual; typical: ~200 g |
| Noise Level | Not specified in manual |
| Automatic Voltage Adaptation | Yes (50/60 Hz adaptive) |
| Repair Service | OWIM GmbH & Co. KG, tel: 08000569216 (UK) |
Frequently Asked Questions - ZTSD 36 C2 ZOOFARI
User questions about ZTSD 36 C2 ZOOFARI
0 question about this device. Answer the ones you know or ask your own.
Ask a new question about this device
Download the instructions for your Uncategorized in PDF format for free! Find your manual ZTSD 36 C2 - ZOOFARI and take your electronic device back in hand. On this page are published all the documents necessary for the use of your device. ZTSD 36 C2 by ZOOFARI.
USER MANUAL ZTSD 36 C2 ZOOFARI
natural_image
Black hairbrush with a circular head and textured blade, alongside a detailed close-up of its six different hair clip sets (no text or symbols visible)PET HAIR CLIPPERS ZTSD 36 C2
GB
PET HAIR CLIPPERS
Operation and safety notes
SI
APARAT ZA STRIŽENJE ŽIVALSKE DLAKE
GB Operation and safety notes Page 5
List of pictograms used....Page 6
Introduction......Page 6
Intended use....Page 6
Parts description....Page 6
Technical data....Page 6
Scope of delivery....Page 6
Safety notices....Page 7
Before use......Page 10
Oiling the blades....Page 10
Operation Page 10
Changing the attachments......Page 10
Setting the trim length Page 10
Trimming fur....Page 11
Cleaning and care....Page 11
Troubleshooting Page 12
Disposal Page 12
Warranty Page 12
Warranty claim procedure......Page 13
Service Page 13
| List of pictograms used | |||
 | Observe the warnings and safety notices! |  | Use indoors |
 | Product meets the applicable European product-specific directives. |  | Safety class II |
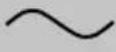 | Alternating current/voltage Watts |  | |
| Hz | Hertz (mains frequency) | ||
Pet hair clippers
- Introduction
We congratulate you on the purchase of your new product. You have chosen a high quality product. The instructions for use are part of the product. They contain important information concerning safety, use and disposal. Before using the product, please familiarise yourself with all of the safety information and instructions for use. Only use the product as described and for the specified applications. If you pass the product on to anyone else, please ensure that you also pass on all the documentation with it.
Intendeduse
The product is only designed to cut and trim of animal hair in domestic households. The product is only intended for use indoors in private households and is not intended for commercial use or for any other use.
Partsdescription
1 Cutting head
2 Suspension loop
3 Safety lock
4 Adjustment switch (trim length)
5 ON/OFF switch
6 Trimmingguide:
1/8'' (3 mm cutting length)
1/4'' (6 mm cutting length)
3/8'' (9 mm cutting length)
1/2'' (12 mm cutting length)
Trimming guide for side step cut (right)
Trimming guide for side step cut (left)
7 Blade cover
8 Cleaning brush
9 Blade oil
- Technicaldata
Input voltage: 100-240V\~, 50/60Hz
Rated power: 10W
Protection class: II/
- Scope of delivery
1 Pet hair clippers
1 Blade cover
6 Trimming guides
1 Blade oil
1 Cleaning brush
1 Instruction manual

Safetynotices
KEEP ALL SAFETY NOTICES AND INSTRUCTIONS FOR FUTURE REFERENCE!


WARNING!
DANGER TO LIFE
AND RISK OF ACCIDENTS FOR INFANTS AND CHILD-
REN! Never leave children unsupervised with the packaging materials. The packaging material poses a suffocation hazard. Children frequently underestimate the dangers. Always keep children away from the packaging material.
■ CAUTION! This product is not a toy for children! Children are not aware of the dangers associated with handling electrical products.
This product can be used by children aged from 8 years and above and persons with reduced physical, sensory or mental capabilities or lack of experience and knowledge if they have been given supervision or instruction concerning use of the product in a safe way and understand the hazards involved. Children
shall not play with the product. Cleaning and user maintenance shall not be made by children without supervision.
■ The product can be used by children aged from 3 years under supervision.
■ Use only the original accessory parts for this product.
- Check the cutting head 1 for proper function before using the product.
■ Never use the product with a damaged or broken trimming guide.
■ The absence of teeth on the trimming guide can lead to injury.
■ Switch the product off before you put it down.
■ The product is intended exclusively for the cutting and trimming of animal hair.

Avoid the risk of fatal injury from electric shock
■ Connect the product only to correctly installed and earthed mains sockets that are easily accessible. Ensure that the rating of the local power supply tallies completely with the details
given on the rating plate of the product.
■ Ensure that the power cable does not become damaged. Protect the power cable from sources of heat and ensure that it cannot be damaged.
If the plug and / or supply cord is damaged, it must be replaced by the manufacturer, its service agent or similarly qualified persons in order to avoid a hazard.
WARNING! Keep the product dry. The product is suitable for use only in dry areas.
WARNING! Do not use this product near bathtubs, showers, basins or other vessels containing water. The proximity of moisture presents a danger, even when the product is switched off.
■ Never immerse the product in water or other liquids when it is connected!
WARNING! Should the product be dropped into water, ABSOLUTELY disconnect the plug from the mains socket before extracting the product.
■ After use or when cleaning it, ALWAYS remove the plug from the mains power socket. Do not pull on the power cable directly, pull the plug.
WARNING! Never touch the plug with moist or wet hands, especially when you plug it into the socket or pull it out of the socket.
WARNING! Never sub-merge the product or the supply cord in water or any other liquid and never rinse this/these under running water.
- Do not use the product while the animal is being bathed or when the fur is wet.
WARNING!
For additional protection, the installation of a residual current device (RCD) having a rated residual operating current not exceeding 30 mA is advisable in the electrical circuit supplying the bathroom. Ask your installer for advice.
- Remove the plug from the socket - if a malfunction occurs, - before you clean the product, - if you have not used the product for a long time, - during a thunderstorm and - after each use.
When doing so, remove the plug directly from the socket and do not pull it out using the supply cord.

Avoid risk of injury
- Do not change the accessories while the product is switched on.
- Do not use the product if you detect any kind of visible, external damage. Never use a damaged product.
If liquid gets into the product, check before using the product once more.
If you notice that the supply cord, plug, housing or another part has become damaged, the product can no longer be used.
■ Repairs should only be carried out by a specialist. Improper repairs may result in considerable danger to the user. This will also make any warranty claims void. - Do not use defective attachments with the product as these could have sharp corners.
■ Defective components must always be replaced with original spare parts. Only by using original spare parts can you ensure that safety requirements are met.
■ Connect plug to an outlet which is well within reach.
■ Never use the product unsupervised and only use it in
accordance with the information stated on the type plate.
■ The tips of the attachments are sharp.
■ Switch off the product before attaching or switching the attachments, as well as before cleaning.
■ Lay the supply cord so nobody will step on or trip over it.
- Do not use the product if you have an open wound, cut, sunburn or blister.

Avoid the danger of damage to property
Electrical products may pose a hazard to animals. Animals can also damage the product. Always keep animals away from electrical products when it is not in use.
■ Protect the product from moisture, drops of water and splashing water.
- Ensure that the supply cord does not get stuck in cupboard doors and that it is not pulled over hot surfaces. This could damage the supply cord's insulation.
■ Use the original accessories only.
- Do not place the product on hot surfaces, near hot surfaces or near an open fire.
■ To prevent impermissible heating do not cover the plug and the product during use. - Do not use any corrosive or abrasive cleaning agents.
- Keep the blade oil out of reach of children. Do not ingest the blade oil, do not get it into your eyes. Keep it in a safe place if it is not being used.
No action is needed from users to shift the product between 50 and 60 Hz. The product adapts itself for both 50 and 60 Hz.
- Before use
□ Remove all parts from the package.
- Oiling the blades
It is recommended that you oil the blades before first use and after cleaning to guarantee complete functionality.
□ Apply one or two drops of blade oil 9 between the blades and distribute them evenly (see Fig. 1).
☐ Wipe away any excess oil using a cloth.
☐ You can also use any acid-free oil such as sewing machine oil.
Operation
- Changing the attachments (Fig. C–E)
□ Remove the blade guard 7 from the cutting head 1.
Place the required trimming guide 6 with the prongs facing upwards on the cutting head 1 and thereby press the flap of the trimming guide 6 down firmly onto the lower metal edge of the cutting head 1 (see Fig. C and D).
☐ Ensure that the trimming guide ☐ has properly engaged with "click" sound before starting to cut/trim the fur (see Fig. E).
CAUTION!
It is normal that the product will become hot during use.
- Occasionally turn off the product while using and check to see if product has possibly gotten too hot for your pet. If so, let the product cool off; otherwise the hot shaving head may hurt your pet.
As a rough guide, you should start dipping behind the shoulders and slowly work your way backwards and downwards. Work very carefully when clipping / trimming your pet's sensitive body parts such as face, stomach, legs or hindquarters.
- Setting the trim length
☐ To set different trim lengths, hold the main body of the product slide the adjustment switch 4 into the desired position (0.9–1.8 mm). The set trim length will be displayed on adjustment switch 4.
1. Select a shorter trim length: Press and hold the safety lock 3 and slide the adjustment switch 4 upwards. The shortest trim length is 0.9 mm (see Fig. A).
2. Select a longer trim length: Press and hold the safety lock 3 and slide the adjustment switch 4 downwards. The longest trim length is 1.8 mm (see Fig. A).
It is suggested to start with fine adjustment switch 4 at 1.2 mm to experience the optimal handling.
●Trimmingfur
Note: The fur being trimmed should be clean, dry and untangled.
□ Carefully comb the fur to disentangle any potential knots.
☐ Begin by using the longer trimming guides 6 and trim the fur gradually to the desired length. It is advisable to first trim a small area so as to test the individual trimming guides 6.
Example:
Use the trimming guide 3.0 mm 6 with the following settings of adjustment switch 4 (trim length 3.9–4.8 mm):
On adjustment switch 4:
The shorter trim length (0.9 mm):
short hair (3.9 mm)
☐ Avoid making sudden movements when trimming.
☐ Switch the product on by sliding the ON / OFF switch 5 to the "I" position.
☐ Slowly run the product through the fur against the direction of hair growth. Hold the product so that the trimming guide 6 is as flat as possible against the animal.
☐ You can graduate the desired trim length of the trimming guides 6 more accurately by sliding the adjustment switch 4. These gradations differ by 0.3 mm.
Through removal of the trimming guide 6, i.e. using only the cutting head 1 itself, you can cut clean contours.
☐ After use, switch the product off by sliding the ON/OFF switch 5 to the position "0".
Middle trim length (1.2 mm / 1.5 mm):
mid-length hair (4.2 mm / 4.5 mm)
The longer trim length (1.8 mm):
long hair (4.8 mm)
(See the table below for all the length adjustments.)
| Trimming guide 6 (mm) | Trim length with accurate trim adjustment by adjustment switch 4 (mm) | |||
| 0.9 1.2 | 1.5 1.8 | |||
| 3.0 3.9 4.2 4.5 4.8 | ||||
| 6.0 6.9 7.2 7.5 7.8 | ||||
| 9.0 9.9 10.2 10.5 10.8 | ||||
| 12.0 12.9 13.2 13.5 13.8 | ||||
- Cleaning and care

Before cleaning, remove the plug from the mains power socket.

CAUTION! PROPERTY DAMAGE!
■ NEVER submerse the product in water or other liquids.
- Do not use any corrosive or abrasive cleaning agents.
□ Clean the housing using a damp cloth and a mild detergent.
☐ Switch the product off by sliding the ON / OFF switch 5 to the "0" position.
☐ Remove the plug from the mains socket.
☐ Remove the trimmer guide 6 or the cutting head 1 from the product (see Fig. E and F).
Note: Put the blade cover 7 on cutting head 1 before removing it from the product.
Note: Never untighten the screws on cutting head 1.
□ Wash the trimmer guide 6 or the cutting head 1 with running water if necessary.
□ Dry the trimmer guide 6 and cutting head 1.
☐ Remove any remaining bits of hair from the cutting head 1 and product by using the cleaning brush 8 provided (see Fig. G and H).
□ Apply one or two drops of blade oil 9 between the blades and the moving parts (see Fig. I).
☐ Adjust the adjustment switch 4 to 1.8 mm after you have finished cleaning the product. To reinstall the cutting head 1 to the product, insert the bottom of cutting head 1 to the product, and push down the cutting head 1 with click sound (see Fig. J).
Note: Clean the cutting head trimmer guide 6 after every use.
- Troubleshooting
| Error Cause Solution | ||
| Trimming is difficult. | Hair may be stuck inside the blades. | Clean the cutting head 1 and the product and oil it if necessary. |
●Disposal
The packaging is made entirely of recyclable materials, which you may dispose of at local recycling facilities.

Observe the marking of the packaging materials for waste separation, which are marked with abbreviations (a) and numbers (b) with following meaning: 1-7: plastics / 20-22: paper and fibre-board/80-98: composite materials.

The product and packaging materials are recyclable, dispose of it separately for better waste treatment. The Triman logo is valid in France only.

Contact your local refuse disposal authority for more details of how to dispose of your worn-out product.

To help protect the environment, please dispose of the product properly when it has reached the end of its useful life and not in the household waste. Information on collection points and their opening hours can be obtained from your local authority.
- Warranty
The product has been manufactured to strict quality guidelines and meticulously examined before delivery. In the event of product defects you have legal rights against the retailer of this product. Your legal rights are not limited in any way by our warranty detailed below.
The warranty for this product is 3 years from the date of purchase. Should this product show any fault in materials or manufacture within 3 years from the date of purchase, we will repair or replace it – at our choice – free of charge to you.
The warranty period begins on the date of purchase. Please keep the original sales receipt in a safe location. This document is required as your proof of purchase. This warranty becomes void if the product has been damaged, or used or maintained improperly.
The warranty applies to defects in material or manufacture. This warranty does not cover product parts subject to normal wear, thus possibly considered consumables (e.g. batteries) or for damage to fragile parts, e.g. switches, rechargeable batteries or glass parts.
● Warranty claim procedure
To ensure quick processing of your case, please observe the following instructions:
Please have the till receipt and the item number (e.g. IAN 123456_7890) available as proof of purchase.
You will find the item number on the rating plate, an engraving on the front page of the instructions for use (bottom left), or as a sticker on the rear or bottom of the product.
If functional or other defects occur, please contact the service department listed either by telephone or by e-mail.
You can return a defective product to us free of charge to the service address that will be provided to you. Ensure that you enclose the proof of purchase (till receipt) and information about what the defect is and when it occurred.
Service
GB Service Great Britain
Tel.: 08000569216
E-Mail: owim@lidl.co.uk

Pooblaščeni serviser:
OWIM GmbH & Co. KG
Stiftsbergstraße 1
74167 Neckarsulm
NEMČIJA