
HM1812 - Breaker MAKITA - Free user manual and instructions
Find the device manual for free HM1812 MAKITA in PDF.

| Brand | Makita |
| Model | HM1812 |
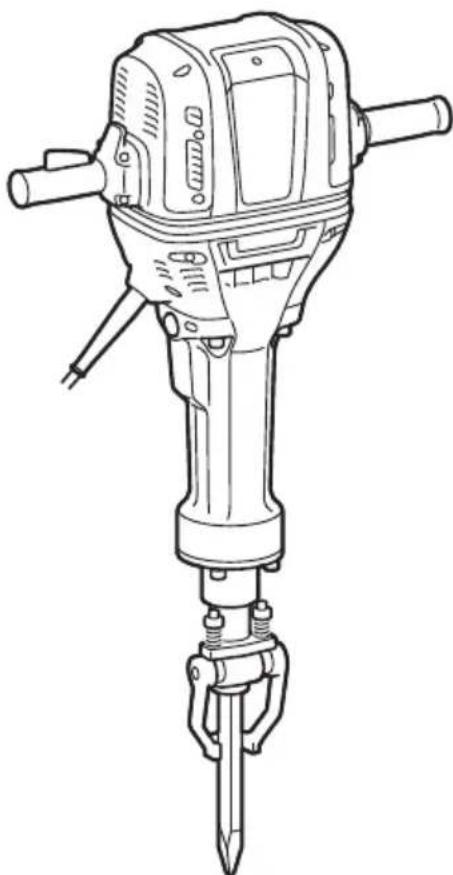
| Product Type | Concrete Breaker (Jackhammer) |
| Category | Concrete Breaker |
| Impact Rate | 870 min⁻¹ |
| Dimensions (L × W × H) | 843 × 210 × 608 mm |
| Net Weight (according to EPTA 01/2014) | 31.3 kg |
| Power Supply | Mains (single-phase AC) |
| Double Insulation | Yes (Class II) |
| Sound Pressure Level (LpA) | 98 dB(A) |
| Sound Power Level (LWA) | 106 dB(A) |
| Vibration Emission (chiseling) | 9.7 m/s² (total value, K=1.5 m/s²) |
| Intended Use | Chiseling, scaling, heavy demolition, driving, compacting |
| Auxiliary Handle | Yes (torque handle) |
| Dust Extraction System | Optional (accessory) |
| Indicator Lights | Green (operation), Red (maintenance/worn brushes) |
| Switch Type | Trigger (on/off) |
| Compatible Bits | With or without collar |
| Routine Maintenance | Check brushes, greasing, cleaning |
| Safety | Double insulation, hearing and eye protection recommended |
| Recommended Accessories | Chisel, cold chisel, scaling chisel, spade hammer, tamper, grease |
Frequently Asked Questions - HM1812 MAKITA
User questions about HM1812 MAKITA
0 question about this device. Answer the ones you know or ask your own.
Ask a new question about this device
Download the instructions for your Breaker in PDF format for free! Find your manual HM1812 - MAKITA and take your electronic device back in hand. On this page are published all the documents necessary for the use of your device. HM1812 by MAKITA.
USER MANUAL HM1812 MAKITA
GB Electric Breaker Instruction Manual
F Marteau-Piqueur Manuel d'instructions
D Stemmhammer Betriebsanleitung
Demolitore elettrico Istruzioni per l'uso
NL Elektrische breekhamer Gebruiksaanwijzing
E Demoledor Eléctrico Manual de instructiones
P Martelo Demolidor Manual de instruções
DK Opbrydningshammer Brugsanvisning
GR Hλεκτρικό ποτολέτο κατεδαφίσεων Μθηγίες χρήσεως
TR Elektrkli Kirici Kullanma kilavuzu
HM1802 HM1812
1
015520
2
015521
3
4
015619
5
6
015524
7
8
015606
ENGLISH (Original instructions)
Explanation of general view
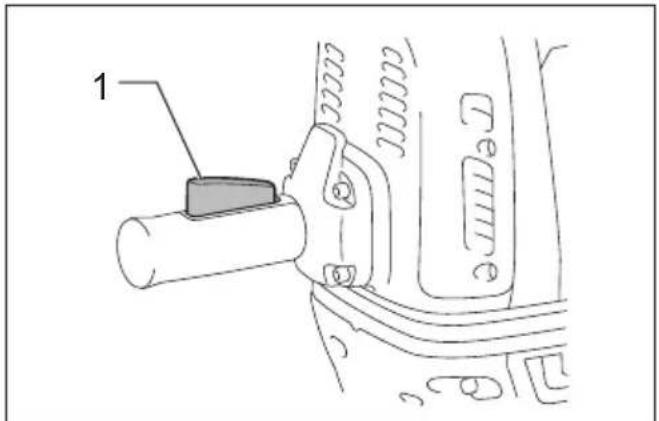
1 Switch lever
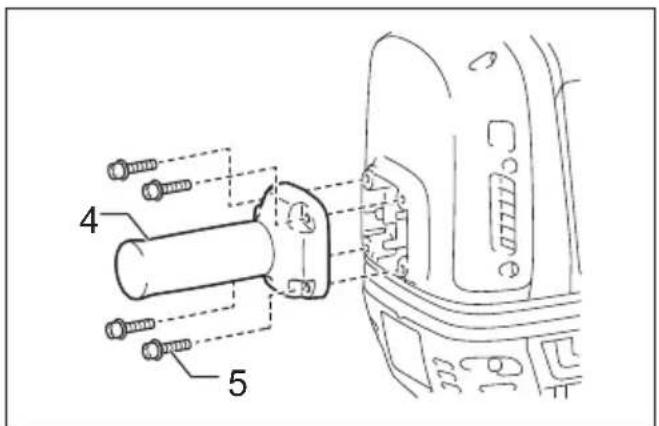
5 Bolt
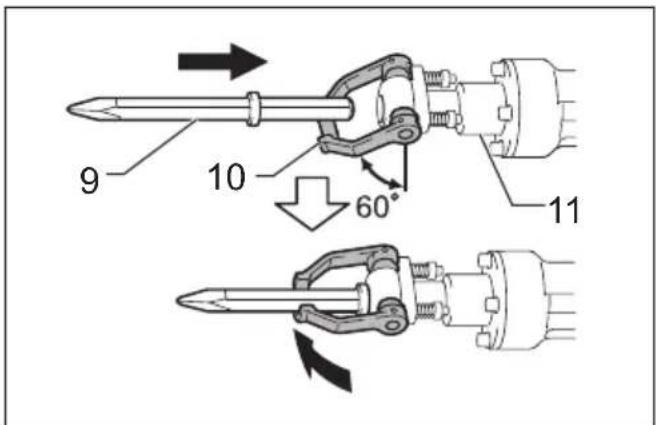
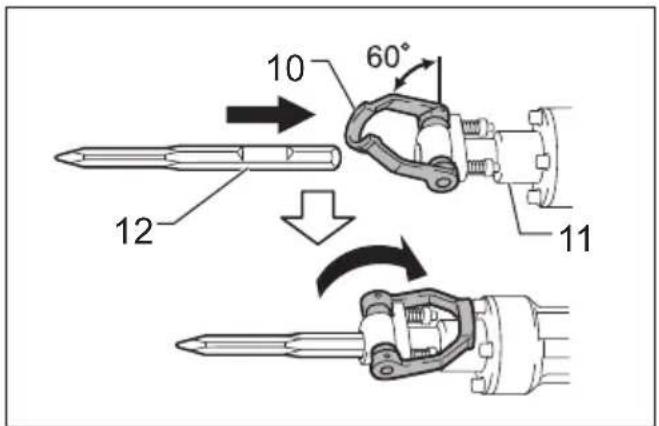
10 Tool retainer
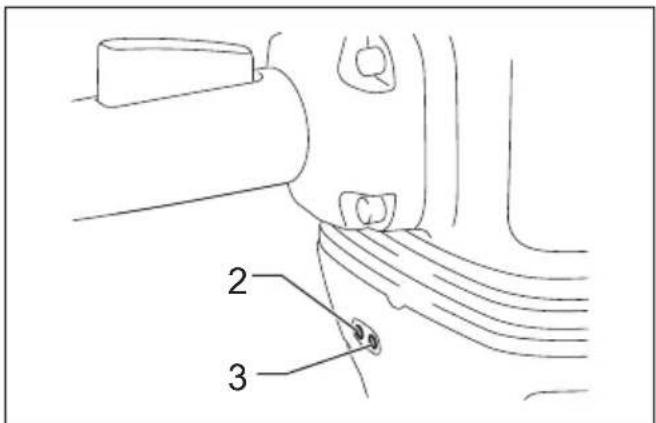
2 Power-ON indicator lamp (green)
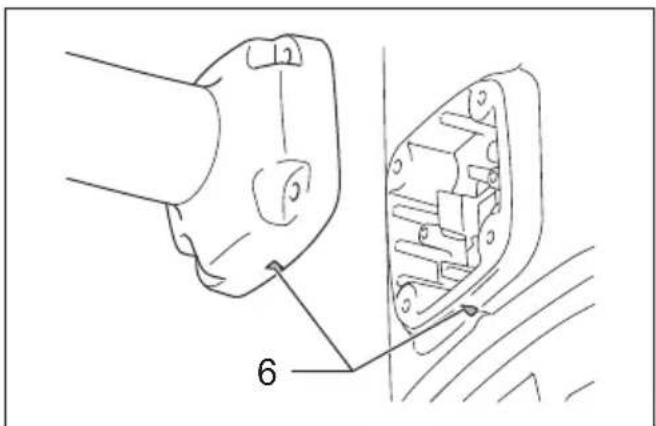
6 Triangle alignment mark
11 Tool holder
3 Service indicator lamp (red)
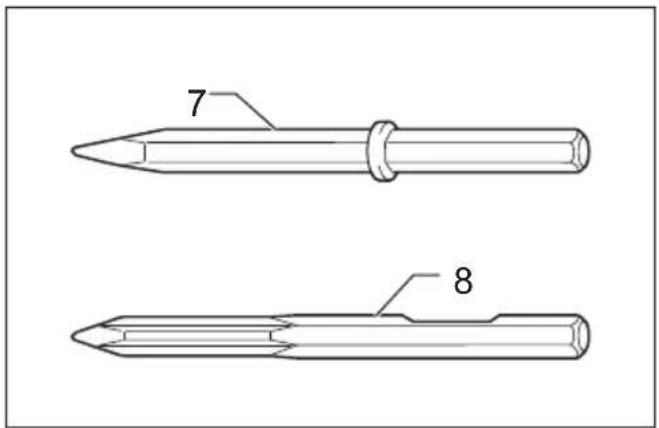
7 Bit with collar
12 Notched portion of the bit
4 Soft grip
8 Bit without collar
9 Bit
SPECIFICATIONS
| Model HM1802 HM181 | 12 | |
| Blows per minute 870 | ||
| Dimensions 843 x 210 x 608 mm | ||
| Net weight 29.4 kg 31.3 kg | ||
| Safety class | ☐/II | |
- Due to our continuing program of research and development, the specifications herein are subject to change without notice.
- Specifications may differ from country to country.
Weight according to EPTA-Procedure 01/2014
ENE046-1
Intended use
The tool is intended for heavy chiselling and demolition work as well as for driving and compacting with appropriate accessories.
ENF002-2
Power supply
The tool should be connected only to a power supply of the same voltage as indicated on the nameplate, and can only be operated on single-phase AC supply. They are double-insulated and can, therefore, also be used from sockets without earth wire.
GEA010-2
General power tool safety warnings
WARNING: Read all safety warnings, instructions, illustrations and specifications provided with this power tool. Failure to follow all instructions listed below may result in electric shock, fire and/or serious injury.
Save all warnings and instructions for future reference.
The term "power tool" in the warnings refers to your mains-operated (corded) power tool or battery-operated (cordless) power tool.
GEB239-1
ELECTRIC BREAKER SAFETY WARNINGS
Safety instructions for all operations
- Wear ear protectors. Exposure to noise can cause hearing loss.
- Use auxiliary handle(s), if supplied with the tool. Loss of control can cause personal injury.
- Hold the power tool by insulated gripping surfaces, when performing an operation where the cutting accessory may contact hidden wiring or its own cord. Cutting accessory contacting a "live" wire may make exposed metal parts of the power tool "live" and could give the operator an electric shock.
Additional safety warnings
- Wear a hard hat (safety helmet), safety glasses and/or face shield. Ordinary eye or sun glasses are NOT safety glasses. It is also highly recommended that you wear a dust mask and thickly padded gloves.
- Be sure the bit is secured in place before operation.
- Under normal operation, the tool is designed to produce vibration. The screws can come loose easily, causing a breakdown or accident. Check tightness of screws carefully before operation.
- In cold weather or when the tool has not been used for a long time, let the tool warm up for a while by operating it under no load. This will loosen up the lubrication. Without proper warm-up, hammering operation is difficult.
- Always be sure you have a firm footing. Be sure no one is below when using the tool in high locations.
- Hold the tool firmly with both hands.
- Keep hands away from moving parts.
- Do not leave the tool running. Operate the tool only when hand-held.
- Do not point the tool at any one in the area when operating. The bit could fly out and injure someone seriously.
- Do not touch the bit, parts close to the bit, or workpiece immediately after operation; they may be extremely hot and could burn your skin.
- Some material contains chemicals which may be toxic. Take caution to prevent dust inhalation and skin contact. Follow material supplier safety data.
- Do not touch the power plug with wet hands.
- Before operation, make sure that there is no buried object such as electric pipe, water pipe or gas pipe in the working area. Otherwise, the bit may touch them, resulting an electric shock, electrical leakage or gas leak.
- Do not operate the tool at no-load unnecessarily.
SAVE THESE INSTRUCTIONS.
WARNING:
DO NOT let comfort or familiarity with product (gained from repeated use) replace strict adherence to safety rules for the subject product. MISUSE or failure to follow the safety rules stated in this instruction manual may cause serious personal injury.
FUNCTIONAL DESCRIPTION
CAUTION:
- Always be sure that the tool is switched off and unplugged before adjusting or checking function on the tool.
Switch action (Fig. 1)
CAUTION:
- Before plugging in the tool, always check to see that the switch lever actuates properly and returns to the "OFF" position when released.
To start the tool, simply squeeze the switch lever. Release the switch lever to stop.
For model HM1812 only
NOTE:
- Blows at no load per minute becomes smaller than those on load in order to reduce vibration under no load, but this does not show trouble. Once operation starts with a bit against concrete, blows per minute increase. When temperature is low and there is less fluidity in grease, the tool may not have this function even with the motor rotating.
Indicator lamps (Fig. 2)
The green power-ON indicator lamp lights up when the tool is plugged. The indicator lamp is lit but the tool does not start even if the tool is switched on, the carbon brushes may be worn out, or the controller, the motor or the ON/OFF switch may be malfunction.
The red service indicator lamp flickers up when the carbon brushes are nearly worn out to indicate that the tool needs servicing. After some period of use, motor will automatically be shut off.
ASSEMBLY
CAUTION:
- Always be sure that the tool is switched off and unplugged before carrying out any work on the tool.
Installing soft grip (Fig. 3 & 4)
Soft grip is NOT installed before factory shipment. Install soft grip securely.
Set the triangle alignment marks on the hammer body and on the soft grip when installing the soft grip.
Installing or removing the bit (optional accessory) (Fig. 5)
CAUTION:
- Always assure that the bit is securely retained by attempting to pull the bit out of the tool holder after installing the bit.
- Follow the below 2 installation methods in accordance with the 2 different types of bits. If inappropriate installation method is selected, the bit cannot be secured.
This tool accepts bits either with or without a collar on its shank.
To install the bit, follow either procedure (1) or (2) described below.
(1) For bits with a collar (Fig. 6)
Pivot the tool retainer downward (approx. 60 degrees). Insert the bit into the tool holder until it stops. Return the tool retainer and secure the bit.
(2) For bits without a collar (Fig. 7)
Pivot the tool retainer upward (approx. 60 degrees). Face the notched portion of the bit upward. Insert the bit into the tool holder until it stops. Pivot the tool retainer further until it stops at the tool holder.
To remove the bit, follow the installation procedure in reverse.
OPERATION
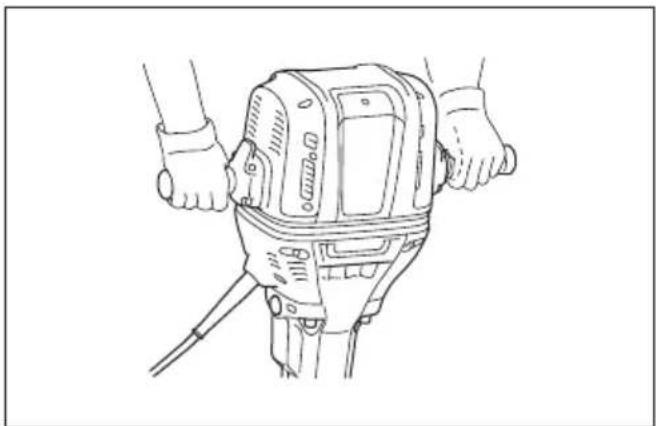
Chipping/Scaling/Demolition (Fig. 8)
CAUTION:
- Keep well-balanced posture when holding the heavy tool before / during / after operation to avoid personal injuries.
- Secure debris in case of breaking it into smaller pieces.
- Hold the tool firmly with both hands. Turn the tool on and apply slight pressure on the tool so that the tool will not bounce around, uncontrolled. Pressing very hard on the tool will not increase the efficiency.
- Do not pull out the tool if stuck. Instead, break the work around the bit tip.
- Be sure to place the tool on the stable floor or ground after use.
Always use the soft grip (auxiliary handle) and firmly hold the tool by both side grip and switch handle during operations.
MAINTENANCE
CAUTION:
- Store the machine in horizontal position to avoid possible grease leakage.
- Never use gasoline, benzine, thinner, alcohol or the like. Discoloration, deformation or cracks may result.
To maintain product safety and reliability, repairs, any maintenance or adjustment should be performed by Makita Authorized Service Centers, always using Makita replacement parts.
OPTIONAL ACCESSORIES
CAUTION:
- These accessories or attachments are recommended for use with your Makita tool specified in this manual. The use of any other accessories or attachments might present a risk of injury to persons. Only use accessory or attachment for its stated purpose.
If you need any assistance for more details regarding these accessories, ask your local Makita Service Center.
- Bull point
Cold chisel - Scaling chisel
- Clay spade
- Rammer
- Hammer / bit grease
- Dust extractor attachment
NOTE:
- Some items in the list may be included in the tool package as standard accessories. They may differ from country to country.
ENG905-1
Noise
The typical A-weighted noise level determined according to EN62841-2-6:
Model HM1802
Sound pressure level (L_pA) : 98 dB (A)
Sound power level (L_WA) : 106 dB (A)
Uncertainty (K): 1.85 dB (A)
Model HM1812
Sound pressure level (L_pA) : 98 dB (A)
Sound power level (L_WA) : 106 dB (A)
Uncertainty (K): 2.2 dB (A)
ENG907-1
NOTE:
- The declared noise emission value(s) has been measured in accordance with a standard test method and may be used for comparing one tool with another.
- The declared noise emission value(s) may also be used in a preliminary assessment of exposure.
WARNING:
- Wear ear protection.
- The noise emission during actual use of the power tool can differ from the declared value(s) depending on the ways in which the tool is used especially what kind of workpiece is processed.
- Be sure to identify safety measures to protect the operator that are based on an estimation of exposure in the actual conditions of use (taking account of all parts of the operating cycle such as the times when the tool is switched off and when it is running idle in addition to the trigger time).
Vibration
The vibration total value (tri-axial vector sum) determined according to EN62841-2-6:
Model HM1802
Work mode: chiselling
Vibration emission (a_h,CHeq) .. 15.6~m / s^2
Uncertainty (K): 2.0m / s^2
Model HM1812
Work mode: chiselling
Vibration emission (a_h,CHeq) .. 9.7~m / s^2
Uncertainty (K): 1.5m / s^2
ENG901-2
NOTE:
- The declared vibration total value(s) has been measured in accordance with a standard test method and may be used for comparing one tool with another.
- The declared vibration total value(s) may also be used in a preliminary assessment of exposure.
WARNING:
- The vibration emission during actual use of the power tool can differ from the declared value(s) depending on the ways in which the tool is used especially what kind of workpiece is processed.
- Be sure to identify safety measures to protect the operator that are based on an estimation of exposure in the actual conditions of use (taking account of all parts of the operating cycle such as the times when the tool is switched off and when it is running idle in addition to the trigger time).
DECLARATIONS OF CONFORMITY
For European countries only
The Declarations of conformity are included in Annex A to this instruction manual.
FRANÇAIS (Instructions originales)
Descriptif
1 Interrupteur
4 Poignée couple
8 Foret sans collerette
ACCESSIONS EN OPTION
ATTENTION:
OPTIONELE ACCESSOIRES
LET OP:
IPOEIOIOIHSEEI AΦAIA Ω I A TON HAEKTPIKO OPAYΣTHPA
Osnyies aopaleias yia oaes epyaiecs
1.Φopate wtoaonides.Hekθeən oE topuβo μTopei va Tpokaεoi atwεia akoi
- Na xpnoiopnoie Tc Bonthetaic aae, eva TApexovtae To epyaleio. H anwia Tou eayxou tnpoe va Tpokaedi Tpoowtikotpaupatio.
- Na Kpatate To nEeKtpio Epyaeeio aTo Tc Aae C emuovon otav EKTEaleite Epyaoie Cs kata Tc OTIOIEc To EApTnma KOITNC MTOpei va epoei Oe ETTAPHm E Kpumueva Kaawdelta nE To IIO Tou To KAwOIO. ZI TEPiTTWOn ETTAmpns Tou EapntmuoC KOTNc E NAEKTPoPoPo KaawOIO, MTOpei Ta EKTEeipveva MetAAIAk EApTnpata Tou nEeKTPiKou Epyaeiou Va Kataotouv Ta iDia NAEKTPoPoPpKa iVa TTPOKAeouv NAEKTPoPTAnGia oTo XeIPiotn.
PpOeTeC PPOEIDOnIOeI OaPaeiaC
- Φopáte σκληρο καπελo (kpavoc αφαλεiα), yuaia αφαλεiα κai/η πpωσπiδa. Ta koivá yuaia opαεως η λιου ΔEN εινai yuaia αφαλεiας. Eπiαns, ouviotatai iδiaɪτepως va φopáte μασka πpootαiας aɪо τη σκόνη kai yávtia με xovtpn ἄνεύοι.
- Pniv aTo n aeitoupyia, Bepaiwtheta ot n mutn exi aoqaiioe.
- ΕΚΑνΟΙΚΕς Συνθήκες λειουργίας, to εργαλείος εἶναι σχέδιασμένον αν παράγει κραδαμούς. Πι βίδες μπόρείνα χαλαρώσουν εύκολα, προκαλώντας βλάβη ἡ ατύχημα. Ελέγξετε προσεκτικά το σφίξιμο των βίδων πριν από τη λειουργία.
- Otav kavei Kpuo n av dev exete xpoioptoinoei To epyaieio yia meyalo xpoviko diaotnma, afoTE TO va zetataei ia liyo EITIPETOVtac Touva LEIoupyoei xwpic opfio.Me autov tov tpanto 8ealtiwetai n laitavon.Av dev zetataei ootá, n kpouotikn LEIoupyia evai duokoan.
- Na βεβαινεOTE πάντος Μι ΕτέκεOTE Μαθερα.Οταν χρησιμιοίετο Μεγαλείος Ευηλές τόποθεσες, να βεβαινεOTE Μι δεν βρίσκεται κανένας αήτο κάτω.
- KpatnoTe To epyaeeio oTaepa μe Ta duo xepia.
-
DiatnpieTe Ta xepia oac paekia ano kivoupeva epn.
-
Mny aqivete to epyaleio oE aeitoupyia.To epyaleio npeTcI va pioKetai oE aeitoupyia mOvo otav To Kpatate.
- Mny Otpepete To Epyaleio OTous Tapeupikokouc oTo Xwpo otav To xnoioutoeite. H mutn mtopevi Eaektoeutei kai va Tpokaloei oobapo Tpaumatuo.
- Mny ayyiEte Tn mutn, tnnata Kovta ot n mutn n to Teuaxio epyaiaac aepowc meta tn aeitoupyia. Mtopei va eivai egaipetikcaeotka kai va Tpokknei Eykauma oTo depma oas.
- Mepika uikia Tepiexouv Xnikia Tou mTopei va eivai toixka. Pooexete wote va aTPOEUYET Nv EIOVON KOKVNCa TNV Etnapn ME To depua. Akoauthe ta 8e0oEv aospaaleiac uikou Toun TAPEXOVTAI ANTOV TpOumTheuT.
- Mny ayyiETo oic Tou nAekptikou Kaawoiou e pEvva xepia.
- Piv tn aeitoupyia,betaaiwtheite otI dev utapxiei kantoio 0aumevo avtikeiEvO oTWC nAektpikoc 0wnvac, 0wnvacc vepou n 0wnvacc aepiou OTNVPeipoxn epyaoc. diaopoptika, n uTn mtopei va ta akouptnoEi, exovTac wctteaeqa nAekptponxi, nAekpiKn diappon ndiappon aepiou
- Mn θετε to εργαλείο σε λειθουργία χωρίς φόρτο, αν auto δεν εἰναι παπαραιῦτο.
ΦYAAETIΩOADHIGEAYTEΣ.
NPOEIAOIOIH:
MHN EITIpeEte To aveo n Esoikeiwo n e To TPOIOV (AOyw EINAVEIAHMEVNC XPNOs)
VA AVTKATAOtnoei TNV AUOTnp TnPNON TOW
KAVOVW Aaopaaleia c Tou TAPovTOc Epyaeiou. H
AANOAEMENXPHEH n aelaeia va akoLauOhte
Tous KAVOEC aopaleia c Tou biATUWovTAI OTO
TAPOV EYxepio oBnyiw MTOpei va Tpokaleo
Ooapop TPOOSNIKO Tpaumatioo.
NEPIRPAΦH ΛEITOYPTIAZ
PNOZOXH:
Móvo yia xwpe ts Eupwnns
Oi Anwoeic Suuoppwongn Tepiaaavovtai oTO
Papaptnma A oTo TApov EYxEpiio Odyiuv.
