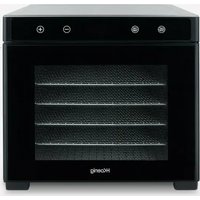
DSY700 - Food Dehydrator H.KOENIG - Free user manual and instructions
Find the device manual for free DSY700 H.KOENIG in PDF.
| Product Type | Food Dehydrator |
| Brand and Model | H.Koenig DSY700 |
| Capacity | Approximately 5 trays (unspecified) |
| Temperature Range | 40 - 70 °C |
| Timer | 1 to 48 hours, auto shut-off |
| Tray Material | Plastic grids (dishwasher safe) |
| Included Accessories | Non-stick mesh screens for small foods |
| Power Supply | 220-240 V ~ 50/60 Hz (standard estimate) |
| Power | Approximately 500 W (estimate) |
| Dimensions (W x D x H) | Approximately 30 x 30 x 30 cm (estimate) |
| Weight | Approximately 3 kg (estimate) |
| Main Functions | Dehydration of fruits, vegetables, herbs, meat, and fish |
| Control | Digital with +/- buttons, LED display |
| Cleaning and Maintenance | Trays dishwasher safe; base wiped with a damp cloth; do not immerse base |
| Safety | Auto shut-off, base must not be immersed, do not use outdoors, keep out of reach of children under 8 years |
| Warranty | 2 years (excluding consumable parts and accessories) |
| Spare Parts Repairability | Available at sav.hkoenig.com |
| General Information | Household use only; do not use for foods containing alcohol |
Frequently Asked Questions - DSY700 H.KOENIG
User questions about DSY700 H.KOENIG
0 question about this device. Answer the ones you know or ask your own.
Ask a new question about this device
Download the instructions for your Food Dehydrator in PDF format for free! Find your manual DSY700 - H.KOENIG and take your electronic device back in hand. On this page are published all the documents necessary for the use of your device. DSY700 by H.KOENIG.
USER MANUAL DSY700 H.KOENIG
Digital food dehydrator
Deshydrateur d'aliments numérique
Digitales dorrgerät
Digitale voedsel dehydrator
Deshidratador de alimentos digital
Essiccatore alimentare digitale
ENGLISH
Dehydrates fruits, vegetables, herbs, and spices. Digital temperature control and timer for precise drying time and temperatures
INSTRUCTIONS
The following important safeguards are recommended by most portable appliance manufactures.
IMPORTANT SAFEGUARDS
To reduce the risk of personal injury or property damage, when using electrical appliances basic safety precautions should always be followed, including the following:
1.Read all instructions.
2.Do not touch hot surface. Use handles or knobs.
3. To protect against electrical shock, do not immerse cord, plug, or the dehydrator base in water or other liquid.
4.Close supervision is necessary when any appliance is used by or near children.
5. Unplug from outlet when not in use and before cleaning. Allow to cool before putting on or taking off parts, and before cleaning the appliance.
6. Do not operate any appliance with a damaged cord or plug or in the event the appliance malfunctions or has been damaged in any manner.
If the supply cord is damaged, it must be replaced by the manufacturer or its service agent or a similarly qualified person in order to avoid a hazard.
- This appliance may be used by persons with reduced physical, sensory or mental capabilities or lack of experience or knowledge, provided that they are supervised or instructed in the safe use of the appliance and that they fully understand the potential hazards.
- The use of accessory attachments not recommended by the appliance manufacturer may cause injuries.
- Do not let cord hand over edge of table or counter or touch hot surfaces.
- Do not use outdoors.
- Do not place on or near a hot gas or electric burner or in a heated oven.
- Never use this appliance to dehydrate foods that contain alcohol or have been marinated in alcohol.
- Do not use appliance for other than intended use.
- Cleaning and maintenance should not be carried out by children unless they are at least 8 years of age and are supervised by an adult.
- Keep the appliance and its power cord out of reach of children under 8 years of age.
- When using electrical equipment, safety precautions must always be taken to prevent the risk of fire, electric shock and/or injury in the event of misuse.
17.Make sure that the voltage rating on the typeplate corresponds to your main voltage of your installation.
If this is not the case, contact the dealer and do not connect the unit.
18.Never leave the unit unattended while in operation.
19. Your appliance has been designed for household use only. It was not designed to be used in the following cases which are not covered by the warranty:
- in kitchen areas reserved for staff in shops, offices and other professional environments,
-in farm inns,
- by customers of hotels, motels and other residential environments,
- in bed and breakfast type environments.
SAVE THIS INSTRUCTION
This product is for household use only
How to use the digital control
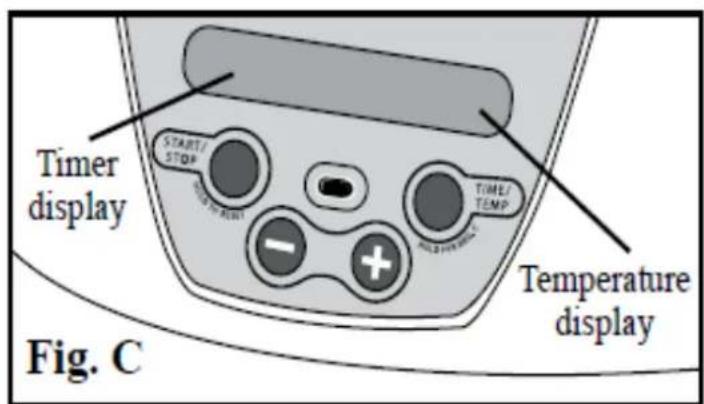
The digital control(Fig.c) allows for easy adjustment of adjustment dehydration temperature. In addition, it will automatically shut off the dehydrator when the selected time has elapsed.
To Adjust Temperature
-
First press the start/stop button, Then Press the TIME/TEMP button and the time in the display window will begin to flash, Then Press the + or - buttons to select the desired time, to change the time hold down the + or - buttons, the time will change, timer range for this dehydrator is (1 to 48 hours)
-
After the display keep time no flash, then press the TIME/TEMP button again. Press the + or - buttons to select the desired temperature up 1 press. To change the temperature rapidly, hold down the + or - buttons. The temperature range for this dehydrator is 40 - 70^
Once you have the desired time and temperature set, the dehydrator will working on. At any time, you can adjust the time or temperature by using the TIME/TEMP,+ ,and - buttons. You can stop the dehydrator at any time by pressing the START/STOP button.
General Dehydrating Information
Safety precaution: Wash hands thoroughly prior to preparing food for dehydrating. Likewise, thoroughly clean all utensils, cutting boards, and counters that be used for preparing food. Wash food before preparing them for dehydrating. When selecting food for drying, choose those that are at peak eating quality. Avoid overripe* or immature fruits and vegetables. Remove any parts of the food that are bruised or blemished.
.For even drying, cut food into uniform size, shapes, and thickness.
Drying time are highly variable depending on the type and amount of food, thickness, evenness of food pieces, humidity, air temperature, personal preference, and even the age of the plant at the time of harvesting. That is why throughout the book you will notice there is a range of average drying times. In some cases you may find you may need to, or prefer to, dry your foods for shorter or longer periods than those listed. For best results, begin checking your food at the beginning of the range listed in the instructions. You should then gauge how often you should recheck the food based on how the drying is progressing. With some foods, such as herbs, that may mean every 10 minutes, and with other foods, such as fruits, that may mean every 1-2 hours.
. Dehydration prevents microbial growth, however, chemical reaction caused by enzymes in fruits and vegetables can occur unless the product is pretreated before drying.. Pretreatment will prevent or minimize undesirable color and texture changes during drying and storage. See specific sections for recommend pretreatment.
. Place food in a single layer on the trays. Do not allow food to touch or overlap. When drying the strong-smelling foods, such as onions and garlic, be aware that there will be a strong odor during the drying process. That odor may linger after drying has been complete.
. Individual pieces of food may not all dry at the same time. Foods that are appropriately dried should be removed before those that still require additional drying.
Always check all of the trays for food that are appropriately dried.
.If one tray of food is finished before the others, remove the dried food and return the empty tray to the unit rather than rearranging the trays.
. Do not add fresh fruits and vegetables to a partially dried load. This will add moisture and increase the drying time.
Allow for continuous drying. Do not unplug the dehydrator in the middle of the drying circle and resume drying at a later time as this may result in poor quality and/or unsafe food.
Packaging and Storage
Dried foods need to be properly packaged to prevent reabsorption of moisture and microbial deterioration. Pack food in clean, dry, airtight containers. Glass jars or freezer containers with tight-fitting lids are good for storage. Resealable plastic freezer bags are also acceptable.
. Store package dried food in a dry, cool location away from light. Higher temperatures and exposure to light will shorten the storage time and result in loss of quality and nutrients.
.Fruit leather/rolls should keep for up to 1 month at room temperature. Vegetables have about half the storage life as fruit. If food is to be kept longer, then store in a freezer.
.Package vegetables and fruits in separate storage containers to avoid flavor transfer.
Emperature mode advices:
-Herbs 40-50°C
-Greens 50^
-Bread 50^
-Yoghurt 50^
-Vegetables 50 - 55^
-Fruits 50 - 60^
-Meat, Fish 70^
Fruit
Selection and preparation.
Select fruits that are at the peak of the ripeness. Wash fruits to remove dirt and debris. There are many options when it comes to drying fruit and personal preference should be your guide. Fruits can be sliced, halved, or if small left whole will require the most drying time.
Slice fruit uniformly and in piece about 1/4 inch thick. Fruits that are left whole, such as blueberries, cranberries and grapes, should be dipped in boiling water for 30-60 seconds and then plunged in ice water to crack the skin. This procedure will reduce the drying time.
Pretreatment
Many fruits will darked quickly once they are peeled and/or cut and will continue to darken even after the fruit is dried. This is due to the exposure of the natural enzymes in some fruits to air. There are several pretreatment options to prevent this discoloration Pretreatment is not necessary but is recommends to prevent discoloration .Some people may detect a slight flavor change with pretreated fruit. See the Fruit Drying Guide on page 6 to determine which fruit will benefit from the pretreatment. You may want to dry the different options and see which you prefer.
Ascorbic acid(Vitamin C)-Ascorbic acid, available in tablet or powdered form, is available at drugstores. Mix 2 1/2 tablespoons of powder ascorbic acid in 1 quart cold water. Vitamin C tablet(six 500mg/tablets equal 1 teaspoons ascorbic acid) should be crushed before mixing with water. Place cut fruit,such as bananas,peaches,apples,or pears,in mixture and soak for 10 minutes. Remove fruit and drain well before placing on drying trays.
Ascorbic acid mixture-These commercially available products, such as Mrs. Wages Fresh Fruit Preserver, are a combination of ascorbic acid and sugar and are commonly used for fresh fruits and for canning and freezing Follow the manufacturers' directions for use of these mixture.
Lemon juice-Mix equal parts lemon juice and cold water. Place cut fruit in solution and soak for 10 minutes. Remove fruit and drain well before placing on drying trays.
Place piece of fruit on dehydrator trays in a single layer, close together but not touching or overlapping.Refer to the Fruit Drying Guide on before for suggested preparation,and the drying times. Dry fruit at 50 - 60^
Determining Dryness
Refer to the Fruit Drying Guide on before page and begin checking the fruit at the beginning of the average drying time range. Remove a few pieces of fruit from each dehydrator tray and allow to cool to room temperature. Fruits are acceptably dry when they are soft and pliable, but not sticky. Fruit folded in half should not stick together. Apple and banana slices can be dried until crisp, if desired. If fruits seem to have a lot of moisture remaining, recheck every 1 to 2 hours. If fruits appear to be almost done, check again in 30 minutes. Always check fruits from each tray.
Uses
Dried fruits make great snacks. They can also be added to trail mixes, cereals, muffins, breads, and other baked products. Dried fruit can be used as is or softened prior to use. To soften dried fruit, submerge in boiling water and soak for 5 minutes or place fruit in a steaming.
Select ripe or slightly overripe fruit and remove any bruised areas. Wash fruit sand remove peel, seeds, and stems. Cut fruit into chunks and using a food processor or blender, puree until smooth(applesauce consistency). To get the pureeing process started, you may need to add approximately 1 tablespoon of fruit juice or water.
If desired, fruit can be pretreated to preserve its natural color. Add 112 teaspoons of lemon juice to each 112 cups pureed fruit. See the Fruit Drying Guide on page 6 to determine which fruits will benefit from pretreatment.
The natural sweetness of fruit is intensified with drying. However, if preference is for a sweeter fruit roll, you can add honey, maple syrup, corn syrup, or sugar to the pureed fruit if desired. Try different amounts of sweeteners, staring with 1 tablespoon for each 1 12 cups of fruit puree, to find your preference. Fruit with sweeteners added will take longer to dry than fruit that is not sweetened. Canned fruit can also be used to easily make fruit leather. Drain juice from fruit, saving juice for later use. Place fruit in food processor or blender and puree until smooth. Applesauce can be used directly from the container.
FRUIT DRYING GUIDE
Dry fruit at 50-60 °C
Drying times are highly variable depending on the type and amount of food, thickness, evenness of food pieces, humidity, air temperature personal preference, and even the age of the plant at the time of harvesting.
| Fruit | Preparation | Pretreatment | Average Drying Time(hours) |
| Apples | Peel,if desired, core, and cut in rings or slices, 1/8 to 1/4” thick. | Ascorbic acid, ascorbic, acid mixture or lemon juice | 4-9 |
| Apricots | Cut in half, remove pit, and cut in quarters or 1/4” thick slices. | (see apples) | 8-16 |
| Bananas | Peel and cut into 1/4” thick slices. | (see apples) | 6-8 |
| Blueberries | Remove stems Dip in boiling water for 30 to 60 seconds and then plunge in ice water to crack the skin. | None | 9-17 |
| Cherries | Remove stems and pit. Cut in half, chop, or leave whole. | None | 15-23 |
| Cranberries | Remove stems. Dip in boiling water for 30 to 60 seconds and then plunge in ice water to crack the skin. | None | 10-18 |
| Figs | Remove stems. Small figs can be left whole. Otherwise, cut in half. Dip whole figs in boiling water for 30 to 60 seconds and then plunge in ice water to crack the skin. | None | 8-15 |
| Grapes | Leave whole or cut in half.Dip whole grapes in in boiling water for 30 to 60 seconds and then plunge in ice water to crack the skin. | None | 13-21 |
| Kiwi | Peel and cut into 1/4” to 3/8thick slices. | None | 4-6 |
| Nectari nes | Cut in half and remove pit. MAY also quarter or slice 1/4”thick | See apples | 6-10(Slices) 36-48(halves or quarters) |
| Peaches | Peel if desired. Cut in half and remove pit. May also quarter or slice 1/4” thick. | See apples | 6-10(Slices) 36-48(halves or quarters) |
| Pears | Peel, core, and slice 1/4” thick | See apples | 7-13 |
| Pineapple | Peel, core, and slice 1/4” thick | None | 5-12 |
| Plums/Prunes | Halve or quarter and remove pit. | None | 8-15 |
| Rhubarb | Trim and discard leaves. Cut stalk into 1/4” slices | None | 6-9 |
| Strawberries | Remove the leafy crown. Halve or slice 1/4” thick | None | 6-12 |
Drying Vegetables
Dry vegetables at 50 - 55^ . Vegetables dry much faster than fruits. At the end of the drying period moisture loss is rapid. As a result, vegetables need to be checked often towards the ends of the end of the drying time to prevent over-drying. Food turns brown when it is over-dried. When drying smaller vegetables, such as peas or carrots, it is recommended that you place them on a mesh screen on the tray. A mesh screen will help prevent smaller foods from falling through the grates in the tray as they dehydrate. See information on before pages, "How to Use the Nonstick Mesh Screens."
Selection and Preparation
Wash vegetables to remove dirt and debris. Trim vegetables to remove fibrous or woody portions or bruised and decayed areas, peel, and slice using the preparation information found on the Vegetable Drying Guide on before pages. Slice or cut vegetable into pieces that are uniform in size. See before for pretreatment information about specific vegetables.
Pretreatment
The process of blanching involves subjecting vegetables to a high enough temperature to deactivate the enzymes. Blanching is necessary to stop the naturally occurring enzymes from causing loss of color and flavor during drying and storage. Blanching also relaxes the tissue walls so moisture can more readily escape during drying and enter during dehydrating;
Blanching can be done in water or steam. Water blanching causes a greater loss of nutrients but is faster than steam blanching and achieves a more even heat penetration.
Steam Blanching- Fill a deep pot with water and bring to a boil. Place vegetables loosely in a basket or colander that will allow steam to freely circulate around the vegetables. Do not fill basket or colander with more than a 2 12 inch layer of vegetables. Position the basket or colander in the pot, making sure it does not contact the boiling water. Cover with a close fitting lid. Steam for the time indicated in the Vegetable Drying Guide on before pages..
Water blanching -Fill a large pot 32 full with water. Cover and bring to a boil. Place vegetables loosely in a basket or colander and submerge in the boiling water. Cover and blanch for the time indicated in the Vegetable Drying Guide. Water should return to a boil in less than 1 minute. If not, too many vegetables were added to the basket; reduce the amount of vegetables added for the next batch. Water blanch for the time indicated in the Vegetable Drying Guide below. Immediately after steam or water blanching, dip the vegetables in cold water to quickly cool them. Drain the vegetables and arrange them in a single layer on the dehydrator trays. Refer to the Vegetable Drying Guide below for drying times.
Determining Dryness
Refer to the Vegetable Drying Guide below and begin checking the vegetables at the beginning of the average drying time range.
Remove a few pieces of vegetables from each dehydrator tray and allow to cool to room temperature. Test for dryness by breaking the pieces in half. Most vegetables will be crisp when appropriately dried and will break easily. If vegetables do not break easily, additional drying time is needed. If vegetables seem to have a lot of moisture remaining, recheck every 1 to 2 hours. If vegetables appear to be almost done, check again in 30 minutes. Always check vegetables from each tray.
Follow "Packaging and Storage" information on before pages.
VEGETABLE DRYING GUIDE
Dry vegetables at 50 - 55^
Drying times are highly variable depending on the type and amount of food, thickness, evenness of food pieces, humidity, air temperature, personal preference, and even the age of the plant at the time of harvesting.
| Vegetable | Preparation | Pretreatment water blanching or steam blanching | Average Drying Time |
| Asparagus | Cut into 1" pieces. | water 3½-4½ minutes steam 4-5 minutes | 6-8 hours |
| Beans, green/wax | Remove ends and strings. Cut into 1" pieces. | water 2 minutes steam 2-2½ minutes | 6-11 hours |
| Beets | Cook until tender. Cool and peel. Cut into shoestring strips 1/8" thick. | None - Already cooked. | 4-7 hours |
| Broccoli | Cut into serving pieces. | water 2 minutes steam 3-3½ minutes | 4-7 hours |
| Carrots | Peel and cut off ends. Cut into 1/8" to 1¼" slices. | water 3 minutes steam 3-3½ minutes | 4-10 hours |
| Cauliflower | Cut into serving pieces. | water 3-4 minutes steam 4-5 minutes | 5-8 hours |
| Celery | Trim ends. Cut into 1¼" slices. | water 2 minutes steam 2 minutes | 2-4 hours |
| Corn, cut | Husk and remove silk. Blanch and cut corn from cob. | water 1½ minutes s team 2-2½ minutes | 6-10 hours |
| Mushrooms | Wash and slice 3/8" thick. | None | 2-6 hours |
| Onions | Remove outer skin. Cut off top and root ends. Cut into 1¼" slices. | None | 3-7 hours |
| Peas | Shell. | water 2 minutes steam 3 minutes | 5-9 hours |
| Peppers and pimentos | Remove stem, core, and inner partitions. Cut into 1¼" strips. | None | 5-10 hours |
| Potatoes | Peel and cut into 1¼" slices. | water 5-6 minutes steam 6-8 minutes | 4-8 hours |
| Summer squash and zucchini | Trim ends. Cut into 1¼" slices. | water 1½ minutes steam 2½-3 minutes | 4-6 hours |
| Tomatoes | Peel, if desired. Cut into sections 3/4" wide. | None | 6-11 hours |
Uses
Dried vegetables have a unique flavor and texture and are best used as ingredients for soups, stews, casseroles, and sauces rather than stand-alone side dishes. When using in soups, dried vegetables can be added without soaking. Dried vegetables used for other purposes need to be soaked before cooking. To soak, start with 1 12 to 2 cups of boiling water for every 1 cup of dried vegetables. Soak for 1 to 2 hours or until vegetables have returned to nearly the same size they were before dehydrating. Additional water should be added as needed during the soaking process. After soaking, simmer the vegetables in the soaking water until tender, allowing excess water to evaporate.
Drying Herbs
Drying fresh herbs allows your to have a ready supply of economical herbs that are available to use all trough the year. To retain the best flavor of your herbs, it is recommended that you dry them at the lowest temperature setting, 40 - 50^ .
Selection and Preparation
Pick herbs for drying just before the flowers first open. These herbs will be most flavorful. The best time to pick herbs is early morning just after the dew has evaporated. Rinse leaves and stems in cool water to remove any dust or insects and then gently shake to remove excess water. Remove dead and bruised leaves or stems. Large leafed herbs, such as basil, sage and mint, should be removed from their stems for faster drying. Smaller leafed herbs can be left on their stem and removed after drying. Placing the herbs on a mesh screen will help prevent them from falling through the grates in the tray as they dehydrate.
Determining Dryness
Herbs are acceptably dry when they are crispy and crumble easily. Refer to the Herb Drying Guide below and begin checking the herbs at the beginning of the average drying time range. Remove a few herbs from each dehydrator tray and allow to cool to room temperature. If the herbs do not crumble easily, recheck every hour.
Packaging and storage
Dried leaves are best stored whole and then crumbled when needed. Follow "packaging and storage" information on before pages.
Uses
Most dried herbs are 3 to 4 times stronger than the fresh herbs, therefore when using dried herbs in a recipe that calls for fresh herbs, use 1/4 to 1/3 of the amount called for in the recipe.
| Herb | Average drying time | Herb | Average drying time |
| Basil leaves | 10-15 hours | Mint leaves | 9-14 hours |
| Bay leaves | 5-7 hours | Oregano leaves | 9-12 hours |
| Chives | 9-15 hours | Parsley leaves | 6-8 hours |
| Cilantro leaves | 6-8 hours | Rosemary leaves | 8-12 hours |
| Dill leaves | 3-5 hours | Sage leaves | 12-16 hours |
| Fennel | 3-5 hours | Tarragon leaves | 5-7 hours |
| marjoram | 9-12 hours | Thyme leaves | 4-6 hours |
Cooking meat before dehydrating - After marinating meat strips, place meat strips and liquid marinade into a shallow pan. If no liquid remains, add enough water to cover meat strips. Bring liquid to a boil for 5 minutes.
Remove meat strips from marinade, drain, and then position strips on dehydrator trays. Position strips on dehydrator trays close together, but not overlapping. Dry jerky at 70^ for 4 to 8 hours. See "Determining Dryness" information below.
If you did not cook the meat prior to dehydrating, cook it after, following the instructions below:
Cooking meat after dehydrating - Preheat oven until the internal temperature is 135^ . (For an accurate temperature reading, check with an oven thermometer.)
Remove jerky strips from dehydrator trays and place on a baking sheet close together, but not touching. Heat jerky in preheated oven for 10 minutes. Remove jerky from baking sheet and cool to room temperature.
Packaging and Storage
After cooling, pat jerky with paper toweling to remove any fat droplets which may form on the jerky. Following "Packaging and Storage" information on before pages. Jerky can be stored 1 to 2 months at room temperature. However, to maintain the best flavor and quality, store in the refrigerator or freezer.
Jerky Marinade
1 12 -2 pounds of lean meat
14 cup soy sauce
1 tablespoon Worcestershire sauce
1 teaspoon hickory smoke-flavored salt
12 teaspoon onion powder
14 teaspoon garlic powder
14 teaspoon black pepper
Combine all ingredients in a small bowl and follow "Preparing Jerky from Meat Strips".
Care and Cleaning
- Remove plug from wall outlet before cleaning.
- Wash the dehydrator trays and cover in warm water and a mild detergent or wash in a dishwasher.
If necessary, a soft brush may be used to loosen dried on food particles. Do not use steel wool scouring pads or abrasive cleaners on any of the dehydrator parts.
3. Wipe the dehydrator base with a soft, damp cloth. DO NOT IMMERSE THE DEHYDRATOR BASE IN WATER OR OTHER LIQUID.
The screen which covers the center hub on the dehydrator platform lifts off for cleaning, if needed.
Wash in warm water, dry thoroughly, reposition over hub, and snap in place.
WARRANTY
The warranty period for our products is 2 years, unless otherwise stated, starting from the date of initial purchase or the date of delivery.
If you have any problems or questions, you can easily access our help pages, troubleshooting tips, FAQ, and user manuals on our service site: https://sav.hkopenig.com.
By typing the reference name of your device in the search bar, you can access all available online support, designed to best meet your needs.
If you still cannot find an answer to your question or problem, then click on "Did the answer solve your problem?" This will direct you to the Customer Support Request Form, which you can fill out to validate your request and get help.
WARRANTY CONDITIONS
The warranty covers all failures occurring under normal use, in accordance with the usage and specifications in the user's manual.
This warranty does not apply to packaging or transportation problems during shipment of the product by the owner. It also does not include normal wear and tear of the product, nor maintenance or replacement of consumable parts.
EXCLUSION OF WARRANTY
- Accessories and wearing parts (^*)
- Normal maintenance of the device.
- All breakdowns resulting from improper use (shocks, failure to comply with power supply recommendations, poor conditions of use, etc.), insufficient maintenance or misuse of the device, as well as the use of unsuitable accessories.
- Damage of external origin: fire, water damage, electrical surge, etc.
- Any equipment that has been disassembled, even partially, by persons other than those authorized to do so (notably the user).
- The products whose serial number would be missing, deteriorated or illegible that would not allow its identification.
- The products subjected to leasing, demonstration, or exhibition.
(*) Some parts of your device, called wear parts or consumables, deteriorate with time and frequency of use of your device. This wear and tear are normal but can be accentuated by poor conditions of use or maintenance of your device. These parts are therefore not covered by the warranty.
The accessories supplied with the device are also excluded from the warranty. They cannot be exchanged or refunded. However, some accessories can be purchased directly through our website: https://sav.hkoenig.com/.
ENVIRONMENT
CAUTION:

Do not dispose of this product as it has with other household products. There is a separation of this waste product into communities, you will need to inform
your local authorities about the places where you can return this product. In fact, electrical and electronic products contain hazardous substances that have harmful effects on the environment or human health and should be recycled. The symbol here indicates that electrical and electronic equipment should be chosen carefully, a wheeled waste container is marked with a cross.
Adeva SAS / H.Koenig Europe - 8 rue Marc Seguin - 77290 Mitry Mory - France www.hkoenig.com - sav@hkoenig.com - contact@hkoenig.com - Tél: +33 1 64 67 00 05