USER MANUAL Smart Glass Panel Heater PRINCESS
Smart Glass Panel Heater
01.341500.01.001/01.341501.01.001
01.342000.01.001/01.342001.01.001
PRINCESS
PARTS DESCRIPTION
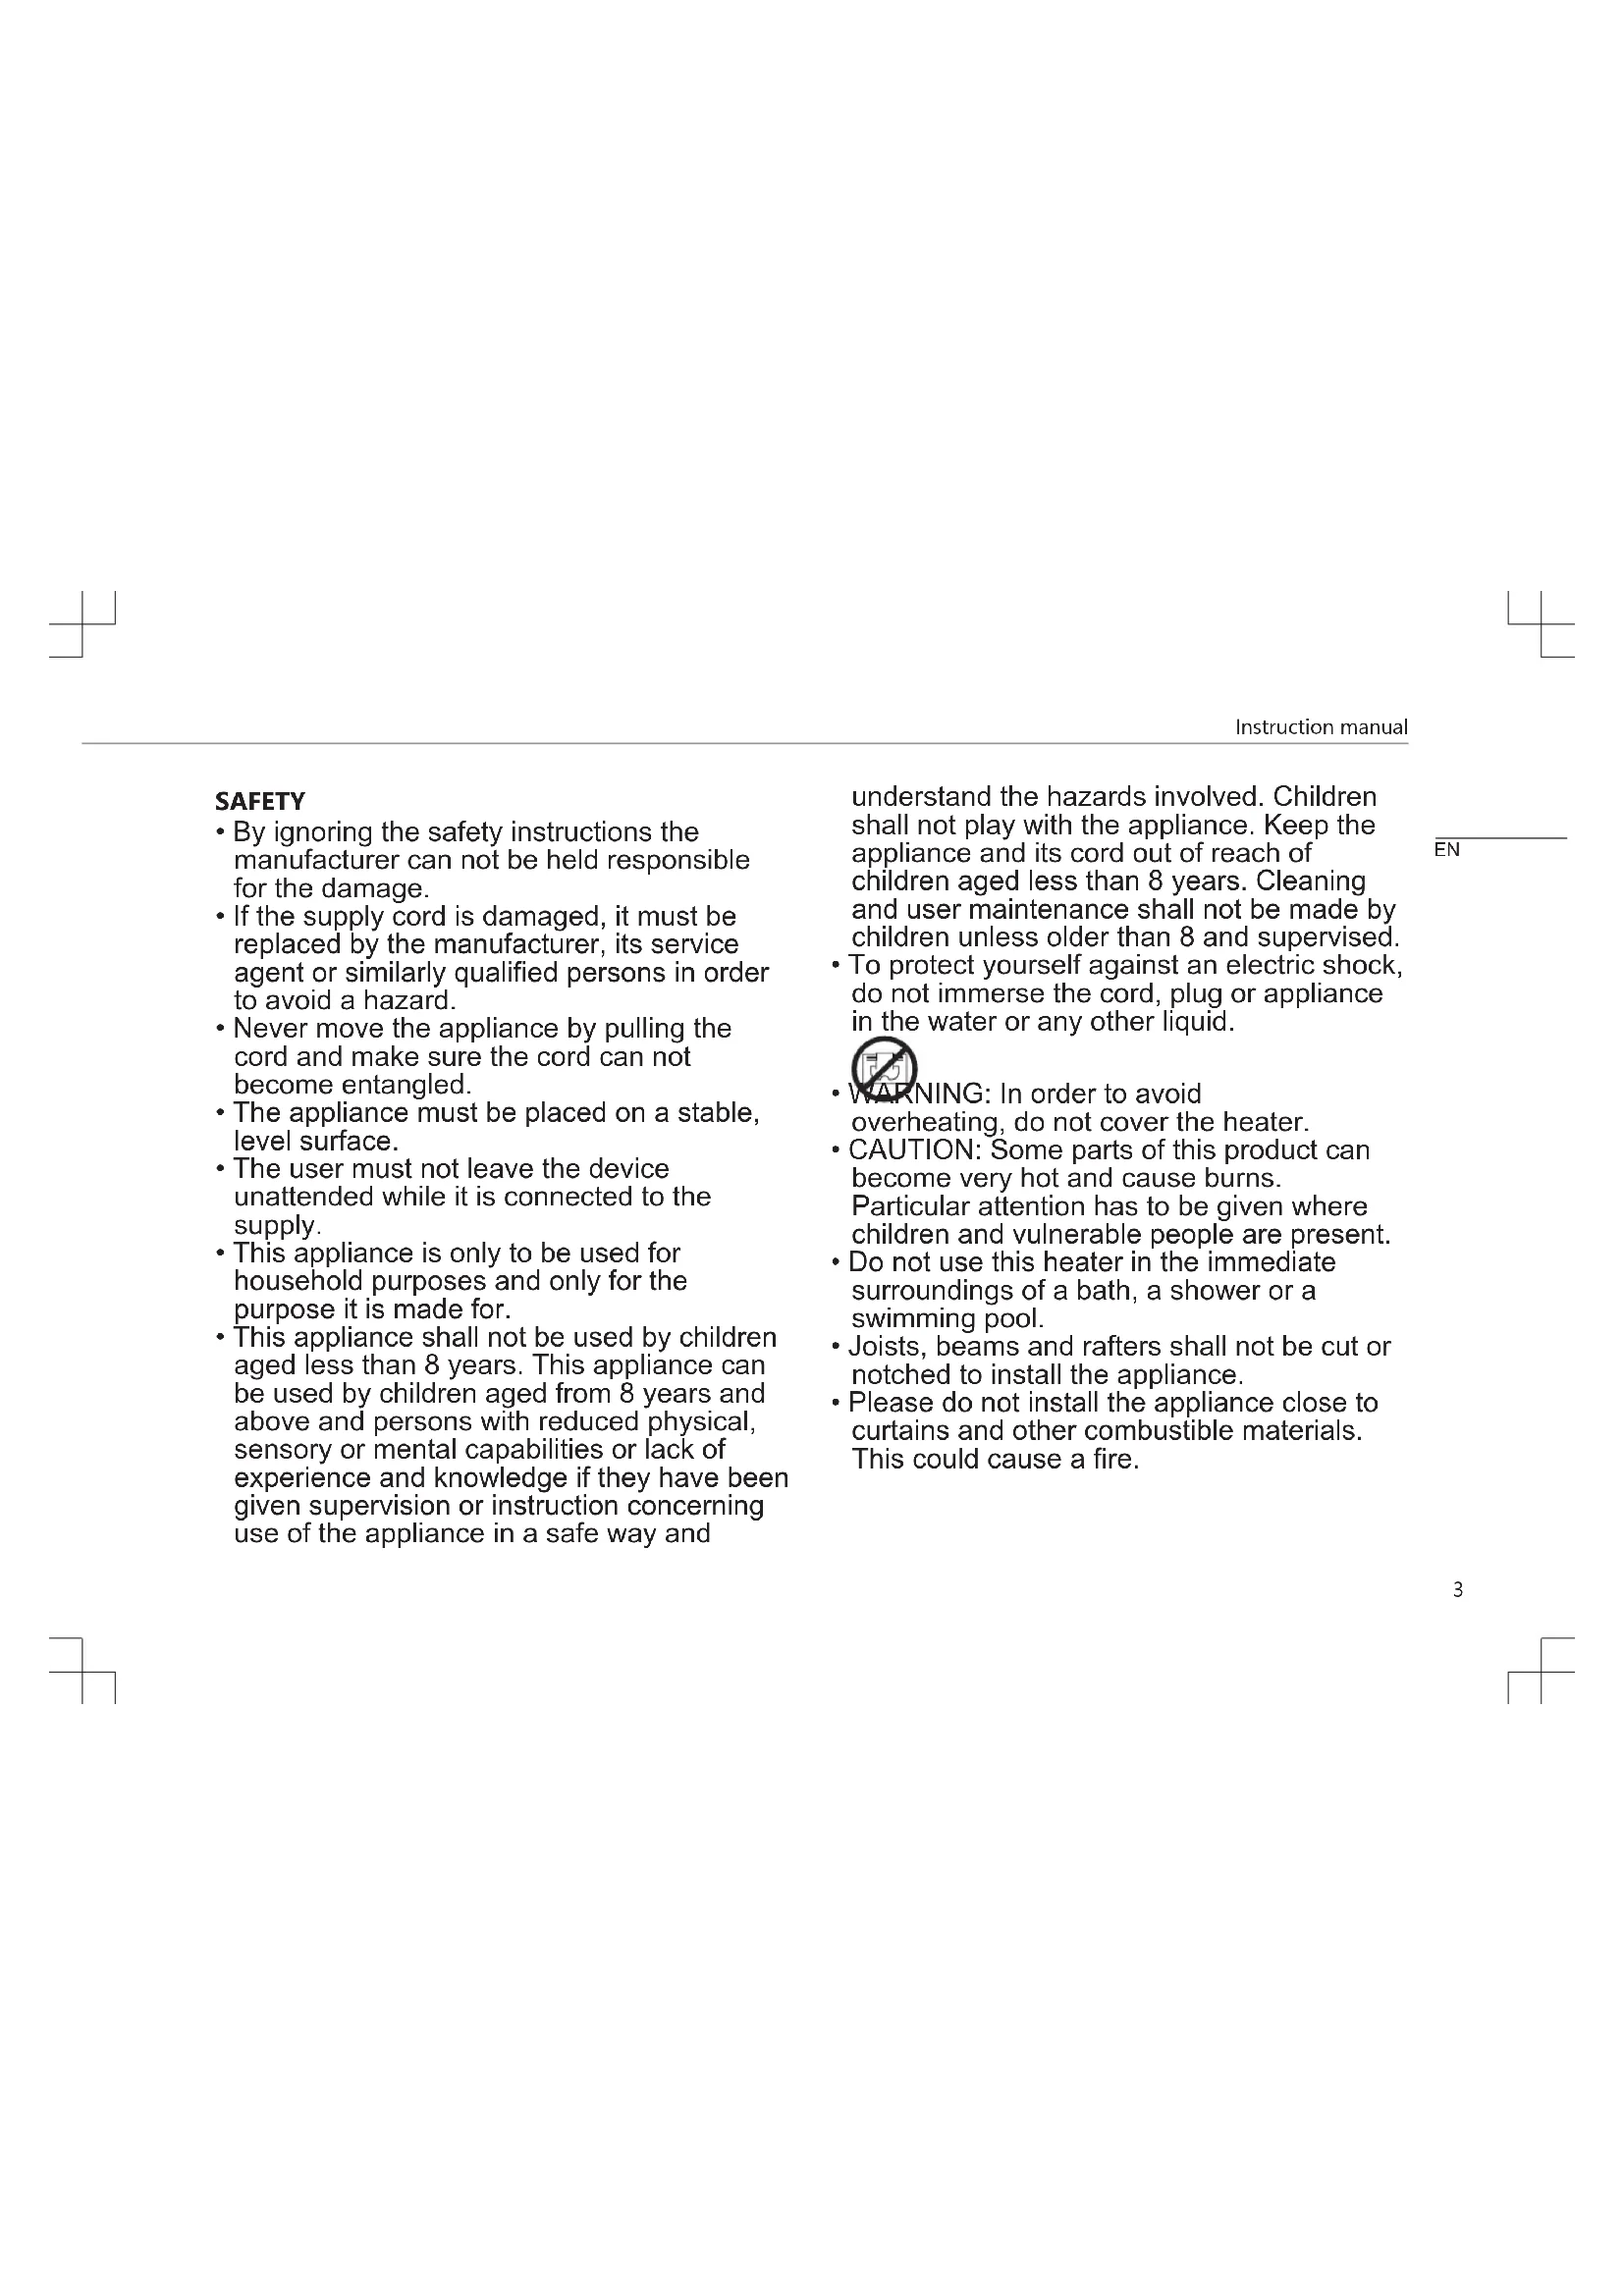
SAFETY
- By ignoring the safety instructions the manufacturer can not be held responsible for the damage.
- If the supply cord is damaged, it must be replaced by the manufacturer, its service agent or similarly qualified persons in order to avoid a hazard.
- Never move the appliance by pulling the cord and make sure the cord can not become entangled.
- The appliance must be placed on a stable, level surface.
- The user must not leave the device unattended while it is connected to the supply.
- This appliance is only to be used for household purposes and only for the purpose it is made for.
- This appliance shall not be used by children aged less than 8 years. This appliance can be used by children aged from 8 years and above and persons with reduced physical, sensory or mental capabilities or lack of experience and knowledge if they have been given supervision or instruction concerning use of the appliance in a safe way and
understand the hazards involved. Children shall not play with the appliance. Keep the appliance and its cord out of reach of children aged less than 8 years. Cleaning and user maintenance shall not be made by children unless older than 8 and supervised.
- To protect yourself against an electric shock, do not immerse the cord, plug or appliance in the water or any other liquid.

WARNING: In order to avoid overheating, do not cover the heater.
- CAUTION: Some parts of this product can become very hot and cause burns. Particular attention has to be given where children and vulnerable people are present.
- Do not use this heater in the immediate surroundings of a bath, a shower or a swimming pool.
- Joists, beams and rafters shall not be cut or notched to install the appliance.
- Please do not install the appliance close to curtains and other combustible materials. This could cause a fire.
Instruction manual
- The appliance shall, under no circumstances, be covered with insulating material or similar material.
- The heater must not be located immediately below a socket-outlet.
- Do not use this heater if it has been dropped.
- Do not use if there are visible signs of damage to the heater.
- Use this heater on a horizontal and stable surface, or fix it to the wall, as applicable.
- WARNING: Do not use this heater in small rooms when they are occupied by persons not capable of leaving the room on their own, unless constant supervision is provided.
- WARNING: To reduce the risk of fire, keep textiles, curtain, or any other flammable material a minimum distance of 1m from the air outlet.
- The heater needs to be installed so that the switches and other controls cannot be touched by a person in the bath or shower.
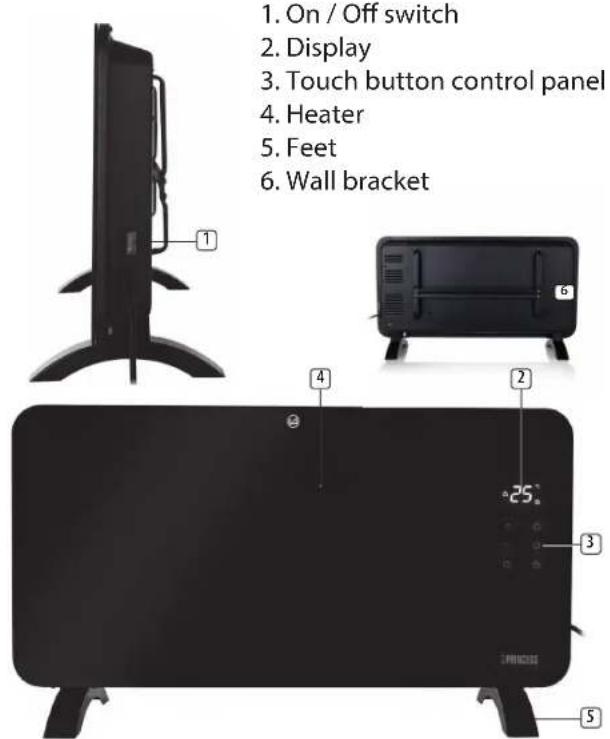
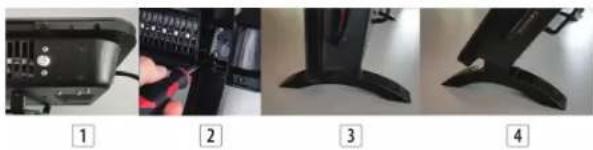
PARTS DESCRIPTION
- On/Off switch
- Display
- Touch button control panel
- Heater
- Feet
- Wall bracket
INSTALLATION
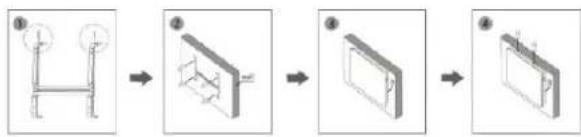
Before using the heater, the feet must be fitted to the unit. (image 1)
These are to be attached to the base of the heater using the 8 ST12x4mm screws provided. (image 2)
- Take care to ensure that the feet are located correctly on the bottom end of the heater.
- The heater should stand vertically once the feet are installed (image 3). If the heater tilts backwards then please remove the feet and rotate them before fitting again. (image 4)
Wall mounting
- Please note that the product must be installed at least 15cm from the floor and 50~cm from the ceiling.
- First install the bracket with the provided screws. (image 1)
- Drill the holes in the wall on each side, then insert the plastic expanded plugs and fix the bracket in the wall with the screws provided. (image 2)
- Place the heater in a suitable position and ensure that the holes are aligned with the bracket. (image 3)
- Tighten the screws on top of the bracket. (image 4)
BEFORE THE FIRST USE
- Place the device on a flat stable surface and ensure a minimum of 10cm free space around the device. This device is not suitable for installation in a cabinet or for outside use.
- Put the power cable into the socket. (Note: Make sure the voltage which is indicated on the device matches the local voltage before connecting the device. Voltage 220V-240V 50/60Hz)
- When the device is turned on for the first time, a slight odour will occur. This is normal, ensure adequate ventilation. This fragrance is only temporary and will disappear soon.
- During heating up and cooling down there may be some noises caused by the heater casing expanding and contracting, this is normal and does not indicate any fault.

Instruction manual
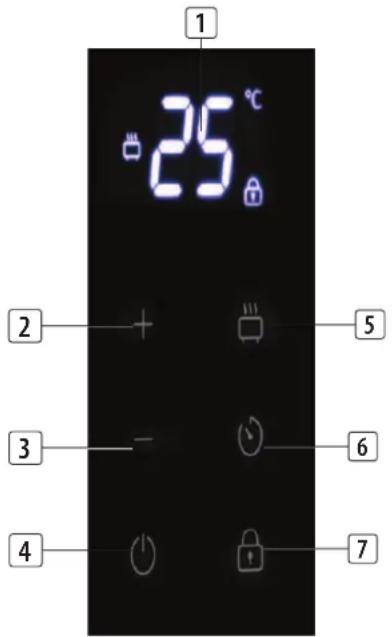
DISPLAY/TOUCH BUTTON FUNCTIONS
| 1 Display |
| 2 Temperature "+" button |
| 3 Temperature "-" button |
| 4 Power button |
| 5 Mode button |
| 6 Timer button |
| 7 Child lock button |
USE
- Push the On/Off switch on the side of the heater to turn the heater on.
- Press the power touch button to set the functions. The display will show what function is active.
- Use the mode button to adjust to low or high power. The upper symbol on the display is for high power, the lower one indicates the low power setting.
- Press 'temperature up (+)' or 'temperature down (-)' buttons to regulate the temperature you desired. The temperature can be set between 15^ and 35^ .
- Press the timer button to select the desired range between 1 hour to 24 hours. The set time will disappear after a few seconds.
- To enable the child lock HOLD down the lock button for 5 seconds and the lock symbol will appear on the display.
- To disable the child lock HOLD the lock button again for 5 seconds and the lock symbol will disappear.
-
The child lock can be overridden by unplugging the heater or by switching it off using the main ON/OFF switch on the side of the device.
-
Once the child lock is active you cannot operate any of the heater touch functions.
TIP-OVER PROTECTION
- Should the heater be tipped over during use then the heater will automatically turn off.
- If the unit has been tipped over then it cannot be turned on from the Climate app or via a smart speaker.
- To reset the unit, place it upright on a stable surface and the heater will automatically power on and connect to WiFi if previously setup. In around 2 minutes the device will be ready to be controlled via the app or smart speaker again.
- If the child lock is active then voice control from a smart speaker will be disabled. You would need to disable the child lock to enable voice control.
- WARNING: Ensure the device cannot be operated by unsupervised persons.

USING THE HEATER WITH CLIMATE APP
- The heater can be used manually with its built-in controls or you can use a smart phone or smart speaker to control it. Before you begin, ensure the Homewizard Climate app is downloaded. The Homewizard Climate app is available on Android and iOS.
Pair your heater to HomeWizard Climate app
Make sure your heater is powered.
- Open HomeWizard Climate APP.
- Create an account or if you already have a HomeWizard account, please log in using those details.
- Click "Add new Climate Device" to add a new device.
- Select the device you wanted to connect.
- Follow the instructions on the app to connect the heater.
- To control your device with voice using a smart speaker please refer to the manufacturer's instructions on how to enable a skill through your device.
Technical Specification
| Details 341500/1 3420 | 00/1 | |
| Voltage 220-240V 220 | -240V | |
| Frequency 50/60Hz 50 | 60Hz | |
| Power 750/1500W 100 | 0/2000W | |
| IP Code IP24 IP24 | | |
CLEANING AND MAINTENANCE
- Before cleaning, unplug the appliance and wait for the appliance to cool down.
- Clean the appliance with a damp cloth. Never use harsh and abrasive cleaners, scouring pad or steel wool, which damages the device.
- Clean the two air outlets (above and below) by using a vacuum cleaner to remove dust from inside.

Instruction manual
- Hereby, Smartwares Europe declares that the radio equipment type 341500 / 341501 / 342000 / 342001 are in compliance with Directive 2014/53/EU
- The full text of the EU declaration of conformity is available at the following internet address: www.princesshome.eu/doc
ENVIRONMENT

This appliance should not be put into the domestic garbage at
the end of its durability, but must be offered at a central point for the recycling of electric and electronic domestic appliances. This symbol on the appliance, instruction manual and packaging puts your attention to this important issue. The materials used in this appliance can be recycled. By recycling of used domestic appliances you contribute an important push to the protection of our environment. Ask your local authorities for information regarding the point of recollection.
Support
You can find all available information and spare parts at www.princesshome.eu!
VEILIGHEID
Specifications techniques
| Détails 341500/1 342000/1 | |
| Tension 220-240 V 220-240 V | |
| Fréquence 50/60 Hz 50/60 Hz | |
| Puisance 750/1500 W 1000/2000 W | |
| Code IP IP24 IP24 | |
NETTOYAGE ET ENTRETIEN
BARNLÁS OCH SMART HÖGTALARE
ANVANDA VARMAREN MED CLIMATE-APPEN
KORZYSTANIE Z NAGRZEWNICY Z APLIKACJA CLIMATE APP

Climate
OVLADANI OHRIVACE POMOCI APLIKACE CLIMATE
MEPbI PEPDOCTOPOXHOCTN
-ПОНЗВОДИТЕЛБ He HecET OTBETCTBEHHOCHTN 3a yuEp6 B cnyuae HecO6JIHODeHnЯ npaBNJ TExHnKn 6e3OnaCHOCTN.
Bo n36ekahne onacbix cnTyauin dIyra 3aMeHbI NOBpeKdeHHoro KaBeJI NITAHn peKOMeHdyETcO6paNTbcr K npOn3BOIDTeIO,ero cepBnCHOMy aReHTy IIN dpYrIM DOCTaTOUHO
KBaIINOpUPOBaHHbIM CNeUaJIncTaM.
He nepemeeuane yctpoinCTBO, B3aBwnnc 3a Ka6eIb nITaHnA, a TaKKe CneIte 3a TeM, UTo6bl Ka6eJIb He nepeKpyuHbIcra.
- YCTaHOBnTe yCTpoNCTBO Ha yCTOuHBOIPOBHOI NOBepXHOCTN.
He octabJrTe NOdkHoueHHoe K NCTOCHKy nHTAHN yCTpOcTBO 6e3 npncmOTpa.
JaHHoe yCTPOINCTBO npeHa3HaeHo TOJbKO IINIOJIb3OBAHN B 6blTOBbIX ycNOBnX IN TOJbKO NO Ha3HaeHIO.
JaHHOyCTPOINCTBO He npEHa3NaueHo InI
NcNoJb3OBAHNA DeTBM N BO3pacte Do 8
JIET. JaHHOyCTPOINCTBO MOXET
NcNoJb3OBAtBCa DeTBM N BO3pacte OT 8
JIET N JIODbM C OrpaHueHHbIMN
fN3UHeCKIMN, CeHCOPHBIMN
YMCTBeHHbIMN CnocO6HOCTaM NJIHN He
IMeOuIMN COOTBeTCTBHyIOUeRO ONbITa INI
3HaHn, TOIbKO npY yCNOBUN, YTO 3a IN
DeiCTBnAMN OCyUeCTBnRETCK KOHTPOJb
INI OHN 3HaKOMbIC TexHnKO 6e3OpacHO
3KcNpyatauny cTpojCTBa,a TaKKe
NoHMAOT CBra3aHHbE C 3TmPnCKn. He
No3BOJnTe DeTAm IrpaTb C yCTpOChBOM.
XpaHnTE yCTpojCTBO n erO shyp
3NeKTponNTAHn B MeCe, HeoCTyNHOM
DnA DetEn MnaDiwe 8 Net. OunchKa n
06cnxkBaHne yCTpojCTBa MoXeT
npoBOIDtbcr DeTbMn TOJIbKO Nocne
IOCTNXeHn IMN BO3pacta 8 Net INI NOd
npncMOTpOM B3pocNbIX.
-Bo n36exahanie npaxeHnna 3neKtpnuecknM TOKOM He norgykaite shyp 3neKtponntaHnna, wTeNceJIb nn yCTpoIcTBo B BOdy nIN JIO6yIO dpyryIO KNDKOCTb.
- ПЕДУПЕЖDEHNE: He NaKpbIbAte o6orpeBaTeIb BO n36eXaHne ero neperpeBa.
BHIMAHHE! HeKoTOpBie KOMNoHEnTbI HAcToaero npOdykTa CNJbHO HarpeBaOTcra NMOyT npNBecTu K OXOrAm. Heo6xOdmo yDeJIaTb OC6oe BHIMAHNE npN 3Kcnnyatauyn yCTpOuCTBa B MeCTax, B
③ PRINCESS
KOTOpbIX HAXOJrTcR DeTn NIN JIOIN C ORpaHueHHbIMN yMCTBeHHbIMN BO3MOXHOCTaMn.
3anpeaetcraKcnnyatnpoBaTa HarpeBaTeJIb B HenocpeDCTBeHHOJ 6n30ctn OT BaHH, dyweBix Ka6Hn nn 6accenHOB.
-ДяуctaHOBKNyCTPOYCTBA3anpeuaeTcA
ДетаТыглбеленьБанкax,
пекладинхИп nonepeunHax.
3anpeaetcyaTaHaABnBaTb yCTpOInCTBO B HenocpeDCTBeHHo6IIN30CTN OT WTOP IN pyrHx ropUOnx MaTePuaNoB. 3To MoKeT npNBecTN K NOXapy.
-ПокрьВаТь yСТРОДСТВ ИЗЛЯЦИНHBIM IJIH aHaIOrNHyHbIM MaTePnAION MCTPORO 3aIpeSeHo.
3anpeaetcyaCTaHaBnBaTb 6oRpeBaTeJIb HenocpeIcTBeHNO IO p03eKoJ 3neKtpocTeN.
3anpeaaetcncnojbs0BaTbHarpebaTeB nocne ero naeHn.
3anpeaaetcnaonb3oBaTbHarpeBaTeJIb C BnIMMbIMCJedamNIOBpeKdHn.
- YctaHOBNTe HArpeBaTeJIb Ha TOpu3OHTaJIbHOJ yCToUHBOJ NOBepXHOCTN IIN 3aKpeIInTe eTo HA cTeHe C co6JIIODeHNEM INHcTpyKcII NO yCTaHOBKe.
- INPEДУПЕХДЕH涅E: 3anpeшаetc6e3 NOCTOЯHHOrO npICMOTpa HcNoJb3OBaTb DaHbI OobPeBaTeNb B He6oNbUHX NOMeUeHnIX, ecINB HNX HaxOJaTcRJIIOuN, KOtOpbIe He MOryT NOKHyTb INx 6e3 NOCTOPOHHe NOMOuN.
- INPEДУПЕЖДEHNE: Дя снжспя риcka BO3ROPаня CO6JIIODAЯTe DCtAHцИн He MeHee 1 MeTp a MexIy OTBepCTHm ДЯ BbIpyCKa BO3dYxa I TKaHЯM, WTopaMn I DpyrIMN BOCJIЯMaHЯReMbIM MaTePnaJaAM.
- O6orpeBaTeIb DoJIKeH yCTaHaBJIbBaTbcra TaK, TTObblBkIOuAteIb n Dpyrne 3NeMeHTbl ynpabBHeHryCtpoiCTBOM 6bln HeOcraeMbI N3 BaHHbI IIN dywa.
ONICAHNE KOMNOHEHTOB
- CeTeBaKhONka
2.Диспел徳
- KoHTPOJIbHaI naHEnb C ceHCOPbIMKHOIIKaMn
4.06orpeBaTeB
- OnopHbIe nOCTaBKn
- HacteHHaCKoBa
YCTAHOBKA
C6opKa onOpHbIX nOcTaBOK
- Ppei nCnOJIb 30BaHHeM O6OrpeBaTeIa Tpe6yETc npncoeDHHtB K HeMy OnOpHbIe NoCTaBKn. (Pnc.1)
- PnncoeHHNEIe NOCTABKN K OCHOBAHNO 06OrpeBaTeJIc NMOUbO 8 BnHTOB 12x4MMN3KOMNIKeKTa.(Pnc.2)
OnopHbIe NOCTabK DOnJXHbI bbl npaBnIbHO paCNOJKeHbHa HxHHe qACTNoObrpeBaTeJI.
Iocne yctahOBKn noCTabOK oBorpeBaTeNb doJnKeH pacnonaraTbca BepTKaJIbHO (Pnc.3).EcInoBorpeBaTeN hAKNoHReTc H3aD (Pnc.4).CHIMITE onOpHbIe NOCTABKN, NOBepHnTe IN n CHOBA 3akpenite Ha yctpoCTBe.
HacteHHoe KpenneHne
- 06paTne BHHMaHHe: ycTpoIcTBo HeOxOIMo pa3MeaTaB hapacTOrAHn He Mehee 15 cm OT nona n 50 cm do notonka.
BCTaBBTe npnnaHouuieCBAHTbB OOnOpHyO Cko6y(Pnc.1).
- PpocBepnTe OTBepcTne B CTeHe C KaXdoN CTopoHbI, 3aTeM BCTaBbTe PIIactNKOBbIe pacuINPteJbHbIe 3aRyUKN I npKpePiTE cKOBy K CTeHe C NOMOuBo I npInaraoUHXC BHTOB (Pnc.2).
- YctaHOBtE o6oRpeBaTeIb TaK, YTo6bl OTBepCTncoBnadJIn CoCKo60i (Pnc.3).
3aKpyTne BnHTbHa BePxHaeYacTn Cko6bI(Pnc.4).
NEPEDHAUJOMNCIOJIb3OBAHNA
- YctaHOBnTE yCTPOINCTBO Ha POBHyIO yCTOINHBYIO NOBepXnOCTb TAK, YTO6bl BOKpyr Hrero 6blNO He MeHee 10 cm CBO6oHOro npoctpaHCTBa.3To yCTPOINCTBO He npedHa3NaHcHo NDy YCTAHOBKn B WkApaX N DnN UcONb3OBAHn HA OTKpbITOM BO3DyXe.
Iopdknoute HHPNTAHN KpO3eTke.(PpMueaHne. 86dntecb,yTO HApRKeHHe, yKa3aHHoe HaycToHCTBe (220- 240B,50/60ΓU),ncTeBoe HApRKeHHe coBnaHaOT.)
- Pn nepBOM BKNIOHEny yCTPONCTBa NOBNTc HExapakTePbH 3anax.3TO He ABnEeTc HEnCnpaBHOCTbO.ObecneYbTe HaNEXKaUy BeHTINLmIO.3To apomat CKopo NcHe3HeT.
- PnHarpBeBaHN IN OxnaKeHmOBorpeBaTeN MoKETnDaBaTb pa3nHbIe 3ByKn. OH Nbl3BaHbI paCWhpeHHeM n CKaTNEm Kopnyca o6OrpeBaTeN; 3TO HopMaIbHO H He ABnEeTcR npn3HaKOM KAKOR-Nn6o DeFeKtA.
③ PRINCESS

ФУHKUIN CEHCOPHbIX KHOJOK I DUNCJIER
IIO nCTeueHn CpOa CnyKbI He BkMdbBaIte DaHHOE
yctpoCTBO C 6bIb0BIMN OTXoAMn. BmecTo 3TOrO erO Heo6xOIMOCaTb B cHTpaBbHbI pyHKT nepepabOTK 3neKTPueecknx ININ3NEKTOPHbIX 6bITOBIX pnp6OpOB. Ha 3TOT BaxKnbl MOMENTyka3bBAe T dHaNNc CMBON, IcNoJIb3yeMbI Ha yctpoCTBE, BYPKOBODCTBE NO 3KcPnlyaTuIN H aynakOBKe. IcNoJIb3yeMbIE BdaHOM yctpoCTBE MaTePAIbnIbIOJNkT BTOpHNOpepabOTke.CnocO6CTByA BTOpHNOpepABOTKE 6bITOBIX pnp6OpOB, BBI BHOCTe OrpOMHBI BKlad B 3aunITy OKpyKaIOUeI cpebl.IHΦOPMAUIO O 6bnKaiIeM NYPHTe C6opa TaKHX pnp6OpOB MOKHOyHaTB oprAHAX MecTHORO CAMOYNpABNeHn.
Iopndepkka
BcnoctynnaHnHOpmauN CBeHeHnO 3aunactx npBedeHbHa Be6-caTe www.princesshome.eu!


This product is only suitable for well insulated spaces or occasional use.
Max. radio-frequency power: 17.30dBm

Copyright 2019