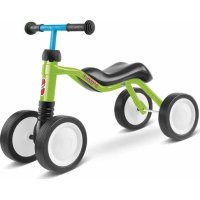
CAT 1 S - Tricycle Puky - Free user manual and instructions
Find the device manual for free CAT 1 S Puky in PDF.
| Product type | Children's tricycle |
| Brand | Puky |
| Model | CAT 1 S |
| Maximum load | 25 kg |
| Main features | Tricycle with tipping bucket, removable push handle, adjustable handlebar, height-adjustable saddle, disengageable freewheel (for pedaling). |
| Care and cleaning | Clean with a soft cloth and soapy water. Do not use a pressure washer. Regularly check for wear and tighten screws. |
| Safety | Use under adult supervision. Do not use on public roads. Wear closed-toe shoes. Maximum load 25 kg. Use original spare parts. |
| Spare parts and repairability | Wear parts: wheels, crank bearing, brake, brake caps. Replace with original PUKY parts. Contact a specialized dealer for repairs. |
| General information | CE marking according to directive 2009/48/EC. Type plate under the rear of the frame. |
Frequently Asked Questions - CAT 1 S Puky
User questions about CAT 1 S Puky
0 question about this device. Answer the ones you know or ask your own.
Ask a new question about this device
Download the instructions for your Tricycle in PDF format for free! Find your manual CAT 1 S - Puky and take your electronic device back in hand. On this page are published all the documents necessary for the use of your device. CAT 1 S by Puky.
USER MANUAL CAT 1 S Puky
Please read carefully before use of the tricycle and retain in for further use.
IpeepHaayanom HcnoJb3OBAHn
Tpexkonechoro BENOCINEDA BHIMaTeIbHO npOHTne I O63aTeIbHO COxpaHInTe pyKOBOdCTBO.
Congratulations on purchasing this PUKY tricycle. You've picked a quality product that you're sure to enjoy.
This manual contains information on how to safely use and care for your tricycle. Read this manual carefully before use and hold onto it for future reference. In case of questions or problems, please contact your specialized dealer or contact us on the web:
www.puky.net.
Parental responsibility
When the product is used as intended, there are basically no hazards involved in playing with the tricycle. However, keep in mind that because of the energy level and temperament of children and young people, unforeseeable situations and dangers can arise for which the manufacturer cannot be held liable.
Teach children and young people how to properly handle the tricycle.
Supervise them and alert them to any possible dangers.
Place of use
Only use the tricycle in a suitable, secure play area and protected space (i.e. playground.) This vehicle does not comply with the StVZO (German road traffic regulations) and may not be used in street traffic. The maximum approved load is 25kg .
User instructions
Closed shoes are required. The tricycle may not be ridden in the vicinity of stairs, steep terrain, swimming pools or other bodies of water. Any stairs in the area should be secured such that there is no way for children to ride up or down them on the tricycle.
Before allowing children to play with the tricycle, always completely remove the push bar and the footrest (only CAT 1SP.)
The product is subject to the law on liability for material defects. Damage resulting from excessive loads, trauma, inadequate maintenance or through normal wear are excluded from liability.
CE certification
The tricycle conforms to the requirements of the European guideline 2009/48/EG on the safety of toys and is marked with a CE label.
Nameplate
The nameplate is affixed beneath the rear frame. Use the vehicle ID card at the end of this instruction manual to write down the information from the nameplate so that you can have it readily available in case you have questions or wish to order spare parts.
Maintenance and care
Before using, check all parts for wear and ensure that all screw connections are properly tightened. Self-locking hexagon nuts do not move freely and must be replaced once completely removed!
To maintain the high standard of design safety, any worn or defective parts must be replaced immediately with PUKY original spare parts. For safety reasons, the vehicle should not be used until it is repaired. Do not attempt to straighten any bend parts but have them replaced.
Wear parts: wheels, pedal bearings, brakes, brake caps.
The tricycle should not be cleaned with a high-pressure cleaner. Clean the tricycle with a light soapy solution and then carefully wipe the whole thing dry with a soft cloth. Keep corrosive materials (road salt, seawater, fertilizer) away from the tricycle. The tricycle should not be stored in a humid area.
Unpacking and scope of delivery
Do not use any sharp objects to open the packaging or remove protective material. You might accidentally damage the paint or parts of the tricycle.
Take all the parts out of the packaging.
- Remove the protective material. Keep all packaging material out of the reach of children; there is a risk of suffocation.
Check that no parts are missing or damaged. In case anything is missing, please contact your specialized dealer before starting any further work.
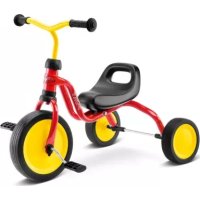
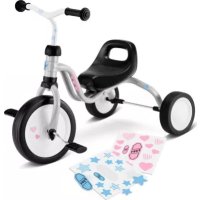
The delivery comprises (Figure A):
- Frame
- Fork, incl. front wheel and foot pedals
- Handlebars
- Seat, incl. screw connection
- Rear axle with wheels
- Push bar tube
- Push bar grip
- Tipper
9.Shovel (only CAT 1SP) - Mesh insert with netting (only CAT 1SP)
- Footrest (only CAT 1SP)
Assembly
For assembly instructions, refer to the last pages of this manual.
For assembly, you will need the following tools (Figure B):
- Open end wrench, 10mm
- Allen wrench, 5mm
- Screw driver (slotted)
Small parts required during assembly (for example screws and washers) should be kept out of reach of small children. There is a risk of suffocation if swallowed.
Assembly must be done carefully by an adult to prevent accidents or injuries later on. Make sure to take enough time for this. Some assembly work requires manual dexterity and familiarity with tools (i.e. wrenches.) If you are not sure, please refer to your specialized dealer or a workshop.
In some places, screws need to be tightened with a specific torque. This torque is given in newton meters (i.e. 2 Nm.) If a screw is tightened with insufficient torque, the connection may be too loose and unsafe. If the torque is too great, screws and other parts can be damaged or destroyed.
Figure 1: Remove screws and insert rear axle into frame
Align square nuts facing backwards.
Figure 2: Put screws in place and tighten.
Figure 3: Remove transport restraint (rubber band) and take off the washer.
Figure 4: Push fork shaft through the steering head tube until the stop. Put the washer back on.
Align the nibs on the fork shaft to face backwards.
Figure 5: Push the handlebars onto the fork shaft until the stop and tighten screw. Next, push the spherical cap down until it snaps into place.
Align the slot on the steering shaft to face backwards.
Figure 6: Remove both screws from the seat holder
Figure 7: Put on the seat and fasten it with screws.
Figure 8: Assemble push bar tube, grip and shovel (only CAT 1SP.)
Figure 9: Insert push bar into the seat holder and lock in.
Make sure that the catch (spring) snaps in correctly.
Figure 10: Push trough onto rear axle until it snaps into place.
Figure 11: (only CAT 1SP) Affix netting on trough and use it to fasten the mesh insert.
Figure 12: (only CAT 1SP) Pull the attached belt first through the footrest and then through the belt latch.
Figure 13: (only CAT 1SP) Stick the footrest onto the pedals and attached the belt on the frame.
When using the footrest, the freewheel hub must be switched on (pull catch ring away from the rim.)
Operation
Figure 14: Disable the freewheel hub so that the child can pedal by him/herself. To do this, press the catch ring against the rim until it snaps into place. Slightly turn the pedal to make it easier to snap the catch ring into place.
Figure 15: Turn the knob 90^ to enable or disable the steering lock.
Figure 16: The seat position can be continuously adjusted by slightly loosening the screw connection.
Afterwards, twist the screw connection back on and tighten sufficiently.
Figure 17: Set the height of the push bar by pressing the catch (spring.)
Make sure that the catch (spring) snaps back in correctly.
Figure 18: To remove the push bar: unscrew the safety lever, push the catch (spring) and pull the bar out.
Figure 19: (only CAT 1 SP) The net can be removed by pulling it out of the clip on the trough.
Figure 20: (only CAT 1SP) To use the shovel, pull the push bar apart, and snap on the shovel.
Inleiding
Pnc.6:OTBnHTtB DBA 6OJTa n3 OCHOBb IJIa CnDEHb.
Pnc.7:YcTaHOBnTB CnIeHbe N 3aKpyTnTb 6oJIbl.
Pnc.8: CoeHNHTb Tpy6Kn pOuTeNbCKo pyuKn, pyuKu nIOnaToUHbI NOTOK (TOnbKO dnnCAT 1 SP).
Pnc.9: Tpy6ky poNTeNbcko pyKu BCTaBnTb B OCHOBAHne CnDeHbN 3aΦNKcnpoBaTb. O6paNTe BHMaHne Ha npabNBHyU yCTaHOBky nΦHKcaUNO CTOnopa (nyxHHbl).
Pnc.10:YCTaHOBtB K3OB Ha 3aHIO OcB IV6eIITbcra B TOM, YTO OHa 3aФИКсИрОВанacb.
Pnc.11:TOIbKO CAT 1SP)UcTaHOBnTb cet- cyTuHnKaNkYHa 6BaraXHyo KOp3nHy, UTo6bl 3aΦnKcnpoBaTb HacAnky-CnTO.
Pnc.12:TOJbKO CAT 1SP)IpoTMyTb npnlaeraembi peMeHb cHaana chepe3 noDHOxKky, a 3aTeM chepe3 peMeHHbte 3aMKn.
Pnc.13: (ToIbKO CAT 1SP) UcTaHOBnTb NOHOKy Ha waTyH n 3aKpeNtB peMHn Ha pame.
Pn nCnoB3OBAHm NOHOxKn CneNyet aKTHBnPOBaTb peXm CBO6oHOrO XoJa (OTKaTb cTOnOpHoe KOJc0 OT o6oJa).
YnpaBJeHne
Pnc.14: DeakTNBupOBaTb peKIM CBO6oHoro XOda, YTO6bl MaIbIIM Mor cAm KpyTNTb neJaIN: dNIA 3TORo Heo6XoIMo HaIaBnTB Ha CTOpOpHoe KOJIbU O No HApabNeHHo K O6Oky Noka OH He 3aueJKNHeTcR. PeKOMeHNyETcR cnerKa NOBepHyTb WAtyH, YTO 06nErHT 3aueJKNBaHne.
Pnc.15:ДЯakTNBnPOBaHnIydeakTNBnPOBAHnCTOnopa pyneBOrO ynpaBJIeHnI Heo6xoDIMO NOBOPaHBaTb Ha 90^ NOBOPOTHyO pykoTky.
Pnc.16:IonoKeHnCnDeHbMaOxHO 6ecCTyneHuato peryNipoBaTb, nna Yero Tpe6yetc H6oBhoe ocna6JeHne KpeNHeHH.
Iocne perynnpOBKn 6oNTbI BHOBc cneayet NaedKHO 3akpyTntb.
Pnc.17:OtperynnpoBaTbNo BbICote Tpy6ky poNTeJIbCKo pyuKn NyTeM HaxaTna Ha CTo-nop (npyKnHy).
06paTte BnMaHne Ha Bo3BpaT cToNopa (npyHNbI) B npaBnIbHOe NIOXKeHne C 3aueKnBaHneM.
Pnc.18: ChTne Tpy6Kn pOINTeJIbCKo pyKn: Ocna6ntb fHKcnpyHouu npBvur, HaxaTb Ha cTOnop (pnyKInHy) n BbHvTy Tpy6Ky.
Pnc.19:TOJIbKO DnA CAT 1 SP) CeTky MoKHO CHaTb,OCB6oDnB ee ot 3axmOB 6araXHOJ KOp3HbI.
Pnc.20: (TOnbKO dIg CAT 1 SP) IJIg nC- NOIb3OBAHnI IOnaTHORo IOTka Heo6XoIMO OTcoEiINHTb Yactn Tpy6Kn OT poNITeBCKoI pyuKn I Nocne 3TOrO 3aΦHKcnpOBaTb IOTOK Ha yKopoueHHo Tpy6Ke.
适用本手册的质保申明及法定保修条款。
Please complete the identification plate on the cycle passport page. The PUKY identification plate is fitted to the vehicles as shown in the drawings below and must be noted down for ordering replacement parts from your dealer.