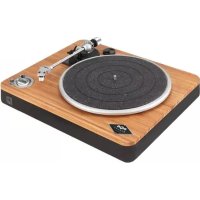
Stir It Up Wireless - Turntable HOUSE OF MARLEY - Free user manual and instructions
Find the device manual for free Stir It Up Wireless HOUSE OF MARLEY in PDF.



User questions about Stir It Up Wireless HOUSE OF MARLEY
0 question about this device. Answer the ones you know or ask your own.
Ask a new question about this device
Download the instructions for your Turntable in PDF format for free! Find your manual Stir It Up Wireless - HOUSE OF MARLEY and take your electronic device back in hand. On this page are published all the documents necessary for the use of your device. Stir It Up Wireless by HOUSE OF MARLEY.
USER MANUAL Stir It Up Wireless HOUSE OF MARLEY
natural_image
Abstract black geometric logo design with interlocking shapes (no text or symbols)MARLEY
STIR IT UP TURNTABLE RECORD PLAYER INSTRUCTIONS
Welcome to the House of Marley.
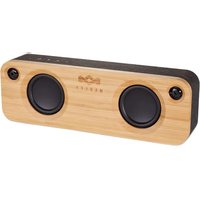
We are honored you have selected the Stir It Up Turntable to become part of your music experience. The Stir It Up features design and material cues from our Get Together BT speaker and retro-design details of turntables from the Bob Marley era (1960-1980). Simple forms with rich materials, fit and finishes. Let the natural materials shine.
BEFORE USE
- Choose unit installation location carefully. Avoid placing it in direct sunlight or close to a source of heat. Also avoid locations subject to vibrations and excessive dust, cold or moisture. Keep away from sources that hum, such as transformers or motors.
- Do not open the cabinet as this may result in damage to the circuitry or electrical shock. If a foreign object should get into the set, contact Customer Service.
- Be sure not to handle record with dirty fingers. Never play a record that has a crack on the surface.
- When removing the power plug from the wall outlet, always pull directly on the plug, never pull the cord.
- To protect the stylus, don't forget to put on the white protective needle cover after use.
- Do not attempt to clean the unit with chemical solvents as this might damage the finish. Use a clean, dry cloth.
- In order to shut off the power to this product completely, unplug the power cord from the wall outlet. Be sure to unplug the unit if you do not intend to use it for an extended period of time, such as a vacation.
- Keep this manual in a safe place for future reference.
ASSEMBLY
- Take all the components from the package and then place the product on a stable surface.
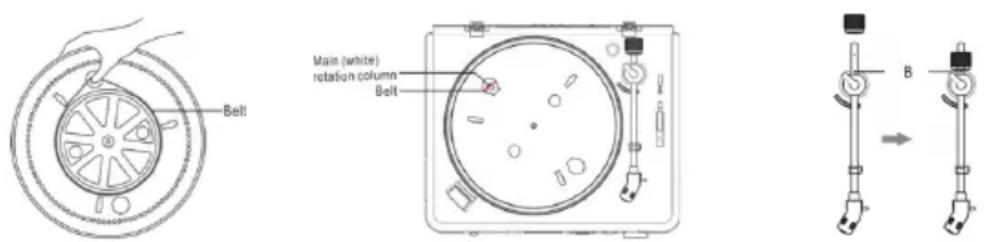
- Surround the belt on the bottom of metal platter. Make sure the belt is not installed twisted. Use your thumb to stretch the belt as the illustration below.
- Reverse the platter and don't forget to keep holding the belt. Then match the spindle and insert the platter to the unit.
- Surround the belt which is held with your thumb into the main (white) rotation column of the triangular arrangement gear columns.
- Place the turntable mat on the platter. Then the main assembly is accomplished.
NOTE: To disassemble the turntable, directly grasp the turntable and pull it upward
-
Remove the counterweight and place it in its proper location on the Tone arm (refer to illustration)
-
Remove the 45rpm adapter and place it in it's new home located in the top right corner of the record player.
EN
POWERING YOUR STIR IT UP TURNTABLE
Your Stir It Up turntable uses an AC power supply and is powered by a standard wall outlet.
-
Insert the AC power supply into Stir It Up.
-
Insert the wall plug into an appropriate wall outlet.
EASY TO USE
- Connect the AC power supply to the household outlet.
- Rotate the OFF / 33/45 knob to turn on the unit and Select the speed according to the record you are playing.
- Put a record on the turntable. Remember to use the 45 RPM adaptor located on the top right corner when playing a 45 RPM record.
- Lift and move the tone arm to turntable. Place the tone arm on the edge of the record and the record starts playing.
- Assemble the balance weight and set it to a proper position.
NOTE: The balance weight is to adjust the pressure of the needle. If the pressure is too much, the sound will become distorted; if the pressure is too little, track skipping will easily happen. Please adjust the balance weight by turning the balance weight clockwise or counter-clockwise.
-
To pause or stop playing, you need to lift and move the tone arm back to the tone arm rest manually.
-
When the end of the record is reached, the tone arm and rotation stop. Lift the tone arm and place it to tone arm rest manually.
CONNECTIONS
CAUTION: Switch off the power to all equipment before making connections. Read the instructions of each component you intend to use with this unit. Be sure to insert each plug securely. To prevent hum and noise, avoid bundling the signal interconnection cables together with the AC power cord.
LINE OUT OPERATION
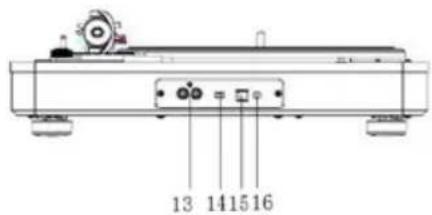
- Switch the PRE-AMP OFF/ON SWITCH to ON position.
- Plug one end of the RCA cable (included) into the LINE OUT socket at the back of the unit. Be sure to match the color with the socket.
- Plug the other end of the cable into the LINE IN socket of your home amplifier device.
- Switch on the unit and the amplifier device you connected.
- Adjust the volume on the amplifier device.
PHONO OUT OPERATION
- Switch the PRE-AMP OFF/ON SWITCH to OFF position.
- Plug one end of the cable (included) into the PHONO OUT socket at the back of the unit. Be sure to match the color with the socket.
- Plug the other end of the cable into the PHONO IN socket of your home amplifier device.
- Switch on the unit and the amplifier device you connected.
- Adjust the volume on your amplifier device.
HEADPHONE OPERATION
- Connect a set of headphone (not included) on the Earphone socket on the front panel of the unit.
NOTE: Never put on the headphone till you have plugged in the headphone plug
USB-PC Function, Audacity Software
Full instruction for the Audacity Software USB-PC Function can be found at: http://www.audacityteam.org/download/
LOCATION OF CONTROLS
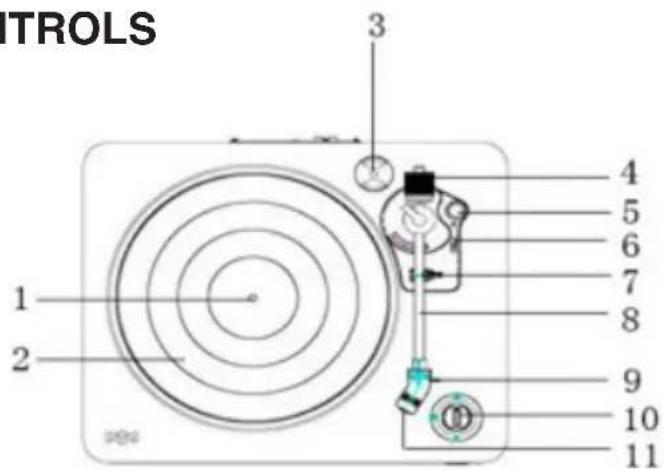
- Spindle
- Turntable
- 45 Rpm adaptor
- Balance weight
- Anti-skating knob
- Tone arm lift level
- Tone arm rest holder
- Tone arm
- Stylus
- Off / 33/45 knob
- Needle cover
- Earphone socket
- Rca output sockets
- Pre-amp off/on switch
- Usb socket
- Ac power socket
text_image
TROLS 1 2 3 4 5 6 7 8 9 10 11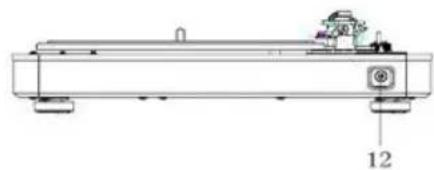
natural_image
Technical line drawing of a mechanical component with no visible text or symbols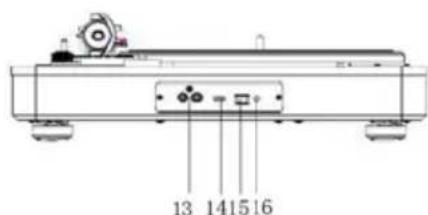
text_image
13 1415 16- Connect the external amplifier device.
- Place a record on the turntable, over the central spindle. Place the EP adapter over the central spindle when playing 45 rpm records.
- Set the Speed Selector to 33 or 45 rpm according to the record.
- Release the tone arm clamp, and remove the needle cover from the stylus.
- Lift the Tone arm with the Tone arm Lift Lever.
- Move the tone arm to the beginning of the record, or to the start of a particular track.
- Gently lower the tone arm onto the record with the Tone arm Lift lever to start playing.
- When the record is finished the tone arm will automatically stop. To stop manually, lift the tone arm from the record and return it to the rest.
NOTES:
- Remove the needle cover before you balance the tone arm.
- Hold tone arm whenever you make any adjustment or action so as to protect the tone arm.
- Do not try to adjust the balance weight while playing a record as this could break the needle and scratch the record.
- Re-secured the tone arm before transportation to protect the needle.
- Remove the balance weight before transportation to prevent damage or breakage to the unit.
- Do not stop or turn the platter manually. Moving or jarring the turntable without securing the Tone arm clamp could result in damage to the Tone arm.
ANTI-SKATING
Normally the anti-skating should be set to its minimum setting. Anti-skate compensates for inward tracking forces that occur with certain pick-up when the stylus nears the center of the record. If the turntable is experiencing excessive skipping while nearing the center spindle, try increase the anti-skating in the increments indicated on the dial. Start by adding an increment of 1, test its performance, then increase it more, and so on.
NOTE: During adjusting the anti-skating knob, leave the tone arm and balance weight alone to prevent damaging the stylus (needle).
TROUBLESHOOTING GUIDE
In case of trouble with the unit, please look through below and see if you can solve the problem by yourself before calling your dealer.
THE WHOLE UNIT
| PROBLEM | CAUSE | SOLUTION |
| Power does not come on when the power switch is pressed. | Unit is unplugged. | Connect the unit to the AC power supply. |
| No sound | The working input does not match the source input. | Reselect a source. |
| The unit has no response or could not reset. | External factors such as ESD (Electro-static discharge) affect the unit. | Remove the power cord and all power supply devices, then re-plug in the unit after one minute. |
PHONO PLAYER
| PROBLEM | CAUSE | SOLUTION |
| The sound is noisy when playing the record. | The stylus is not placed in the middle center. | Replace the stylus which is placed in the middle center. |
| No sound | The working input does not match the source input. | Reselect a source. |
| The unit has no response or could not reset. | External factors such as ESD (Electro-static discharge) affect the unit. | Remove the power cord and all power supply devices, then re-plug in the unit after one minute. |
WARNINGS AND STANDARD SAFETY INFO ADDED
Safety Precautions
WARNING: To reduce the risk of fire or electric shock, do not expose this appliance to rain or moisture.
CAUTION: Use of controls or adjustments or performance of procedures other than those specified may result in hazardous radiation exposures.
CAUTION: RISK OF ELECTRIC SHOCKS - DO NOT OPEN!
EN
To reduce the risk of electric shock, do not remove cover or back.
No user serviceable parts inside. Refer servicing to qualified service personnel.
nt flash with arrowhead symbol, within an equilateral triangle, is intended to alert user to the presence of non-insulated “dangerous voltage” within the product’s enclosure that may be of sufficient magnitude to constitute risk of electric shock to persons.

clamation point within an equilateral triangle is intended to alert user to the presence of important operating and maintenance
(servicing) instructions in the literature accompanying the appliance.
(see markings on the back of the unit.)
This unit operates on 100-240V. If the unit is not used for a long period of time, remove the plug from the AC mains.
Ensure all connections are properly made before operating the unit.
This unit must not be exposed to moisture or rain.
This unit should be positioned so that it is properly ventilated. Avoid placing it, for example, close to curtains, on the carpet or in a built-in installation such as a bookcase.
Do not expose this unit to direct sunlight or heat radiating sources.
IMPORTANT SAFETY INSTRUCTIONS
-
Follow and keep these instructions.
-
Heed all warnings.
-
Do not use this apparatus near water.
-
Clean only with a dry cloth.
-
Do not block any ventilation openings. Install in accordance with the manufacturer's instructions.
-
Do not install near any heat sources such as radiators, heat registers, stoves, or other apparatus (including amplifiers) that produce heat.
-
Protect the power cord from being walked on or pinched particularly at plug, convenience receptacles, and the point where they exit from the apparatus.
-
Only use attachments/accessories specified by the manufacturer.
-
Unplug this apparatus during lightning storms or when unused for long periods of time.
-
Refer all servicing to qualified service personnel. Servicing is required when the apparatus has been damaged in any way, such as power-supply cord or plug is damaged, liquid has been spilled or objects have fallen into the apparatus, the apparatus has been exposed to rain or moisture, does not operate normally, or has been dropped.
-
To reduce the risk of fire or electric shock, do not expose this apparatus to rain or moisture.
- CAUTION: Danger of explosion if battery is incorrectly replaced. Replace only with the same or equivalent type.
WEEE EXPLANATION
marking indicates that this product should not be disposed with oth-
er household wastes throughout the EU. To prevent possible harm to the environment or human health from uncontrolled waste disposal, recycle it responsibly to promote the sustainable reuse of material resources. To return your used device, please use the return and collection systems or contact the retailer where the product was purchased. They can take this product for environmental safe recycling.
BATTERY DIRECTIVE
symbol indicates that batteries must not be disposed of in the domestic waste as they contain substances which can be damaging to the environment and health. Please dispose of batteries in designated collection points.
WARNING: The battery (in remote control) shall not be exposed to excessive heat such as sunshine, fire or the like.
WARNING: DO NOT INGEST BATTERY, CHEMICAL BURN HAZARD.
This product contains a coin/button cell battery. If the coin/ button cell battery is swallowed, it can cause severe internal burns in just 2 hours and can lead to
death. Keep new and used batteries away from children. If the battery compartment does not close securely, stop using the product and keep it away from children. If you think batteries might have been swallowed or placed inside any part of the body, seek immediate medical attention.
FCC STATEMENT
This equipment has been tested and found to comply with the limits for a Class B digital device, pursuant to part 15 of the FCC Rules. These limits are designed to provide reasonable protection against harmful interference in a residential installation. This equipment generates uses and can radiate radio frequency energy and, if not installed and used in accordance with the instructions, may cause harmful interference to radio communications. However, there is no guarantee that interference will not occur in a particular installation. If this equipment does cause harmful interference to radio or television reception, which can be determined by turning the equipment off and on, the user is encouraged to try to correct the interference by one or more of the following measures:
- Reorient or relocate the receiving antenna.
- Increase the separation between the equipment and receiver.
- Connect the equipment into an outlet on a circuit different from that to which the receiver is connected.
- Consult the dealer or an experienced radio/TV technician for help.
CAUTION: Any changes or modifications not expressly approved by the party responsible for compliance could void the user's authority to operate the equipment.
This appliance can be used by children aged from 8 years and above and persons with reduced physical, sensory or mental capabilities or lack of experience and knowledge if they have been given supervision or instruction concerning use of the appliance in a safe way and understand the hazards involved. Children shall not play with the appliance. Cleaning and user maintenance shall not be made by children without supervision.

text_image
MARLEY®GIRADISCOS STIR IT UP INSTRUCCIONES DEL TOCADISCOS
natural_image
Technical line drawing of a mechanical component with no visible text or symbols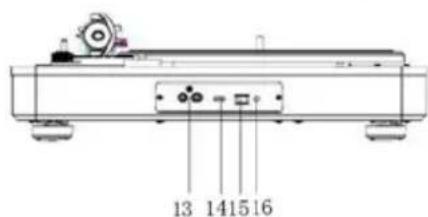
text_image
13 141516ÉCOUTER DES VINYLES
natural_image
Technical line drawing of a mechanical component with mounting holes and a small inset view (no text or symbols)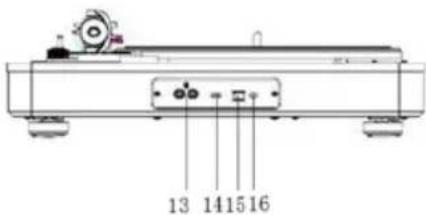
text_image
13 14 15 16SCHALLPLATTEN HÖREN
natural_image
Technical line drawing of a mechanical component with mounting holes and a labeled part (12), no readable text or symbols present.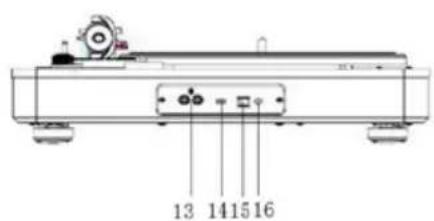
text_image
13 14 15 16RIPRODUZIONE DISCHI
natural_image
Abstract black geometric logo design with interlocking shapes (no text or symbols)MARLEY
STIR IT UP PLADESPILLER BRUGSVEJLEDNING
text_image
Main (white) rotation column Bolt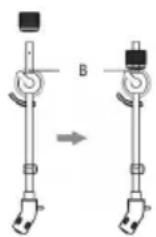
STR∅M TIL DIN STIR IT UP PLADESPILLER
natural_image
Technical line drawing of a mechanical component with no visible text or symbols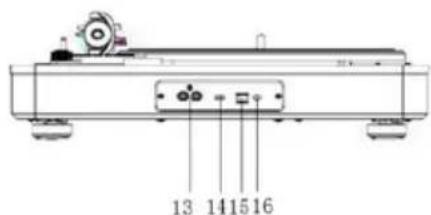
text_image
13 14 15 16AFSPILNING
text_image
Main (white) rotation column Belt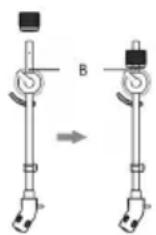
PŘIPOJENÍ NAPÁJENÍ GRAMOFONU STIR IT UP
natural_image
Technical line drawing of a mechanical component with mounting holes and a labeled part (12), no readable text or symbols present.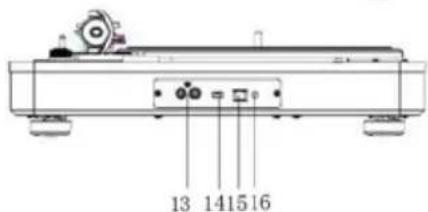
text_image
13 1415 16Üdvözli a House of Marley!
natural_image
Technical line drawing of a mechanical component with no visible text or symbols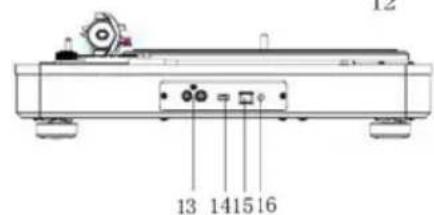
text_image
13 14 15 16LEMEZEK LEJÁTSZÁSA
Witamy w House of Marley
natural_image
Technical line drawing of a mechanical component with no visible text or symbols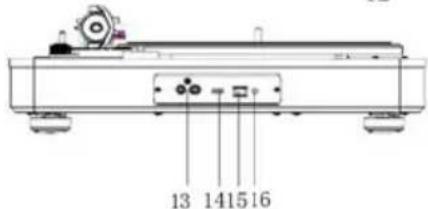
text_image
13 141516ODTWARZANIE PŁYT
natural_image
Abstract black geometric logo design with interlocking shapes (no text or symbols)MARLEY
GRAMOFÓN STIR IT UP POKYNY PRE PREHRÁVANIE GRAMOPLATNÍ
text_image
Belt Main (white) rotation column Belt BNAPÁJANIE GRAMOFÓNU STIR IT UP
natural_image
Technical line drawing of a mechanical component with mounting holes and a numbered label (12), no readable text or symbols present.
text_image
13 14 15 16PREHRÁVANIE PLATNÍ
DÔLEŽITÉ BEZPEČNOSTNÉ POKYNY
natural_image
Abstract black geometric logo design with interlocking shapes (no text or symbols)MARLEY
text_image
Main (white) rotation column Belt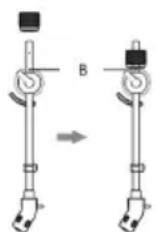
RU
natural_image
Technical line drawing of a mechanical component with mounting holes and a small inset view (no text or symbols)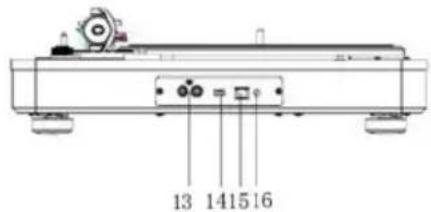
text_image
13 1415 16natural_image
Abstract black geometric logo design with interlocking shapes (no text or symbols)MARLEY
STIR IT UP-PLATENSPELER PLATENSPELERHANDLEIDING
WELKOM BIJ HOUSE OF MARLEY
text_image
Main (white) rotation column Belt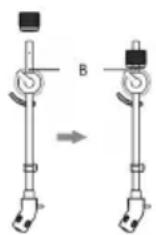
NL
natural_image
Technical line drawing of a mechanical component with mounting holes and a small inset view (no text or symbols)- Rca output-ingang
- Voorversterker off/on-schakelaar
- Usb-ingang
- Ac-stroomaansluiting
NL
text_image
13 14 15 16PLATEN AFSPELEN
natural_image
Abstract black geometric logo design with interlocking shapes (no text or symbols)MARLEY
text_image
Main (white) rotation column Bolt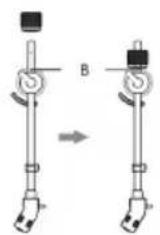
AR
مادختسالا قلوهس
natural_image
Abstract black geometric logo design with interlocking shapes (no text or symbols)MARLEY
STIR IT UP TURNTABLE INSTRUKSER FOR PLATESPILLER
text_image
Main (white) rotation column Bolt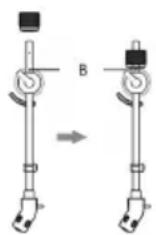
Å KOBLE TIL STR∅M PÅ DIN STIR IT UP TURNTABLE
natural_image
Abstract black geometric logo design with interlocking shapes (no text or symbols)MARLEY
STIR IT UP -LEVYSOITIN LEVYSOITTIMEN KÄYTTÖOHJEET
Tervetuloa House of Marleyn pariin
natural_image
Technical line drawing of a mechanical component with mounting holes and a small inset view (no text or symbols)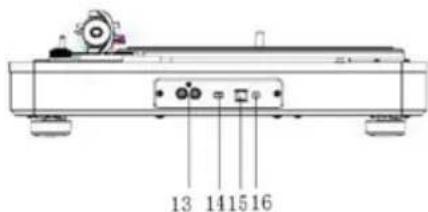
text_image
13 14 15 16LEVYJEN KUUNTELU
natural_image
Technical line drawing of a mechanical component with mounting holes and a small inset view (no text or symbols)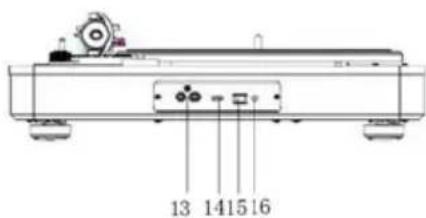
text_image
13 1415 16ATT LYSSNA PÅ SKIVOR
natural_image
Abstract black geometric logo design with interlocking shapes (no text or symbols)MARLEY
text_image
Main (white) rotation column Belt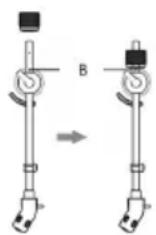
EL
natural_image
Technical line drawing of a mechanical component with labeled parts (no text or symbols beyond basic labels)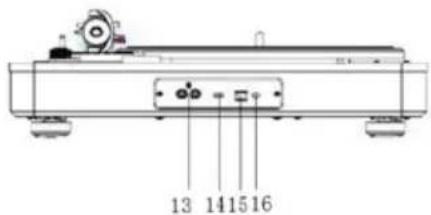
text_image
13 14 15 16ΑΚΡΟΑΣΗ ΔΙΣΚΩΝ
natural_image
Abstract black geometric logo design with interlocking shapes (no text or symbols)MARLEY
GIRA-DISCOS STIR IT UP INSTRUÇÕES DO LEITOR DE DISCOS
BEM-VINDO À HOUSE OF MARLEY
natural_image
Technical line drawing of a mechanical device with labeled component 12 (no text or symbols beyond label)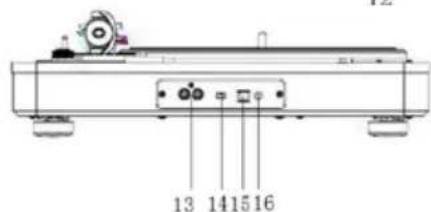
text_image
13 14 15 16STIR IT UP PIKABINI ELEKTRIĞE BAĞLAMA
natural_image
Technical line drawing of a mechanical component with mounting holes and a numbered label (12), no readable text or symbols present.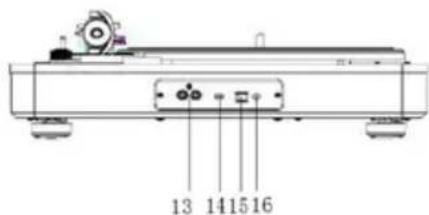
text_image
13 141516PLAK DINLEME
natural_image
Abstract black geometric logo design with interlocking shapes and a registered trademark symbol (no text or symbols present)MARLEY
text_image
Bell Main (white) rotation column Belt B전원공급방법
natural_image
Technical line drawing of a mechanical component with labeled parts (no text or symbols beyond basic labels)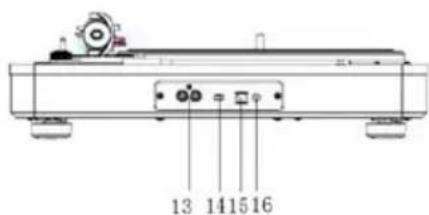
text_image
13 14 15 16레코드 듣기
@Fifty-Six Hope Road Music Ltd.,©2011-2016. Right of Publicity and Persona Rights. Fifty-Six Hope Road Music Ltd.
Made in China. Fabriqué en Chine. IB - EMJToooSB
Distributed by House of Marley, LLC, 3000 Pontiac Trail, Commerce Township, MI 48390. Distributed in Europe by HoMedics Group Ltd., Somerhill Business Park, Five Oak Green Rd, Tonbridge, Kent TN11 OGP, UK.
Due to continuous product improvements, pictures on the car ton may differ slightly from the actual product. All other brands, product names, company names and trademarks are property of their respective owners.