PREMIUM P14 - Fan HOUSE OF MARLEY - Free user manual and instructions
Find the device manual for free PREMIUM P14 HOUSE OF MARLEY in PDF.

| Brand | House of Marley |
| Model | PREMIUM P14 |
| Product type | Air extractor fan |
| Use | Domestic ventilation for wet rooms (bathroom, kitchen, laundry room, toilet) |
| Opening diameter | 100 mm |
| Supply voltage | 230 V ~50 Hz |
| IP protection rating | IP44 |
| Electrical class | Class II (double insulation) |
| Power consumption (slow/max speed) | 4 W / 8 W |
| Airflow (slow/max speed) | 36 m³/h / 115 m³/h |
| Sound pressure at 3 m (slow/max speed) | 11.5 dB(A) / 26 dB(A) |
| Maximum pressure (slow/max speed) | 9.5 Pa / 7.5 Pa |
| Maximum flow temperature | 40 °C |
| Adjustable timer | 0 to 15 minutes |
| Humidity control | 40% to 95% relative humidity |
| Operating modes | Permanent (24/24h) or intermittent via switch S1 |
| Minimum installation height | 2.3 m above floor |
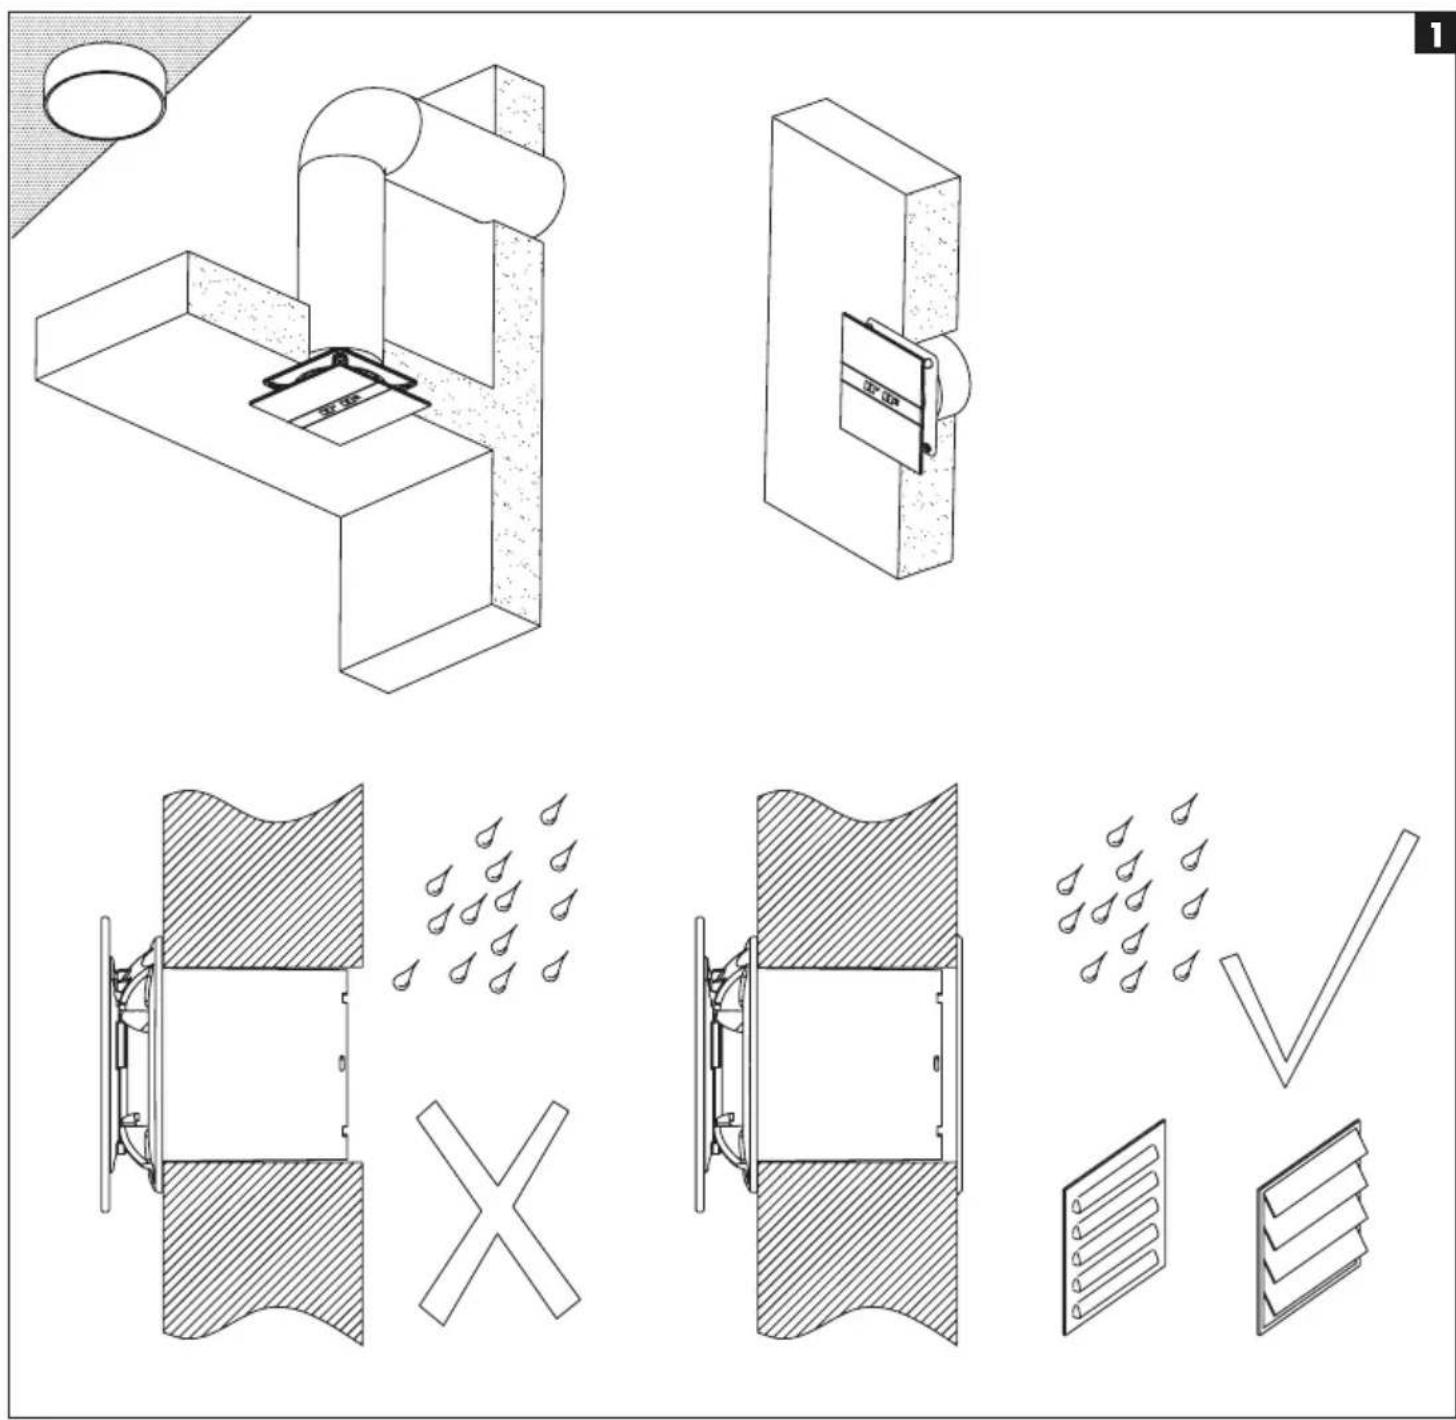
| Mounting | Wall or ceiling, direct outlet or with individual duct (ø100 mm) |
| Cleaning | With a damp cloth; disconnect before cleaning |
| Maintenance | Regular inspection of the blade and motor; no additional maintenance required |
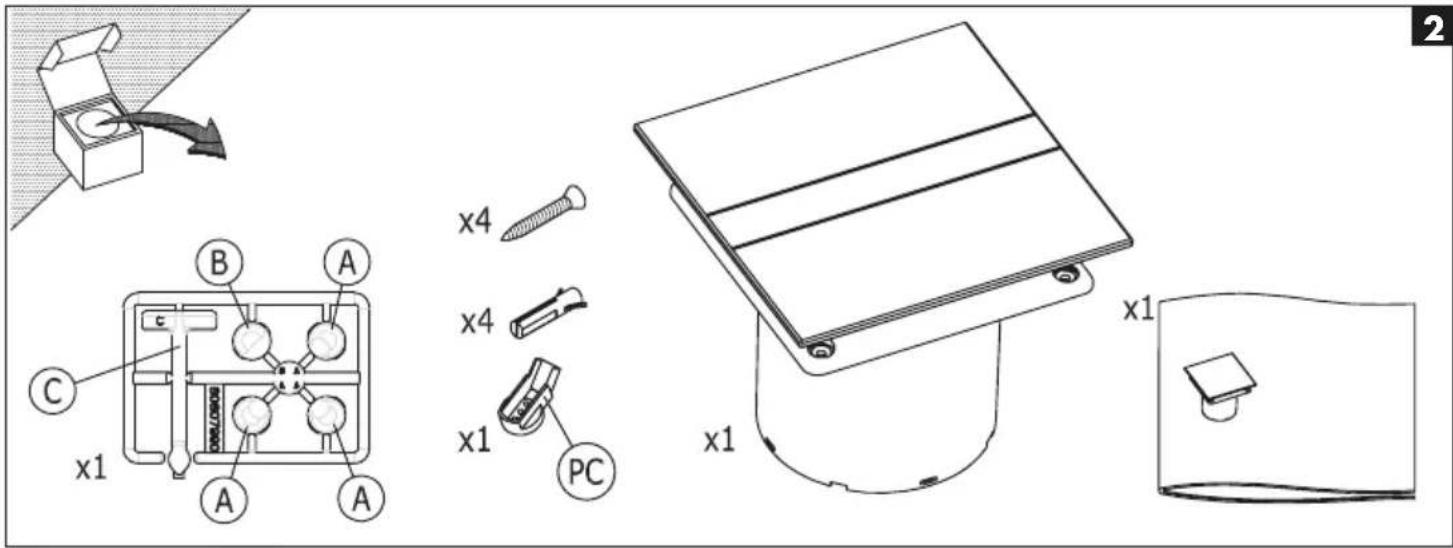
| Included accessories | Wall plugs and fixing screws |
Frequently Asked Questions - PREMIUM P14 HOUSE OF MARLEY
User questions about PREMIUM P14 HOUSE OF MARLEY
0 question about this device. Answer the ones you know or ask your own.
Ask a new question about this device
Download the instructions for your Fan in PDF format for free! Find your manual PREMIUM P14 - HOUSE OF MARLEY and take your electronic device back in hand. On this page are published all the documents necessary for the use of your device. PREMIUM P14 by HOUSE OF MARLEY.
USER MANUAL PREMIUM P14 HOUSE OF MARLEY
natural_image
Five gray star icons in a horizontal row, no text or symbols present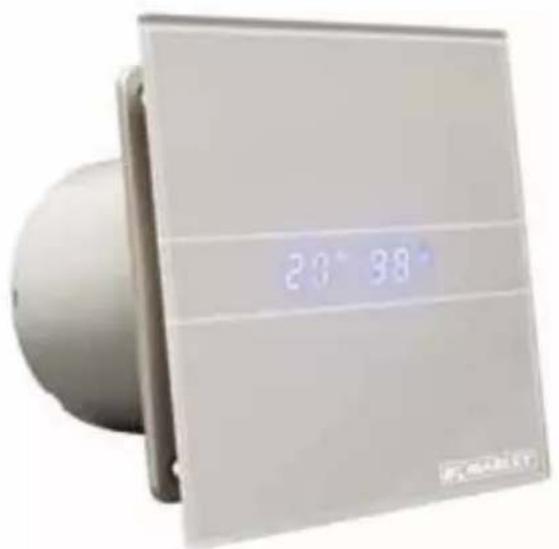
natural_image
Exterior view of a white air conditioner unit with digital display (no text or symbols visible)DEDE Betriebs-/Montageanleitung 7
GBGB Operating/assembly instructions 10
FRFR Instruction de service et de montage 13
ITIT Istruzioni per l'uso e il montaggio 16
SESE Bruks-/monteringsanvisning 19
PLPL Instrukcja obstugi/montażu 22
text_image
Technical diagram showing exploded view of a device with labeled components and assembly steps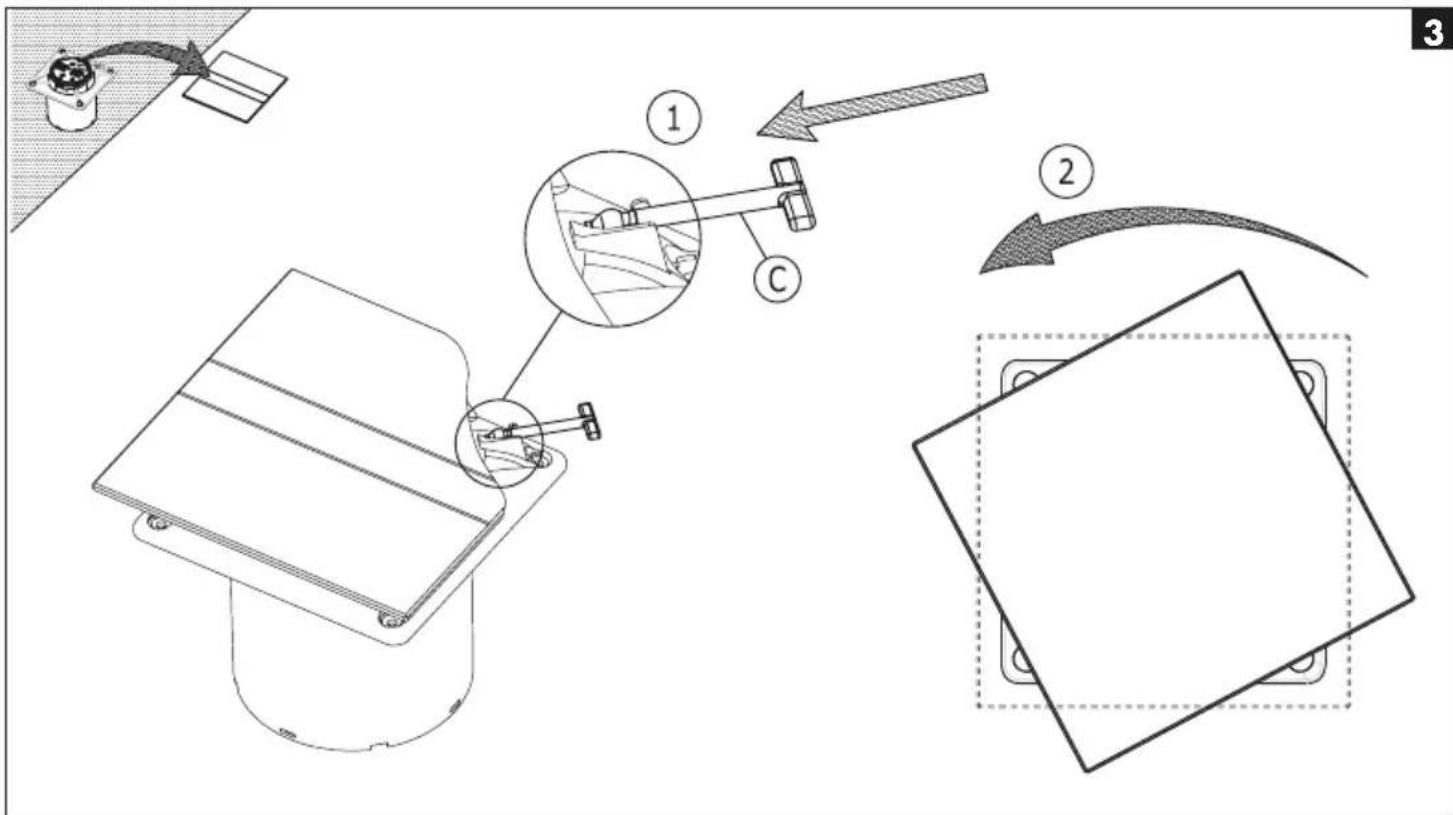
flowchart
graph TD
    A["Device with sensor"] --> B["Tool"]
    B --> C["Assembly"]
    C --> D["Step ①: Internal part with two arms"]
    D --> E["Step ②: Internal part with two arms"]
    E --> F["Final assembly"]
text_image
Ø4mm A B A B Ø100 A 110 mm B 106 mm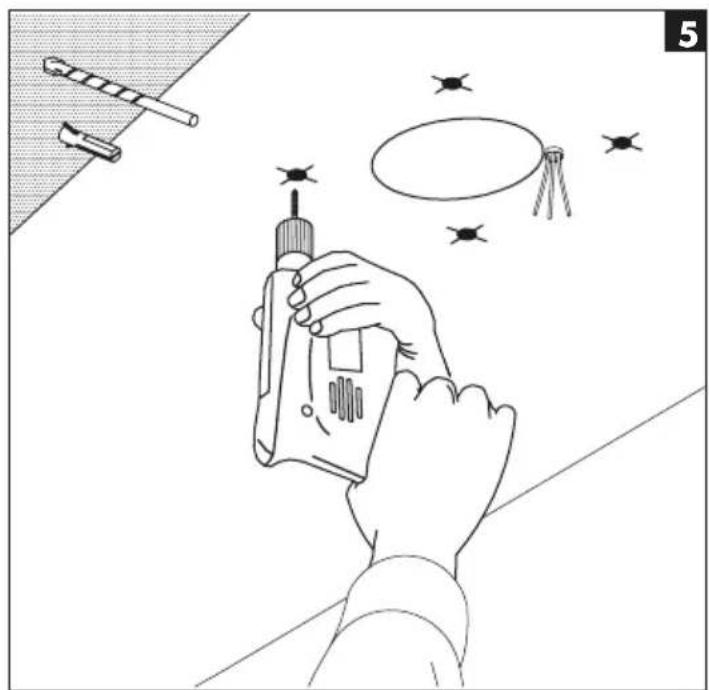
natural_image
Illustration of a hand using a power tool to interact with a target and other tools (no text or symbols present)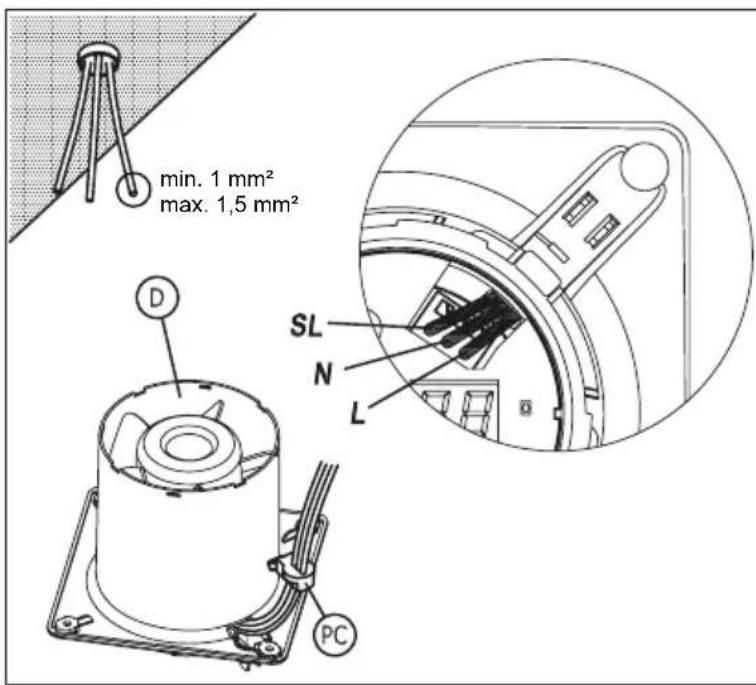
text_image
min. 1 mm² max. 1,5 mm² D SL N L PC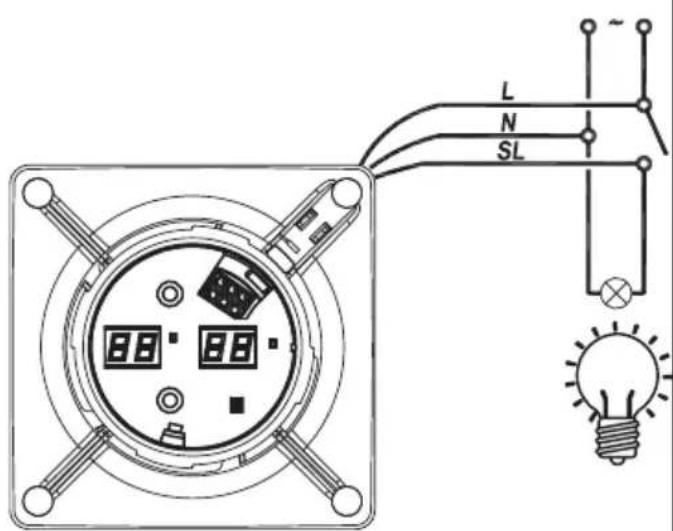
text_image
L N SL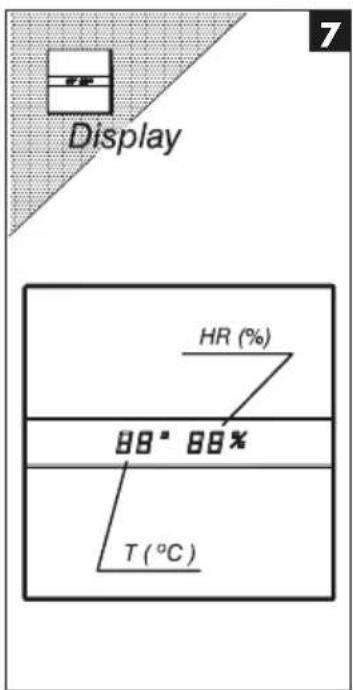
text_image
Display HR (%) 88° 88% T (°C)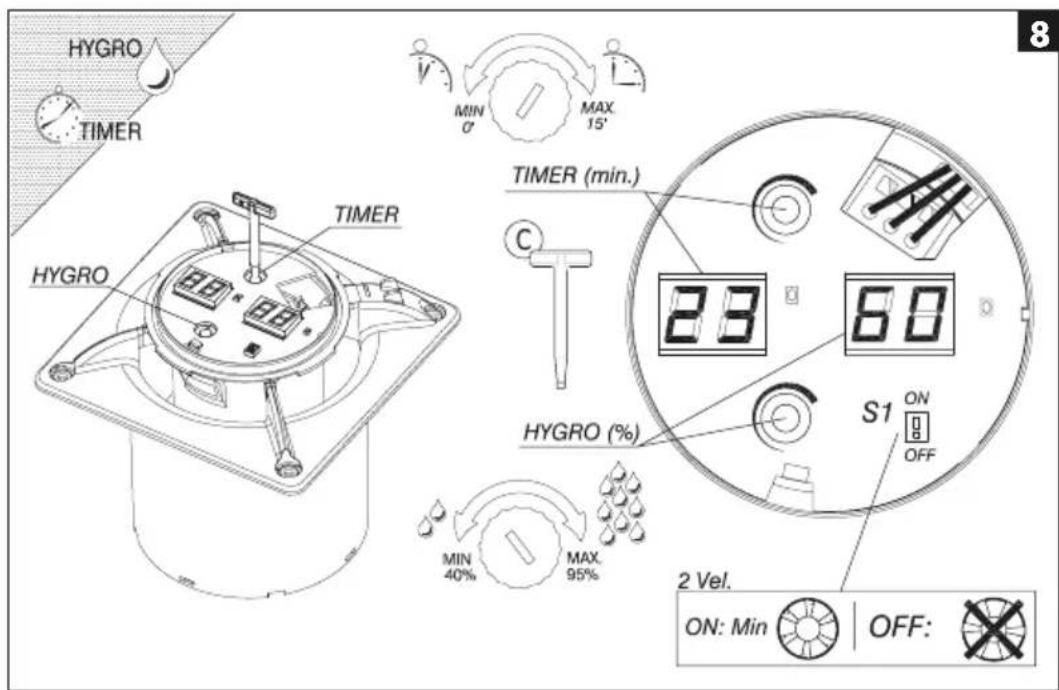
text_image
HYGRO TIMER HYGRO TIMER MIN 0° MAX. 15° TIMER (min.) C 23 60 HYGRO (%) MIN 40% MAX. 95% S1 ON OFF 2 Vel. ON: Min OFF: 8
text_image
Technical diagram of a device with labeled components and wiring, including inset view and exploded view.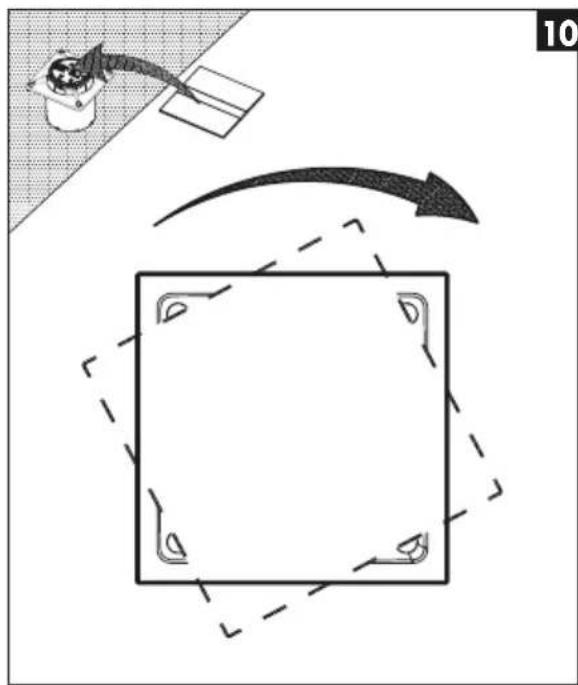
natural_image
Diagram showing a square frame with arrows indicating rotation or movement, and a small object on the left (no text or symbols)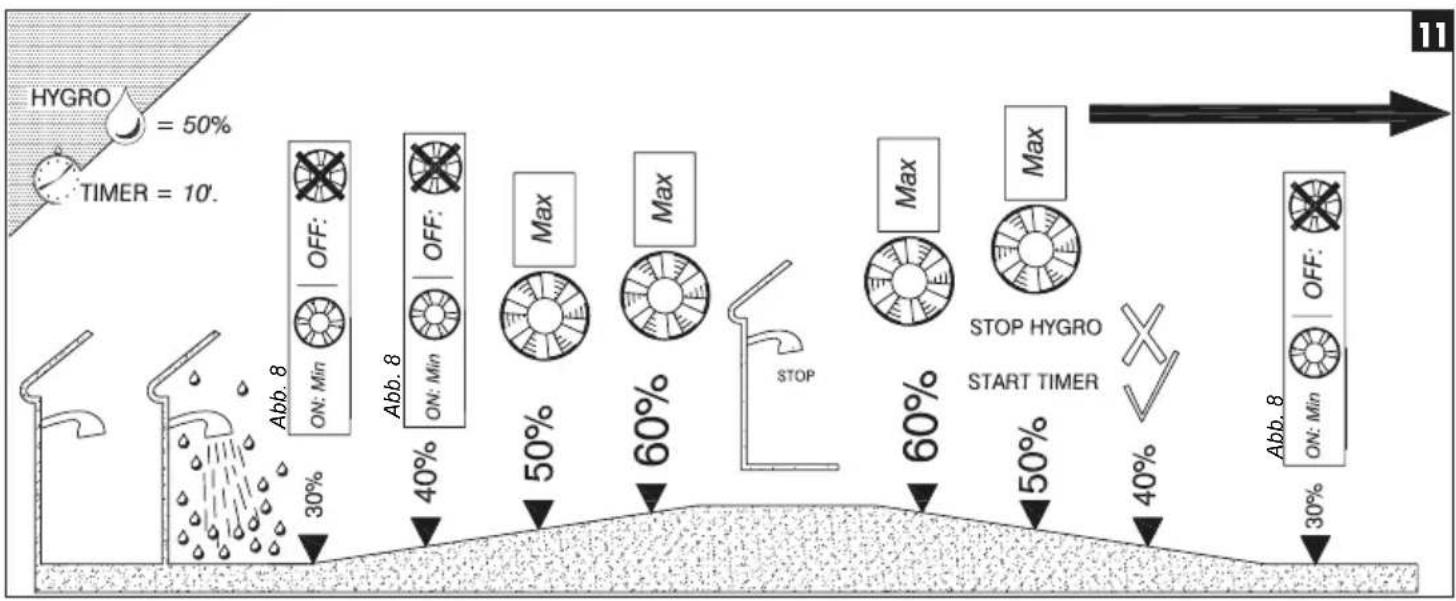
flowchart
graph TD
    A["Hygro"] --> B["OFF: ON: Min 30%"]
    B --> C["OFF: ON: Min 40%"]
    C --> D["Max 50%"]
    D --> E["Max 60%"]
    E --> F["STOP HYGro START TIMER 50%"]
    F --> G["STOP HYGro START TIMER 40%"]
    G --> H["OFF: ON: Min 30%"]
    H --> I["OFF: ON: Min 10%"]
    style A fill:#f9f,stroke:#333
    style I fill:#f9f,stroke:#333
text_image
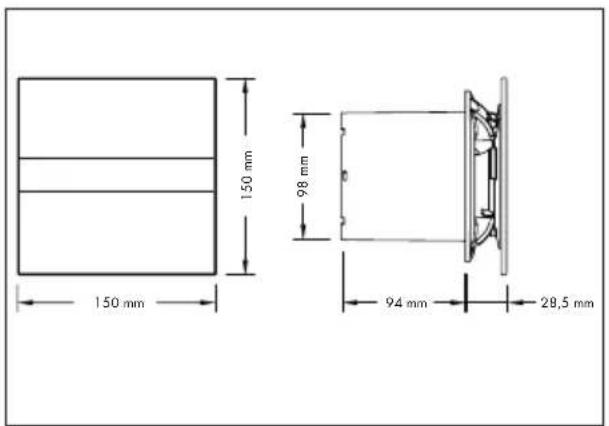
150 mm 150 mm 98 mm 94 mm 28,5 mm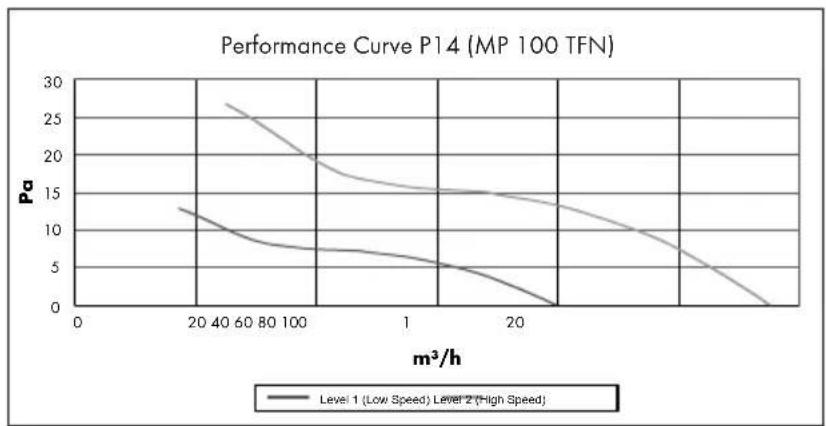
line
| m³/h | Level 1 (Low Speed) | Level 2 (High Speed) | |------|---------------------|----------------------| | 0 | 13 | 27 | | 20 | 10 | 20 | | 40 | 8 | 15 | | 60 | 7 | 14 | | 80 | 6 | 13 | | 100 | 5 | 12 | | 1 | 4 | 11 | | 20 | 2 | 8 | | 40 | 0 | 4 |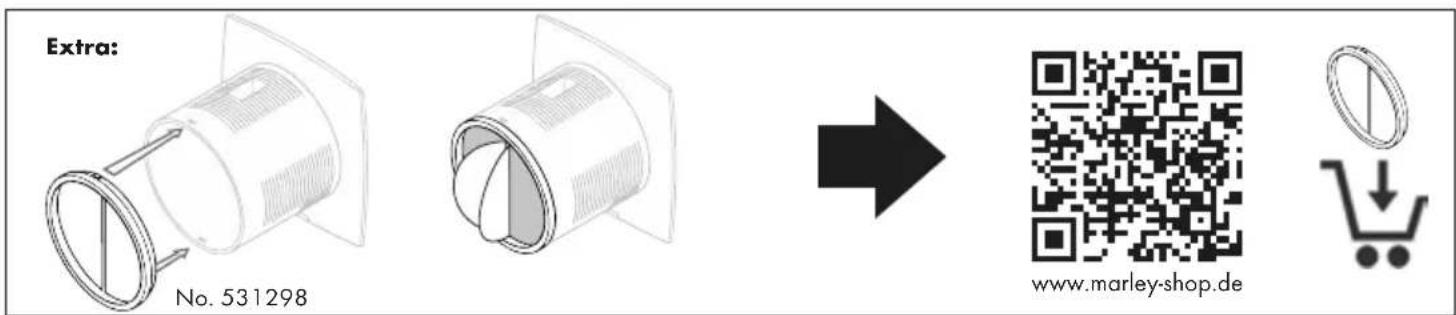
text_image
Extra: No. 531298 www.marley-shop.de
DEUTSCH
Lieber Kunde,
To guarantee the safety and correct working of the appliance, please read the following instructions CAREFULLY before beginning the installation.

IMPORTANT:
Make sure that the power supply has been disconnected before performing the installation or electrical connection of the appliance.
Installation, electrical connections and settings must be carried out by a qualified person in line with local regulations.
If these installation instructions are not followed the product may be damaged.
For optimal performance, the appliance must be installed correctly (installation of the unit, ducts and air replacement inlets).
This extractor fan is designed for the ventilation of households or similar premises. Do not use for any purpose other than that for which it was designed.
This appliance can be used by children aged from 8 years and above and persons with reduced physical, sensory or mental capabilities or lack of experience and knowledge if they have been given supervision or instruction concerning use of the appliance in a safe way and understand the hazards involved. Children shall not play with the appliance. Cleaning and user maintenance shall not be made by children without supervision.
The fan is to be installed so that the blades are more than 2,3 m above the floor.
This extractor fan does not produce radio/television interference (Directive 2004/108/EC).

Prior to piping installation, consult the municipal by-laws on s and request permission from the person responsible for the
Precaution must be taken to avoid the backflow of gases into the room from the open gas pipe or from other open-flame devices.
The room must have adequate ventilation if this appliance is used simultaneously with other appliances that run on gas or other fuels.
Do not install the exhaust conduit (D) of the extractor fan to a chimney flume, ventilation pipes, hot air ducts or ducts used to evacuate fumes from appliances that run on gas or other fuels.

DO NOT install this product in areas with the follow charac-
teristics:
• Excess of oil or grease.
- Areas with corrosive or flammable liquid gas or vapour.
- Areas with temperatures higher than 40^ or lower than -5^ .
- Areas exposed to the environment (rain, sun, snow, etc.)
- Areas with possible obstacles that obstruct the access to the fan. The product and its parts must not be submerged in water or other liquids.
The IP rating is only valid if the installation of the appliance complies with what is indicated in this manual.
The manufacturer declines all responsibility for personal injury or damage to animals or objects caused by inappropriate use of the appliance according to the warnings for installation, use and maintenance described in this instruction manual.
After finishing the installation these instructions should be given to the owner/user of the appliance.
The appliance must be able to be disconnected from the mains electricity supply after installation.
It can be disconnected by making the plug accessible or by incorporating a switch in the fixed wiring that meets electrical installation standards.

INSTALLATION:
Before starting the installation, check that the propeller is not deformed or damaged, that it can turn freely, and that no foreign body is lodged inside the outer casing."
The appliance shall be installed according to the attached graphic documentation. It may be installed on the wall or ceiling, with direct exhaust to an individual exhaust duct (see fig. 1)
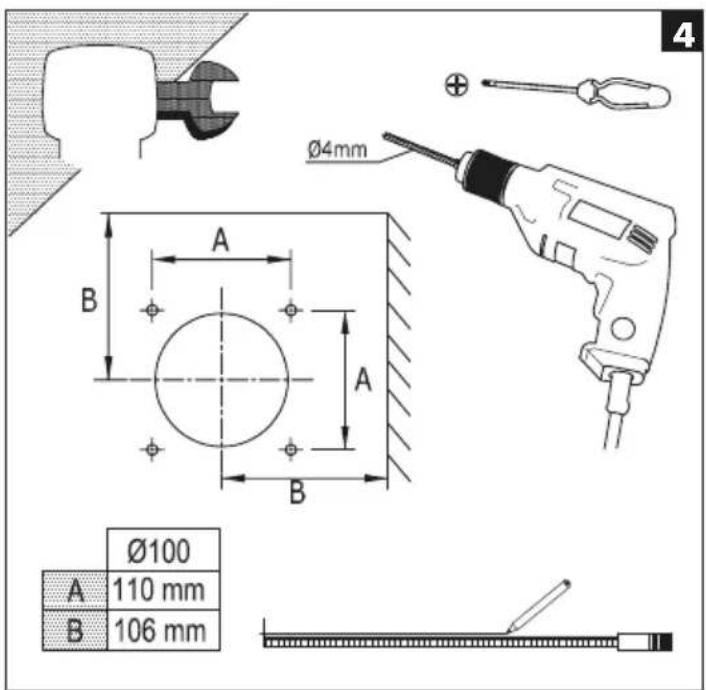
To install, make a circular hole with a diameter of 100 mm in the wall or ceiling where the appliance will be installed, together with the holes for fixing it (see fig. 4 and 5).
Remove the cover as shown in fig. 2.
Run the power supply cables through the "PC" part and the conduit in the appliance (see fig. 6). Connect according to section "ELECTRICAL CONNECTION"
If the assembly is done with an individual exhaust tube, place the tube (D) in the hole prepared for air exhaust.
Whether the assembly is done with an individual exhaust tube or with a direct outlet, air grilles must be installed that comply with national safety requirements for preventing access to the fan blades (see fig. 1)
Make sure that there is no obstacle blocking the flow of air.
Attach the base of the casing using the plugs and screws supplied by the manufacturer (see fig. 2).

ELECTRICAL CONNECTION:
Make sure that the voltage (V) and frequency (Hz) of the power supply correspond to the values indicated on the nameplate.

The appliance must be permanently connected with fixed install-iring, fitted in the wall and entering the appliance through the e (see fig. 6).
No earthing connection is required, given that this is a doubly-insulated appliance. (Class II).
The power supply cable must be placed so that no liquid or vapour can enter the appliance along it. If this were not possible, the cable entry should be sealed additionally, e.g. with silicone. Otherwise, the indicated IP rating would not be maintained.

Fan with TIMER-HYGRO control. Activation by humidity control in 40% and 95%. Adjustable timer from 0' to 15'.
Designed for continuous general ventilation of humid rooms (bathrooms, kitchens, washing rooms and toilets).
For manual operation set humidity setting to 95%.
For the electrical connection, follow the connection diagram (see fig. 6). In the event that this appliance is not used, it is recommended that you disconnect it from the mains electricity supply.

SETTINGS and OPERATION:
When power is applied for the first time, the fan goes into test mode for a few seconds, and during that time the displays show the factory-set Timer - Hygro values.
To adjust the timer, turn the "TIMER" pin until the desired value appears on the display (0'-15').
To adjust the level of humidity, turn the "HYGRO" pin until the desired value appears on the display (40% - 95%).
The P14 model permits the continuous ventilation (for 24 hours) of damp rooms through the ACTIVATION of S1 switch (S1: ON).
When the level of humidity is higher than the set level, the Hygro function is activated and the fan will operate at maximum speed.
Once the level of humidity falls below the set value, the device will continue to operate at maximum speed for the period of time set in the Timer function, and will eventually stop if S1=OFF or continue to operate at low speed if S1=ON.
Maximum and slow speeds are factory settings.
The extractor fan will also start, at maximum speed, if activated by the light switch in the room. When the light switch in the room is turned off, the fan will continue to work at maximum speed for the period of time set in the Timer function, and will eventually stop if S1=OFF or continue to operate at low speed if S1=ON.

To finish the installation, verify that all the connections have been done correctly and make sure that the cables are placed correctly. Install the front cover in its position and make sure that it cannot be removed without using a tool (see fig. 10).
Make sure that the blades turn freely.
Cleaning and Maintenance:
- Before cleaning make sure that the appliance is not connected to the electric network and prevent it from being reconnected by accident.
- Clean with a damp cloth regularly.
- The appliance does not require additional maintenance.
- The motor, propeller and all components should be inspected periodically to ensure that they are not dirty and have not suffered any damage. The frequency of inspections depends on the appliance's operating conditions.
- Remove the dirt on the propeller and the inner parts of the casing to avoid imbalances during operation, a decrease in aerodynamic performance and motor damage.

TECNICAL DATA\*
| Fan P14 (MP 100 TFN) | ||
| Protection class/type: | ☐ / IP 44 | |
| Mains voltage: 230 V | ~50 Hz | |
| Max. air temperature: 40 °C | ||
| Max. duct: 3,1 m | ||
| Level 1 2 | ||
| Power consumption W: 4 8 | ||
| Noise level dB (A) 3 m: 11,526 | ||
| Output m^3/h : 36 115 | ||
| Pressure build-up Max Pa: | 9,5 7,5 | |
This device is not a precision thermometer / hygrometer.
The displayed values of T (°C) and HR (%) are only for reference (see fig. 7).
* Subject to technical alterations.

FRANÇAIS
Cher client,
This marking indicates that this product should not be disposed with other household wastes throughout the EU. To prevent possible harm to the environment or human health from uncontrolled waste disposal, recycle it responsibly to promote the sustainable reuse of material resources. To return your used device, please use the return and collection systems or contact the retailer where the product was purchased. They can take this product for environmental safe recycling.

FRANÇAIS
Hereby, Marley Deutschland GmbH declares that the product P14, MP 100 TFN, is in compliance with directives 2014/30/EMV, 2014/35/LVDS, 2011/65/ROHS, 2012/27/CE and 2009/125/CE. The full text of the EU declaration of conformity is available at the following internet address:
http://www.marley.de/index.php?id=1965


MARLEY
Phone +49.(0)5031.53-0Phone +49.(0)5031.53-0
Fax +49.(0)5031.53-371 Fax +49.(0)5031.53-371
www.marley.de