MCRB270D - Speakers YAMAHA - Free user manual and instructions
Find the device manual for free MCRB270D YAMAHA in PDF.
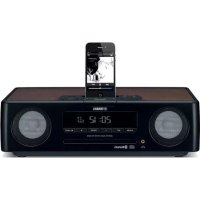
| Product Type | Compact audio system with CD receiver, FM/DAB tuner, Bluetooth |
| Brand | YAMAHA |
| Model | MCRB270D (main unit CRX-B370D) |
| Dimensions (W × H × D) | 180 × 118 × 322 mm |
| Weight | 2.7 kg |
| Power Supply | 100-240 V AC, 50/60 Hz |
| Power Consumption | 18 W (eco standby 0.3 W) |
| Amplifier Output Power | 20 W + 20 W (6 Ω, 1 kHz, 10% THD) |
| Supported Audio Formats (CD) | CD audio, MP3, WMA |
| Supported Audio Formats (USB) | WAV, MP3, WMA, MPEG-4 AAC, FLAC, ALAC, AIFF |
| Wireless Connectivity | Bluetooth version 4.2, profiles A2DP/AVRCP, codecs SBC/AAC |
| Radio Tuner | FM (87.5-108 MHz) and DAB/DAB+ (Band III) |
| Audio Inputs | AUX IN (3.5 mm mini-jack), DIGITAL IN (optical) |
| Audio Outputs | SUBWOOFER OUT (RCA), PHONES (6.3 mm jack), speakers |
| Radio Preset Memory | 30 stations (FM or DAB) |
| Sleep Timer | 30/60/90/120 min or OFF |
| Special Functions | Random playback, repeat, bass/treble adjustment, balance, auto standby, Bluetooth standby |
| Care and Cleaning | Soft, dry cloth. Do not use chemical products. |
| Laser Safety | Class 1. Do not open. Refer servicing to qualified personnel. |
| Included Accessories | Remote control, FM antenna, DAB/FM antenna, 2 AA batteries |
Frequently Asked Questions - MCRB270D YAMAHA
User questions about MCRB270D YAMAHA
0 question about this device. Answer the ones you know or ask your own.
Ask a new question about this device
Download the instructions for your Speakers in PDF format for free! Find your manual MCRB270D - YAMAHA and take your electronic device back in hand. On this page are published all the documents necessary for the use of your device. MCRB270D by YAMAHA.
USER MANUAL MCRB270D YAMAHA
English
Français
Deutsch
Svenska
Italiano
Español
Nederlands
Table of Contents
PRECAUTIONS 3
Introduction 7
About this manual 7
Trademarks 7
Accessories 7
What you can do with this unit 8
Parts name 9
Front panel 9
Rear panel 10
Front panel display 11
Remote control 12
Preparations 13
Connecting speakers 13
Connecting the antenna 14
Turning on the power 15
Using the sleep timer 15
Listening to music 16
Listening to CDs 16
Playing music on USB memory devices 17
Playing music via Bluetooth® connection 18
Listening to DAB stations (CRX-B370D only) 19
Listening to FM radio stations 22
Radio Data System (U.K. and Europe models only) 24
Playing music from external devices 25
More on playback 26
Shuffle/Repeat playback 26
Playback information 27
Adjusting sound quality 27
Option menu 28
Troubleshooting 29
General 29
Bluetooth 30
Disc 31
USB memory devices 31
DAB reception (CRX-B370D only) 32
FM reception 32
Messages in the front panel display 33
Supported devices/media and file formats 34
Supported devices/media 34
File format 35
Specifications 36
PRECAUTIONS
PLEASE READ CAREFULLY BEFORE USE. BE SURE TO FOLLOW THESE INSTRUCTIONS.
The precautions listed below are to prevent risk of harm to the user and others, as well as to prevent property damage, and to help the user use this unit properly and safely. Be sure to follow these instructions.
After reading this manual, be sure to keep it in a safe place where it can be referenced at any time.
- Be sure to request inspections or repairs from the dealer where you purchased the unit or from qualified Yamaha service personnel.
- Yamaha cannot be held responsible for injury to you or damage of the products caused by improper use or modifications to the unit.
- This product is for ordinary homes. Do not use for applications requiring high reliability, such as managing lives, health care or high-value assets.

WARNING
This content indicates "risk of serious injury or death."
Laser
- Do not remove the cover for repair. This unit uses a laser. Laser light entering your eyes may cause visual impairment. Request Inspections or repairs from the dealer where you purchased the unit or from qualified Yamaha service personnel.
- Do not look into the laser source. If there is nothing to block it, this unit emits a visible laser. Avoid looking at the laser directly. Laser light entering your eyes may cause visual impairment. When the plug is inserted into the AC outlet, do not place your eyes near openings of the disk tray or other openings, and do not try to look inside the unit.
Power supply/power cord
- Do not do anything that could damage the power cord.
- Do not place it near a heater.
- Do not bend it excessively or alter it.
- Do not scratch it.
- Do not place it under a heavy object.
Using the power cord with the core of the cord exposed could cause electric shocks or a fire.
- Never charge this unit if it is wet. Failure to observe this may cause electric shocks or a terminal circuit shortage and cause a fire or malfunctions.
- Do not touch the power plug or cord if there is a chance of lightning. Failure to observe this may cause electric shocks.
- Use this unit with the power supply voltage printed on it. Failure to connect to an appropriate AC outlet may cause a fire, electric shocks, or malfunctions.
- Check the electric plug periodically and remove any dirt or dust which may have accumulated on it. Failure to observe this may cause a fire or electric shocks.
- When setting up the unit, make sure that the AC outlet you are using is easily accessible. If some trouble or malfunction occurs, immediately turn off the power switch and disconnect the plug from the AC outlet. Even when the power switch is turned off, as long as the power cord is not unplugged from the wall AC outlet, the unit will not be disconnected from the power source.
- If you hear thunder or suspect approaching lightning, quickly turn off the power switch and pull the power plug from the AC outlet. Failure to observe this may cause a fire or malfunctions.
- If not using the unit for long periods of time, be sure to pull the power plug from the AC outlet. Failure to observe this may cause a fire or malfunctions.
Do not disassemble
- Do not disassemble or modify this unit. Failure to observe this may cause a fire, electric shocks, injury, or malfunctions. If you notice any irregularities, be sure to request an inspection or repair from the dealer where you purchased the unit or from qualified Yamaha service personnel.
Water warning
- Do not expose the unit to rain, use it near water or in damp or wet conditions, or place on it any containers (such as vases, bottles or glasses) containing liquids which might spill into any openings or places where water may drop. A liquid such as water getting into the unit may cause a fire, electric shocks, or malfunctions. If any liquid such as water seeps into the device, turn off the power immediately and unplug the power cord from the AC outlet. Then, request an inspection from the dealer where you purchased the unit or from qualified Yamaha service personnel.
- Never insert or remove an electric plug with wet hands. Do not handle this unit with wet hands. Failure to observe this may cause electric shocks or malfunctions.
Fire warning
- Do not place any burning items or open flames near the unit, since they may cause a fire.
Maintenance and care
- Do not use aerosols or spray-type chemicals that contain combustible gas for cleaning or lubrication. The combustible gas will remain inside the unit, which may cause explosion or fire.
Battery use
- Do not disassemble a battery. If the contents of the battery get on your hands or in your eyes, it can cause blindness or chemical burns.
- Do not dispose of batteries in fire. Doing so may result in the battery bursting, causing a fire or injury.
- Do not attempt to recharge batteries that are not intended to be charged. Charging could cause the battery to burst or leak, which can cause blindness, chemical burns, or injury.
- If the batteries do leak, avoid contact with the leaked fluid. If the battery fluid should come in contact with your eyes, mouth, or skin, wash immediately with water and consult a doctor. Battery fluid is corrosive and may possibly cause loss of sight or chemical burns.
Wireless unit
- Do not use this unit near medical devices or Inside medical facilities. Radio waves from this unit may affect electro-medical devices.
- Do not use this unit within 15 cm (6 in) of persons with a heart pacemaker implant or a defibrillator implant. Radio waves from this unit may affect electro-medical devices, such as a heart pacemaker implant or defibrillator implant.
If you notice any abnormality
- If any of the following abnormalities occur, immediately turn off the power and disconnect the power plug.
- The power cord/plug is damaged.
- An unusual smell or smoke is emitted from the unit.
- Foreign material gets into the interior of the unit.
- There is a loss of sound during use.
- There is a crack or damage in the unit.
Continued use could cause electric shocks, a fire, or malfunctions. Immediately request an inspection or repair from the dealer where you purchased the unit or from qualified Yamaha service personnel. - Be careful not to drop or apply strong impact to this unit. If you suspect the unit may have been damaged due to dropping or impact, immediately turn off the power and pull the power plug from the AC outlet. Failure to observe this may cause electric shocks, a fire, or malfunctions. Immediately request an inspection from the dealer where you purchased the unit or from qualified Yamaha service personnel.

CAUTION
This content indicates "risk of injury."
Power supply/power cord
- Do not use an AC outlet where the power plug fits loosely when inserted. Failure to observe this may cause a fire, electric shocks, or burns.
- When removing the electric plug from the unit or an AC outlet, always hold the plug itself and not the cord. Pulling by the cord can damage it and cause electric shocks or a fire.
- Insert the power plug firmly all the way into the AC outlet. Using the unit when it is not plugged in sufficiently can cause dust to accumulate on the plug, causing a fire or burns.
Installation
- Do not place the unit in an unstable position where it might accidentally drop or fall over and cause injuries.
- Do not block this unit's ventilation holes (cooling slits). This unit has ventilation holes on the side to prevent the internal temperature from becoming too high. Failure to observe this may trap heat inside the unit, causing a fire or malfunctions.
- When installing this unit:
- Do not cover it with any cloth.
- Do not install it on a carpet or rug.
- Make sure the top surface faces up; do not install on its sides or upside down.
- Do not use the device in a confined, poorly-ventilated location.
Failure to observe the above may trap heat inside the unit, causing a fire or malfunctions. Ensure that there is adequate space around the unit: at least 5 cm (2 in) on top, 5 cm (2 in) on the sides, and 5 cm (2 in) on the rear. - Do not install the unit in places where it may come into contact with corrosive gases or salt air or places that have excessive smoke or steam. Doing so may result in malfunction.
- Before moving this unit, be sure to turn off the power switch and disconnect all connection cables. Failure to observe this may damage the cables or cause you to trip and fall.
- For proper installation of the outdoor antenna, make sure to have it done by the dealer from where you purchased the unit or by qualified service personnel. Failure to observe this may cause the installation to fall and result in injury. Installation requires special skills and experience.
Hearing loss
- Do not use the unit for a long period of time at a high or uncomfortable volume level, since this can cause permanent hearing loss. If you experience any hearing loss or ringing in the ears, consult a physician.
- Before connecting the unit to other devices, turn off the power for all devices. Also, before turning the power of all devices on or off, make sure that all volume levels are set to the minimum. Failing to do so may result in hearing loss, electric shock, or device damage.
- When turning on the AC power in your audio system, always turn on the unit LAST, to avoid hearing loss and speaker damage. When turning the power off, the unit should be turned off
FIRST for the same reason. Failure to observe the above may cause hearing impairment or speaker damage.
Maintenance
- Remove the power plug from the AC outlet before cleaning the unit. Failure to observe this may cause electric shocks.
Handling caution
- Do not insert your hand or fingers into disk slot of this unit. Failure to observe this may cause injury.
- Do not insert foreign materials such as metal or paper into disk slot of this unit. Failure to observe this may cause a fire, electric shocks, or malfunctions. If foreign material gets into the unit, immediately shut off the power and pull the power plug from the AC outlet and request an inspection from the dealer where you purchased the unit or from qualified Yamaha service personnel.
- Do not do the following:
- stand on or sit on the equipment.
- put heavy items on top of the equipment.
- place the equipment in a stack.
- apply unreasonable force to buttons, switches, input/output terminals, etc.
- Avoid pulling the connected cables to prevent injuries or damage to the unit by causing it to fall.
- Do not operate the unit if the sound is distorting. Prolonged use in this condition could cause overheating and result in fire.
Battery use
- Always replace all batteries at the same time. Do not use new batteries together with old ones. Using new ones with old ones could cause a fire, burns, or inflammation due to fluid leaks.
- Do not use batteries other than specified batteries. Doing so cause fire, burns, or inflammation due to leakage.
- Do not mix battery types, such as alkaline batteries with manganese batteries, or batteries from different makers, or different types of batteries from the same maker, since this can cause a fire, burns, or inflammation due to fluid leaks.
- Keep batteries away from children. A child could accidentally swallow a battery. Failure to observe this may also cause inflammation due to battery fluid leaks.
- Do not put in a pocket or bag, carry, or store batteries together with pieces of metal. The battery could short, burst, or leak, causing a fire or injury.
- Always make sure all batteries are inserted in conformity with the +/- polarity markings. Failure to do so might result in a fire, bums, or inflammation due to fluid leaks.
- When the batteries run out, or if the unit is not to be used for a long time remove the batteries from the unit to prevent possible leakage of the battery fluid.
- When storing or discarding batteries, insulate the terminal area by applying tape, or some other protection. Mixing them with other batteries or metal objects can cause a fire, burns, or inflammation due to fluid.
NOTICE
Indicates points that you must observe in order to prevent product failure, damage or malfunction and data loss.
Power supply/power cord
- If not using the unit for a long period of time, be sure to pull the power plug from the outlet. Even if the ① switch has been turned off (the screen display is off), a minute current is still flowing.
Installation
- Do not use this unit in the vicinity of other electronic equipment, such as a TV, radio, or mobile phone. Failure to observe this may cause this unit or the TV or radio to produce noise.
- Do not use this unit in a location that is exposed to direct sunlight that becomes extremely hot, such as near a heater, or extremely cold, or that is subject to excessive dust or vibration. Failure to observe this may cause the unit's panel to become deformed, the internal components to malfunction, or for operation to become unstable.
• Install this unit as far away from other electronic equipment as possible. Digital signals from this unit may interfere with other electronic equipment. - If using a wireless function, avoid installing this unit near metal walls or desks, microwave ovens, or other wireless network devices. Obstructions could shorten the transmission distance.
Connections
- If connecting external units, be sure to thoroughly read the manual for each unit and connect them in accordance with the instructions. Failure to properly handle a unit in accordance with the instructions could cause malfunctions.
- Do not connect this unit to industrial units.
Digital audio interface standards for consumer use and industrial use are different. This unit has been designed to connect to a consumer-use digital audio interface. Connections to an industrial-use digital audio interface could not only cause this unit to malfunction, but could also damage the speakers.
Handling
- Do not place vinyl, plastic, or rubber products on this unit. Failure to observe this may cause discoloration or deformation in the panel of this unit.
- If the ambient temperature changes drastically (such as during unit transportation or under rapid heating or cooling) and there is a chance condensation may have formed in the unit, leave the unit for several hours without turning on the power until it is completely dry before use. Using the unit while there is condensation can cause malfunctions.
Maintenance
- When cleaning the unit, use a dry, soft cloth. Using chemicals such as benzine or thinner, cleaning agents, or chemical scrubbing cloths can cause discoloration or deformation.
Batteries
- Be sure to discard used batteries in accordance with local regulations.
About content in this manual
- The illustrations and screens in this manual are for instructional purposes only.
- The company names and product names in this manual are the trademarks or registered trademarks of their respective companies.
- Software may be revised and updated without prior notice.
LASERSAFETY
| This unit employs a laser. Due to possible eye injury, only a qualified service person should remove the cover or attempt to service this device. |
DANGER
| This unit emits visible laser radiation when open. Avoid direct eye exposure to beam. |
| When this unit is plugged into the wall outlet, do not place your eyes close to the opening of the disc tray and other openings to look into inside. |
CAUTION
| Use of controls or adjustments or performance of procedures other than those specified herein may result in hazardous radiation exposure. |
| The laser component in this product is capable of emitting radiation exceeding the limit for Class I. |
The model number, serial number, power requirements, etc., may be found on or near the name plate, which is at the rear of the unit. You should note this serial number in the space provided below and retain this manual as a permanent record of your purchase to aid identification in the event of theft.
Model No.
Serial No.
(rear_en_01)
Information for users on collection and disposal of old equipment and used batteries:
These symbols on the products, packaging, and/or accompanying documents mean that used electrical and electronic products and batteries should not be mixed with general household waste. For proper treatment, recovery and recycling of old products and used batteries, please take them to applicable collection points, in accordance with your national legislation.
By disposing of these products and batteries correctly, you will help to save valuable resources and prevent any potential negative effects on human health and the environment which could otherwise arise from inappropriate waste handling.
For more information about collection and recycling of old products and batteries, please contact your local municipality, your waste disposal service or the point of sale where you purchased the items.

For business users in the European Union: If you wish to discard electrical and electronic equipment, please contact your dealer or supplier for further information.
Information on Disposal In other Countries outside the European Union: These symbols are only valid in the European Union. If you wish to discard these items, please contact your local authorities or dealer and ask for the correct method of disposal.
Note for the battery symbol (bottom two symbol examples): This symbol might be used in combination with a chemical symbol. In this case it complies with the requirement set by the EU Battery Directive for the chemical involved.
(weee_battery_eu_en_02)
Introduction
Confirm the package contents and useful points of this manual.
About this manual
- Instructions and illustrations used in this manual refer to the CRX-B3/0D, unless otherwise specified.
- How to operate this unit is described mainly using the remote control.
• Illustrations may differ from actual item depicted.
Symbols:
Caution Indicates information that should be read before use to prevent failure or physical damage.
Note Indicates precautions and supplementary information that should be read before using the unit.
References another page or pages that provide additional information.
Trademarks

Bluetooth®
The Bluetooth ^® word mark and logos are registered trademarks owned by Bluetooth SIG, Inc. and any use of such marks by Yamaha Corporation is under license. Other trademarks and trade names are those of their respective owners.

Digital Audio Broadcasting

Digital Audio Broadcasting
(For CRX-B370D)
The unit supports DAB/DAB+ tuning.

Yamaha Eco-Label is a mark that certifies products of high environmental performance.
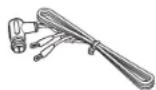
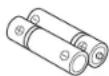
Accessories
Remote control FM antenna
(for CRX-B370)
DAB/FM antenna (for CRX-B370D)
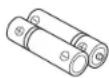
Batteries (x 2)
(AA, R6, UM-3)
What you can do with this unit
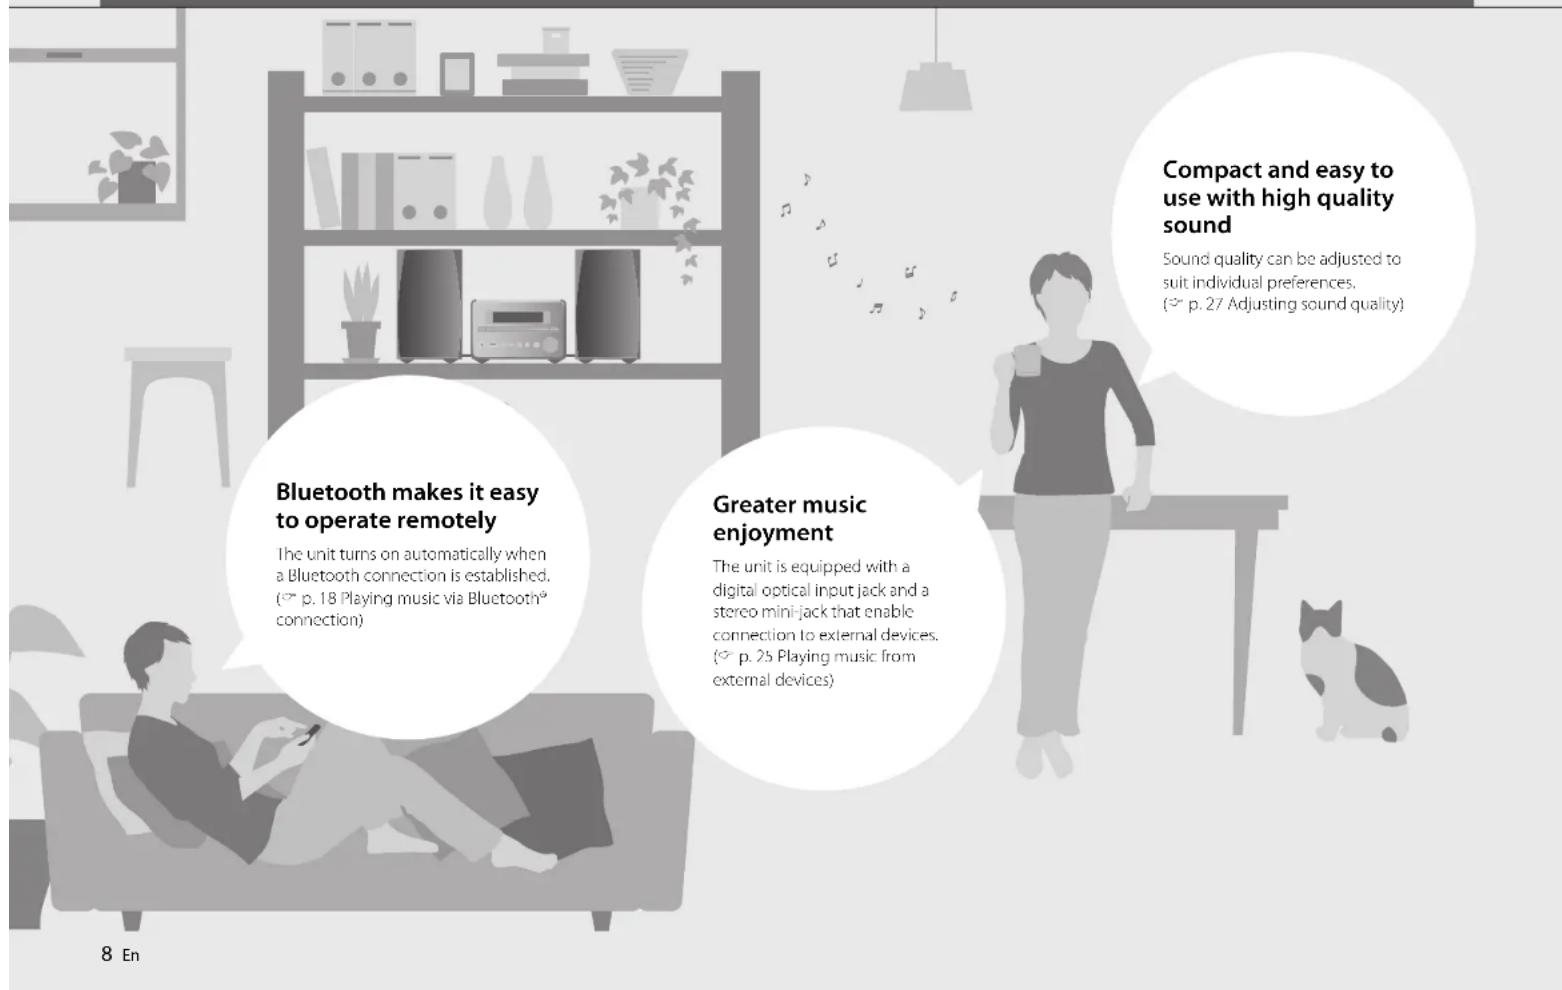
Compact and easy to use with high quality sound
Sound quality can be adjusted to suit individual preferences. (→ p. 27 Adjusting sound quality)
Parts name
Familiarize yourself with all parts and their functions.
Front panel
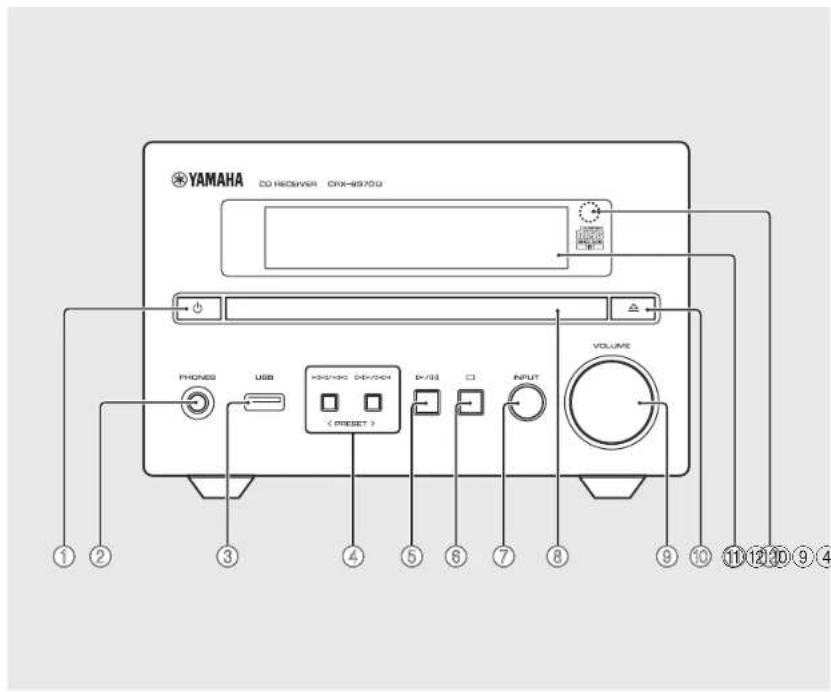
① ⏻ (Power) (p. 15)
The front panel display turns on when the unit is turned on.
②PHONES
Connect headphones to this jack.
Note
When headphones are connected, there is no sound from the speakers or subwoofer.
③USB jack (p. 17)
④ | | | | / < | | >, | | | | / > (p. 16, 17) PRESET </> ( p. 20, 22)
⑤ =>/□□ (Play/pause) (p. 16, 17)
⑥ □ (Stop) (○ p. 16, 17)
⑦ INPUT (p. 16, 17)
Change the input source. (The selected input source is shown in the front panel display.)
⑧Disc tray ( p. 16)
⑨VOLUME
Adjust the volume.
⑥7Open/close the disc tray) (p. 16)
⑪ Front panel display (p. 11)
⑫ Remote control sensor
Rear panel

①Power cord (p. 15)
②Service only jack
Use when the unit requires maintenances.
③ DIGITAL IN jack (optical input) (p. 25)
④Antenna jack (◦ p. 14)
CRX-B370 jack positioning differs from that shown in the illustration.
⑤ AUX IN jack (mini jack input) (p. 25)
⑥SUBWOOFER OUT jack (p. 13)
⑦SPEAKERS terminals (p. 13)
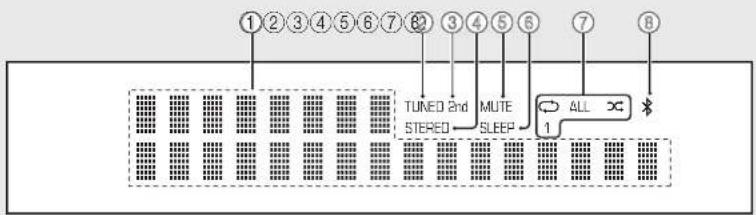
Front panel display
flowchart
graph TD
    A["1 2 3 4 5 6 7 8"] --> B["TUNED AND STEREO"]
    C["3 4 5 6"] --> D["MUTE SLEEP"]
    E["7"] --> F["ALL"]
    G["8"] --> F
    B --> H["1"]
    D --> I["1"]
①Multi information display
Show various information, such as music information and the radio frequency.
Characters shown in the front panel display are alphanumeric only.
②TUNED indicator
Glows when the unit is receiving a signal from an FM station.
③2nd indicator
Glows when a secondary DAB station is played.
④STEREO indicator
Glows when the unit is receiving a signal from an FM stereo broadcast.
⑤MUTE Indicator
Glows when the sound is muted (p. 12).
⑥SLEEP Indicator
Glows when the sleep timer is set (p. 15).
⑦ Shuffle/repeat indicator
Glows when the shuffle or repeat function is enabled for songs in a CD or USB memory device.
⑧ \* Bluetooth indicator
Show the status of Bluetooth connection.
Note
Changing display brightness
Each press of the DIMMER button on the remote control ( ^15 p. 12) changes the brightness: bright (default), mid dim, or dim.
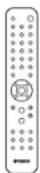
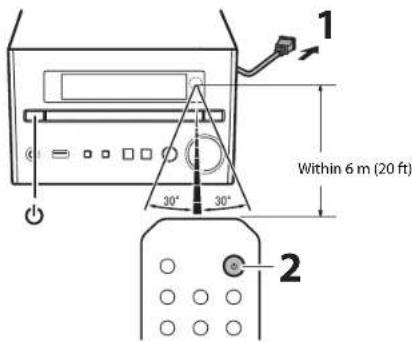
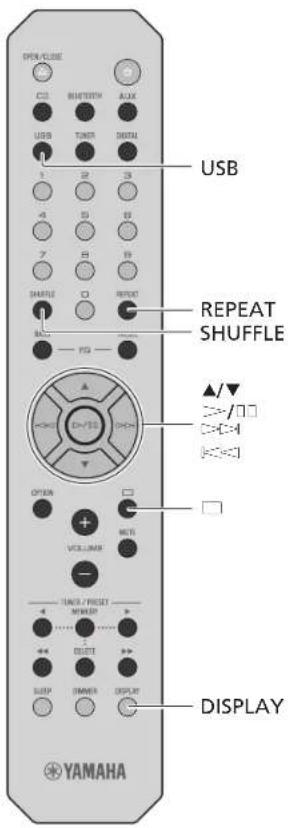
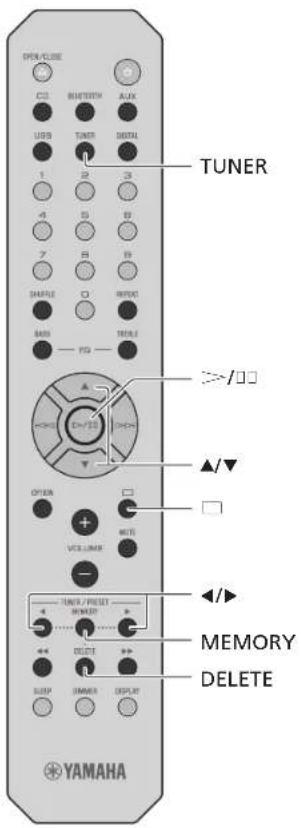
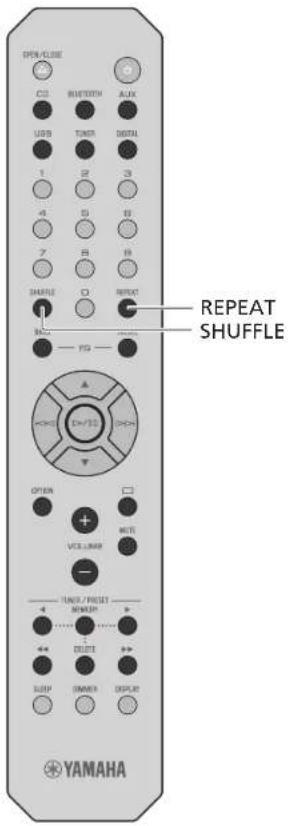
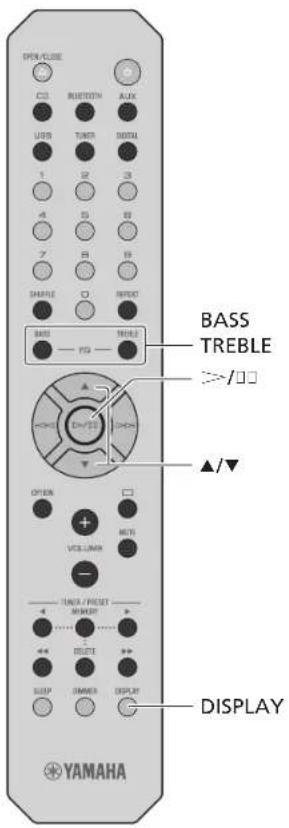
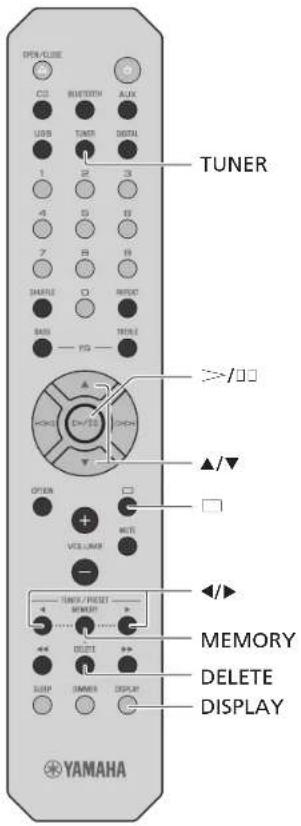
Remote control
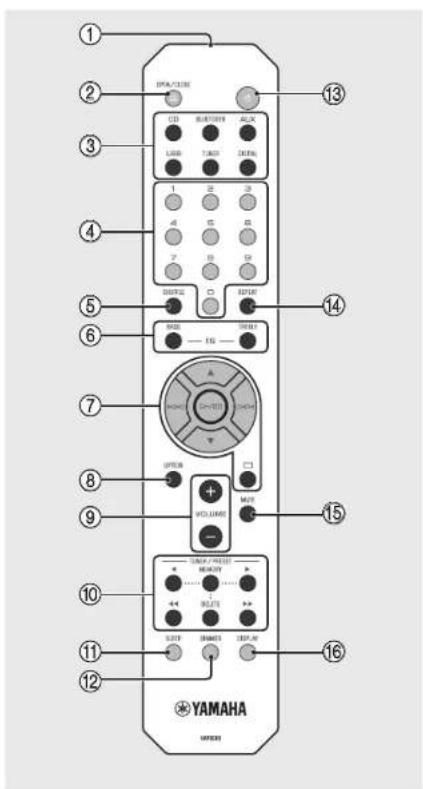
①Infrared signal transmitter
② OPEN/CLOSE △ (Open/close the disc tray)
(▼ p. 16)
③Input source buttons
Switch the input source
④Numeric buttons (◦ p. 16)
⑤SHUFFLE (p. 26)
⑥BASS, TREBLE (p. 27)
⑦ Audio control, cursor control buttons ( p. 16, 17)
⑧OPTION (p. 28)
⑨VOLUME +/- Adjust the volume.
⑩TUNER/PRESET (p. 20, 22)
⑪SLEEP (p. 15)
⑫DIMMER (p. 11)
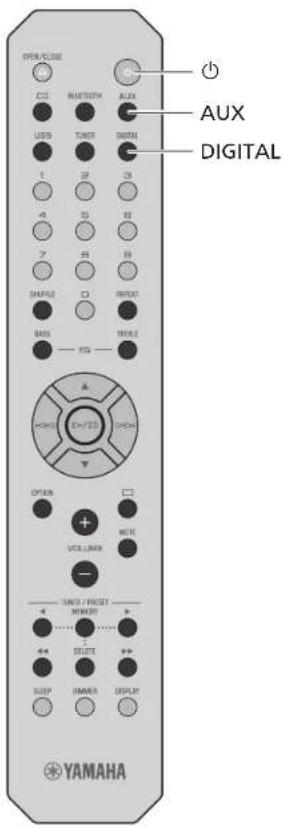
⑬ ⏻ (Power) (p. 15)
⑭REPEAT (p. 26)
⑮MUTE
Turn mute on or off.
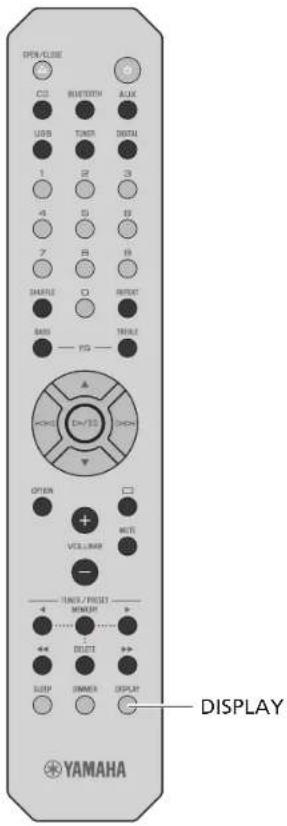
⑯DISPLAY (p. 27)
Installing batteries
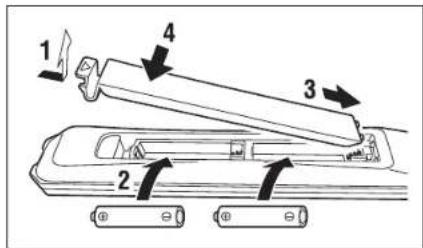
Check the "+" and "-" of the batteries and insert them in the correct directions.
Note
Change both batteries when the operation range of the remote control decreases.
Preparations
Connect speakers, the antenna, etc. and turn the unit on.
Do not connect the power cord of the unit until you have finished connecting all cables.
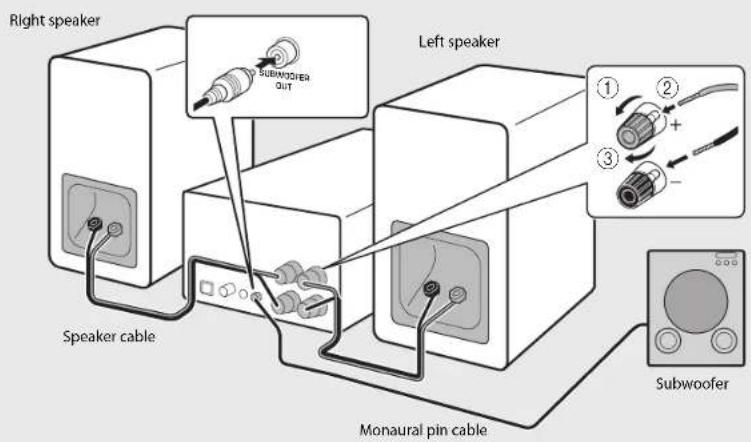
Connecting speakers
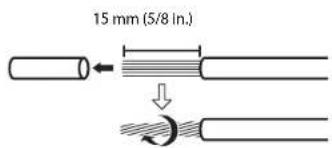
1 Remove the insulation from the ends of the speaker cables to expose the bare wires.
2 Connect speakers to the unit, as the illustration shows.
• Prepare speakers, subwoofer and speaker cables separately.
• See documentation provided with the speakers for more information.
Caution
- If the bare speaker wires touch each other or any metal part of the unit, it could damage the unit and/or the speakers.
• Use speakers of at least 6 Ω impedance.
Note
- Make sure that left and right (L, R) connections and polarity (red: +, black: -) are correct. If connections are incorrect, the sound will be unnatural.
- You can also connect a subwoofer to the unit (it must have a built-in amplifier).
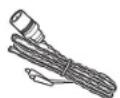
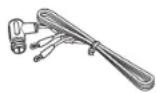
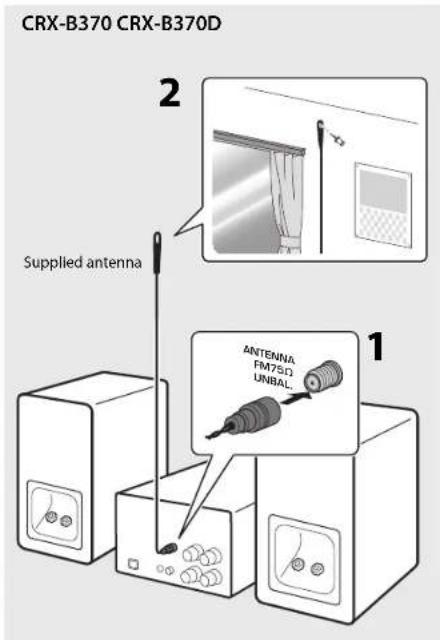
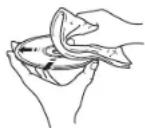
Connecting the antenna
1 Connect the supplied antenna to the unit.
2 Install it with pins where the unit can obtain good reception.

Note
- Be sure to stretch out the antenna as the illustration shows.
- If radio reception with the supplied antenna is not satisfactory, an outdoor antenna (sold separately) may improve reception.
Turning on the power
Plug the power cord into a power outlet, and press ⏻.
•The unit turns on.
- Press ⏻ again to turn the unit off (standby mode).
Reducing power consumption
Auto standby
The unit will automatically enter standby mode (auto standby) if in any of the following situations:
- BLUETOOTH, CD, or USB is selected as the input source, but no audio is played, and no operations are performed, for more than 20 minutes.
- An input source other than above is selected, but no operations are performed for more than 8 hours.
See "Option menu" (p. 28) to disable the auto standby function.
Eco standby
The unit minimizes power consumption in eco standby mode. Disable the BT Standby (Bluetooth standby) function to enable eco standby (p. 28).
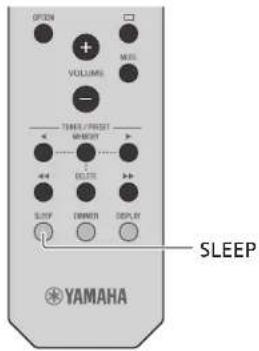
Using the sleep timer
You can set the time after which the unit automatically enters standby mode. The time can be selected from 120/90/60/30 min., or OFF.
Press SLEEP repeatedly to select the time.
The SLEEP indicator lights up when the sleep timer is set.
Note
• To cancel the sleep timer, press SLEEP again.
Listening to music
Listening to CDs
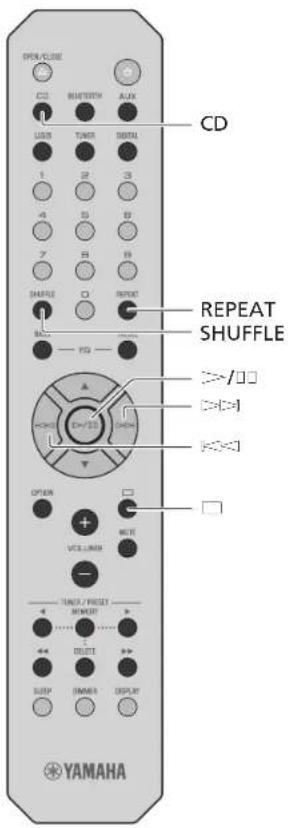
1 Press CD on the remote control.
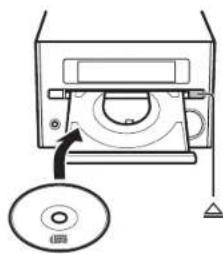
2 Set a CD in the disc tray.
Press △ to open/close the disc tray.
3 Press ▷/□□.
Playback starts.
Use the following buttons to control audio playback. A song can also be selected using the numeric buttons on the remote control.
| I>=/☐C Play/pause | |
| ☐ Stop | |
| I<=|>| | Skip to the beginning of the song being played back. Press and hold to fast rewind. |
| I=>| | | Skip to the next song. Press and hold to fast forward. |
| SHUFFLL/ REPEAT | p. 26 |
Note
- This unit allows playback of audio CDs, and data CDs in which MP3/WMA files are recorded. For details on playable CDs, see "Supported devices/media and file formats" (27 p. 34).
- When CD playback is stopped, playback will resume from the beginning of the song last played. Pressing □ (stop) while playback is stopped will clear resume playback.
- You can cancel the song number selected with the numeric buttons by pressing □ (stop).
- Music files stored on a data CD can be played using the same operations used to play music stored on a USB memory device (p. 17).
- If you turn off the unit with CD selected as the input source and a CD set in it, the unit automatically plays back the set CD next time you turn on the unit.
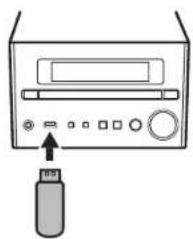
Playing music on USB memory devices
1 Press USB on the remote control.
2 Connect a USB memory device to the USB jack.
natural_image
Diagram of a CD-ROM interface with an inserted USB port (no text or symbols visible)3 Select a song.
Use the following buttons to control audio playback.
| ▲▼ | Select a folder. |
| [=>/□,][<=>] | Confirm the selected item and proceed to the next level, or start/pause playback. |
| [=><>] Return to the previous item. | |
| ☐ Stop | |
| SHUFFLE/REPEAT | p. 26 |
| DISPLAY | Display information about the content being played ( p. 27 ). |

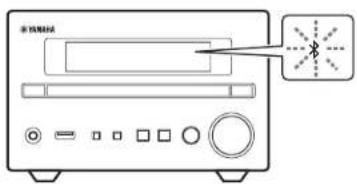
BLUETOOTH
Playing music via Bluetooth® connection
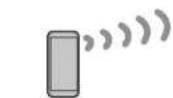
Bluetooth device
This unit
1 Enable the Bluetooth function on your Bluetooth device.
2 Press BLUETOOTH on the remote control.
3 Select this unit from the Bluetooth device list on your Bluetooth device.
The ✦ indicator glows when a connection is established.
4 Play music using your Bluetooth device.
Note
- Decrease the volume of the unit before playback. Otherwise, playback volume may be too loud.
- If a Bluetooth device has been connected before, the unit will connect to the last connected device when BLUETOOTH on the remote control is pressed.
- If the unit is connected to another device via Bluetooth connection, press and hold BLUETOOTH at least three seconds to terminate that connection before connecting to the target device.
- If a passkey is required during the Bluetooth connection, enter the number '0000.'
• See documentation provided with your Bluetooth device for more information on Bluetooth connection.
Unable to connect the unit to a Bluetooth device
If a Bluetooth connection was not established after following the instructions shown at left, try the following.
1 If the Bluetooth device has been connected to the unit before, delete the unit from the list of devices registered with your Bluetooth device.
2Press and hold BLUETOOTH on the remote control for at least three seconds.
- "Pairing" will be shown in the front panel display.
3Select this unit from the Bluetooth device list on your Bluetooth device.
- The \$ will grow in the front panel display when a connection is established.
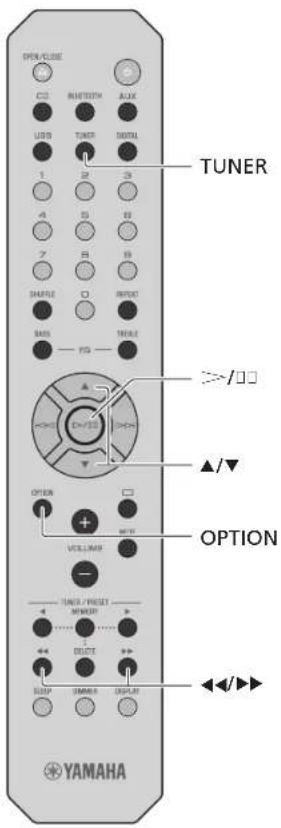
Listening to DAB stations (CRX-B370D only)
Connect the antenna supplied with the unit ( p. 14) to receive DAB stations.
Initial scan
Press TUNER repeatedly to select [DAB].
- Initial scan starts automatically when you select [DAB] for the first time.
- When scanning is completed, the number of receivable DAB stations is shown in the front panel display momentarily, and the first station stored is played.
Tuning in DAB stations
1 Press TUNER repeatedly to select [DAB].
When the unit cannot receive the DAB signal, "Off Air" is shown in the front panel display.
2 Press ◀◀/▶▶ to select a DAB station.

Note
- Initial scan is also available from the option menu.
1 Press OPTION when DAB is selected as the input source.
- The option menu is shown in the front panel display.
2 Press ▲/▼ to select [Initial Scan] and press [=>/□].
-Initial scan starts and finishes automatically.
- If an initial scan is performed, stored DAB station information and preset DAB stations are cleared.
•This unit can receive only Band II DAB frequencies.
Frequency in MHz/Channel label
| 174.928/5A | 176.640/5B | 178.352/5C | 180.064/5D |
| 181.936/6A | 183.648/6B | 185.360/6C | 187.072/6D |
| 188.928/7A | 190.640/7B | 192.352/7C | 194.064/7D |
| 195.936/8A | 197.648/8B | 199.360/8C | 201.072/8D |
| 202.928/9A | 204.640/9B | 206.352/9C | 208.064/9D |
| 209.936/10A | 211.648/10B | 213.360/10C | 215.072/10D |
| 216.928/11A | 218.640/11B | 220.352/11C | 222.064/11D |
| 223.936/12A | 225.648/12B | 227.360/12C | 229.072/12D |
| 230.784/13A | 232.496/13B | 234.208/13C | 235.776/13D |
| 237.488/13E | 239.200/13F |

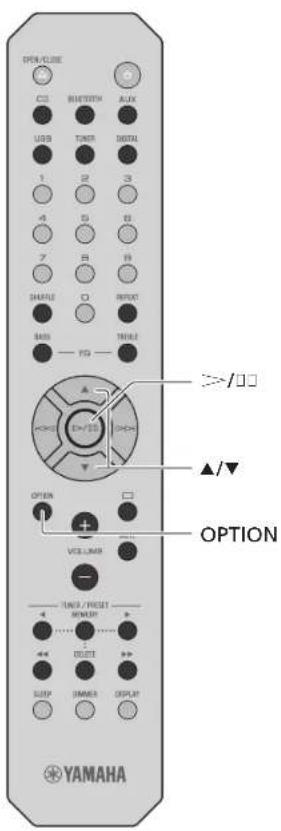
Presetting DAB stations
Use the preset function to store your favorite 30 DAB stations.
1 Tune in a DAB station (p. 19) and press MEMORY.
The preset number flashes in the front panel display.

2 Press ▲/▼ to select the desired preset number.
3 Press ▷/□□ to complete presetting.
To cancel the DAB preset setting, press □.
Selecting preset DAB stations
1 Press TUNER repeatedly to select [DAB].
2 Press ◀/▶ to select a preset station.
Note
- DAS station information shown in the front panel display is switched in the following order each time DISPLAY is pressed.
STATION (default)
DLS (Dynamic Label Segment)
ENSEMBLE
CHANNEL/FREQ (Channel label and frequency)
SIG.Q. (signal quality)
AUDIO FORMAT
Deleting a preset station
1 Press and hold DELETE for at least two seconds with DAB selected as the input source.
-The preset number flashes in the front panel display.
2 Press ▲/▼ to select the preset number for the station to be deleted.
3Press [>=/LL.
-The station assigned to the selected preset number is deleted.
Confirming the reception
You can confirm the DAB signal level. This is useful when setting up the antenna.
1 Press OPTION when DAB is selected as the input source.
The option menu is shown in the front panel display.
2 Press ▲/▼ to select [DAB Tune Aid] and press ▶/□□.
3 Press ▲/▼ to change the channel label. The measured DAB signal reception level is displayed.

The level is from 0 (none) to 100 (best).
4 Press OPTION to exit the option menu.
Note
- When the DAB signal is weak in [Tune Aid], try adjusting the position of the antenna to obtain good reception.
Listening to FM radio stations
Connect the antenna supplied with the unit (p. 14) to receive FM stations.
Tuning in FM stations
1 Press TUNER.
2 Press and hold ◀◀ or ▶▶ until automatic tuning starts.
Automatic tuning stops when a station is tuned in.

Note
- If station reception is weak, tune into a station manually by pressing / repeatedly. Sound will be heard in monaural.
Presetting FM stations
Auto preset
The unit tunes in stations with good reception and presels them automatically.
1 Press TUNER.
2 Press and hold MEMORY at least two seconds.
3 Press MEMORY.
Auto preset starts, and when it finishes, "Completed!" is shown in the front panel display.
Note
- Auto preset replaces all stations currently stored with new stations.
• Up to 30 FM stations can be preset. - Press □ to cancel Auto preset.
Manual preset
1 Tune into a station you want to preset (p. 22).
2 Press MEMORY.
The preset number flashes in the front panel display.

3 Press ▲/▼ to select the desired preset number.
4 Press □> /□□ to preset the station.
Note
• To cancel manual preset setting, press □.
Selecting preset FM stations
1 Press TUNER.
2 Press ◀/▶ to select a station.
The number of a registered preset can also be selected using the numeric buttons.
Note
Deleting a preset station
1 Press and hold DELETE at least two seconds when FM is selected as the input source.
-The preset number flashes in the front panel display.
2 Press ▲/▼ to select the preset number of the station to be deleted.
3Press □=□□.
-The station in the selected preset number is deleted.
Radio Data System (U.K. and Europe models only)
The unit can receive Radio Data System information.
Press DISPLAY when the input source is FM.
Each press of the button changes the information displays shown below.
PService (Program Service)
PIY (Program Type)
RT (Radio Text)
CT (Clock Time)
Frequency
Note
- If the signal transmission of the Radio Data System station is too weak, this unit may not be able to receive Radio Data System information completely. In particular, RT (Radio Text) information uses a lot of bandwidth, so it may be less available compared to other types of information.
Playing music from external devices
This unit allows playback from external devices. Use the jacks (DIGITAL IN or AUX IN) according to the device to be connected (∅ p. 10).
1 Unplug the power cord of the unit and connect the external device to the unit.
Use cables sold separately for connection.
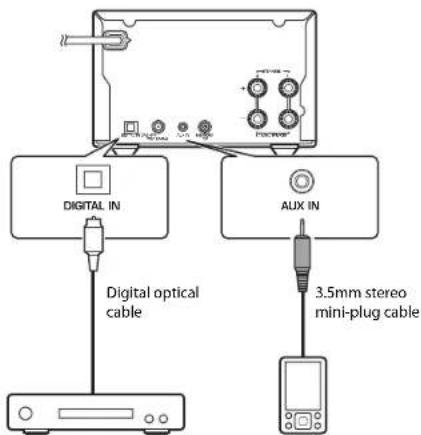
Audio device equipped with an optical output jack
Portable music player, etc.
2 Plug the power cord of the unit back into the wall outlet and press ⏻ to turn the unit on.
3 Press AUX or DIGITAL to select the input source.
4 Play the connected external device.
See documentation provided with the external device for information on playback.
Note
- Decrease the volume of the unit and the connected external device before connection. Otherwise, playback volume may be too loud.
• See documentation provided with the external device for more information on connecting devices.
More on playback
Features such as shuffle/repeat playback, displaying song information, etc. make this unit even more convenient to use.
Shuffle/Repeat playback
Operation is the same for playback of content from USB memory devices and CDs.
Shuffle (Random) playback
Press SHUFFLE during playback.
The shuffle indicator in the front panel display switches as shown below each time SHUFFLE is pressed.
× Shuffle folders*
ALL Shuffle all songs
Goes off The shuffle function is not applied.
* The range of shuffle depends on the media being played back.
Repeat playback
Press REPEAT during playback.
The repeat indicator in the front panel display switches as shown below each time REPEAT is pressed.
1 Repeat the song being played.
Repeat folders*
ALL Repeat all songs
Goes off The repeat function is not applied.
* The range of repeat depends on the playback media.
Playback information
While content from a USB memory device or CD is being played, the song title, elapsed time, etc. can be shown in the front panel display.
Press DISPLAY during playback.

The display switches in the order shown below each time DISPLAY is pressed.
| Data CD/USB CD | |
| Song title*1 | Playing time |
| Artist name Remaining time of the song | *2 |
| Album title Remaining time of the disc | *2 |
| Playing time Song title | *1,*3 |
| Artist name *3 | |
| Album title *3 |
*1 If the song title cannot be recognized, the file name may be displayed.
*2 Only when an audio CD is played.
^x3 Only when an audio CD encoded with information that can be displayed is played.
Note
- Characters shown in the front panel display are alphanumerics only.
Adjusting sound quality
Adjusting tones (default in bold face)
Use BASS and TRFBLF on the remote control to adjust the level at which high (treble) and low (bass) tones are output while listening to sound.
(-5 to 0 to +5)
1 Press BASS or TREBLE.
2 Change the level with ▲/▼ and press □=√□□.
Adjusting balance (default in bold face)
Use the option menu to adjust the volume balance of the left and right speakers (p. 28).
This setting is not applied when using headphones.
(Lch. +5 to center to Rch.+5)
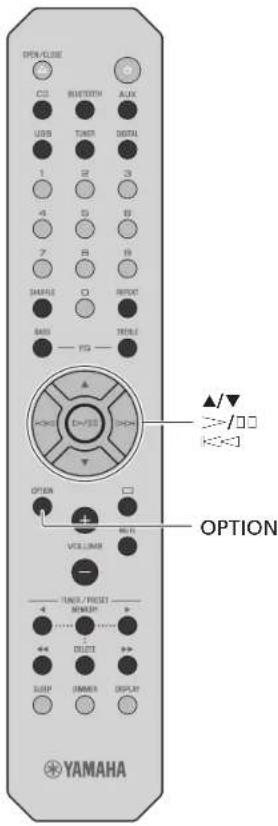
Option menu
The option menu allows you to configure the unit to suit how you will use it.
1 Press OPTION.
The option menu list is shown in the front panel display. Refer to "Option menu list" (p. 28).
2 Select a desired option menu with ▲/▼ and press □/□□.

3 Change the setting with ▲/▼ and press ▶/□□.
- Repeat step 3 if there is a sub menu.
- Press to cancel the setting and return to the previous level.
- Repeat steps 2 and 3 if you want to set another menu item.
4 Press OPTION to exit the option settings.
Option menu list
| Menu Default | Function | |
| Initial Scan ^1 (°p. 19) | Scan all receivable DAB frequencies and register them in the unit. | |
| DAB Tunc Aid ^2 (°p. 21) | Show the level of received DAB signal. | |
| Balance (°p. 27) center | Adjust the volume balance of the left and right speakers. | |
| AutoPowerSidby(°p. 15) | On | Set the unit to enter standby mode automatically. |
| BT Standby(Bluetooth standby) | On | When a Bluetooth device is connected to this unit while the unit is in standby mode, the unit will be turned on automatically. |
| Bluetooth On | Enable/disable the Bluetooth function. | |
| InitializeSet | Reset to the factory default settings. |
* Only when a DAB station is tuned in (CRX-B370D).
Troubleshooting
Refer to the table below when the unit does not function properly. If your problem is not listed below or if the instruction below does not help, turn off the unit, disconnect the power cord, and contact the nearest authorized Yamaha dealer or service center.
First, check that the connectors of each cable are securely inserted in to jacks on each device. Check also that the power cord is plugged into an outlet.
General
| Problem Cause Solution | ||
| The unit enters the standby mode soon after the power is turned on. The unit does not operate properly. | The power cord is not properly connected. Connect the power cord firmly. | |
| The internal microcomputer has frozen due to an external electrical shock (lightning, excessive static electricity, etc.) or a drop in power supply voltage. | Press and hold Ⓑ on the front panel for more than 10 seconds to initialize and reboot the unit. If the problem persists, unplug the unit from the electrical outlet, wait for at least 30 seconds, and then plug the unit into the electrical outlet again. | |
| No sound. | No appropriate input source has been selected. | Select an appropriate input source with INPUT on the front panel or the input source buttons on the remote control ( ^27 p. 9, 12). |
| Speaker connections are not secure. | Secure the connections ( ^27 p. 13). | |
| The volume is minimum or mute. Turn up the volume. | ||
| Sound is heard from the speaker on one side only. | The external device or speakers are not connected properly. | Connect the external device or speaker cables properly ( ^27 p. 13, 25). If the problem persists, the cables may be defective. |
| Noise is heard. | This unit is too close to digital or radio-frequency equipment. Move this unit away from such equipment. | |
| The audio cable used to connect the unit and external device may be defective. | Connect the audio cable firmly. If the problem persists, use another audio cable. | |
| The power suddenly turns off. | The sleep timer may be set ( ^27 p. 15). | Turn on the unit and play the source again. |
| Auto Power Standby function is activated ( ^27 p. 15). | ||
| There is noise interference from digital or high frequency equipment. | This unit is too close to the digital or high-frequency equipment. Place this unit farther away from such equipment. | |
| The remote control does not work or does not function properly. | The remote control may be outside its operation range. | Operate the remote control within its operation range (○ p. 15). |
| The remote control sensor on this unit may be exposed to direct sunlight or strong lighting such as an inverter type fluorescent lamp. | Change the orientation of lighting or the unit, or location of the unit. | |
| The battery may be worn out. | Replace the batteries with new ones (○ p. 12). | |
| There are obstacles between the sensor of this unit and the remote control. | Remove the obstacles. | |
Bluetooth
| Problem Cause Solution | ||
| Unable to connect the unit to a Bluetooth device. | The [Bluetooth] of the option settings is set to [Off]. Set it to [On]. | |
| The unit is already connected to another Bluetooth device. | Terminate the current Bluetooth connection, and then connect to the new device (p. 18). | |
| The unit and the Bluetooth device are too far apart. Move the Bluetooth device closer to the unit. | ||
| A device that operates in the 2.4 GHz band (microwave oven, wireless network device, etc.) is interfering with wireless communication. | Move the unit and Bluetooth device farther away from the device. If the wireless LAN router supports the 5 GHz band, connect network devices to the network using the 5 GHz band. | |
| The passkey for devices such as a Bluetooth adapter is not "0000". Use a Bluetooth device with a passkey of "0000." | ||
| The Bluetooth device does not support the Advanced Audio Distribution Profile (A2DP). | Use a Bluetooth device that supports A2DP. | |
| No sound is played, or sound is interrupted during playback. | The volume level on the Bluetooth device is set too low. Increase the volume on the Bluetooth device. | |
| The Bluetooth device is not configured to transmit audio signal to this unit. | On the Bluetooth device, select this unit as the audio output destination. | |
| The Bluetooth connection has been terminated. | Establish the Bluetooth connection again (p. 18). | |
| A device that operates in the 2.4 GHz band (microwave oven, wireless network device, etc.) is interfering with wireless communication. | Move the unit and Bluetooth device farther away from the device. If the wireless LAN router supports the 5 GHz band, connect network devices to the network using the 5 GHz band. | |
| The unit and the Bluetooth device are too far apart. Move the Bluetooth device closer to the unit. | ||
Disc
| Problem Cause Solution | ||
| Playback does not start (or stops immediately) after pressing >=/□□, | The disc may be dirty. Wipe the disc clean (°° p. 34). | |
| The disc inserted in the unit may not be supported. | Use a disc supported by the unit (°° p. 34). | |
| If the unit was moved from a cold to warm place, condensation may have formed on the disc reading lens. | Wait for an hour or two until the unit adjusts to the room temperature, and try again. | |
| No sound is played, or the sound is interrupted during playback. | The disc may be dirty. Wipe the disc clean (°° p. 34). | |
| The disc inserted in the unit may not be supported. | Use a disc supported by the unit (°° p. 34). |
USB memory devices
| Problem Cause Solution | ||
| The unit does not detect the USB memory device. | The USB memory device is not connected to the USB jack securely. | Turn off the unit, reconnect your USB memory device, and turn the unit on again (p. 17). |
| A USB memory device in a format other than FAT16/32 format is used. Use a USB memory device with FAT16 or FAT32 format. | ||
| Folders and files in the USB memory device cannot be viewed. | The data in the USB memory device is protected by encryption. Use a USB memory device without an encryption function. | |
| No sound is played, or the sound is interrupted during playback. | The music file is not supported by the unit. | Play a music file supported by the unit (p. 39). |
DAB reception (CRX-B370D only)
| Problem Cause Solution | ||
| Cannot tune into any DAB stations. | The initial scan operations were not performed. | Perform the initial scan operations (p. 19). |
| The initial scan operations are not successful and [Not Found] is shown in the front panel display. | The DAB signals are too weak. | Use the DAB Tune Aid feature to conform the best position of the antenna (p. 21). |
| The positioning of the antenna is not optimal for DAB reception. | ||
| There is no DAB coverage in your area. | Check with your dealer or WorldDMB online at http://www.worlddab.org for a listing of the DAB coverage in your area. | |
| There is noise interference (e.g. hiss, crackle or jitter) | The antenna needs to be repositioned. | Readjust the position of the antenna (p. 14). |
| The DAB signals are too weak. | Use the DAB Tune Aid feature to conform the best position of the antenna (p. 21). | |
| The DAB station information is not shown or is inaccurate. | The DAB station may be temporarily out of service, or the DAB station information is not provided by the DAB broadcaster. | Contact the DAB broadcaster. |
FM reception
| Problem Cause Solution | ||
| FM stereo reception is noisy. | The antenna is not connected properly. | Make sure the antenna is connected properly and change the position of the antenna (p. 14). |
| The radio station may be far from your area, or the antenna input is poor. | Use a commercially available outdoor antenna. For details, consult a specialist store. | |
| Automatic tuning does not work. The radio station may be far from your area, or the antenna input is poor. | Use a commercially available outdoor antenna. For details, consult a specialist store. | |
| Use the manual tuning method (p. 23). | ||
| Cannot select a preset radio station. | The preset (memory) may have been erased. | Preset radio stations again (p. 22, 23). |
| There is distortion, and clear reception cannot be obtained even with a good FM antenna or an outdoor antenna. | Multipath reflection or other radio interference may be occurring. | Change the height, direction, or placement of the antenna. |
Messages in the front panel display
| Message Cause Solution | ||
| Access Error The unit cannot access the USB memory device. | Turn off the unit and reconnect your USB memory device. If the problem persists, try another USB memory device. | |
| Disc Error A disc that is not supported by the unit has been inserted. Insert a disc that is supported by the unit. | ||
| Loading... The unit is loading the specified file/content. Wait until the unit finishes loading. | ||
| No Content | The disc or USB memory device does not contain files supported by the unit. | Use a disc or USB memory device that contains files supported by the unit. |
| No Disc | The disc inserted in the unit may not be supported. | Use a disc supported by the unit (10 p. 34). |
| The disc may be dirty, or foreign matter may be attached to it. | Wipe the disc clean. Alternatively, remove foreign matter adhered to the disc. | |
| Disc is set upside-down. Set the disc with the labeled side facing up. | ||
| Overcurrent | The connected USB memory device is not supported by the unit. | Disconnect the USB memory device, turn off the unit, and turn it on again. If this does not solve the problem for the USB memory device, it is not playable on the unit. |
| USB memory device is not connected properly. | ||
| Unknown The unit cannot access the USB memory device. | Turn off the unit and reconnect your USB memory device. If the problem persists, try another USB memory device. | |
| Unknown Disc A disc that is not recognized by the unit has been inserted. Insert a disc that can be played the unit. | ||
| USB Error | The unit cannot play back the songs stored on the USB memory devices for some reason. | Check if the format of files you are trying to play is supported by the unit (10 p. 35). |
Supported devices/media and file formats
Supported devices/media
USB memory devices
- This unit is compatible with USB memory devices that are in FAT16 or FAT32 format. Do not connect any other type of USB memory devices.
- USB memory devices with encryption cannot be used.
•Operation of all USB memory devices cannot be guaranteed.
Yamaha and suppliers do not accept any liability for the loss of data saved on a USB memory device connected to the unit. As a precaution, it is recommended to make backup copies of important files.
Discs
- This unit is designed for use with audio CD, CD-R/RW (ISO 9660 format) with any of the following logos printed on the disc or the disc jacket.
Audio CD


CD-R/RW*


* Discs which bear one of the following.
FOR CONSUMER
FOR CONSUMER USE
FOR MUSIC USE ONLY
- 8-cm discs are playable with this unit.
Set a disc in the inner recessed area of the disc tray.
Notes on discs
- Do not set any other type of disc other than stated above in this unit. Doing so may damage the unit.
- CD-R/RW cannot be played back unless finalized. Finalization means the process for making a disc to be ready for playback on a compatible device.
- Some discs cannot be played back depending on the disc characteristics or recording conditions.
- Do not use any non-standard shaped discs such as a heart-shaped disc.
- Do not use discs with many scratches or a crack on their surface, or warped/glued discs.
Handling discs
- Do not touch the surface of the disc. Hold a disc by its edge or center hole.
- Use a soft-tipped pen when writing on the label side of a disc.
- Do not put tape, seal, glue, etc., on a disc.
- Do not use a protective cover to prevent scratches.
- Do not set foreign object on the disc tray.
- Do not set more than one disc in this unit at one time. This could cause damage to both this unit and the discs.
- If a disc becomes dirty, wipe it with a clean, dry soft cloth from the center out to the edge. Do not use record cleaner or paint thinner.
- Do not use any lens cleaners as they may cause malfunction.
- Do not expose discs to direct sunlight, high temperature, high humidity, or dust.
- When a disc is not being used, remove it from this unit and store in an appropriate case.
File format
This unit supports the following file formats.
USB
| Format | Sampling frequency (kHz) | Quantization bits (bit) | Bitrate (kbps) | Number of channels |
| WAV^* | 32/44.1/48/88.2/96/176.4/192 | 16/24 - 2 | ||
| MP3 32/44.1/48 16 8-320 2 | ||||
| WMA 32/44.1/48 16 8-320 2 | ||||
| MPEG-4 AAC-LC 32/44.1/48 16 8-320 2 | ||||
| FLAC | 32/44.1/48/88.2/96/176.4/192 | 16/24 - 2 | ||
| ALAC 32/44.1/48 16/24 - 2 | ||||
| AIFF | 32/44.1/48/88.2/96/176.4/192 | 16/24 - 2 | ||
* Linear PCM format only
•Digital Rights Management (DRM) files cannot be played back.
Disc
| Format | Sampling frequency (kHz) | Quantization bits | Bitrate (kbps) | Number of channels |
| MP3 32/44.1/48 16 8-320 2 | ||||
| WMA 32/44.1/48 16 8-320 2 | ||||
Specifications
Input
| AUX IN 3.5 mm stereo min jack | |
| DIGITAL IN Optical jack |
Output
| SUBWOOFER OUT RCA monaural jack | |
| SPI AKI RS 1/R - | |
| PHONES 6.3 mm in diameter |
CD
| Laser | Type Semiconductor laser GaAs/GaAlAs |
| Wave length /90 nm | |
| Output power 7 mW | |
| Media CD, CD R/RW | |
| Audio format Audio CD, MP3, WMA | |
Tuner
| Preset memory 30 | ||
| Tuning range FM | U.S.A. and Canada models: 87.5 MHz to 107.9 MHzOther models: 87.5 MHz to 108.0 MHz | |
DAB (CRX-B370D only)
| Preset Memory 30 | |
| Tuning range DAB 174 MHz to 240 MHz (Band III) | |
| Compatibility DAB/DAB+ | |
Bluetooth
| Bluetooth version Ver. 4.2 | |
| Supported profile | A2DP (Advanced Audio Distribution Profile)AVRCP (Audio/Video Remote Control Profile) |
| Compatible codecs | SBC, AAC |
| Maximum communication range | 10 m (33 ft) (without interference) |
| Radio frequency (operational frequency) | 2402 MHz to 2480 MHz |
| Maximum output power (EIRP) | 4 dBm (2.5 mW) |
Amplifier section
| Maximum output power | 20 W + 20 W (6 Ω, 1 K Hz, 10 % T I D) |
| Frequency response | 20 Hz to 30 kHz (0.13 dB) |
| Total harmonic distortion | ≤ 0.05 % (2.5 W/6 Ω) |
General
| Power supply/Frequency | AC 100 to 240 V, 50/60 Hz |
| Power consumption | 18 W |
| Standby power consumption | Bluetooth standby off: 0.3 W (ECO)Bluetooth standby on: 1.5 W |
| Dimensions (W × H × D) | 180 × 118 × 322 mm (7 1/8 × 4 5/8 × 12 5/8 Inch) |
| Weight | 2.7 kg (5.9 lbs.) |
The contents of this manual apply to the latest specifications as of the publishing date. To obtain the latest manual, access the Yamaha website then download the manual file.

With an advanced energy saving design, this product achieves a low power consumption of not more than 1.8 watts when in Bluetooth standby mode.
Table des matières
PRÉCAUTIONS D'USAGE 38
Introduction 43
Digital Audio Broadcasting

Digital/Audie Broadcasting
(Pour CRX-B370D)
natural_image
Diagram showing a CD inside a microwave oven with an arrow indicating the next dish (no text or symbols present)3 Appuyez sur ▷/□□.
La lecture démarre.
natural_image
Diagram of a CD-ROM interface with an external USB port and control buttons (no text or symbols)| 174.928/5A | 176.640/5B | 178.352/5C | 180.064/5D |
| 181.936/6A | 183.648/6B | 185.360/6C | 187.072/6D |
| 188.928/7A | 190.640/7B | 192.352/7C | 194.064/7D |
| 195.936/8A | 197.648/8B | 199.360/8C | 201.072/8D |
| 202.928/9A | 204.640/9B | 206.352/9C | 208.064/9D |
| 209.936/10A | 211.648/10B | 213.360/10C | 215.072/10D |
| 216.928/11A | 218.640/11B | 220.352/11C | 222.064/11D |
| 223.936/12A | 225.648/12B | 227.360/12C | 229.072/12D |
| 230.784/13A | 232.496/13B | 234.208/13C | 235.776/13D |
| 237.488/13E | 239.200/13F |
Préréglage de stations DAB
DLS (Dynamic Label Segment)
ENSEMBLE
Digital Audio Broadcasting

Digital Audio Broadcasting
(Für CRX-B370D)
natural_image
Diagram of a CD-ROM interface with an external USB port and indicator lights (no text or symbols)| 174.928/5A | 176.640/5B | 178.352/5C | 180.064/5D |
| 181.936/6A | 183.648/6B | 185.360/6C | 187.072/6D |
| 188.928/7A | 190.640/7B | 192.352/7C | 194.064/7D |
| 195.936/8A | 197.648/8B | 199.360/8C | 201.072/8D |
| 202.928/9A | 204.640/9B | 206.352/9C | 208.064/9D |
| 209.936/10A | 211.648/10B | 213.360/10C | 215.072/10D |
| 216.928/11A | 218.640/11B | 220.352/11C | 222.064/11D |
| 223.936/12A | 225.648/12B | 227.360/12C | 229.072/12D |
| 230.784/13A | 232.496/13B | 234.208/13C | 235.776/13D |
| 237.488/13E | 239.200/13F |

DLS (Dynamic Label Segment)
ENSEMBLE
Digital Audio Broadcasting

(For CRX-B370D)
①Nätsladd (s. 123)
②Jack för service endast
①Infraröd sändare
② OPEN/CLOSE △ (Öppna/stäng skivfacket) (s. 124)
③ Knappar för ingångskällor
Växla ingångskälla.
④Slifferknappar (s. 124)
⑤SHUFFLE (s. 134)
⑥BASS, TREBLE (s. 135)
⑦ Ljudkontroll, markörknappar (s. 124, 125)
⑧OPTION (s. 136)
⑨VOLUME +/- Justera volymen.
⑩TUNER/PRESET (s. 128, 130)
⑪SLEEP (s. 123)
⑫DIMMER (s. 119)
⑬ ⏻ (ström) (s. 123)
⑭REPEAT (s. 134)
⑯MUTE
Slå på/av volymdämpningen.
⑯DISPLAY (s. 135)
Installera batterier

3 Tryck på □> /□□.
natural_image
Diagram of a computer interface with an inserted port and control buttons (no text or symbols)Obs!
| 174.928/5A | 176.640/5B | 178.352/5C | 180.064/5D |
| 181.936/6A | 183.648/6B | 185.360/6C | 187.072/6D |
| 188.928/7A | 190.640/7B | 192.352/7C | 194.064/7D |
| 195.936/8A | 197.648/8B | 199.360/8C | 201.072/8D |
| 202.928/9A | 204.640/9B | 206.352/9C | 208.064/9D |
| 209.936/10A | 211.648/10B | 213.360/10C | 215.072/10D |
| 216.928/11A | 218.640/11B | 220.352/11C | 222.064/11D |
| 223.936/12A | 225.648/12B | 227.360/12C | 229.072/12D |
| 230.784/13A | 232.496/13B | 234.208/13C | 235.776/13D |
| 237.488/13E | 239.200/13F |

DLS (Dynamic Label Segment)
ENSEMBLE
Digital Audio Broadcasting

Digital/Multi Broadcasting
(per CRX-B370D)
Antenna DAB/FM (per CRX-B370D)
Batterie (x 2)
(AA, R6, UM-3)

Nota
natural_image
Diagram showing a CD inside a microwave oven with an arrow indicating the next dish (no text or symbols present)3 Premere ▷/□□.
natural_image
Diagram of a computer monitor with an inserted port and control buttons, no text or symbols present| 174.928/5A | 176.640/5B | 178.352/5C | 180.064/5D |
| 181.936/6A | 183.648/6B | 185.360/6C | 187.072/6D |
| 188.928/7A | 190.640/7B | 192.352/7C | 194.064/7D |
| 195.936/8A | 197.648/8B | 199.360/8C | 201.072/8D |
| 202.928/9A | 204.640/9B | 206.352/9C | 208.064/9D |
| 209.936/10A | 211.648/10B | 213.360/10C | 215.072/10D |
| 216.928/11A | 218.640/11B | 220.352/11C | 222.064/11D |
| 223.936/12A | 225.648/12B | 227.360/12C | 229.072/12D |
| 230.784/13A | 232.496/13B | 234.208/13C | 235.776/13D |
| 237.488/13E | 239.200/13F |

DLS (Dynamic Label Segment)
ENSEMBLE
Digital Audio Broadcasting

natural_image
Diagram showing a CD inside a microwave oven with an arrow indicating the next CD (no text or symbols present)3 Pulse ▷/□□.
natural_image
Diagram of a computer monitor with an attached USB port, showing no text or symbols| 174.928/5A | 176.640/5B | 178.352/5C | 180.064/5D |
| 181.936/6A | 183.648/6B | 185.360/6C | 187.072/6D |
| 188.928/7A | 190.640/7B | 192.352/7C | 194.064/7D |
| 195.936/8A | 197.648/8B | 199.360/8C | 201.072/8D |
| 202.928/9A | 204.640/9B | 206.352/9C | 208.064/9D |
| 209.936/10A | 211.648/10B | 213.360/10C | 215.072/10D |
| 216.928/11A | 218.640/11B | 220.352/11C | 222.064/11D |
| 223.936/12A | 225.648/12B | 227.360/12C | 229.072/12D |
| 230.784/13A | 232.496/13B | 234.208/13C | 235.776/13D |
| 237.488/13E | 239.200/13F |

PService (Program Service)
DAB (solo CRX-B370D)
natural_image
Diagram showing a CD inside a microwave oven with an arrow indicating the next dish (no text or symbols present)3 Druk op ▷/□□.
De weergave begint.
natural_image
Diagram of a CD-ROM interface with an inserted USB port (no text or symbols visible)3 Kies een nummer.
| 174.928/5A | 176.640/5B | 178.352/5C | 180.064/5D |
| 181.936/6A | 183.648/6B | 185.360/6C | 187.072/6D |
| 188.928/7A | 190.640/7B | 192.352/7C | 194.064/7D |
| 195.936/8A | 197.648/8B | 199.360/8C | 201.072/8D |
| 202.928/9A | 204.640/9B | 206.352/9C | 208.064/9D |
| 209.936/10A | 211.648/10B | 213.360/10C | 215.072/10D |
| 216.928/11A | 218.640/11B | 220.352/11C | 222.064/11D |
| 223.936/12A | 225.648/12B | 227.360/12C | 229.072/12D |
| 230.784/13A | 232.496/13B | 234.208/13C | 235.776/13D |
| 237.488/13E | 239.200/13F |

DLS (Dynamic Label Segment)
ENSEMBLE
CHANNEL/FREQ (kanaal en frequentie)
PService (Program Service)
PTY (Programmatype)
RT (Radiotekst)
CT (Kloktijd)
Frequentie
Opmerking
Opmerking over discs
This product uses the following software.
Version 2.0, January 2004
http://www.apache.org/licenses/
TERMS AND CONDITIONS FOR USE, REPRODUCTION, AND DISTRIBUTION
- Definitions.
"License" shall mean the terms and conditions for use, reproduction, and distribution as defined by Sections 1 through 9 of this document.
"Licensor" shall mean the copyright owner or entity authorized by the copyright owner that is granting the License.
"Legal Entity" shall mean the union of the acting entity and all other entities that control, are controlled by, or are under common control with that entity. For the purposes of this definition, "control" means (i) the power, direct or indirect, to cause the direction or management of such entity, whether by contract or otherwise, or (ii) ownership of fifty percent (50%) or more of the outstanding shares, or (iii) beneficial ownership of such entity.
"You" (or "Your") shall mean an individual or Legal Entity exercising permissions granted by this License.
"Source" form shall mean the preferred form for making modifications, including but not limited to software source code, documentation source, and configuration files.
"Object" form shall mean any form resulting from mechanical transformation or translation of a Source form, including but not limited to compiled object code, generated documentation, and conversions to other media types.
"Work" shall mean the work of authorship, whether in Source or Object form, made available under the License, as indicated by a copyright notice that is included in or attached to the work (an example is provided in the Appendix below).
"Derivative Works" shall mean any work, whether in Source or Object form, that is based on (or derived from) the Work and for which the editorial revisions, annotations, elaborations, or other modifications represent, as a whole, an original work of authorship. For the purposes of this License, Derivative Works shall not include works that remain separable from, or merely link (or bind by name) to the interfaces of, the Work and Derivative Works thereof.
"Contribution" shall mean any work of authorship, including the original version of the Work and any modifications or additions to that Work or Derivative Works thereof, that is intentionally submitted to Licensor for inclusion in the Work by the copyright owner or by an individual or Legal Entity authorized to submit on behalf of the copyright owner. For the purposes of this definition, "submitted" means any form of electronic, verbal, or written communication sent to the Licensor or its representatives, including but not limited to communication on electronic mailing lists, source code control systems, and issue tracking systems that are managed by, or on behalf of, the Licensor for the purpose of discussing and improving the Work, but excluding communication that is conspicuously marked or otherwise designated in writing by the copyright owner as "Not a Contribution."
*Contributor* shall mean Licensor and any individual or Legal Entity on behalf of whom a Contribution has been received by Licensor and subsequently incorporated within the Work
-
Grant of Copyright License. Subject to the terms and conditions of this License, each Contributor hereby grants to You a perpetual, worldwide, non-exclusive, no-charge, royalty-free, irrevocable copyright license to reproduce, prepare Derivative Works of, publicly display, publicly perform, sublicense, and distribute the Work and such Derivative Works in Source or Object form.
-
Grant of Patent License. Subject to the terms and conditions of this License, each Contributor hereby grants to You a perpetual, worldwide, non-exclusive, no-charge, royalty-free, irrevocable (except as stated in this section) patent license to make, have made, use, offer to sell, sell, import, and otherwise transfer the Work, where such license applies only to those patent claims licensable by such Contributor that are necessarily infringed by their Contribution(s) alone or by combination of their Contribution(s) with the Work to which such Contribution(s) was submitted. If You institute patent litigation against any entity (including a cross-claim or counterclaim in a lawsuit) alleging that the Work or a Contribution incorporated within the Work constitutes direct or contributory patent infringement, then any patent licenses granted to You under this License for that Work shall terminate as of the date such litigation is filed.
-
Redistribution. You may reproduce and distribute copies of the Work or Derivative Works thereof in any medium, with or without modifications, and in Source or Object form, provided that You meet the following conditions:
(a)You must give any other recipients of the Work or Derivative Works a copy of this License; and (b)You must cause any modified files to carry prominent notices stating that You changed the files; and
(c) You must retain, in the Source form of any Derivative Works that You distribute, all copyright, patent, trademark, and attribution notices from the Source form of the Work, excluding those notices that do not pertain to any part of the Derivative Works; and
(d) If the Work includes a "NOTICE" text file as part of its distribution, then any Derivative Works that You distribute must include a readable copy of the attribution notices contained within such NOTICE file, excluding those notices that do not pertain to any part of the Derivative Works, in at least one of the following places: within a NOTICE text file distributed as part of the Derivative Works; within the Source form or documentation, if provided along with the Derivative Works; or, within a display generated by the Derivative Works, if and wherever such third-party notices normally appear. The contents of the NOTICE file are for informational purposes only and do not modify the License. You may add Your own attribution notices within Derivative Works that You distribute, alongside or as an addendum to the NOTICE text from the Work, provided that such additional attribution notices cannot be construed as modifying the License.
You may add Your own copyright statement to Your modifications and may provide additional or different license terms and conditions for use, reproduction, or distribution of Your modifications, or for any such Derivative Works as a whole, provided Your use, reproduction, and distribution of the Work otherwise complies with the conditions stated in this License.
-
Submission of Contributions. Unless You explicitly state otherwise, any Contribution intentionally submitted for inclusion in the Work by You to the Licensor shall be under the terms and conditions of this License, without any additional terms or conditions. Notwithstanding the above, nothing herein shall supersede or modify the terms of any separate license agreement you may have executed with Licensor regarding such Contributions.
-
Trademarks. This License does not grant permission to use the trade names, trademarks, service marks, or product names of the Licensor, except as required for reasonable and customary use in describing the origin of the Work and reproducing the content of the NOTICE file.
-
Disclaimer of Warranty. Unless required by applicable law or agreed to in writing, Licensor provides the Work (and each Contributor provides its Contributions) on an "AS IS" BASIS, WITHOUT WARRANTIES OR CONDITIONS OF ANY KIND, either express or implied, including, without limitation, any warranties or conditions of TITLE, NON-INFRINGEMENT, MERCHANTABILITY, or FITNESS FOR A PARTICULAR PURPOSE. You are solely responsible for determining the appropriateness of using or redistributing the Work and assume any risks associated with Your exercise of permissions under this License.
-
Limitation of Liability. In no event and under no legal theory, whether in tort (including negligence), contract, or otherwise, unless required by applicable law (such as deliberate and grossly negligent acts) or agreed to in writing, shall any Contributor be liable to You for damages, including any direct, indirect, special, incidental, or consequential damages of any character arising as a result of this License or out of the use or inability to use the Work (including but not limited to damages for loss of goodwill, work stoppage, computer failure or malfunction, or any and all other commercial damages or losses), even if such Contributor has been advised of the possibility of such damages.
-
Accepting Warranty or Additional Liability. While redistributing the Work or Derivative Works thereof, You may choose to offer, and charge a fee for, acceptance of support, warranty, indemnity, or other liability obligations and/or rights consistent with this License. However, in accepting such obligations, You may act only on Your own behalf and on Your sole responsibility, not on behalf of any other Contributor, and only if You agree to indemnify, defend, and hold each Contributor harmless for any liability incurred by, or claims asserted against, such Contributor by reason of your accepting any such warranty or additional liability.
END OF TERMS AND CONDITIONS
FLAC
Copyright © 2000–2009 Josh Coalson
Copyright © 2011–2016 Xiph.Org Foundation
Redistribution and use in source and binary forms, with or without modification, are permitted provided that the following conditions are met:
- Redistributions of source code must retain the above copyright notice, this list of conditions and the following disclaimer.
- Redistributions in binary form must reproduce the above copyright notice, this list of conditions and the following disclaimer in the documentation and/or other materials provided with the distribution
- Neither the name of the Xiph.org Foundation nor the names of its contributors may be used to endorse or promote products derived from this software without specific prior written permission. THIS SOFTWARE IS PROVIDED BY THE COPYRIGHT HOLDERS AND CONTRIBUTORS "AS IS" AND ANY EXPRESS OR IMPLIED WARRANTIES, INCLUDING, BUT NOT LIMITED TO, THE IMPLIED WARRANTIES OF MERCHANTABILITY AND FITNESS FOR A PARTICULAR PURPOSE ARE DISCLAIMED. IN NO EVENT SHALL THE FOUNDATION OR CONTRIBUTORS BE LIABLE FOR ANY DIRECT, INDIRECT, INCIDENTAL, SPECIAL, EXEMPLARY, OR CONSEQUENTIAL DAMAGES (INCLUDING, BUT NOT LIMITED TO, PROCUREMENT OF SUBSTITUTE GOODS OR SERVICES; LOSS OF USE, DATA, OR PROFITS; OR BUSINESS INTERRUPTION) HOWEVER CAUSED AND ON ANY THEORY OF LIABILITY, WHETHER IN CONTRACT, STRICT LIABILITY, OR TORT (INCLUDING NEGLIGENCE OR OTHERWISE) ARISING IN ANY WAY OUT OF THE USE OF THIS SOFTWARE, EVEN IF ADVISED OF THE POSSIBILITY OF SUCH DAMAGE.
| EN | IFIED EU DECLARATION OF CONFORMITY |
| Hereby, Yamaha Music Europe GmbH declares that the radio equipment type [CRX-B370/CRX-B370D] is in compliance with Directive 2014/53/EU. The full text of the EU declaration of conformity is available at the following internet address: https://europe.yamaha.com/en/support/compliance/doc.html | |
| FR | ARATION UE DE CONFORMITE SIMPLIFIEE |
| Le soussigné, Yamaha Music Europe GmbH, déclare que l'équipement radioélectrique du type [CRX-B370/CRX-B370D] est conforme à la directive 2014/53/UE. Le texte complet de la déclaration UE de conformité est disponible à l'adresse internet suivante: https://europe.yamaha.com/en/support/compliance/doc.html | |
| DE | NFACHTE EU-KONFORMITÄTSERKLÄRUNG |
| Hiermit erklärt Yamaha Music Europe GmbH, dass der Funkanlagen typ [CRX-B370/CRX-B370D] der Richtlinie 2014/53/EU entspricht. Der vollständige Text der EU-Konformitätserklärung ist unter der folgenden Internetadresse verfügbar; https://europe.yamaha.com/en/support/compliance/doc.html | |
| SV | IKLAD EU-FÖRSÄKran OM ÖVERENSSTÄMMELSE |
| Härmed försäkrar Yamaha Music Europe GmbH mit denna typ av radioutrustning [CRX-B370/CRX-B370D] överensstämmer med direktiv 2014/53/FU. Den fullständige texten till FU-försäkran om överensstämmelse finns på följunde webbadress: https://europe.yamaha.com/en/support/compliance/doc.html | |
| IT | RAZIONE DI CONFORMITÄ UE SEMPLICIFICA |
| Il fabbricante, Yamaha Music Europe GmbH, dichiarra che il tipo di appurecchiaturu radio [CRX-B370/CRX-B370D] è conforme alla diretiva 2014/53/UE. Il texto completo della dichiarazione di conformità UE è isponibile al seguente indirizzo Internet: https://europe.yamaha.com/en/support/compliance/doc.html | |
| ES | ARACIÓN UE DE CONFORMIDAD SIMPLIFICADA |
| Por la presente, Yamaha Music Europe GmbH declara que el tipo de equipo radiocléctrico [CRX-B370/CRX-B370D] es conforme con la Directiva 2014/53/UE. El texto completo de la declaración UE de conformidad esta isponibile en la direction Internet siguiente: https://europe.yamaha.com/en/support/compliance/doc.html | |
| PT | ARAÇÃO UE DE CONFORMIDADE SIMPLIFICADA |
| O(a) abaixo assinado(a) Yamaha Music Europe GmbH declara que o presente tipo de equipamento de rádio [CRX-B370/CRX-B370D] está em conformidade com a Diretiva 2014/53/UE. O texto integral da declaração de conformidade esta disponível no seguinte endereço de Internet: https://europe.yamaha.com/en/support/compliance/doc.html | |
| NL | ENVOUDIGDE EU-CONFORMITEITSVERKLARING |
| Hierbjj verklaar ik, Yamaha Music Europe GmbH, dat het type radioapparanur [CRX-B370/CRX-B370D] conform is met Richtlijn 2014/53/FU. De volledige tekst van de FU-conformiteitsverklaring kan worden geraadpleegd op het volgende internetadres: https://europe.yamaha.com/en/support/compliance/doc.html | |
| BG | ОПРОСТЕНА ЕС ДЕКЛАРАЦИЯ ЗА СЪОТВЕТСТВИЕ |
| С настоящото Yamaha Music Europe GmbH декларира, че тоги тип радиоскормяжение [CRX-B370/CRX-B370D] в съответствие с Директива 2014/53/ЕС. Цюностият текст на ЕС декларацията за съответствие може да се намери на следия интернет адрес: https://europe.yamaha.com/en/support/compliance/doc.html | |
| CS | IODUŠENÉ EU PROHLÁŠENÍ O SHODĚ |
| Tímto Yamaha Music Europe GmbH prohlasuje, že typ ráidiového zařizení [CRX-B370/CRX-B370D] je v souladu se směrnić 2014/53/EU. Uplné znění EU prohlasení o shoelé je k dispozici na léto internetové adrese: https://europe.yamaha.com/en/support/compliance/doc.html | |
| DA | WKLET EU-OVERENSSTEMMELSESERKLÆRING |
| Hermed erklerer Yamaha Music Europe GmbH, at radioudsýrstypen [CRX-B370/CRX-B370D] er 1 overensstemmelse med direktiv 2014/53/FU. EU-overensstemmelseserkleringens fulde tekst kan findes på folgende internetadresse: https://europe.yamaha.com/en/support/compliance/doc.html | |
| ET | JUSTATUD ELI VASTAVUSDEKLARATSIOON |
| Külesolevaga deklarecrib Yamaha Music Europe GmbH, et käesolev ruadouseadme tűüp [CRX-B370/CRX-B370D] vastab direktivi 2014/53/LL nõutele. L.Li vastavusdeklaratsiooni täichlak tekst on kättesaadav järgmisel internetuadressil: https://europe.yamaha.com/en/support/compliance/doc.html | |
| EL | ΑΠΛΟΥΣΤΕΥΜΕΝΗ ΔΗΛΩΣΗ ΣΥΜΜΟΡΦΩΣΗΣ ΕΕ |
| Με την πορούσει ότη Yamaha Music Europe GmbH, δήλωνεί ότη σρυδικοξπλεμούς[CRX-B370/CRX-B370D] λήροι την οδηγία 2014/53/ΕΕ. Το λήρες κείμενο της δήλωσης πομφόρφωσης ΕΕ διαίτρεια στην ακάλειουθη υτοσαλίδια στον διαδίκτυσ: https://europe.yamaha.com/en/support/compliance/doc.html | |
| HR | DNOSTAVLJENA EU IZJAVA O SUKLADNOSTI |
| Yamaha Music Europe GmbH ovime izjavljuje da je radijska oprema ερομα ερομα ερομα ερομα ερομα ερομα ερομα ερομα ερομα ερομα ερομα ερομα ερομα ερομα ερομα ερομα ερομα ερομα ερομα ερομα ερομοι ερομα ερομα ερομα ερομα ερομα ερομα ερομα ερομα ερομα ερομα ερομα ερομα ερομα ερομα ερομα ερομα ερομα ερομα ερομα ερομι ερομα ερομα ερομα ερομα ερομα ερομα ερομα ερομα ερομα ερομα ερομα ερομα ερομα ερομα ερομα ερομα ερομα ερομα ερομα εροικούς ειον ειον ειον ειον ειον ειον ειον ειον ειον ειον ειον ειον ειον ειον ειον ειον ειον ειον ειον ειον ειον ειον ειον ειον ειον ειο νικόνης ειον ειον ειον ειον ειον ειον ειον ειον ειον ειον ειον ειον ειον ειον ειον ειον ειον ειον ειον ειον ειον ειον ειον ειον ειικόνης ειον ειον ειον ειον ειον ειον ειον ειον ειον ειον ειον ειον ειον ειον ειον ειον ειον ειον ειον ειον ειον ειον ειον είνης ειον ειον ειον ειον ειον ειον ειον ειον ειον ειον ειον ειον ειον ειον ειον ειον ειον ειον ειον ειον ειον ειον ειον ειον eικόνης ειον ειον ειον ειον ειον ειον ειον ειον ειον ειον ειον ειον ειον ειον ειον ειον ειον ειον ειον ειον ειον ειον ειον εεινης ειον ειον ειον ειον ειον ειον ειον ειον ειον ειον ειον ειον ειον ειον ειον ειον ειον ειον ειον ειον ειον ειον ειον ειονεικόνης ειον ειον ειον ειον ειον ειον ειον ειον ειον ειον ειον ειον ειον ειον ειον ειον ειον ειον ειον ειον ειον ειον ειον εωνενης ειον ειον ειον ειον ειον ειον ειον ειον ειον ειον ειον ειον ειον ειον ειον ειον ειον ειον ειον ειον ειον ειον ειον ειον αυτής ειον ειον ειον ειον ειον ειον ειον ειον ειον ειον ειον ειον ειον ειον ειον ειον ειον ειον ειον ειον ειον ειον ειον ειον ειακόνης ειον ειον ειον ειον ειον ειον ειον ειον ειον ειον ειον ειον ειον ειον ειον ειον ειον ειον ειον ειον ειον ειον ειον ειακόνη ένης ειον ειον ειον ειον ειον ειον ειον ειον ειον ειον ειον ειον ειον ειον ειον ειον ειον ειον ειον ειον ειον ειον ειον ειον | |
| LV | VIENKÄRŠOTA ES ATBILSTÍBAS DEKLARÁCÍJA |
| Ar šo Yamaha Music Europe GmbH deklarě, ka radioiekārīa [CRX-B370/CRX-B370D] atbilst Direktivai 2014/53/ES. Pilns LS atbilstifas deklarácijas tekstas ir piejejams šidīi interneta vietně:https://europe.yamaha.com/en/support/compliance/doc.html | |
| LT | RASTINTA ES ATITIKTIES DEKLARACÍJA |
| As, Yamaha Music Europe GmbH, patvirānu, kad radijo prenginių tipas [CRX-B370/CRX-B370D] alitinka Direktyva 2014/53/FS. Visas FS atitikties delarčacijos tekstas pricinamas šiuo intermcto adresu:https://europe.yamaha.com/en/support/compliance/doc.html | |
| HU | EGYSZERUŠITETT EU-MEGFELELŐSÉGI NYILATKOZAT |
| Yamaha Music Europe GmbH igazolja, hogy a [CRX-B370/CRX-B370D] tipusši rádióberendezés megfelel a 2014/53/EU irányelvnek. Az EU-megfelelőségi nyilatkozat teljes szövege elérhető a következő intermetes címen:https://europe.yamaha.com/en/support/compliance/doc.html | |
| PL | UPROSZCZONA DEKLARACJA ZGODNOŚCI UE |
| Yamaha Music Europe GmbH niniejszym oświadcza, że typ urządzenia radiowego [CRX-B370/CRX-B370D] jest zgodny z dyroktywą 2014/53/UE. Pelmy tekst deklaracji zgodności UE jest dostępny pod następującym adresem internetowym: https://europe.yamaha.com/en/support/compliance/doc.html | |
| RO | DECLARAŁIA UE DE CONFORMITATE SIMPLIFICATĄ |
| Prin prezenta, Yamaha Music Europe GmbH declará că tipal de echipamente radio [CRX-B370/CRX-B370D] este in conformitate cu Directiva 2014/53/UF. Textul integral al declaratiej EUF de confermitate este disponibil la urmátórea adrese iontrem. https://europe.yamaha.com/en/support/compliance/doc.html | |
| SK | IODUŠENÉ EU VYHLÁSENIE O ZHODE |
| Yamaha Music Europe GmbH rýmto vyhlásuje, ze rádiové zariadenie typu [CRX-B370/CRX-B370D] je v sialade so smernicou 2014/53/FU. Uplné EU vyhlásenie o zhode je k dispozicii na tejlo internetovej adrese:https://europe.yamaha.com/en/support/compliance/doc.html | |
| SL | OSTAVLJENA IZJAVA EU O SKLADNOSTI |
| Yamaha Music Europe GmbH potrótuje, da je tip radijske opreme [CRX-B370/CRX-B370D] skladen z Direktivo 2014/53/FU. Čelotno besedilo izjave FU i skladnosti je na voljo na naslednjem spletem naslovu:https://europe.yamaha.com/en/support/compliance/doc.html | |
| FI | YKSINKERTAISTETTU EU-VAATIMUSTENMUKAISUUSVAKUUTUS |
| Yamaha Music Europe GmbH vakuttaa, että radiolaitetyppi [CRX-B370/CRX-B370D] on direktivin 2014/53/EU mukainen. EU-vaatimustenmukaisuusvakuntaksen täysimittainen teksti on saatavilla seuraavassa internetosoitteessa: https://europe.yamaha.com/en/support/compliance/doc.html | |
| TR | BASÍTLEŠTÍRÍLMÍŠ AVRUPA BÍRLÍGI YUGUNLUK BÍLDÍRÍMI |
| Išbu belge ile, Yamaha Music Europe GmbH, radyo cihaz tipinin [CRX-B370/CRX-B370D], Direktif 2014/53/AB'ye ugyunluğunu beyan eder. AB uyumu beyananan tam metni aságudaki internet adresinden edinilebilir:https://europe.yamaha.com/en/support/compliance/doc.html | |
AVEEA71102A
Important Notice: Guarantee Information for customers in EEA\* and Switzerland
English
For detailed guarantee information about this Yamaha product, and Pan-EEA* and Switzerland warranty service, please either visit the website address below (Printable file is available at our website) or contact the Yamaha representative office for your country. * EEA: European Economic Area
https://europe.yamaha.com/warranty/
Yamaha Global Site https://www.yamaha.com/
Yamaha Downloads https://download.yamaha.com/
YAMAHA CORPORATION
10-1 Nakazawa-cho, Naka-ku, Hamamatsu, 430-8650 Japan
Manual Development Group © 2018 Yamaha Corporation
Published 03/2019 KSEM-B0
VCW6750