DABMAN i500 BT - Radio Telestar - Free user manual and instructions
Find the device manual for free DABMAN i500 BT Telestar in PDF.
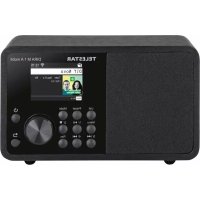
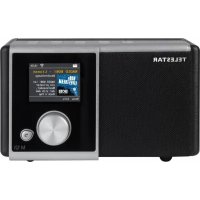
| Product Type | Radio DAB/DAB+/FM/Internet/Bluetooth |
| Model | DABMAN i500 BT |
| Brand | Telestar |
| Dimensions (W x H x D) | 437 x 83 x 31 mm |
| Weight | 2.6 kg |
| Power Supply | 12 V DC, 1 A (AC adapter included) |
| Input Voltage | 100-240 V AC, 50/60 Hz |
| DAB/DAB+ Reception | Band III 174-240 MHz, sensitivity up to -100 dBm |
| FM Reception | 87.5-108 MHz, sensitivity up to -100 dBm |
| Internet Radio | Wi-Fi IEEE 802.11b/g, encryption WEP/WPA/WPA2 |
| Bluetooth | Typical range 10 m |
| Supported audio formats | MP3, AAC, AAC+, WMA (up to 320 kbps) |
| Connectivity | LAN (RJ45), USB, analog audio output RCA, optical and electrical digital output |
| Display | Color display |
| Remote control | Yes, included (CR2025 battery) |
| Additional functions | 2 alarms, sleep timer, preset and customizable equalizer, control via UNDOK app (Android/iOS) |
| Package contents | Radio, remote control, AC adapter, WLAN antenna, FM/DAB antenna, RCA audio cable, digital optical cable, user manual, warranty card |
| Maintenance | Clean with a soft, dry cloth. Disconnect before cleaning. |
| Safety | Do not open the housing. Use only the supplied power supply. Avoid moisture and excessive heat. |
| Service and repairability | Technical hotline: +49 2676 9520101, email: service@telestar.de. Send the device to customer service if necessary. |
| Intended use | Receiver for DAB/DAB+/FM radio signals, Internet, Bluetooth, USB/UPnP playback. For domestic use only. |
Frequently Asked Questions - DABMAN i500 BT Telestar
User questions about DABMAN i500 BT Telestar
0 question about this device. Answer the ones you know or ask your own.
Ask a new question about this device
Download the instructions for your Radio in PDF format for free! Find your manual DABMAN i500 BT - Telestar and take your electronic device back in hand. On this page are published all the documents necessary for the use of your device. DABMAN i500 BT by Telestar.
USER MANUAL DABMAN i500 BT Telestar
Zur Info: von Routern, SSID, MAC & IPs
SSID Broadcast (WLAN)
WPS - Wi-Fi Protected Setup
Napster, Deezer, Quobuz, Tidal, Amazon Music
2.1.Explanation of symbols 57
2.2.Intended Use. 57
2.3. Safety instructions. 58
2.4. Operational safety 59
2.5. Connecting the device 59
2.6. Protecting the device against damages 59
2.7. Risk of injury 60
2.8. Handling the batteries 60
2.9.Cleaning the device 61
2.10. Actions in case of malfunction 61
3.DELIVERYCONTENTS 62
4. IMAGES 63
5.WHATISNEEDED? 67
6. FIRST USE 68
- Setup in detail. 71
7.1 Set options on the router 72
8.0Turning the device on for the first time. 73
The network setup wizard 73
Integration via cable. 73
Wireless integration 74
Wireless integration via a router 75
Setting up the wireless connection on the radio 75
8.1 Display 77
8.2 List view 78
8.3Playback view. 79
8.4 Receiving DAB/DAB+ transmission 79
8.5 Receiving VHF transmission. 80
8.6 Internet radio 81
8.7 Podcast & Radio-On-Demand 81
8.8 Digital media player (playback from a UPnP server). 81
8.9 Favourites 82
8.10 Add a new internet radio URL 82
8.11 Stations 82
8.12Podcasts 83
8.13 History 83
8.14 Music player (UPnP) 83
8.15 Sleep timer 84
8.16 ALARM 85
CONTENTS
9.0 Settings 85
10. Bluetooth 90
11. Operating via UNDOK app 91
12.Music streaming services. 92
13.Troubleshooting. 93
14. Technical data 94
15. Service and support 95
16. CE Marking 96
17. Glossar 97
1. Foreword
Dear customer
Thank you for choosing this product.
If your Internet radio is not working properly, it is not necessarily due to a defect. Please do not immediately send the device back, call us!
Technical Hotline
for Germany: +49 / 02676 / 9520101
Alternatively, please send an e-mail to service@telestar.de or a fax to +49 / 02676 / 9520159.

Should it not be possible to solve the problem in this way, please send the device to our service centre at the following address:
For Germany: TELESTAR Service Center,
Am Weiher 14,
56766 Ulmen
For Austria: fsms GmbH,
Welser Straße 79,
A-4060 Leonding
Please read these instructions carefully and keep them for future reference. If you sell the device, or pass it on, please also hand over this manual.
2. SAFETY INSTRUCTIONS
2.1. Explanation of symbols
| Symbol | Meaning |
| DANGER | This signal word indicates a hazard with a high degree of risk, which, if ignored, results in death or serious injury. |
| WARNING! | This signal word indicates a hazard with a medium degree of risk, which, if ignored, may result in death or serious injury. |
| CAUTION! | This signal word indicates a hazard with a low degree of risk, which, if ignored, may result in minor or moderate injury. |
| NOTE! | This signal word warns of possible property damage. |
Protection class II

Electrical devices with protection class II have a reinforced or double insulation equal to the rated insulation voltage between active and touchable parts
(VDE 0100 part 410, 412.1). They usually have no connection to the protective conductor. Even if they have electrically conductive surfaces, they are protected by a reinforced or double insulation from contact with other live parts
2.2. Intended Use
The device is used as a receiver for DAB/DAB+/VHF radio signals for receiving Internet radio stations and Bluetooth audio signals, or for playing back audio files on a USB data storage device or on a network drive.
Any other operation or use of the device is considered improper and may result in personal injury or property damage.
Do not use the device for any other purpose.
Operate the device indoors only.
The device is only intended for private use and not for commercial use.
We assume that the person operating this device has general knowledge of how to use electronic entertainment devices.
There is no liability in the event of improper use.
Only use spare parts and accessories supplied or approved by us.
Do not modify the device and do not use any accessories or spare parts not explicitly approved or supplied by us.
Do not use the device in potentially explosive areas.
These include e.g. fuel storage areas, tank facilities, or areas where solvents are stored or processed.
Do not operate the device in areas with particle-contaminated air (e.g. flour or wood dust)
Do not expose the device to extreme conditions,
e.g. direct sunlight,
high humidity, moisture, extremely high or low temperatures, open fire.
2.3. Safety instructions

WARNING!
Risk of injury!
Risk of injury to children and persons with reduced physical, sensory, or mental abilities (e.g. partially disabled, elderly persons with limited physical and mental abilities), or lack of experience and knowledge.
Please keep the device only in places that are inaccessible to children.
This device may be used by children over the age of 8 and by persons with reduced physical, sensory or mental abilities or lack of experience and/or knowledge, if they are supervised or have been instructed in the safe use of the device and have understood the resulting hazards.
Never let children use the device unattended.
Do not store the used packaging materials (bags, polystyrene pieces, etc.) within the reach of children.
Children are not allowed to play with the packaging.

2.4. Operational safety

DANGER
Risk of injury!
Risk of injury due to electric shock from live parts.
There is a risk of electric shock or fire due to an unintentional short circuit.
Please check the device for damages before every use.
If you notice any visible damage or if the device has visible damages, please stop operating it.
If you notice a technical or mechanical problem, please contact TELESTAR Service.
Use only the supplied power supply unit!
Never open the casing of the device.
In the event of a malfunction, disconnect the radio from the power source.
If you move the device from a cold to a warm environment, moisture may develop inside the device.
In such a case, wait for approximately one hour before using it.
In case of prolonged periods of absence or thunder storm, unplug the device from the wall socket.
If foreign bodies or liquids enter the device, immediately disconnect the power supply unit from the wall socket. Have the device inspected by a qualified person before using it again.
Otherwise, you run the risk of an electric shock.
2.5. Connecting the device
Only connect the device to a professionally installed, earthed and electrically fused wall socket.
Make sure that the power source [wall socket] is easily accessible.
Do not bend or squeeze the cable connections.
Before operating the device, check that the voltage indicated on the device matches the local mains voltage.
2.6. Protecting the device against damages
NOTE!
Unfavorable environmental conditions such as humidity, excessive heat, or lack of ventilation can damage the device.
Use the device only in dry rooms.
Avoid the direct proximity of: heat sources, such as radiators, open flames, e.g. candles, devices with strong magnetic fields, e.g. speakers.
Ensure that there is sufficient distance to other objects and that the device is not covered to always guarantee sufficient ventilation.
Avoid direct sunlight and places with excessive dust.
Make sure that contact with moisture, water, and splashing water is avoided and that there are no liquid filled items - e.g. vases - placed near the device.
Do not place any heavy objects on the device.
Make sure that the device is not exposed to dripping or splashing water, and that there are no open sources of fire (e.g. lighted candles) near the device.

2.7. Risk of injury

Excessive sound pressure when using earphones or headphones may result in damage or loss of hearing.
Listening with earphones or headphones with increased volume over a long period of time may cause damage to the user.
Please check the volume before inserting earphones into your ears, or putting on headphones.
Set the volume to a low level and increase it only enough that it is still comfortable for you.
2.8. Handling the batteries
The device comes with 2 batteries of the type CR 2025/3V Only use this battery type for the remote control.

If the batteries are swallowed, there is a risk of internal injury. The battery acid in the batteries may cause injury on contact with the skin.
Immediately seek medical attention after accidental swallowing or signs of skin burns.
Keep new and used batteries always away from children.
Immediately remove the leaked batteries from the device and clean the contacts before inserting new batteries.

WARNING!
Improper use of batteries results in a risk of explosion.

Use only new batteries of the same type.
Please do not use any new and old batteries together in one device.
When inserting the batteries, ensure the correct polarization.
Never charge batteries.
Batteries should only be stored in cool and dry locations.
Never throw batteries into a fire.
If the device will not be used for a long time, remove the batteries from the device.
Never expose batteries to extreme heat or direct sunlight.
2.9. Cleaning the device
Before cleaning, unplug the device from the wall socket.
Use a dry, soft cloth to clean the device. Please do not use liquids to clean the device.
Do not use solvents and cleaning agents as they may damage the surface and/or inscriptions of the device.
2.10. Actions in case of malfunction
If the device malfunctions, disconnect it from the power supply and wait for a few seconds.
Reconnect the device to the power supply.
It may be necessary to reset to the factory settings.
If this does not work, please contact your dealer or contact TELESTAR Digital GmbH directly.
3. DELIVERY CONTENTS
No. Quantity Statement
1 1 DABMAN i500 BT
21 Remote control
3 1 External power supply unit
4.1 WLAN antenna
51VHF/DAB antenna
61 User manual
71 Warranty card
81 RCA audio cable
9 1 Optical audio cable
4. IMAGES

1. Power on/off button
Use this button to turn on the device or to switch it to standby mode.
2. Navigation wheel with press function
To make a selection, scroll through the menu by turning the wheel in the list view. To select a menu item, press the wheel once.
3. Colour display
4. IMAGES
4. Volume control, navigation wheel and OK confirmation button
Use the wheel to change the volume or to navigate through the device's menu. Press the button to confirm an entry.
5. USB connection
Here you can connect a USB data storage device to the device, such as a USB hard drive or USB stick, to play music files from it.
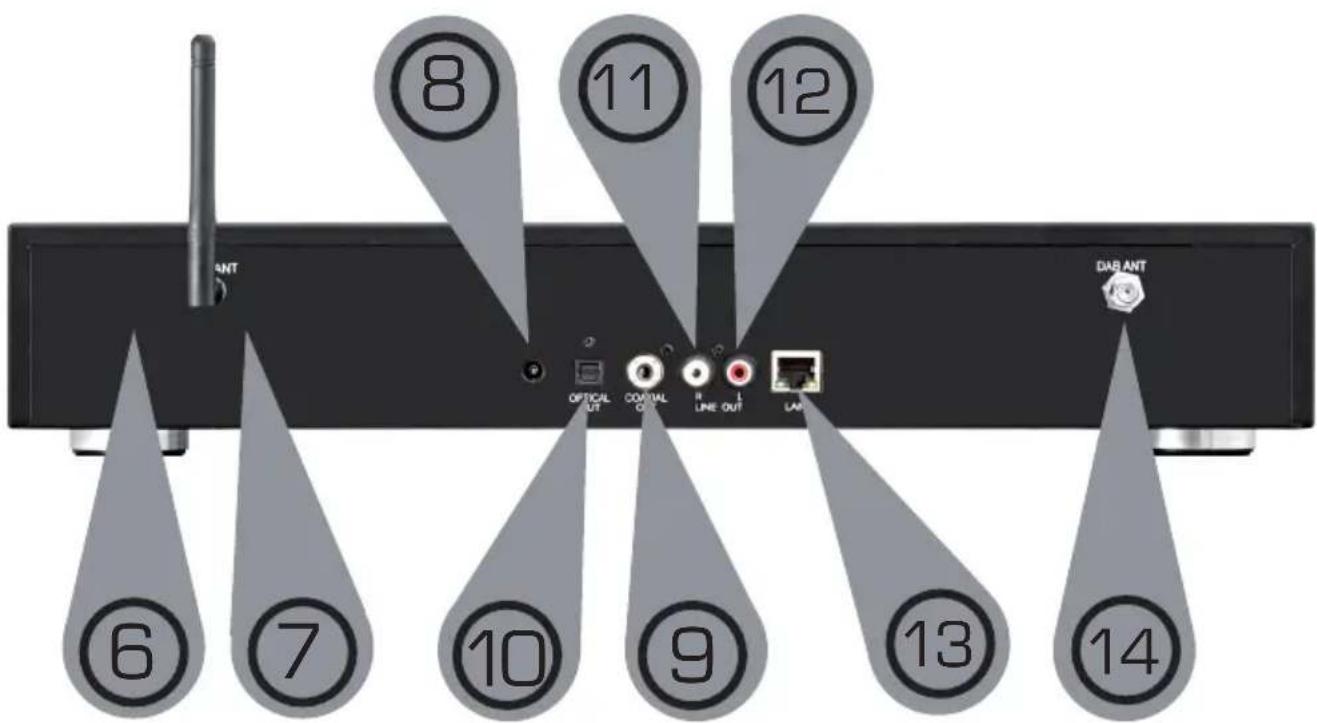
6. Bluetooth antenna
Connect the supplied Bluetooth aerial here.
7. WLAN antenna
Connect the supplied WLAN antenna here so that you can connect the device to your WLAN home network via WLAN.
8. Power supply input
Use this jack to connect the device to the [included] power supply unit in order to power the device.
9. Optical digital output
If your digital amplifier has a corresponding optical input, connect the i500's OPTICAL OUT jack to the optical SPDIF input on your amplifier. You will need a fibre optic cable to do this.
10. Electrical digital output
If your digital amplifier has a corresponding electrical input, connect the SPDIF jack of the i500 to the optical SPDIF
input of your amplifier.
11/12. Analog audio output left/right
Use these sockets to connect the radio to a Hi-Fi amplifier or powered speakers to transmit the music received by the radio to a sound system.
13. LAN connection
Here you can connect the device to an existing network with a network cable to use the internet radio feature. [Alternatively, the device can also be connected via WLAN.]
14. VHF radio antenna
Connect the included VHF telescopic antenna to receive VHF radio stations.
4. IMAGES

4. IMAGES
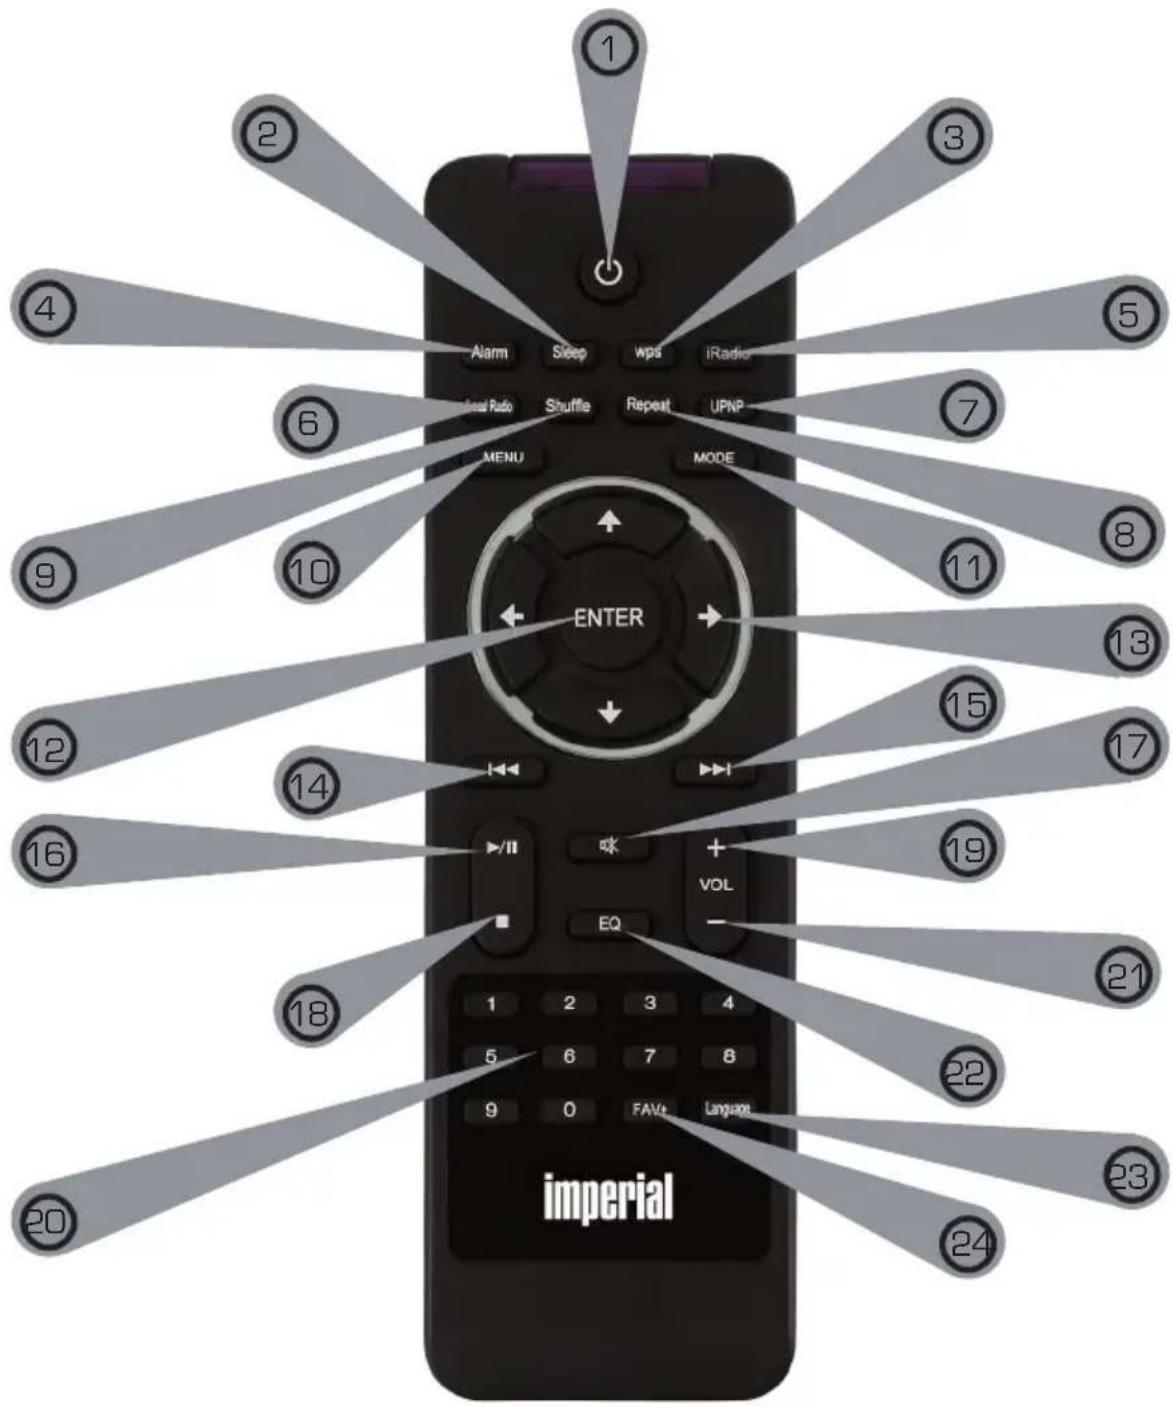
1. Standby button
Use this button to turn the device on or off.
2. Sleep
Use this button to turn the device's sleep timer on or off.
3. WPS button
With this button you can establish a WLAN connection in your home network. Please also refer to section 8.
4. Alarm
Use this button to activate the alarm clock function
5. Internet radio
6. Local radio
7. UPnP
Enables the device's UPnP function
For more information see section 8.8
8. Repeat
Use this button to repeat playback of one or several tracks
9.Shuffle
This activates random playback
10. Menu
Use this button to activate the device's menu
11.Mode
Switch to different operating modes here.
12. Enter
This button is used to confirm an entry
13. Navigation up/down - left/right
Use these buttons to navigate through the menu
14. Select previous track / rewind
Use this button to select the previous track or to rewind.
15. Select next track / fast forward
Use this button to select the next track or to fast forward.
16. Play
Starts or pauses playback
17. Mute
Sets the device's volume to silent.
18. Stop
Stops playback
19. V+ volume
Increases the volume
20. Numeric keypad
21. V-volume
Decreases the volume
E
4. IMAGES
22. EQ equaliser function
You can activate the equaliser function and configure custom sound settings by using this button.
23. Language
You can change the menu language with this button.
24.Favourites button
Switches to one of your individually saved favourite stations.
Note:
In addition to the remote control, a variety of the radio's functions can be controlled via an app if you have a mobile device with Android or iOS operating system. Please also refer to section 10.


5. WHAT IS NEEDED?
Your DABMAN i500 BT is a network device which, as with all similar devices, should be connected to your network.
By integrating with a home network that has an internet connection, over 10,000 radio stations are available to you.
You can also use the radio purely as a DAB+ receiver. The DAB+ reception in your area should be sufficient for this. You can find information about DAB+ reception in your region on e.g. www.getdigitalradio.com
To connect the device to the internet, you will need the following:
- An internet connection (e.g. DSL, ideally with a flat rate)
- A router for internet access,
For wireless connection: a WLAN (wireless LAN) router
- For WLAN integration: your network key (WEP, WPA or WPA2)
This, like any other key, protects against unauthorised access and was configured when your network was set up.
For access to this kind of secured network, the key must be entered in the radio at a later stage. If your network doesn't have a key, the device can connect to the internet without this input.
Note:
If you aren't sure whether to use this kind of key in your network, just try it without any input first! If the device doesn't work after that, repeat the setup procedure. You should then know the key. If necessary, ask the person who set up your network for help. Often the WLAN password is the one located on the bottom of your internet router, unless the key has been manually changed.
Alternatively, the device can be connected to the internet router via a LAN cable.
6. FIRST USE
The radio can be controlled by using either the device buttons or the remote control. It is simpler and more convenient to operate the DABMAN i500 BT with the remote control.
For this reason, this manual mainly explains how to set up and operate the radio using the supplied remote control.
Connect the radio to the included power supply unit (image 7 page 9) and establish the power supply.
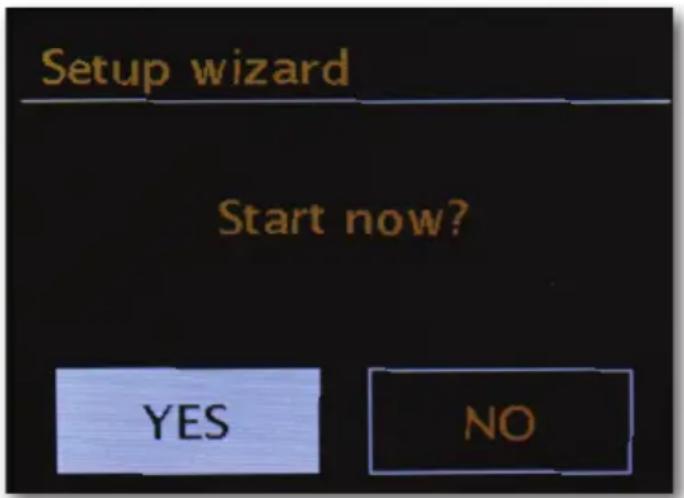
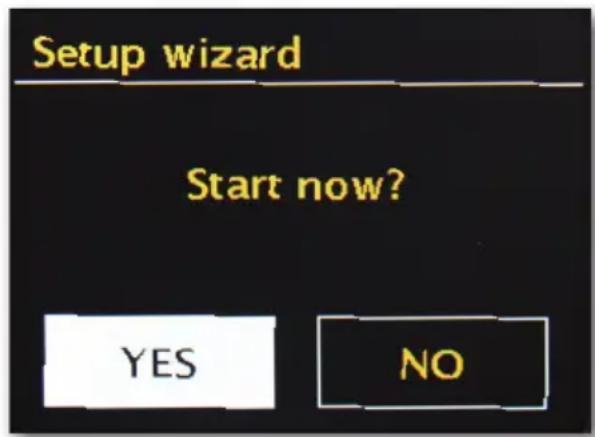
When you start up the device for the first time, a setup wizard will start, guiding you through the one-time setup process.

Select the answer with the navigation wheel (Image 4, page 9) or with the "Left" and "Right" buttons on the remote control.
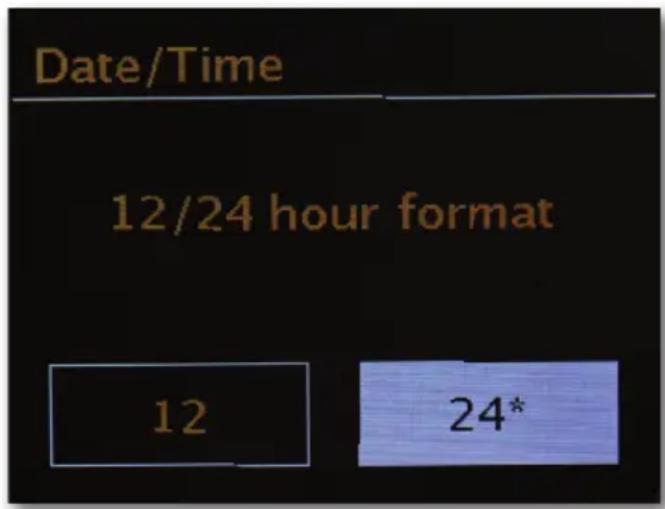
In the next step, select the time format 12h or 24h.
You can get the current time from the internet or from a DAB+ transmitter. This means that the radio is always set to the correct and current time.
In this case please select „Update from internet" or „Update from DAB". If you would like to set the time manually, then please select „No update". In the next step, please select the time zone you are in. For the UK, please select UTC + 0:00 and confirm by selecting OK.
In the next step, select whether to automatically connect the radio to the network the next time the device is switched on.
The following section briefly describes how to integrate into a network. For more detailed setup information see section 7 Setup in detail.
To establish an internet connection, in the next step, confirm that you live in „Most of Europe".


The device will search for all available networks.
When the search is complete, the setup wizard gives you the option to choose between wired connection and wireless (WLAN) connection. If you have connected the radio via a network cable, please select the wired option and confirm by selecting OK.
When connecting via WLAN, please select your WLAN network on the display and confirm by selecting OK.
After selecting the desired network, you must enter the password to connect to the WLAN.
As usual, move through the options using the navigation wheel.
Please confirm the entered key by selecting OK.
The OK" panel can also be reached via the navigation wheel.

After successful setup, you will be able to access internet radio stations.
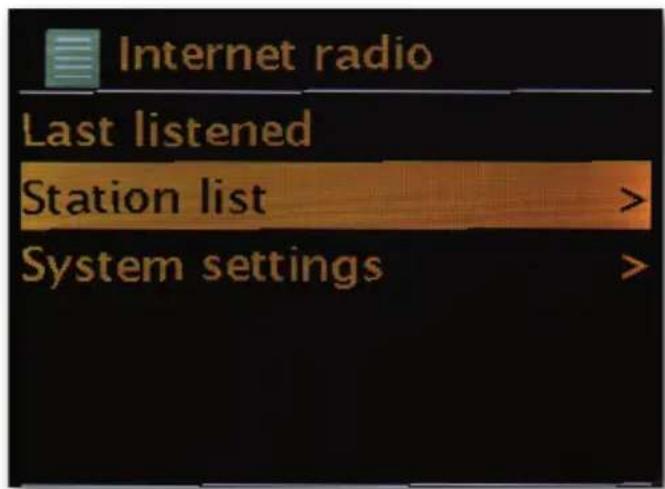
In the main menu, select "Internet radio" and confirm the selection.
In the following menu, you can either jump directly to one of the last stations you listened to, view the complete station list, go to the system settings or - if you have changed your mind - return to the main menu.
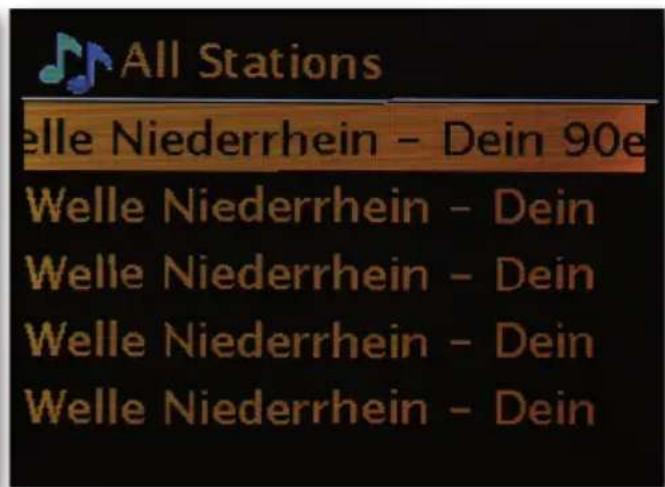
If you decide on the station list, then you can navigate to the station of your choice, according to your personal taste, in the following sub-menu. Due to the large number of available stations worldwide, our database is sorted according to countries, genres, popular stations, etc. and is always kept up to date.
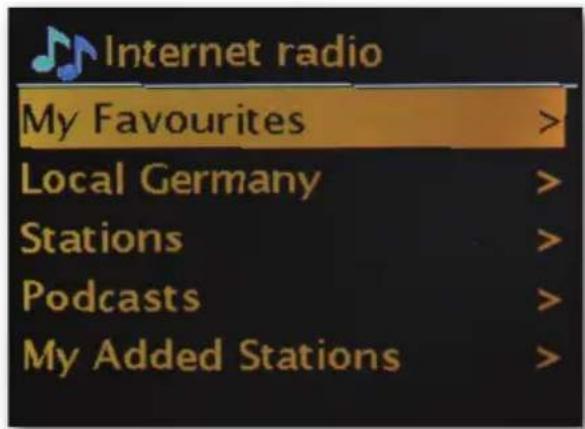
Playback starts after the selection has been made.
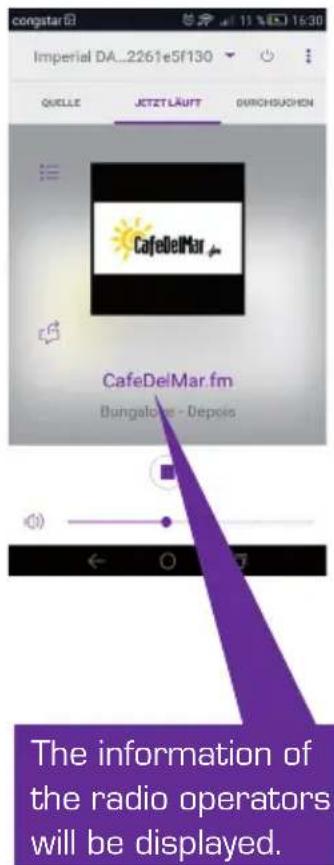
Refer to the playback screen for information about the station being played and - if transmitted - information about the programme or the artist and the title of the song that is currently playing.
To adjust the volume during playback, please use the volume control on the case or the buttons on the remote control.

7. Setup in detail
One question before starting: cable or radio?
The DABMAN derives its data for playback primarily from the network, be it from the internet or the home network. There are basically two different ways to complete the integration process:
Wirelessly (WLAN, Wi-Fi)
The connection to an access point (AP), router or computer is established via a wireless link.
For info: on routers, SSID, MAC & IPs
The brief explanations given here, along with the glossary in the appendix, are intended to help you to better understand the choices and settings that are needed for your network. Some points are only relevant in connection with a wireless network, so you can just use this chapter as necessary. We continue with the concrete setup from section _8 - Scenario 1 - network integration via cable!
7.1 Set options on the router
In any case, you will need to be familiar with the router - or the router's administrator - so that you can adjust settings and know what to do with the device. All you have to do is enter
a specific address (e.g. 192.168.0.1) in the web browser and you will find a convenient interface where you can set all the options.
SSID broadcast (WLAN)
As you can read in the technical glossary, the abbreviation SSID is the technical term for the network name so that you can be notified of all radio network devices in range: here is a network with this ID. However, some routers also have the ability to hide this name. This option is usually called SSID broadcast and can be turned on or off. If sharing is disabled, you will need to know this name to manually enter it when setting up the DABMAN i500 BT.
Device ID: the MAC address
The "MAC address" is a unique identifier for each network device. These addresses are "burned" into the devices and are therefore almost unalterable.
This is precisely why this ID is suitable for configuring a router so that it only allows devices with a specific ID to access the network or the internet. In this case, the router would have to be notified of the DABMAN device's MAC address so that it can fulfil its purpose and use the network connection and access data in the network. The ID of each DABMAN is located on a sticker on the back of the device.
Fixed IP
Under certain conditions, it makes sense to find a device under the same address. Actually, most networks are now set up so that the identification address of the TCP/IP protocol, or the "IP address", is assigned dynamically. This means that each device will be assigned a valid IP address via a DHCP server when the first connection is established, and will stay assigned to this one as long as it is not used otherwise.
Actually, the user remains unaware of this process, as everything happens fully automatically. However, if a network is based on static IPs, not on dynamically assigned IP addresses, there are usually precise rules on exactly which numbers can be selected. The DABMAN i500 BT also has this kind of IP address. If the network wants a fixed IP address, you have to know the rules for assigning one.

8.0 Turning the device on for the first time
To operate the DABMAN i500 BT, press the on/off button on the remote control or on the radio itself.
After turning on the device, you will be taken to the setup wizard, which will assist you in setting up your DABMAN i500 BT radio.
Then set the format for the time (12/24-hour clock).
The next step is the date and time, which you set individually with the navigation wheel and confirm by pressing the wheel or via the remote control. The date format used is European - the day comes first, followed by the month. Then you can choose a WLAN region. If you're not based in Spain or France, „Most of Europe“ is the right choice for a European.
The network setup wizard
Since the DABMAN i500 BT, as a network device, doesn't yet have any information about the possible network environments from which it will obtain its contents, it automatically accesses the network setup wizard after initial power-up and language selection:
As with all other DABMAN menus, you can navigate through the selection using the navigation wheel or the "Up" and "Down" or "Left" and "Right" buttons on the remote control. Confirm by pressing the navigation wheel or OK on the remote control.
Integration via cable
If a network cable is plugged in when the device is turned on and the connection to a functioning network is established, the setup should be very quick and uncomplicated, as follows:
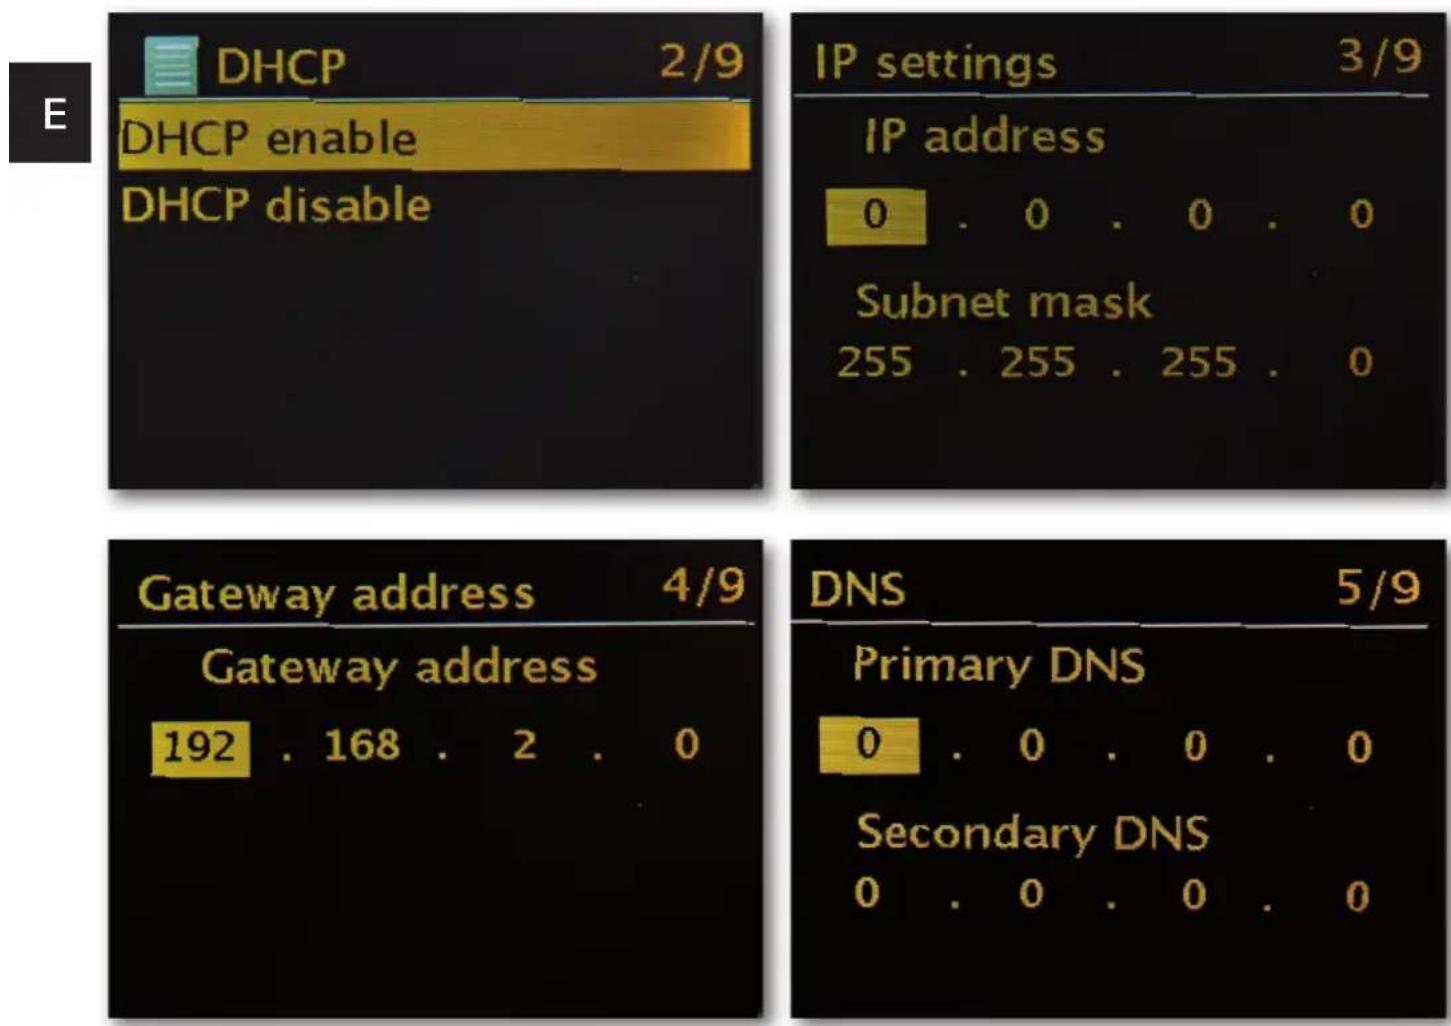
If a DHCP server is active for your router - as in almost every current model, please select "Cable".
The wizard now automatically connects to your router and obtains its network address from the DHCP server. Any device wishing to participate in the network needs a "house number" like this so that the data packets can be delivered properly.
In some rare cases, however, fixed IP addresses are distributed for certain access regu
lations - for more information, speak with your network administrator.
See „Fixed IP“
In the following menu please select to turn off DHCP. Here you can use the navigation wheel to enter the corresponding values.
To reach large numbers (such as 192) faster, turn the wheel to the left. To get to the next window, please press the wheel or the OK button on your remote control once.
Then the gateway address needs to be specified.
Now just enter the DNS address... and, it's finished!
The connection is now established and the settings are stored in the DABMAN.
Wireless integration
As an alternative to network integration via cable - as described under „Scenario 1 - integration via cable" - we would like to give you the necessary tools to integrate the device by wireless signal via a router.
Not unimportant: Choosing the location
A radio signal is always transmitted directly from point to point or from antenna to antenna. The quality of a radio connection is therefore always dependent on the obstacles that need to be crossed between the DABMAN and the other device. This means that setting it up in positions that have a shorter distance can actually result in a worse connection.
For example, if there is more masonry or other sources of interference that have to be traversed, the signal quality decreases despite the shorter distance:
However, the following applies: the more transmitting power the router has, the greater the reception range!
Wireless integration via a router
Unlike wired networks, WLAN (wireless local area network) offers a significant increase in freedom and convenience, but it does require closer scrutiny here and there - especially if you don't want to ignore the security aspects.
Data is wirelessly transported via one or more special access points (abbreviated AP). Most of these WLAN access points are now integrated with the broadband routers for your internet connection. Without knowing the numerical data, it can be assumed that this is the most prevalent way of using broadband internet access and sharing it locally with multiple users. In this context, the DABMAN also offers the greatest enjoyment, because you can receive radio from the far reaches of the internet, or tracks from other computers on the network, without even having to turn on your computer.
Setting up the wireless connection on the radio
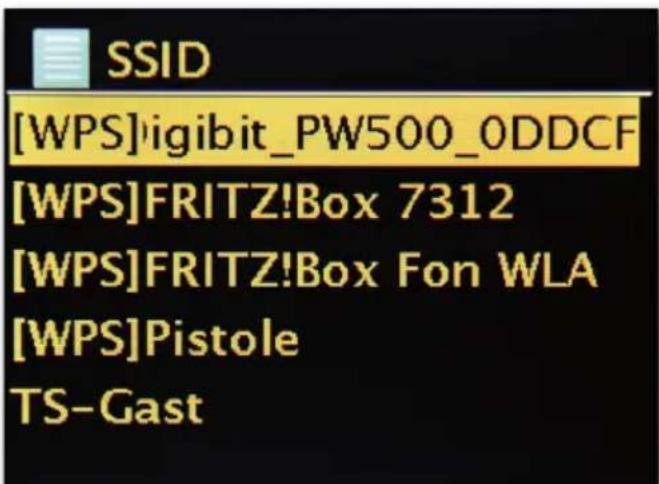
To integrate the device into your network, the DABMAN i500 BT starts the wizard to connect to your network.
It begins by listing all found networks.
Yours should be visible in this list.
It will look something like this:
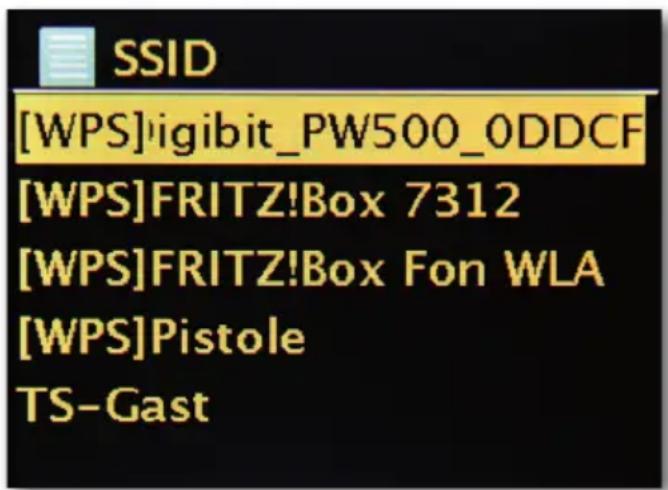
Now select „your“ network. If the requested network doesn’t appear, you can repeat the search via the menu item „Rescan“.
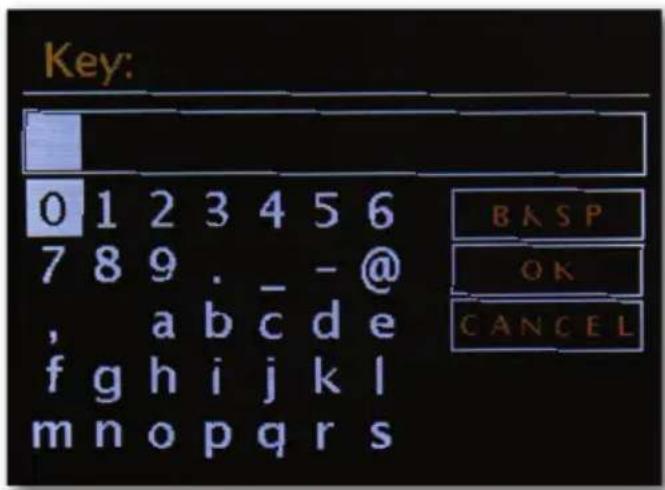
After selecting the network, you must now enter the network password. At least, if you have properly encrypted your WLAN router.
Which we would strongly advise you to do at this point.
Use the navigation wheel to enter the password for your WLAN router: turn the wheel to select the letters and numbers, and press the wheel to confirm the entry. Special characters can be found by scrolling further with the wheel.

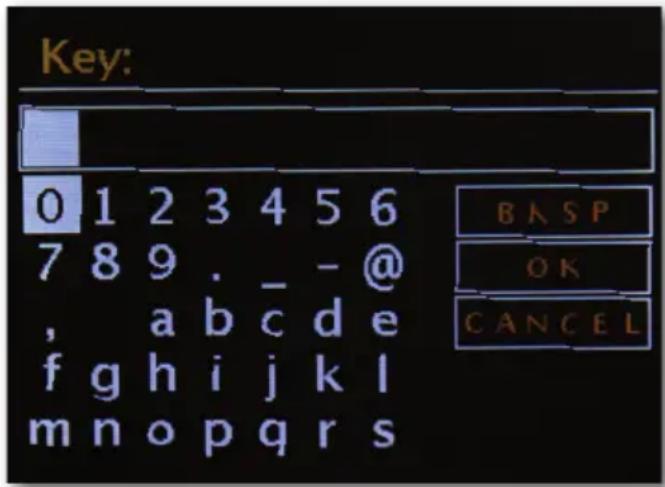
When the password has been entered fully, go to the field [ok]. Please do not confirm every letter with [ok], as this would cancel the input process.
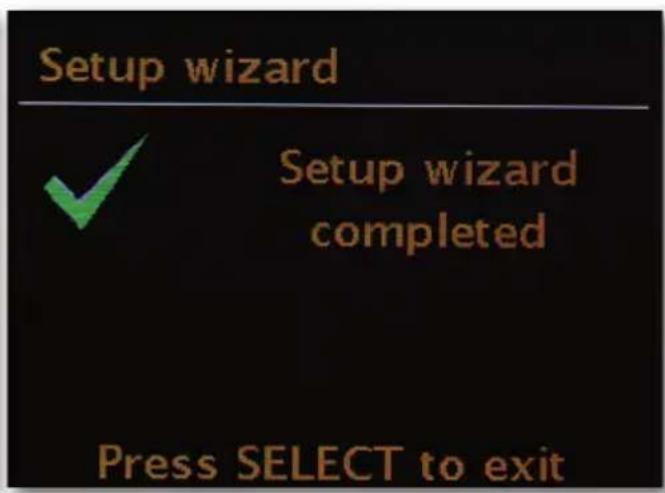
After confirming via the OK button, the DABMAN i500 BT sends the password to the router ("Please wait" appears on the screen), which - after successful synchronisation - registers the DABMAN i500 BT [indicated on the display as „Connected“]. If everything has gone well, the network setup wizard will respond with the completion message „Settings complete“. Press the navigation wheel to return to the main menu.
The entries you have made are stored in the device and don't have to be entered again. The next time you turn on the DABMAN i500 BT, it will find your router by itself and automatically log into the network.
Manual settings
You must select this entry if your router doesn't reveal the network name and you have to enter it manually or if the router doesn't have a DHCP server and the IP address should be permanently assigned. From here onwards, the setup follows the same steps as "integration via cable".
WPS - Wi-Fi protected setup
Behind this cryptic name is a standard for easily and securely setting up the DABMAN i500 BT in a network. Please note that your router must also support this protocol in order for it to work with the connection..
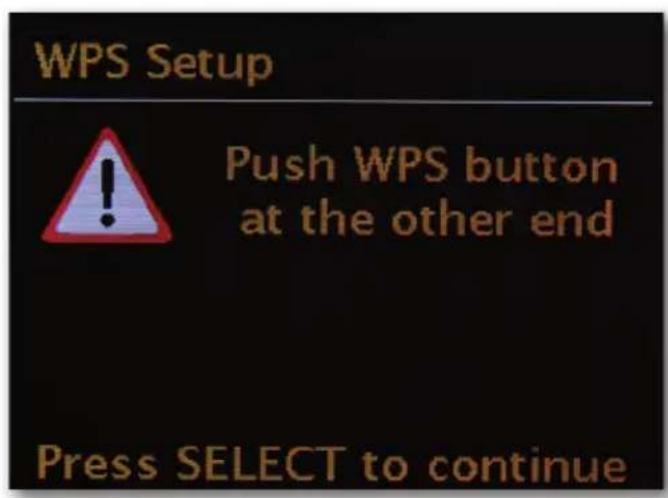
To use this connection setup, press the WPS button (PBC) on your router and then press OK on your DABMAN i500 BT.
For configuration on your router please refer to the corresponding manual.

8.1 Display
In this section, we would like to familiarise you with the display of the i500 so that you always know what's happening
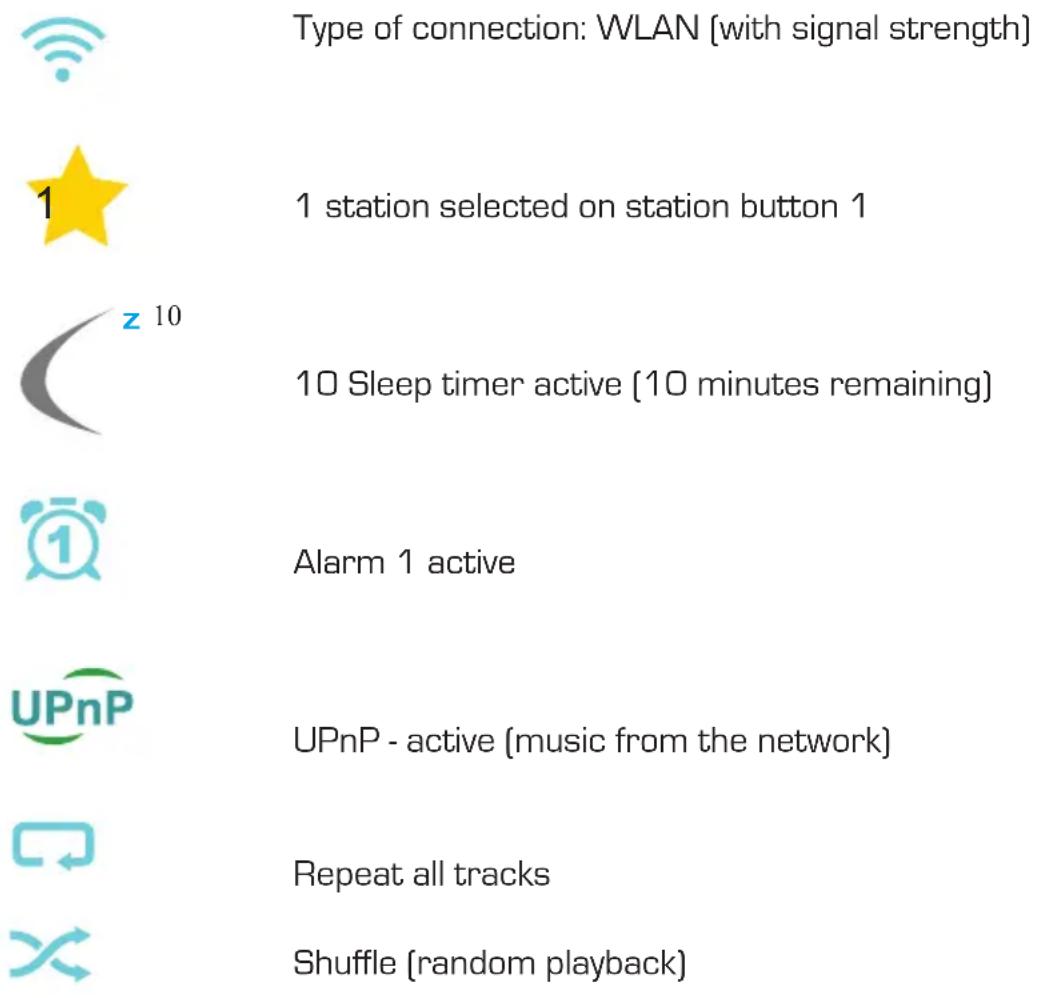
At the top of the screen is the status bar.
This is where you will see the name of the folder that you are currently in.
If you have selected a playback mode, the current time will be displayed next to the mode.
In internet radio mode, if you have saved the current station to a station button, the footer will display the respective number (e.g. P3). If you play music from the network, the comment „UPnP“ appears there. You will also find the currently selected connection type in the lower right corner.

8.2 ListView
You will find the list view in all selection menus. Other navigation levels are indicated by an arrow symbol [>] . To enable better orientation, in the status bar you will find the name of the menu you are currently in.
8.3Playback view
After successful selection of a source, playback will start and the view will change:


Now you will find information such as the station name, artist and song. For more information, press the [Info button] on top of your DABMAN i500 BT. There is then additional information on the reception quality, technical data about the stream, the programme and the preferred music genre and the workload of the playback buffer.
You will see:
The volume can be adjusted here with the respective buttons on the DABMAN i500 BT case or via the remote control. If you turn the volume all the way to zero, the message "Muted" will appear, and there will no longer be sound from the radio. Alternatively, you can of course use the Mute button on the remote control.
8.4 Receiving DAB/DAB+ transmission
Scan / Full scan
In the main menu, use the navigation wheel to select the sub-item „DAB“ and confirm by pressing the wheel. Then select „Full scan“, whereupon the radio finds all the DAB and DAB+ transmitters available in your reception area.
Channel list
In the DAB menu you will find the sub-item „Station list". Pressing the navigation wheel will allow you to select from the stations found by the scan. Pressing the navigation wheel again will display various information about the currently playing station. You can move to the next or previous station by using the navigation wheel on the radio or on the remote control without having to return to the station list first.
Clear station list / reset invalid stations
If a question mark appears before the station name in the station list, the DABMAN i500 BT can no longer receive that station. This may be due to poorer reception, but could also be due to a change on the part of the broadcasters.
To prevent these stations that are no longer available from displaying in the station list, select the sub-item „Clear station list" and answer the confirmation prompt with „Yes".
Station order
The sub-item „Station order" in the DAB menu allows you to decide whether to sort the broadcasters in the station list by alphanumeric order or by separate ensembles (these are groups of stations broadcast together in a „packet'or by validity (stations without a question mark before the station name).
DRC
DRC stands for dynamic range control. This feature lets you adjust volume differences between different DAB+/DAB transmitters for a more homogeneous listening experience.
Manual adjustment
Check reception of the individual DAB channels (e.g. channel 5C, channel 5D etc.)
8.5 Receiving VHF transmission
Scan
In the main menu, use the navigation wheel to select the sub-item "FM" and confirm by pressing the wheel. Pressing the navigation wheel again will find you the next available station. Your DABMAN i500 BT has RDS and can therefore display the name of the station (if broadcasted).
Scan settings
If you press the back button on your radio [or the remote control] while the FM radio is on, you can specify in the sub-item „Scan settings" whether the device's search should only consider powerful stations with good transmission quality.
Audio settings
If the FM reception is generally poor, you can specify in the sub-item „Audio settings" for the stations to only be played in mono rather than in stereo. This can significantly reduce the interference ratio of the signal.
Manual station search
As an alternative to scanning, you can use the Skip Back/Skip Forward buttons either on the radio or on the remote control to jump to specific frequencies and find the stations on those wavebands.
Receive time information via DAB, VHF or internet
You don't need to set the DABMAN i500 BT's built-in clock yourself, as many transmitters broadcast a coded time signal along with your programme. However, this only works if you receive the corresponding channels at sufficient quality. In the main menu, use the navigation wheel to select the sub-item „System Settings“, then „Date/Time“ and then „Auto Update“. Now you can choose to receive the time signal from broadcasters via DAB/DAB+, VHF or from the internet.
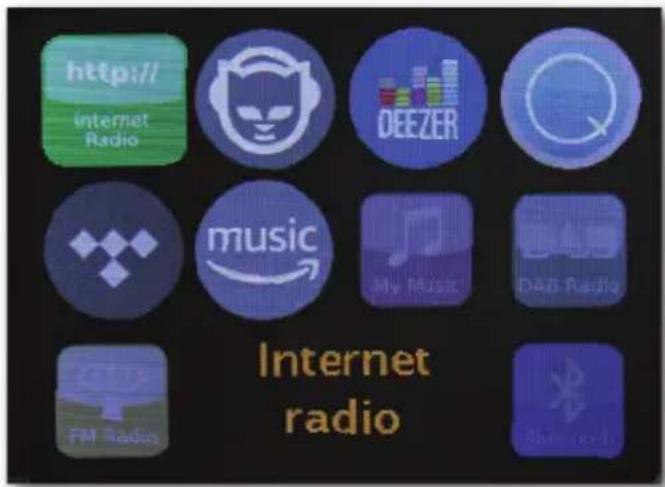
8.6 Internet radio
In the previous section, we have already shown you the impressive possibilities of the internet radio function of your DABMAN i500 BT. The big advantage compared to the conventional method of consuming internet radio via a web browser on a computer is that your DABMAN i500 BT accesses the internet WITHOUT relying on the computer, by connecting directly to your internet router.
The list of internet radio stations is constantly being updated and expanded. This ensures that, even with all the changes that the internet is constantly undergoing, there is always a fully up-to-date and - most importantly - reliably functioning selection of internet radio stations. The radio automatically retrieves the current version on the internet when accessing the internet radio menu, ensuring that it is always up to date. Use the usual navigation buttons to surf the station list, which is already sorted into your preferred order. If you happen to find a station that you want to return to later, simply press one of the station buttons for about 2 seconds during playback in order to save the liked station, and then connect to it again later by using the same number button.
An asterisk [] then appears in the bottom line of the display, followed by the respective storage number - for example ^1^ . Other options for managing favourites are presented further down.
8.7 Podcast & Radio-On-Demand
On-demand radio is virtually synonymous with podcasting. It refers to the creation of popular standalone productions by daily radio channels - also available from large and well-known radio stations - and making them available online. This means that you, as a listener, are no longer tied to the fixed transmission times of traditional broadcasting, but instead you can access the available content at any time.
The variety of content is enormous and keeps growing every day. Perhaps another interesting alternative to traditional radio: not only do broadcasters offer their content in this way, the available portfolio also includes recordings of lectures at universities, language courses, comedy productions or simply audio blogs.
8.8 Digital media player (playback from a UPnP server)
You can share music files for playback on the network by using server software running on a computer or other device. For the DABMAN i500 BT, a UPnP (Universal Plug and Play) compatible server must be used to provide the data.
Simple file sharing, as is familiar from the world of Windows networks, is not possible here. In contrast to inflexible static file sharing, the DABMAN i500 BT offers flexible sorting through a UPnP virtual media server, which allows you to handle your collections more flexibly: a song can be found by artist, genre, album, and based on the folder structure.
8.9 Favourites
Your DABMAN i500 BT has its own favourites list, which you can find on the „Internet radio“ page. To create favourites, press and hold the navigation wheel or the OK button on the remote control for a few seconds. If a favourite is stored, the radio will acknowledge this on the display with the message „Favourite added".
To remove a favourite that has been added, select it in the „Favourites“ menu [white background] and once again hold down the navigation wheel or the OK button of the remote control for a few seconds. Now a „Remove favourite“ menu will appear.
Please note that contents from UPnP servers cannot be saved as favourites as they are not permanently available.

8.10 Add a new internet radio URL
To add a new radio station URL, register your DABMAN i500 BT at www.wifiradio-frontier.com. You can request your personal access code under the menu item „Help" on the radio. With the access code, you can then register your radio and add a new URL.
The new station will appear on the radio under „My added stations".
8.11 Stations
There are various ways for you to find the right station from among the diverse options. Under [Local stations United Kingdom] you will only find national channels. And since that's still a lot to choose from, we've further sorted them for you by music style and content.
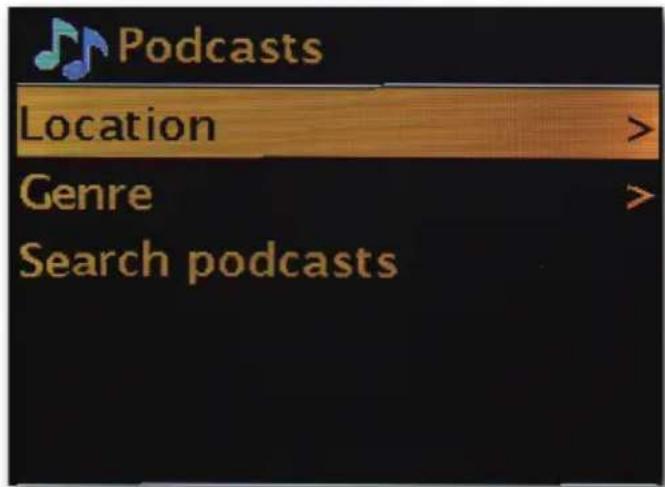
8.12 Podcasts
With your DABMAN i500 BT you can not only subscribe to radio stations, but also to podcasts from all over the world. As you can see, the podcasts in [Countries] are sorted by continent.
Under [Topics] you can also search for a specific subject.
But you can also - as with the radio stations - search for a podcast you know by entering its name.

8.13 History
Recently played tracks and recently received radio stations are listed under the menu item „Last heard". This means that even the stations you thought were lost forever due to a brief lapse in memory can easily be relocated.
8.14 Music player (UPnP)
UPnP enables the user to receive data from the network. For example, if you have shared your music collection on your computer via a UPnP programme (e.g. Windows Media Player 11/12), you can use the DABMAN i500 BT to access it from the living room or kitchen and play tracks from it. If your music collection is stored centrally on a network hard disk (NAS), this works even without a computer. Your radio then works as a network player to directly access the music on the disk.
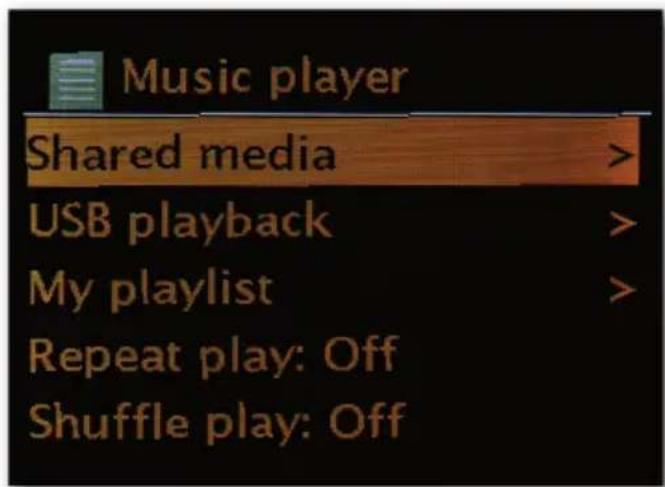


You can reach the menu item [Music player] either via the main menu or via the Mode button; you can find these on both your DABMAN i500 BT and on the remote control.
If you choose this option, you will be offered two icons:
"Internet radio" and "Music player".
Make your choice with the navigation wheel or the "Left"/"Right" buttons of the remote control.
If you wait too long, the screen returns to the main menu.
8.15 Sleep timer
Once activated, it ensures that the DABMAN i500 BT automatically shuts off after the pre-set time, which is especially beneficial if you yourself have fallen asleep in the meantime. The „sleep time“ can be extended to up to one hour in 15-minute increments; the default setting is „Sleep timer off“. Since the alarm function can be set with its own volume setting, you don't need to worry about whether or not you'll be able to hear the DABMAN i500 BT even though it was set to a low volume before you fell asleep. We really do think of everything!

8.16 ALARM
Your radio also has 2 built-in alarm clocks.
In the menu, the alarm can be activated and the time can be set.
For the source, you can choose from an alarm tone, your most recently heard station or from your favourites. To adjust the volume, the source will play and you can use the navigation wheel to set the desired volume level.


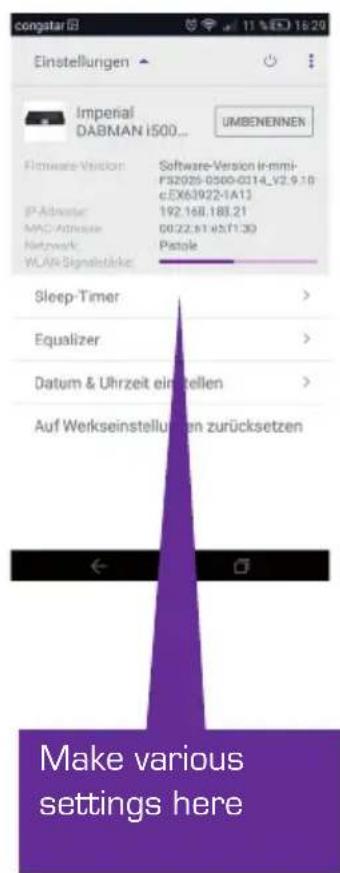
9.0 Settings
In this extensive menu you will find information about your DABMAN i500 BT and you can make and save settings on the device.
Equaliser
The equaliser allows you to customise the DABMAN's sound to your liking.
The various programmes balance the bass, mids and treble differently, so there is something to suit every ear. For unamplified outputs (analog, digital) the equaliser is of course not taken into account - the sound reproduction of these is always unadulterated.
The following equalisers are available:
Normal, Mid, Jazz, Rock, Soundtrack, Classical, Pop, News.
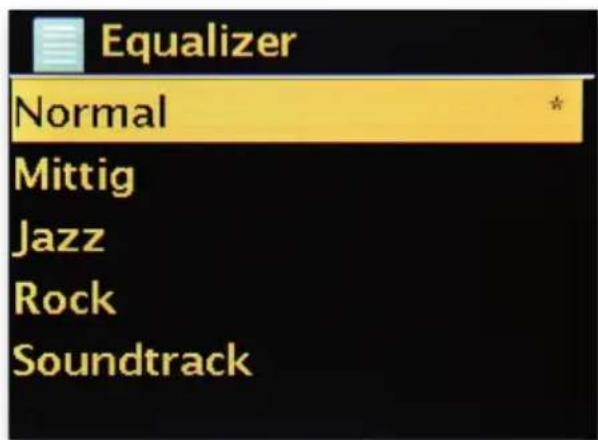
If you don't like any of the pre-sets, you can also create and save your own under „My equalisers configuration".
Bass and treble can be raised or lowered by 14 dB.
You can then find your saved settings via „My equalisers".
Internet settings
Here you can adjust your radio's network settings.
Network wizard
Here - if desired or necessary - you can choose another network.
For WLAN networks that you have already logged into, you don't need to enter the password again.
E
PBC WLAN setup
PBC stands for „push button configuration". Here you can connect your DABMAN i500 BT to your router via WPS (WiFi-protected setup) if the router supports this feature. You will find more information in the manual for your router.
Show settings
Shows all relevant information about your DABMAN i500 BT's current connection to your network. Among other things, you can check whether WLAN or DHCP are active, or how the MAC address,SSID, IP address or primary DNS are running.
WLAN region
In some cases, other countries [or continents] also have other WLAN frequencies and transmitter power outputs. For example, if you want to take your DABMAN i500 BT with you to the US, it makes sense to inform the device of this here.
Manual settings
Here you can switch between „cable“ and „wireless“, enable or disable DHCP and much more.
NetRemote PIN setup
Here you can change the PIN code for remote access to your DABMAN i500 BT. The default is "1234".
If you choose to make use of this feature, we urge you to please change this somewhat unoriginal password.
Remove network profiles
Do you want to pass on your DABMAN i500 BT but you'd like to remove access to your network first? You can easily do that here.
Stay connected to network
In standby mode, the DABMAN i500 BT can either stay connected or can disconnect from the internet. If you opt for disconnection in standby mode, the DABMAN i500 BT has to re-establish the connection to the internet when you turn it on.
This means it will take a little longer for the DABMAN i500 BT to listen to the first station. If you stay connected to the internet, the process is much faster when you turn it on.
Time/date settings
Under this menu item, you can set the date and time. You already did that in the setup wizard at the beginning - but maybe you want to take the DABMAN i500 Bluetooth on holiday with you, perhaps you're moving, or maybe you forgot to turn on the daylight saving time option. In any case, under [Set time/date] you can make all the changes you need. Manual adjustment is easy with the navigation wheel and press function.
After successful entry, the clock and the date are set and will be kept on track as best as possible.
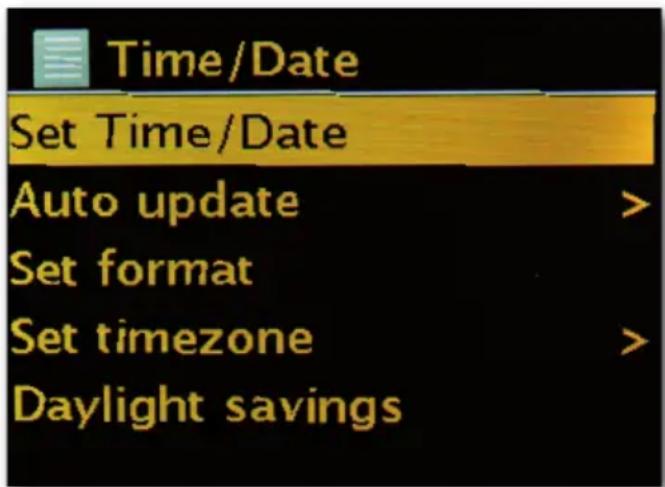
If you would like a bit more convenience, you can also get the time and date from the network via [Time/date sync]. After all, who has a clock at home that is truly accurate? The radio automatically uses an NTP (network time protocol) server for synchronisation.
Set format
If you want to change the time format, you can do that under [Format settings].
Here you can choose between 12-hour and 24-hour clock formats.
Please note that the additions AM and PM are not displayed on the 12-hour display.
Under [Set time zone], you can select the time zone that you are currently in. Starting with the CET (Central European Time), let's make our way around the world! If you live in the UK, "London" is probably the right choice, even if you live in another city. Do you live in a region with daylight saving time? You can inform your DABMAN i500 BT of this under [Daylight saving time] so that you always have the right time - even if you forget to change it manually in spring and autumn. Then use the Back button to get back to the settings.
Sleep mode
Here you can decide when the DABMAN i500 BT automatically switches itself off. The default is [Off], but it's possible to set it to [2 hours], [4 hours], [5 hours] and [6 hours].
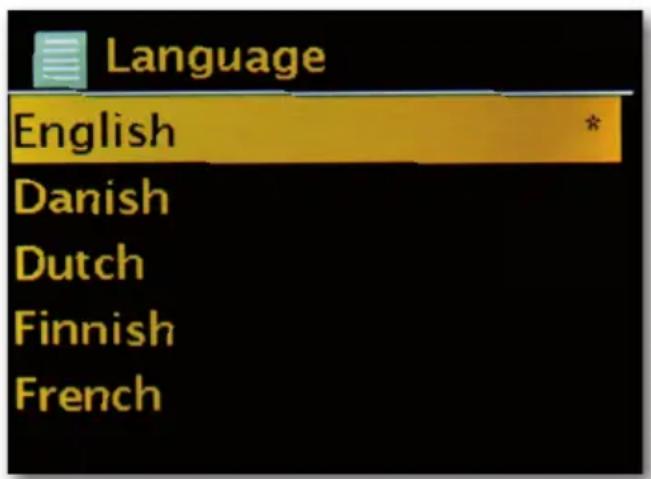
Language
Here you can select the menu for the DABMAN i500 BT. At the time of printing this manual, the languages available are English, French, Spanish, Italian, German and Dutch. Use the navigation wheel to scroll through the list and confirm by pressing once. You can go back to the system settings with the i500 Back button.

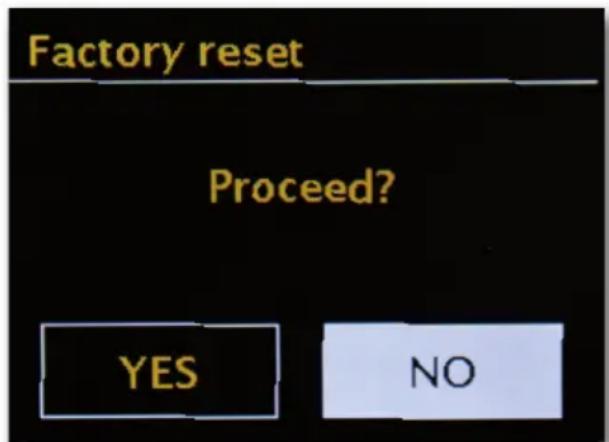
Factory settings
And, most importantly, there is also a security question here: you can always go back if you have chosen this menu item, because the following window will appear:
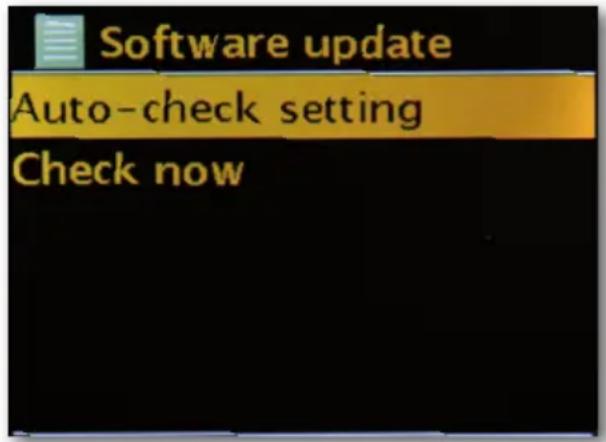
Update software
No matter how good something is, there's always room for improvement!
For this reason, the firmware in the DABMAN i500 BT can be updated.
When you access this menu, the DABMAN i500 BT connects to the update server and checks whether any updates are available. You can then install them or view additional information.
After successful installation, the system restarts. If you don't want to do this manually every time, please select „Automatic updates".
If you prefer to get involved from time to time, click on „Check for updates“.
CAUTION:
When a firmware update is made, all settings you have made will be lost (e.g. network profiles, favourite stations, equaliser settings). These must therefore be remade after the update.
Would you like to start again from scratch and reset the date and network connections?
Then just start the setup wizard again!

Menu interval
Here you can set the length of time that the device will wait before changing from the list view back to the playback view.
Device info
All information relevant to the device is displayed in this menu. Here you will find the installed firmware version and the hardware ID of your DABMAN i500 BT. The information found here is also very helpful if you require support from us. Then use the Back button to get back to the settings.
Backlight timeout (sec)
Here you can choose when the illumination of the colour display switches off automatically. You can either turn off the automatic setting so it is always [On] or choose a timeout of between 10 and 180 seconds.
Operating status
Here you can select how bright the display should be during operation.
You can choose between the three levels [High], [Medium] and [Low]. The default is [High]
Standby mode
Here you can choose how bright the display should be in standby mode. You can choose between the two levels [Medium] and [Low]. The default is [Medium]
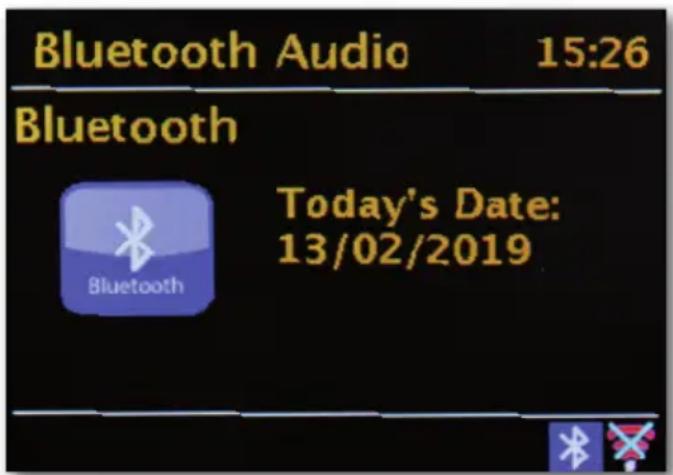
10. Bluetooth
There is also the option to connect the DABMAN i500 BT to an external device (e.g. smartphone/tablet) via Bluetooth.
The Bluetooth connection can then be used to play media [locally stored MP3 files, streamed music, web radio] from the external device via the radio. Bluetooth mode is recommended for when there is no network connection available and you have the device in close vicinity to the radio. Select Bluetooth in the menu.
A Bluetooth connection must be established to be able to send audio files to the radio via Bluetooth.

10.1 Establishing a Bluetooth connection
If you have selected the Bluetooth mode on the radio, it will be in pairing mode and will search for Bluetooth devices to be connected. Now activate the Bluetooth function of the external device you want to connect (for further details, please refer to the operating instructions of the device you want to connect). Search for „DABMAN i500 BT" in the list of available devices, select it and make the connection. A Bluetooth symbol will appear in the upper left corner of the radio display.
10.2 Play media via Bluetooth
Once you have established a Bluetooth connection as described in section 10.1, you can use the DABMAN i500 BT to play music files stored on the external device.
To do this, please follow these steps:
Start playing the music on the external device by switching on the corresponding playback function (MP3 player, etc.) or select a track on the respective play list and start playback.
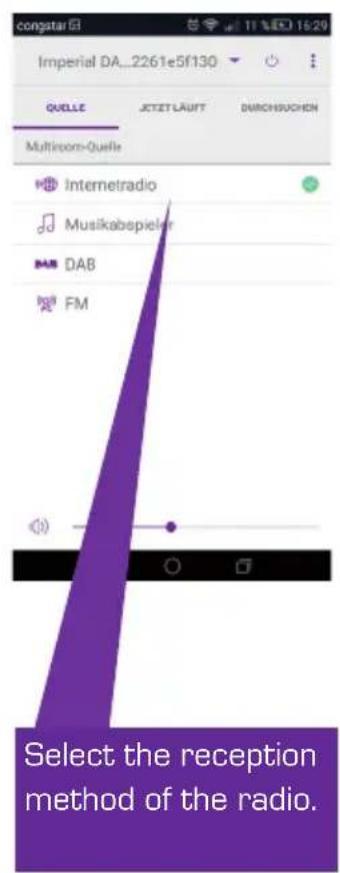
11. Operating via UNDOK app
In addition to the local control and remote control, you can also conveniently control your i500 BT radio via an app,
which is available for Android and IOS.
Download the UNDOK application from the Google Play store for Android operating systems, or from iTunes for iOS operating systems, and install the app on your smartphone/tablet.
Make sure that the radio and your mobile tablet are logged into the same network.
Start the application.
When starting the app, it will automatically recognise the DABMAN i500 as long as it is logged into the same network.
Note:
This description corresponds to the app at the time of going to press.
Features or appearance may change in the course of software updates to the app.
12. Music streaming services
In addition to internet and DAB radio stations, you can also use numerous internet music streaming services on the i500 BT.
The radio supports the following streaming providers:
Napster, Deezer, Quobuz, Tidal, Amazon Music
[At time of going to press. Changes possible at any time.]
If you want to use one or more of these streaming services, you need to register with the corresponding provider.
You will receive further information on registration from the respective provider.
Select your music streaming provider in the main menu and confirm by selecting OK.

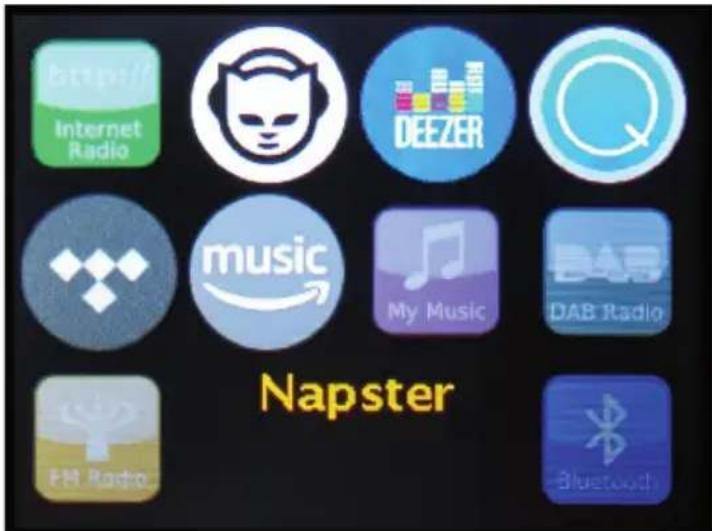
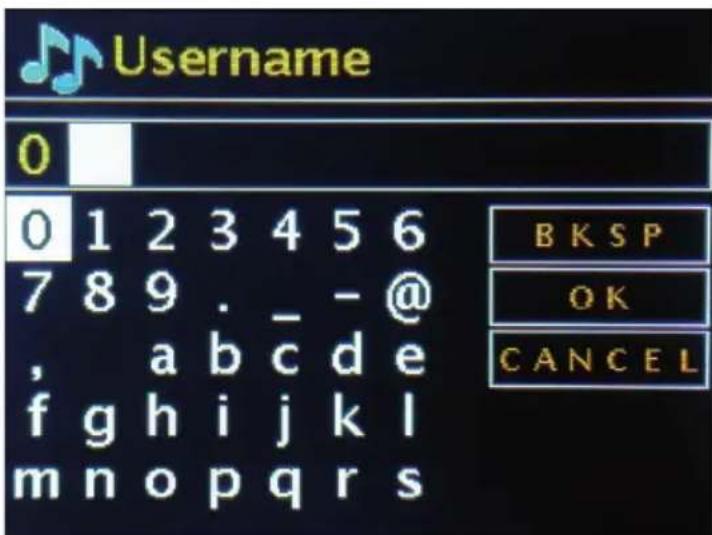
Enter your registration details in the next window.
Now you can play your music via the provider.
13. Troubleshooting
| Fault | Possible cause and solution |
| No display, radio does not respond | Connect the device to the mains using the power supply unit included with the radio. |
| Operation via remote control is not possible | Batteries empty or positioned incorrectly. Please check whether the batteries are inserted in the correct direction. |
| Poor DAB+ reception | No stations available Perform a scan Antenna not fully extended. Change the location of the radio (possibly closer to a window), perform another scan |
| Weak FM reception | Antenna not fully extended, Extend the FM antenna to its full length. Change the location of the radio |
| Bad audio quality of music playback | Low bit rate file. Check the audio file. Tip: For MP3 files, the bitrate should be 192 kbit/s or higher. |
| Volume too low | the volume setting on the i500 Check the volume setting of the paired device that the music is playing from. |
| Network connection cannot be established | Check the WLAN function Activate the DHCP function of the router that the radio is connected to. A firewall may be active in the network. |
14. Technical data

| Internetradio | |
| Chipset | Frontier Silicon chipset approx. 10,000 internet radio stations available MP3 (bitrate up to 320 kbit/s, sample rate up to 48 KHz) |
| Audio CODECs | AAC/AAC+ (bitrate up to 320 kbit/s, sample rate up to 48 KHz) WMA (bitrate up to 320 kbit/s, sample rate up to 48 KHz) |
| Wi-Fi | UPnP / DLNA compatible IEEE 802.11b/g WPA/WPA2/WEP (64/128 bit key) |
| DAB/DAB+/FM | |
| DAB | Sensitivity up to -100dBm |
| DAB+ | Sensitivity up to -101dBm |
| FM | Sensitivity up to -100dBm |
| Decoding | |
| Reception area | DAB Band III 174 MHz - 240 MHz FM 87.5 MHz - 108 MHz |
| Connections | |
| Line out | RCA stereo L/R |
| SPDIF out | Optical and electrical |
| LAN | 10/100 Mbps (RJ45) |
| Power supply | 12 volts DC 1 A secondary |
| Power supply unit | 10-240 V AC 50/60 Hz primary |
| Measurements | |
| Dimensions WxHxD | 437mm x 83mm x 31mm |
| Weight | 2.6 kg |
| Battery remote control | |
| Type CR 2025 / 3 V | |
15. Service and support
Dear Customer,
Thank you for choosing a product from our company! Our product meets the legal requirements and was manufactured subject to continuous quality control. The technical data correspond to the status at the time of printing. Subject to change.
The warranty period for the DABMAN i500 BT meets the legal requirements at the time of purchase.
We also offer professional help via our telephone HOTLINE service.
The professional technicians in our service department are available to answer your questions. You can ask them any questions you have regarding IMPERIAL products and receive tips for locating a possible fault.
Our technicians are available Monday - Friday from 8:00 am to 4:45 pm on the following telephone number:
02676/9520101
or by email at: service@telestar.de
If the Service Hotline is unable to help you, send your DABMAN i500, preferably in its original packaging, or at least packed securely for transport, to the following address:
TELESTAR-DIGITALGmbH
Service Center Am Weiher 14 (Industrial Estate)
56766 Ulmen
Germany
16. CE Marking
CE
Your device bears the CE marking and complies with all relevant EU standards.
TELESTAR DIGITAL GmbH hereby declares that the
IMPERIAL DABMAN i500 BT device complies with the basic requirements and other relevant provisions of the
EMC Directive 2004/108/EC, the RoHS Directive 2011/65/EC,
the Low Voltage Directive 2006/95/EC, the R&TTE Directive 1999/5/EC and the ErP Directive 1275/2008/EC.
The Declaration of Conformity for this product is available at:
Access Point (AP / node)
An access point is a network component to which
the WLAN clients (terminals) connect in order to exchange data with the internet or other clients. It is identified by the SSID. The DABMAN can connect to an AP to obtain data from various other computers in the local network or audio streams from the internet.
DHCP
An abbreviation that stands for "dynamic host configuration protocol", DHCP enables the dynamic allocation of IP addresses and configuration parameters of a computer to be assigned with the help of an appropriate server. DHCP makes it possible to integrate an additional network component without configuration. The DABMAN configuration wizard enables DHCP so that no further configuration parameters have to be entered.
IEEE 802.11b/g
Designates an industry standard for wireless networks.
It is issued by the Institute of Electrical and Electronics Engineers. Here, b designates a maximum data transfer of 11 Mbit/s and g designates 54 Mbit/s Our DABMAN supports these two standards.
IP (IP address) - (internet protocol)
Designates a transmission protocol widely used in computer networks. Each client receives an IP address [like a house number] which appears as a sequence of four groups of numbers separated by a dot (e.g. 127.80.1.34) With DHCP, this address is assigned automatically. If the DABMAN is not configured via DHCP, the IP address can be entered manually.
LAN
A local area network, or LAN, is a computer network in a limited geographical area (usually a wired network).
MAC address
A MAC (media access control) address is the hardware address of every network component and
it is used to uniquely identify each one. it is fixed and unchangeable.
Since the DABMAN is a network component, it also has a fixed MAC address. This can be found on the bottom of the device.

Router
A router is a piece of communication hardware that ensures that data packets sent through a network arrive at the correct destination computer [client]. Often, the router links different networks together, such as WLAN and LAN. The DABMAN is a client in this context and receives said data packets.
SSID (ESSID)
A service set identifier (SSID) or network name is a wireless network identifier based on IEEE 802.11.
Each wireless LAN has a configurable SSID or extended service set identifier (ESSID) to uniquely identify the wireless network. It therefore constitutes the name of the network.
The radio automatically detects all found networks, but also has the option of manually entering an SSID.
UPnP
This abbreviation stands for Universal Plug and Play and is based on a set of standardised network protocols. It is used for activation of devices (stereos, printers, routers, domestic appliances), originating from different manufacturers, via an IP-based network. The radio is a UPnP device that can receive data with corresponding software.
WEP encryption
WEP stands for wired equivalent privacy, which describes an encryption standard for WLANs. Naturally, DABMAN can also receive and interpret WEP-encrypted data.
WPA encryption
Like WEP, WPA is also a standard for encryption and authentication. WPA was developed to address the fundamental weaknesses of WEP encryption. WPA can therefore be considered the secure successor of WEP.
WPS Wi-Fi protected setup is a standard for a simple and secure way of connecting to a wireless network.
Wi-Fi
Certificate for WLAN products that operate according to IEEE802.11 standards and are compatible with other products. The radio also meets the technical standards of the Wi-Fi consortium.
WLAN
Also known as wireless LAN or wireless local area network, this refers to a wireless local network used to transmit data.

imperial®
Mode d'emploi
IMPERIAL DABMAN i500 BT


CONTENU
1.Avant-propos. 104
2. CONSIGNES DE SECURITE 105
TELESTAR Service Center,
F
Am Weiher 14
56766 Ulmen
Pour l'Autriche :
fsmsGmbH,
Welser Straße 79,
A-4060 Leonding
Napster, Deezer, Quobuz, Tidal, Amazon Music
Chere cliente, cher client!
directive ErP 1275/2008/CE.
WPS-Wi-Fi Protected Setup
Napster, Deezer, Quobuz, Tidal, Amazon Music
SSID Broadcast (WLAN)
Connaissance wireless
WPS - Wi-Fi Protected Setup
Napster, Deezer, Quobuz, Tidal, Amazon Music