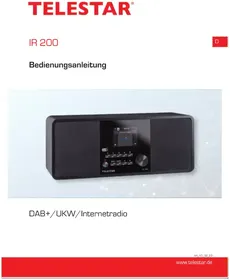
DIRA M 1 A - Radio Telestar - Free user manual and instructions
Find the device manual for free DIRA M 1 A Telestar in PDF.
| Product type | Internet Radio DAB+/FM |
| Brand | Telestar |
| Model | DIRA M 1 A |
| Category | Radio |
| Power supply | 220-240 V~, 50/60 Hz |
| Power consumption standby | Eco: very low; standby with clock: slightly higher |
| Battery (mobile model) | Rechargeable lithium-ion polymer, charges via mains |
| Reception | DAB+, FM, Internet radio |
| Connectivity | Wi-Fi, Bluetooth, USB (FAT32), AUX IN (3.5 mm jack), UPnP |
| Main functions | DAB+/FM/Internet radio; USB player; Bluetooth; USB recording; alarm (5 alarms); sleep timer; equalizer (presets + custom); weather display; emergency warning function (EWF); mobile app |
| Control | Touch (rotary knob, buttons) and remote control |
| Display | Adjustable backlit screen |
| Antenna | Telescopic included |
| Package contents | Radio, remote control (battery included), power adapter, antenna, user manual |
| Care and cleaning | Unplug before cleaning; use a dry, soft cloth; do not use solvents or liquid products |
| Safety | Protection class II; indoor use only; do not open the housing; keep out of reach of children |
| Operating temperature | Indoor use, avoid excessive heat and humidity |
| Dimensions (approx.) | Not specified (estimation: 30 x 15 x 20 cm) |
| Weight (approx.) | Not specified (estimation: 1.5 kg) |
| Spare parts and repairability | Contact TELESTAR customer service; repairs by qualified personnel only |
| General information | Warranty according to legal provisions; hotline support: 02676 / 95 20 101 (Mon-Fri 8:00-16:45) |
Frequently Asked Questions - DIRA M 1 A Telestar
User questions about DIRA M 1 A Telestar
0 question about this device. Answer the ones you know or ask your own.
Ask a new question about this device
Download the instructions for your Radio in PDF format for free! Find your manual DIRA M 1 A - Telestar and take your electronic device back in hand. On this page are published all the documents necessary for the use of your device. DIRA M 1 A by Telestar.
USER MANUAL DIRA M 1 A Telestar
text_image
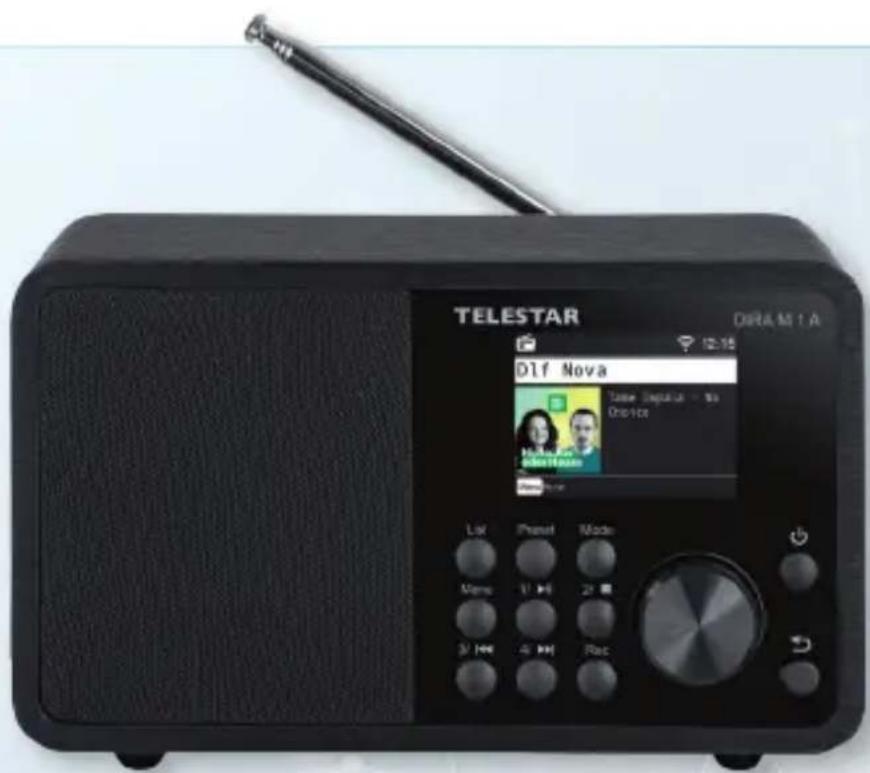
TELESTAR DIRA M 1 A Dlf Nova Tamer Singala - No Choice List Present Mode Mony 1st >8 2nd 3rd HM 4th HM RecDAB+/UKW/Internetradio

text_image
Soundmate Soundmate Google Play App Store
TELESTAR Service Center,
Am Weiher 14,
56766 Ulmen
e-mail: service@telestar.de
D
Anzahl Erklärung
1 TELESTAR DIRA M 1 A / M 1 A mobil Radio
1 Fernbedienung
1 externes Netzteil
natural_image
Two-step illustration showing hands holding a device, labeled ① and ② (no text or symbols on the devices themselves)text_image
All private data will be deleted. Are you sure to continue? OK Abbrechen7. EINSTELLUNGEN
text_image
My EQ Profile Setting Backup EQ to USB Load EQ from USB Load the Default EQ EQ Advanced Setting Wed 19-10-2022
bar
Rock | Step | Frequency (Hz) | |---|---| | List | 1.6 | | Freq | 2.2 | | Menu | 0 | | Step | -1.7 | | Mode | 45 Hz |
8.13. Wetter
text_image
EMERGENCY WARNING FUNCTIONALITY
text_image
Smartphone screen displaying app interface with icons and a radio device showing a music player interface.
natural_image
Orange square icon with a white S-shaped logo and the word 'Soundmate' below it (no additional text or symbols)
text_image
JITTSI Google Play
text_image
Audio Systems DARSUN (540 CD) Chekada Optionstext_image
Internet Radio STAR/SAT RADIO STAR/SAT Radio 1. 2017 3. 2018 (minutes, 14:15) (minutes Tong Tong)Wiedergabe Funktion
text_image
Fenbedioning + VOL = MODE OK FINI LIST OK IN INFO 0 1 2 3 ALARM 4 5 6 SLEEP 7 8 9Fernbedienung
natural_image
Simple line drawing of a trash bin with diagonal lines crossing it, no text or symbols presentOperating instructions
text_image
TELESTAR DIF Nova Take Meptake - the Choice Lix Pramet Mode Mens 21 H 20 M 3/ H 4 H RecDAB+/FM/Internetradio

text_image
Soundmate Soundmate Google Play App Store


TABLE OF CONTENTS
- Preface 85
1.2. Intended use....85 - SAFETY INSTRUCTIONS 86
2.1. Explanation of symbols....86
2.2. Safety instructions 88
2.3. Operational safety 89
2.4. Connecting the device 91
2.5. Protect the device from damage....91
2.6. Risk of injury....92
2.7. Information on the radio interface .....93
2.8. Handling batteries 94
2.9. Cleaning the device 96
2.10. Legal information 96 - Scope of delivery 97
- OVERVIEW OF CONTROLS 98
- REMOTE CONTROL 100
- INSTALLATION 104
6.1 General operating instructions....104
6.2. Preparing the remote control 104
6.3 Antenna connection 105
6.4. Power connection.... 105
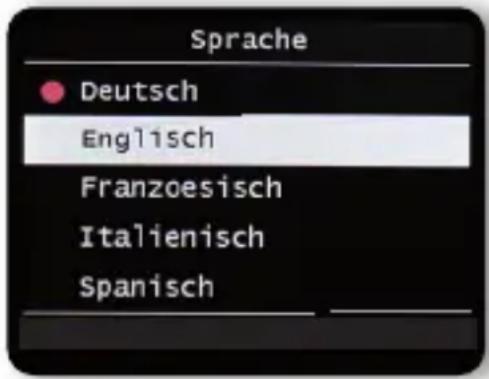
6.5. Menu language 106
6.6. Date time mode 106
6.7. GMT time zone 107
6.8.Daylight saving 108
6.9.Location 108
6.11. WiFi/network selection ..... 109

TABLE OF CONTENTS
- Settings 110
7.1. General operation.... 110
7.1.1. Menu button.... 110
7.1.2. Back button.... 111
7.1.3. List button.... 111
7.1.4. Mode button.... 111
7.2.1 Language 112
7.2.2 Date time 112
7.2.3. Network 113
7.2.4. Alarm 114
7.2.5. Edit timer....116
7.2.6. Standby mode ..... 117
7.2.7. Sleep timer 118
7.2.8. Backlight 118
7.2.9. Location setting....119
7.2.10. Software update ..... 120
7.2.11. Factory settings ..... 120
7.2.12.Version 121
TABLE OF CONTENTS
- OPERATION 122
8.1. DAB+ radio.... 122
8.1.1. Station list 122
8.1.2. DAB search 122
8.1.3. DAB manual search ..... 124
8.2. Selecting an internet radio station .....124
8.3. Searching for an internet radio station .....125
8.4. Saving radio stations....126
8.5. Saving radio stations to your favourites list....126
8.6. Local radio stations....127
8.7. Changing the volume ..... 128
8.8. Switching operating mode ..... 128
8.9. AUX IN 129
8.10. UPnP 130
8.11. USB playback/multimedia 131
8.12. EQ (equaliser) 132
8.13. Weather 133
8.14. Recording radio broadcasts....134
8.15. Radio as a Bluetooth receiver ..... 136
8.15.1. Establishing a Bluetooth connection .....136
8.15.2. Playing media via Bluetooth....137
8.16.FM Radio 138
8.16.1. Automatic FM search.... 138
8.17. Emergency-Warning-Functionality....139
8.17.1. EWF? What does it mean? 139
8.17.2. Setting EWF.... 140
8.18. Charging the battery (only model DIRA M 1 A mobile).....140
8.19. Operation via the app.... 141

TABLE OF CONTENTS
- TROUBLESHOOTING 145
- STORAGE 147
- BRAND INFORMATION.... 147
12.1.DISPOSING of packaging 148
12.2. DEVICE DISPOSAL.... 148 - Disposal Information 148
12.3. DISPOSING of batteries.... 149 - Disposal Information 149
- Properties and technical data....150
- SERVICE AND SUPPORT 154
- CE seal 155
- Legal notice.... 155
1. PREFACE
Valued customer,
thank you for choosing this product. Please read these instructions carefully and keep them for future reference.
This operating manual is part of the device! If you sell or pass on the device, please make sure you also hand over the operating manual. 1.2.
E
1.2. Intended use
This product is a consumer electronics device.
This device serves as a receiver of DAB+, FM and internet radio signals and plays audio files from
a USB data carrier, Bluetooth device or network drive as well as recording audio files onto a USB data carrier.
Any other operation or use of he device is considered improper and can lead to personal injury or property damage.
Do not use this device for any other purpose.
Only use the device indoors.
The device is intended for private, non-commercial use only.
We assume that the user has some general knowledge about
using electronic entertainment equipment. Liability is excluded in the event of improper use.

2. SAFETY INSTRUCTIONS
2.1. Explanation of symbols
SYMBOL MEANING

DANGER!
This signal indicates a hazard with a high level of risk which, if the instruction is not observed, will result in death or serious injury.

WARNING!
This signal indicates a hazard with a medium level of risk which, if the instruction is not observed, may result in death or serious injury.

CAUTION!
This signal indicates a hazard with a low level of risk which, if the instruction is not observed, may result in minor or moderate injury.
NOTE!
This signal warns the user of possible material damage and references special descriptions for the operation of the device.

This symbol indicates danger.
SYMBOL MEANING

Protection class II
Electrical devices that fall under protection class II have reinforced or double insulation to the amount of the rated insulation voltage between active and accessible parts (VDE 0100 part 410, 412.1). They usually have no connection to the protective conductor. Even if they have conductive surfaces, they are protected from contact with other live parts by reinforced or double insulation
E

Products labelled with this symbol meet the requirements of the guidelines of the European Community.
Abb. 1

Abb. 2

These symbols indicate the polarity of the plug for devices with hollow plugs.
A distinction is made between 2 variants
Fig. 1: Outside plus / inside minus
Fig. 2: Inside plus / outside minus

Devices with this symbol may only be operated indoors in a dry environment.

2. SAFETY INSTRUCTIONS
2.2. Safety instructions

WARNING!
Check the device before use.
The device must not be used if it is defective or damaged.
Risk of injury
Risk of injury to children and people with reduced physical, sensory or mental ability (e.g. disabled people, elderly people with limited physical and mental ability) or a lack of experience and knowledge.
Always keep the device out of the reach of children.
This device can be used by children aged 8 years and above and persons with reduced physical, sensory or mental ability or lack of experience and/or knowledge if they are supervised or have been given instruction concerning safe use of the device and understand the hazards involved.
Never let children use the device unsupervised.
Danger of suffocation!
Packaging material is not a toy!
Do not store the packaging material used (bags, polystyrene pieces etc.) within the reach of children.
Children must not play with the packaging. There is a risk of suffocation, especially with packaging films.
2. SAFETY INSTRUCTIONS
2.3. Operational safety

DANGER!
Risk of injury!
Risk of injury from electric shock from live parts.
There is a risk of electric shock or fire due to accidental short circuits.
Check the device for damage before each use.
If you notice visible damage or if the device shows visible damage, do not use it anymore.
If you discover a technical or mechanical problem, please contact TELESTAR Service.
Only use the power adapter provided! Never use any other power adapter.
Never open the device casing.
Immediately disconnect the device from the power in the event of any malfunction. To do so, immediately unplug the device.
Only use replacement parts and accessories that have been supplied and approved by us.
Do not physically alter the device and do not use any spare parts or additional devices that were not explicitly approved or provided by us.
Do not use the device in potentially explosive environments.
These include, for example, fuel storage areas, petrol stations, or areas in which solvents are stored or processed.
Do not use the device in areas where the air is contami nated with particles (e.g. flour or wood-chip dust)

2. SAFETY INSTRUCTIONS
Operation errors may appear in the form of the device becoming hot or smoke developing from the device or the power unit.
Loud or unusual noises can also be a sign of a malfunction.
In this case, pull the power adapter out of the power socket immediately.
Only handle the power adapter by the casing.
Never pull the power adapter out of the socket by the cable.
After a malfunction, the device must not be used until it has been checked or repaired by a qualified person.
If you bring the device from a cold to a warm environ ment, moisture can form inside the device.
In this case, wait about an hour before using it.
Unplug the device from the power socket if you are absent for a longer period and during thunderstorms.
Make sure that contact with moisture, water or spray is avoided and that no objects filled with liquids - e.g. vases - are placed on or near the device or its power adapter.
If foreign bodies or liquids get into the device or the power adapter, pull the power adapter out of the socket immediately. Have the device checked by qualified personnel before you use it again.
Otherwise, there is a risk of electric shock.
Make sure that the device and the power adapter are not exposed to dripping or splashing water
and that there are no naked flames (e.g. burning candles) near the device or the power supply.
The power adapter must never be touched or handled with wet or damp hands.
2. SAFETY INSTRUCTIONS
2.4. Connecting the device
Only connect the device to a properly installed, earthed and electrically protected socket.
Please ensure that the power source (socket) is easily accessible.
Do not kink or crush any cable connections.
Before using the device, check whether the voltage specification on the device corresponds to local mains voltage. The information on the power adapter must correspond to the local mains supply.
Only connect the radio to a properly installed socket with 220–240 V AC at 50–60 Hz.
Place the radio on a firm, level surface.
The device consumes power in standby mode. To completely disconnect the device from the mains, the power adapter must be unplugged from the socket.
2.5. Protect the device from damage
NOTE!
Unfavourable environmental conditions such as moisture, excessive heat or lack of ventilation can damage the device.
Only use the device in dry rooms.
Avoid the direct vicinity of: heat sources such as radiators, naked flames such as candles, and devices with strong magnetic fields such as speakers.
Do not expose the device to extreme conditions, e.g. direct sunlight, high humidity, moisture, extremely high or low temperatures or naked flames.

2. SAFETY INSTRUCTIONS
Ensure that there is sufficient distance from other objects so that the device is not covered and adequate ventilation is always guaranteed.
Avoid direct sunlight and unusually dusty locations.
Do not place any heavy objects on the device or the power adapter.
Do not use the device in potentially explosive environments.
These include, for example, fuel storage areas, tank facilities, or areas in which solvents are stored or processed.
Do not use the device in areas where the air is contami nated with particles (e.g. flour or wood-chip dust)
2.6. Risk of injury

WARNING!
Excessive sound pressure when using earphones or headphones can cause hearing damage or loss.
Using earphones or headphones at a high volume for a long period of time can cause injury to the user.
Please check the volume before putting the earphones or headphones in or onto your ears.
Set the volume to low and only increase the volume enough that you still find it comfortable.
2.7. Information on the radio interface
The device generates an electromagnetic field.
Please pay attention to notices in your area that prohibit
or restrict the operation of electronic devices.
This may be the case, for example, in hospitals, at petrol stations and tank facilities or at airports.
If corresponding warnings apply, disconnect the device from the power immediately.
The components contained in the device generate
electromagnetic energy and magnetic fields.
These can affect medical devices such as pacemakers or defibrillators.
Therefore, please maintain sufficient and safe distance between the radio and medical devices.
If you have reason to believe that the radio is causing interference with a medical device, immediately turn off or unplug the radio.

2. SAFETY INSTRUCTIONS
2.8. Handling batteries
In principle, only use the type of battery included in the delivery.

DANGER!
Risk of injury!
Improper handling of batteries poses a risk of injury!
Never open batteries, short-circuit them or throw them into flames.
Never charge batteries. Attempting to charge batteries can create a risk of explosion.
The polarity must be correct! Make sure that the plus (+) and minus (-) poles are inserted correctly to avoid a short circuit.
Only use batteries specified for this product.
Remove the batteries from the device if it is not going to be used for a long time.
Remove exhausted or leaking batteries from the device immediately. If batteries have leaked, there is a risk of burns if the liquid comes into contact with the skin.
Keep both new and used batteries out of the reach of children.
There is a risk of internal injury if batteries are swallowed. The battery acid in the batteries can cause injuries if it comes into contact with the skin.
In the event of accidental ingestion or if there are signs of skin burns, rinse the affected areas with plenty of clean water and seek medical attention immediately.
Batteries are not toys!
Always keep new and used batteries away from children.
2. SAFETY INSTRUCTIONS
Remove leaking batteries from the device immediately and clean the contacts before inserting new batteries.

WARNING!


There is a risk of explosion if batteries are used improperly!
Only use new batteries of the same type.
Please never use new and old batteries together in one device.
Pay attention to the correct polarity when inserting the batteries.
Never charge batteries.
Batteries should be stored in a cool and dry place.
Never throw batteries into fire.
If the device is not used for a long time,
please remove the batteries from the device.
Never expose batteries to extreme heat or direct sunlight.
Batteries must not be deformed or opened.
Stop using the remote control if the battery compartment cover no longer closes properly.

2. SAFETY INSTRUCTIONS
2.9. Cleaning the device
Unplug the device prior to cleaning.
Use a soft, dry cloth to clean the device. Please do not use any liquids to clean the device.

Do not use any solvents or cleaning agents, as these may damage the surface or labelling.
Children should not clean the device.
2.10. Legal information
The device is intended for use in all European Union member states as well as Switzerland, Norway, Liechtenstein and Iceland.
The radio reception range meets the legal requirements for these countries.
If the device is to be operated in another country, the laws of the country of use must be observed.
3. SCOPE OF DELIVERY
Please remove all parts from the packaging and
remove all packaging materials completely.
If one or more of the specified parts is missing, please contact:
TELESTAR Service Center, Am Weiher 14,
56766 Ulmen
e-mail: service@telestar.de
E
Quantity Explanation
1 TELESTAR DIRA M 1 A / DIRA M 1 A mobil
1 Remote control
1 Telescopic antenna
1 External power adapter
1 Operating manual
1 Battery for remote control type CR 2025 / 3V
(already inserted into the remote)

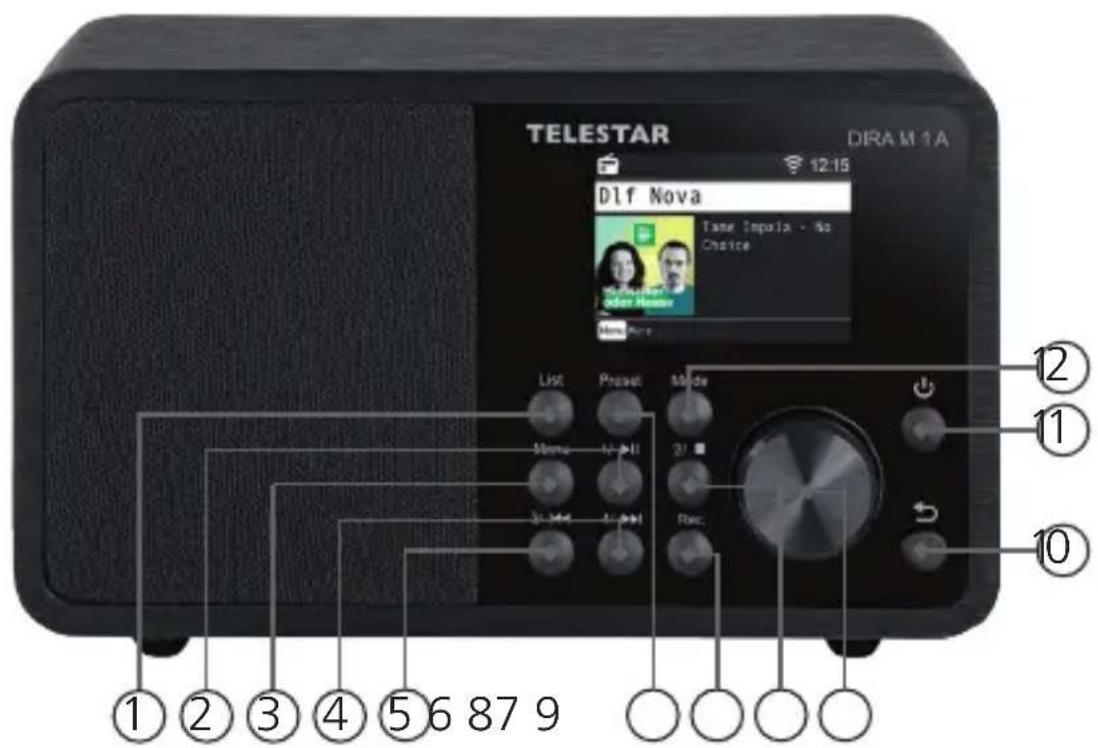
4. OVERVIEW OF CONTROLS
text_image
TELESTAR DRAM 1A Dlf Nova Time Impola - No Choice List Project Mode Stone 2/1 3/1/4 Rec ①②③④⑤⑥879 ①②⑪⑩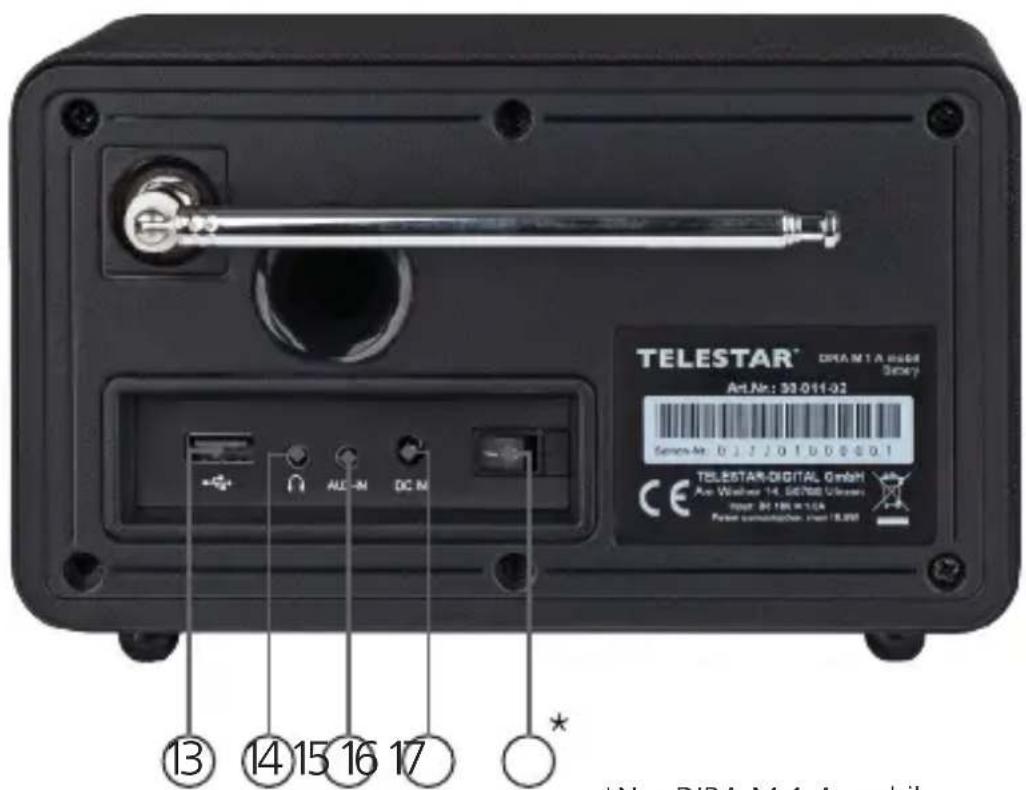
text_image
TELESTAR® DREAM1A 6008 Screw Art.Nr: 33-011-02 Service No: 0127201D005001 TELESTAR-DIGITAL GmbH Air Washer 14 SE700 Ulcers post: 34.198.1124 Polar seminikanen: post 18.000 ⑬ ⑭ ⑭ ⑭ ⑮ ⑮ ⑯ ⑰ ⑰ ⑰ ⑰ *New DIRA M4 A mobile*Nur DIRA M 1 A mobil

4. OVERVIEW OF CONTROLS
1. List
Displays a list of the 40 most recently selected radio stations.
2. Station memory slot 1/play/pause
In radio mode, switches to the 1st station memory slot.
Starts or pauses playback in USB/media/UPnP mode.
3. MENU
Opens the device's menu.
4. Station memory slot 4/next track
In radio mode, switches to the 4th station memory slot.
Use this button to select the next track or rewind in USB/media/UPnP/mode.
5. Station memory slot 3/previous track
In radio mode, switches to the 3rd station memory slot.
Use this button to select the previous track or rewind in USB/media/UPnP-mode.
6. Preset
Displays the favourite programme list.
7. REC/record
Starts a recording of the current radio programme on a connected USB storage device.
8. Station memory slot 2/STOP
In radio mode, switches to the 2nd station memory slot.
Stops playback in USB/media/UPnP mode.
9. Control knob, confirmation button
Use the knob to change the volume or press the button to confirm menu entries.
10. Back
This button takes you one step back in the menu.

5. REMOTE CONTROL
11. Power button on-off
Press this button to turn the device on or into standby mode.
12. Mode
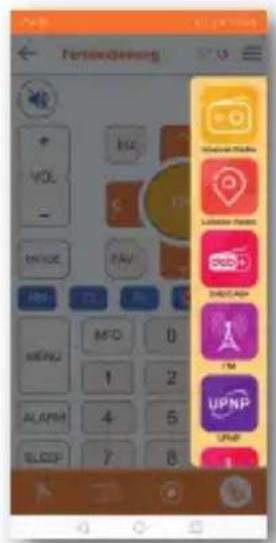
Switches between the radio's various operating modes (internet radio, local radio, FM, DAB+, Cloud music, UPnP, AUX, multimedia, Bluetooth,).
13. USB connection
Here, you can connect the device to a USB data carrier such as a USB hard drive or USB thumb drive to play music files from it.
14. Headphone connection
Insert headphones here to listen to the music being played on the radio through your headphones. If headphones are connected, music playback via the device's speakers will be interrupted.
15. AUX IN
Connect an external audio source here, such as an MP3 player, smartphone or tablet with a 3.5mm AUX jack cable.
16. Power adapter connection
Connect the device with the power adapter (included) here.
17. Mains switch (only DIRA M 1 A mobile)
With the power switch, the device is completely disconnected from the power supply. Use this switch to turn the device on or off.

5. REMOTE CONTROL
The radio can be controlled using either the buttons on the device or the remote control. The remote control is the more convenient and easier way to operate the device.

text_image
① ② ③ ④ ⑤ ⑥ ⑦ ⑧ ⑨ ⑩ ⑪ ⑫ ⑬ ⑭ ⑮ ⑯ ⑰ ⑱ ⑲ ⑳ ⑴ ⑵ ⑶ VOL+ 1 2 VOL- 4 S1 S2 E P 5 6 TELESTAR

5. REMOTE CONTROL
1. Standby button
Use this button to switch the device on or off.
2. Mode
Switch between the different modes.
This button can be programmed with a different function.
See chapter 8.16.
3. Mute
Mutes the device.
4. EQ equaliser function
Use this button to activate the equaliser function and change individual sound settings.
5. Back
This button takes you one step back in the menu.
6. Navigate up/down - right/left / volume VOL+ -
Use these buttons to navigate through the menu.
Use the ◀▶ buttons to decrease or increase the volume.
7. ENTER/OK
Use this button to confirm an entry or selection.
8. LIST/programme list
Use this button to view the radio programme list.
9. FAV+
Use this button to add a selected radio station to your favourites list.
10. Control and select the music track via USB, UPnP, media
I◄◄ Select previous track / fast rewind
Stops playback
▶II Starts or pauses playback
▶▶I Select next track / fast forward

5. REMOTE CONTROL
11. INFO
Displays information about the current radio programme.
12. Menu
Use this button to view the device menu
13. ● Rec
Starts a recording of the current radio programme to a connected USB storage device.
Hold the button for more than 2 seconds to activate the timer menu for recording a radio broadcast.
14. Numeric keypad
15. VOL + / VOL -
Use these buttons to increase or decrease the volume.
16. SLEEP
Press this button to set a sleep timer. The radio will switch to standby mode after the time you have set.

6. INSTALLATION
6.1 General operating instructions
Switch the device on or off using the standby button on the device or the remote control.
You can use the VOL+ button on the remote control or turn the knob on the device to increase the volume.
You can use the VOL- button on the remote control or turn the knob on the device to decrease the volume.
You can use the ▼▲ buttons or the control knob to select menu items.
Use the OK button on the remote control or press the knob on the device to confirm your selection.
6.2. Preparing the remote control
Remove the battery transport lock on the remote control. To do so, pull out the plastic tab on the battery housing in the remote control. This establishes battery contact.
To replace the remote control battery, open the battery compartment on the back of the remote control.
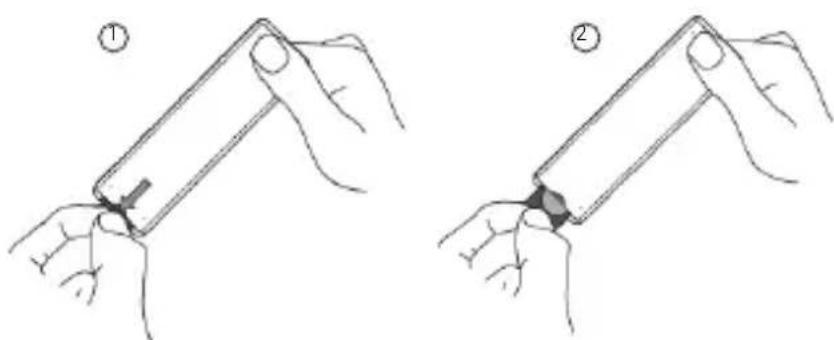
natural_image
Two-step illustration showing hands holding a device with a clip, labeled ① and ② (no text or symbols on the devices themselves)Pull the battery compartment out of the remote control.
Remove the battery and insert a new battery of the same type.

There is a risk of explosion if batteries are used improperly! Please read the related safety information in Chapter 2.8. Pay attention to the correct battery polarity! Reinsert the battery compartment.

6.3 Antenna connection
Screw the antenna provided into the antenna connection on the back of the device.
6.4. Power connection
Connect the power adapter provided to the corresponding port on the back of the device. Now plug the power adapter into a 230V socket.
Turn on the device using the power switch on the back
(*only DIRA M 1 A mobile)
Turn on the radio using the standby button on the remote control or on the device. The device will turn on.
6. INSTALLATION
6.5. Menu language
Use the up/down buttons on the remote control to select the menu language. Use the OK button on the remote control to confirm your preferred menu language.
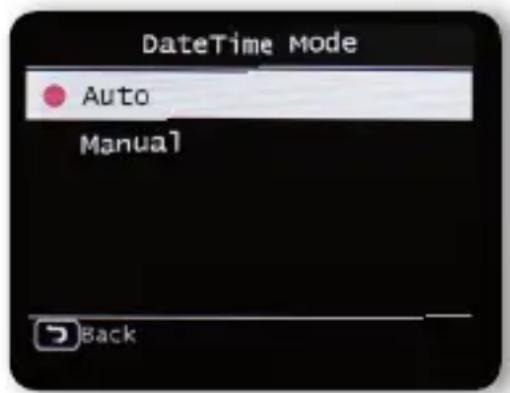
Select how the radio should synchronise the time here. Use the up/down buttons on the remote control to make a selection. Use the OK button on the remote control or press the knob on the device to confirm your selection.
text_image
DateTime Mode Auto Manual BackThe device's factory setting is to
automatically set the time. If the device is connected to the internet via the network, the time and date are automatically synchronised.
6. INSTALLATION
6.6. Date time mode
You therefore do not have to set the time manually. You can change these settings at any time in the main menu under System.
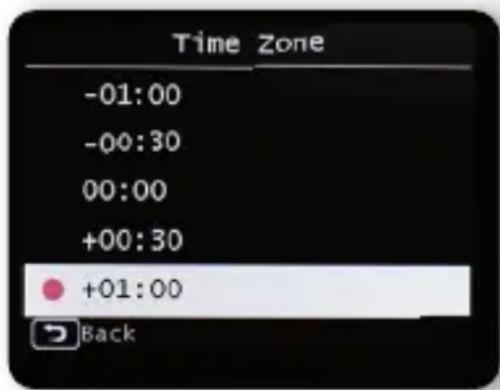
6.7. GMT time zone
Select your time zone here. For Germany and most of Europe, select GMT + 1:00.
text_image
Time Zone -01:00 -00:30 00:00 +00:30 +01:00 BackUse the ▼▲ buttons on the remote control to make a selection. Use the OK button on the remote control or press the knob on the device to confirm.
6. INSTALLATION
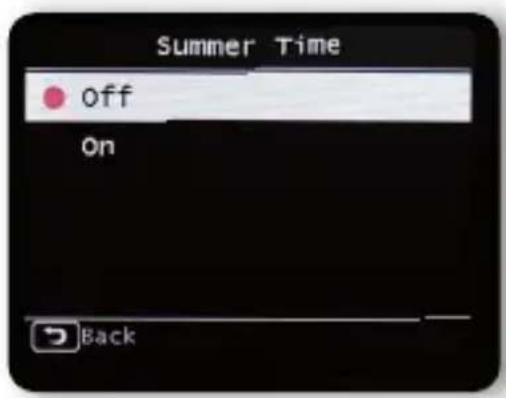
6.8. Daylight saving
Switch on daylight saving time here if it currently applies.
Use the ▼▲ buttons on the remote control to make a selection. Use the OK button on the remote control or press the knob on the device to confirm.
text_image
Summer Time off On Back6.9. Location
Choose your continent and then your country in order to access internet radio broadcasts from your local stations.
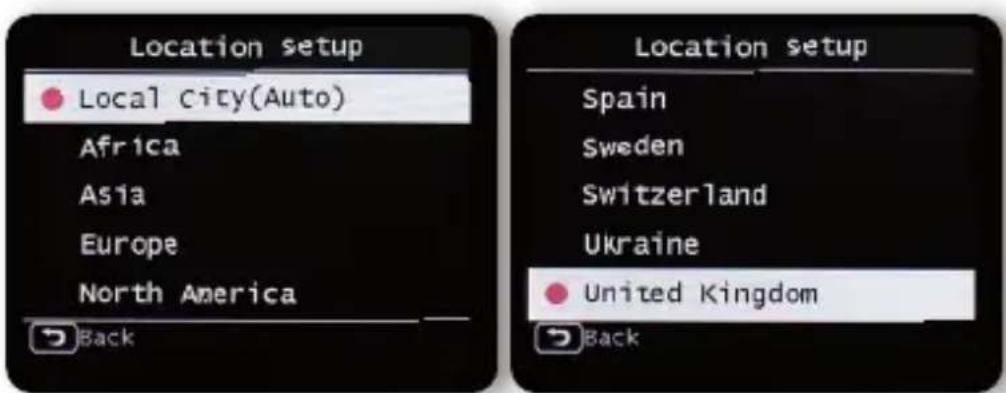
text_image
Location setup ● Local City(Auto) Africa Asia Europe North America Back Location setup Spain Sweden Switzerland Ukraine ● United Kingdom BackUse the ▼▲ buttons on the remote control to make a selection. Use the OK button on the remote control or press the knob on the device to confirm.
6. INSTALLATION
6.11. WiFi/network selection
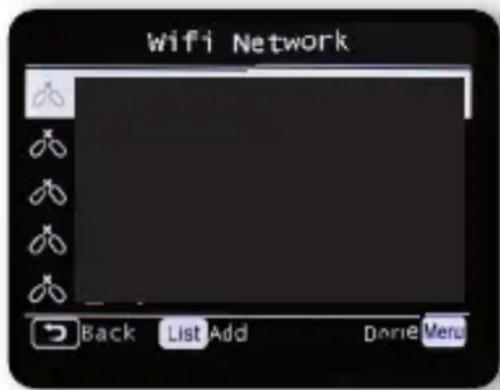
In the next step, you will be shown all the available WiFi networks that are within range of the device. Select the network you want to connect to and confirm by pressing the OK button.
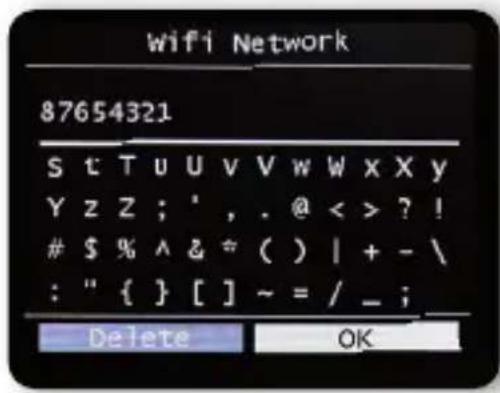
Enter the WIFI password. Use the ▼▲ buttons on the remote control or the knob on the device to select a character, and use ▶ to jump forwards. Press OK to confirm.
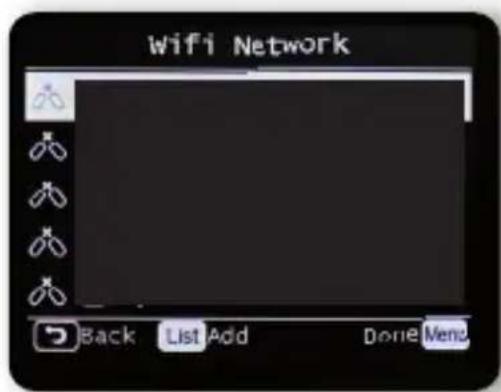
text_image
Wifi Network Back List Add Done Menu
text_image
Wifi Network 87654321 s t T u U v V w W x X y Y z Z ; ', . @ < > ? !$ % ^ & * ( ) | + - \
: " { } [ ] ~ = / _ ; Delete OKPlease note that the router registration process can take some time.

7. SETTINGS
7.1. General operation
7.1.1. Menu button
Press and hold the Menu button on the device or
remote control. Regardless of current device settings, this always returns you to the main menu.
Navigate the main menu using the ▶◀ buttons or the knob on the device.
The main menu can be split up into the following
sub-points:
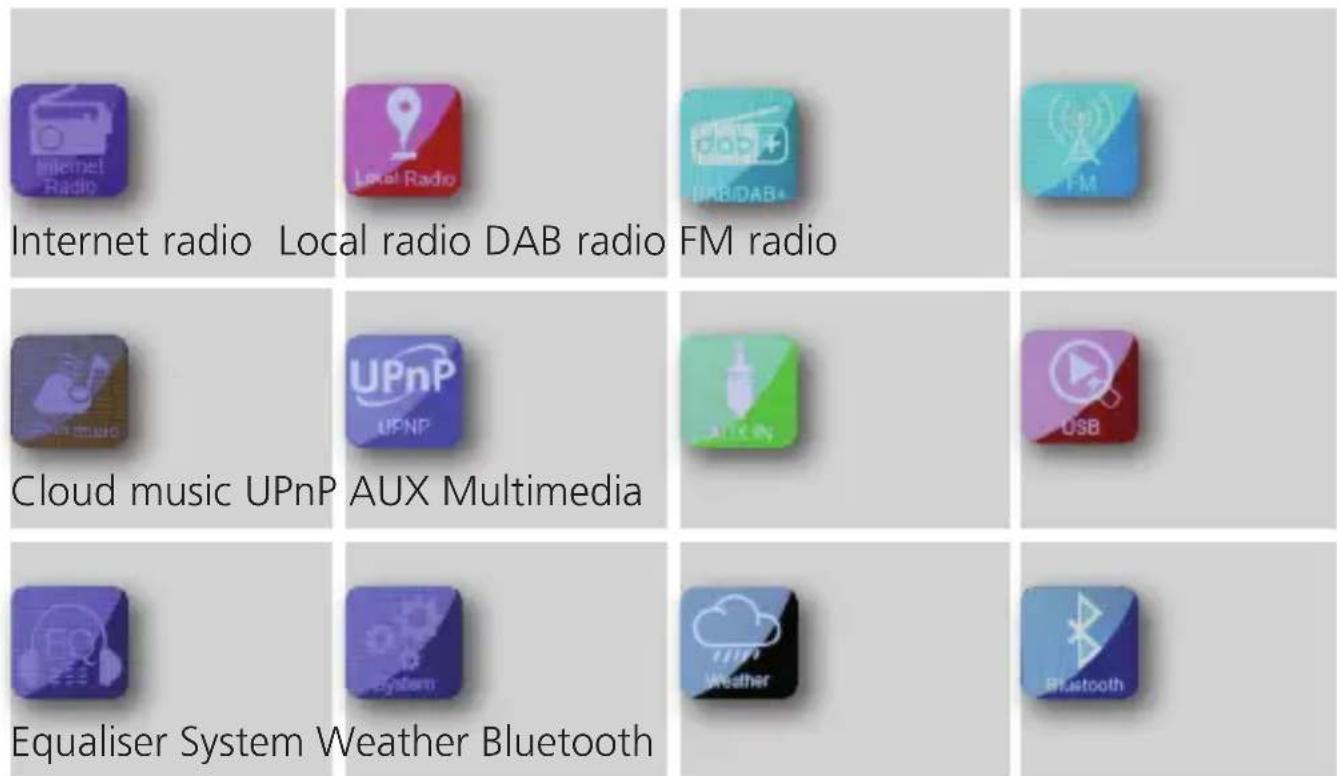
text_image
Internet radio Local radio DAB radio FM radio Cloud music UPnP AUX Multimedia Equaliser System Weather BluetoothYou can use the arrow buttons ▶◀ or the control knob to select individual points within the menu.
Use the OK button on the remote control or the knob on the device to confirm your selection.
7. SETTINGS
7.1.2. Back button
Using the back button (button 13 on the device / button 5 on the remote control) will always take you one step back.
7.1.3. List button
In radio mode, pressing the List button displays an overview of radio stations you have previously listened to.
7.1.4. Mode button
You can use the Mode button to switch between the radio's various operating modes.
7.2. System
Press the Menu button on the remote control or the device and use the ▶◀ buttons to select System in the menu.
Use the OK button on the remote control or press the knob on the device to confirm your selection. In this part of the menu, you can change individual device settings.
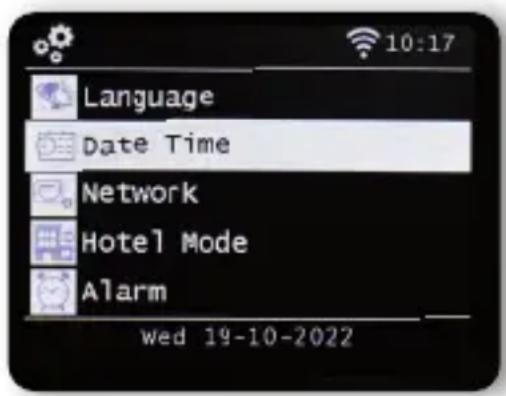
text_image
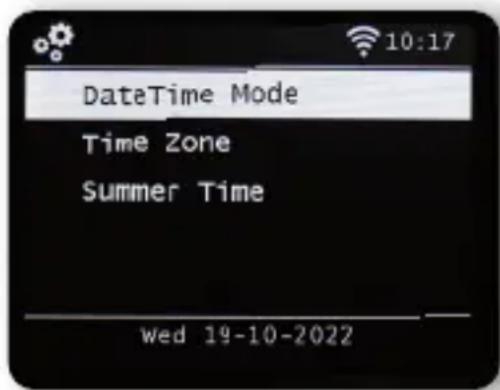
Language Date Time Network Hotel Mode Alarm wed 19-10-20227. SETTINGS
7.2.1 Language
Use the ▼▲ buttons on the remote control to select the menu language. Use the OK button on the remote control to confirm your preferred menu language.
7.2.2 Date time
Use the ▼▲ buttons on the remote control to make a selection. Use the OK button on the remote control or press the knob on the device to confirm.
text_image
DateTime Mode Time Zone Summer Time wed 19-10-2022The device's factory setting is to automatically set the time. If the device is connected to the internet via the network, the time and date are automatically synchronised. You therefore do not have to set the time manually. Select how the radio should synchronise the time here.
7. SETTINGS
7.2.3. Network
In order for the device to function as an internet radio, the radio must be connected to a network with internet access.
If you have not already done so in the initial setup, you can set up a network connection under this menu item.
Press the MENU button on the remote control or on the device and use the ▶◀ buttons on the remote control or the knob on the device to select System in the menu.
Use the OK button on the remote control or the knob on the device to confirm your selection.
Use the ▼▲ buttons on the remote control to select Network in the menu.
text_image
Wifi Network Back List Add Dome MenuUse the OK button on the remote control or the knob on the device to confirm your selection.
Use the ▼▲ buttons on the remote control to select the network you want to connect to and confirm by pressing the OK button.
Enter the WiFi password. Use the ▼▲ buttons on the remote control or the knob on the device to select a character, and use ▶ to jump forwards. Press OK to confirm.

7. SETTINGS
7.2.3. Network
text_image
Wifi Network 87654321 S t T u U v V w W x X y Y z Z ; ', . @ < > ? !$ % ^ & ≈ ( ) | + - \
: " { } [ ] ~ = / _ ; Delete OKPlease note that the registration process can take some time.
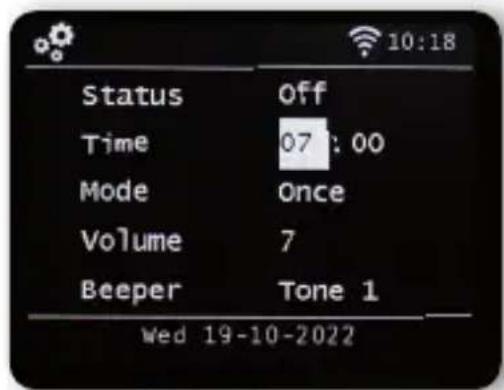
7.2.4. Alarm
The device can be used as a radio alarm clock.
You can set up to 5 alarm times in this menu option.
To set an alarm, please proceed as follows:
Press the MENU button on the remote control or on the
device and use the ▶◀ buttons on the remote control or the knob on the device to select System in the menu.
Use the ▼▲ buttons on the remote control or the knob on the device to select Alarm in the menu and press the OK button on the remote control or the knob on the device to confirm.
7. SETTINGS
7.2.4. Alarm

text_image
1 off 00:00 Once 2 off 00:00 Once 3 off 00:00 Once 4 off 00:00 Once 5 off 00:00 Once Wed 19-10-2022
Select one of the 5 available alarms and confirm by pressing the knob on the device or the OK button on the remote control.
text_image
Status Off Time 07:00 Mode Once Volume 7 Beeper Tone 1 Wed 19-10-2022Activate the alarm clock via the Status line.
In the next line, set the time for the alarm. Use the number pad on the remote control or the knob on the device.
Your entries must be confirmed by pressing the OK button.
Set the repetition intervals in the Date line.
You can decide whether the alarm should be activated at the set time once, daily, on weekdays or on weekends only.

7. SETTINGS
7.2.4. Alarm
In the next line, set the volume for the alarm.
In the Tone line, you can choose a sound or a DAB+, internet or FM radio station to play.
Please note that at least one favourite station must be saved for the selected reception mode if choosing the radio station option.
To stop an alarm, press the ⏻ button on the remote control or the device.
To activate the snooze function, press any button on the device (apart from the Standby button).
This pauses the alarm for 5 minutes.
The alarm is reactivated after 5 minutes.
To deactivate the alarm until the following day, press the ⏻ button on the device.
7.2.5. Edit timer
In this menu, you can edit a set recording timer. Please read chapter 8.14.
7. SETTINGS
7.2.6. Standby mode
This function lets you adjust the display in standby mode.
Use the ▼▲ buttons on the remote control or the knob on the device to select Standby mode in the menu and press the OK button on the remote control or the knob on the device to confirm.
text_image
Eco Standby • Standby with Clock Auto Standby wed 19-10-2022Select your desired function then confirm by pressing the knob on the device or the OK button on the remote control.
Eco standby
In this mode, the device consumes very little power when in standby mode. The time is not displayed in this standby mode.
Standby with clock
In this mode, the time is displayed in standby mode if you turn the device off by using the Standby button.
This slightly increases power consumption.
Eco standby mode is activated by holding the Standby button.
Auto standby
In this mode, the device automatically switches to standby after a set time if no operation is performed during this period.
7. SETTINGS
7.2.7. Sleep timer
The sleep timer function can be used to automatically switch the radio into standby mode. Here, you can determine the amount of time until the device automatically switches off. Use the ▼▲ buttons on the remote control or the knob on the device to select
Sleep timer in the menu and press the OK button on the remote control or the knob on the device to confirm.
text_image
off 10 Min 20 Min 30 Min 40 Min wed 19-10-2022Select Off to disable this feature or select a preset time between 10 and 120 minutes.
Confirm your entry by pressing OK on the remote control or confirm by pressing the control knob on the device.
7.2.8. Backlight
This function lets you adapt the brightness of the display.
Use the ▼▲ buttons on the remote control or the control knob on the device to select Backlight in the System menu and press the OK button on the remote control or the knob on the device to confirm.
7. SETTINGS
7.2.8. Backlight
text_image
Alarm Record Timer Standby Mode Sleep Timer Backlight wed 19-10-2022 10:19 10:19 wed 19-10-2022
You can adjust the backlight for both operation and standby mode. Use the ▶◀ buttons or the knob on the device and press OK to confirm
7.2.9. Location setting
This setting allows you to set the region in which you are located. In this setting, the radio selects local radio stations in your area via the local radio function.
Use the ▼▲ buttons on the remote control or the knob on the device to select the Location setting in the System menu and then press the OK button on the remote control or the knob on the device to confirm.
Then select your continent, followed by your country.
7. SETTINGS
It may be necessary to update the operating software to improve the device's function. The USB interface allows you to update your radio's operating software, which is available on www.telestar.de if required. The software provided on the website must be unzipped. The unzipped file is then transferred to an appropriate storage medium and connected to the radio via the USB port.
Please refer to the software download information for the software update procedure.
Alternatively, the update can be carried out via the network connection. In this case, select Via network.
7.2.11. Factory settings
This part of the menu lets you restore the device's factory settings. The device will then subsequently restart with its factory settings.
Use the ▼▲ buttons on the remote control or the knob
on the device to select Factory settings in the System menu then press the OK button on the remote control or the knob on the device to confirm.
text_image
All private data will be deleted.Are you sure to continue? OK Cancel7. SETTINGS
7.2.11. Factory settings
Use the OK button to confirm if you would like to restore factory settings. Select Cancel if you want to cancel this action.
If you activate factory settings, the device will return to the settings it had at the time of delivery. All saved stations and favourites lists will be lost.
7.2.12. Version
This part of the menu provides information about the firmware version currently installed on the device.
Use the ▼▲ buttons on the remote control or the knob on the device to select the Version setting in the System menu and then press the OK button on the remote control or the knob on the device to confirm.
8. OPERATION
8.1. DAB+ radio
You can receive digitally transmitted radio stations in this radio mode.
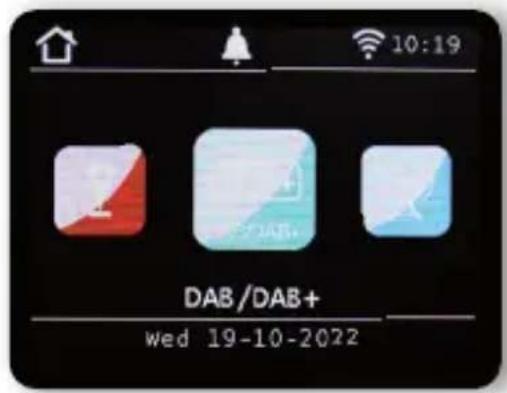
Press the MENU button on the remote control or on the device use the ▶◀ buttons to select the menu item DAB/DAB+.
To confirm your selection, press the OK button on the remote control or press the knob on the device.
8.1.1. Station list
Press the List button to view the station's DAB station list. You can now use this station list to select your desired station.
Please note that a DAB station list is only available if a DAB station scan has been successfully performed beforehand.
Please also read chapter 8.1.2.
8.1.2. DAB search
To perform an automatic station search in DAB
mode, press the Back ↩ button, several times if necessary.
If the radio has not yet had any programmes stored in DAB mode, a search will start automatically as soon as the radio is switched to DAB receiving mode.
8.1.2. DAB search
text_image
DAB/DAB+ wed 19-10-2022
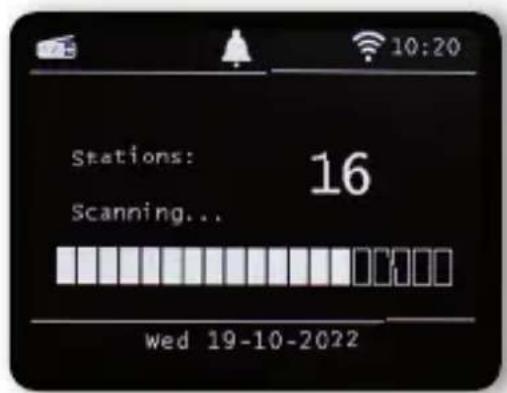
Switch to the automatic station search line and confirm by pressing the Enter/OK button on the remote control or by pressing the control knob on the device.
The radio will now automatically search for all receivable digital radio stations and then save them in a station list. You can access these as described in Chapter 8.1.1.
text_image
Stations: 16 Scanning... wed 19-10-2022The number on the right shows the number of radio stations found. After a successful search, the radio starts playing the first station found.

8. OPERATION
8.1.3. DAB manual search
You can also search for DAB stations manually.
You will need to know the broadcast frequency to do so.
In this part of the menu, select the desired station frequency and press OK to confirm.
8.2. Selecting an internet radio station
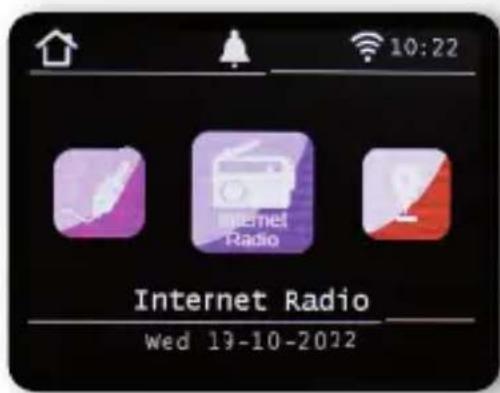
Use the arrow buttons ▶◀ in the main menu to select Internet radio and then press the OK button on the remote control or the OK button on the device to confirm.
text_image
10:22 Internet Radio wed 19-10-2022As soon as you have switched to internet radio mode, you'll be shown an overview.
text_image
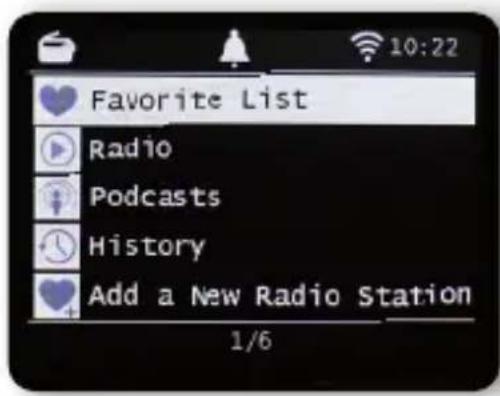
Favorite List Radio Podcasts History Add a New Radio Station 1/68.2. Selecting an internet radio station
Various lists are available here.
Favourites list
This list displays all individually stored radio stations. On how to save a radio station, please also consult chapter 8.4.
Radio
Various radio programme lists are provided here.
Podcasts
Here, you can choose from a number of radio podcasts.
History
This list shows the 40 most recent radio stations you have selected.
Search
You can use this function to search for a specific radio station.
8.3. Searching for an internet radio station
Select the Search line and confirm by pressing the knob on the device.

text_image
0 1 2 3 4 5 6 7 8 9 a A b B c C d D e E f F g G h H i I j J k K l L m M n N o O p P q Q r R s Delete OKEnter the name of the radio station in the search field using the keyboard on the remote control.

8. OPERATION
8.3. Searching for an internet radio station
Use the ▼▲▶◀ buttons to do this.
Confirm your entry by pressing OK.
The radio will now search for all stations that correspond to this entry. Use the ▼▲ buttons to choose a station and confirm by pressing the knob on the device.
8.4. Saving radio stations
You can store up to 4 radio stations on one station memory button.
Select a radio station that you want to save and hold down the station memory button on the device on which you want to store the radio station for approx. 3 seconds.
The radio station will be saved.
You can now use this button to access the radio station.
8.5. Saving radio stations to your favourites list
Radio stations can be saved in a favourites list that you can quickly call up using the favourites button on the remote control. You can save up to 10 favourite radio stations in this list.
Choose a radio station that you would like to add to your favourites list.
Press the FAV+ button on the remote control.
Now select the number for the memory slot to which you would like to save the radio station.
Hold the FAV+ button on the remote control for approx. 2 seconds. The radio station will be saved to the chosen slot.
8. OPERATION
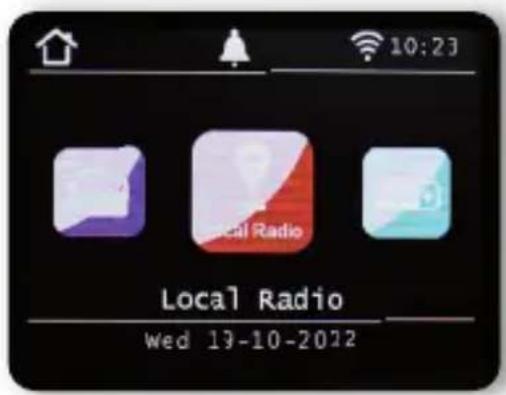
8.6. Local radio stations
To make it easier for you to search for stations in your area in internet radio mode, you can search for specific radio stations from your region in the device's menu.
Use the ▶◀ buttons on the remote control or the knob on the device to select Local radio.
text_image
Local Radio wed 19-10-2022This part of the menu lets you sort a selection of various internet radio stations by country region so you can find them more easily.
You can use the ▼▲ buttons here to select your desired programme list.
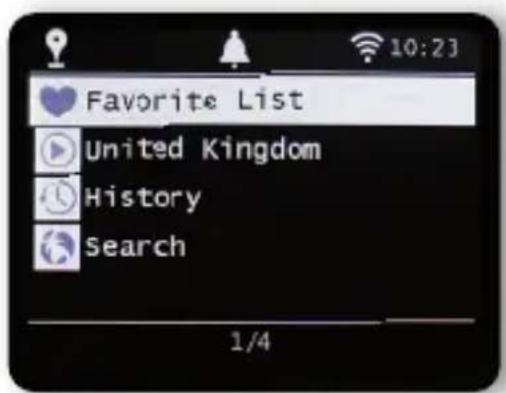
text_image
Favorite List United Kingdom History Search 1/4Confirm your entry by pressing OK.

8. OPERATION
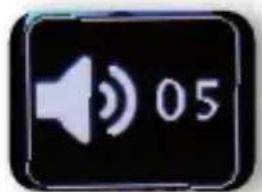
8.7. Changing the volume
Adjust the volume using the VOL+/VOL- buttons on the remote control or by using the knob on the device.

text_image
05To mute the radio, press the Mute button on the remote control.
8.8. Switching operating mode
Press the MODE button on the remote control to switch between AUX, UPnP, local radio, DAB+ radio, FM radio, Cloud music, UPnP, AUX IN, multimedia, internet radio and Bluetooth operating modes.
8. OPERATION
8.9. AUX IN
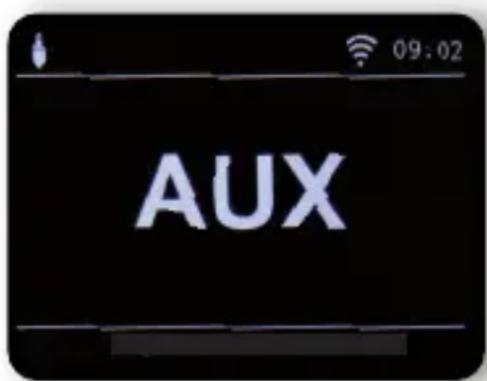
You can connect an external music player to the radio, e.g. an MP3 player. To do so, connect the external device to the back of the radio using a suitable cable and switch the device on. Press the MENU button on the remote control or on the device and use the ▶◀ buttons on the remote control or the knob on the device to select AUX in the menu.
Press OK on the remote control or the control knob on the device to confirm.
Alternatively, you can switch to AUX mode by pressing the MODE button on the device repeatedly until the AUX mode is activated.
text_image
AUXYou can now play music from the external device. The output (skip track, back, stop, play) is controlled via the connected
device. The volume can be adjusted via the VOL+ / VOL- buttons or the control knob on the radio or via the external device.
Please note that you have to connect the external device using a suitable cable.
The radio is equipped with an AUX IN input that is suitable for a 3.5mm stereo jack.

8. OPERATION
8.10. UPnP
If you have connected the radio to a wireless network, you can also use the radio as a media player to play music files from
connected devices in the network such as PCs or smartphones via UPnP. you can also use the radio as a media player to play music files from connected devices in the network such as PCs or smartphones via UPnP.
The devices must be integrated into the same home network for this, and the corresponding media content must be approved for sharing in the network. Share the corresponding media content within this network.
To select UPnP, do the following: Press the MENU button on the remote control or on the device, and use the ▶◀ buttons on the remote control or the control dial on the device to select UPnP.
Press OK on the remote control or the control knob on the device to confirm. Select a track you want to play and confirm by pressing the knob on the device.

text_image
UpnP 09:02 Gold Rush 00:00 00:008.11. USB playback/multimedia
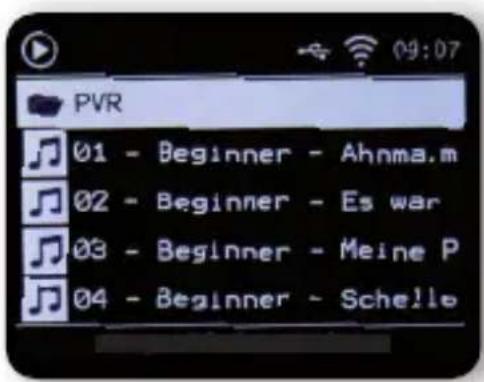
You can play MP3 music files from a USB storage device.
To do so, insert a USB drive containing music files into the USB port on the back.
Press the MENU button on the remote control or on the device, and use the ▶◀ buttons on the remote control or the control dial on the device to select Multimedia.
Press OK on the remote control or the control knob on the device to confirm. Select a track you want to play and confirm by pressing the knob on the device.
text_image
PVR 01 - Beginner - Ahnma.m 02 - Beginner - Es war 03 - Beginner - Meine P 04 - Beginner - Schello
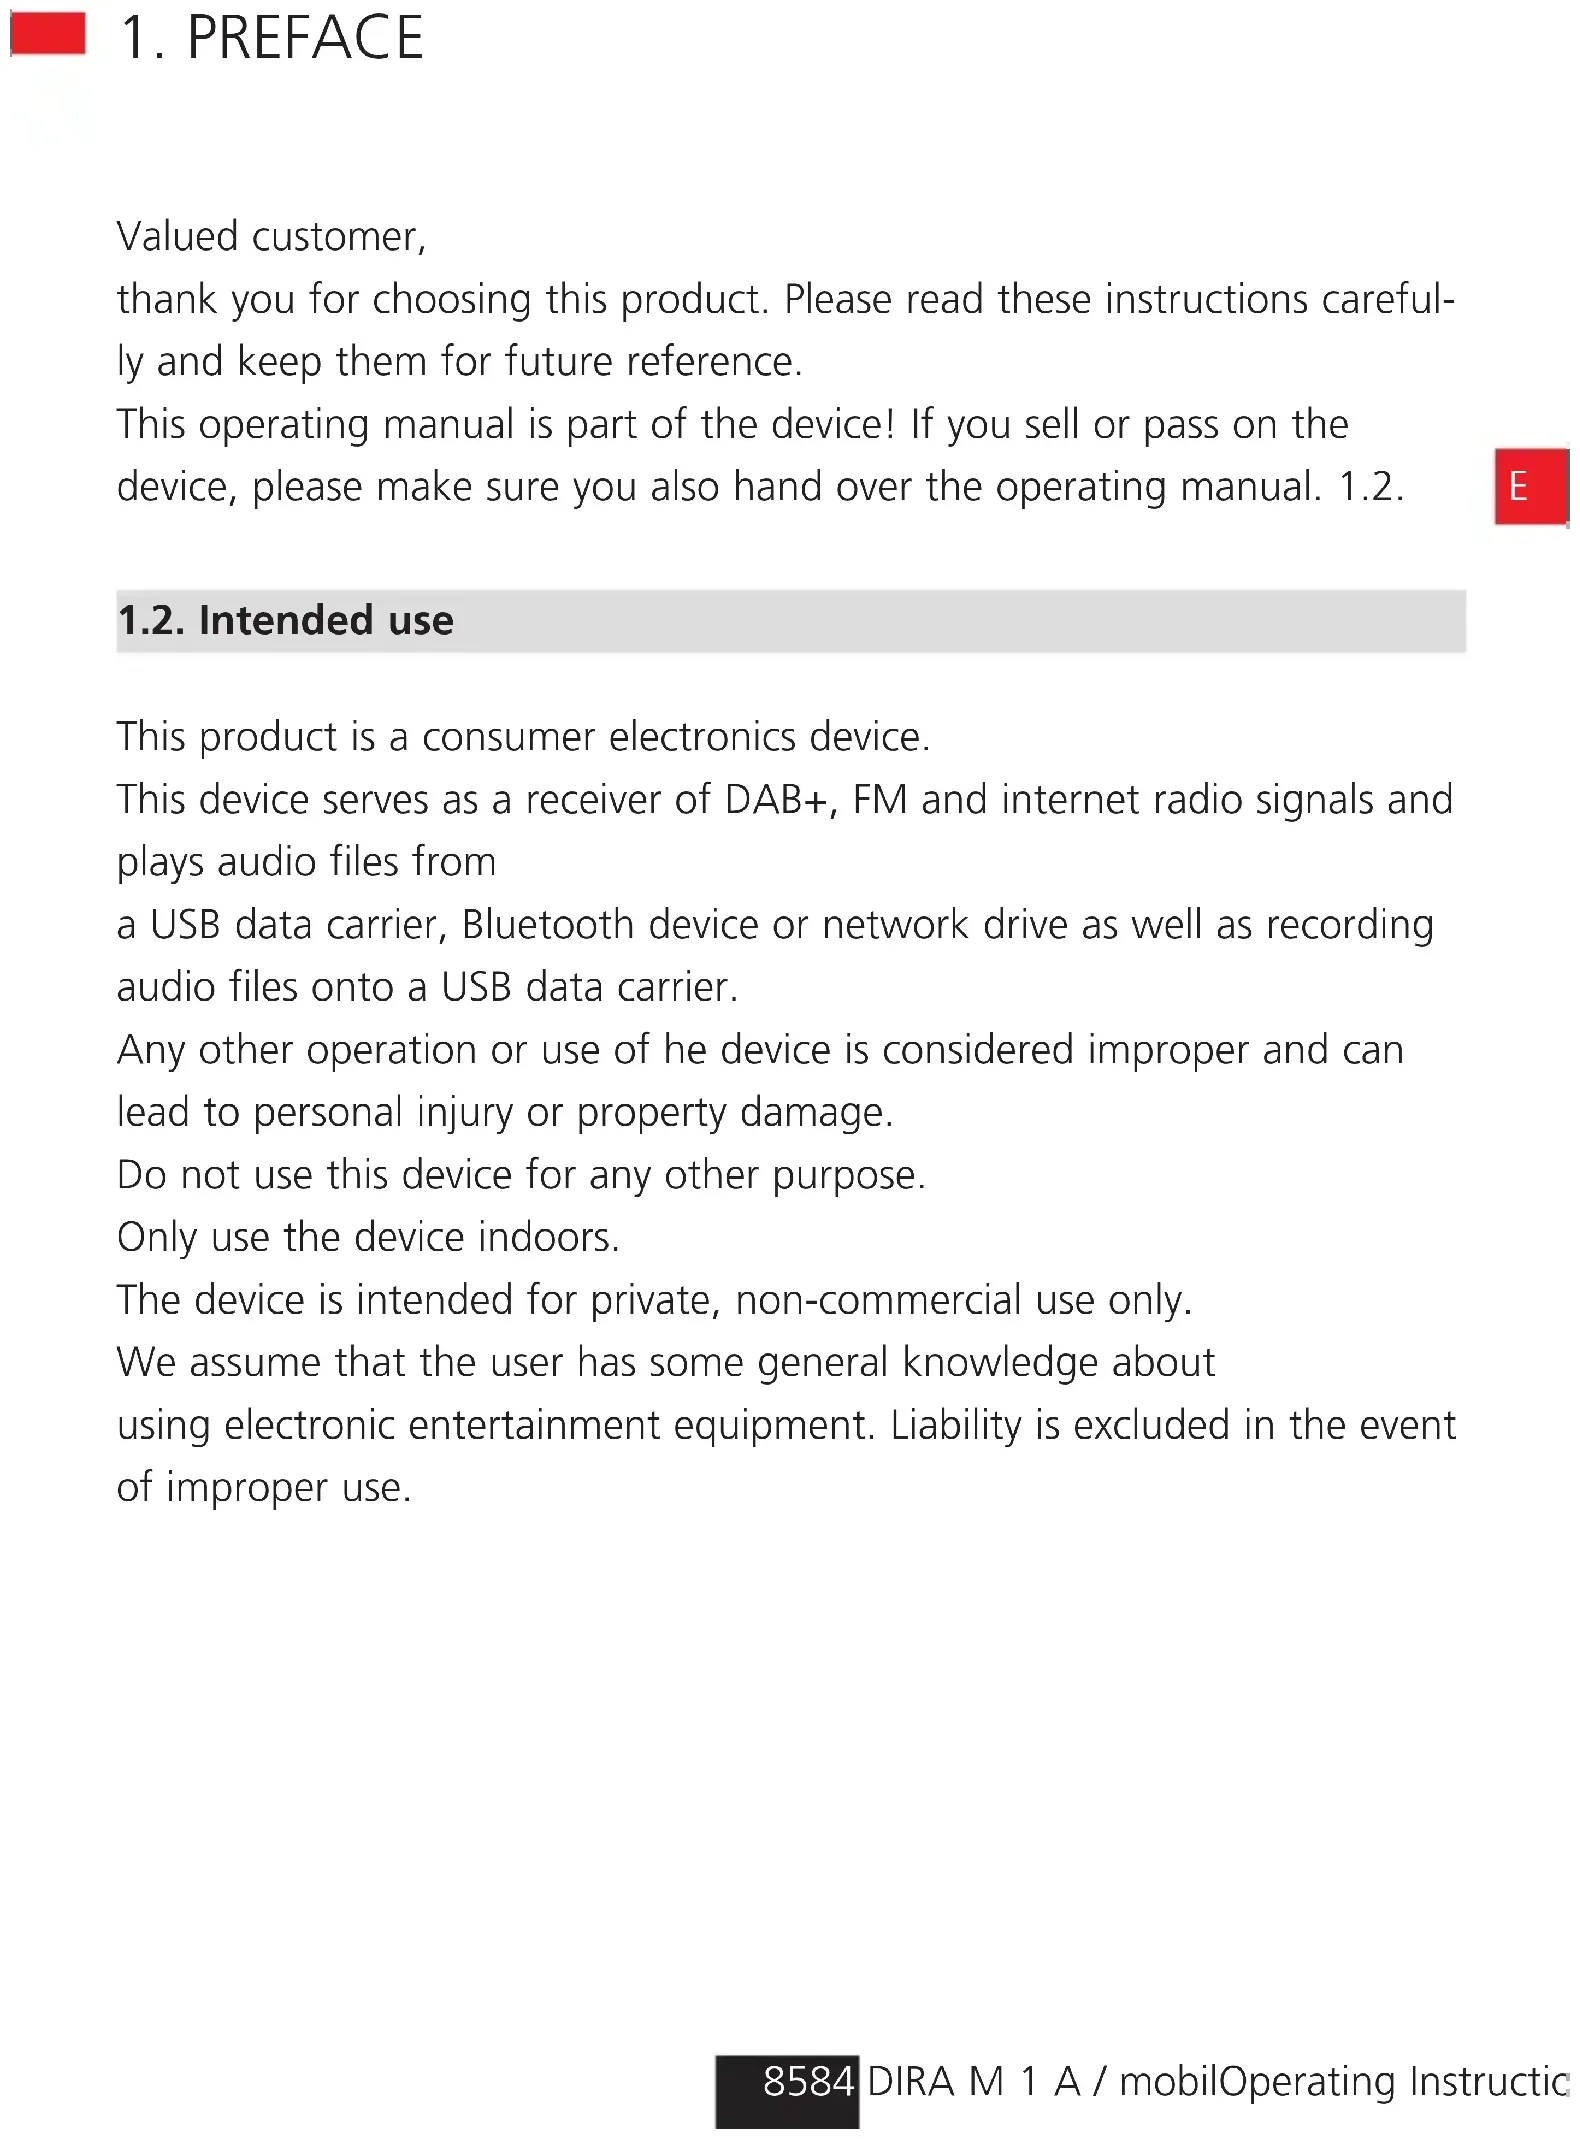
8. OPERATION
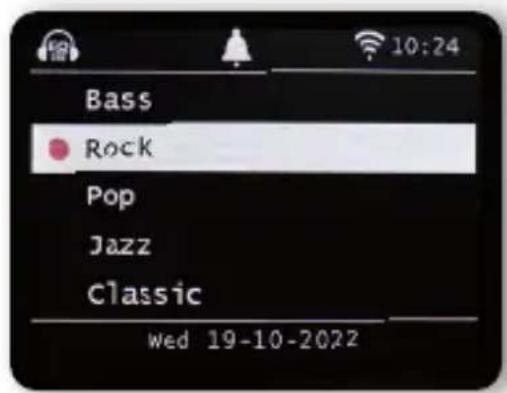
8.12. EQ (equaliser)
In this section, you can select certain sound
settings. In addition to several sound presets, you can also customise your radio's sound and save this setting under My EQ.
Use the ▼▲ buttons on the remote control or the control knob on the device to select Equalizer in the main menu then press the OK button on the remote control or the knob on the device to confirm
text_image
Bass Rock Pop Jazz Classic wed 19-10-2022Use the ▼▲ buttons on the remote control or the control knob on the device to select a sound preset and confirm by pressing OK on the remote control or by pressing the knob on the device. Under My EQ profile, you can change the radio's basic settings. Here, you can adjust the cut-off frequency for high tones (treble) and low tones (bass) to suit your Taste.
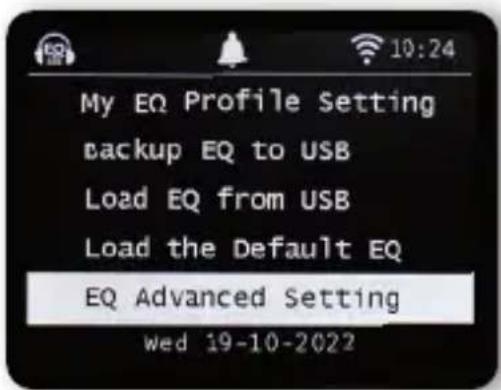
text_image
My EQ Profile Setting backup EQ to USB Load EQ from USB Load the Default EQ EQ Advanced Setting wed 19-10-2022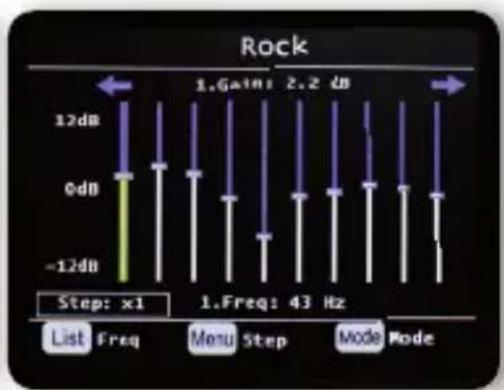
text_image
Rock 1. Gain: 2.2 dB 12dB 0dB -12dB Step: x1 1.Freq: 43 Hz List Freq Menu Step Mode ModeUnder EQ advanced settings, you can adjust various frequency ranges.
8. OPERATION
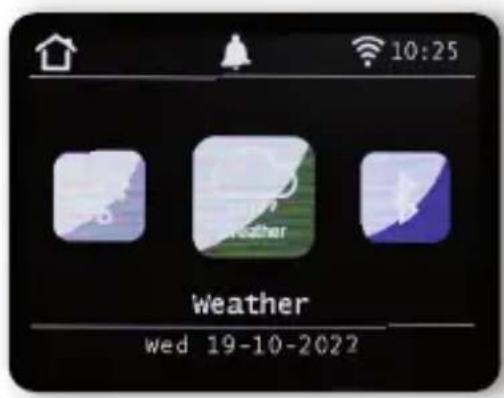
8.13. Weather
The device can show current weather information for your location. To view the weather, select Weather in the radio's main menu then press OK to confirm.
text_image
10:25 weather wed 19-10-2022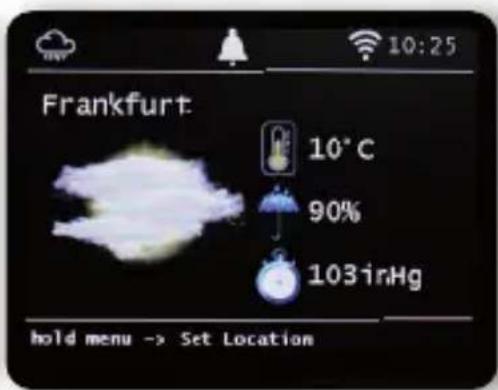
text_image
Frankfurt 10°C 90% 103inHg hold menu -> Set LocationYou can use the MENU button to change the location for the weather report. Enter the name of the city for which you want the latest weather information.
If the device is connected to the Internet, you can view weather information on the device display. Please note:
For the weather forecast, the device accesses an internet server on which weather data is stored.
Therefore, the weather data displayed may differ from the actual weather data at your location.


8. OPERATION
8.14. Recording radio broadcasts
You can use the device to record UKW, DAB+ and internet radio programmes onto a connected USB data carrier.
The radio creates a folder on the connected USB data carrier in which all recordings are stored. The folder is named PVR.
The files are saved in the audio format transmitted by the radio station.
You can record a programme while playing
if you have connected a USB data carrier to the radio.
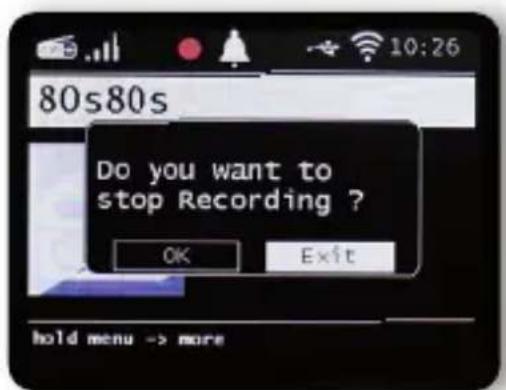
While a programme is playing, press the Record button (Rec) on the device or remote control. A red recording icon will appear on the display.

text_image
80s80s Initializing Recorder... hold menu -> moreTo stop recording, press the Stop button and confirm the request with OK.
text_image
80s80s Do you want to stop Recording ? OK Exit hold menu -> more8. OPERATION
8.14. Recording radio broadcasts
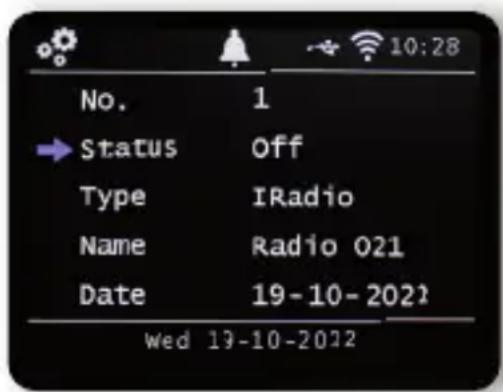
Similarly to a video or DVD recorder, the radio can also be used to programme timed recordings to record radio broadcasts when you are not at home, for example. To do this, hold the Record button on the device or on the remote control for more than 2 seconds.
Alternatively, select Timer in the System menu.
text_image
No. 1 → Status Off Type IRadio Name Radio 021 Date 19-10-2022 wed 19-10-2022Name: Select the radio programme that is to be recorded here.
Date: Enter the date on which the timer should start here.
Start time: Select the start time line, then press the OK button and enter the time when the timer should be activated using the up/down arrow buttons on the remote control or the knob.
Duration: Set the recording time in hours and minutes here.
Mode: Determine whether the recording should occur only once or daily.

8. OPERATION
8.15. Radio as a Bluetooth receiver
The radio can be connected to an external device
(e.g. smartphone, tablet) via Bluetooth.
The Bluetooth connection can then be used to play media
(locally stored MP3 files, streamed music, online radio) from external devices via the radio. Select Bluetooth in the menu.
A Bluetooth connection must be established before you can send audio files to the radio via Bluetooth.
8.15.1. Establishing a Bluetooth connection
Press the Menu button on the remote control or on the device, and select Bluetooth mode.
Once you have selected the Bluetooth mode on the radio,
the device will be in pairing mode and will search for Bluetooth devices to connect to.
Now activate the Bluetooth function on the external device to be connected (for further details, please refer to the operating manual for this device). In the overview of available devices, search for
'DIRA M 1 A / DIRA M 1 A mobil', select this and then establish the connection.
8.15.2. Playing media via Bluetooth
Once you have established a Bluetooth connection as described in chapter 8.15.1, you can play music files stored on the external device via the radio.
To do so, proceed as follows:
Start music playback on the external device by
activating the relevant playback function (MP3 player etc.) or choosing a title from the relevant playback list then beginning playback.
Select your desired receiving device from the Bluetooth list.
Confirm by pressing the control knob.
This will create a Bluetooth connection with the receiving device.

8. OPERATION
8.16. FM Radio
In this menu item you can receive analogue VHF radio stations switched to FM/VHF mode, a station search must be carried out.
An automatic and a manual search function are available for this purpose.
8.16.1. Automatic FM search
After switching to FM, press the List button on the device. Press and hold the OK button until the search starts.
bar
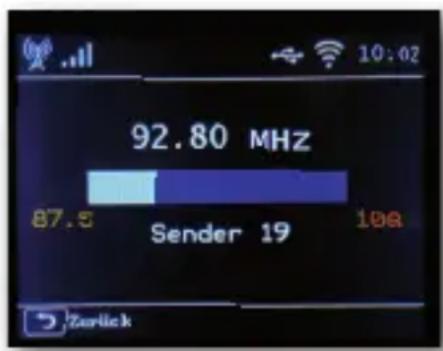
| Category | Value | |---|---| | Sender | 19 | | 87.5 | 92.80 MHz | | 100 | 100 |The device starts the automatic station search and saves all frequencies on which a radio station was found.
Please note that the sensitivity of the reception and the associated number of radio stations found depends on the search sensitivity settings. To change the seek sensitivity, press the Menu button in FM mode. Choose between „All stations“, „Weak stations“ and „Strong stations“.
8. OPERATION
8.17. Emergency-Warning-Functionality
8.17.1. EWF? What does it mean?

text_image
EMERGENCY WARNING FUNCTIONALITYEmergency-Warning-Functionality" - EWF for short, enables the population to be warned quickly and reliably in the event of a disaster. Whether it's flooding, extreme storms, a chemical accident or a terrorist attack - the digital radio provides information about imminent dangers.
The current radio program is interrupted in the event of an emergency alarm and the radios automatically switch to the warning and information channel. Radios that are in „standby mode“ are automatically activated. In addition to the warning announcement, the warning message appears on the radio display in multiple languages and with detailed instructions and information.


8. OPERATION
8.17.2. Setting EWF
Press the MENU button on the remote control or on device and select System using the buttons on the remote control or the rotary control on the device. Confirm with OK on the remote control or by pressing the rotary control on the device. Select the EWF menu item and confirm by pressing the rotary control on the device or with OK on the remote control.
ON/OFF
Activate or deactivate the EWF function in the On/Off line.
Adjust Volume
Here you set the volume at which a warning message is to be played.
standby monitor
If necessary, additional text information is transmitted via DAB. If you want them to be shown in the display, select active.
8.18. Charging the battery (only model DIRA M 1 A mobile)
The DIRA M 1 A mobile has a rechargeable Li-ion polymer battery that is charged as soon as the radio is connected to the mains and switched on with the mains switch. When first used, the battery should be charged for about 12 hours. Charging stops automatically when the battery is fully charged. The charging status is shown in the display at the bottom left by a pictogram
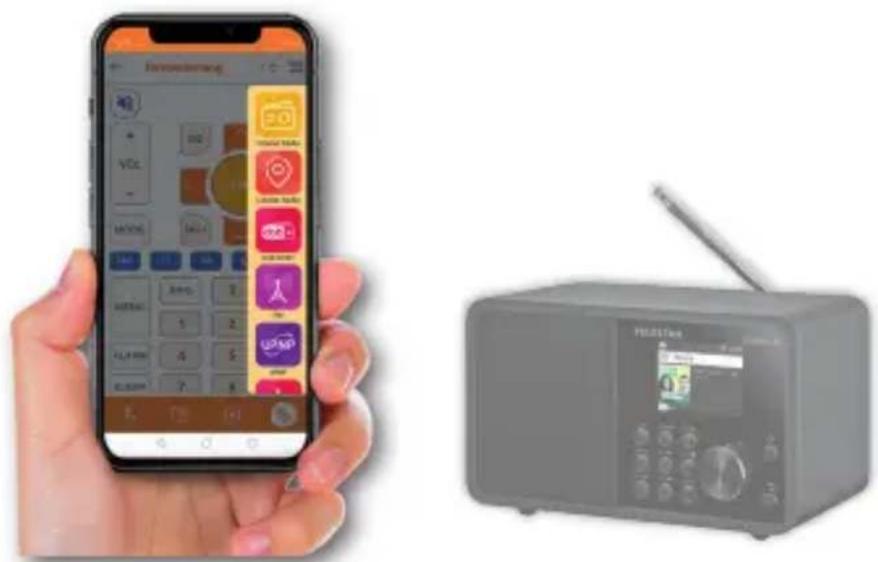
8.19. Operation via the app
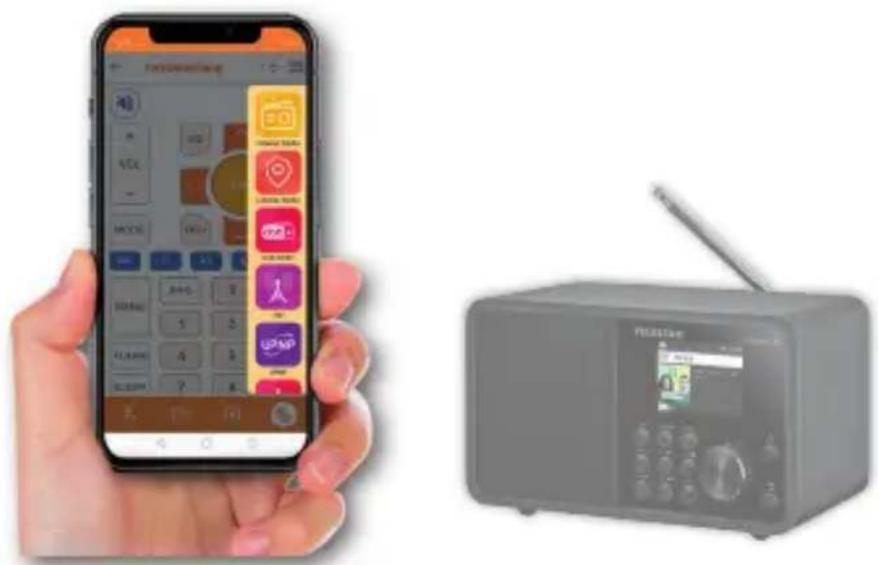
text_image
Hand holding smartphone displaying app interface with app icons and a radio device showing a digital display.
You can use the app to operate compatible internet radio services via your tablet or smartphone.
The app is suitable for iOS and Android operating systems.
Please note:
This description corresponds to the app as at 06/2021.
The app's functions or appearance may be changed by software updates.
Download the application from the Google Play Store®
for Android ® operating systems or iTunes for iOS ® operating systems then install the app onto your smartphone.

natural_image
Orange square icon with a white S-shaped logo and the word 'Soundmate' below it (no additional text or symbols)
text_image
ATTINIO Google Play
text_image
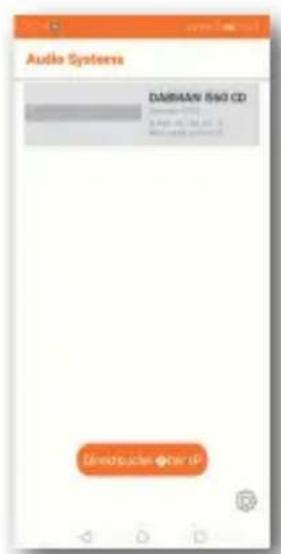
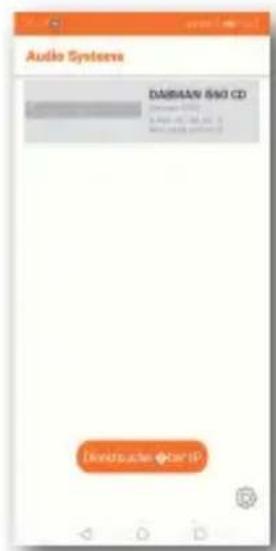
Audio Systems DAI#AAN 860 CD Undisclosed Other OfStart the app.
When you start the app, it will automatically recognise the radio as long as it is registered to the same network.
The app's main menu is structured like the radio menu.
The icons used in the app are comparable to the symbols in the radio menu.
Tap on the discovered radio to start the app.
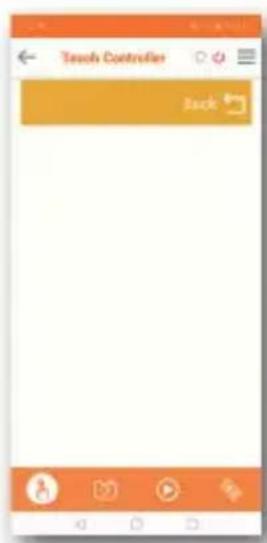
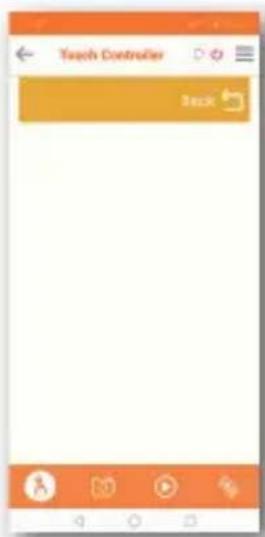
text_image
Tensby Controller BackTouch controller
You can use the touch controller to swipe right or left, up or down to control various functions, e.g. volume or programme selection.
text_image
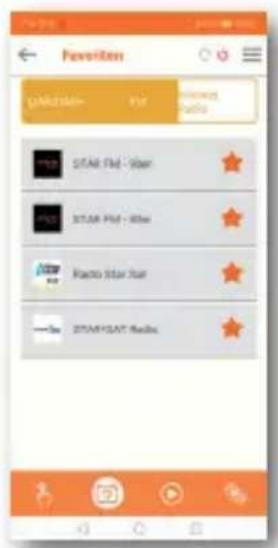
Fevrolen GARU Star - 500 STAR Star - Star STAR Star - Star Krao Star Star STAR Star - MediaAccessing favourite stations
You can use this function to view your saved favourite radio stations. Select a favourite radio station from the list.
Favourite radio stations
can be saved to the radio as described in the radio's operating instructions.

text_image
FortiveClosing VOL KIZ C MENU FAV MEN AFC 0 1 2 ALARM 4 5 SLEEP 7 8 Microsoft Media Lululemon Media OK!+ DIRECTLAB I'M UPNP UPN 1Playback function
Use this button to view current playback. Here, you can select internet, DAB + or FM radio stations. You can also change the volume here. Here, you can begin recording to a USB data carrier. As well as the current radio station, any additional information provided by the radio station about the current programme will also be displayed.
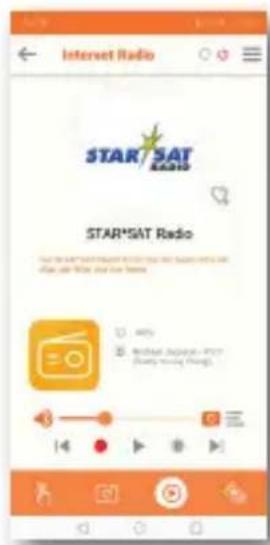
text_image
Internet Radio STAR/SAT RADIO STAR/SAT Radio How to use the Internet Radio program in the Internet Radio program, or how to use the Internet Radio program.Playback function
Use this button to view current playback. Here, you can select internet, DAB + or FM radio stations. You can also change the volume here. Here, you can begin recording to a USB data carrier.
As well as the current radio station, any additional information provided by the radio station about the current programme will also be displayed.
text_image
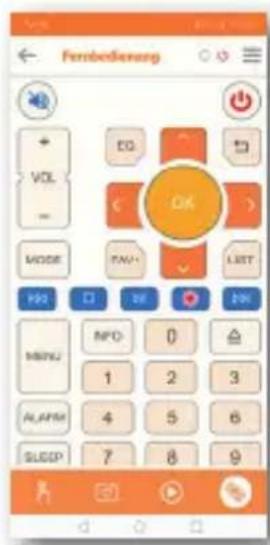
Fernbedierung + VOL - MODE OK OK MENJ MPO 1 2 3 ALARM 4 5 6 SLEEP 7 8 9Remote control
The remote control function lets you control the radio using a virtual remote control.
To do this, tap the remote control symbol at the bottom.
You can now control all radio functions with the help of this virtual remote control.
Symptom Possible cause and troubleshooting
| Display not on, radio does not react | Connect to power using the power cable provided. |
| Remote control does not work | Battery dead or incorrectly inserted. Please check that the batteries are inserted in the correct direction. Point the remote control at the device. |
| DAB+ reception interrupted | No stations availableRun a search.Antenna not fully extended. Change the radio's location (e.g. nearer to a window), perform another search. |
| Radio programmes glitching | Change the location of the radio. |
| AUX playback not working | The radio is in the wrong modeSwitch to 'AUX' modeCable connection faulty. Check the cable connection between the radio and the external device |
| Poor audio quality when playing music | File with low bit rate. Check the audio file. Tip: For MP3 files, the bit rate should be 192Kbit/s or higher. |

Symptom Possible cause and troubleshooting
| Volume too low Check the volume setting on the radio. Check the volume setting on the paired device from which you are playing music. | |
| Network connection can-not be established | Check the WiFi function.Activate the DHCP function on the router to which the radio is to be registered.There may be an active firewall in the network. |
| WiFi connection cannot be established | Check the availability of WiFi networks.Reduce the distance between the WiFi router and the radio.Make sure that you are using the correct WEP/WPA password when connecting to a WiFi router. |
| No internet radio stations available | Check network access points. The radio station is currently unavailable. The station's link has been changed or it is no longer transmitting. |
| USB data carrier not recognised | Make sure that the USB storage device is FAT32 formatted. |
| No sound is coming from the device. All other functions are OK. | Headphones are plugged in.Unplug the headphones. |
10. STORAGE
When not in use, please unplug the power adapter from the socket, disconnect the power adapter cable from the radio and store the device in a dry place protected from dust.
If the device is not in use for a longer period of time, the battery must be removed from the remote control.
E
11. BRAND INFORMATION
Product and company names mentioned here are trademarks or registered trademarks of their respective owners.
12. DISPOSAL INFORMATION
12.1. DISPOSING of packaging
The packaging consists
exclusively of materials that can be recycled.
Please dispose of these properly.

12.2. DEVICE DISPOSAL
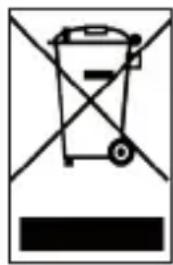
The symbol on the right of a crossed out waste bin indicates that this device is subject to Directive 2012 / 19 / EU.
This directive specifies that this device may not be disposed of with normal household waste at the end of its life but must be taken to especially equipped collection points, recycling centres or waste disposal facilities.
natural_image
Simple line drawing of a trash bin with crossed lines indicating no waste or plastic (no text or symbols)This type of disposal is free of charge. Protect the environment and dispose of waste properly. Further information is available from your local waste collection company or your city or municipal office.
12. DISPOSAL INFORMATION
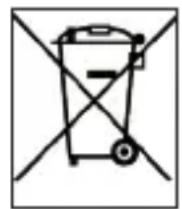
12.3. DISPOSING of batteries
Batteries may not be disposed of with household waste. The symbol on the right means that you as a consumer are required to separately dispose of all batteries and battery packs. Suitable collection bins are provided at specialist retailers and numerous public facilities.
Information on the disposal of old batteries can also be found via waste disposal companies, municipal and local authorities.
This type of disposal is free of charge. Protect the environment and dispose of waste properly.
An additional chemical symbol Pb (lead) or Hg (mercury) under the crossed-out bin means that the battery contains more than 0.0005% mercury or 0.004% lead.
13. PROPERTIES AND TECHNICAL DATA
| Internet radio | |
| Audio codecs MP3 (bit rate up to 320 Kbits/s, sampling rate up to 48 KHz)AAC/AAC+ (bit rate up to 320 Kbits/s, sampling rate up to 48 KHz)WMA (bit rate up to 320 Kbits/s, sampling rate up to 48 KHz)WAV | |
| DAB/DAB+/FM | |
| Reception range DAB band III 174 MHz - 240 MHzFM 87.5 MHz -108 Mhz | |
| Display | |
| TFT colour display | 3.2 inch colour display |
| Son | |
| Speaker 1 x 15 W | Music output3" speakerat 6Ω |
13. PROPERTIES AND TECHNICAL DATA
| Connexions | |
| Headphones | 3.5mm stereo jack input |
| AUX IN | 3.5mm stereo jack input |
| Polarity | 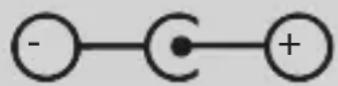 |
| Power adapter connec-tion | |
| USB port | USB 2.0 standard |
| Des conditions de fonctionnement | |
| Temperature range 0 | °C - 45 °C |
| Humidity 20% - 80% relative humidity | |
| WiFi interface | |
| Frequency range | 2.412 GHz - 2.4835 GHz |
| Modulation | CCK, DQPSK, DBPSK,64-QAM, 16-QAM, QPSK, BPSK,IEEE 802.11b/g /n |
| IEEE standards | |
| WiFi data rate | 1, 2, 5.5, 11Mbps |
| 802.11b: | 6, 9, 12, 18, 24, 36, 48, 54 Mbps |
| 802.11g: | HT20 to 72.2 Mbps |
| 802.11n | HT40 to 150 Mbps |
| Transmitting power 18.5dBm (Max) | |

13. PROPERTIES AND TECHNICAL DATA
Technical data for adapter DIRA M 1 A
| Manufacturer SHENZHEN SOY TECHNOLOGY CO.LTD. | |
| Model name SOY-1500100EU-035E | |
| Input voltage 100-240 V | |
| AC frequency input 50 Hz | |
| Output voltage 15 V DC | |
| Output power 1 A | |
| Output capacity 15 W | |
| Average operational efficiency | 88.25% |
| Efficiency at minor power (10%) | 87.08% |
| Power consumption when not on 0,08 W | |
Technical data for adapter DIRA M 1 A mobile
| Manufacturer SHENZHEN SOY TECHNOLOGY CO.LTD. | |
| Model name SOY-1800100EU-063G | |
| Input voltage 100-240 V | |
| AC frequency input 50 Hz | |
| Output voltage 18 V DC | |
| Output power 1 A | |
| Output capacity 18 W | |
| Average operational efficiency 88,25% | |
| Efficiency at minor power (10%) 87,08% | |
| Power consumption when not on 0,08 W | |
13. PROPERTIES AND TECHNICAL DATA
Storage conditions
Always keep in a dry place.
Dimensions and weight DIRA M 1 A
Width x height x depth (mm) 277 x 1117 x 127
Weight 990 g
Dimensions and weight DIRA M 1 A mobil
Width x height x depth (mm) 277 x 1117 x 127
Weight 1180 g
Remote control battery
Type CR 2025 / 3 V
14. SERVICE AND SUPPORT
Dear customer!
Thank you for choosing one of our products. Our product meets legal requirements and has been manufactured under constant quality control.
The technical data corresponds to the current status at the time of printing.
Changes are reserved.
The warranty period for the
TELESTAR DIRA M 1 A / DIRA M 1 A mobil corresponds to the statutory provisions at the time of purchase.
We also offer a HOTLINE telephone service with
professional support.
Professional service specialists are available to answer your questions. Here, you can ask any questions you may have about TELESTAR products and get troubleshooting suggestions.
Our technicians
are available from Monday to Friday between 8 am and 4:45 pm at the following phone number:
02676 / 95 20 101
or via email: service@telestar.de
If the service hotline is unable to assist you, please send your TELESTAR DIRA M 1 A / DIRA M 1 A mobil to the following address, preferably in its original packaging but packaged for safe transport:
TELESTAR - DIGITAL GmbH
Service centre
Your device is labelled with the CE seal and complies with all required EU standards. The TELESTAR DIRA M 1 A / DIRA M 1 A mobil complies with all significant protective requirements of the radio guideline 2014/53/EU (RED – Radio Equipment Devices), the low voltage guideline 2014/35/EU and the RoHS guideline (2011/65/EU) as well as the REACH Act 1907/2006
The declaration of conformity for this product is available at:
TELESTAR DIRA M 1 A:
All technical data and functions described in these operating instructions are correct at the time of printing and are subject to change without prior notice. We assume no liability for misprints or errors. Copying and reproduction only permitted with the express permission of TELESTAR-DIGITAL GmbH.
TELESTAR®
DIRA M 1 A
DIRA M 1 A mobil
text_image
Soundmate Soundmate Google Play App Edit


TABLE DES MATIÈRES
The device is intended for private, non-commercial use only.
We assume that the user has some general knowledge about using electronic entertainment equipment. Liability is excluded in the event of improper use.
2. CONSIGNES DE SÉCURITÉ
2.1. Explanation of symbols
SYMBOL MEANING

DANGER!
Please remove all parts from the packaging and
remove all packaging materials completely.
If one or more of the specified parts is missing, please contact:
TELESTAR Service Center, Am Weiher 14,
56766 Ulmen
e-mail: service@telestar.de

Quantity Explanation
1 TELESTAR DIRA M 1 A / DIRA M 1 A mobil
1 Remote control
1 Telescopic antenna
1 External power adapter
1 Operating manual
1 Battery for remote control type CR 2025 / 3V
(already inserted into the remote)
4. APERÇU DES ÉLÉMENTS DE COMMANDE

text_image
TELESTAR DIRAM 1.A Dlf Nova Tame Impala - No Choice List Presal Mode Mono 4-91 21 @-50 6-991 Rec ①②③④⑤⑥87 9 ①②③④⑤⑥⑦⑨ ⑩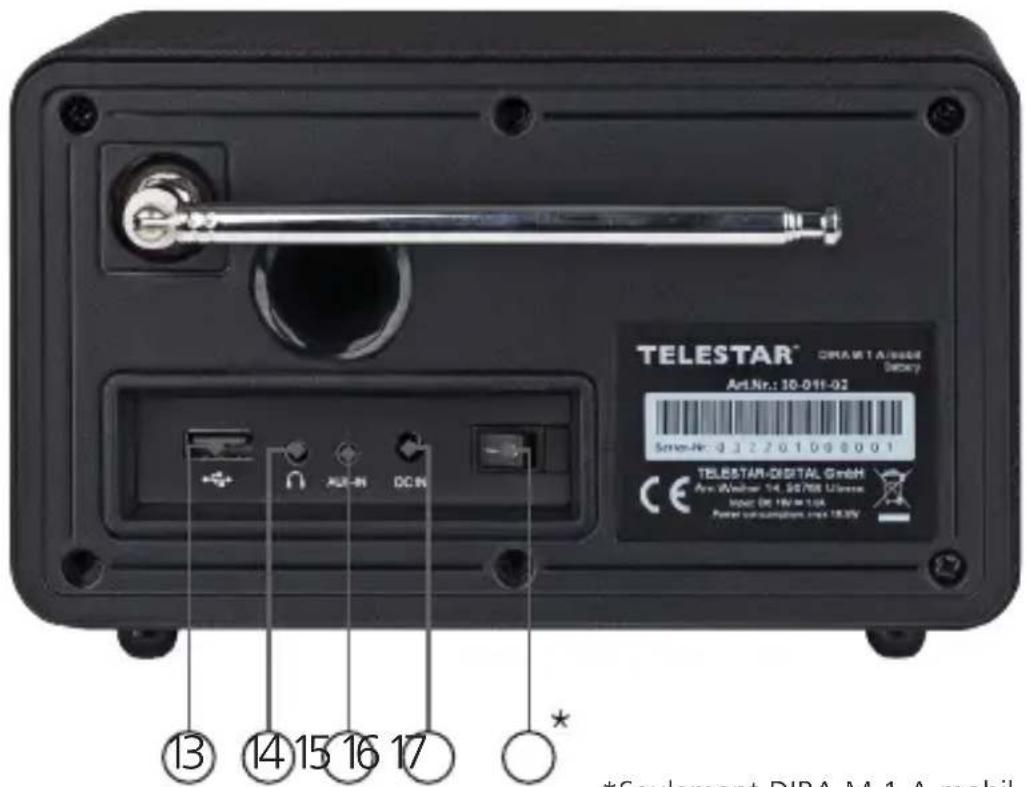
text_image
TELESTAR® CIRAMET A/0004 Art.Nr.: 10-011-02 Sensen-Nr: 3.3.2701098001 TELESTAR-DIGITAL GmbH Ave-Walker 14.95768 Umsara Mood OE 16V 1.0A Power consumption max 18.0V ⑬ ⑭ ⑮ ⑯ ⑰ ⑱ ⑲ ⑳ ⑮ *Seulament DIPA M.1 A mobil*Seulement DIRA M 1 A mobil

4. APERÇU DES ÉLÉMENTS DE COMMANDE
1. Liste
2. Touche mémoire station 1/Play/Pause
natural_image
Two-step illustration showing hands holding a tool, labeled ① and ② (no text or symbols on the diagram itself)text_image
Yellow triangular warning sign with black exclamation mark symboltext_image
Radio locale Mer 19-10-2022natural_image
Abstract geometric pattern with red, orange, and blue vertical bars (no text or symbols)EMERGENCY WARNING FUNCTIONALITY

8.19. Operation via the app

text_image
Hand holding smartphone displaying app interface with 'VOL' and 'MODEL' controls, next to a Radio Station device showing a screen with a logo.
natural_image
Orange square icon with a white S-shaped logo and the word 'Soundmate' below it (no additional text or symbols)
text_image
AT&T BD Google Play
text_image
Establish in App Store8. FONCTIONNEMENT
text_image
Audio Systems DAIRAW 540 CD Dinksuchter - 3x10-17Start the app.
When you start the app, it will automatically recognise the radio as long as it is registered to the same network.
The app's main menu is structured like the radio menu.
The icons used in the app are comparable to the symbols in the radio menu.
Tap on the discovered radio to start the app.
text_image
Teach Controller BackTouch controller
You can use the touch controller to swipe right or left, up or down to control various functions, e.g. volume or programme selection.
8. FONCTIONNEMENT

text_image
Favorites Fanfinder - For newest Radio STAR Film - War STAR Film - Star Radio Star Sun STAR/SSAT RadioAccessing favourite stations
You can use this function to view your saved favourite radio stations. Select a favourite radio station from the list.
Favourite radio stations
can be saved to the radio as described in the radio's operating instructions.

text_image
Fertbeddienberg VOL K2 LOAD TAY PORT NEW 1 ALARM 4 SLEEP 7 8 Transporter Linker, Pardier Dob SABUCAD UPNP OPP 1Fonction de lecture
| Internet radio | |
| Audio codecs MP3 (bit rate up to 320 Kbits/s, sampling rate up to 48 KHz)AAC/AAC+ (bit rate up to 320 Kbits/s, sampling rate up to 48 KHz)WMA (bit rate up to 320 Kbits/s, sampling rate up to 48 KHz)WAV | |
| DAB/DAB+/FM | |
| Reception range DAB band III 174 MHz - 240 MHzFM 87.5 MHz -108 Mhz | |
| Display | |
| TFT colour display 3.2 inch colour display | |
| Son | |
| Speaker 1 x 15 W | Music output3" speakerat 6Ω |
13. CARACTÉRISTIQUES ET DONNÉES TECHNIQUES
Connexions
| Headphones | 3.5mm stereo jack input |
| AUX IN | 3.5mm stereo jack input |
| Polarity | 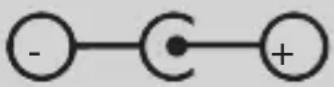 |
| Power adapter connec-tion | |
| USB port | USB 2.0 standard |
Operating conditions
| Temperature range 0 | °C - 45 °C |
| Humidity 20% - 80% relative humidity | |
Interface Wifi
| Frequency range | 2.412 GHz - 2.4835 GHz |
| Modulation | CCK, DQPSK, DBPSK,64-QAM, 16-QAM, QPSK, BPSK,IEEE 802.11b/g /n |
| IEEE standards | |
| WiFi data rate | 1, 2, 5.5, 11Mbps |
| 802.11b: | 6, 9, 12, 18, 24, 36, 48, 54 Mbps |
| 802.11g: | HT20 to 72.2 Mbps |
| 802.11n | HT40 to 150 Mbps |
Transmitting power 18.5dBm (Max)
13. CARACTÉRISTIQUES ET DONNÉES TECHNIQUES
| Données techniques bloc d'alimentation DIRA M 1 A | |
| Manufacturer SHENZHEN SOY TECHNOLOGY CO.LTD. | |
| Model name SOY-1500100EU-035E | |
| Input voltage 100-240 V | |
| AC frequency input 50 Hz | |
| Output voltage 15 V DC | |
| Output power 1 A | |
| Output capacity 15 W | |
| Average operational efficiency | 88.25% |
| Efficiency at minor power (10%) | 87.08% |
| Power consumption when not on 0,08 W | |
| Données techniques bloc d'alimentation DIRA M1 A mobile | |
| Manufacturer SHENZHEN SOY TECHNOLOGY CO.LTD. | |
| Model name SOY-1800100EU-063G | |
| Input voltage 100-240 V | |
| AC frequency input 50 Hz | |
| Output voltage 18 V DC | |
| Output power 1 A | |
| Output capacity 18 W | |
| Average operational efficiency 88,25% | |
| Efficiency at minor power (10%) 87,08% | |
| Power consumption when not on 0,08 W | |
13. CARACTÉRISTIQUES ET DONNÉES TECHNIQUES
| Conditions de stockage |
| Always keep in a dry place. |
| Dimensions et poids DIRA M 1 A |
| Width x height x depth (mm) 277 x 1117 x 127 |
| Weight 990 g |
| Dimensions et poids DIRA M 1 A mobil |
| Width x height x depth (mm) 277 x 1117 x 127 |
| Weight 1180 g |
| Pile de la télécommande |
| Type CR 2025 / 3 V |
14. SERVICE ET ASSISTANCE
Chère cliente, cher client,
Your device is labelled with the CE seal and complies with all required EU standards. The TELESTAR DIRA M 1 A / DIRA M 1 A mobil complies with all significant protective requirements of the radio guideline 2014/53/EU (RED – Radio Equipment Devices), the low voltage guideline 2014/35/EU and the RoHS guideline (2011/65/EU) as well as the REACH Act 1907/2006 The declaration of conformity for this product is available at:
TELESTAR DIRA M 1 A:
natural_image
Simple geometric diagram of two concentric squares (no text or symbols)TELESTAR Service Center, Am Weiher 14,
56766 Ulmen
E-mail: service@telestar.de
(radio Internet, radio locale, FM, DAB+, cloud music, UPnP, AUX, multimedia, Bluetooth,) della radio.
- Porta USB
natural_image
Two-step illustration showing hands holding a device with a small object, labeled ① and ② (no text or symbols on the devices themselves)text_image
Yellow triangular warning sign with black exclamation mark symboltext_image
off sopra Mer 13-10-20226.9. Posizione
text_image
0 1 2 3 4 5 6 7 8 9 a A b B c C d D e E f F g G h H i I j J k K l L m M n N o O p P q Q r R S Elimina OKtext_image
Elenco preferiti Radio Podcast Ultimo sentito Add a New Radio Station 1/68. COMANDI
text_image
Radio locale Mer 19-10-2022text_image
EMERGENCY WARNING FUNCTIONALITY
text_image
Hand holding smartphone displaying app interface with VCL and radio, next to a portable electronic device labeled 'TELESTAN'.
natural_image
Orange square app icon with white S-shaped logo and the word 'Soundmate' below (no additional text or symbols)
text_image
Jazz BID Google Play
text_image
Enhabitlich in App Store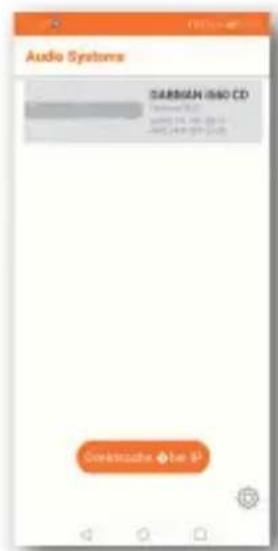
text_image
Audio Systems SANSIAN i60 CD Retrusted 1.0 using 24.0 Hz 20.0 -500, 149.0 Hz 20.0 Gettrache + let ittext_image
Internet Radio STAR/SAT RADIO STAR/SAT Radio App: STAR/SAT RADIO (http://www.10.1234/10.1235) View all Star/Sat radio and home OFF: Aircraft: Jansai-877 (Play Monday, Friday)natural_image
Recycling symbol with three arrows forming a triangle (no text or labels)text_image
Diagram showing a trash bin crossed out by diagonal lines, indicating no waste or disposal.natural_image
Simple geometric diagram of two concentric squares (no text or symbols)text_image
WAARSCHUWING!TELESTAR Service Center, Am Weiher 14,
56766 Ulmen
e-mail: service@telestar.de
NL
Aantal Verklaring
1 TELESTAR DIRA M 1 A / DIRA M 1 A mobil
1 Afstandsbediening
1 Telescoopantenne
1 Externe netstekker
natural_image
Two-step illustration showing hands holding a tool or device, labeled ① and ② (no text or symbols on the devices themselves)text_image
Yellow triangular warning sign with black exclamation mark symboltext_image
Radio locale Mer 19-10-2022text_image
EMERGENCY WARNING FUNCTIONALITY
8.19. Bediening via app
text_image
Hand holding smartphone displaying app interface with 'VOC' and 'MODE' buttons, next to a radio device labeled 'PEEETON'.
Met de applicatie kunt duw compatibele internetradio bedienen via tablet of smartphone.
natural_image
Orange square app icon with white S-shaped logo and the word 'Soundmate' below (no additional text or symbols)
text_image
QR code with Google Play logo above it, likely linking to a digital resource or webpage.
text_image
Favorite Star/Star - Fst 30%+ Fst - 30km 30%+ Fst - 25km Pacific Star/Star 30%+ Fst - 25kmtext_image
Internet Radio STAR/SAT RADIO STAR/SAT Radio http://www.10.12/10.13/10.14/10.15/10.16/10.17/10.18/10.19/10.20/10.21/10.22/10.23/10.24/10.25/10.26/10.27/10.28/10.29/10.30/10.31/10.32/10.33/10.34/10.35/10.36/10.37/10.38/10.39/10.40/10.41/10.42/10.43/10.44/10.45/10.46/10.47/10.48/10.49/10.50/10.51/10.52/10.53/10.54/10.55/10.56/10.57/10.58/10.59/10.60/10.61/10.62/10.63/10.64/10.65/10.66/10.67/10.68/10.69/10.70/10.71/10.72/10.73/10.74/10.75/10.76/10.77/10.78/10.79/10.80/10.81/10.82/10.83/10.84/10.85/10.86/10.87/10.88/10.89/10.90/10.91/10.92/10.93/10.94/10.95/10.96/10.97/10.98/10.99/11.00Weergavefunctie
natural_image
Simple line drawing of a trash bin with diagonal lines crossing it, no text or symbols present.natural_image
Simple line drawing of a trash bin with crossed lines indicating no waste or discharge (no text or symbols)NL
of via mail op: service@telestar.de