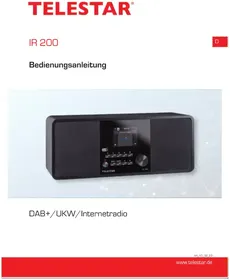
DIRA S 24 CD - Radio Telestar - Free user manual and instructions
Find the device manual for free DIRA S 24 CD Telestar in PDF.
| Product Type | Clock radio with CD player, DAB+/FM, Bluetooth, USB, AUX |
| Brand | Telestar |
| Model | DIRA S 24 CD |
| Dimensions (W x H x D) | 360 mm x 140 mm x 195 mm |
| Weight | 3.38 kg |
| Power supply | External power supply 100-240 V, 50/60 Hz, output 15 V / 2.4 A |
| Standby consumption | Eco mode: < 0.1 W; clock mode: slightly higher |
| Radio reception | DAB+ (Band III 174-240 MHz) and FM (87.5-108 MHz) |
| Speakers | 2 x 15 W, 3-inch speakers |
| Display | 2.4-inch TFT color display |
| Connectivity | Bluetooth (receiver and transmitter), USB 2.0 port, 3.5 mm AUX input, 3.5 mm headphone output |
| CD player | Audio CD, MP3, data CD |
| Additional features | Clock radio (5 alarms), sleep timer, USB recording, built-in equalizer |
| Remote control | Included, CR2025 battery already installed |
| Antenna | Telescopic antenna included |
| Package contents | Radio, remote control, antenna, power supply, user manual, CR2025 battery |
| Operating conditions | Temperature: 0 °C to 45 °C, humidity: 20% to 80% RH |
| Cleaning and maintenance | Disconnect before cleaning; use a dry, soft cloth; do not use solvents or liquids |
| Safety | Protection class II; do not expose to water, open flames; use only the supplied power supply |
| Repairability and spare parts | Do not open the housing; contact Telestar customer service for repairs; manufacturer's warranty 24 months |
| General information | Indoor use, private; CE marking; compliant with directives 2014/53/EU, 2014/35/EU, RoHS, REACH |
Frequently Asked Questions - DIRA S 24 CD Telestar
User questions about DIRA S 24 CD Telestar
0 question about this device. Answer the ones you know or ask your own.
Ask a new question about this device
Download the instructions for your Radio in PDF format for free! Find your manual DIRA S 24 CD - Telestar and take your electronic device back in hand. On this page are published all the documents necessary for the use of your device. DIRA S 24 CD by Telestar.
USER MANUAL DIRA S 24 CD Telestar
text_image
TELESTAR Dlf Mova Sanding with Touch to My Eyes DIRA 824 CDDIRA S 24 CD
Deutsch
Inhalt
TELESTAR Service Center,
Am Weiher 14,
56766 Ulmen
e-mail: service@telestar.de
Anzahl Erklärung
1 TELESTAR DIRA S 24 CD
1 Fernbedienung
1 Teleskopantenne
1 externes Netzteil
text_image
Yellow triangular warning sign with black exclamation mark symbol
Equalizer CD Player AUX


Multimedia
text_image
All private data will be deleted.Are you sure to continue? OK Abbrechen8. BEDIENUNG
text_image
Bass 11.81% Bass Cutoff 134.54 Hz Treble 13.39% Treble Cutoff 7896 Hzbar
Klassik | Step | Gain (dB) | Frequency (Hz) | |---|---|---| | 1 | 18.0 | 1.0 | | 2 | -18.0 | 1.0 | | 3 | 9.0 | 1.0 | | 4 | -1.0 | 1.0 | | 5 | 1.0 | 1.0 | | 6 | -1.0 | 1.0 | | 7 | 1.0 | 1.0 | | 8 | -1.0 | 1.0 | | 9 | 1.0 | 1.0 | | 10 | -1.0 | 1.0 | | 11 | 1.0 | 1.0 | | 12 | -1.0 | 1.0 | | 13 | 1.0 | 1.0 | | 14 | -1.0 | 1.0 | | 15 | 1.0 | 1.0 | | 16 | -1.0 | 1.0 | | 17 | 1.0 | 1.0 | | 18 | -1.0 | 1.0 | | 19 | 1.0 | 1.0 | | 20 | -1.0 | 1.0 | | 21 | 1.0 | 1.0 | | 22 | -1.0 | 1.0 | | 23 | 1.0 | 1.0 | | 24 | -1.0 | 1.0 | | 25 | 1.0 | 1.0 | | 26 | -1.0 | 1.0 | | 27 | 1.0 | 1.0 | | 28 | -1.0 | 1.0 | | 29 | 1.0 | 1.0 | | 30 | -1.0 | 1.0 | | 31 | 1.0 | 1.0 | | 32 | -1.0 | 1.0 | | 33 | 1.0 | 1.0 | | 34 | -1.0 | 1.0 | | 35 | 1.0 | 1.0 | | 36 | -1.0 | 1.0 | | 37 | 1.0 | 1.0 | | 38 | -1.0 | 1.0 | | 39 | 1.0 | 1.0 | | 40 | -1.0 | 1.0 | | 41 | 1.0 | 1.0 | | 42 | -1.0 | 1.0 | | 43 | 1.0 | 1.0 | | 44 | -1.0 | 1.0 | | 45 | 1.0 | 1.0 | | 46 | -1.0 | 1.0 | | 47 | 1.0 | 1.0 | | 48 | -1.0 | 1.0 | | 49 | 1.0 | 1.0 | | 50 | -1.0 | 1.0 | | Note: The data is extracted from the image and presented in a table format as requested in the code.-
Preface 62
1.2. Proper use according to design....62 -
SAFETY INSTRUCTIONS 63
2.1. Explanation of symbols 63
2.1. Explanation of symbols 64
2.2. Safety instructions.... 65
2.3. Operational safety 66
2.5. Protect the device from damage 68
2.6. Risk of injury 69
2.7. Information on the radio interface....69
2.8. Handling batteries 70
2.9. Cleaning the device 71
2.10. Legal information.... 71
3. SCOPE OF DELIVERY 72
4. OVERVIEW OF CONTROLS.... 73
5. REMOTE CONTROL 76
6. INSTALLATION....79
6.1. General operating instructions.... 79
6.2. Preparing the remote control.... 79
6.3. Antenna connection....80
6.4. Power connection 80
6.5. Date time mode 81
6.6. GMT time zone....81
6.7.Daylight saving....82
6.8. Standby mode.... 82
TABLE OF CONTENTS
-
SETTINGS 83
7.1.General operation 83
7.1.1. Menu button 83
7.1.2. Back button 84
7.1.3. List button 84
7.1.4. Mode button 84
7.2. System 84
7.2.1.Language 85
7.2.2. Date and time 85
7.2.3. Alarm 86
7.2.4. Recording timer 87
7.2.5. Standby mode 87
7.2.6.Sleep timer....88
7.2.7. Display brightness 89
7.2.8. Bluetooth 90
7.2.9. Software update via USB 90
7.2.10. Factory settings 90
7.2.11.Version....91 -
OPERATION 91
8.1.DAB+radio 91
8.1.1. Station list 92
8.1.2. DAB search 92
8.1.3. DAB manual search.... 93
8.2. Saving radio stations.... 93
8.3. Saving radio stations to your favourites list.... 93
8.4. Changing the volume.... 94
8.5. Switching operating mode 94
8.6.AUX IN 94
8.7. USB playback/multimedia....95
8.8. EQ (equaliser) 96
8.9. Recording radio broadcasts 97
8.10. Radio as a Bluetooth receiver 99
8.10.1. Establishing a Bluetooth connection 99
TABLE OF CONTENTS
8.10.2. Playing media via Bluetooth.... 99
8.10.3. Radio as a Bluetooth transmitter....99
8.11. Changing the function of the MODE button. 100
8.12.CD player....100
9. TROUBLESHOOTING 102
10.STORAGE 103
11. TRADEMARK NOTICE 103
12. DISPOSAL INFORMATION 104
12.1. DISPOSING OF PACKAGING.... 104
12.2. DEVICE DISPOSAL 104
12.3. DISPOSING OF BATTERIES.... 104
13. PROPERTIES AND TECHNICAL DATA 105
14. SERVICE AND SUPPORT 107
15. WARRANTY INFORMATION 108
16. CE SEAL 109
1. Preface
Valued customer,
thank you for choosing this product.
Please read these instructions carefully and
keep them for future reference.
This operating manual is part of the device! Should you sell or pass on the device, make sure to hand on the operating instructions as well.
1.2. Proper use according to design
This product is an
entertainment device.
This device serves as a receiver of DAB+ & FM and plays audio files from a USB data carrier, CD player, Bluetooth device as well as recording audio files onto a USB data carrier. Any other use or operation of the device is seen as not intended and may cause personal or material damages.
Do not use this device for any other purpose.
Only use the device indoors.
The device is intended for private, non-commercial use only. We assume that the user has some general knowledge about using electronic entertainment equipment. Liability expires in the event of improper use.
2. SAFETY INSTRUCTIONS
2.1. Explanation of symbols
| Symbol | Meaning |
 DANGER! DANGER! | This signal indicates a hazard with a high level of risk which, if the instruction is not observed, will result in death or serious injury. |
 WARNING! WARNING! | This signal indicates a hazard with a medium level of risk which, if the instruction is not observed, may result in death or serious injury. |
 CAUTION! CAUTION! | This signal indicates a hazard with a low level of risk which, if the instruction is not observed, may result in minor or moderate injury. |
 NOTE! NOTE! | This signal word warns against possible material damages and indicates specific instructions to operate the device. |
 | This symbol indicates danger. |
2. SAFETY INSTRUCTIONS
2.1. Explanation of symbols
| Symbol | Meaning |
 | Protection class IIElectrical devices that fall under protection class II have reinforced or double insulation to the amount of the rated insulation voltage between active and accessible parts (VDE 0100 part 410, 412.1). They usually have no connection to the protective conductor. Even if they have conductive surfaces, they are protected from contact with other live parts by reinforced or double insulation. |
 | Products labelled with this symbol meet the requirements of the guidelines of the European Community. |
Fig. 1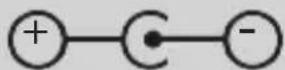 Fig. 2 Fig. 2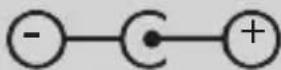 | These symbols indicate the polarity of the plug for devices with hollow plugs.A distinction is made between 2 variantsFig. 1: Outside plus / inside minusFig. 2: Inside plus / outside minus |
 | Devices with this symbol may only be operated indoors in a dry environment. |
2. SAFETY INSTRUCTIONS
2.2. Safety instructions

WARNING!
Check the device before use.
The device must not be used if it is defective or damaged.
Risk of injury
Risk of injury to children and people with reduced physical, sensory or mental ability (e.g. disabled people, elderly people with limited physical and mental ability) or a lack of experience and knowledge.
Store the device out of the reach of children.
This device may be used by children from the age of 8 and by persons with reduced physical, sensory or mental abilities or a lack of experience and/or knowledge, if they are supervised or have been trained regarding the safe use of the devices and have understood the related risks.
Never let children use the device unsupervised.
Danger of suffocation!
Packaging material is not a toy!
Store the used packaging materials (bags, polystyrene parts etc.) out of reach of children. Children must not play with the packaging.
The packaging foil poses a particular risk of choking.
2. SAFETY INSTRUCTIONS
2.3. Operational safety

DANGER!
Risk of injury!
Risk of injury from electric shock from live parts.
There is a risk of electric shock or fire due to accidental short circuits.
Check the device for damages prior to every use.
Should you detect visible damages or the device has visible damages, do not put it into operation.
Should you detect a technical or mechanical problem please contact the TELESTAR service.
Only use the power unit that was included! Never use any other power adapter.> Never open the device casing.
Immediately disconnect the device from the power in the event of any malfunction. To do so, immediately unplug the power plug from the mains socket and the device.
Only use replacement parts and accessories that have been supplied and approved by us.
Do not physically alter the device and do not use any spare parts or additional devices that were not explicitly approved or provided by us.
Do not use the device in potentially explosive environments. These include, for example, petrol storage areas, tank systems, or areas in which solvents are stored or processed.
Do not use the device in areas where the air is contaminated with particles (e.g. flour or wood-chip dust)
Malfunctions may be indicated by the device heating up or smoke rising from the device or its power adapter.
Loud or unusual noises can also be a sign of a malfunction.
In this case, pull the power adapter out of the power socket immediately.
2. SAFETY INSTRUCTIONS
Only handle the power adapter by the casing.
Never pull the power unit's plug from the socket.
After a malfunction, the device must not be used until it has been checked or repaired by a qualified person.
If you introduce the device to a cold or warm environment, moisture may develop inside the device. In such an event, wait approximately one hour before using the device again.
Should you be gone for a longer period or in the event of a thunderstorm, unplug the device.
Take care to prevent moisture, water or splash water from coming into contact with the device and ensure that receptacles filled with water - e.g. vases - are not placed on or near the power unit.
In the event that foreign objects or liquid should enter the device or power unit, immediately unplug the power unit. Have a qualified specialist inspect the device before putting it into operation again. Otherwise there is a risk of electrocution.
Make sure that the device and power unit is not at risk of dripping or splash water and that there are no open flames (e.g. lit candles) near the device or the power supply.
The power unit must never be touched or grabbed with wet or moist hands.2.4. Connect device
Only plug the device into properly installed, earthed and electrically secured power sockets.
Please keep the power source (socket) easily accessible.
Do not kink or crush any cable connections.
Before using the device, check whether the voltage specification on the device corresponds to your local power voltage. The specifications on the power unit must correspond to the local power grid.
2. SAFETY INSTRUCTIONS
Only plug the device into a properly installed grid socket with 220-240 V alternating current, 50-60 Hz.
Place the radio on a firm, level surface.
The device consumes power in standby mode.
To fully switch off the device, the plug must be pulled from the socket.
2.5. Protect the device from damage

NOTE!
Unfavourable environmental conditions such as moisture, excess heat or a lack of ventilation may damage the device.
Only use the device in dry rooms.
Avoid the direct vicinity of: heat sources, such as radiators, naked flames such as candles, and devices with strong magnetic fields such as speakers.
Do not expose the device to extreme conditions such as direct sunlight, high humidity, moisture, extremely high or low temperatures, naked flames.
Ensure sufficient distance from other objects to prevent the device from being obstructed so that sufficient air ventilation is ensured.
Avoid direct sunlight and places with an exceptional amount of dust.
Do not place any heavy objects on the device or the power unit.
Do not use the device in potentially explosive environments. These include, for example, fuel storage areas, petrol stations, or areas in which solvents are stored or processed.
Do not use the device in areas where the air is contaminated with particles (e.g. flour or wood-chip dust)
2. SAFETY INSTRUCTIONS
2.6. Risk of injury

WARNING!
Excessive sound pressure when using earphones or headphones can cause hearing damage or loss.
Using earphones or headphones at a high volume for a long period of time can cause injury to the user.
Please check the volume before putting the earphones or headphones in or onto your ears.
Set the volume to low and only increase the volume enough that you still find it comfortable.
2.7. Information on the radio interface
The device generates an electromagnetic field.
Please pay attention to notices in your area that prohibit or restrict the operation of electronic devices.
This may be the case, for example, in hospitals, at petrol stations and tank facilities or at airports.
If corresponding warnings apply, disconnect the device from the power immediately. The components contained in the device generate electromagnetic energy and magnetic fields.
These can affect medical devices such as pacemakers or defibrillators.
Therefore, please maintain sufficient and safe distance between the radio and medical devices.
If you have reason to believe that the radio is causing interference with a medical device, immediately turn off or unplug the radio.
2. SAFETY INSTRUCTIONS
2.8. Handling batteries
In principle, only use the type of battery included in the delivery.

DANGER!
Risk of injury!
Improper handling of batteries poses a risk of injury!
Never open batteries, short-circuit these or toss them into naked flames.
Never charge batteries. Attempting to charge batteries can create a risk of explosion.
The polarity must be correct! Make sure that the plus (+) and minus (-) poles are inserted correctly to avoid a short circuit.
Only use batteries specified for this product.
Remove batteries from the device if it is not going to be used for a long time.
Remove exhausted or leaking batteries from the device immediately.
If batteries have leaked, there is a risk of burns if the liquid comes into contact with the skin.
Keep both new and used batteries out of the reach of children.
There is a risk of internal injury if batteries are swallowed. The battery acid in the batteries can cause injuries if it comes into contact with the skin.
In the event of accidental ingestion or if there are signs of skin burns, rinse the affected areas with clean water and get medical help immediately.
Batteries are not toys!
Always keep new and used batteries away from children.
Remove leaking batteries from the device and clean the contact points before inserting new batteries.
2. SAFETY INSTRUCTIONS

text_image
WARNING!
There is a risk of explosion if batteries are used improperly!
Only use new batteries of the same type.
Please refrain from combining new and old batteries in one device.
Pay attention to the correct polarisation when inserting batteries.
Never charge batteries.
Batteries should be stored in a cool and dry place.
Never throw batteries into fire.
If the device is not used for a long time, please remove the batteries from the device.
Never expose the batteries to major heat or direct rays of sunlight.
Batteries must not be deformed or opened.
Stop using the remote if the battery lid no longer closes properly.
2.9. Cleaning the device
Unplug the device prior to cleaning. Use a soft, dry cloth to clean the device. Please do not use any liquids to clean the device.
Do not use any solvents or cleaning agents, as these may damage the surface or labelling. Children should not clean the device.
2.10. Legal information
The device is intended for use in all European Union member states as well as Switzerland, Norway, Liechtenstein and Iceland.
The radio reception range meets the legal requirements for these countries.
If the device is to be operated in another country, the laws of the country of use must be observed.
3. SCOPE OF DELIVERY
Please remove all parts from the packaging and completely remove all packaging materials. If one or more of the specified parts is missing, please contact: TELESTAR Service Center, Am Weiher 14, 56766 Ulmen e-mail: service@telestar.de
Amount Explanation
1 TELESTAR DIRA S 24 CD
1 Remote control
1 Telescopic antenna
1 External power adapter
1 Operating manual
Battery for remote control type CR 2025 / 3V (already inserted into the remote)
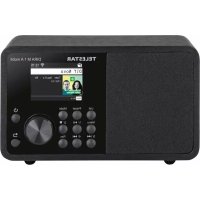
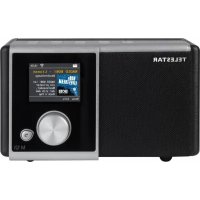
4. OVERVIEW OF CONTROLS
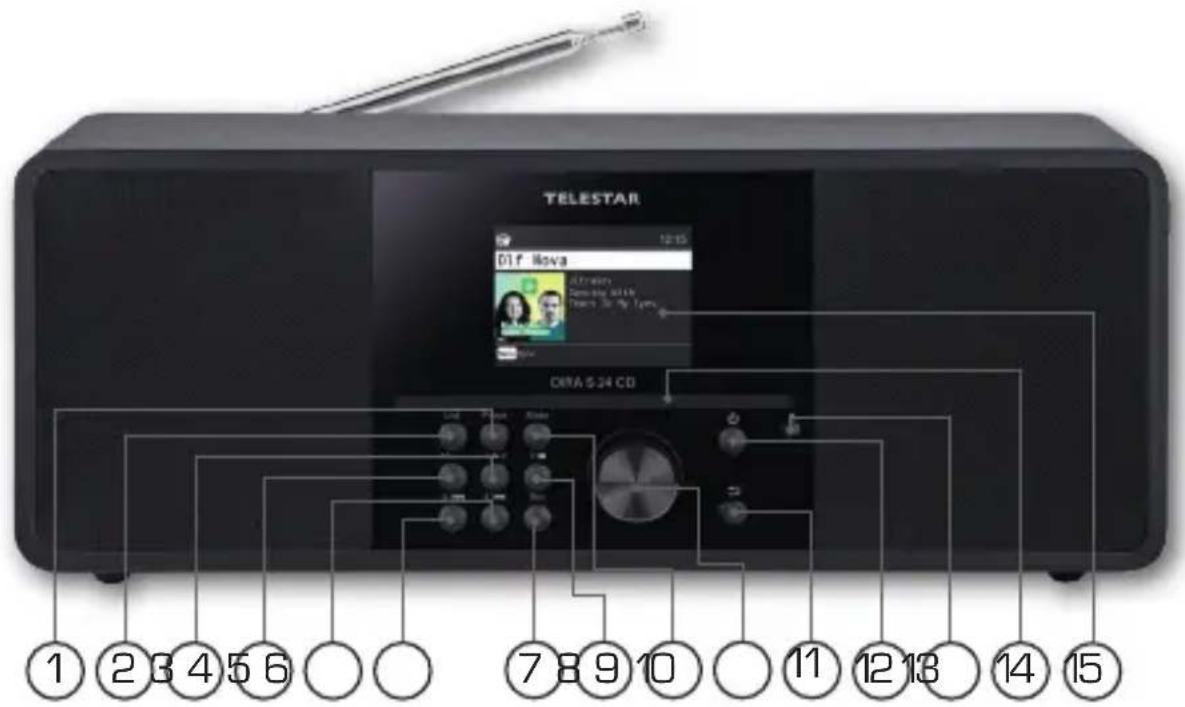
text_image
TELESTAR 01f Nova OIFA 5.24 CD 1 2 3 4 5 6 7 8 9 10 11 12 13 14 15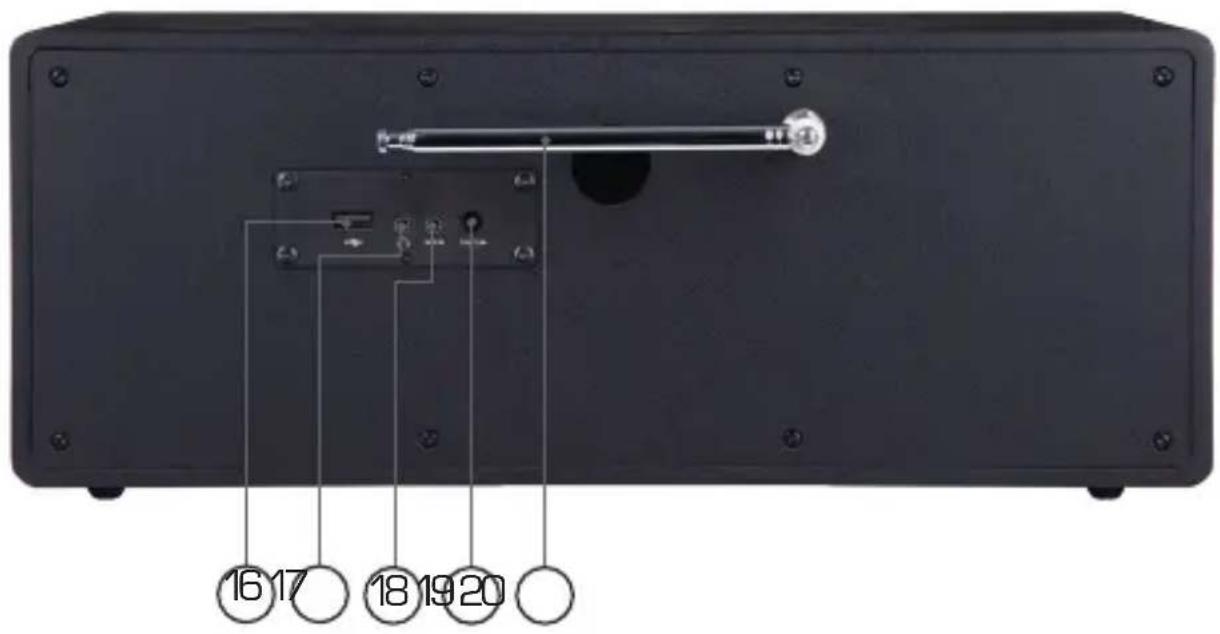
text_image
16 17 18 19 204. OVERVIEW OF CONTROLS
1. Preset
Displays the favourite programme list.
2. List
Displays a list of the 40 most recently selected radio stations.
3. Station memory slot 1/play/pause
In radio mode, switches to the 1st station memory slot.
Starts or pauses playback in USB/media or CD mode.
4. MENU
Keep this button pressed for 2 seconds to access the main menu of the device.
5. Station memory slot 4/next track
In radio mode, switches to the 4th station memory slot.
Use this button to select the next track or fast forward in USB/media or CD mode.
6 station memory key 3/previous track
In radio mode, switches to the 3rd station memory slot.
Use this button to select the previous track or rewind in USB/media or CD mode.
7. REC/record
Starts a recording of the current radio programme on a connected USB storage device.
8. Station memory slot 2/STOP
In radio mode, switches to the 2nd station memory slot.
Stops playback in USB/media or CD mode.
9. Mode
Switches between the different operating modes of the radio
[DAB+ Radio, FM Radio, AUX, Bluetooth, CD Player].
10. Control dial, confirmation button
Use the dial to change the volume or press the button to confirm menu entries.
11. Back
This button takes you one step back in the menu.
4. OVERVIEW OF CONTROLS
12. Power button on/off
Switch the device on or into standby by pressing this button.
13. Eject
Use this button to eject a CD from the CD drive.
14. CD drive
Insert a CD with the labelled side facing up.
15. Display
16. USB connection
Connect the device to a USB data carrier such as a USB hard drive or USB stick to play music files on the device.
17. Headphone connection
Insert headphones here to listen to the music played back from the radio through your headphones. If headphones are connected, music playback via the device's speakers will be interrupted.
18. AUX IN
Connect an external audio source here, such as an MP3 player, smartphone or tablet with a 3.5mm AUX jack cable.
19. Power adapter connection
Connect the device with the power adapter (included) here.
20. Telescopic antenna
Pull out the telescopic antenna fully to enable radio reception via DAB+ or FM.
5. REMOTE CONTROL
The radio can be controlled using either the buttons on the device or the remote control. The remote control is the more convenient and easier way to operate the device.
text_image
① ② ③ ④ ⑤ ⑥ ⑦ ⑧ ⑨ ⑩ ⑪ ⑫ ⑬ ⑭ ⑮ ⑯ ⑰ ⑱ ⑲ ⑳ ⑴ ⑵ ⑶ VOL+ 1 2 VOL- 4 S:EP 5 6 TELESTAR5. REMOTE CONTROL
1. Standby button
Use this button to switch the device on or off.
2. Mode
Switch between the different modes.
This button can be programmed with a different function.
Also see chapter 8.11.
3. Mute
Mutes the device.
4. EQ equaliser function
You can activate the equaliser function with this button and change custom sound settings.
5. Back
This button takes you one step back in the menu.
6. Navigate up/down - right/left / volume VOL+ -
Use these buttons to navigate through the menu.
Use the ◀▶buttons to decrease or increase the volume.
7. ENTER/OK
Use this button to confirm an entry or selection.
8. LIST/programme list
Use this button to view the radio programme list.
9. FAV+
Use this button to add a selected radio station to your favourites list.
10. Control and selection of music tracks via USB, UPnP, Media or CD
Select previous track / fast rewind
Stops playback
▶ Starts or pauses playback
▶▶ Select next track / fast forward
11. INFO
Displays information about the current radio programme.
5. REMOTE CONTROL
12. Menu
Keep this button pressed for 2 seconds to access the main menu of the device.
13. ● Rec/ Eject
Starts recording the current radio programme onto a connected USB storage device. Hold the button for more than 2 seconds to activate the timer menu for recording a radio broadcast.
Press this button in CD player mode to eject a CD.
13. SLEEP
Use this button to set a time period after which the radio will automatically switch off.
14. Numeric keypad
15. VOL + / VOL -
Use these buttons to increase or decrease the volume.
16. SLEEP
Press this button to set a sleep timer. The radio will switch to standby mode after the time you have set.
6. INSTALLATION
6.1. General operating instructions
Switch the device on or off using the standby button on the remote control or on the device,
You can increase the volume using the VOL+ button on the remote control or by rotating the dial on the device.
You can decrease the volume using the VOL+ button on the remote control or by rotating the dial on the device.
The menu items can be selected using the ▼▲ buttons or via the rotary dial.
press the ENTER button on the remote control or by pressing the dial on the device you can confirm a selection.
6.2. Preparing the remote control
Remove the battery transport lock on the remote control. To do this, pull out the plastic tab on the battery case of the remote control. This establishes battery contact.
To replace the remote control battery, open the battery compartment on the back of the remote control.
Pull the battery compartment out of the remote control.
Remove the battery and insert a new battery of the same type.

text_image
Yellow triangular warning sign with black exclamation mark symbolThere is a risk of explosion if batteries are used improperly!
Please read the related safety information in Chapter 2.8.
Pay attention to the correct battery polarity!
Then replace the battery compartment again.
6. INSTALLATION
6.3. Antenna connection
Screw the antenna provided into the antenna connection on the back of the device.
6.4. Power connection
Connect the power adapter provided to the corresponding port on the back of the device. Now plug the power adapter into a 230V socket. Switch the radio on using the standby button on the remote control or on the device, The device will turn on.

text_image
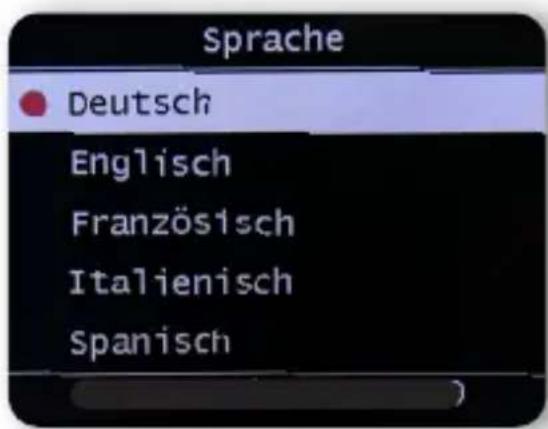
TELESTARUse the up/down buttons on the remote control to select the menu language. Confirm your chosen menu language by pressing the ENTER button on the remote control.
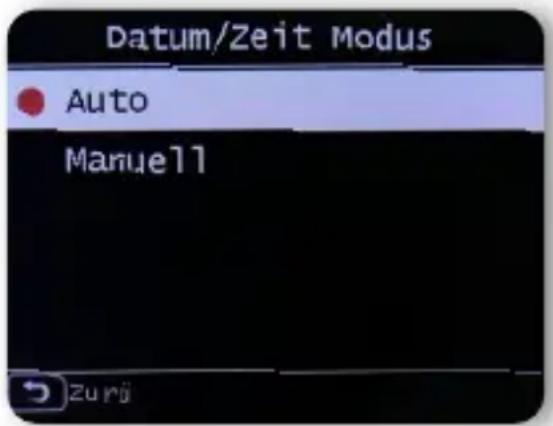
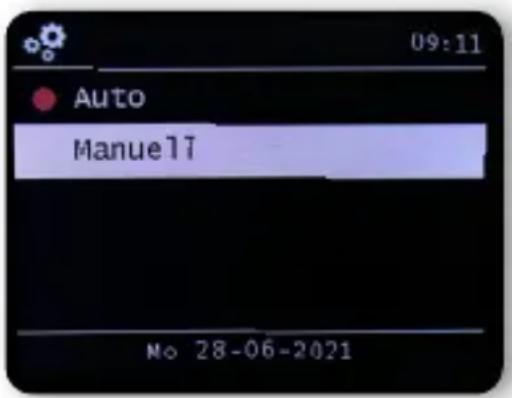
Select how the radio should synchronise the time here. Use the up/down buttons on the remote control to make a selection. Use the ENTER button on the remote control or press the dial on the device to confirm your selection.
text_image
Datum/Zeit Modus ● Auto Manuell ZurjThe device's factory setting is to automatically set the time. If the device is able to receive DAB+ radio stations and a DAB+ search has been carried out, the time and date are synchronised automatically. You therefore do not have to set the time manually.
You may change these settings at any time in the main menu under System.
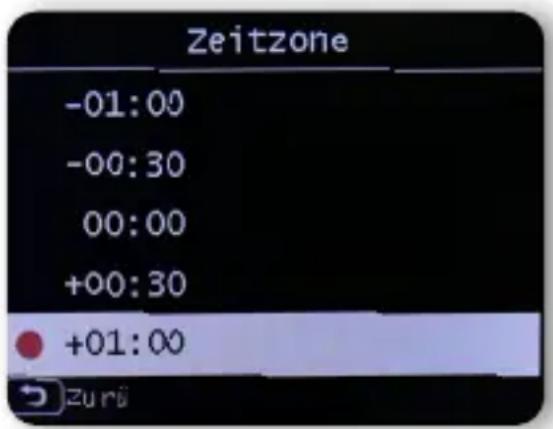
6.6. GMT time zone
Select your time zone here. For Germany and most of Europe, select GMT + 1:00.
text_image
Zeitzone -01:00 -00:30 00:00 +00:30 +01:00 zurü6. INSTALLATION
Use the ▼▲ buttons on the remote control to make a selection. Use the ENTER button on the remote control or press the dial on the device to confirm.
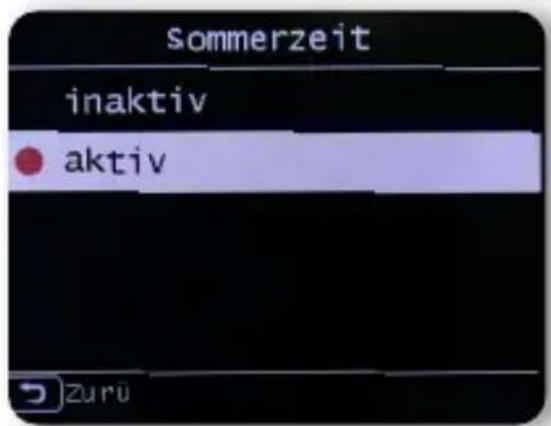
6.7. Daylight saving
Switch on daylight saving time here if it currently applies.
Use the ▼▲ buttons on the remote control to make a selection. Use the ENTER button on the remote control or press the dial on the device to confirm.
Here, define whether the time should be displayed when the radio is in standby mode.
Use the ▼▲ buttons on the remote control to make a selection.
Use the ENTER button on the remote control or on the device to confirm or
6. INSTALLATION
press the dial on the device.

NOTE!
If ‘Standby with clock’ is selected, the device’s power consumption will increase slightly.
7. SETTINGS
7.1. General operation
7.1.1. Menu button
Keep this button pressed for 2 seconds to access the main menu of the device. Independent of the current setting of the device this will always take you to the main menu. Navigate the main menu using the ▶◀ buttons or the dial on the device. The main menu is split up into the following sub-points:

System Bluetooth


DAB radio

FM radio

Equaliser CD player AUX


Multimedia
You can use the arrow buttons ▶◀ to select individual menu items or use the dial. Confirm your selection with the OK button of the remote control or by pressing the dial on the device.
7. SETTINGS
7.1.2. Back button
Use the Back button (button number 11/button number 5 on the remote control) to go back one step in any settings menu.
7.1.3. List button
In radio mode, pressing the List button displays an overview of radio stations you have previously listened to.
7.1.4. Mode button
Use the Mode button to switch the different operating modes of the radio.
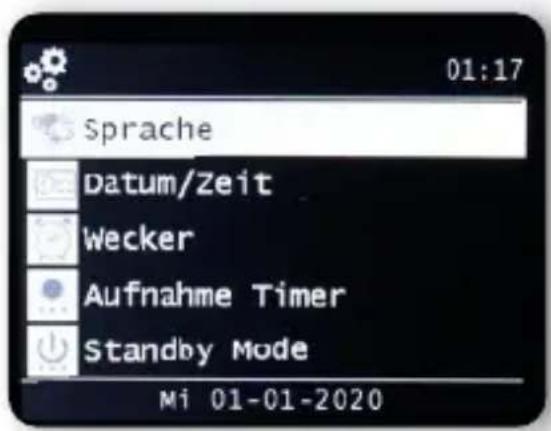
7.2. System

Hold the Menubutton on the remote control or the device for 2 seconds and use the ▶buttons to select Systemin the menu. Use the ENTER button on the remote control or the dialon the device to confirm your selection. In this part of the menu, you can change individual device settings.
Use the ▼▲ buttons on the remote control to select the menu language. Confirm the desired menu language with the ENTER button on the remote control.
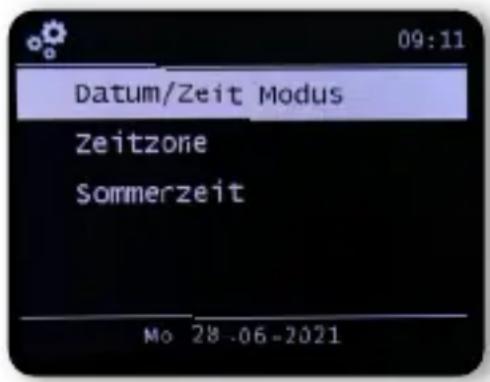
7.2.2. Date and time
Use the ▼▲ buttons on the remote control to make a selection. Use the ENTER button on the remote control or press the dial on the device to confirm.
text_image
Datum/Zeit Modus Zeitzone Sommerzeit Mo 28.06-2021The device's factory setting is to automatically set the time. If the device is able to receive DAB+ radio stations and a DAB+ search has been carried out, the time and date are automatically synchronised. You therefore do not have to set the time manually.
Select how the radio should synchronise the time here.
text_image
09:11 Auto ManuelT No 28-06-20217. SETTINGS
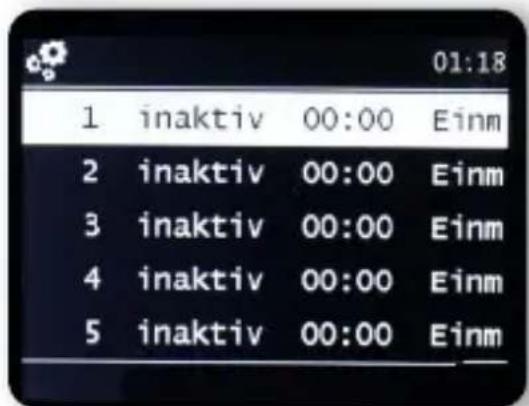
7.2.3. Alarm
The device can be used as a radio alarm clock.
You can set up to 5 alarm times in this menu option.
To set an alarm, please proceed as follows:
Hold the MENU button on the remote control or on the device for 2 seconds, and using the ▶◀ buttons on the remote control or the control dial on the device, select the menu item System. Use the ▼▲ buttons on the remote control or the dial on the device to select Alarm in the menu and press the ENTER button on the remote control or the dial on the device to confirm.
text_image
01:18 1 inaktiv 00:00 Einm 2 inaktiv 00:00 Einm 3 inaktiv 00:00 Einm 4 inaktiv 00:00 Einm 5 inaktiv 00:00 EinmSelect one of the 5 available alarms and confirm by pressing the dial on the device or the OK button on the remote control.
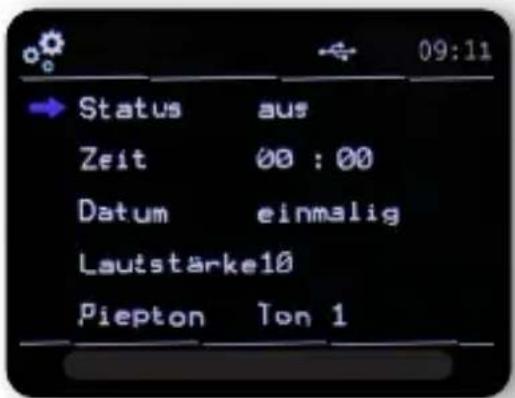
Activate the alarm clock via the Status line.
In the next line, set the time for the alarm. Use thenumber pad on the remote control or the dial on the device.
7. SETTINGS
Your entries must be saved by pressing the ENTER button. In the date line, set the repeat intervals. You can decide whether the alarm should be activated at the set time once, daily, on weekdays or on weekends only.
In the next line, set the volume for the alarm.
In the beep line you can decide whether to have an alarm sound or a radio station which is received via DAB+ or FM
Please note that when choosing a radio station at least one favourite station must be saved for the respective type.
To stop an alarm, press the ⏻ button
on the remote control or on the device.
To activate the snooze function, press any button on the device
(apart from the Standby button).
This pauses the alarm for 5 minutes.
The alarm is reactivated after 5 minutes.
To deactivate the alarm until the next day, press
the ⏻ button on the unit.
7.2.4. Recording timer
In this menu, you can edit a set recording timer. Please read chapter 8.14.
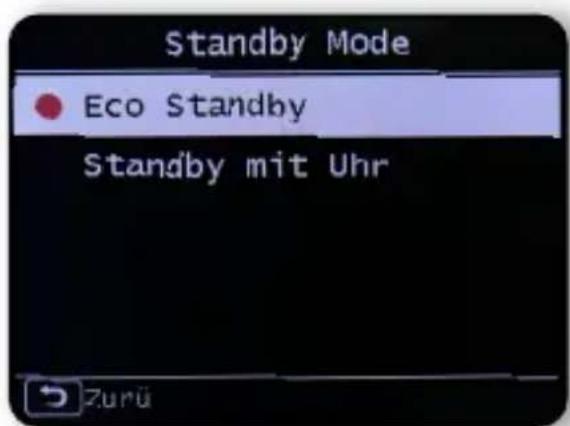
7.2.5. Standby mode
With this function you can adjust the display in
Standby mode. Use the ▼▲ buttons on the remote control or the dial on the device to select the menu item
Standby mode and then press the ENTER button on the remote control or confirm by pressing the dial on the device.
7. SETTINGS
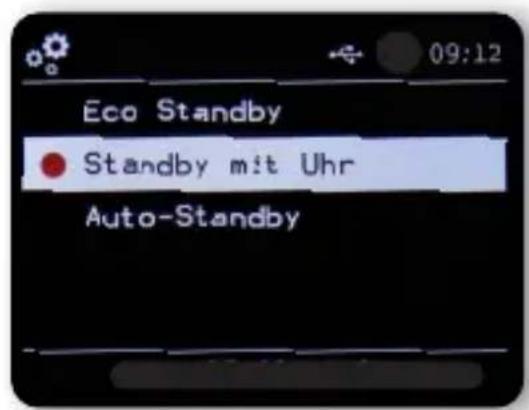
Select your desired function then confirm by pressing the dial on the device or the OK button on the remote control.
Eco standby
In this mode, the device consumes very little power when in standby mode. The time is not displayed in this standby mode.
Standby with clock
In this mode, the time is displayed in standby mode if you turn the device off by using the Standby button.
This slightly increases power consumption.
If you press and hold the standby button, you activate
Eco Standby mode.
Auto standby
In this mode, the device automatically switches to standby after a set time if no operation has been performed during this period.
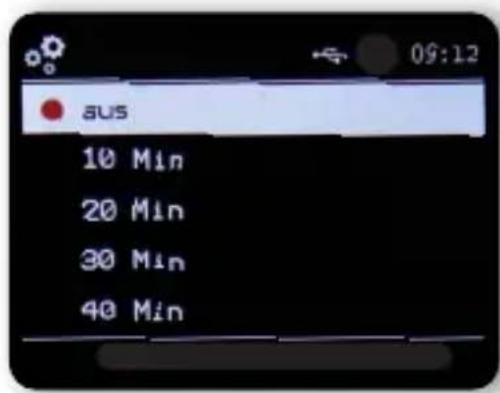
7.2.6. Sleep timer
The radio automatically switches to standby mode via the sleep timer function. Here, you can determine the amount of time until the device automatically switches off. with the ▼▲ buttons on the remote control or the dial on the device select Sleep timer in the menu and press the ENTER button on the remote control or the dial on the device to confirm.
7. SETTINGS
text_image
aus 10 Min 20 Min 30 Min 40 MinChoose Turn off to deactivate this function or select a preset time between 10 and 120 minutes.
Confirm your entry by pressing OK on the remote control or confirm by pressing the dial on the device.
7.2.7. Display brightness
This function lets you adapt the brightness of the display.
Use the ▼▲ buttons on the remote control or the control dial on the device to select the
Backlight menu item and press the ENTER button on the remote control or confirm by pressing the dial on the device.
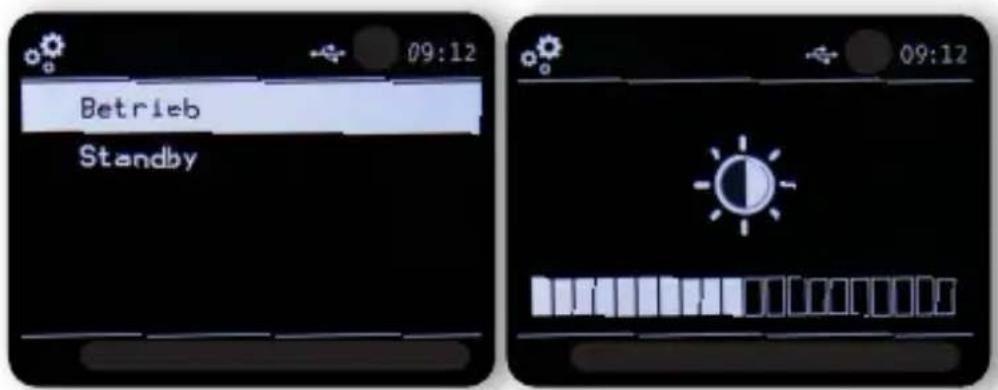
You can adjust the backlight for both operation and standby mode. Use the ▶◀ buttons or the dial on the device and press ENTER to confirm.
7. SETTINGS
7.2.8. Bluetooth
In this menu you can change the name of the radio which is displayed in the Bluetooth device list of a connected mobile device.
Use the ▼▲ buttons on the remote control or the control dial on the device to select the Bluetooth menu item and press the ENTER button on the remote control or confirm by pressing the dial on the device. Select the Change Bluetooth name line and confirm by pressing the dial or pressing the ENTER button on the remote control. Change the name as required.
7.2.9. Software update via USB
An update of the operating software may be necessary to improve the functions of the device. The USB interface allows you to update your radio's operating software, which can be downloaded from www.telestar.de if necessary. The software provided on the website must be unpacked. Execute the unzipped file on a suitable storage medium and connect it to the radio via USB. Please refer to the software download information for the software update procedure.
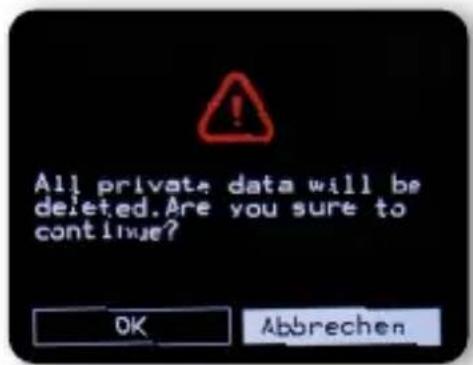
7.2.10. Factory settings
This part of the menu lets you restore the device's factory settings. The device will then subsequently restart with its factory settings.
Use the ▼▲ buttons on the remote control or with the aid of the dial on the device to select the
Factory settings menu item menu and press the ENTER button on the remote control or by pressing the dial on the device.
7. SETTINGS
text_image
All private data will be deleted. Are you sure to continue? OK AbbrechenUse the OK button to confirm if you would like to restore factory settings. Select Cancel if you want to cancel this action.
If you activate factory settings, the device will return to the settings it had at the time of delivery. All saved channels and favourite lists will be lost.
7.2.11. Version
In this menu item you can find and view information about the firmware version installed on the device.
Use the ▼▲ buttons on the remote control or the
control dial on the device to select the
version and then press the ENTER button on the remote control or confirm by pressing the dial on the device.
8. OPERATION
8.1. DAB+ radio
You can receive digitally transmitted radio stations in this radio mode.
Press the Menu button on the remote control or on the device use the ▶◀ buttons to select the menu item DAB/DAB+.
To confirm your selection, press the ENTER button on the remote control or press the dial on the device.
8. OPERATION
8.1.1. Station list
Press the List button to view the station's DAB station list. You can now use this station list to select your desired station.
Please note that a DAB station list is only available if a DAB station scan has been successfully performed beforehand.
Please also read chapter 8.1.2.
8.1.2. DAB search
To perform an automatic station search in the DAB
receiving mode, press the Back button
several times as necessary. Should the radio not yet have any programmes stored in DAB mode,
a search will start automatically as soon as the radio is switched to DAB receiving mode.
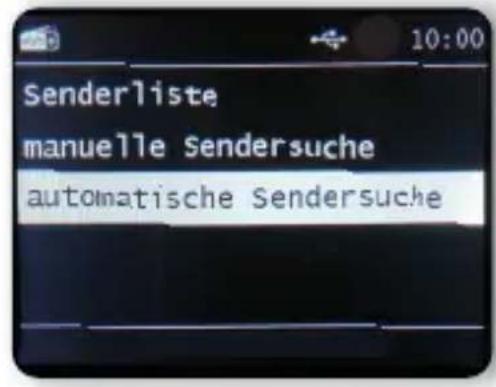
Switch to the automatic station search line and confirm by pressing the Enter/OK button on the remote control or by pressing the dial on the device. The radio will now automatically search for all receivable digital radio stations and then save them in a station list. You can access these as described in Chapter 8.1.1.
8. OPERATION
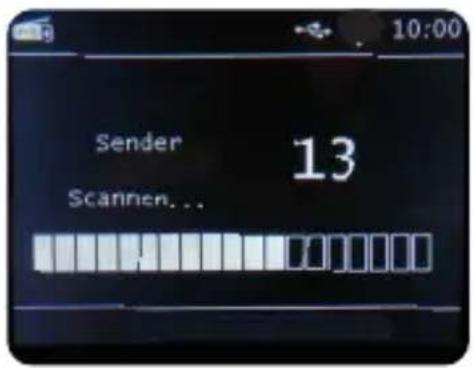
text_image
Sender 13 Scannen...The number on the right shows the number of radio stations found. After a successful search, the radio starts playing the first station found.
8.1.3. DAB manual search
You can also search for DAB stations manually.
You will need to know the broadcast frequency to do so.
In this part of the menu, select the desired station frequency and press ENTER to confirm.
8.2. Saving radio stations
You can save up to 4 radio stations on one station memory button.
Select a radio station that you want to save and hold down the station memory button on the device on which you want to store the radio station for approx. 3 seconds. The radio station will be saved.
You can now use this button to access the radio station.
8.3. Saving radio stations to your favourites list
Radio stations can be saved in a favourites list that you can quickly call up using the favourites button on the remote control. You can save up to 10 favourite radio stations in this list.
Choose a radio station that you would like to add to your favourites list. Press the FAV+ button on the remote control.
8. OPERATION
Now select the number for the memory slot to which you would like to store the radio station.
Hold the FAV+ button on the remote control pressed for approx.
2 seconds. The radio station will be saved to the chosen slot.
8.4. Changing the volume
Adjust the volume using the VOL+/VOL- buttons on the remote control or by using the dial on the device.

text_image
05To mute the radio, press the Mute button on the remote control.
8.5. Switching operating mode
Press the MODE button on the remote control to switch between AUX, DAB+ radio, FM radio, AUX IN, multimedia, CD player and Bluetooth operating modes.
8.6. AUX IN
You can connect an external music source to the radio, such as an MP3 player. To do so, connect an external device to the back of the radio using a suitable cable and switch on the device. Press and hold the MENU button on the remote control or on the device for 2 seconds and use the ▶◀ buttons on the remote control or the dial on the device to select AUX in the menu. Press OK on the remote control or the dial on the device to confirm.
Alternatively, you can switch to AUX mode by pressing the MODE button on the device repeatedly until the AUX mode is activated.
8. OPERATION
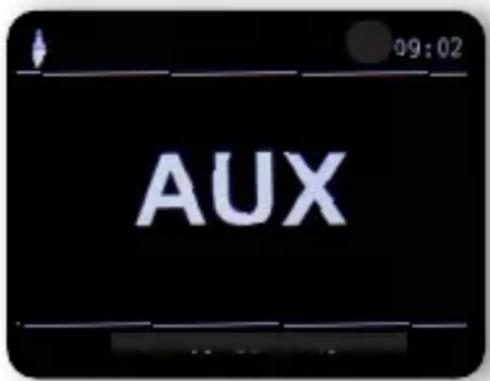
text_image
AUXYou can now play music from the external device. The control (previous track, back, stop, play) is done via the connected device; the playback volume can be controlled via the VOL+/VOL- buttons or the radio dial or controlled via the external device.
Please note that you have to connect the external device using a suitable cable. The radio is equipped with an AUX IN input that is suitable for a 3.5mm stereo jack.
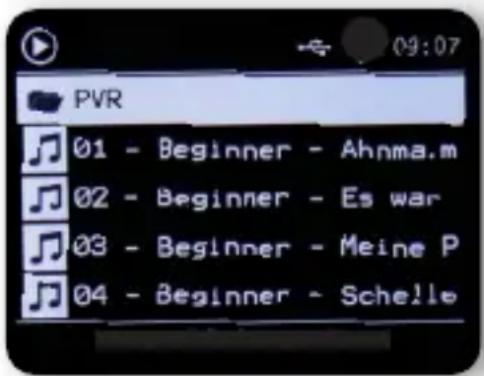
8.7. USB playback/multimedia
You can play MP3 music files from a USB storage carrier. To do so, insert a USB drive containing music files into the USB port on the back.
Press the Menu button on the remote control or on the device, and use the ▶◀ buttons on the remote control or the control dial on the device to select Multimedia.
Press OK on the remote control or the dial on the device to confirm. Select a track you want to play and confirm using the dial on the unit.
text_image
PVR 01 - Beginner - Ahnma.m 02 - Beginner - Es war 03 - Beginner - Meine P 04 - Beginner - Schelle8. OPERATION
8.8. EQ (equaliser)
In this section, you can select certain sound
settings. In addition to several sound presets, you can also customise your radio's sound and save this setting under My EQ.
Use the ▼▲ buttons on the remote control or the dial
control dial on the device to select the menu item
Equalizer and then press the ENTER button on the remote control or confirm by pressing the dial on the device.
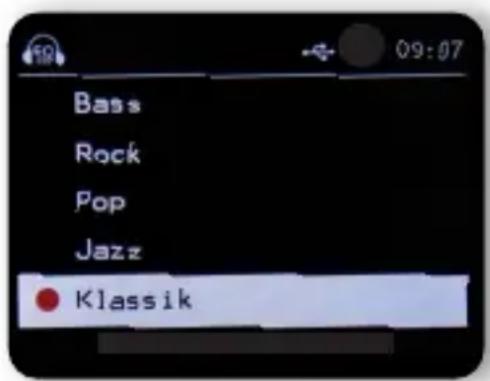
text_image
Bass Rock Pop Jazz KlassikUse the ▼▲ buttons on the remote control or the dial on the device to select a sound preset and confirm by pressing OK on the remote control or by pressing the dial on the device.
Under My EQ profile, you can change the radio's basic settings.
Here, you can adjust the cut-off frequency for high tones (treble) and low tones (bass) to suit your taste.
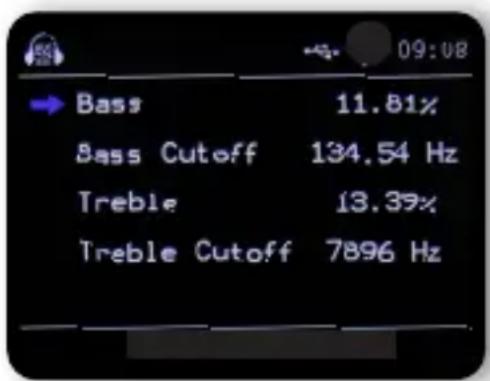
text_image
09:08 → Bass 11.81% Bass Cutoff 134.54 Hz Treble 13.39% Treble Cutoff 7896 Hz8. OPERATION
Under EQ advanced settings, you can adjust various frequency ranges.
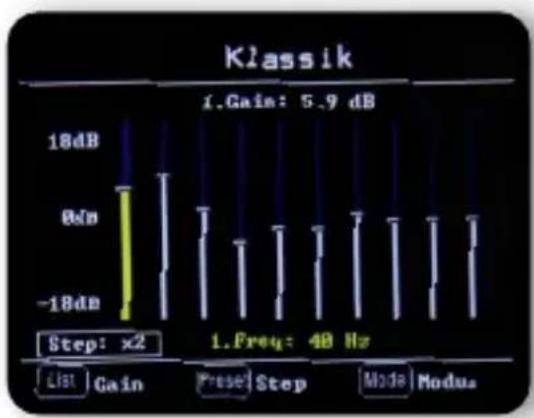
bar
Klassik | Step | Gain (dB) | Frequency (Hz) | |---|---|---| | 1 | 18 | 0 | | 2 | -18 | 0 | Step: x2 1.Cain: 5.9 dB 1.Freq: 48 Hz List | Gain | Prese | Step | Mode | Modu.8.9. Recording radio broadcasts
You can use the device to record FM and DAB+ radio programmes onto a connected USB data carrier. The radio creates a folder on the connected USB data carrier in which all recordings are stored. The folder is named PVR. The files are saved in the audio format transmitted by the radio station. (for FM stations: .wav / for DAB+ stations : .AAC) You can record a programme directly during operation, provided you have connected a USB data carrier to the radio. While a programme is on, press the Record button (Rec) on the device or on the remote control.
A red recording icon will appear on the display.
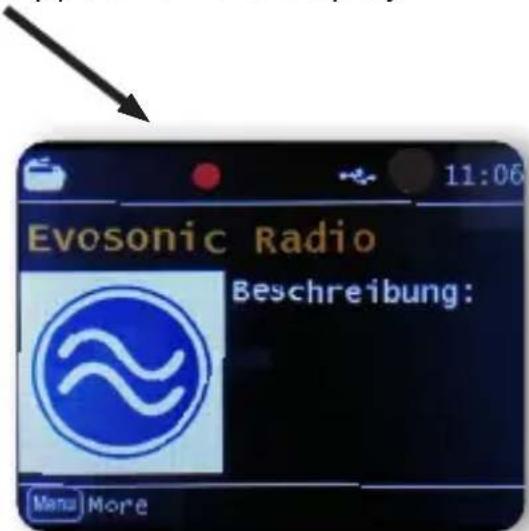
text_image
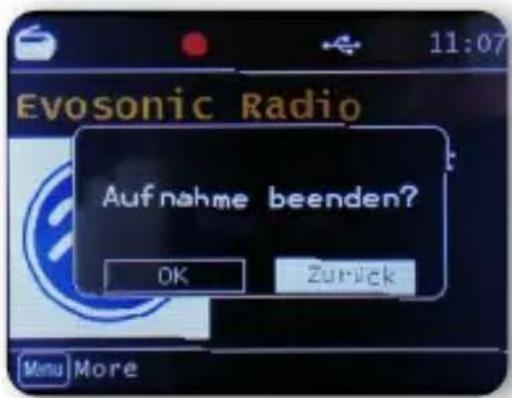
Evosonic Radio Beschreibung: Menu MoreTo stop recording, press the Stop button and confirm the request with OK.
8. OPERATION
The radio, similar to a video or DVD recorder, can also be programmed with a timer recording to record radio broadcasts when you are not at home, for example. Hold the Record button on the device or on the remote control for more than 2 seconds.
Alternatively, select the Timer recording menu item in the System menu.
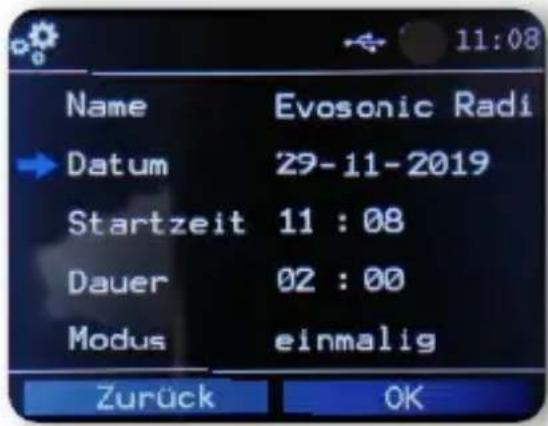
text_image
Name Evosonic Radi → Datum 29-11-2019 Startzeit 11 : 08 Dauer 02 : 00 Modus einmalig Zurück OKName: Choose the radio programme here that you would like to record.
Date: Enter the date on which the timer shall start.
Start time: Select the start time line, then press the OK button and enter the time using the up/down arrow buttons on the remote control or the dial at which time the timer is to be activated.
Duration: Set the recording time in hours and minutes here.
8. OPERATION
Mode: Determine whether the recording should occur only once or daily.
8.10. Radio as a Bluetooth receiver
The radio can be connected to an external device (e.g. smartphone, tablet) via Bluetooth.
The Bluetooth connection can then be used to play media (locally stored MP3 files, streamed music, online radio) from external devices via the radio.
Select Bluetooth in the menu.
A Bluetooth connection must be established before you can send audio files to the radio via Bluetooth.
8.10.1. Establishing a Bluetooth connection
Press the Menu button on the device or on the remote control and select Bluetooth mode. Once you have selected the Bluetooth mode on the radio, it is in pairing mode and will search for Bluetooth devices to connect to. Now activate the Bluetooth function on the external device to be connected (for further details, please refer to the operating manual for the device to be connected). In the overview of available devices, search for “DIRA S 24 CD”, select this and then establish the connection.
8.10.2. Playing media via Bluetooth
Once you have established a Bluetooth connection as described in chapter 8.10.1, you can play music files stored on the external device via the radio. To do so, proceed as follows:
Start music playback on the external device by activating the relevant play-back function (MP3 player etc.) or choosing a title from the relevant playback list then beginning playback.
8.10.3. Radio as a Bluetooth transmitter
The radio can also be used as a Bluetooth transmitter.
This lets you transfer audio signals from the radio via Bluetooth to suitable Bluetooth receiving devices (e.g. Bluetooth headphones).
To begin Bluetooth transmission, proceed as follows:
8. OPERATION
Ensure that the Bluetooth receiver is activated and ready.
Press and hold theMenu button on the device or remote control and select Bluetooth mode.
In Bluetooth mode, hold down the Menu button for
around 2 seconds. Switch to the Bluetooth role line.
The radio will now search for Bluetooth receiving devices.
Select your desired receiving device from the Bluetooth list.
Confirm by pressing the dial.
This will create a Bluetooth connection with the receiving device.

NOTE!
Once a Bluetooth connection has been established with the receiving device, the radio's speakers will be deactivated. The sound can only be heard via the Bluetooth receiver in this setting.
8.11. Changing the function of the MODE button.
There is a MODE button on the device itself and on the remote control, the function of which can be changed.
To adjust the function of this button to suit your needs, please proceed as follows:
Hold the Menu button on the remote control or the device for 2 seconds and use the ▶◀ buttons or the dial to select System in the menu.
Use the ENTER button on the remote control or the dialon the device to confirm your selection.
Select Buttons and confirm your selection by pressing the dial.
Confirm MODE and select the function you want the MODE button to activate.
Leave the menu by pressing the Back button.
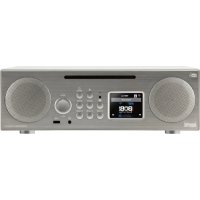
8.12. CD player
The device has a CD drive that you can use to play both audio and MP3 data CDs. Hold the Menu button on the remote control or the device for 2 seconds and use the ▶◀buttons or the dial to select CD in the menu. Insert a CD into the drive.
8. OPERATION
The device will automatically load the CD.
An overview of the audio tracks on the CD is displayed.
Use the ▶◀ buttons to select a track you want to play and confirm by pressing the dial or ENTER button on the remote control.
Use the ▶▶I button to skip to the next track.
Press ◀◀◀ to jump back one track. The ▶ll button pauses playback or resumes playback.
Press the EJECT button on the device to eject the CD from the drive.
9. TROUBLESHOOTING
| Symptom | Possible cause and troubleshooting |
| No display, Radio not reacting to operation | Connect the power using the included power unit. |
| Remote control does not work | Battery dead or incorrectly inserted. Please check that the batteries are inserted in the correct direction. Point the remote control at the device. |
| DAB+ reception interrupted | No stations availableRun a scan.Antenna not fully extended. Change the radio's location (e.g. nearer to a window), perform another search. |
| Radio programmes glitching | Change the location of the radio. |
| AUX playback not working | The radio is in the wrong modeSwitch to 'AUX' modeCable connection faulty. Check the cable connection between the radio and the external device |
| Poor audio quality when playing music | File with low bit rate. Check the audio file. Tip: For MP3 files, the bit rate should be 192Kbit/s or higher. |
9. TROUBLESHOOTING
| Symptom | Possible cause and troubleshooting |
| Volume too low Check the volume setting on the radio. Check the volume setting on the paired device from which you are playing music. | |
| USB data carrier not recognised | Make sure that the USB storage device is FAT32 formatted. |
| No sound is coming from the device. All other functions are OK. | Headphones are plugged in. Unplug the headphones. |
| Glitches in CD playback. | CD damaged or scratched. Check the CD for damage or scratches. |
10. STORAGE
When not in use, please unplug the power adapter from the socket, disconnect the power adapter cable from the radio and store the device in a dry place protected from dust.
If the device is not in use for a longer period of time, the battery must be removed from the remote control.
11. TRADEMARK NOTICE
Other product and company names mentioned herein are trademarks or registered trademarks of their respective owners.
12. DISPOSAL INFORMATION
12.1. DISPOSING OF PACKAGING
The packaging consists exclusively
of materials that can be recycled. Please
dispose of these properly according to the “dual system”.

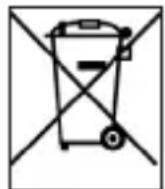
12.2. DEVICE DISPOSAL
The symbol on the right with the
crossed out waste bin on wheels
indicates that this device is subject to Directive 2012 / 19 / EU.
This directive specifies that this device,
at the end of its service life, must be taken to specific
collection centres, recycling centres or waste disposal facilities.
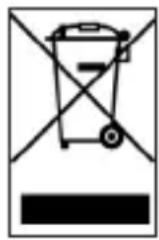
This type of disposal is free of charge. Protect the environment and dispose of waste properly. Further information is available from your local waste collection company or your city or municipal office.
12.3. DISPOSING OF BATTERIES
Batteries may not be disposed of with household waste.
The symbol on the right means that you as a consumer are required to dispose of all batteries and battery packs separately. Appropriate
collection bins are provided at specialist retailers and
numerous public facilities. Information on disposal of old batteries
can also be found via waste disposal companies, municipal and local authorities. This type of disposal is free of charge. Protect the environment and dispose of waste properly.
An additional chemical symbol Pb (lead) or Hg (mercury) under the crossed-out bin means that the battery contains more than 0.0005% mercury or 0.004% lead.
13. PROPERTIES AND TECHNICAL DATA
| DAB/DAB+/FM | |
| Reception range DAB band III 174 MHz - 240 MHzFM 87.5 MHz -108 Mhz | |
| Display | |
| TFT colour display 2.4 inch TFT colour display | |
| Sound | |
| Speaker 2 x 15 W | Music output3" speaker to 6Ω |
| Connections | |
| Headphones | 3.5mm stereo jack input |
| AUX IN | 3.5mm stereo jack input |
| Polarity | 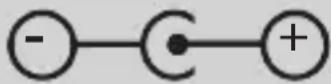 |
| Power adapter connectionUSB port | USB 2.0 standard |
| Operating conditions | |
| Temperature range 0 | °C - 45 °C |
| Humidity 20% - 80% relative humidity | |
13. PROPERTIES AND TECHNICAL DATA
| Technical data for adapter | |
| Manufacturer | SHENZHEN SOY TECHNOLOGY CO.LTD. |
| Model name | SOY-1500240EU-056B |
| Input voltage | 100-240V |
| AC frequency input | 50/50Hz |
| Output voltage | 15V |
| Output power | 2.4A |
| Output capacity | 36W |
| Average operational efficiency in operation | 85.60% |
| Efficiency at minor power (10%) | 87.41% |
| Power consumption when not on | <0.1W |
| Storage conditions | |
| Always keep in a dry place. | |
| Dimensions and weight | |
| Width x height x depth 360 mm x 140 mm x 195 mm | |
| Weight 3.38 kg | |
| Remote control battery | |
| Type CR 2025 / 3 V | |
14. SERVICE AND SUPPORT
Dear customer!
Thank you for choosing one of our products. Our product meets legal requirements and has been manufactured under constant quality control.
The technical data corresponds to the current status at the time of printing.
Changes are reserved.
The warranty period for the TELESTAR DIRA 24 CD.
corresponds to the legal requirements at the time of purchase.
We also offer a telephone
HOTLINE telephone service with professional support.
Professional specialists are ready to offer their assistance in our service area. Here, you can ask any questions you may have about TELESTAR products and get troubleshooting suggestions.
Our technical staff is available Mondays- Fridays from
08:00 - 16:45 at the following phone
number:
02676 / 95 20 101
or via email: service@telestar.de
If the service hotline is unable to assist you, please send your TELESTAR DIRA S 24 CD to the following address, preferably in its original packaging but packaged for safe transport:
TELESTAR - DIGITAL GmbH
Service centre
On this device beyond the statutory warranty TELESTAR provides a 24-month manufacturer warranty from the date of purchase from the dealer. This includes the repair of any defects, without requiring proof that a material or manufacturing defect already existed at the time of purchase.
The warranty excludes external visible defects, as well as damage resulting from improper installation or incorrect operation, as well as removal or destruction of manufacturer's numbers or mechanical damage.
The warranty will become void if interventions take place by unauthorised third parties.
To preserve the full warranty coverage, it is essential to make sure during installation that only original
TELESTAR accessories are used. The warranty covers the repair or replacement of the defective component, however excludes other work which may be required.
We would like to inform you that we generally do not replace items with a new item if the costs for this are
disproportionately higher than those for a repair (standard case).
In general TELESTAR does not accept costs for damage repaired by unauthorised third parties.
For warranty claims, the faulty device or part must be sent in the original packaging including accessories and a (copy) purchase receipt to TELESTAR. (Address in the chapter SERVICE and SUPPORT)
For repair queries regarding devices already sent:
e-mail: rekla@telestar.de
16. CE SEAL
CE
Your device is labelled with the CE mark and complies with all required EU standards.
The TELESTAR DIRA S 24 CD meets the key protection provisions of the radio equipment directive 2014/53/EU (RED -Radio Equipment Devices), the low voltage directive 2014/35/EU
as well as the RoHS directive 2011/65/EU and the REACH directive 1907/2006
The declaration of conformity for this product is available at: https://telestar.de/de_DE/Konformitaetserklaerung/352-529/?productID=23263
Distributor:
Cher client, chère cliente,
TELESTAR Service Center,
Am Weiher 14,
56766 Ulmen
Courriel : service@telestar.de
3. Touche mémoire station 1/Play/Pause
text_image
Yellow triangular warning sign with black exclamation mark symboltext_image
All private data will be deleted.Are you sure to continue? OK Abbrechentext_image
Bass 11.81% Bass Cutoff 134.54 Hz Treble 13.39% Treble Cutoff 7896 Hz(RED - Radio Equipment Devices),
text_image
TELESTAR DIF Mova Serving With Tests In My Eyes DIRA 5/24 CDDIRA S 24 CD
Italiano
INDICE
TELESTAR Service Center,
Am Weiher 14,
56766 Ulmen
E-mail: service@telestar.de
text_image
All private data will be deleted.Are you sure to continue? OK Abbrechentext_image
09:08 → Bass 11.81% Bass Cutoff 134.54 Hz Treble 13.39% Treble Cutoff 7896 Hz(RED -Radio Equipment Devices),
text_image
TELESTAR DIF Novo DIF Novo Singing with Tests In My Eyes DIRA 524 CDDIRA S 24 CD
Nederlands
INHOUDSOPGAVE
INHOUDSOPGAVE 226
TELESTAR Service Center,
Am Weiher 14,
56766 Ulmen
e-mail: service@telestar.de
Aantal Verklaring
1 TELESTAR DIRA S 24 CD
1 Afstandsbediening
1 Telescoopantenne
1 Externe netstekker
text_image
Yellow triangular warning sign with black exclamation mark symbol7.2.9. Update software via USB
text_image
All private data will be deleted.Are you sure to continue? OK Abbrechentext_image
09:08 → Bass 11.81% Bass Cutoff 134.54 Hz Treble 13.39% Treble Cutoff 7896 Hzof via mail op: service@telestar.de
(RED -Radio Equipment Devices),