USER MANUAL DMR202 MAKITA
ENGLISH (Original instructions)
Symbols
The following show the symbols used for the equipment. Be sure that you understand their meaning before use.

Read instruction manual.

Only for EU countries
Due to the presence of hazardous components in the equipment, waste electrical and electronic equipment, accumulators and batteries may have a negative impact on the environment and human health. Do not dispose of electrical and electronic appliances or batteries with household waste! In accordance with the European Directive on waste electrical and electronic equipment and on accumulators and batteries and waste accumulators and batteries, as well as their adaptation to national law, waste electrical equipment, batteries and accumulators should be stored separately and delivered to a separate collection point for municipal waste, operating in accordance with the regulations on environmental protection.
This is indicated by the symbol of the crossed-out wheeled bin placed on the equipment.
IMPORTANT SAFETY INSTRUCTIONS
WARNING:
When using electric tools, basic safety precautions should always be followed to reduce the risk of fire, electric shock, and personal injury, including the following:
- Read this instruction manual and the charger instruction manual carefully before use.
- Clean only with dry cloth.
- Do not install near any heat sources such as radiators, heat registers, stoves, or other apparatus (including amplifiers) that produce heat.
- Only use attachments/accessories specified by the manufacturer.
- Unplug this apparatus during lighting storms or when unused for long periods of time.
- A battery operated speaker with integral batteries or a separate battery pack must be recharged only with the specified charger for the battery. A charger that may be suitable for one type of battery may create a risk of fire when used with another battery.
- Use battery operated speaker only with specifically designated battery packs. Use of any other batteries may create a risk of fire.
- When battery pack is not in use, keep it away from other metal objects like: paper clips, coins, keys, nails, screws, or other small metal objects that can make a connection from one terminal to another. Shorting the battery terminals together may cause sparks, burns, or a fire.
-
Avoid body contact with grounded surfaces such as pipes, radiators, ranges and refrigerators. There is an increased risk of electric shock if your body is grounded.
-
Under abusive conditions, liquid may be ejected from the battery; avoid contact. If contact accidentally occurs, flush with water. If liquid contacts eyes, additionally seek medical help. Liquid ejected from the battery may cause irritation or burns.
- Do not use a battery pack or tool that is damaged or modified. Damaged or modified batteries may exhibit unpredictable behaviour resulting in fire, explosion or risk of injury.
- Do not expose a battery pack or tool to fire or excessive temperature. Exposure to fire or temperature above 130 ^ C may cause explosion.
- Follow all charging instructions and do not charge the battery pack or tool outside the temperature range specified in the instructions. Charging improperly or at temperatures outside the specified range may damage the battery and increase the risk of fire.
- The MAINS plug is used as the disconnect device, and it shall remain readily operable.
- Do not use the product at a high volume for any extended period. To avoid hearing damage, use the product at moderate volume level.
- (For products with LCD display only) LCD displays include liquid which may cause irritation and poisoning. If the liquid enters the eyes, mouth or skin, rinse it with water and call a doctor.
- Do not expose the product to rain or wet conditions. Water entering the product will increase the risk of electric shock.
- This product is not intended for use by persons (including children) with reduced physical, sensory or mental capabilities, or lack of experience and knowledge, unless they have been given supervision or instruction concerning use of the product by a person responsible for their safety. Children should be supervised to ensure that they do not play with the product. Store the product out of the reach of children.
SAVE THESE INSTRUCTIONS
SPECIFIC SAFETY RULES
FOR BATTERY CARTRIDGE
- Before using battery cartridge, read all instructions and cautionary markings on (1) battery charger, (2) battery, and (3) product using battery.
- Do not disassemble battery cartridge.
- If operating time has become excessively shorter, stop operating immediately. It may result in a risk of overheating, possible burns and even an explosion.
- If electrolyte gets into your eyes, rinse them out with clear water and seek medical attention right away. It may result in loss of your eyesight.
- Do not short the battery cartridge:
(1) Do not touch the terminals with any conductive material.
(2) Avoid storing battery cartridge in a container with other metal objects such as nails, coins, etc.
(3) Do not expose battery cartridge to water or rain. A battery short can cause a large current flow, overheating, possible burns and even a breakdown.
- Do not store the tool and battery cartridge in locations where the temperature may reach or exceed 50 ^ C(122^)
- Do not incinerate the battery cartridge even if it is severely damaged or is completely worn out. The battery cartridge can explode in a fire.
- Be careful not to drop or strike battery.
- Do not use a damaged battery.
- To avoid risk, the manual of replaceable the battery should be read before use. And the max discharging current of the battery should be greater than or equal to 8A.
- The contained lithium-ion batteries are subject to the Dangerous Goods Legislation requirements. For commercial transports e.g. by third parties, forwarding agents, special requirement on packaging and labeling must be observed.
For preparation of the item being shipped, consulting an expert for hazardous material is required. Please also observe possibly more detailed national regulations. Tape or mask off open contacts and pack up the battery in such a manner that it cannot move around in the packaging.
- Follow your local regulations relating to disposal of battery.
- Use the batteries only with the products specified by Makita. Installing the batteries to non-compliant products may result in a fire, excessive heat, explosion, or leak of electrolyte.
CAUTION:
- Danger of explosion if battery is incorrectly replaced.
- Replace only with the same or equivalent type.
Only use genuine Makita batteries. Use of nongenuine Makita batteries, or batteries that have been altered, may result in the battery bursting causing fires, personal injury and damage. It will also void the Makita warranty for the Makita tool and charger.
Tips for maintaining maximum battery life
- Charge the battery cartridge before completely discharged. Always stop tool operation and charge the battery cartridge when you notice less tool power.
- Never recharge a fully charged battery cartridge. Overcharging shortens the battery service life.
- Charge the battery cartridge with room temperature at 10^ - 40^ (50°F - 104°F). Let a hot battery cartridge cool down before charging it.
- Charge the battery cartridge if you do not use it for a long period (more than six months).
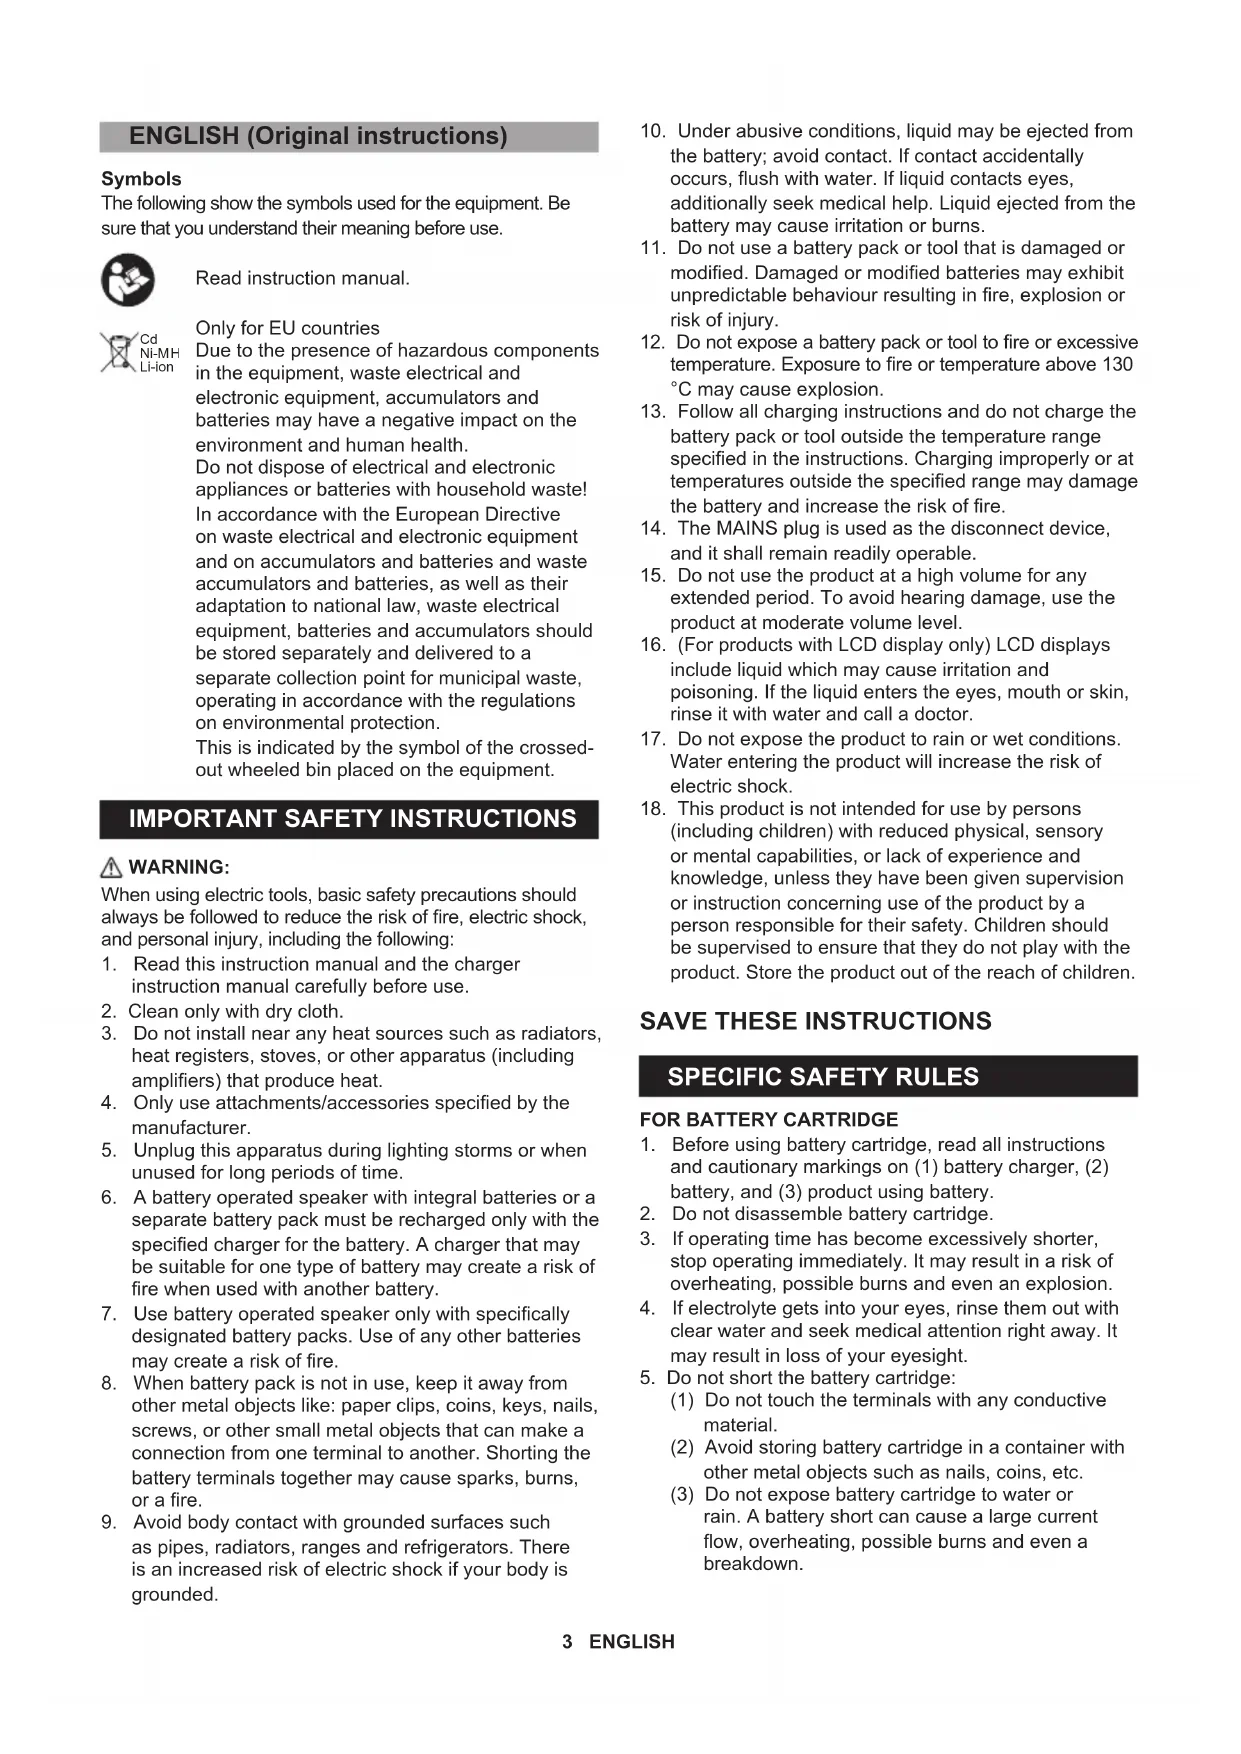
Explanation of general view (Fig.1)
- Battery compartment locker
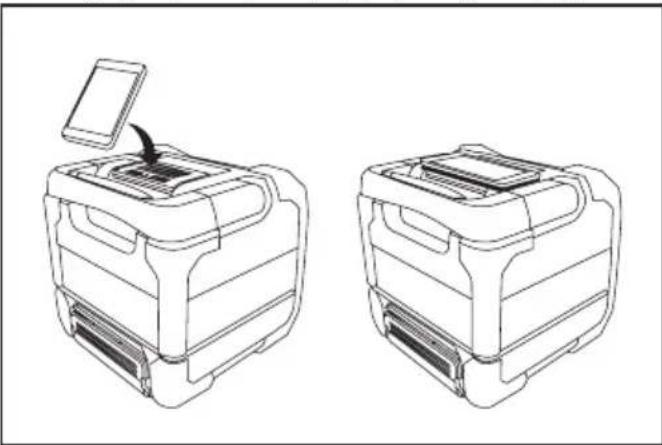
- Mobile (Cell phone) placing panel
- Volume up button
- Volume down button
- Play mode button
- Next folder button
- Next track button/Fast-forward button
- LCD display
- Play/Pause button
- Previous track button/ Rewind button
- Previous folder button/ Bluetooth pairing button
- Source button
- Power button
- Speaker
- Handle
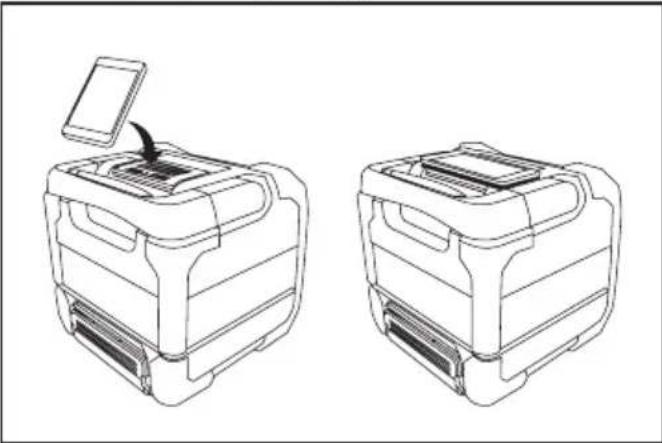
- DC in socket
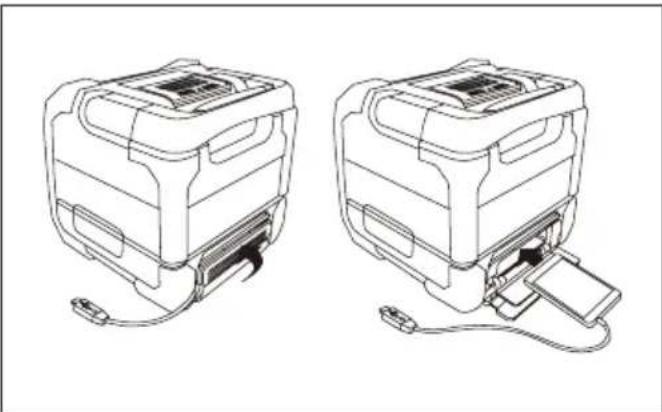
- Auxiliary input socket
- USB charging socket
- Mobile storage cabinet cover
- Cable hole
- Mobile (Cell phone) storage cabinet
- 14.4 V/18V battery terminal
- 10.8 V-12Vmax battery terminal
- USB playback socket
- Battery cover
- Battery cartridge
- Button
Power
The speaker can be powered by Makita battery packs or a standard wall outlet.
Power by battery
When "LOW BATTERY" is shown on the display, please replace the battery. The following table indicates the operating time on a single charge.
| Battery Capacity | Battery Cartridge Voltage | AT SPEAKER OUTPUT = 100mW
Unit: Hour (Approximately) |
| 10.8V-12Vmax | 14.4V 18V | | USB
Playback | Bluetooth A | JX IN | USB Playback
+ USB Charge (2.1A) |
| 1.3Ah | | BL1415 3.5 | 5.5 5.5 1.0 | | | | |
| | BL1815 4.0 | 6.0 6.0 1.2 | | | |
| 1.5Ah | BL1015 | | | 5.5 7.5 9 | 0 0.9 | | |
| BL1016 | | | | | | |
| BL1415N 5.0 | 7.0 7.0 1.3 | | | | |
| | BL1815N 5.5 | 7.5 7.5 1.4 | | | |
| 2.0Ah | BL1020B | | | 7.5 10 11 | 1.1 | | |
| BL1021B | | | | | | |
| | BL1820(B) 7 | 0 10 | 10 | 1.9 | |
| 3.0Ah | | BL1430(B) | | 8.0 | 12 | 12 | 2.2 |
| | BL1830(B) | 10 | 14 | 14 | 2.7 |
| 4.0Ah | BL1040B | | | 14 | 20 | 23 | 2.2 |
| BL1041B | | | | | | |
| BL1440 | | 13 | 19 | 19 | 3.5 |
| | BL1840(B) | 14 | 20 | 20 | 3.5 |
| 5.0Ah | | BL1450 | | 16 | 23 | 23 | 4.0 |
| | BL1850(B) | 18 | 26 | 26 | 4.5 |
| 6.0Ah | | BL1460B | | 17 | 25 | 25 | 4.5 |
| | BL1860B | 22 | 32 | 32 | 5.5 |
WARNING: Only use the battery cartridges listed above. Use of any other battery cartridges may cause injury and/or fire. Note: Table regarding to the battery operating time above is for reference. The actual operating time may differ with the type of the battery, charging condition, or usage environment.
Installing or removing slide battery cartridge (Fig. 3 and 4)
- To install the battery cartridge, align the tongue on the battery cartridge with the groove in the housing and slip it into place. Always insert it all the way until it locks in place with a little click.
If you can see the red indicator on the upper side of the button, it is not locked completely. Install it fully until the red indicator cannot be seen. If not, it may accidentally fall out of the tool, causing injury to you or someone around you.
- Do not use force when inserting the battery cartridge. If the cartridge does not slide in easily, it is not being inserted correctly.
- To remove the battery cartridge, sliding it from the tool while pressing the button on the front of the cartridge.
IMPORTANT:
- Be careful not to pinch your fingers when closing the battery cover.
Note:
When the speaker is in low battery, 'LOW BATTERY' will appear and flash on the LCD display.
Indicating the remaining battery capacity
Only for battery cartridges with "B" at the end of the model number
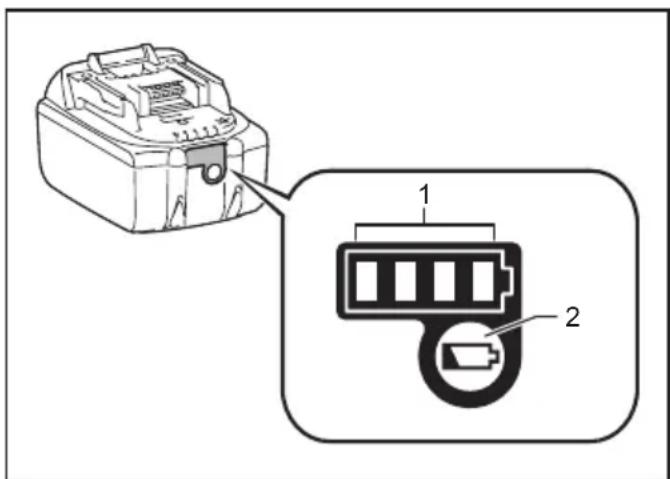
Press the check button on the battery cartridge to indicate the remaining battery capacity. The indicator lamps light up for few seconds.
14.4V/18V batteries
| Indicator or lamps | Remaining Capacity |
| Lighted Off Blinking | | |
| | | 75% ~ 100% |
| | | 50% ~ 75% |
| | | 25% ~ 50% |
| | | 0% ~ 25% |
| | | Charge the battery |
| | | The battery may have malfunctioned |
10.8V-12V max batteries
| Indicator or lamps | Remaining Capacity |
| Lighted Off Blinking | | |
| | | 75% ~ 100% |
| | | 50% ~ 75% |
| | | 25% ~ 50% |
| | | 0% ~ 25% |
NOTE: Depending on the conditions of use and the ambient temperature, the indication may differ slightly from the actual capacity.
Using Supplied AC power adaptor (Fig. 5)
Remove the rubber protector and insert the adaptor plug into the DC socket on the right side of the speaker. Plug the adaptor into a standard mains socket outlet. Whenever the adaptor is used, the battery pack is automatically disconnected. The AC adaptor should be disconnected from the main supply when not in use.
IMPORTANT:
- The mains adaptor is used as the means of connecting the speaker to the mains supply. The mains socket used for the speaker must remain accessible during
normal use. In order to disconnect the speaker from the mains completely, the mains adaptor should be removed from the mains outlet completely.
- Use the AC power adaptor supplied with the product or specified by Makita only.
- Do not hold the power supply cable and plug by your mouth. Doing so might cause an electric shock.
- Do not touch the power plug with wet or greasy hands.
- If the cord is damaged, have it replaced by our authorized service center in order to avoid a safety hazard. Do not use it before repair.
- After use, always store AC power adaptor out of the reach of children. If Children play with the cord, they may suffer injury.
USB power supply socket
This jack can be used to charge a mobile phone or any other device that uses less than 2.1A of DC current. Charging will only occur when the speaker is switched on.
Note: Ensure the specification of your external device such as mobile phone, mp3 player or iPod is compatible with the speaker. Please read instruction manual of your external device before charging.
IMPORTANT:
- Before connecting USB device to the charger, always backup your data of USB device. Otherwise your data may lose by any possibility.
- The charger may not supply power to some USB devices.
- When not using or after charging, remove the USB cable and close the cover.
- Do not connect power source to USB port. Otherwise there is risk of fire. The USB port is only intended for charging lower voltage device. Always place the cover onto the USB port when not charging the lower voltage device.
- Do not insert a nail, wire, etc. into USB power supply port. Otherwise a circuit short may cause smoke and fire.
- Do not connect this USB socket with your PC USB port, as it is highly possible that it may cause breakdown of the units.
Pairing and connecting a device to the speaker
You need to pair your Bluetooth device with the speaker before you can auto-link to play/stream Bluetooth music through the speaker. Pairing creates a 'bond' so two devices can recognize each other.
To have the better sound quality, we recommend setting the volume to more than two-thirds level on your Bluetooth device and then adjust the volume on the speaker as required.
Pairing and playing your Bluetooth device for the first time
- Press the Power button to turn on the speaker and the 'BT PAIR' will appear on the display to show the speaker is discoverable.
- Activate Bluetooth on your device according to the device's user manual to link to the speaker. Locate the Bluetooth device list and select the device named 'DMR202' with some mobiles (which are equipped with earlier versions than BT2.1 Bluetooth device), you may need to input the pass code "0000".
- Once connected, there will be a beep sound and the display will show 'BT CONNECT'. You can simply select and play any music from your source device. Volume control can be adjusted from your source device, or directly from the speaker.
- Use the controls on your Bluetooth-enabled device or on the speaker to play/pause and navigate tracks.
Note:
- If 2 Bluetooth devices, pairing for the first time, both search for the speaker, it will show its availability on both devices. However, if one device links with this unit first, then the other Bluetooth device won't find it on the list.
- If your Bluetooth device is temporarily disconnected to the speaker, then you need to manually reconnect your device again to the speaker.
- If 'DMR202' shows in your Bluetooth device list but your device cannot connect with it, please delete the item from your list and pair the device with the speaker again following the steps described previously.
- The effective operation range between the system and the paired device is approximately 10 meters (30 feet). Any obstacle between the system and the device can reduce the operational range.
- Bluetooth connectivity performance may vary depending on the connected Bluetooth devices. Please refer to the Bluetooth capabilities of your device before connecting to the speaker. All features may not be supported on some paired Bluetooth devices.
Playing audio files in Bluetooth mode
When you have successfully connected the speaker with the chosen Bluetooth device, you can start to play your music using the controls on your connected Bluetooth device.
- Once playing has started adjust the volume to the required setting using the Volume buttons + on the speaker or on your enabled Bluetooth device.
- When you press the Volume up/down button, the volume indicator will flash in fast flashing red. If the indicator light in solid red, it indicates the volume is in maximum volume or minimum volume.
- Use the controls on your device to play/pause and navigate tracks. Alternatively, control the playback using Play/Pause Next track Previous track buttons on the speaker.
- Press and hold the Next track or Previous button to fast-forward/Rewind the current track. Release the button when the desired point in the track is reached.
Note:
- That not all player applications or devices may respond to all of these controls.
- Some mobile phones may temporarily disconnect from the speaker when you make or receive calls. Some devices may temporarily mute their Bluetooth audio streaming when they receive text messages, emails or for other reasons unrelated to audio streaming. Such behaviour is a function of the connected device and does not indicate a fault with the speaker.
- The display does not show information such as title, artist, album, etc., when playing in Bluetooth mode.
- The play mode function (Repeat/Random) cannot be used in Bluetooth mode.
Speaker memory and reconnecting a device
The speaker can memorize up to 8 sets of paired device, when the memory exceeds this amount, the oldest pairing history will be over written. If your Bluetooth device already paired with the speaker previously, the unit will memorize your Bluetooth device and it attempts to reconnect with a device in memory which is last connected. If the last connected device is not available, the speaker will be discoverable.
Disconnecting your Bluetooth device
Press and hold the Bluetooth pairing button or 2-3 seconds to disconnect with your Bluetooth device. The Bluetooth indicator flashes in blue indicating the speaker is discoverable again for pairing.
A 3.5mm Auxiliary input socket is provided on the right side of the unit to permit an audio signal to be fed into the unit from any devices that features a headphone or audio output, such as an iPod, MP3 or CD player.
- Connect a stereo or mono audio source (for example, iPod, MP3 or CD player) to the Auxiliary input socket (marked 'AUX') and the Aux in indicator turns green indicating the speaker is in auxiliary input mode.
- Adjust the Volume control on your iPod, MP3 or CD player to ensure an adequate signal and then adjust the volume on the speaker for comfortable listening.
- To have the better sound quality, we recommend setting the volume to more than two-thirds level on your audio device and then adjust the volume on the speaker as required.
Note:
- When Aux in socket is connected an audio device, the speaker will be switched from Bluetooth to auxiliary input mode. You can also press the source button to select your desired mode.
- The display does not show information such as title, artist, album, etc., when playing via auxiliary input socket.
- The playback or play mode cannot be controlled with the buttons on the speaker, when playing via auxiliary input socket.
Using USB memory devices
Important:
- Your speaker is only designed to work with USB flash memory devices. It is not intended to be connected to hard disk drives or any other type of USB device.
- It is possible to use SD or SDHC cards for media playback when held in a suitable USB adaptor. However, due to the wide variation of such adaptors, it is not possible to guarantee that all adaptor/card combinations will work with the speaker.
- The speaker has been tested with a range of USB memory devices of up to 32GB capacity. It supports USB 2.0 full speed and USB 3.0. (Note: when using USB 3.0, please allow the speaker to detect the device for a longer period of time.)
- USB memory must use the FAT or FAT 32 filing system in order to operate with the speaker, it does not support NTFS.
- Audio formats supported for playback are MP3,WMA and AAC. Playback does not support files encoded using WMA lossless, WMA Voice, WMA 10 professional, nor files of any format which have DRM protection.

Cautions:
- In order to minimize the risk of damage to your speaker, your USB Memory, please place the speaker such that the device cannot easily be knocked while it is inserted in the socket.
- Remove the USB before carrying the speaker or if not using the USB feature for a prolonged period.
- Turn off the speaker before removing your USB memory device.
- The USB connection is intended only for flash memory devices.The use of hard disk storage media is not supported.
- Playback via USB files stored on MP3 players is not guarantee.
- Large file size or high memory USB device takes longer time to read.
Playing files from USB memory devices
- Open the battery cover and insert the USB memory device into the USB slot which is located in the battery compartment.Close the battery cover
- Press the Power button to turn on the speaker and the 'Reading' will appear and flash on the LCD display. Then the speaker will enter the USB mode and start playing from the USB memory device. The display will show the folder and file numbers, e.g. 'F001 T0001'. The speaker also shows the scrolling text messages (such as title, artist, album etc.) when there is information available.
Note:
a) The text coding only supports UNICODE, if the USB files contain text coding other than UNICODE, the scrolling messages will appear garbled texts.
b) Once the USB memory device is plugged in, the speaker will automatically enter in USB mode. You can also press the source button to select your desired mode if needed.
- To pause playing, press the Play/Pause button to resume playing, press the Play/Pause button again. Note:
a) If you turn off the speaker, the next time the speaker is turned on, it will resume to the last played track.
b) If you switch to other mode when playing from the USB memory device, playback will be paused. When you switch to the USB mode again, playback will resume from the point where it was paused.
c) It is recommended to store only music files (MP3/WMA/AAC) in your USB memory device. If there is one folder contains file(s) other than music files, your speaker will skip this file/ folder and the file/folder number shown on the display will not be serial.
Selecting a file
- While the USB memory device is playing, press either the Next track button Previous track button to change to the desired file. The file number is updated on the display. If there's more than one folder, all files in the current folder should have been played and the next folder will be played.
- Press and hold the Next track button Previous track button to fast-forward/Rewind the current track. Release the button when the desired point in the track is reached.
To skip to another folder
With the USB memory device is in pause or play mode, press and release the Next folder button or Previous folder button. The first file of the next or previous folder will be played.
Note:
If your USB contains a folder without files, the device will skip the folder and play the files in the next folder.
Play Mode
When playing the files in the USB memory device, press and release Repeat/Random button to select.
Repeat 1: repeatedly play the file you are listening to.
Repeat Folder : repeatedly play the files within the folder you are listening to.
Random : it will play files in the USB by in random.
Repeat All: repeatedly play the folders in the USB.
MAINTENANCE
CAUTION:
- Never use gasoline, benzine, thinner, alcohol or the like. Discoloration, deformation or cracks may result.
SPECIFICATION
| Amplifier |
| Output power | 10.8V-12Vmax:3W
14.4V:6W
18V:10W |
| Frequency response 50Hz~20kHz |
| Aux In |
| Input sensitivity 250mVrms @100Hz |
| Speaker |
| Main speaker 101.6mm 8ohm | 10W |
| Tweeter speaker 36mm 8ohm | 10W |
| Bluetooth
(The Bluetooth® word mark and logos are registered trademarks owned by Bluetooth SIG, Inc.) |
| Bluetooth version 4.0 | |
| Bluetooth Profiles | A2DP
SCMS-T
AVRCP |
| Transmission Power Power Class2 |
| Transmissson Range | Max.10m (varies according to usage conditions) |
| Supported codec SBC | |
| Compatible Bluetooth profile | A2DP |
| Maximum radio-frequency power | BT EDR: 3.88dBm
BT LE: -1.4dBm |
| Operating Frequency 2402MHz | Hz~2480MHz |
| USBPlayback Socket |
| USB Standards USB3.0 / US | B2.0 |
| Compatible File System FAT | 32/16/12 |
| Playable Audio format MP3 | WMA / AAC |
| Max. Current | 500 mA (Max) |
| General |
| AC power adaptor | DC in 12V 1.5A, center pin positive |
| Battery | Slide battery:
10.8 V-12Vmax
14.4 V
18 V |
| Dimensions(W × H × D) | 211 mm × 206 mm × 199 mm |
| Weight | 2.7KG (without battery) |
The company reserves the rights to amend the specification without notice.
FRANCAIS
Symboles
10.8V-12V max accu's
| Indicatorlampjes | Resterendecapaciteit |
| Opgelicht | Uit Knippert | |
| | | 75% ~ 100% |
| | | 50% ~ 75% |
| | | 25% ~ 50% |
| | | 0% ~ 25% |
Para saltar aOTHERcarpeta
Repeat All: reproduc repetidamente as pastas no USB.
MANUTENÇAO
ATENÇA:
Móvo yia tic xwpe ts EC
Aoyw TnC TnapouiaC Tuv Etnikivuov
ouatakwv eepw otov EgoTIAOo, o
aTIOBANTOC nEKTPIKOC KAI nEKTPOVIKOG
EOTIAOUC, OUI OuaOWpeuteCs KAI OI MTATAPIECS
TTOpei va exouv apvntIKn EITIDpaan 0To
TEPIALAOv KAI TNV AVpWtIVN UyEA.
Mnv aToppTTETe Tc nEKTPIKECs KAI
nEKTPOVIKEC OuaKEUEc NMTATAPIECS PAZI ME TA
OIKIAKA aToppmuata!
SUVWVA TE TNV EUPWTAAIK NODNYIA YIA TOV
aTIOBANTO nEKTPIKO KAI nEKTPOVIKO EOTIAOPO
KAI YIA TOU C OUAOWPEUTEC KAI MTATAPIECS KAI
Tous aTIOBANTOU C OUAOWPEUTEC KAI MTATAPIECS,
KaThetaKai TNV PPOApOvN Touc OTNV
eOVIKN VOpOeia, O aTIOBANTOC nEKTPIKOC
EOTIAOUC, O I MTATAPIECS KAI OUI OUAOWPEUTEC
Ta TTPTTEI VA aTIOThNEUovTAt EEXWiPTa KAI VA
TAPADIBOVTAI OE EEXWiPTo ONeio OuaLoyNC
YIA DNOtIKa aTIOBNTA, To OTIO AELIToupyei
OuPwva ME Touc KAVOVIOUGYIA TNV
TPoTAIA Tou PEPBAALovTOG.
Auto UTTODEIKVUETAI ATTO TO OUMBOLO TOU
diaypauevou TPOxopopou KaDou TOn
BPiOKeTAl avaptnevo Etavw OTOV EGTIAOIO.
ZHMANTIKEOADHIGEASAΦAANEIA
NPOEIANOIOIHsH:
Kata Tn xponon nAekptikwv Epyaaleiwv, TpeTTEI TAVTOVE aakolouovtai Ta baoika metpa aopaaieac yia Tnemuwn Tou Kivduvou Tupkayiac, nAekptpAnngic kaiTPaumatioou, ountepiaamabavouevwTwPapakatw
- Aiaaote auto to eyyepio 0nyiw kai tig oyniecs xno tsou poptiotn npoeekia piv aio tn xphon.
- Kaθapiοτε μόνο με στέγνο παι.
- Mny toTIOtheTeIe Tn OoKEun KovTa OE nYEs ,OTWc KALOPIE,EPuOuaOwpeUTec, oUTEc n loITc SuOKEUEc (akoun kai EvioxUTc) Tpuayouv 0epuOTna.
- XpəiμoIToiEITE mOvo Eξaŋμata/Tapελκόεva Tou Kaθopiçovtai aTó Tov kataokεuaotn..
- ATOOUVBDETE TNOUKEUN KATAN DIAPKEIA KATAIYIDWV nOTAV DEV XPOIIMOTIOIEITAI YIA YEAYAOXPOVIKO DIAOTNAAATTOOUVDOTE TNOUKEUN KA TAN DIAPKEIA kATAIYIDWV nOTAV DEV XPOIIMOTIOIEITAI YIA YEAYAOXPOVIKO DIAOTNAA.
- 'Eva nxeio nou aeitoupyei eevosatomegaeves μπatapieçn iua xwpiotn μntatapia πpertie va φoptiεtai mvo e to ouykepiévo φoptiotni yia tnv μntatapia. 'Evac φoptiotns nou μntopei va εivai katalnnoc yia evav tuTTO μntatapiac μntopei va δnuioupynaei kivduo TUPkayiac otav xpnoioutoeita μe aAto tuto μntatapiac.
- XpnoiopoToinoTe To nxeio mOvo ME TIC EIDIKA
Kaθoipouéves μTatapiec. H xpnon oToiwovnnte
aAawv μTataipiWv μTopei va δημioupynoεi kivduvo
TUPkaylac.
- Otav n mntatapia eviai o xpnon, kpatnoTe tn
paKpi aTTO aAAA aETAAIAk avtikemuva,OTIWc
ouvdtnpes, Kepuata, kEiIdia, KAPPIa, BiEcs n
aaa mikp aetaaikacvtikemuva TIO uTnopeiva
DnmuypnoovuiauVDoan to TOv eva akpoektn
OTOV AALo.To paxukkawmaTwvTolawv TCS
mntatapiac mTOpEi va TpokaaleeI OTIVthpeC,
Eykaumata n TUPKayia.
- ATOUYE Tn OwATIK N EAnp M E YEIWUEVc ETIAPVEIECS,OTWCSOWANVECS,KALOPIEPKOUZIVECS KAI yuyia.YTAPXei AuNuevos KIVDuvoc NkEKTPOITANEGiAc otav to Owma oac evai YEIWevo.
- Ytro kataxpnoTikc ouvthkcs, evdxetai va ektoxeutei upo aTTOV mTATAPia.ATOPOUYETN V ETTaqn. EAV ePTE Tuxia Oe EITaqn, EITAUVETe ME VEPO. Se TEPITIWON EITaQns Upvw Me ta patia, ZntnoTE IATPIKn BOntheia.To uypo mTATAPIAC MTOpeiva TPOKaAoei EpeOIOHOykaUmata.
- Mny xpnoiopoioite To Tnaketo mTataipivv n Epyaleio Tou exei kataoTPapei n TpOIOIOHc. OI KATEOTpauevec n TPOITOTIOINUEVS MTATAPIEC Evexetai va TApouiaocouv aTPOBAAETTN OuPTEPiOPa μe aTOTAEa TUPKAYIA, EkPENn N KIVDUVO Tpaumoiou.
- Mny ekTeTe eva Tnaketo mTataiwv n epyaiao e wTia n utepboAikn 0epuokpaa.Hek0eon o e wTia n 0epuokpaa avwTwv 130 ^ C mTopeni va TpokaEe i EKpnIg.
- AkoAouOtnoTe oAeTic OndyieC FOPTiTeTo TnAkeTo mTatapiWv N To EpyAeio EKTosou Eupouc OepokpaaiaC Tou KAthetaEtaI OTIC OndyieC. H AavTaouevn FOption n Ae OepokpaoEcKTOs Tou KAthetaOpeiv a Kataotpeei Tnv MTTapia KAI VA auNoei Tov KIVDUVO WtiaC.
- To uσa KevtpiKns Tpoopooiaç xnpoiuontoieiTai ωc oukeun anoovδeons, kai θa npapeivei λεitoupyikn.
- Mny xpnoiopoioite to ppoiov o uynn evtaon yia eya xpoviKO diaoTna. Ia va aTnpuyTe bAe tsakons, xpnoiOIOIOnTe to ppoiov oe tpi a ETTtEda Evtaanxou.
- (Tia pioiovtae oovn LCD mvo) Oi oovc LCD Tepiaaavouv uypo Tounpopei va npokaleoi eepio kai dnlambdaipiaon. Eav to uypo ioxwnpoei 0t a tia, to otota n to depua, eTAAveTe e vpo kai kaolete yiatpo.
- Mny ekTeTe To pioov oE bpoxn n oE upec ouvKnKc. H dieioou vepou oTo pioov 0a auGnoTov Kivduvo nAekptpOAnIgac.
- To npoiov auto dev npoopicetai yia xpno anto a topa (ouptepiaaavoeuv waiidowv) e uiwvec oomegakec, aohtnpiakec n diavontikec ikavotntes n eaaeyn eptiapac kai yywong, ektoe ev touc npaoxthetaov en oyiec oxetikae t npon Tou npoiovtoc ano atopo utueuvo yia tnva aopaia touc. Ta taioia thpente i va etiiaenovtai ia va bebaiwtei otivaizouv e to npoiov. Attohneote to npoiov akpiia anto taiia.
Giaithich tong quat (Hinh 1)
- Khoang chuá pin
- Bäng dāt dien thoai di dong (dien thoai di dong)
- Nút táng am luong
- Nut giam am luong
- Nutché do bat
- Nut thu muc tiep
- Nut chuyen bai tie/ nut chuyen tiep nhanh
- Man hinh LCD
- Nut Phat/ Tam dnu ng
- Nút quay lái bai truó/Nút tua lái
- Nut thu muc truc/ Nut ghep doi Bluetooth
- Nut nguòn
- Nut nguôn
- Loa
- Cam tay
- O cām vào mò chieu
- O cām vào phu tro
- Ö cam sac USB
- Vô tú luu tru di dong
- Lô cap
- Tu luu tru dien thoai di dong (dien thoai di dong)
- Dàu pin 14.4 V/18V
- Dau pin 0.8 V-12Vmax
- Ö cam USB phat lai
- Vó Pin
- Hop Pin
- Nut
Nang luong
Loa co the duoc cap nang luong boi b o pin Makita hoac mot c am tuong tiue chuan.
Nang luong bang pin