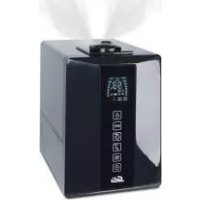
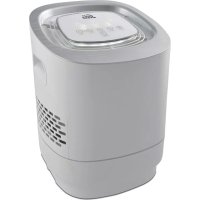
Ultrasonic Pure 7217 - Humidifier Solis - Free user manual and instructions
Find the device manual for free Ultrasonic Pure 7217 Solis in PDF.
User questions about Ultrasonic Pure 7217 Solis
0 question about this device. Answer the ones you know or ask your own.
Ask a new question about this device
Download the instructions for your Humidifier in PDF format for free! Find your manual Ultrasonic Pure 7217 - Solis and take your electronic device back in hand. On this page are published all the documents necessary for the use of your device. Ultrasonic Pure 7217 by Solis.
USER MANUAL Ultrasonic Pure 7217 Solis
IMPORTANT SAFETY PRECAUTIONS
Please read through this user manual thoroughly before using your Solis Ultrasonic Pure, so that you become familiar with your appliance and can use it safely. We thoroughly recommend that you keep these instructions and, if you pass the appliance on, that you also hand these instructions to the new owner.
For your own safety, please observe the following safety measures when using electrical appliances:
- To prevent electric shock, neither the appliance (with the exception of water tank and nebuliser chamber) nor the power cord and the power plug must come into contact with water or any other liquids. Danger of electric shock! Should the appliance resp. the power cord or the power plug come into contact with liquid, use dry rubber gloves to immediately pull the power plug out of the socket. Do not use the appliance again until you have had it's ability to function safely checked by Solis or a Solis approved service centre.
- Do not operate or unplug the appliance with wet or moist hands or feet.
- Before using the appliance, check that the voltage stated on the type plate of the appliance matches your mains voltage. Do not connect the power plug to a plug board to which other appliances are connected.
- Do not leave the power cable hanging over table edges so that it can be pulled. Make sure that it does not come into contact with hot surfaces, such as hotplates or a radiator, or that they come into contact with the appliance.
-
Keep the appliance away from hot gas, hot ovens and other heat-emitting appliances or heat sources resp. electric appliances. Never use the appliance on a hot or wet surface. Never place the appliance near moisture, heat and naked flames. Keep the humidifier away from moving objects or appliances.
-
Keep a minimum distance of 20~cm between the appliance and walls, curtains or other moisture sensitive materials and objects and please note that air must be allowed to circulate freely around the appliance. When the warm mist function is activated, you should not stay in the vicinity of the warm mist. Never cover the appliance with towel or similar objects while it is in operation. The air inlet and outlet openings must be kept open at all times. Do not place anything on the humidifier and under no circumstances sit down on the appliance.
- Never carry the appliance by the power cord and do not place anything on the power cord. Never pull on the power cord to disconnect the appliance from the power mains. Only pull on the plug.
- We recommend that you do not use an extension cable with this appliance. Do not place the appliance directly underneath a power socket.
- Before disconnecting the power plug of the appliance from the power socket, please make sure that the appliance is not in use.
- The appliance must be placed on an even, clean, stable, heat and moisture resistant and dry surface during use. Place the appliance somewhere it can not fall or be pushed over. The appliance must not be placed near the edge of a table or a work top. Caution: Do not place the appliance on a moisture sensitive surface, as the moist mist quickly sinks down to the ground, leaving moisture there. Ideally, move the appliance to a slightly elevated position so that the mist can spread throughout the room evenly and dissipate fully before it reaches the ground. Never place the appliance on the ground. There is the possibility of condensation (the forming of moisture) happening under the appliance.
-
Do not use the appliance outdoors or in moving vehicles or boats.
-
Do not operate the appliance in wet rooms and moist environments like bathrooms or swimming baths. Risk of electrocution and fire!
- Always unplug the appliance if it is not in use or left unattended, and before cleaning. This also applies if you move, assemble, disassemble or store the appliance. We recommend the use of a residual current device (RCD safety switch) to provide additional protection during the use of electrical appliances. It is advisable to use a safety switch with a rated residual operating current of 30mA maximum. For professional advice consult an electrician.
- Do not make any adjustments to the appliance, cable, plug or accessories.
- Improper use creates the risk of injury! No liability is assumed in the case of potential damages or injuries.
- Never take hold of an appliance that has fallen into water or another liquid. Always pull the power plug before removing it. Do not use the appliance again until you have had it's ability to function safely checked by Solis or a Solis approved service centre.
- Never place the appliance in such a way that it might fall into water or come into contact with water or another liquid (e.g. in or next to a sink).
- Never submerge the appliance or parts of the appliance like power cord, remote control or power plug in water or bring them into contact with water resp. other liquids.
- Place the appliance in such a way that it is not exposed to direct sunlight. Extremely cold temperatures should be equally avoided. Otherwise, the plastic parts could become discoloured or deformed.
-
Never insert sharp or pointed objects or tools into the appliance openings or reach into them with your hand. The appliance might be damaged resp. risk of electric shock and injury!
-
Only use the appliance as described in this manual. Only use with the provided accessories or accessories recommended by Solis, incorrect accessories can lead to damage of the appliance, resp. to fire, electric shock or personal damage.
- Never start the appliance using a external remote or external timer.
- This appliance is only for household use and is not suitable for commercial use.
- Remove and discard all packaging materials and potential stickers or labels before using the appliance for the first time.
- Check your humidifier before every use and make sure that the appliance, the power cord and the power plug are without damage and no parts have come loose.
- To prevent electric shock, do not use the appliance if cord or power plug are damaged or if the appliance has other faults, has fallen down resp. is damaged in any other way or if parts have come loose. Never attempt repairs yourself but take the appliance to Solis or a service centre authorized by Solis in order to get it inspected, repaired or mechanically and electrically maintained, in order to avoid a hazard.
- People with limited physical, sensorial or mental capabilities as well as unknowing or inexperienced people and children must not use the appliance except when supervised or thoroughly instructed on how to use the appliance by a person responsible for their safety. Additionally, they must be aware of the dangers arising from the appliance and know how to operate it safely. Cleaning and maintenance of the appliance must not be done by unsupervised children. Under no circumstances must the appliance be used or cleaned by children under the age of 8.
-
Children must be supervised, so that they do not play with the appliance.
-
Close supervision is necessary when the appliance is used by or near children.
TO PROTECT AGAINST ELECTRIC SHOCK, DO NOT IMMERSE THE HUMIDIFIER, POWER CORD OR POWER PLUG IN WATER OR ALLOW MOISTURE TO COME IN CONTACT WITH THESE PARTS.
- Always make sure that the appliance is correctly assembled before plugging it into the mains and using it.
- Never operate the appliance without water. Caution: Only remove the water tank when the appliance is switched off and cooled down. Only switch on the appliance when the filled water tank has been remounted. The water tank should be removed before moving the appliance. When removing or reinstalling the water tank, drops of water could get onto the surface. If possible, prevent that from happening and, should it happen anyway, wipe them away immediately to prevent damage.
- When filling the tank, only use fresh, cold tap water. First, empty out the water remaining in the tank. Completely fill the water tank with water. Never put additives such as essential oils or perfumes into the water. We recommend that you do not use the appliance if your water hardness is over 25^ .
- Should you wish to lift or move the appliance, always empty the cooled down water tank first and touch the humidifier by the appliance base. Never shake or throw the appliance, it might be damaged and start leaking.
- Do not operate the appliance on an inclined surface.
-
Also, the appliance, when filled with water, should be kept upright at all times.
-
Never shake the appliance or move it to another position while it is in use. Never move the water-filled, activated appliance! Before moving the appliance, you should switch it off, pull the power plug, let it cool down and remove the water tank. The nebuliser chamber is filled with water even after the water tank has been removed. Empty it out following the direction of the arrow on the floor of the nebuliser chamber.
- Never lift the water tank during use - this causes the appliance to switch off immediately.
- Always switch the appliance off and unplug it before moving the appliance, installing or removing parts resp. cleaning or storing the appliance. Let the unplugged appliance cool down completely before cleaning it.
- When not using the appliance for extended periods of time, always disconnect it from the power, empty out the remaining water and let it dry on the inside as well. Store the appliance in a dark, cool and well-circulated place.
- When the appliance is not in use, disconnect the power cord from the wall outlet.
- Do not place any objects on the appliance.
- Unwind the power cord fully before plugging the plug into the socket.
- Pull the plug after every use. Only then, the appliance is fully switched off.
- The appliance has to be cleaned regularly. Please refer to the notes given in the section "Cleaning and maintenance" on page 89 of this manual.
-
Only clean the chassis with a dry or slightly moist towel. Never use aggressive, abrasive or caustic detergents.
-
All programmed settings are deleted when the appliance is disconnected from the power. However, the programmed settings stay intact if the appliance is switched off with the ON/OFF button and remains connected to the power.
Please note: The humidity resp. temperature displayed on the appliance is measured by the appliance itself and might differ from the value displayed on a hygrometer resp. thermometer placed somewhere else in the room.
THE FUNCTIONS AND ADVANTAGES OF YOUR SOLIS ULTRASONIC PURE HUMIDIFIER
Large humidifying capacity
- Choose between cold and warm mist
HEPA filter and active carbon filter for optimal air purification
Built-in humidity switch for consistent humidity (select 40% -80%
- Aroma function
UV light function for destroying bacteria in the air
Negative ion function for ideal air quality
Automatic mode
Night mode
- Timer range from 1 to 10 hours with automatic shutdown
Automatic stop when the water tank is removed or empty
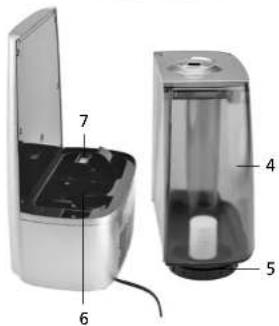
APPLIANCE DESCRIPTION

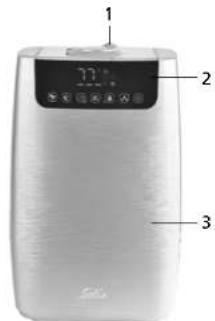

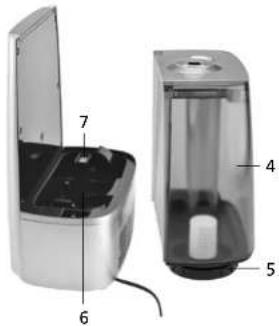
Description of parts
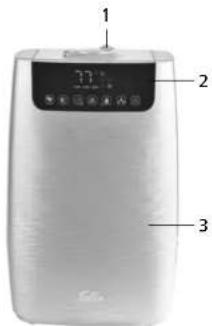
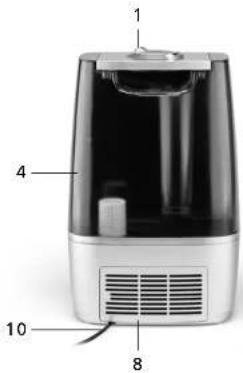
1 Mist outlet
2 LED display and touch-sensitive sensor buttons
3 Appliance front
4 Water tank with handle
5 Water tank lid with screwed-in.
descaling cartridge
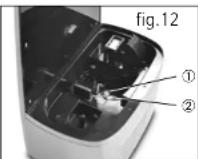
6 Nebuliser chamber with nebuliser and heating element
7 Aroma chamber
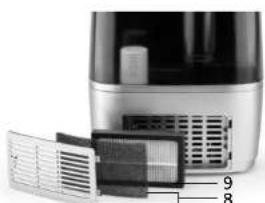
8 Filter cover with underlying net filter
9 HEPA air filter with integrated active carbon filter
10 Power cord
THE LED DISPLAY AND THE FUNCTION BUTTONS ON THE APPLIANCE
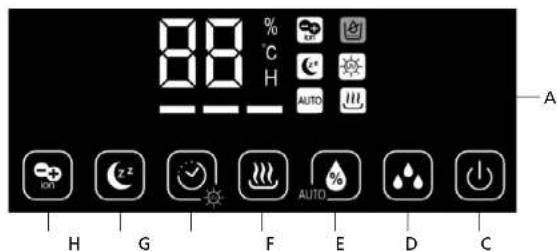
The function buttons
B ON/OFF button
C Humidification output button (3 possible settings)
D Button for manual humidity setting and automatic function
E Warm mist function button
F Timer and UV light function button
G Night mode button
H Negative ion function button
The symbols in the LED display (A)
88 number of the displayed value
% When this symbol lights up behind the number, the value refers to the ambient humidity
C When this symbol lights up behind the number, the value refers to the ambient temperature
H When this symbol lights up behind the number, the timer is switched on. If you press the timer button, you can briefly check the remaining operating time in hours in the display.
The ambient humidity (%) lights up for 10 seconds, then the display changes to the ambient temperature for 5 seconds (^) then % lights up again and so on.
Negative ion function is switched on
Night mode is switched on
Auto Automatic function is switched on
Warm mist function is switched on
UV light function is switched on
Water tank empty warning light
HumiDificatlon output intensity
In general: Once a function is activated, the corresponding symbol lights up.
THINGS WORTH KNOWING ABOUT THE FUNCTIONS OF YOUR HUMIDIFIER

ON/OFF BUTTON (B)
Once you plug the power plug into the power outlet, a signal sounds and the appliance switches to standby mode, the LED display lights up briefly and goes out again. If you touch the ON/OFF button, the LED display and the blue LED light on the appliance base light up and the humidifier is ready for use. Touch the ON/OFF button another time and the appliance switches back to standby mode.

HUMIDIFICATION OUTPUT BUTTON (C)
With this button, you can adjust the humidification output yourself - choose from 3 output levels: each bar beneath the number represents an output level. Each touch of the button increases the intensity. If one bar lights up, the lowest output level is selected. If three bars light up, the highest output level is selected. After the highest output level, the appliance switches back to the lowest output level if the button is touched again. If you have not activated the warm mist function, cold mist escapes from the outlets.

BUTTON FOR MANUAL HUMIDITY SETTING AND AUTOMATIC FUNCTION (D)
Manually setting the humidity:
You can set the desired humidity value by a short touch of this button: The appliance measures the current room temperature, brings it to the set value and then constantly holds it there. Values between 40% and 80% are possible and can be adjusted in steps of 5% . Every touch increases the value and is shown in the display. After 80% , the value jumps back to the neutral setting and then starts again at 40% . After programming, the display goes back to showing the current ambient humidity resp. temperature. As soon as you have entered a value, the appliance starts humidifying for at least 2 minutes, regardless of whether the set value is above or below the actual room humidity. The appliance switches off after these 2 minutes have elapsed, provided the actual room humidity lies above the set value.
An example: If you set a room humidity of 50% , the appliance checks the ambient humidity for 2 minutes while humidifying at the same time. Should the room humidity lie under the set 50% (minus tolerance) after the 2 minutes have elapsed, the humidifier keeps working. Should the room humidity be at 50% or above, the appliance stops working.
The appliance is equipped with a built-in humidity switch, guaranteeing that user programmed air humidity is permanently maintained. The humidity switch checks the humidity constantly at intervals of 10 seconds. Should the effective humidity fall 5% under the value chosen by you, the appliance switches on. This tolerance is picked deliberately to keep the appliance from turning on and off frequently and disturbingly.
In our example this would mean: Should the room humidity fall under 45% the appliance would switch back on 10 seconds later and restore the humidity to 50% . Note: When the appliance is turned on (regardless of whether the power supply has been disrupted or not) it will start operating for at least 2 minutes to meter current air humidity, even if effective air humidity is above the set value. After that, the appliance will either keep operating - if the value is below 45% as in our example - or discontinue operation - if the value is above 50% as in our example.
Memory function:
If the air humidifier is turned on and power has not been disconnected since last programming of air humidity, the programmed value is saved and the appliance will humidify the air of the room according to this last programmed value.
If the power supply has been interrupted, the previously set humidity value is deleted. In this case, the appliance humidifies up to the factory-set standard value of 68% and would require reprogramming by yourself should another value be desired.
Setting the automatic function:
If you touch the button for 3 seconds, the appliance switches to automatic mode. The appliance registers the current room humidity and brings resp. keeps the humidity constant between 55% and 68% . The appliance selects the functions optimal for this purpose itself, depending on the current ambient temperature and humidity. No manual settings for room humidity or humidification output can be made in this function.

WARM MIST FUNCTION BUTTON (E)
When you touch this button, you can activate the warm mist function. You can also increase or decrease the humidification output within the 3 possible intensities with the button in the warm mist function.
Please note: The higher the humidification output setting is in the warm mist function, the warmer the steam is. The warmer the steam is, the higher is the humidification output in turn. Therefore, the humidification output is generally higher for warm mist than for cold mist.
If you touch the button another time, you can switch the warm mist function off again, making the appliance only work with cold mist.

SHUTDOWN TIMER AND UV LIGHT FUNCTION BUTTON (F)
Setting the timer function:
If you briefly touch this button, you can activate the timer function. Each touch of the button increases operation time by 1 hour, settings between 1 hour and 10 hours are possible. After 10, the display jumps back to the neutral setting and then restarts at 1. After the set operation time has elapsed, the appliance automatically switches to standby mode.
GB
Setting the UV light function:
If you touch this button for 3 seconds, you activate the UV light function, which kills the bacteria in the air.
If you touch the button for another 3 seconds, you switch the UV light function back off. The UV light is located in the inside of the appliance and must not be confused with the night light on the front of the appliance.

NIGHT MODE BUTTON (G)
If you touch this button, you switch the appliance to night mode, meaning the LED display is turned off. Also, the symbol indicating active night mode switches off after another 20 seconds, so no disturbing light will bother you during your night's rest. If you touch this button again, you deactivate the night mode. The indications and symbols light up again in the LED display.

NEGATIVE ION FUNCTION BUTTON (H)
If you touch this button, you activate the negative ion function, which allows you to improve the quality of the air. Touching the button again deactivates the negative ion function.
Please note the following:
The operating range of your air humidifier is between 5^ and 45^ , air humidity in the room should be below 90% .
- Your Solis Ultrasonic Pure is not suitable for water which has passed through water descaling equipment working with salt. The descaling cartridge of the humidifier can not absorb the salt, causing white deposits all over the machine. Should white deposits form anyway, the cartridge capacity has depleted. When this happens can vary, depending on water hardness. In this case please replace the descaling cartridge.
We do not recommend using this machine if your water hardness exceeds 25°F.
- Never add additives like essential oils or perfumes to the water!
Caution: When operating the machine after not using it for extended periods of time, we recommend cleaning of water tank, mist duct and nebulisation chamber in any case (see "Cleaning" section).

THE BUTTONS ON YOUR MOTE CONTROL
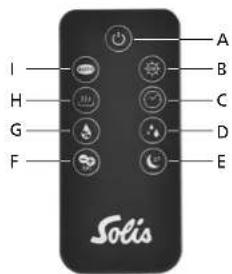
A ON/OFF
B UV light function
C Timer
D Humidification output
E Night mode
F Negative ion function
G Manual humidity setting
H Warm mist function
Automatic function
Caution: The remote control requires a type CR2025 battery. It is already inserted into the remote control. Remove the protective foil from the battery by pulling it out of the remote control.
In general:
- Should the included battery have no charge left, please insert a new type CR2025 battery. Pay attention to the indicated polarity. Should you not use the remote control for extended periods of time, please remove the battery and store it separately. By doing this, you increase the lifetime of the battery.
The effective range of the remote control is up to 3,5 meters. If you do not point the remote control directly towards the receiver, meaning the appliance front, the effective range is less resp. the humidifier does not respond to the signals of the remote control. - Please make sure that no obstructions are located between the remote control and the receiver.
- Please safely keep the remote control, it must not fall down or break.
STARTING UP
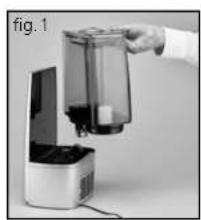
1. MOUNTING DESCALING CARTRIDGE AND FILLING THE TANK WITH WATER
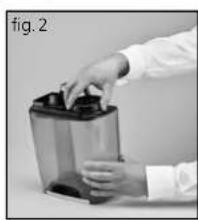
- Use the handle to lift the water tank and turn it around (fig. 1).
- Unscrew the cap of the water tank (fig. 2)
- Clock-wisely screw the descending cartridge onto the thread on the cap's inner side (fig. 3).
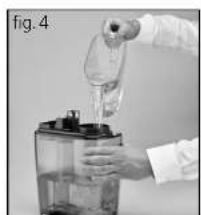
Completely fill the water tank with fresh, cold tap water.
Caution: Always fill the water into the water tank, never pour it directly into the nebulisation chamber (except when cleaning) (fig. 4).
- Close the water tank by clock-wisely turning the cap with the descending cartridge on it. The sealing ring should be positioned correctly (fig. 5).
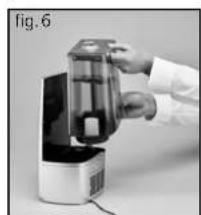
-Turn the water tank back around and correctly replace it on it's base (fig. 6). - Let the descaling cartridge work for 30 minutes without activating the air humidifier. Start using the appliance after the 30 minutes have elapsed.


2. SWITCHING THE APPLIANCE ON
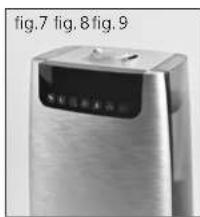
Please note: The two-part mist outlet capable of rotating 360^ can always be individually adjusted for optimal humidity distribution (fig. 7).
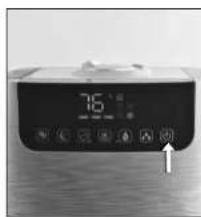
- Plug the power plug into a suitable power outlet, a signal sounds to indicate that your appliance is in standby mode.
- Touch the ON/OFF button, the LED display and the blue function light on the appliance base light up and your appliance starts (fig. 8).
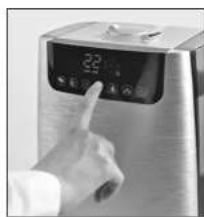
- Now touch the desired function buttons to program your appliance according to your needs (fig. 9).
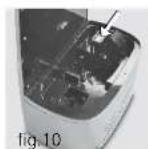
3. ACTIVATING THE AROMA FUNCTION
- Due to the sponge placed in the aroma compartment, your Solis Ultrasonic Pure can diffuse pleasant fragrance.
- Remove the aroma tray from the bracket (fig. 10).
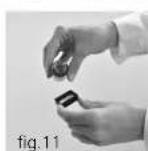
- Drizzle a few drops of water-soluble aroma oil onto the sponge (fig. 11).
Put the aroma tray back into the bracket. - When you turn on your air humidifier, the aroma function will be activated.
If you want to deactivate the aroma function, or should the appliance not be in use for extended periods of time, remove the aroma sponge from the compartment and wash it with a little of mild soap water. Let it dry completely before placing it back in the aroma compartment. Basically, the aroma sponge is reusable.
Caution: Never put additives like essential oils or perfumes into the tank resp. the water! This would cause damage to your appliance!
4. TURNING OFF THE APPLIANCE
Turn off the appliance with the ON/OFF button.
- Pull the power plug from the socket.
- Remove the water tank from the base and open the cap. Pour out the water and rinse the tank. Also empty the nebuliser chamber.
- Let all parts dry and store away the appliance.
GB
5. AUTOMATIC SHUTDOWN WHEN WATER TANK IS EMPTY
Should the water tank be empty, a threefold acoustic signal sounds. The corresponding symbol lights up in the display while the remaining indicators go out. The appliance will automatically stop humidifying. In this case, turn off the appliance with the ON/OFF button. Let the appliance cool down before pouring any more water in the tank.
- Caution: The appliance and the water in the nebulisation chamber might be very hot. When lifting the appliance or removing the water tank right after operation you risk scalding yourself with the hot water!
- Ensure that the water tank is always completely refilled.
CLEANING AND MAINTENANCE
1. CLEANING CHASSIS AND WATER TANK
Always switch off the appliance and pull the power plug before cleaning.
- Let appliance cool down completely.
Regularly clean the water tank using clean water (at least twice a week). Should there be lime deposits in the water tank, add decalcifier suitable for air humidifiers to the rinse water. Follow the directions on the bottle.
- Clean the outside of the appliance with a soft, slightly moist towel and, if necessary, some mild dishwashing liquid. Never dip the appliance in water and do not spray it with water or other liquids.
- Caution: Never use aggressive or caustic detergents or a scouring sponge. The plastic chassis might be damaged.
2. CLEANING NEBULISER,HEATING ELEMENT AND NEBULISER CHAMBER
Caution: Always let the appliance cool down completely before cleaning the nebuliser, the heating element and the nebuliser chamber.
- Pour the water remaining in the appliance out following the direction of the arrow (the arrow on the floor of the nebuliser chamber).
Clean the nebuliser chamber, the nebuliser membrane and the heating element once a week with a soft brush and water mixed with a little amount of mild dishwashing liquid. Rinse everything with clear water and then dry everything with a towel.
Should your water be so hard that white limestone deposits, which could not be removed with water and dishwashing liquid, form on the heating element and on the nebuliser membrane in spite of the descending cartridge, you should clean both with some water and a descaling agent suitable for humidifiers.
- Put a small amount of descaling agent suitable for humidifiers on the heating element and the nebuliser membrane and take note of the instructions on the bottle. Then, fill both with water and let everything sit for 10-15 minutes.
- Then use a soft brush to remove the limestone.
- Rinse nebuliser chamber, nebuliser membrane and heating element twice with water.
Caution: Do not pour water directly into the nebuliser chamber except when cleaning it!
Never use aggressive or scouring detergents or sponges – these might scratch the surface and damage the nebuliser membrane.
3. CLEANING THE FILTER
GB
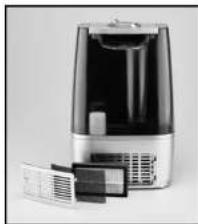
You can open the cover leading to the filter compartment by pushing the cover inwards at the spot marked by an arrow and releasing it. The cover jumps out of the bracing and can be removed.
Directly behind the cover, there is a black rough net filter. Should it be dirtied, please remove it from the cover and wash it under lukewarm water. Let it dry completely before placing it back.
In the filter compartment, there is a HEPA filter with an integrated active carbon filter. You should replace this filter with a new filter half-yearly or at least once a year, depending on the operating time of your humidifier. You can find the art-no. in the chapter "Consumable items" and you can acquire them from Solis or your dealership.
Simply lift the HEPA filter from the compartment and put the new filter into the appliance with the black side facing the appliance inside.
4. STORAGE
- Pour out all the water from the water tank and the nebuliser chamber. Dry off the entire appliance with a soft cloth. Allow the appliance to stand uncovered - with removed, opened tank - until it is completely dry.
- Store the appliance in a dry and dark place with good air circulation and protected from dust.

TROUBLESHOOTING
| PROBLEM POTENTIAL CAUSE POTENTIAL RESOLUTION | ||
| No mist is diffused. | Power plug not plugged in.ON/OFF button not activated Empty water tank.Not enough water in tank. | Plug in appliance触摸ON/OFF buttonFill tank with water.Refill tank with water. |
| Unpleasant smell. | New appliance.Water dirty or not fresh. | Remove tank cap and allow open tank to stand in a cool and dark place for approx.12 hours.Clean water tank, fill with fresh tap water. |
| Appliance is noisy. | Tank not positioned correctly.Not enough water in tank.Appliance positioned unevenly. | Correctly position tank on the base.Refill water in tankPLACE appliance on solid and even ground. |
| Steam evaporates around the outlet nozzle. | Gap between steam outlet and water tank. | Remove the mist outlet from the tank lid, rinse it with water and place it back in its position. |
If a problem can not be solved as described or if you see yourself confronted with another problem, please contact Solis or a service centre authorised by Solis.
You require these consumable items for your humidifier:
Art.-no. 700.84 Descaling cartridge
Art.-no. 700.83 HEPA filter with integrated active carbon filter
- The descending cartridge and the HEPA filter are available from good specialist stores or from Solis. You can find the contact addresses at the end of this manual.
TECHNICAL SPECIFICATIONS
Model no. SH802A, Type 7217
Product description Ultrasonic Humidifier and Airwasher
Voltage/Frequency 220-240 V~/50 Hz
Output 25 watts (cool humidification)
105 watts (warm humidification)
GB
Humidity switch 40% -80%
Suitable room size 40 m
Weight approx. 2,45 kg
Dimensions
Water tank capacity
Technical changes reserved.
^2 / 100m^3
approx. 24,0× 37,5× 17,0 cm (W× H× D)
4,51
DISPOSAL

EU 2012/19/EU
Information for correct disposal of the product in accordance with the European Directive EU 2012/19/EU.
At the end of its working life this equipment must not be disposed of as an household waste. It must be taken to special local community waste collection centres or to a dealer providing this service. Disposing of electrical and electronic equipment separately avoids possible negative effects on the environment and human health deriving from an inappropriate disposal and enables its components to be recovered and recycled to obtain significant savings in energy and resources. In order to underline the duty to dispose of this equipment separately, the product is marked with a crossed-out dustbin.
Solis of Switzerland Ltd reserves the right to carry out technical and visual changes and modifications to improve the product at any time.
SOLIS HELPLINE
This item stands out due to its long-life cycle and reliability. Despite this though, if a malfunction ever occurs, simply give us a call. Often a breakdown can be easily and quickly remedied with the right tip or technique without having to straight away send off the device for repair. We will give you all the advice and practical support you require. The contact addresses can be found at the end of this manual.
Keep the original packaging in a safe place so that you may use it in the event that transportation or shipping of the product becomes necessary.
BELANGRIJKE VEILIGHEIDSINFORMATIE
APPPARAATBESCHRIJVING


2. APPARAAT INSCHAKELEN
Solis customer service
Please contact us in advance of sending in products for return or repair. We will gladly give you the respective address. Alternatively, you can simply visit www.solis.com.
Solis Klantendienst Helpline
Address for return shipment of
goods differs - please refer to:
Address for return shipment of
goods differs - please refer
www.solis.com
+41-91-8029010
@ support.ch@solis.com
www.solis.com