MT 8240 - Shaver GRUNDIG - Free user manual and instructions
Find the device manual for free MT 8240 GRUNDIG in PDF.
| Product type | Multi-purpose shaver / Professional trimmer |
| Brand | Grundig |
| Model | MT 8240 |
| Power supply | AC adapter 100-240 V~, 50/60 Hz, output 5 V / 1 A; built-in rechargeable lithium-polymer battery |
| Charging time | Approximately 120 minutes (first charge: approximately 24 hours) |
| Runtime | Approximately 120 minutes |
| Protection rating | IPX4 (splash-proof) |
| Blade material | Ceramic and stainless steel |
| Included accessories | Cutting head (38 mm), body shaver head, rotary trimmer attachment, beard comb (30 mm), single foil shaver attachment, adjustable combs (2/4/6/8 mm and 10/12/14/16 mm), 2 mm comb, adapter, cleaning brush, oil, pouch |
| Functions | Hair cutting, beard cutting, close shaving, body hair trimming, nose hair trimming |
| Cutting length adjustment | Adjustable combs: 2-16 mm (hair/beard); adjustable comb 2/5/9 mm (body) |
| Cleaning | Cleaning brush; accessories washable under running water (except the main unit) |
| Safety | Can be used in the bath or shower (IPX4); do not immerse in water |
| Power adapter | Adapter model LGSPSD050100EP: input 100-240 V~, output 5 V / 1 A, efficiency 77.32%, no-load consumption 0.049 W |
Frequently Asked Questions - MT 8240 GRUNDIG
User questions about MT 8240 GRUNDIG
0 question about this device. Answer the ones you know or ask your own.
Ask a new question about this device
Download the instructions for your Shaver in PDF format for free! Find your manual MT 8240 - GRUNDIG and take your electronic device back in hand. On this page are published all the documents necessary for the use of your device. MT 8240 by GRUNDIG.
USER MANUAL MT 8240 GRUNDIG
Professional Multi Hair Trimmer Set User Manual

MT 8240
WET & DRY
DE-EN-TR-ES-HR-FR-PL
DEUTSCH 04-22
ENGLISH 23-35
TÜRKÇE 36-51
ESPANOL 52-67
HRVATSKI 68-79
FRANÇAIS 80-93
POLSKI 94-108
SICHERHEIT
Please read this instruction manual thoroughly prior to using this appliance! Follow all safety instructions in order to avoid damage due to improper use!
This appliance is designed for domestic use only.
- Keep the instruction manual for future use. Should a third party be given the appliance, please ensure the instruction manual is included.
Suitable for use in a bath or shower.
Suitable for cleaning under an open water tap.
- Do not immerse the appliance in water or let it come into contact with water, even during cleaning.
- Do not drop the appliance.
SAFETY
If not already present, for additional protection it is recommend to install a residual-current-operated protective device (RCD) with a rated residual operating current not exceeding 30mA in the electrical circuit of your bathroom. Ask your electrician for advice.
Always disconnect the power supply unit if the appliance is not being charged or used.
- Never use the appliance if it is visibly damaged.
- Always ensure hands are dry and hair is free from excess water before handling the mains AC/DC adapter plug.
- Only use the adapter provided.
- Always keep the appliance out of the reach of children.
SAFETY
- This appliance can be used by children aged from 8 years and above and persons with redued physical, sensory or mental capabilities or lack of experience and knowledge if they have been given supervision or instruction concerning use of the appliance in a safe way and understand the hazards involved. Children shall not play with the appliance. Cleaning and user maintenance shall not be made by children without supervision.
- Do not dismantle the appliance under any circumstances. No warranty claims are accepted for damage resulting from improper handling.
- Do not insert the appliance with nose trimmer attached too far into the nose during use.
Always remember to turn on the appliance before you insert it into your nose to avoid injury. - Do not use the appliance if you suffer from ache, eczema or any other skin irritations.
SAFETY
- Do not apply excessive pressure as this damages the attachment and may cause skin injury.
- Detach the hand-held part from the supply cord before cleaning it in water.
- This appliance contains batteries that are non-replaceable.
WARNING: For the purposes of recharging the battery, only use the detachable supply unit provided with this appliance.
Dear customer,
Congratulations on the purchase of your GRUNDIG MT 8240 Professional Multi Hair Trimmer Set.
Read the following user notes carefully to ensure you can enjoy your quality product from GRUNDIG for many years to come.
Meanings of the symbols
Following symbols are used in various sections of this manual:

Important information and useful hints about usage.

WARNING:
Warnings against dangerous situations concerning the security of life and property.

Electrical insulation class.
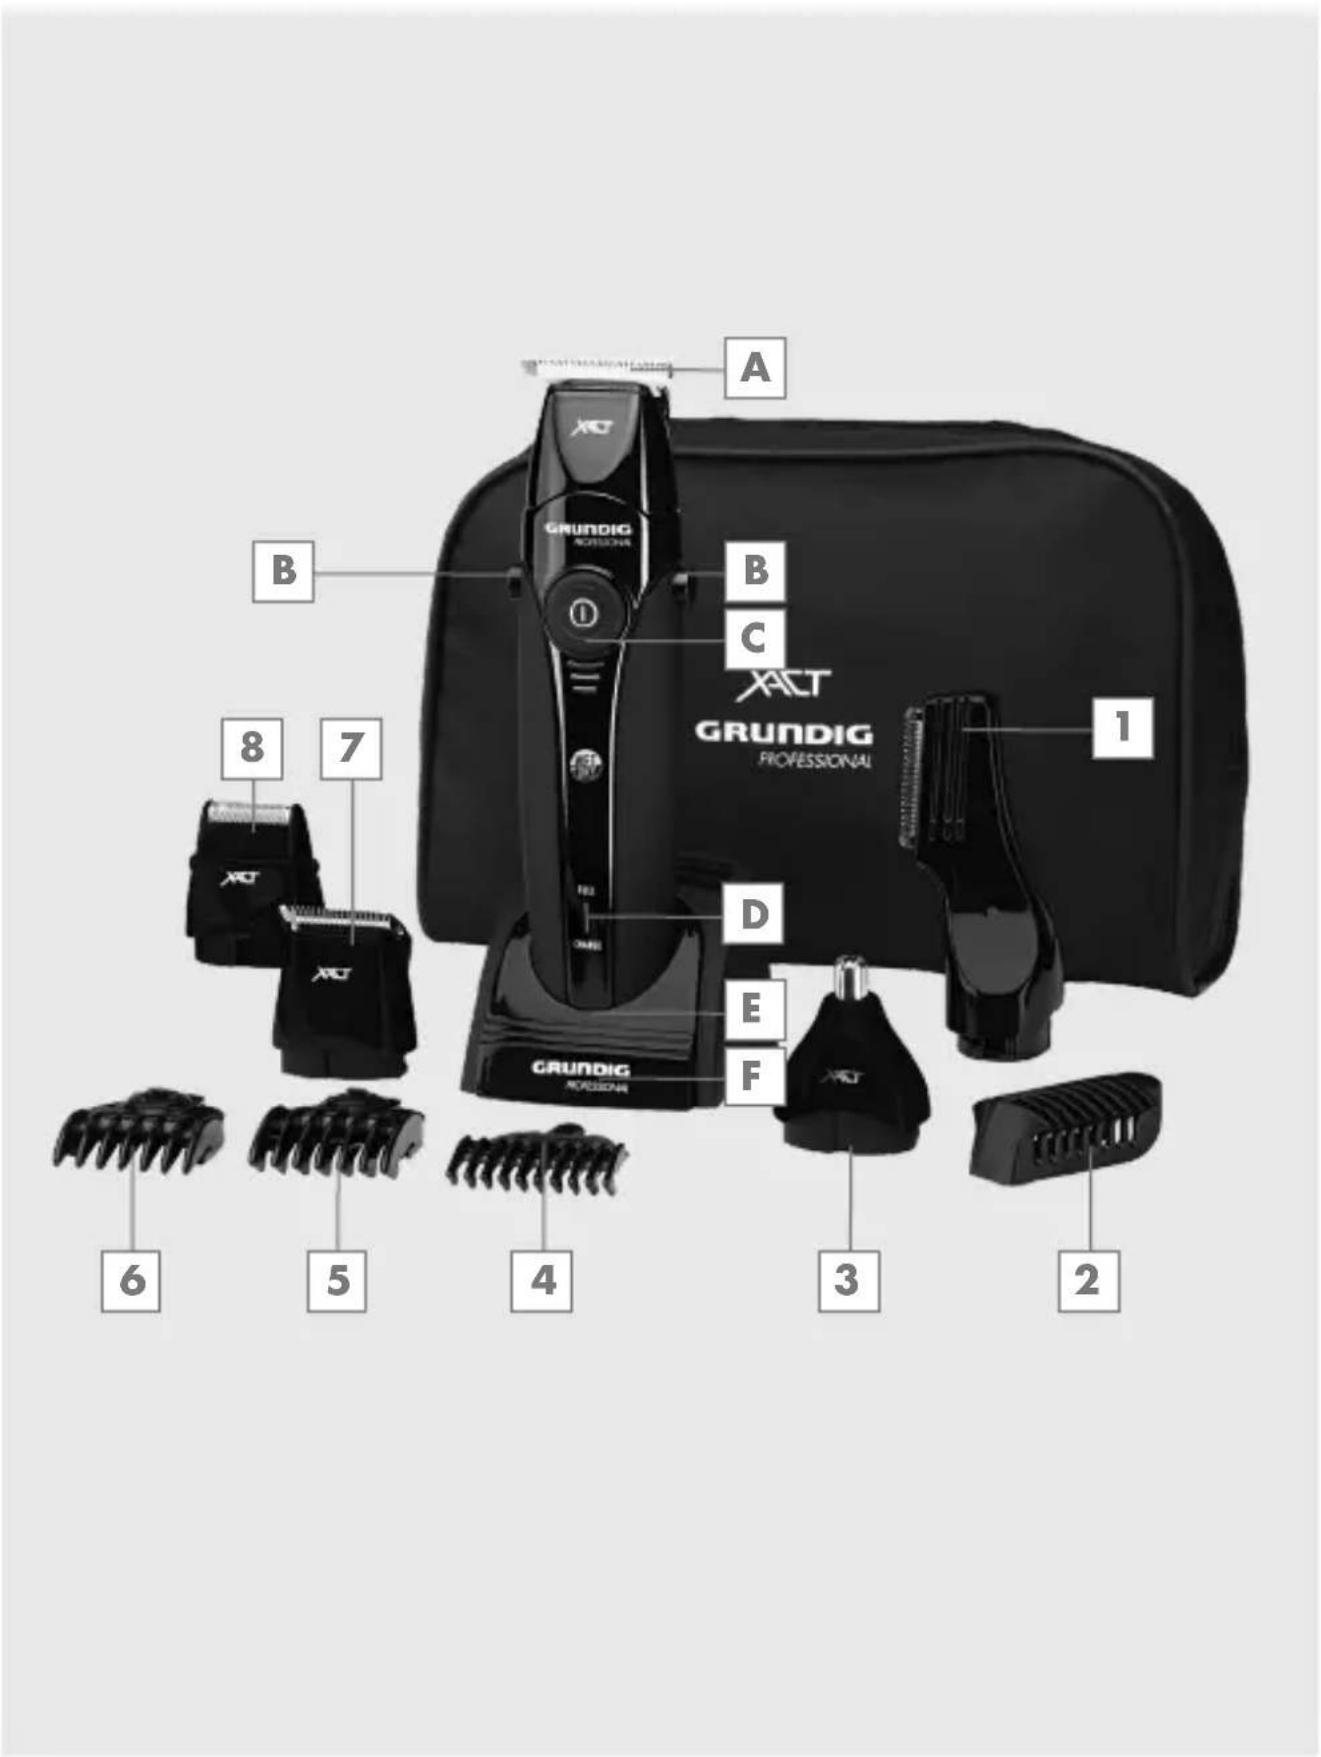
Controls
See the illustration on page 3.
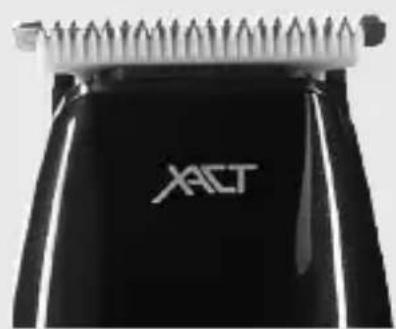
A Professional ceramic/stainless steel cutting head (width 38 mm)
B Side catches for removing attachments
On/Off switch
D Charging display (LED). Lights up red when charging and green when it is fully charged
E Socket for plugging into the charging stand or connecting the adapter
F Charging stand
Accessories
Body hair trimming head
2 Attachment comb for body hair trimming head (2, 5, 9 mm)
3 Trimming attachment with rotating blade
4 Blending comb (2 mm)
Large adjustable comb (10, 12, 14, 16 mm)
6 Small adjustable comb (2, 4, 6, 8 mm)
7 Beard trimming attachment (width 30mm
8 Shaving attachment with single foil for a smooth shave
Adapter
Cleaning brush
Oil
Comb
Pouch
POWER SUPPLY
Preparation
1 Remove all packaging and keep safe for future storage.
2 Inspect the appliance before use to ensure the blades are free of hair, debris etc.
3 Before use, ensure that the trim mer is sufficiently charged or plugged into the mains.
Rechargeable battery operation
When operating the appliance with the built-in lithium polymer battery, only use the supplied adapter for charging.
Check that the voltage indicated on the type plate of the adapter unit corresponds to your local power supply.
1 Plug the power cord into the appliance socket E and the adapter unit into the wall socket.
Notes
Charge up the batteries completely before using them for the first time or if you have not used them for a long time (approx. 24 hours timer-controlled charging).
- The charging display D lights up red when charging and changes to green when it is fully charged.
After initial charging, the time required for the subsequent charging of batteries is 120 minutes only with the appliance switched off. If you switch on the appliance while it is charging, charging will stop.
- The charging display disappears.
The ambient temperature should be between 5^ and 40^ .
- When fully charged, the appliance works for about 120 minutes. This depends on the attachment being used. It is not advisable to charge the batteries after every use, especially if you do not use the appliance for the full battery capacity.
Charge the batteries at your convenience only when they are completely discharged. This increases their service life. Avoid charging every day.
Using the charging stand
1 Plug the socket E of the appliance into the charging stand.
2 Plug the power cord into the socket on the charging stand.
3 Plug the adapter into the wall socket.
Mains operation (with the adapter)
Check that the voltage indicated on the type plate of the adapter corresponds to your local power supply.
The only way to disconnect the appliance from the power supply is to unplug the adapter.
1 Insert the power cord into the socket on the appliance.
2 Plug the adapter into the wall socket.
Caution
- When in the bathroom or next to a water connection, you must only use the appliance in battery mode; never run it from the mains.
Cutting hair
Please use the ceramic/stainless steel cutting head A width 38 mm).
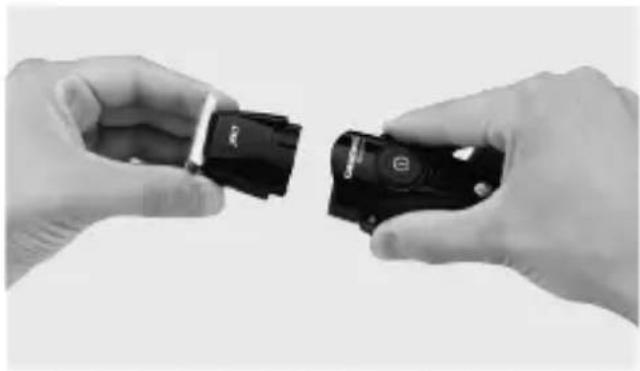
1 If necessary, remove the attachment by pressing in both side catches B and lifting off.
2 Insert ceramic/stainless steel cutting head A carefully at the top and press down until it clicks into place.
3 Place a towel around the neck and shoulders of the person whose hair you are trimming.
4 Make sure the person is seated so that their head is roughly at your eye level. Before trimming, comb the hair so that it falls naturally and you can see the direction in which it grows.
5 Press the C button to switch on the appliance and start cutting your hair.
6 Press the C button to switch off the appliance after use.
Beard trimming
Please use the beard trimming attachment (width 30 mm).
If necessary, remove the attachment by pressing in both side catches and lifting off.
2 Insert beard trimming attachment carefully at the top and press down until it clicks into place.
3 Loosen the beard hair by combing the beard in the direction the hair grows.
4 Press the button to switch on the appliance and start trimming your beard.
5 Press the C button to switch off the appliance after use.
Trimming hair or beard to a certain length
Please use the comb attachments 4 to 6.
If necessary, remove the attachment by pressing in both side catches and lifting off.
2 Insert attachment A width 38 mm) or (width 30~mm ) carefully at the top and press down until it clicks into place.
Note
The comb attachments fit both cutting heads.
| comb attach-ment 4 | 2 mm |
| comb attach-ment 5 | 10, 12, 14, 16 mm |
| comb attach-ment 6 | 2, 4, 6, 8 mm |
3 Push the comb attachment carefully and firmly onto the rounded rear half of the cutting head from above and let it click into place.

Note
To adjust the small and large adjustable comb attachments 5 and 6 press the button in the middle of each attachment and push it up or down.
4 Press the C button to switch on the appliance and start trimming.
5 Press the C button to switch off the appliance after use.
6 After use, remove the comb attachment 4 to 6 by pressing the locking tab at the back and lifting the comb attachment.
Thinning out hair
If necessary, remove the attachment by pressing in both side catches and lifting off.
2 Insert attachment A width 38 mm) or 7 (width 30~mm put comb attachment 4 width 2 mm carefully at the top and press down until it clicks into place.
3 Press the button to switch on the appliance and start thinning out your hair.
4 Press the button to switch off the appliance after use.
Skin close cut of body hair
Please use the body hair trimming head.
If necessary, remove the attachment by pressing in both side catches and lifting off.
2 Insert attachment 1 carefully at the top and press down until it clicks into place.
3 Press the button to switch on the appliance and start trimming your body hair.
Notes
- Do not apply strong pressure when cutting, as this may cause skin injury.
Clean the body hair trimming head with the cleaning brush supplied.
4 Press the C button to switch off the appliance after use.
Trimming body hair to a certain length
Please use the body hair trimming head 1 and attachment comb 2.
If necessary, remove the attachment by pressing in both side catches and lifting off.
2 Insert attachment carefully at the top and press down until it clicks into place.
3 Push the attachment comb 2 carefully and firmly onto the rounded rear half of the cutting head from above and let it click into place.
Note
To adjust the attachment comb 2 attach it in one of the three side rails of the body hair trimming head 1. The nearest rail to the trimming blades will adjust the attachment to 9mm the middle rail to 5mm and the outer rail to 2mm
4 Press the button to switch on the appliance and start trimming your body hair.
5 Press the button to switch off the appliance after use.
Close shaving
Please use the shaving attachment 8.

If necessary, remove the attachment by pressing in both side catches and lifting off.
2 Insert shaving attachment carefully at the top and press down until it clicks into place.
3 Press the C button to switch on the appliance and start shaving.
4 Press the C button to switch off the appliance after use.
Notes
Do not apply strong pressure when shaving, as this could damage the single blade foil.
You can remove the single blade foil of the shaving attachment. To do this, press both side catches on the shaving attachment. Clean the blade head with the cleaning brush supplied.
Removing hair from nose
1 Attach the trimming attachment with rotating blade 3.
2 To turn the appliance on, press the On/Off button C.
3 Insert the cutting unit gently into the nostril.
Caution
- Do not insert the appliance too far into the nose during use.
4 Gently move the cutting edge in and out of the nostril while rotating the appliance.
5 To turn the appliance off, press the On/Off button C.
Cleaning and care
1 Switch off the appliance and unplug the adapter from the mains.
2 Remove the attachment and clean the blade head with the brush supplied.
Caution
If cleaning with the brush is not sufficient, you can also clean the attachments under the running water after removing the attachment from the body. Trimmer set body is not washable.
The cutting head on the attachment does not normally need to be oiled. If you clean the attachment under running water regularly but you also want to maintain the original condition of the cutting head for as long as possible, it is worth oiling it at regular intervals with the oil provided.
3 Use a soft, dry cloth or the brush supplied to clean the appliance housing and the charging unit.
Caution
- Never put the charging unit or power supply unit in water or any other liquid.
Before using the appliance again, ensure that all attachments have been carefully dried using a soft towel.
Do not use cleaning agents.
Note
Remove any clippings after each use.
Storage
If you do not plan to use the appliance for a long period of time, please store it carefully.
1 Make sure it is unplugged, has completely cooled down and all the accessories are completely dry.
2 Store the parts in the original box in a cool, dry place.
3 Make sure the appliance is kept out of the reach of children.
Compliance with the WEEE Directive and Disposing of the Waste Product:
This product complies with EU WEEE Directive (2012/19/EU). This product bears a classification symbol for waste electrical and electronic equipment (WEEE).

This symbol indicates that this product shall not be disposed with other household wastes at the end of its service life. Used device must be returned to official collection point for recy
cling of electrical and electronic devices. To find these collection systems please contact to your local authorities or retailer where the product was purchased. Each household performs important role in recovering and recycling of old appliance. Appropriate disposal of used appliance helps prevent potential negative consequences for the environment and human health.
Compliance with RoHS Directive
The product you have purchased complies with EU RoHS Directive (2011/65/EU). It does not contain harmful and prohibited materials specified in the Directive.
Package information

Packaging materials of the product are manufactured from recyclable materials in accordance with our National Environment Regulations. Do not
dispose of the packaging materials together with the domestic or other wastes.
Take them to the packaging material collection points designated by the local authorities.
Technical data
Parameter of External Power Supply
Manufacturer: Lygo (Dongguan) Electronic Product Ltd.
Model Identifier: LGSPSD050100EP
Input Voltage: 100-240V~
Input Frequency: 50/60Hz
Input Current: 0.5A
Output Voltage: 5.0V
Output Current: 1.0A
Output Power: 5.0W
Average active efficiency: 77.32%
No-load power consumption: 0.049W
Batteries: Lithium-Polymer-Akku
Protected against splashing water (IPX4)
Electrical insulation class: II
Technical and design modifications are reserved.
PAPEL RECICLADO Y RECIBLABLE
Cher client, chere clientele,
Fabricant: Lygo (Dongguan) Electronic Product Ltd.
Producent: Lygo (Dongguan) Electronic Product Ltd.
Identityfikator modelu: LGSPSD050100EP