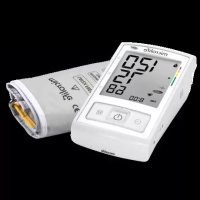
BP A3L Comfort - Sphygmomanometer MICROLIFE - Free user manual and instructions
Find the device manual for free BP A3L Comfort MICROLIFE in PDF.



| Product type | Automatic upper arm blood pressure monitor |
| Brand | Microlife |
| Model | BP A3L Comfort |
| Dimensions | 143 x 85 x 58 mm |
| Weight | 385 g (batteries included) |
| Power supply | 4 AA 1.5V alkaline batteries or DC 6V, 600 mA mains adapter (optional) |
| Battery life | Approximately 920 measurements with new batteries |
| Measurement method | Oscillometric, compliant with Korotkoff method |
| Blood pressure measurement range | 20 – 280 mmHg |
| Pulse measurement range | 40 – 200 beats/min |
| Static pressure accuracy | ± 3 mmHg |
| Pulse accuracy | ± 5 % of reading value |
| Memory | 99 measurements per user, for 2 users |
| Cuff | Size M (22-32 cm), M-L (22-42 cm), L (32-42 cm) |
| Special features | MAM mode (automatic triple measurement), Irregular Heartbeat Detection (IHB), measurement classification indicator (color code) |
| Connectivity | USB port for data transfer to PC (BPA+ software optional) |
| Display | Digital display with date, time, battery indicators, memory, user |
| Warranty | 5 years for the device, 2 years for the cuff |
| IP classification | IP20 |
| Operating conditions | 10 °C to 40 °C, relative humidity 15% – 90% |
| Care instructions | Clean the device with a dry, soft cloth; cuff washable with soapy water (not machine washable) |
| Safety | Automatic shut-off after 1 min, error detection, compatible with pregnancy and pre-eclampsia |
Frequently Asked Questions - BP A3L Comfort MICROLIFE
User questions about BP A3L Comfort MICROLIFE
0 question about this device. Answer the ones you know or ask your own.
Ask a new question about this device
Download the instructions for your Sphygmomanometer in PDF format for free! Find your manual BP A3L Comfort - MICROLIFE and take your electronic device back in hand. On this page are published all the documents necessary for the use of your device. BP A3L Comfort by MICROLIFE.
USER MANUAL BP A3L Comfort MICROLIFE
9443 Widnau/Switzerland
www.microlife.com
Lithuania
BIPAPCLComltS-V112629
Revision Date: 2023-06-05
microlife
Microlife BP A3L Comfort BP A3L ComfortGuarantee Card
microlife
Name of Purchaser / Nom de l'acheter / Nome de inventrice / Nome des Kaufs / Alcomn ad / Nombre del comprader / Nome de comprader / Naem copier / Ovqvnevo opoeo /
y
Serial Number :Numero de series /Numero de series/ Serien-Nr. / Seri numerais /Numero de series /Numero de series/ Serienum / ApjBpoc; 017, 24
Date of Purchase | Date d'achat | Date d'acquisition | Kafutadom | Satin albari | Fecha de compra | Dasa da compra | Datas van aankooj : Hpuoyum /dvoovc /dav .
Specialist Dealer / Revender / Categorieta riveni diathechandur / Uzman sata / Distribuidor especializzato / Revenderod autorizzato / Specialist Dealer / Ege/kejutvoq cnnpooumaqa
microlife
Microlife BP A3L Comfort
EN
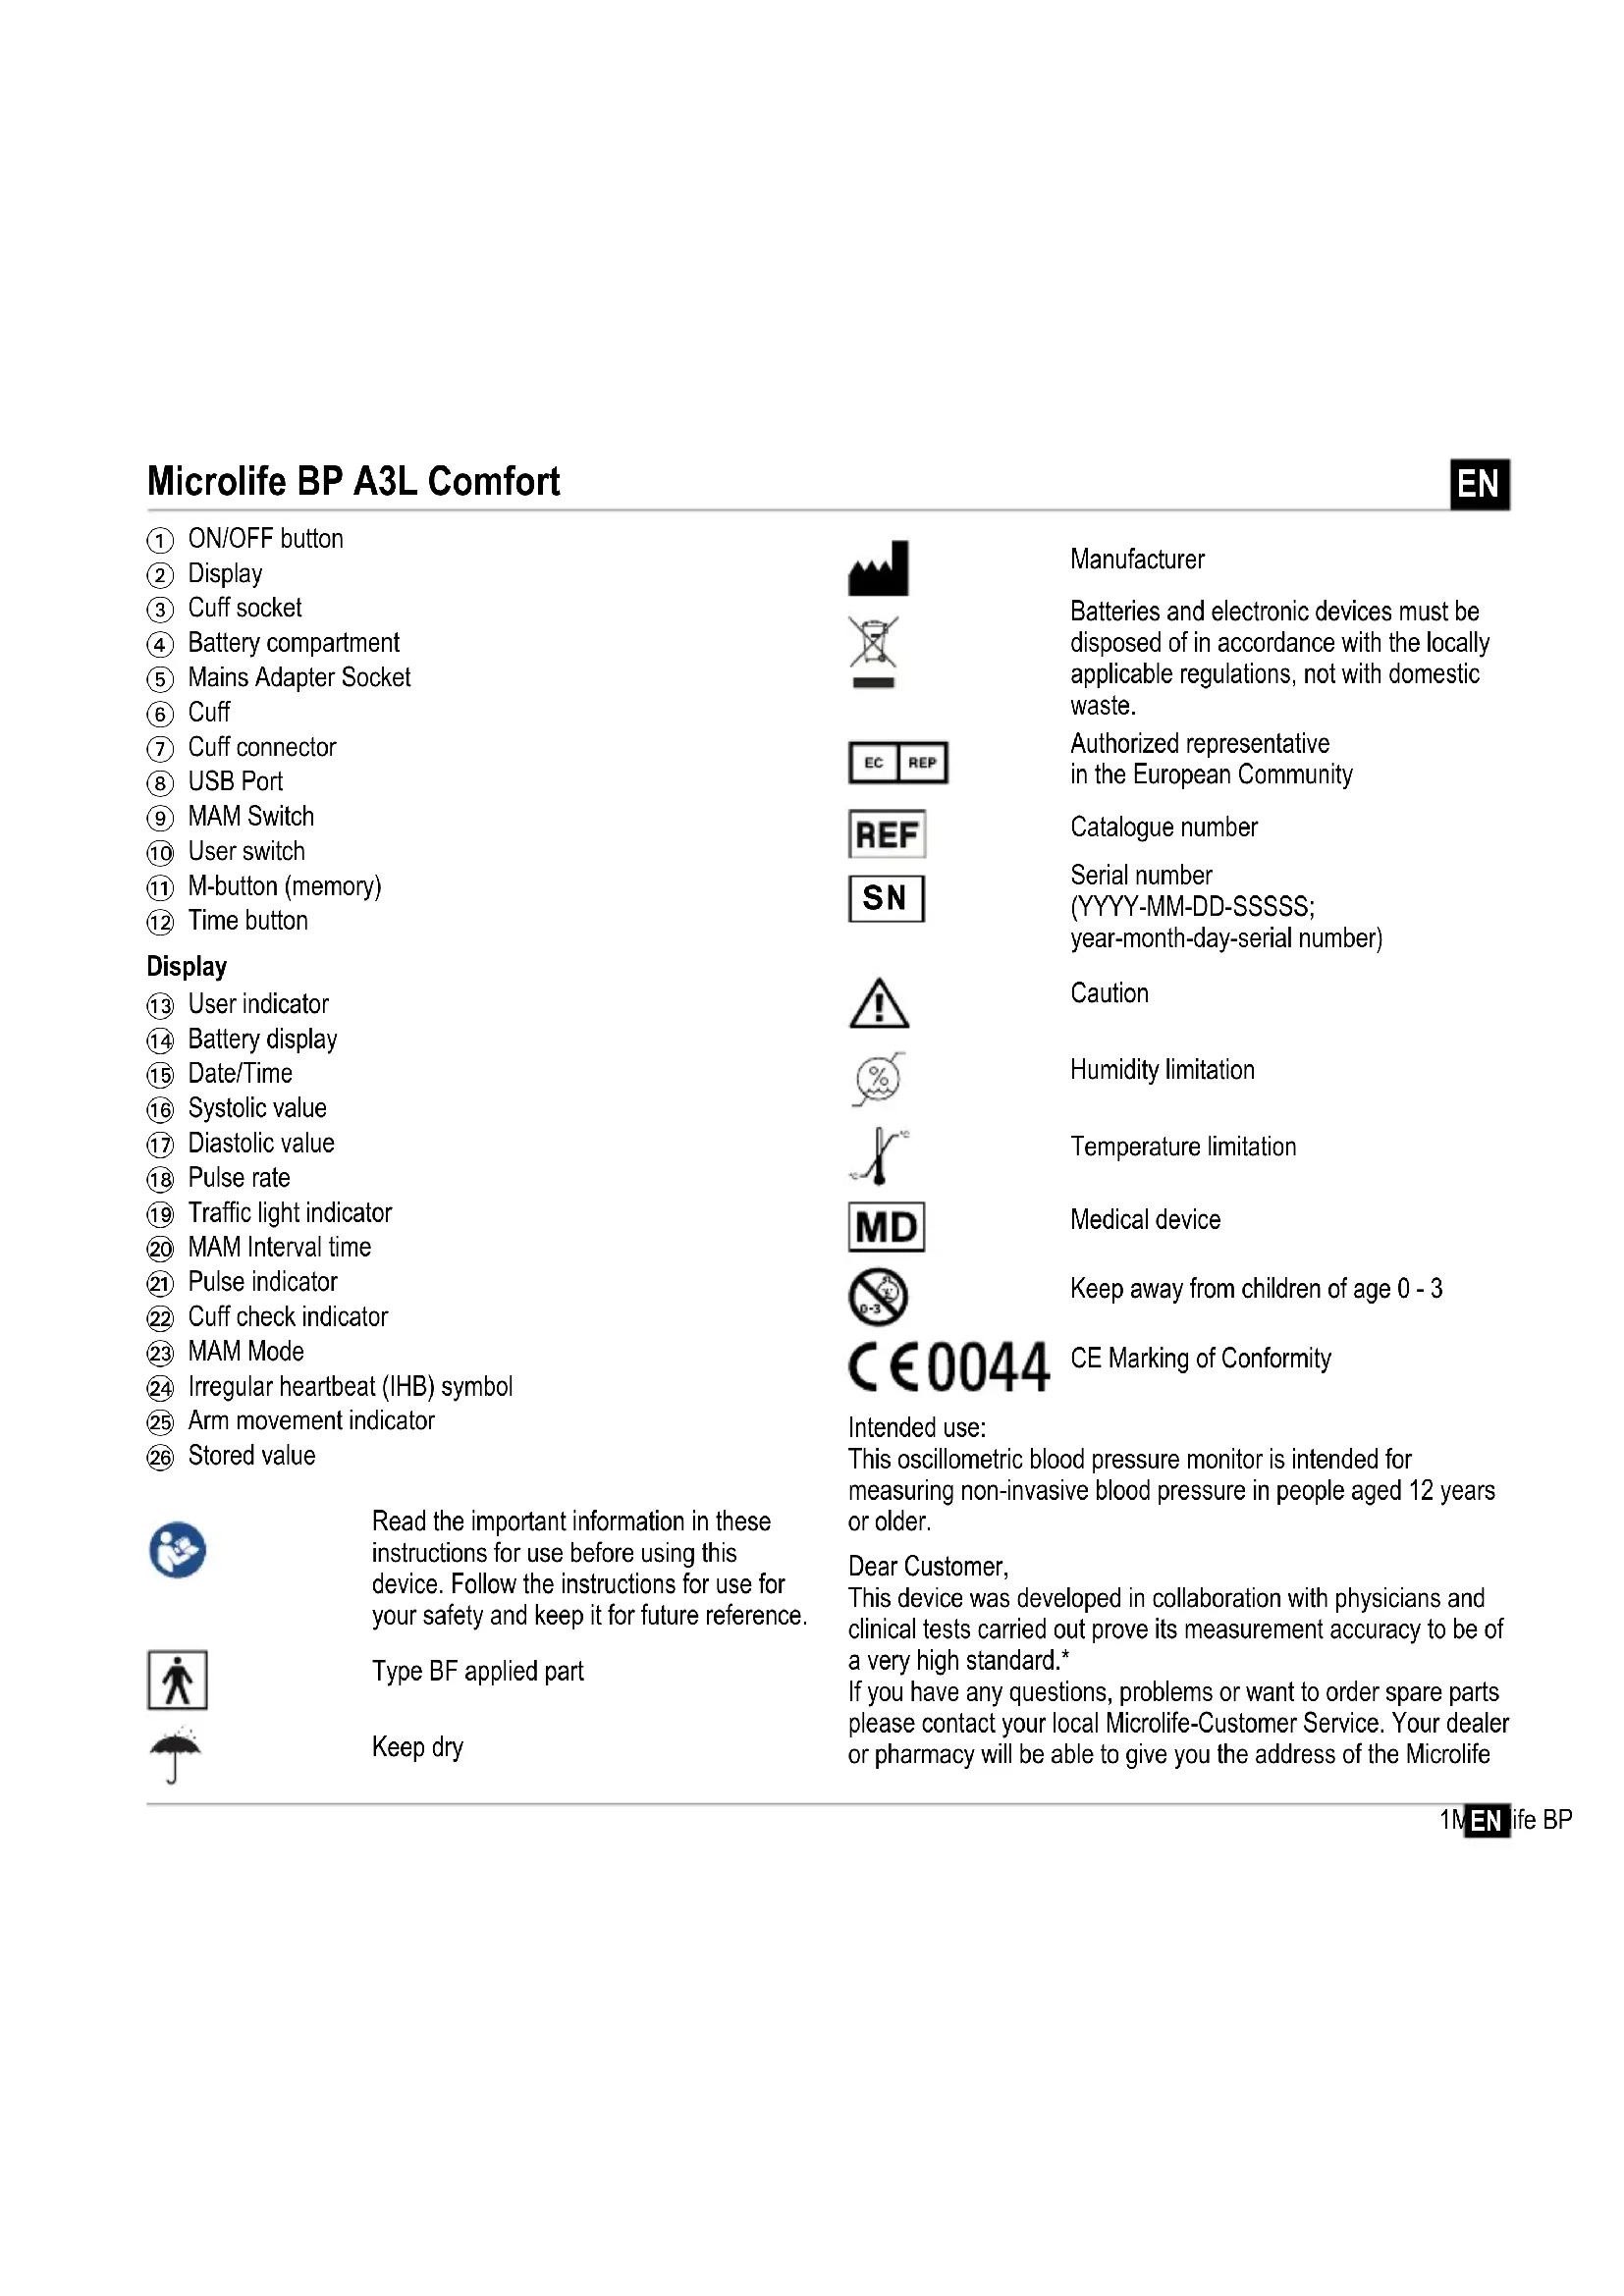
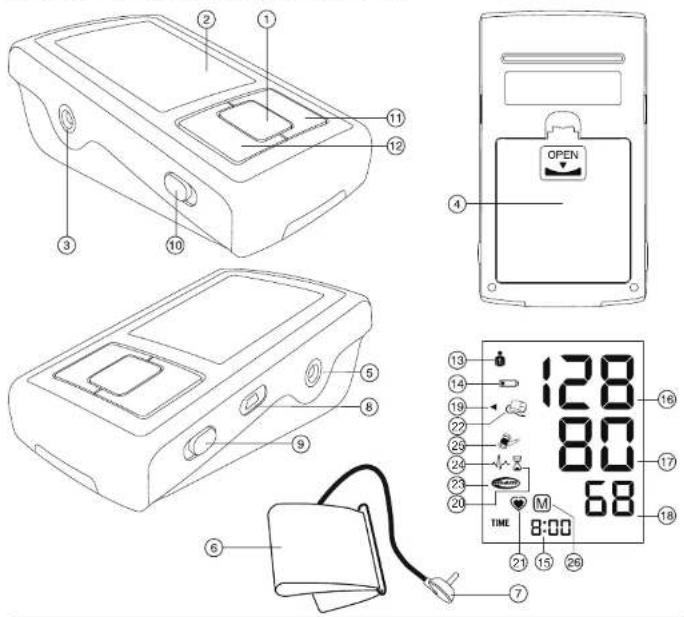
① ON/OFF button
② Display
(3) Cuff socket
④ Battery compartment
(5) Mains Adapter Socket
Cuff
Cuff connector
⑧ USB Port
MAM Switch
User switch
⑪ M-button (memory)
⑫ Time button
Display
⑬User indicator
14 Battery display
15 Date/Time
Systolic value
17 Diastolic value
Pulse rate
Traffic light indicator
20 MAM Interval time
21) Pulse indicator
Cuff check indicator
23 MAM Mode
24 Irregular heartbeat (IHB) symbol
25 Arm movement indicator
26 Stored value

Read the important information in these instructions for use before using this device. Follow the instructions for use for your safety and keep it for future reference.

Type BF applied part

Keep dry




C∈0044
Manufacturer
Batteries and electronic devices must be disposed of in accordance with the locally applicable regulations, not with domestic waste.
Authorized representative in the European Community
Catalogue number
Serial number
(YYYY-MM-DD-SSSSSS; year-month-day-serial number)
Caution
Humidity limitation
Temperature limitation
Medical device
Keep away from children of age 0 - 3
Intended use:
This oscillometric blood pressure monitor is intended for measuring non-invasive blood pressure in people aged 12 years or older.
Dear Customer,
This device was developed in collaboration with physicians and clinical tests carried out prove its measurement accuracy to be of a very high standard.*
If you have any questions, problems or want to order spare parts please contact your local Microlife-Customer Service. Your dealer or pharmacy will be able to give you the address of the Microlife
dealer in your country. Alternatively, visit the internet at www.microlife.com where you will find a wealth of invaluable information on our products. Stay healthy - Microlife AG!
- This device is tested according to the ESH protocol and ISO81060-2:2013.
Table of contents
-
Important facts about blood pressure and self-measurement How do I evaluate my blood pressure
-
Using the device for the first time Inserting the batteries Setting the date and time Selecting the correct cuff Selecting the user Selecting standard or MAM mode MAM mode (highly recommended)
-
Taking a blood pressure measurement Checklist for taking a reliable measurement How not to store a reading
-
Appearance of the irregular heartbeat (IHB) symbol
-
Traffic light indicator in the display
-
PC-Link functions Installation and data transmission
-
Data memory Viewing the stored values Memory full Clearing all values
-
Battery indicator and battery change Low battery Flat battery - replacement Which batteries and which procedure? Using rechargeable batteries
-
Using a mains adapter
- Error Messages
- Safety, care, accuracy
Device care Cleaning the cuff Accuracy test Disposal
- Guarantee
- Technical Specifications
1. Important facts about blood pressure and self-measurement
- Blood pressure is the pressure of the blood flowing in the arteries generated by the pumping of the heart. Two values, the systolic (upper) value and the diastolic (lower) value, are always measured.
- The device indicates the pulse rate (the number of times the heart beats in a minute).
- Permanently high blood pressure values can damage your health and must be treated by your doctor!
- Always discuss your values with your doctor and tell them if you have noticed anything unusual or feel unsure. Never rely on single blood pressure readings.
- There are several causes of excessively high blood pressure values. Your doctor will explain them in more detail and offer treatment where appropriate.
- Under no circumstances should you alter the dosages of drugs or initiate a treatment without consulting your doctor.
- Depending on physical exertion and condition, blood pressure is subject to wide fluctuations as the day progresses. You should therefore take your measurements in the same quiet conditions and when you feel relaxed! Take at least two readings every time (in the morning: before taking medications and eating / in the evening: before going to bed, bathing or taking medication) and average the measurements.
It is quite normal for two measurements taken in quick succession to produce significantly different results. - Deviations between measurements taken by your doctor or in the pharmacy and those taken at home are quite normal, as these situations are completely different.
- Several measurements provide much more reliable information about your blood pressure than just one single measurement.
- Leave a small break of 5 minutes between two measurements.
- If you suffer from a cardiac arrhythmia consult with your doctor before using the device. See also chapter «Appearance of the irregular heartbeat (IHB) symbol» of this user manual.
The pulse display is not suitable for checking the frequency of heart pacemakers! - If you are pregnant, you should monitor your blood pressure regularly as it can change drastically during this time.

This monitor is specially tested for use in pregnancy and pre-eclampsia. When you detect unusual high readings in pregnancy, you should measure after a short while again (eg. 4 hour). If the reading is still too high, consult your doctor or gynecologist.
How do I evaluate my blood pressure
Table for classifying home blood pressure values in adults in accordance with the international Guidelines (ESH, ESC, JSH). Data in mmHg.
| Range Systolic Diastolic Recommendation | |
| 1. blood pressure normal | < 120 < 74 Self-check |
| 2. blood pressure optimum | 120 - 129 74 - 79 Self-check |
| 3. blood pressure elevated | 130 - 134 80 - 84 Self-check |
| 4. blood pressure too high | 135 - 159 85 - 99 Seek medical advice |
| 5. blood pressure dangerously high | ≥ 160 ≥ 100 Urgently seek medical advice! |
The higher value is the one that determines the evaluation. Example: a blood pressure value of 140/80 mmHg or a value of 130/90 mmHg indicates «blood pressure too high».
2. Using the device for the first time
Inserting the batteries
After you have unpacked your device, first insert the batteries. The battery compartment 4 is on the bottom of the device. Insert the batteries (4× 1.5V size AA),thereby observing the indicated polarity.
Setting the date and time
- After the new batteries are fitted, the year number flashes in the display. You can set the year by pressing the M-button ⑪. To confirm and then set the month, press the time button ⑨.
- Press the M-button to set the month. Press the time button to confirm and then set the day.
-
Follow the instructions above to set the day, hour and minutes.
-
Once you have set the minutes and pressed the time button, the date and time are set and the time is displayed.
- If you want to change the date and time, press and hold the time button for approx. 7-8 seconds until the year number starts to flash. Now you can enter the new values as described above.
Selecting the correct cuff
Microlife offers different cuff sizes. Select the cuff size to match the circumference of your upper arms (measured by close fitting in the centre of the upper arm).
| Cuff size for circumference of upper arm | |
| M | 22 - 32 cm |
| M - L | 22 - 42 cm |
| L | 32 - 42 cm |

Pre-shaped cuffs are optionally available.

Only use Microlife cuffs.
Contact your local Microlife Service if the enclosed cuff 6 does not fit.
- Connect the cuff to the device by inserting the cuff connector ⑦ into the cuff socket ③ as far as it will go.
If you buy a spare Microlife cuff (size S, 17-22 cm), please remove the cuff connector from the cuff tube from the cuff supplied with the original device and insert this cuff connector into the tube of the spare cuff (only valid for cuff size S).
Selecting the user
This device allows to store the results for 2 individual users.
Before each measurement, set the user switch 10 for the intended user: user 1 or user 2.
User 1: slide the user switch 山 upwards to the user 1 icon.
User 2: slide the user switch 10 downwards to the user 2 icon.

The first person to measure should select user 1.
Selecting standard or MAM mode
This device enables you to select either standard (standard single measurement) or MAM mode (automatic triple measurement). To select standard mode, slide the MAM switch 9 on the side of the device downwards to position «1» and to select MAM mode, slide this switch upwards to position «3».
MAM mode (highly recommended)
- In MAM mode, 3 measurements are automatically taken in succession and the result is then automatically analysed and displayed. Because the blood pressure constantly fluctuates, a result determined in this way is more reliable than one produced by a single measurement.
- When you select the 3 measurements, the MAM-symbol ② 3 appears in the display.
- The bottom, right hand section of the display shows a 1, 2 or 3 to indicate which of the 3 measurements is currently being taken.
- There is a break of 15 seconds between the measurements. A count down indicates the remaining time.
- The individual results are not displayed. Your blood pressure will only be displayed after all 3 measurements are taken.
- Do not remove the cuff between measurements.
If one of the individual measurements was questionable, a fourth one is automatically taken.
3. Taking a blood pressure measurement
Checklist for taking a reliable measurement
- Avoid activity, eating or smoking immediately before the measurement.
- Sit down on a back-supported chair and relax for 5 minutes. Keep your feet flat on the floor and do not cross your legs.
- Always measure on the same arm (normally left). It is recommended that doctors perform double arm measurements on a patients first visit in order to determine which arm to measure in the future. The arm with the higher blood pressure should be measured.
- Remove close-fitting garments from the upper arm. To avoid constriction, shirt sleeves should not be rolled up - they do not interfere with the cuff if they are laid flat.
-
Always ensure that the correct cuff size is used (marking on the cuff).
-
Fit the cuff closely, but not too tight.
Make sure that the cuff is positioned 1-2 cm above the elbow.
The artery mark on the cuff (ca.3 cm long bar) must lie over the artery which runs down the inner side of the arm. - Support your arm so it is relaxed.
-
Ensure that the cuff is at the same height as your heart.
-
Press the ON/OFF button ① to start the measurement.
- The cuff will now pump up automatically. Relax, do not move and do not tense your arm muscles until the measurement result is displayed. Breathe normally and do not talk.
- When the correct pressure is reached, the pumping stops and the pressure falls gradually. If the required pressure was not reached, the device will automatically pump some more air into the cuff.
- During the measurement, the pulse indicator ② flashes in the display.
- The result, comprising the systolic 16 and the diastolic 17 blood pressure and the pulse rate 18 are displayed. Note also the explanations on further display symbols in this booklet.
11.When the device has finished measuring, remove the cuff. - Switch off the device. (The monitor does switch off automatically after approx. 1 min.).
How not to store a reading
As soon as the reading is displayed press and hold the ON/OFF button 1 until «M» 26 is flashing. Confirm to delete the reading by pressing the M-button 11.

You can stop the measurement at any time by pressing the ON/OFF button or open the cuff (e.g. if you feel uneasy or an unpleasant pressure sensation).
4. Appearance of the irregular heartbeat (IHB) symbol
This symbol 24 indicates that an irregular heartbeat was detected. In this case, the measured blood pressure may deviate from your actual blood pressure values. It is recommended to repeat the measurement.
Information for the doctor in case of repeated appearance of the IHB symbol:
This device is an oscillometric blood pressure monitor that also measures the pulse during blood pressure measurement and indicates when the heart rate is irregular.
5. Traffic light indicator in the display
The bars on the left-hand edge of the display 19 show you the range within which the indicated blood pressure value lies.
Depending on the height of the bar, the readout value is either within the optimum (green), elevated (yellow), too high (orange) or
dangerously high (red) range. The classification corresponds to the 4 ranges in the table as defined by the international guidelines (ESH, ESC, JSH), as described in «Section 1.».
6. PC-Link functions
This device can be used in conjunction with a personal computer (PC) running the Microlife Blood Pressure Analyzer+ (BPA+) software. The memory data can be transferred to the PC by connecting the monitor via a cable.
If no download-voucher and cable is included download the BPA+ software from www.microlife.com/software and use a USB cable with a Mini-B 5 pin connector.
Installation and data transmission
- Connect the monitor via the cable to the PC; there is no need to switch the device on. 3 horizontal bars will appear on the display and last for 3 seconds.
- The bars will then flash to indicate that the connection between PC and device is successful. As long as the cable is plugged in, the bars will keep flashing and the buttons are disabled.

During the connection, the device is completely controlled by the computer.
7. Data memory
This device automatically stores up to 99 measurement values for each of the 2 users.
Viewing the stored values
Select either user 1 or 2 with the user switch 0
Press the M-button 11 briefly, when the device is switched off. The display first shows 26, and 28Awhich stands for the average of all stored values.
Pressing the M-button again displays the previous value. Pressing the M-button repeatedly enables you to move from one stored value to another.
Memory full

Pay attention that the maximum memory capacity of 99 memories per user is not exceeded. When the 99 memory is full, the oldest value is automatically overwritten with the 100th value. Values should be evaluated by a doctor before the memory capacity is reached - otherwise data will be lost.
Clearing all values
Make sure the correct user is activated.
- Select either user 1 or 2 with the user switch ① when the device is switched off.
- Hold down the M-button 11 until CL appears and then release the button.
- Press the M-button while «CL» is flashing to permanently clear all values of the selected user.

Cancel deletion: press ON/OFF button ① while «CL» is flashing.

Individual values cannot be cleared.
8. Battery indicator and battery change
Low battery
When the batteries are approximately 3 / 4 empty the battery symbol will flash as soon as the device is switched on (partly filled battery displayed). Although the device will continue to measure reliably, you should obtain replacement batteries.
Flat battery - replacement
When the batteries are flat, the battery symbol ① will flash as soon as the device is switched on (flat battery displayed). You cannot take any further measurements and must replace the batteries.
- Open the battery compartment 4 on the bottom of the device.
- Replace the batteries - ensure correct polarity as shown by the symbols in the compartment.
- To set date and time, follow the procedure described in Section «2. Using the device for the first time».

The memory retains all values although date and time must be reset - the year number therefore flashes automatically after the batteries are replaced.

The memory retains all values although date and time must be reset - the year number therefore flashes automatically after the batteries are replaced.
Which batteries and which procedure?

Use 4 new, long-life 1.5V size AA alkaline batteries.

Do not use batteries beyond their date of expiry.

Remove batteries if the device is not going to be used for a prolonged period.
Using rechargeable batteries
You can also operate this device using rechargeable batteries.
Only use «NiMH» type reusable batteries.
Batteries must be removed and recharged when the flat battery symbol appears. They should not remain inside the device as they may become damaged (total discharge as a result of low use of the device, even when switched off).
Always remove the rechargeable batteries if you do not intend to use the device for a week or more.
Batteries cannot be charged in the blood pressure monitor. Recharge batteries in an external charger and observe the information regarding charging, care and durability.
9. Using a mains adapter
You can operate this device using the Microlife mains adapter (DC 6V, 600 mA).
Only use the Microlife mains adapter available as an original accessory appropriate for your supply voltage.
Ensure that neither the mains adapter nor the cable are damaged.
- Plug the adapter cable into the mains adapter socket 5 in the blood pressure monitor.
- Plug the adapter plug into the wall socket. When the mains adapter is connected, no battery current is consumed.
10.Error Messages
If an error occurs during the measurement, the measurement is interrupted and an error message, e.g. «Err 3», is displayed.
| Error Description Potential cause and remedy | ||
| «Err 1» Signal too weak | The pulse signals on the cuff are too weak. Re-position the cuff and repeat the measurement.* | |
| «Err 2» ②⑤ | Error signal During the measurement, error signals were detected by the cuff, caused for instance by movement or muscle tension. Repeat the measurement, keeping your arm still. | |
| Error Description Potential cause and remedy | ||
| 《Err 3》22 | No pressure in the cuff | An adequate pressure cannot be generated in the cuff. A leak may have occurred. Check that the cuff is correctly connected and is not too loose. Replace the batteries if necessary. Repeat the measurement. |
| 《Err 5》Abnormal result | The measuring signals are inaccurate and no result can therefore be displayed. Read through the checklist for taking a reliable measurement and then repeat the measurement.* | |
| 《Err 6》MAM Mode There were too many errors during the measurement in MAM mode, making it impossible to obtain a final result. Read through the checklist for taking a reliable measurement and then repeat the measurement.* | ||
| 《HI》Pulse or cuff pressure too high | The pressure in the cuff is too high (over 299 mmHg) OR the pulse is too high (over 200 beats per minute). Relax for 5 minutes and repeat the measurement.* | |
| 《LO》Pulse too low The pulse is too low (less than 40 beats per minute). Repeat the measurement.* | ||
- Please immediately consult your doctor, if this or any other problem occurs repeatedly.
If you think the results are unusual, please read through the information in «Section 1.» carefully.
11.Safety, care, accuracy test and disposal

Safety and protection
-
Follow instructions for use. This document provides important product operation and safety information regarding this device. Please read this document thoroughly before using the device and keep for future reference.
-
This device may only be used for the purposes described in these instructions. The manufacturer cannot be held liable for damage caused by incorrect application.
- This device comprises sensitive components and must be treated with caution. Observe the storage and operating conditions described in the «Technical Specifications» section.
- The cuffs are sensitive and must be handled with care.
Only pump up the cuff once fitted. - Do not use this device if you think it is damaged or notice anything unusual.
- Never open this device.
- Read the additional safety information provided within the individual sections of this instruction manual.
- The measurement results given by this device is not a diagnosis. It is not replacing the need for the consultation of a physician, especially if not matching the patient's symptoms. Do not rely on the measurement result only, always consider other potentially occurring symptoms and the patient's feedback. Calling a doctor or an ambulance is advised if needed.

Ensure that children do not use this device unsupervised; some parts are small enough to be swallowed. Be aware of the risk of strangulation in case this device is supplied with cables or tubes.
Contra-indications
Do not use this device if the patient's condition meets the following contra-indications, to avoid inaccurate measurements or injuries.
- The device is not intended for measuring blood pressure in pediatric patients of age younger than 12 years old (children, infant, or neonates).
- Presence of significant cardiac arrhythmia during measurement may interfere with blood pressure measurement and affect the reliability of blood pressure readings. Consult with your doctor about whether the device is suitable for use in this case.
- The device measures blood pressure using a pressured cuff. If the measuring limb suffers from injuries (for example open wounds) or under conditions or treatments (for example intravenous drip) making it unsuitable for surface contact or pressurization, do not use the device, to avoid worsening of the injuries or conditions.
-
Patient motions during measurement may interfere with the measurement process and influence results.
-
Avoid taking measurements of patients with conditions, diseases, and susceptible to environment conditions that lead to incontrollable motions (e.g. trembling or shivering) and inability to communicate clearly (for example children and unconscious patients).
- The device uses oscillometric method to determine blood pressure. The arm being measure should have normal perfusion. The device is not intended to be used on a limb with restricted or impaired blood circulation. If you suffer with perfusion or blood disorders, consult your doctor before using the device.
- Avoid taking measurement on the arm on the side of a mastectomy or lymph node clearance.
- Do not use this device in a moving vehicle (for example in a car or on an aircraft).
WARNING
#
Indicates a potentially hazardous situation, which if not avoided, could result in death or serious injury.
- This device may only be used for the intended uses described in this Instructions for Use. The manufacturer cannot be held liable for damage caused by incorrect application.
- Do not change the patient medication and treatment based the result of one or multiple measurements. Treatment and medication changes should be prescribed only by a medical professional.
- Inspect the device, cuff, and other parts for damage. DO NOT USE the device, cuff or parts if they appear damaged or operating abnormally.
- Blood flow of the arm is temporarily interrupted during measurement. Extended interruption of blood flow reduces peripheral circulation and may cause tissue injury. Beware of signs (for example tissue discoloration) of impeded peripheral circulation if taking measurements continuously or for an extended period of time.
- Prolonged exposure to cuff pressure will reduce peripheral perfusion and may lead to injury. Avoid situations of extended cuff pressurization beyond normal measurements. In the case of abnormally long pressurization, abort the measurement or loose the cuff to depressurize the cuff.
-
Do not use this device in oxygen rich environment or near flammable gas.
-
The device is not water resistant or water proof. Do not spill or immerse the device in water or other liquids.
- Do not disassemble or attempt to service the device, accessory and parts, during use or in storage. Access to the device internal hardware and software is prohibited. Unauthorized access and servicing of the device, during use or in storage, may compromise the safety and performance of the device.
- Keep the device away from children and people incapable of operating the device. Beware of the risks of accidental ingestion of small parts and of strangulation with the cables and tubes of this device and accessories.

CAUTION
Indicates a potentially hazardous situation which, if not avoided, may result in minor or moderate injury to the user or patient, or cause damage to the device or other property.
- The device is intended only for measuring blood pressure at upper arm. Do not measure other sites because the reading does not reflect your blood pressure accurately.
- After a measurement is completed, loosen the cuff and rest for >5 minutes to restore limb perfusion, before taking another measurement.
- Do not use this device with other medical electrical (ME) equipment simultaneously. This may cause device malfunction or measurement inaccuracies.
- Do not use this device in proximity of high frequency (HF) surgical equipment, magnetic resonance imaging (MRI) equipment, and computerized tomography (CT) scanners. This may cause device malfunction and measurement inaccuracies.
- Use and store the device, cuff and parts in temperature and humidity conditions specified in the «Technical Specifications». Usage and storage of the device, cuff and parts in conditions outside ranges given in the «Technical Specifications» may results in device malfunction and the safety of usage.
- Protect the device and accessories from the following to avoid damaging the device:
water, other liquids, and moisture
extreme temperatures
- impacts and vibrations
direct sunlight
contamination and dust
- This device has 2 user settings. Please ensure it is cleaned and disinfected between users to prevent any cross contamination.
- Stop using this device and cuff and consult with your doctor if you experience skin irritation or discomfort.
Electromagnetic Compatibility Information
This device is compliant with EN60601-1-2: 2015 Electromagnetic Disturbances standard.
This device is not certified to be used in vicinity of High Frequency (HF) medical equipment.
Do not use this device close to strong electromagnetic fields and portable radio frequency communication devices (for example microwave oven and mobile devices). Keep a minimum distance of 0.3m from such devices when using this device.
Device care
Clean the device only with a soft, dry cloth.
Cleaning the cuff
Carefully remove spots on the cuff with a damp cloth and soap-suds.

WARNING: Do not wash the cuff in a washing machine or dishwasher!

WARNING: Do not dry the cuff cover in a tumble dryer!

WARNING: Under no circumstances may you wash the inner bladder!
Accuracy test
We recommend this device is tested for accuracy every 2 years or after mechanical impact (e.g. being dropped). Please contact your local Microlife-Service to arrange the test (see foreword).
Disposal

Batteries and electronic devices must be disposed of in accordance with the locally applicable regulations, not with domestic waste.
12.Guarantee
This device is covered by a 5 year guarantee from the date of purchase. During this guarantee period, at our discretion, Microlife will repair or replace the defective product free of charge.
Opening or altering the device invalidates the guarantee.
The following items are excluded from the guarantee:
- Transport costs and risks of transport.
- Damage caused by incorrect application or non-compliance with the instructions for use.
- Damage caused by leaking batteries.
- Damage caused by accident or misuse.
- Packaging/storage material and instructions for use.
- Regular checks and maintenance (calibration).
- Accessories and wearing parts: Batteries, power adapter (optional).
The cuff is covered by a functional guarantee (bladder tightness) for 2 years.
Should guarantee service be required, please contact the dealer from where the product was purchased, or your local Microlife service. You may contact your local Microlife service through our website: www.microlife.com/support
Compensation is limited to the value of the product. The guarantee will be granted if the complete product is returned with the original invoice. Repair or replacement within guarantee does not prolong or renew the guarantee period. The legal claims and rights of consumers are not limited by this guarantee.
13. Technical Specifications
| Operating conditions: | 10 - 40 °C / 50 - 104 °F |
| 15 - 90 % relative maximum humidity | |
| Storage conditions: | -20 - +55 °C / -4 - +131 °F |
| 15 - 90 % relative maximum humidity | |
| Weight: | 385 g (including batteries) |
| Dimensions: | 143 x 85 x 58 mm |
| Cuff size: | from 22 - 42 cm according to the cuff sizes (see «Selecting the correct cuff») |
| Measuring procedure: | oscillometric, corresponding to Korotkoff method: Phase I systolic, Phase V diastolic |
| Measurement range: | 20 - 280 mmHg – blood pressure |
| 40 - 200 beats per minute – pulse |
Cuff pressure display 0 - 299 mmHg range:
Resolution: 1mmHg
Static accuracy: within ± 3mmHg
Pulse accuracy: ± 5% of the readout value
Voltage source: 4 × 1.5 V alkaline batteries; size AA
- Mains adapter DC 6V, 600 mA (optional)
Battery lifetime: approx. 920 measurements (using new batteries)
IP Class: IP 20
Reference to EN 1060-1/-3/-4; IEC 60601-1;
standards: IEC 60601-1-2 (EMC); IEC 60601-1-11
Expected service life: Device: 5 years or 10000 measurements, whichever comes first Accessories: 2 years or 5000 measurements, whichever comes first
This device complies with the requirements of the Medical Device Directive 93/42/EEC.
Technical alterations reserved.
Microlife BP A3L Comfort
ES
www.microlife.com/support.
www.microlife.com/support
www.microlife.com/support
Calisma kosullari: 10 - 40 °C / 50 - 104 °F %15 - 90 maksimum®,®,®,®,®,®,®,®,®,®,®,®,®,®,®,®,®,®,®,®,®,®,®,®,®,®,®,®,®,®,®,®,®,®,®,®,®,®,®,®,®,®,®,®,®,®,®,®,®,®,®,®,®,®,®,®,®,®,®,®,®,®,®,®,®,®,®,®,®,®,®,®,®,®,®,®,®,®,®,®,®,®,®,®,®,®,®,®,®,®,®,®,®,®,®,®,®,®,®,®,®. Saklama kosullari: -20 - +55 °C / -4 - +131 °F %15 - 90 maksimum®,®,®,®, ®
Agnrlk: 385 g (piller dahl)
Boyutlar: 143 × 85 × 58 mm
Manson boyu: manson ölcülerine gore 22 - 42 cm arasi (bkz. «Dogru kaf seçimi»)
WAARSCHUWING OPGELET

Aoepaia kai Tpootaoia
AkoouhnoTE Tc odnyies xponc.Auto To eyypaO npexei OmaavtkeC PAnpoopoe CxETiKa Me Tn Aetoupyia Tou PtoioVTOc KAI TIV aospaleia autnc ts GsOKeUns. Diabote TPOeKTiKa auto to EyypaO piv XpOoiToinoTe Tn OUsKEUn KAI KpatnoTe TO yia eAovtikn avapopa.
H oukeun autn perte va xnpoiotioiteai yia to okoTIOU Tepiypapetai 0TO npov evtuO obnyiw. O kataaekuaotns 6ev fpei Kaia euovn ia tuxov znla Tou PpokaAeiTai ano Aavthetaevn xpno.
Autn ouakeun anoteleitea anto euaiotheta Eaaptmuata kai Tpente va tnv xepieote me ppooxn. Tnpite tic onyies aTohkeuongkai aeitoupyiaac tou Tepiypapovtai otnv Evotnta 工 Texvika xaapaktnpiotikax!
OIIeipieipidesivauaiogntc kai pTei va Tc xepicote μe TPOOxy.
Φouokwote TnV TepiXeipida Movo otav exei ToTOnTheNtneI OTO βpaxiova.
Mn xnpoiotioieTe n ouakeun eav thewpeite oI exei utootei Znmu n eav napatnpnoeTe kati aouvneioto.
Not e unv aoivte Tn oukeun.
- Δ iαβασετις προσθετες οδηγες ασφαλείας τοις ενότητες του παρόντος φυλαδίου.
To aotéeoua metpno n Tou idetai ano tny ouakeun dev atotele diayvwan. davntikaaiota nvy avaykn ouounc yiatpo, iikakavdew taipiaei me ta oumttwata tou aoevouc. Mnybaoiote movo oto anotéaeopa metpno, navtoe va eetae aaia Tihava ouuTTWATA Ouvutolooyicovtac nvy ywoun Tou aothevouc. Suviotouve va kaolete evav yiatpo n evo aothevoopoe avkthetai avaykaio.

aagaaalg (olal lgljplaswla jlll
连
11
J 1 J j 1 j j j j j j j j j j j j j
j
a
5 5
1 1
iill lilip 1000000000000000000000000000000000000000000
1 (IHB)
!
y 1
a
Cao 100000000000000000000000000000000000000
aIcsejill 1. (AeLw:Jia) aagll no s jy waiell
y
gaae
L 1
.(ESH,ESC,JSH)
aJbIJIgJbIJIgJbIJIgJ.8
yjlll jn jnl
12 × 5 + 1 - 1 = 64
111111111111
jaiil stey Aylle Cily Jb p
y j 9
1.1.10
jgl21 jai 11
1
1
法一. 得
图
42
zai jiei ci 1.13
gaii 1
aalgl (laell) aalalal al aagll Lao lao Lao jia Jai
()
()
解.
Micolife 4
(20 S,22-17),Microlife 5
j j j j j j j j j j j j j j j j j j j j j j j j j j j j j j j j j j j j j j j j j j j j j j j j j j j j j j j
(1gaii ayaiy caii) MAMbai
MAM 3 MAM 2
MAM 3 MAM 4
MAM 5 MAM 6
MAM 7 MAM 8
MAM 9 MAM 10
MAM 11 MAM 12
MAM 13 MAM 14
MAM 15 MAM 16
MAM 17 MAM 18
MAM 19 MAM 20
MAM 21 MAM 22
MAM 23 MAM 24
MAM 25 MAM 26
MAM 27 MAM 28
MAM 29 MAM 30
MAM 31 MAM 32
MAM 33 MAM 34
MAM 35 MAM 36
MAM 37 MAM 38
MAM 39 MAM 40
MAM 41 MAM 42
MAM 43 MAM 44
MAM 45 MAM 46
MAM 47 MAM 48
MAM 49 MAM 50
MAM 51 MAM 52
MAM 53 MAM 54
MAM 54 MAM 55
MAM 56 MAM 57
MAM 58 MAM 58
MAM 59 MAM 60
MAM 61 MAM 61
MAM 62 MAM 62
MAM 63 MAM 63
MAM 64 MAM 64
MAM 65 MAM 65
MAM 66 MAM 66
MAM 67 MAM 67
MAM 68 MAM 68
MAM 69 MAM 69
MAM 70 MAM 70
51.
1 2
aill bina 3
a 1
1 1
5 2
.3
2g. 5 j 14 14 14 14 14 14 14 14 14 14 14 14 14 14 14 14 14 14 14 14 14 14 14 14 14 14 14 14 14 14 14 14 14 14
中
1
1
2
3
4
5
6
7-8
8
山
ybalg jll pss. gjll al jal aolim Microlife . (aill baw y
J 12 J a 12
J 12
J 12
J 12
J 12
J 12
J 12
J 12
J 12
J 12
J 12
J 12
J 12
J 1 J 1 1 1 1 1 1 1 1 1 1 1 1 1 1 1 1 1 1 1 1 1 1 1 1 1 1 1 1 1 1 1 1 1
143

aJaaal Jaa aolao 1200000000000000000000000000000000000000000000
Jy Jiau Jiauacn no yjai jai n auiyai is 1 1
aayaa Jaii
(ajal)
1 1 1 1 1 1 1 1 1 1 1 1 1 1 1 1 1 1 1 1 1 1 1 1 1 1 1 1 1 1 1 1 1 1 1 1 1 1 1

i 1
yol alba la sic ci 15 jalil
a aas gaaanaii jy jgall iiaai y
y 100
bui
xla jia la jia jia jia jia jia jia jia jia jia
a 1
12
Cui jiuJiJIy, Cui JiaJiaJI
julal juaaia a gaa
1
jglil jiali gaiia jiu J 1
jai 15! suiu uuiu jaiiui iuii
aai j
gss
EN60601-1-2:2015
a 1
HF
0g 1 g aagaiyabla ygSll yall jj j
y jj j j j j j j j j j j j j j j j j j j j j j j j j j j j j j j j j j j j j j j j j j j j j j j
10.3 2y 2a 15
jelllll jlll lil
jgl21y
aB
1
a aalaae aalaae alal y jil jil jj
.(j)
jss

Ldai jiljia 12

jss

slll 2 j 1 1
1 1
S 1
M 11 45
time 45
time 45
MAM 1234567890
234567890
MAM 234567890
MAM 234567890
MAM 234567890
MAM 234567890
MAM 234567890
MAM 234567890
MAM 234567890
MAM 23456789
()MAM 1 MAM
J 1000000000000000000000000000000000000000000000000000000000000000000000
J 1
J 1
J 2
J 3
J 4
J 5
∴ m = 3/2 ;
5
( 12 + 5) ( 12 - 5) = 1200
451 j 232 232 232 232 232 232 232 232 232 232 232 232
2j5y jy yj
1-2 45 jiaab
()()
J 1
JaljIyabla 1
j 1 j000000000000000000000000000000000000000000000000000000000000000000000
2J 3
1 ① jg/ gals 45: jgs jg jgl jg
i 1
J 1 J 1 J 1 J 1 J 1 J 1 J 1 J 1 J 1 J 1 J 1 J 1 J 1 J 1 J 1 J 1 J 1 J 1 J 1 J 1 J 1 J 1 J 1 J 1 J 1 J 1 J 1 J 1 J 1 J 1 J 1 J 1 J 1 J 1 J
gai jiu jiljia jy jiy juy jiy jiy jiy jiy jiy jiy
1 1
eJcLgS1JgSsiD jid Laii 8
1
J 1 J 1 1 1 1 1 1 1 1 1 1 1 1 1 1 1 1 1 1 1 1 1 1 1 1 1 1 1 1 1 1 1
L (C) 100000000000000000000000000000000000000
j j j j j j j j j j j j j j j j j j j j j j j j j j j j j j j j j j j j j j j j j j j j j j j j j j j j j j j j j j
1 1
法一. 完 2β 个
- 列示: ... + 1
(1)
1
.
。
.
片
∴ m = 3/11
c.
(1)
3
图
1
⇒ 3x = - 2 + 2√2 = - 4

g2. 1alss
#
so S = 1
1.
)
图1
1
。
∴ m = 3/11
:
( 5)
法
5 °
.
∴ m = 3/11
图
| 1, - | = 1 - 1/| 1|
∴ y = 1/2x - 1
1
∴ SΔOBC = SΔCOD + SΔBOC
∴ m = 3/11
∴ m - 1 ≠ 0 ;
1
∴ m : x = 1 或 3x + 4y + 1 = 0
j jio 0.3 12 a oio j j oioi oio i oioi (o) jao jao
y

∴ 21 × 21 = 21 × 21
-
⇒ 3x - 2y + 1 = 0
1
1.42s2s2s1
J 2
1 1
设 x1 = 2/3,x2 = - 4/3
j 1 j 1 j 1 j 1 j 1 j 1
gjgl jgl 1
EN60601-1-2
2018.


- MICROLIFE BP A3L COMFORT
- EN
- DISPLAY
- C∈0044
- TABLE OF CONTENTS
- IMPORTANT FACTS ABOUT BLOOD PRESSURE AND SELF-MEASUREMENT
- HOW DO I EVALUATE MY BLOOD PRESSURE
- USING THE DEVICE FOR THE FIRST TIME
- INSERTING THE BATTERIES
- SETTING THE DATE AND TIME
- SELECTING THE CORRECT CUFF
- SELECTING THE USER
- SELECTING STANDARD OR MAM MODE
- MAM MODE (HIGHLY RECOMMENDED)
- TAKING A BLOOD PRESSURE MEASUREMENT
- CHECKLIST FOR TAKING A RELIABLE MEASUREMENT
- HOW NOT TO STORE A READING
- APPEARANCE OF THE IRREGULAR HEARTBEAT (IHB) SYMBOL
- INFORMATION FOR THE DOCTOR IN CASE OF REPEATED APPEARANCE OF THE IHB SYMBOL
- TRAFFIC LIGHT INDICATOR IN THE DISPLAY
- PC-LINK FUNCTIONS
- INSTALLATION AND DATA TRANSMISSION
- DATA MEMORY
- VIEWING THE STORED VALUES
- MEMORY FULL
- CLEARING ALL VALUES
- BATTERY INDICATOR AND BATTERY CHANGE
- LOW BATTERY
- FLAT BATTERY - REPLACEMENT
- WHICH BATTERIES AND WHICH PROCEDURE
- USING RECHARGEABLE BATTERIES
- USING A MAINS ADAPTER
- 10.ERROR MESSAGES
- 11.SAFETY, CARE, ACCURACY TEST AND DISPOSAL
- SAFETY AND PROTECTION
- CONTRA-INDICATIONS
- WARNING
- CAUTION
- ELECTROMAGNETIC COMPATIBILITY INFORMATION
- DEVICE CARE
- CLEANING THE CUFF
- ACCURACY TEST
- DISPOSAL
- 12.GUARANTEE
- TECHNICAL SPECIFICATIONS
- WAARSCHUWING OPGELET
- AOEPAIA KAI TPOOTAOIA
- AILL BINA 3
- 143
Brand : MICROLIFE
Model : BP A3L Comfort
Category : Sphygmomanometer