VSZ61240 - Vacuum Cleaner SIEMENS - Free user manual and instructions
Find the device manual for free VSZ61240 SIEMENS in PDF.
User questions about VSZ61240 SIEMENS
0 question about this device. Answer the ones you know or ask your own.
Ask a new question about this device
Download the instructions for your Vacuum Cleaner in PDF format for free! Find your manual VSZ61240 - SIEMENS and take your electronic device back in hand. On this page are published all the documents necessary for the use of your device. VSZ61240 by SIEMENS.
USER MANUAL VSZ61240 SIEMENS
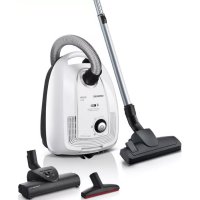
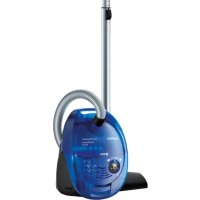
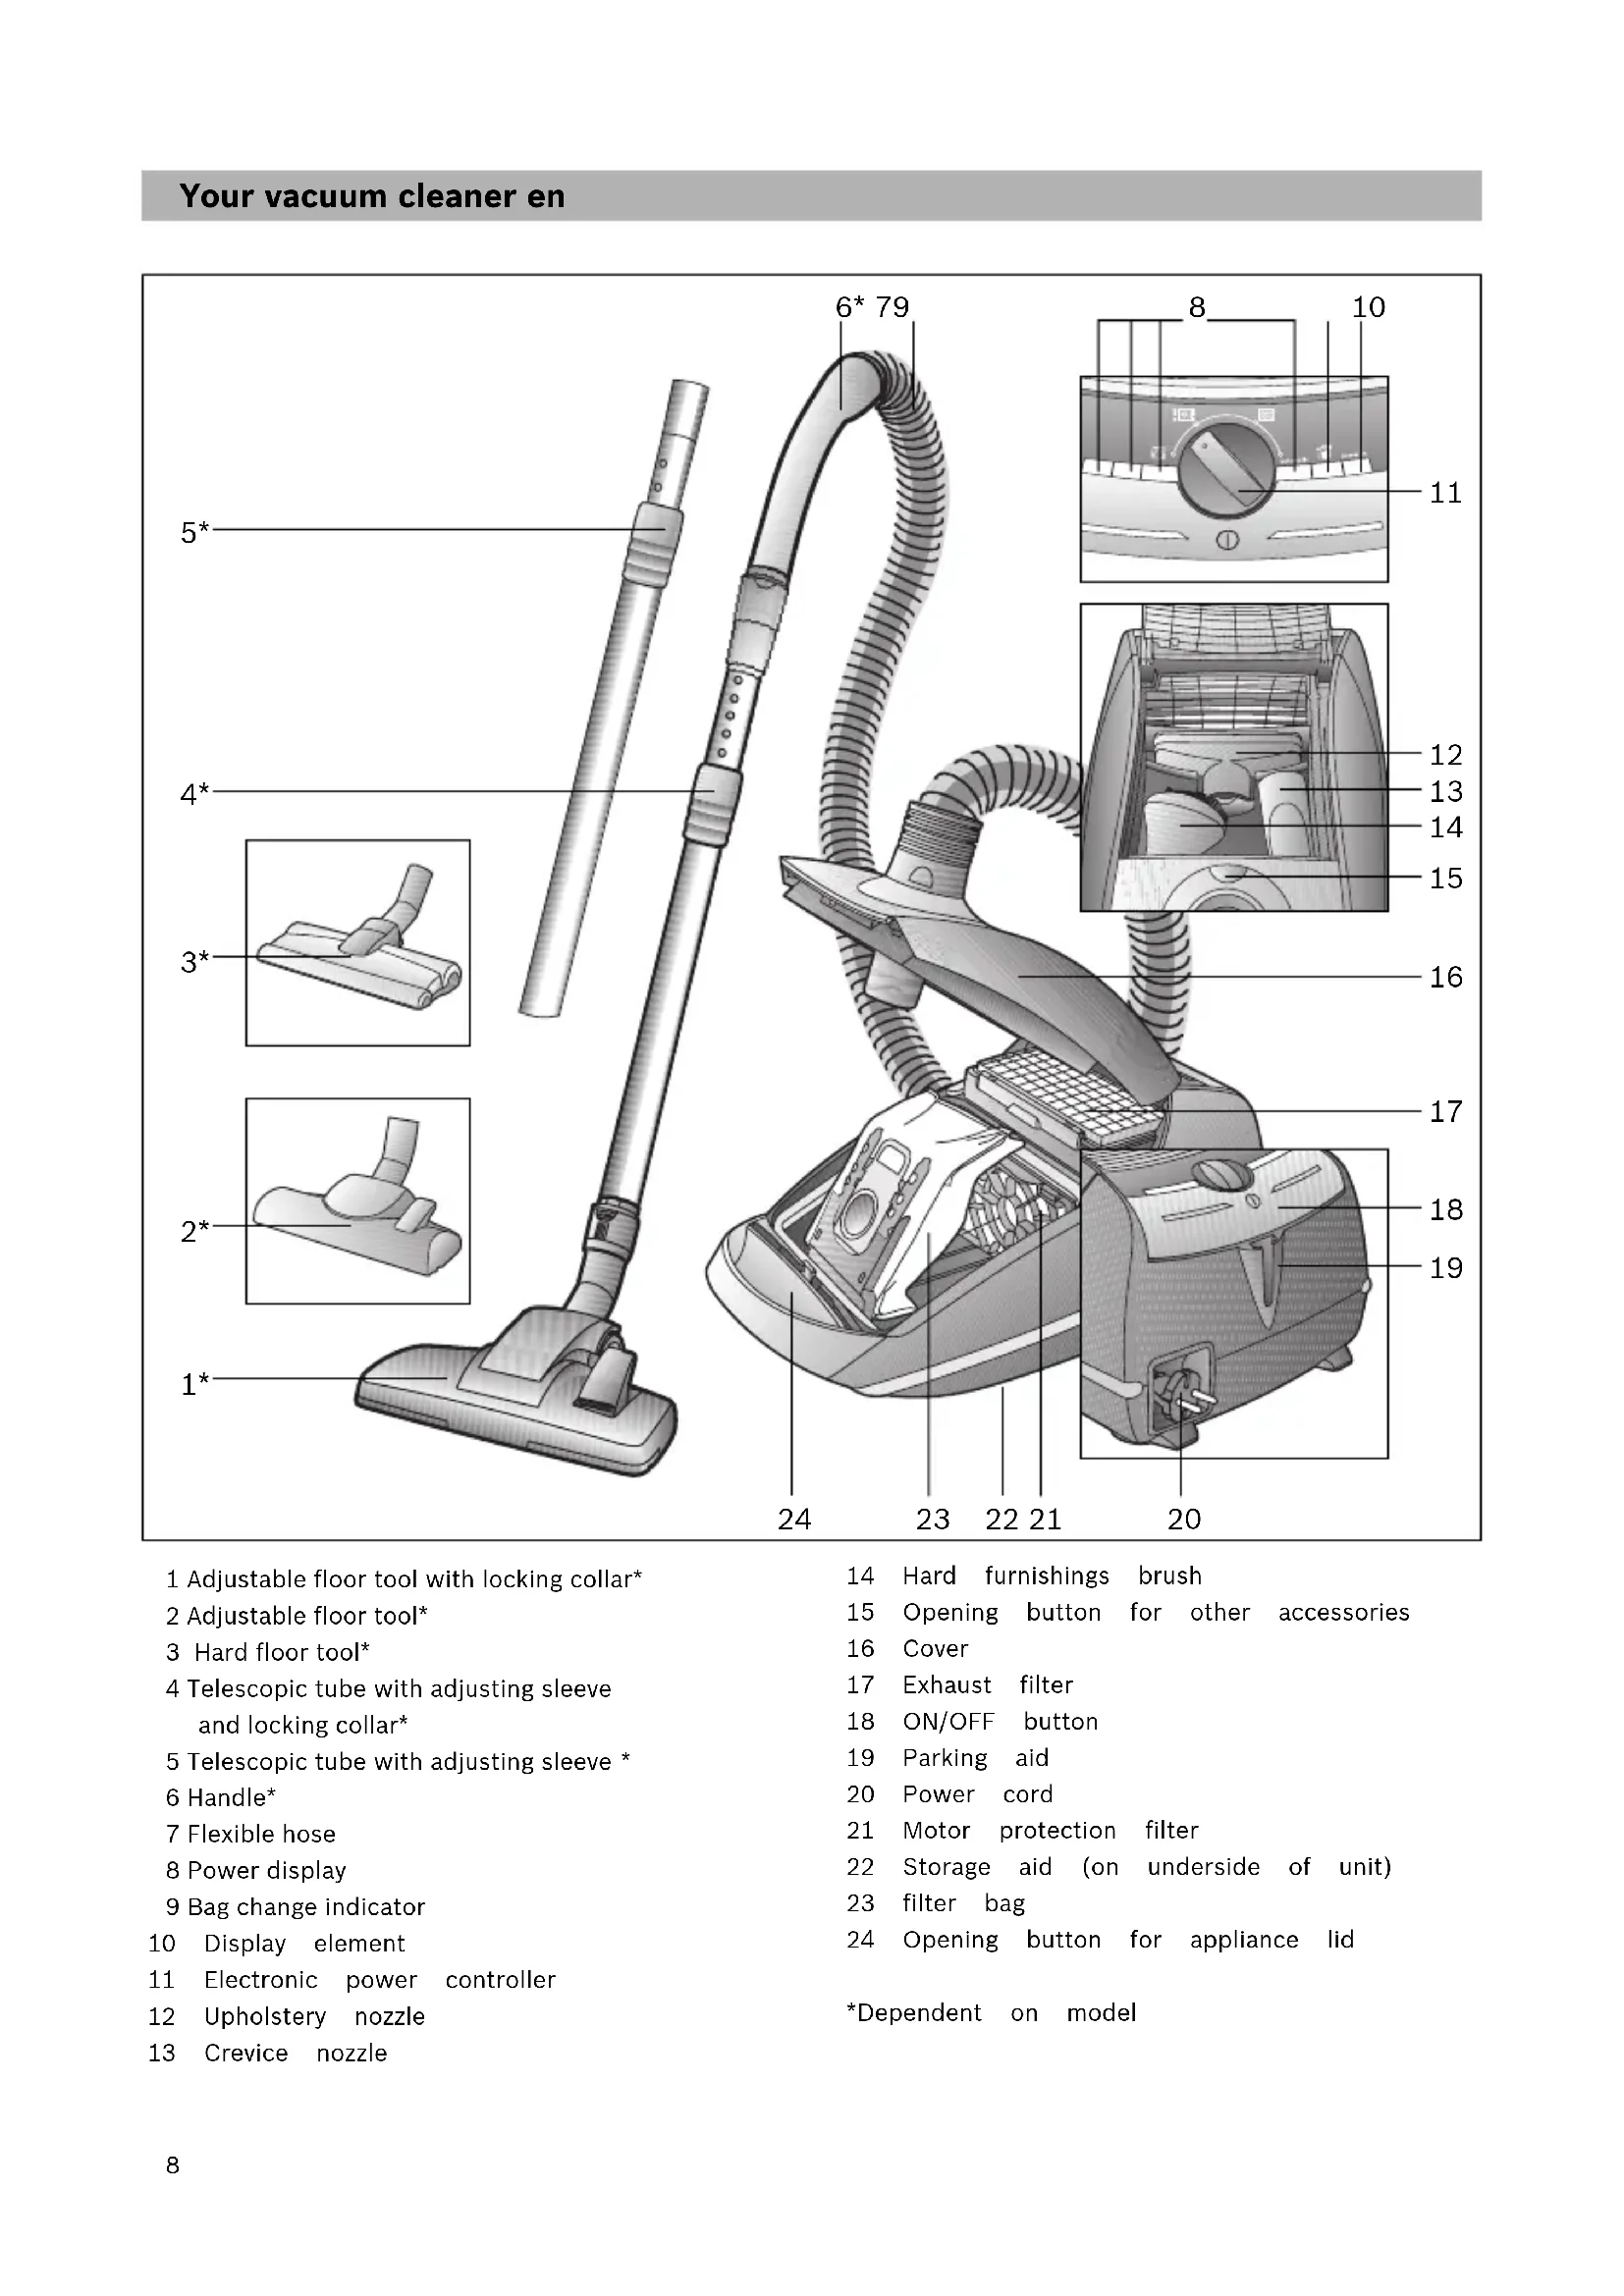
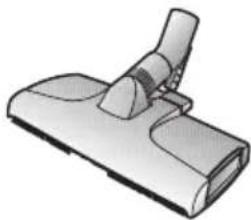
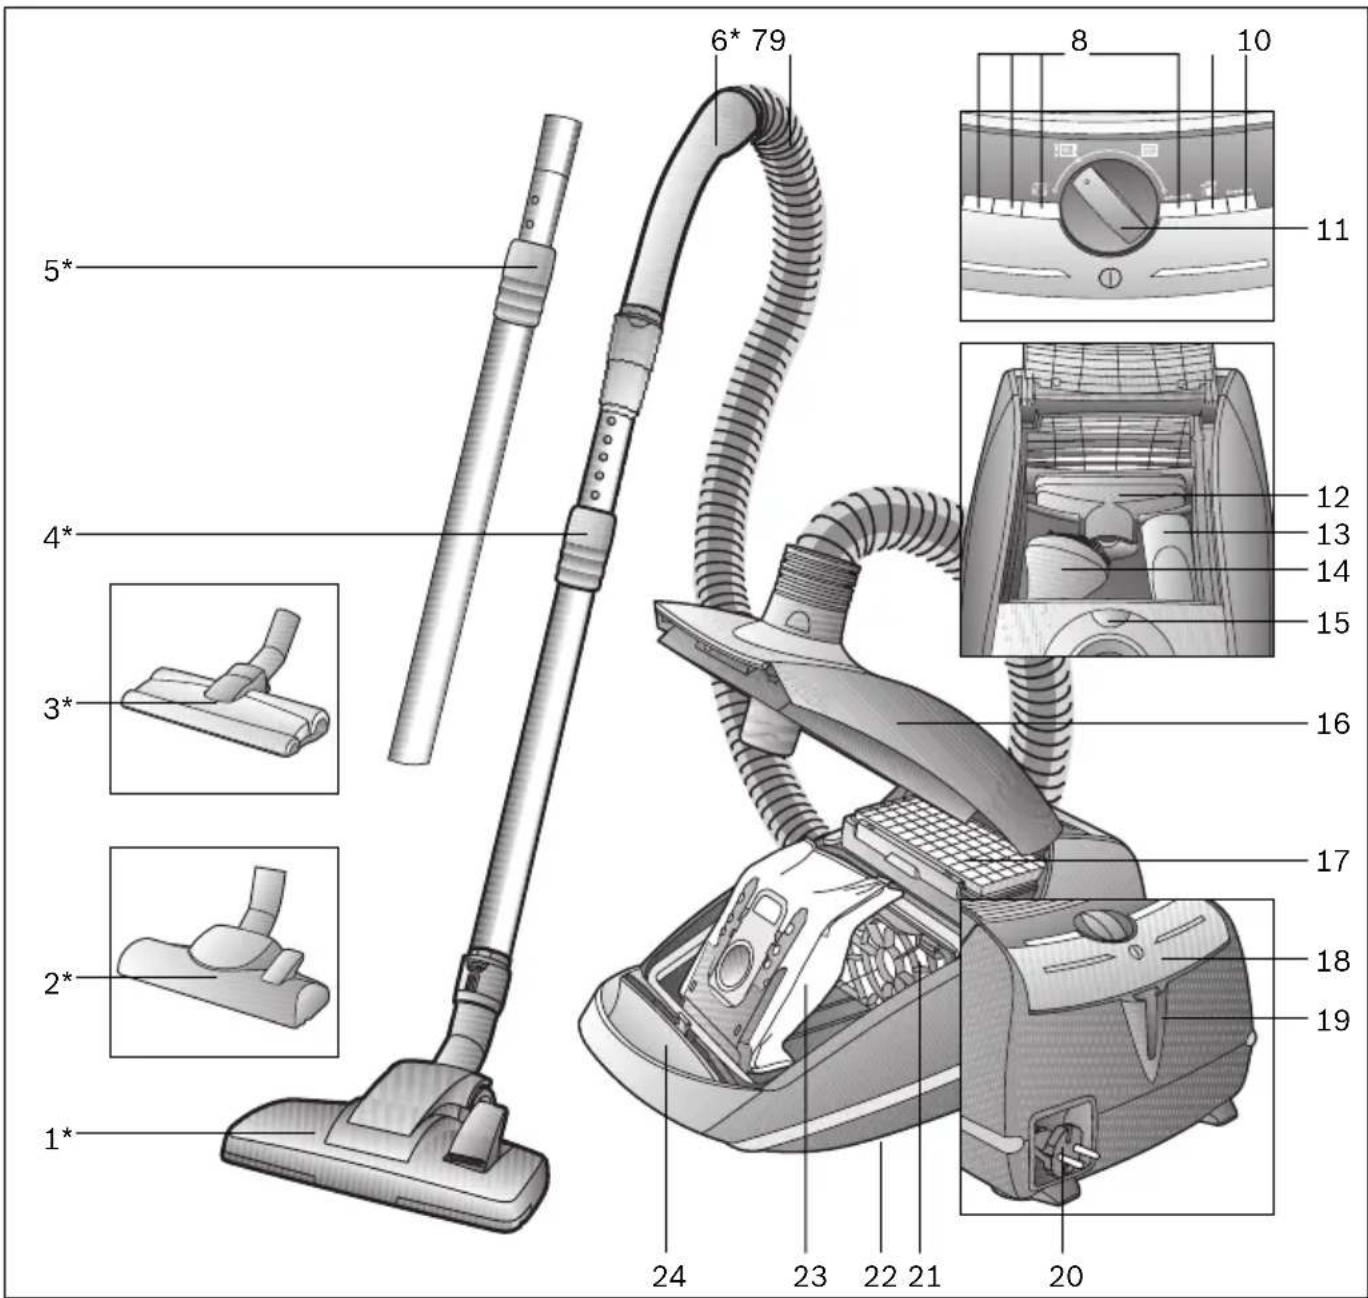
1 Adjustable floor tool with locking collar
2 Adjustable floor tool
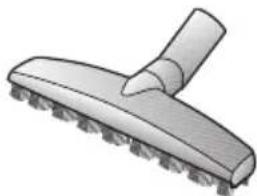
3 Hard floor tool
4 Telescopic tube with adjusting sleeve and locking collar
5 Telescopic tube with adjusting sleeve *
6 Handle*
7 Flexible hose
8 Power display
9 Bag change indicator
10 Display element
11 Electronic power controller
12 Upholstery nozzle
13 Crevice nozzle
14 Hard furnishings brush
15 Opening button for other accessories
16 Cover
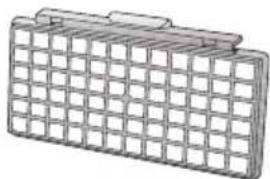
17 Exhaust filter
18 ON/OFF button
19 Parking aid
20 Power cord
21 Motor protection filter
22 Storage aid (on underside of unit)
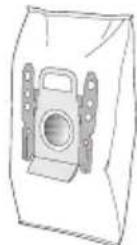
23 filter bag
24 Opening button for appliance lid
*Dependent on model
Congratulations on your purchase of a Siemens VSZ6 vacuum cleaner.
This instruction manual describes various VSZ6 models, which means that some of the equipment features and functions described may not be available on your model.
You should only use original Siemens accessories, which have been specially developed for your vacuum cleaner to achieve the best possible vacuuming results.
Please keep this instruction manual in a safe place. If you pass the vacuum cleaner on to someone else, please also pass on this instruction manual.
Intended use
This vacuum cleaner is intended for domestic use only, not for commercial use.
Only use this vacuum cleaner in accordance with the instructions in this instruction manual.
The manufacturer will not accept any responsibility for damage caused by improper use or incorrect operation. Therefore, you must note the following points.
The vacuum cleaner must only be operated with:
Manufacturer's original dust bags
Manufacturer's original replacement parts, accessories or special accessories
Safety information
This vacuum cleaner complies with the generally accepted standards of technology and relevant safety regulations.
Always observe the information on the rating plate when using the vacuum cleaner and connecting to the power supply.
- Never use the vacuum cleaner without a dust bag fitted. This can damage the appliance.
The appliance may be used by children over the age of 8 years and by persons with reduced physical, sensory or mental capacity or by persons with a lack of experience or knowledge if they are supervised or have been instructed on the safe use of the appliance and the have under-stood the potential dangers of using the appliance.
Children must never play with the appliance
- Cleaning and user maintenance must never be carried out by children without supervision.
The vacuum cleaner may not be used for:
■ cleaning persons or animals
vacuuming up:
- hazardous, sharp-edged, hot or red hot substances.
-damp or liquid substances - highly flammable or explosive substances and gases
- ash, soot from tiled stoves and central heating systems
-
toner dust from printers and copiers.
-
Keep suction away from your head when using the handle, nozzles or pipe.
Risk of injury. - Stand the appliance on a firm, secure surface when vacuuming.
-
When vacuuming stairs, the appliance must always be lower down than you.
In the following cases, stop using the appliance immediately and contact the after-sales service: -
if the mains connection cable is damaged.
- if you have accidentally vacuumed up some liquid or liquid has entered the inside of the appliance
-
if the appliance has been dropped.
-
Do not use the power cord to carry the vacuum cleaner.
- Fully extend the power cord when using the vacuum cleaner continuously for several hours.
- When disconnecting the appliance from the mains, pull on the plug, not the power cord.
- Do not pull the power cord around sharp corners or allow it to become trapped.
Unplug the power cord from the mains before carrying out any work on the vacuum cleaner or its accessories. - Do not use the vacuum cleaner if it is damaged. Unplug the power cord from the mains if a fault is detected.
For safety reasons, only authorised after-sales service personnel are permitted to carry out repairs and fit replacement parts to the vacuum cleaner. - Protect the vacuum cleaner from outside weather conditions, moisture and sources of heat.
The vacuum cleaner is not suitable for use on building sites.
=> Vacuuming up building rubble could damage the appliance.
- Switch off the appliance when it is not in use.
At the end of its life, the appliance should be rendered unusable, then disposed of in an appropriate manner. - Plastic bags and films must be kept out of the reach of children before disposal (risk of suffocation).
- do not pour any flammable substances or substances containing alcohol onto the filters (filter bag, motor protective filter, exhaust filter, etc.).
Disposal information
■ Packaging
The packaging is designed to protect the vacuum cleaner from being damaged during transportation. It is made of environmentally friendly materials and can be recycled.
Dispose of packaging that is no longer required at an appropriate recycling point.
Used vacuum cleaners
Used vacuum cleaners still contain many valuable materials. Therefore, please take your used vacuum cleaner to your retailer or recycling centre to be recycled. For current disposal methods, please enquire at your retailer or your local council.
Disposal of filters and dust bags
Filters and dust bags are made from environmentally friendly materials.
As long as they do not contain substances that are not permitted to be disposed of in the household rubbish, you can dispose of them with your normal household rubbish.
Please note
The mains socket must be protected by at least a 16 amp fuse.
If a fuse should blow when you switch on the appliance, this may be because other electrical appliances which have a high current draw are connected to the same power circuit.
To prevent the fuse from blowing, select the lowest power setting before switching the appliance on, and increase the power only once it is running.
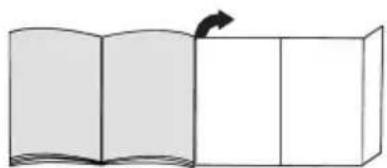
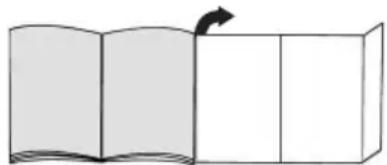
Fold out the picture pages.
Before using for the first time
Figure 1\*
Push the handle onto the flexible hose until it engages.
Setting up
Figure 2
a)Push the flexible hose adapter into the opening on the vacuum cleaner until it engages.
b)To remove the flexible hose, press the release buttons and pull the hose out.
Figure 3\*
a)Connect the handle and the telescopic tube together.
b)Push the handle into the telescopic tube until it engages.
Press on the locking collar and pull out the telescopic tube to disconnect.
Figure 4\*
a)Connect the floor tool and the telescopic tube together.
b)Push the telescopic tube into the connecting piece of the floor tool until it engages.
Press on the locking collar and pull out the telescopic tube to disconnect.
Figure 5\*
To adjust the length of the telescopic tube, adjust the adjusting sleeve/sliding switch in the direction of the arrow and adjust the tube to the required length.
Figure 6
Take the mains plug, pull the power cord to the required length and insert the plug into a socket.
Figure 7
Press the ON/OFF button in the direction of the arrow to switch on your vacuum cleaner.
Vacuuming
Figure 8
a) The required suction level can be infinitely adjusted by turning the control knob in the direction of the arrow.
Low
suction range:
For vacuuming delicate fabrics, e.g. curtains.
Moderate
suction range:
For daily cleaning on lightly soiled areas.
High
suction range:
For vacuuming durable floor coverings, hard floors
and heavily soiled surfaces.
b)Automatic mode:
In the automatic setting, the suction is
automatically adjusted to the type of floor covering.

tion: delicate materials such as curtains must
be vacuumed using the automatic setting.
Figure 9
Adjusting the floor tool:
a)For vacuuming rugs
and carpets
b)For vacuuming
hard floors


Caution!
Floor tools are subject to a certain amount of wear, depending on the type of hard floors you have (e.g. rough, rustic tiles). Therefore, you must check the underside of the floor tool at regular intervals.
Worn undersides of floor tools may have sharp edges that can damage sensitive hard floors, such as parquet or linoleum. The manufacturer does not accept any responsibility for damage caused by worn floor tools.
Turbo brush
If your appliance is equipped with a turbo brush, please consult the accompanying instruction manual for notes on its use and maintenance.
Other accessories that you do not need can be stored easily in the accessories compartment of the appliance lid.
Figure 10
When the opening button is pressed, the lid of the accessories compartment opens automatically.
Take out the required accessories.
Figure 11
After removal, close the lid of the accessories
compartment and engage the catch.
Figure 12
Vacuuming with accessories
(attach to handle or suction pipe as required)
a)Crevicenozzle
For cleaning crevices and corners
b)Upholstery nozzle
For cleaning upholstered furniture, curtains, etc.
c)Hard furnishings brush
For vacuuming picture frames, books, furniture
requiring particular care, etc.
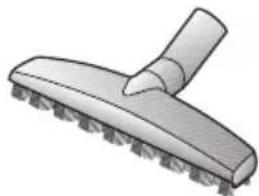
Hard-floor brush
Figure 13
For vacuuming hard floor coverings
(tiles, parquet flooring, etc.)
Cleaning the hard-floor brush
Figure 14
a)Vacuum from below to clean the brush.
b)Cut through threads and hairs wound round the rollers using scissors.
Vacuum threads and hairs with the crevice nozzle.
Figure 15
Once you have switched off the vacuum cleaner, you can use the parking aid on the back of the vacuum cleaner if you wish to stop vacuuming for a short time.
To do this, slide the catch on the floor tool into the groove on the back of the vacuum cleaner.
Figure 16
The appliance can also be carried using the carrying handle when vacuuming stairs, for example.
When the work is done
Figure 17
Unplug the vacuum cleaner.
- Briefly pull the power cord and release.
The cord rewinds automatically.
Figure 18
To store or transport the vacuum cleaner, use the storage aid on the underside of the vacuum cleaner. Stand the vacuum cleaner up on its end. Slide the catch on the floor tool into the groove on the underside of the appliance.
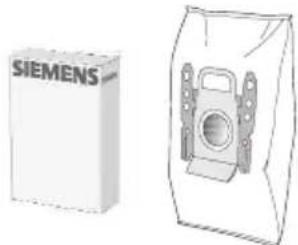
Changing the bag
Replacing the bag
Figure 19
If the bag change indicator is permanently lit when the floor tool is lifted from the floor and the highest suction setting is selected, the filter bag must be replaced even if it is still not full. In this case it is essential to change the bag due to the type of dust which has been vacuumed.
First check that the nozzle, suction pipe and flexible hose are not blocked, as this would also lead to the bag change indicator being triggered.
Figure 20
- When the opening button is pressed, the appliance lid is raised slightly.
Reach underneath the lid and open in the direction of the arrow until the lid engages in the open position.
Figure 21
a)Seal the filter bag by pulling the locking tab and then remove it.
b)Insert a new filter bag into the holder and close the bag compartment lid.
Caution: the lid will only close when the filter bag is inserted.
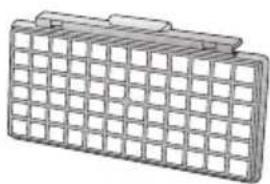
Cleaning the motor protection filter
The motor protection filter should be cleaned regularly by knocking out the dirt and rinsing.
Figure 22
- Open the bag compartment lid (see Figure 20).
- Release the motor protection filter from the catch and remove in the direction of the arrow.
Clean the motor protection filter by tapping it.
If it is very dirty, the motor protection filter should be rinsed out.
The filter must then be left to dry for at least 24 hours.
After cleaning, insert the motor protection filter into the appliance and close the bag compartment lid.
Replacing the micro-hygiene filter
Figure 23\*
- Open the bag compartment lid (see Figure 20).
- Release the filter holder by pressing the locking tab in the direction of the arrow
- Remove the foam filter and micro-hygiene filter. Insert the new micro-hygiene filter and foam filter into the filter holder.
- Insert the filter holder into the vacuum cleaner and clip into place.
Replacing the HEPA filter
Figure 24\*
- Open the bag compartment lid (see Figure 20).
- Release the HEPA filter by pressing the locking tab in the direction of the arrow and remove it from the appliance.
Insert the new HEPA filter and clip into place.
If you have used the vacuum cleaner for fine dust particles, clean the motor protection filter by knocking out the dirt and, if necessary, replace the microhygiene filter, activated carbon filter or HEPA filter.
Care
Always switch off the vacuum cleaner and pull out the mains plug before cleaning the vacuum cleaner.
The vacuum cleaner and plastic accessories can be cleaned with a commercial plastic cleaner.
Do not use a scourer, glass-cleaning agent or all-purpose cleaning product.
Never immerse the vacuum cleaner in water.
The dust compartment can, if necessary, be cleaned with a second vacuum cleaner or simply wiped with a dry cloth or dusting brush.
Subject to technical modifications.
en
Replacement filter pack
Filter type GXXL (VZ41AFGXXL)
For best performance: GXXL plus (VZ41GXXLP)
Contents: 4 filter bags with seal
1 micro-hygiene filter
http://www.dust-bag-siemens.com
HEPA filter (class H12) VZ154HFB
Recommended for allergy sufferers. Ensures very clean exhaust air.
Replace once a year.
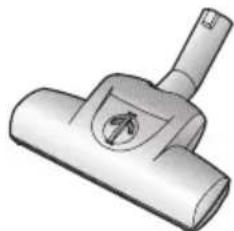
TURBO-UNIVERSAL brush VZ102TBB
All-in-one brushing and vacuuming of short-pile rugs and carpets and all hard floor coverings. Especially suitable for picking up pet hair. The brush roller is driven by the air flow through the vacuum cleaner. No separate electric connection is needed.
Hard floor tool VZ123HD
For vacuuming hard floors (parquet flooring, tiles, terracotta, etc.)
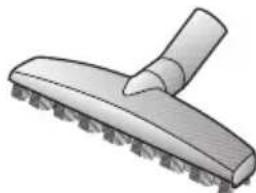
Wiping tool VZ103WD
Suitable for use on parquet, laminate, stone, floorboards, tiles, etc. (test the floor wipes on an inconspicuous area before using on a sensitive hard floor finish or a hard floor with specific care requirements). Removes large particles of dirt while the moist cleaning cloth cleans the floor at the same time.


YnodeiEic yia Tny anooupon
■ Suokekuaogia
H ouakeuaia npoataeuei Tny nAektpikn Akoouna ano Znmu kata n diapoum nC metapopac. Anoteleitai ano pfikk npoc to nepiBaaov uika kal y' auto elva avakukawuun.
Papadote Ta uikoukeuaolac nou dev xpeidzovta dA, oTa onuela ouykveTPwOnc Twv uikov avakukawonc.
Taaouakeunc
Oi naiec ouakeuec nepiexovn noa akopa xnoiauiká. I' auto napadidete nTv axpntn ouakeun oacσ' eva eidiok kataotma n σ' eva kevtpo avakukawonc. Touc tponouc anoupanc mnpoeite va touc nnpoopnptheta ita edika kataotmuata n otic unnpoeiec tou dnuou ac.
Anoupon Tou pIoTPOU KAI TnC oakoulaoc Tou pIoTPOU
Ta iItpa ka oI aakouAe Tov pfItpw exouv kataoKeuaotel ano faiikapnoC to nepiabavov uiká. Epoov dev nepiaauavou oualec, nou anayopeuovtai yia ta oiklak anaoppmuata, npopoiv va anooupoov mazi pe ta kavovikoaikka anoppimuata.
IpooeEe npapaKaA
H npla Tou peuapatoc npenei va elval aopaaiaeyn to elambdaioTo me ia aopdaia 16 A.
Eav n aopalaia kata tny evepyonoinn tc ouokeunc "Poei" ia popa, npopei auto va opeiIeTai OTO yevovoc otio to idio kukawpa Bpiokovtai ouyxpovwc ouvdeedevec kal aaec nalektpikec ouokeuc me uynan katavawon peuatoc.
To "negaioo" nC aopdaieiac unopei va anopeeuxei, puOmuizovtac npiv tvv evpyonoinan tnc ouokueuc Tn xaunlotepn baOmuia loxuoc kai enlaeyovtac otn ouvexia ma uynlotepn baOmuia loxuoc.
AvoiEπapakawTcαeλideεμTcEkoεc!
Piv Tnv npwn xpon
Euk. 1
TOnoTeHnTo Tn xeipoaBn OTOv eukamTo oWnva avappopnonc kal aoppaiote Tnv.
Oeog oε λειτoupyia
EtK. 2
a) TonoetnoTo oToou oAwnavappoepnnc 0to avoyuaavappopnpnc.
b)Kata Tnv apaipeon Tou eukamitou oWnva avappoqnnc Piote Ta nKtpa aanopalionc KaTpaBHeTe EeW ToV eukamnto oWnva.
Euk. 3*
Yka3aHnHa 3a6e3oNaCHOCT
Ta3n PpaxocmykaKa OTROBapHa Tpns3HaTNe HOpMn HaTexHnKaTa N CBpb3aHnTe C HeH HopMn 3a 6e3oTnachOCT.
Cbpxe HnyckaTe BekcTAAoTaunr PpaxocmykaKaTa caMo CbIaCHO hnpMeHaTa Ta6eKa.
HnKOra He pa6oTe Te 6e3 chntbPHa TOp6a. IpaXocMykaKaTa MoKe Da ce IOBpeN!
YpebT MoKe Da Ce TOnA3Ba OT AnuHa HIOBeue ot 8 rOAnHn OTo ANuCa C HamaLeHN cN3nueCKn, CETNBn Nn YMCTBHeHn CTOOC6HOCTn Nn ANIca Ha OTHT N/NN 3HaHHa, aKO Te 6NBat KOHTPOAnpaHn NN Ca HHCTpyKTHpAHN OTHOCHO 6e3oAnachata yNoTppe6a Ha ypeDa n ca pa36paHn Ipon3TuauNTe BCAeDCTBHe Ha TOBa OTaCHOCTH.
Aeata He Tp8Ba Da nIgpaTc ypeDa.
IIOuInCTBaHe HIOaBpXaHe He Tpr6Ba Da ce N3BbPbBa OTea 6e3 Ha6IoDeHe.
H3TIOA3Ba 3a:
N3cMyKBaHe Ha npax OT Xopa Hn XHBOTHn
BCmyKBaHeHa:
-BeuecTBa BpeHn 3a 3paBeTo, cocTp npb6oBe, ropeu nn ropraun
-BAaXHH Hn TeuHn BeueCTBa
- Aleko Bb3IIaMeHMMN HAN EKCTA03HBH NBeIeCTBa I Ra3OBe
-πeπeλ,caKAnOTKaMnHnIeHTpaAHHOTOpTnTeAHHNHCtAaun
-mpaxOTToHepOTPnHTepnKoTnPHMaunHH.
136raBaiTe H3cMyKBAHeTo Ha IpaX C pbKOXBaTKa, AIO3H N Tpb6a B 6An3OCT DO rAbaTa.
=> HMa OtnaCHOCT OTHapaHBAHe!
■ПиИЗСМУКВанeHa Прах ПОCTАБЯТeуpeда Вьрху TBьрДa,сИгYPHа OCHOBA.
■ПиИЗСМУКВанeHa ПрахHa CTbA6ицеуpeДтТрЯБВa Da cToH BUNHaRn IO-HNCKO OT NOA3BaTeA.
Ipi nTOcoueHnTe PO-DOy CAYuAn ypeBt Tpr6Ba BeHaRa Da ce H3KIOUH N Bne Da ce CbbpKeTe Cbc cepBn3a:
- aKo e ПОВрededн ПЮВОДнКьТ 3a 3axpaHBAHe OТ МpeжкTa.
- aKO TIO TIOrpeWka CTe 3acMyKaAN TeHOCT HAN BBB BbTpEWHOCTTa Ha ypeDa e TIOIaHaHa TaeHOCT
- aKO ypeaTe IaHaA O T BnCOko.
He n3IIOA3BaIe Ka6eIa 3a MPeXOBO 3axpaHbAHe 3a Hocene / TpaHCITOpTHpaHE Ha TpaxOCMyKaUkata.
Ппн HeколкочаOB ПpoДьЖитЕн ржим Ha pa6oTa n3TeIeTe HaTbAHO Ka6eA 3a МржоBO 3axpaHBAHe.
3a da pa3kaunTe ypeDa oT MpeKaTa He DbpNaTe 3a Ka6eLa 3a MpekoBO 3axpaHbHe, a 3a 5eTceLa.
He npokapBaTe Ka6eLa 3a MpeXoBO 3axpaHbaHe Ppe3 octpn pb6OBe H He ro pniunTBAHTe.
IpeHn BCnKpaBToN IIO IpaXocMyKaKaTa N KOHCymaTHBnTe H3BaDeTe MpeXOBnIeTceA.
He IyckaIte B EekTlaoatauHa NOBpeDeHa IpxaxocMykaUka. IIpi IIOBBAHe Ha HeH3IIpaBHOCTn H3BaTe UeKepaOT MpeXKOBNA KOHTAKT.
3a n364BaHe Ha ONaChocTH, peMOHTHe n CmHaTaHa pe3ePBn Yactn Ha IpaXOCMyKaUkTa Tp86Ba DaCe N3BbPWBat Camo OTOpH3npaH cepBN3.
IpeIa3BaIte IpaXocMykaKATAOTBbHUN KAnMaTHUHN BANHIN,BAaHaN3TOUHNi HaTOnAHA.
ItpaxocmykaKaTa He e pnprodeHa 3a pa6oTa Ha CTpOteAHN PLoaAdk. 3acMyKBaHeTo Ha OTnADbU OCTpOteAHN pa6OT MoKe Da IOBpeDN ItpaxocmykaKaTa.
13KauBaIe ypeDa, KOrato He ce pa6oTn C Hero.
HaIpaBete BeHa rHeH3TOn3BaEMn H3Ae3AnTe OT yIOTpe6a ypeu, cAe TOBa rH TpeAaTe 3a yHnOxKaBaHe Ha OTNaDbu CbO6pa3Ho N3NCKBaHnTa.
IIaactMacOBuTop6nHΦOAnr Tpr6Ba Da ce CbXpaHBAuYHnOxKaBaT TaKa,YeMaKn Deua Da HMaT DOCTbI Do Tox (OtnachOcT OT 3aDyShaBaHe).
HeIOCTaBnTe Bb3PiAmeHReMn HAN CbΔbpKaaun aAkoXoMaTePNBbpxyΦnATpnte (ΦnATbPHa TOp6a, 3aUHTeh ΦnATbP Ha MoTopa, N3dYXBaU ΦnATbP n T.H.).
yka3aHnna 3a yHnioXkBaHa
Otnakobka
ОпakOBkATA ПpeДПа3Ва ПрахOCMykaЧКаТОТ ПOBpeДА При ТраHCПOTираHe.ТeHaNPaBeHа OT НзамьрсЯВаши Okон hematСрда Матерни Поради TOBA мОжЕ ДбБде peuzKИраHa. ИЗХБряптЕ HeуЖнITE В ВечЕ OпakOBbЧИ Матерни B MecTaTа 3a CBбИраHe Ha CnCTeMaTа 3a ПOTВTOPOI3BAHe "3eLEHa TOnKa".
CTapypeA
CTapHtpePaxocMkyaKnYeCToBceOe OSe CbAbpKata
UeHHMaTePnaA.3aTOBaPiPeaIteBaWAtaCTapa
TpaXocMcyaKaHaBaWnCteuAIn3npanTbProBe
HnB eHNOTcHTPOBeTe 3a peuKInpaHe 3a
IOBTOPHO3PiOAnBaHe.NHΦOpMaun3aakTyauHnTe
NaHHnHaYHnOxKaBaHe Bne MoKeTe Da IOnyUnTe OT
BaWnCteuAIn3npanTbProBeu Hn BbB BaWn
06uHHcknCbBET.
YHHIOXKaBaHe HaΦHANTbpa HΦHANTbphHaTa Top6a
HHTbpbTn HtbpHaTa TOp6a Ca IpOHN3BeDeHN OT He3aMbpcBaUn OkoHaTa CpeDa MaTePnaN. B Cnya, Ye Te He CbDbpxaT BeIeCTBa, KOTo ca 3a6paHeHH 3a 6HtOBnTe OTNaBcN, BHe MoKTe Da rN 3XbPAnTe C HopMaHnTe 6HtOBn OTNaDbuN.
MOA HMaTe TpeABH
MpeKOBnKoHTaKT Tp86Ba Da e OcHpyeH C
PpeIa3NTeAOT Ha-NMaKo 16 A.
Ako PpeIa3NTeAET ce 3aDeIcTBA PPn BkIoUbAHe Ha
ypeDa, TOBa MoKe Da Ce IaXn Ha eHOBpeMeHHO
CBbp3BaHN B cbUaTa eAEKtpuuecka BepnA DpyrN
eAEKtpoyeDn C BnCOK IpaMaTeBp Ha BXOda.
3aEiCTBaHeTo Ha PpeIa3NTeAe PpeDTBpaTHMo,
aKO HAcTpOnTe ypeDa PpeDN BkIoUbAHe Ha Ha-NHCKa
CTeTIeH Ha MOIOHOCT N eEDBa CLeD TOBa N36epeTe IOBnCOka.
Moa oTbPheTe cTpaHnUte c pncyHKn!
TpeH Da 3aOnOHeTe pa6oTa 3a TbPBn TbT
ΦnΓ. 1
BkapaIteApbXkataBcMykATEHnMaPkyuNAnfHKcapaIte.
TyskaHe BdEInCTBHe
ΦnR. 2
a) BkapaTe HaKpaHnHa CmYKaTeHnHa Mapkyu B cmYKaTeHnHa OTBOp HTo HaTnCHe Tdo UpaKaBaHe.
6)3a Da CBAHTE Ha CMyKaTeHnHa MapKyu HaTnCHeTe. HnKcnpaata Na 3DaTuHa Nn3BaTeMapKyua.
Φn.r. 3*
a) BkapaTe ApbxKaTa n TeleckoTHa Tpb6a eHa B dpya.
b)Пиб3HHeTeApBxKKaTa B TeAeCKOITHaTa Tpb6a Do
ФИКСИРанс C ПpeUpaKBAHe.
3a Da OCBO6OAnTe CbeAINHEHNeTO HaTNCHETe BTYAKaTa
3a De6LoKnPaH e N 3BaDeTe ApBxKkTa.
Φn.r. 4*
a) BkapaiTe IOOBAta AIO3a N TeAeCKoIHHaTa Tpb6a eHbBdpyra.
6) BkapaTe TeleckoTHaTa Tpb6a B uyeepa Ha IIOoBaTa 103a Do upaKaBaHe. 3a Da ocBO6OAnTe CbeAHeHHeTo HATNCHeTbYkKaTa 3a De6oKnpaHe n H3BaTe dpXkata.
Φn.r. 5*
C TpemeCTBaHe Ha Nb3raUmaHWeT/IIb3raUna 6yToH B ITOcOKaHa CTpeAkaTa De6AOKnpaNTe TeLeECKOTnHaTa Tpb6a Ce n yctaHOBeTe NcKaHaTa DbAXnHa.
Φn. 6
XBaHeTe 3a IIpncBcEINHBAHe KbM MpeKa 3a ⅢeTceA, I3AbPItaTe rO dNCKaHaTa DbAXnHa N BkAIOUeTe ⅢeTceA B MpeKaTa.
ΦnΓ.7
BkHouTe npaxocmykaKaTa Upe3 3aEeCTBaHe Ha 6yToHa Bk. / N3K. B TOCoKa Ha CTpeKaTa.
H3cmykbaHe Ha npax
ΦHr. 8
a)Upe3 3aBbPtaHe Ha peryIpaunr 6yToH B TIOcKa Ha CTpeAkaTMOKe Da ce peYInpa 6e3CTeHHO KeHaHaTa CnHa Ha N3CMyKBaHe.
HncbK
HnHa3OH Ha MOUHOCT:
3a H3cMyKBaHe Ha Ipx TIO UyBCTBHTeHa MaTePnaH, HAnpMep TepTa.
CpeAeH
HnHa3OH Ha MOUHOCT:
3a ekeHHeBHO IOUHCBaHe Ipi HrOARMO 3aMbpcBaHe.
Bncok
HnHa3OH Ha MOHOCCT:
3aПоочТВаHeHa rpy6n ПОДOBn HAcTHNkN, TBbPdN ITOOBe N IIPIN CnHNo 3AmbpcBaHe.
b)ABTomTuHo:
HaTIOLOXeHHe aBTOMaTHUHO CMyKaTeHaTa MOuHOCCTe HaTnACBa aBTOMaTHUHO KbM TIOOBaTa HAcTHAka.
BHHMaHHe: HHH TbKaHn, KaTo HaIpyMep IepaTea He Tp86Ba Da ce IOuHCTBaT Ha IIOAOXeHne ABTomAtNuHo.
ΦHR. 9
PerynpaHe HaIOOBoTa H03a:
a)3a n3cMyKBAHe OT KnAmmn N TeKCTAHH IOAOBn HAcTHAKn

b)3a n3cmykBaHe OT TBbpAN IOIOBE

BHHMaHHe!
IIOOBNTE AIO3N B 3aBNCMOCT OT BnA TBbp IAoD (HaIP. rpaTaN,pyCTKkAHN TAOUKN) Ce H3HOCBaT DO H3BeCTHa cTeINH. 3aTOBa Ha peoOBHNHTepBaH NOT BpeMe
Bne Tpr6Ba Da IIpoBepBaTe Nb3raUHe Ce qactn Ha 103aTa. H3HOceHH, Nb3raUe C qactn C OCTpn Pb6OBe MoT Da IIpHnHrY BpeJAAHN Bbpx UyBCTBHTeAHN TBbpN IOOBe KaTO IapKeT HAN ANHOeM.
ПОНЗВОДNTЕАТ He ПОEMA OTROBOPHOCT 3a eBEHTyaANH ΜETH, KONTO CE ПИЧИНЯВAT OT ИЗHOCEHa ПОDABa IIO3a.
Yetka "Turbo"
Ako Baunrypee o6opyBaH c Typ6o-ueTka,MOJ npouetete yka3aHHraTa 3a H3IOA3BaHe N IOAdbpKaHe OT npHNOXKeHOTo pKOBoDCTBO 3a pa6ota.
MaKn PpHaAdEeXHocTH, KOHTo B MoMeHTa He ca Bn Heo6xoAumH, Bne MoKeTe yAo6Ho Da ocTaBnte B OTeJeHHeTo 3a PpHaAdEeXHocTH Ha KaTnKa Ha ypeDa.
Φn.r. 10
Pn 3aDeiCTBaHe Ha 6yToHa 3a OTBapAne aBTOMaTHUHO Ce OTBapKaTaNbT Ha HNJaTa 3a PnHaDExKHOCTn.
B3eMeTe XeHaHaTa TpHnHaAeXHoCT.
ΦnΓ. 11
CaeKaTo H3BaAHTe KeLaHaTa PpHnHaAeXHoCT, 3aTBOpTe NΦHKcpaTKePaKaHa HnTaTa 3a PpHnHaAeXHoCTN.
ΦnΓ. 12
H3cMyKBaHe Ha Ipax C IIpHaAeXHoCTN (CIOpeH Heo6xOaMOCTTa IIOCTaBeTe Ha ApbXKaTa, pecI. Ha cMyKaTeHaHaTtpb6a)
a)AIO3a3aФyH
3a nouchTaBe Ha yuHn bTAN
6)A03a 3a TaTnuepePn
3a n3cmykbahe Ha npax TTO TaHnucpaHn Me6eHn, 3aBeCN H.T.H.
c)YeTeKa 3a Me6eAn
3a n3cMyKBaHe Ha IpaX OT paMKn Ha KapTnHn, KHNr, cyBCTBNTeHa Me6eAn N T.H.
AIO3a 3a TBbpAn IOAOBE
Φm. 13*
3a n3cMykBaHe O TBbpHn IOoOBn HaCTNAKN (paHCOBn IIOUKn, NapKeT N.T.H.)
TIOUHCTBaHe Ha IOK3aTa 3a TBbPAn IOOBe
ΦnΓ. 14°
a)3a IOUHCTBaHe H3CMyEte AHO3aTa OTOAOY.
b)HaBHTHe KOHUn N KOCMn IIpepeKeTe C HOKnUa. H3cMyKBAHe Ha KOHUn N KOCMn C IIO3aTa 3aФуrN.
ΦnΓ. 15
Pn KpaTkn Pny3n Pnp N3cMyKbaHeTo Ha npax Bne CLeD N3KIAOuBaHe Ha IpaXOCMyKaUKaTa MOKeTe Da N3TOA3BaTe CnOMaTeAHO yCTpOJCTBO 3a NapKnpaHa Ha HeHata O6paTHa CtpHa.
3a Ta3n cen BkapaTKe KyKaTa Ha IIOOBaTa AIO3a BBB BdIb6HaTHHaTa Ha O6paTHaTa CtpaHa Ha TpaxOcMyKaUKaTa.
ΦnΓ. 16
IpiuH3cMykBaHe Ha IpaX, HAnpHmep TIO CTbA6n, ypeBt MoKe Da 6bDe TpaHCnOpTnpaH N KaTO ce AdbPxN 3a DpbKkata.
Cæda60Ta
ΦnΓ. 17
H3BaDeTe uekepa ot Mpekata.
ApbHHeKpAToKabea3aMpexBoTo 3axpaHbaHe n CaeTobTaOITyChTe.KabeBtABTomatuHo ce HaBnBa.
*CnopeD OKOMTAEKTOBkata
ΦnI. 18
3a NapKnpaHe / TpaHcTOpTnpaHe Ha
IpaXocMyKaUkTa Bne MoKeTe Da H3IOA3BaTe
CTOMaTaTeAHOTo yCTpoiCTBO 3a NapKnpaHe Ha DOHaTa
CTpaHa Ha ypeDa.
TocTaBeTe IpaxOcMyKaUKaTa BbB BepTNKaALHO TIOLOKeHne. BkapaTe KyKaTa Ha IIODoBaTa IIO3a BbB BdIb6HaTHHaTa Ha DOHaTa CtpaHa Ha IIpn6opa.
CmHa HaΦnATbpa
CmHa Ha cHAtbPhata Top6nUka
ΦnI. 19
Ako IIpiIIOBAnHaTa IIOOBA IIO3a IpeYIpaHe Ha CMyKaTeAHaTAMoUHocHa MaKcMym HAnKaTOpbT 3a CmHa HaΦNtbpa CBETn IOCTOHHO,ΦNtbpHaTa TOp6a Tp8Ba Da ce CMeHN, OOpH N Da He e TbHa. B To3N CnyaamCmHaTa e Heo6xOdima TopaDN BnDa Ha 3aTbAHeHnMaTePnA.
Tpi TOBa AIO3aTa, CMyKaTeHHaTa Tpb6a N CMyKaTeAHnMapKyu He 6NBA Da ca 3aDpBCTeHN, TbN KATO TOBa CbIO BODN DO 3aDeiCTBaHe Ha INHdNkauHrTa 3a CMHaHaΦHtbpa.
Φn. 20
Ipn 3aAeHCTBaH 6yToH 3a OTBapHHe KaTaNbT Ha ypeDa ce IOBnra AekO.
Бркнete ПОД KaNTaKa N OTBAPnTe B TIOcOKa Ha CTpeKkata,doKAto KaNtCeФHKnPaB OTBOpeHo TIOAOXeHne.
Φnrg. 21
a)3aTbOpete Hn3BaTe ΦnAtpHaTa TOp6a Upe3 H3TErAHe 3a 3aTBapuata PAActHnKa.
6)IOCTaBete B aBpKaa HOBa cHbPHa TOp6nUka n 3aTBopeTe KaNa Ka Ha IpaXoyAOBHTeAHOTo OTdEHeHne.
BHHMaHHe: KaTaNbT ce 3aTbApra cMo TpN NoCTaBeHa TbPHa Top6a.
TouncBaHe Ha 3aunTHnH PnHTbp Ha ABnraTeA
TouncBaTe peoBHO Ha paBHH INHTepBaAM OT BpeMe 3aunTHHn FAHbP Ha ABnraTeAe TOCpeAcTBOM TOuyKBaHe HAn PpommbaHe!
Φn.r. 22
OTBopete KaTaka Ha IpaXoyAOBHTeHOTO OTdeAeHne (BnK 20).
Ocbo6oTeOTΦHKcaTopa3aunTHnHaHTbPHa MOTopaHToH3BaTeHaBbH BTOcOKaHaCTpeKaTa.
IIOuHCTe Te Upe3 IOuyKBaHe 3aunTHnA FnATbP Ha MOTopa.
Ipn cHNO 3aMbpcaBaHe 3aunTHnTf HAMTbP Ha MOTopa Tpa6Ba Da ce CMeHN. CLeTOBa oCTaBeTe fHATbPa Da IIOCTOn HAJ-MaKo 24 Yaca, 3a Da H3cbxHe.
CaeTIOUHCTBAHETOIOCTaBTe3aUNTHNHA MoTopa BYpeDa,ΦHKcnpaHTe rN 3aTBOpTe KaPaKa Ha IpaXoyOBHTeANHO TOdEHeHne.
CmHaHa MHKPOXnHHeHHnHnΦnTbp
ΦnΓ. 23*
OTBopeTe KaTaka Ha IpaXoyAOBHTeAHOTo OTdEHeHne (BnK dR. 20).
Ae6loKpaIte AbpXaHa HnTbpa KaTo 3a Ta3n UeHaTHcHTe 3aTBapraTa IIaHka B Tocoka HaCTpeAkata
CbaIeTPOyBaUNIeHOTAACT MKNKPOXnHEnHnNp. TocTaBeTe HOB MKNPOxHEnHueH FAnTbp N FAnTpyBaUNIeHONtAACT BDbPxAcaHa FAnTbpa.
IocTaBeTe AbpkaHa HaΦnATbpaB IpxoxcMykaKaKaTa n roΦnKcnpaTe.
CmHa Ha cHbpa"Hepa"
ΦnΓ. 24*
OTbopeTe KaTakaHa TpaxoyAOBHTeAHOTo OTdEHeHnE (BnK pnt.20).
Upe3 HaTnCKaHe Ha 3aTbapraTa TnactHka B IIOcKaHa CTpeAkaTa Ae6oKnpaIe HEPA-ΦnATbpa n roH3BaDeTe OT ypea.
TocTaBeteHOBΦnATbp"Hepa"HToΦnkCnpaTe.
CaeHn3cMyKBaHe Ha qHHuacTHua IpaX,IOUHCTeTe ue3 NouyKBaHe 3aunTHnHa HAMTbp HA MOTopa,eBEHT. CMeHeTe MmKpOxRnEHNHnHaHtbp,PhATbpa c akTNBeH BByIeHnnHEPA-PhNTpa.
TnDAbpXaHe
Ipeu BcKaIO IOUInCTBaHe Ha IpaXOCMyKaUKaTa, Tg Tp6Ba Da ce N3KIAUOn MpeXOBnT UeTceA da Ce N3BaAn.
PpaxocMykaKaTaN pInHaIeXHOCHTne OT IaCTMaCa MoT Da 6bDaT IOuHCTBaHn C ObuaHnTe Ha Ia3apa CpeCTBa 3a IOUHCTBaHe Ha IaACTMaH.
He n3no3BaIte n3tpBauu cpeAcTba, IpeIapaTH 3a IOUHCTBAHe Ha CTbKLo N yHNBepcaAHn CpeAcTba 3a YNCTHe.
Hnkora He NotaTnTe npaxocMykaKaTa BbB BOa.
Pn Heo6xOAnMoCT PpaxoyOBHTeHOTo OTaEHeMe MoKe Da Ce ToHCn C Apyra PpaXocMykaUKa Hn PpocTo Cbc Cyxa KbpTa / YeTkA 3a Ppax.
3aTaaeHNo IpaBo Ha TexHnueckn H3MeHeHn.
bg
OnakOBka CMeHReMH qHATPN
ΦnntbptnTTGXXL(VZ41AFGXXL)
3a otAnuHa pa60Ta: GXXL plus (VZ41GXXLP)
CbAbpKaHHe:4nntbphNTop6n C npncoc6aHHe 3a 3aTbapAHe 1 MnkpoxnrHneHueh FnTbp
http://www.dust-bag-siemens.com
HEPA-ФИNTbp (Klaac H12) VZ154HFB
IpeopbUba ce 3a xopa c aaleprn. 3a n3KIAOHTeAHO uNCT N3dYXBaH Bb3dyX. Da ce CMeH eIN H bT B rOAnHaTa.
Yetka TURBO-UNIVERSAL\*VZ102TBB
YeTKaHe Hn3CMyKBaHe Ha Tpax B eHa pa6oTHa Opeaunrno MOKeTc Kbc fApOp n MOKeTHn TIOOBn HAcTHaKn HAn 3a BCNUHn HAcTHaKn. Oco6eHo TpHroDeHa 3a H3CMyKBaHe Ha XHBOTnHcN KOcmN. 3aBbXbaHeTo Ha YeTKOBn BAJk CtBa Npe3 3ACMyKBaHHI TOK Ha IpaXOCMyKaUKaTa. HMa HyXda OT BKAIOUBAHe B eEkeTpueckata MPexa.

AIO3a 3a TBbPd IOA VZ123HD
3a n3cmykBaHe Ha npax TIO rAdkn IIOOBe (napket, IIOUckN, TepaKota,...)
H36bpcBauaaAIO3a VZ103WD
AIO3aTe e IIpHroDeHa 3a BCnKb BINOBE TBbpN IOOBN HAcTHnKn, KaTO HaIIpIMep IapKeT, AAMnHaT, AbcyeHbBpeHN IOOBe, KaMeHN NIOOBe, NIOUKN, HAp. (IpeBapHTeHNO IIOBepTe DeHCTBHeTo Ha KbpNTe 3a BlaxHo IOuHCTBaHe BbpxU yBCTBnTEAHN TBpN IOOBn Ha HKaroe He3a6eJekmo MrcTo). N3cMykBa rpyb uACTnKb 3aMbpCBAHn, a B CbIoTO BpeMe C IOMoHTa Ha 3akpePeHaTa KbPnA IOAbT MOKe Da 6bDe IOUnCTeh BIAxHO.
1 Perie comutabila pentru所提供e cu manson de deblocare
2 perie pentru所提供comutabilita
3 Perie pentru gresie / parchet
4 Tub telescopic cu manson glisant si manson de deblocare
5 Tub telescopic cu dispositiv * glisant
6 Manerul furtunului*
7 Furtun de aspirator
8 Indicator putere
9 Indicator de schimbare a filtrului
Luati in considerare
- Priza de alimentare trebuie s+ aibā o siguranṭa de cel putīn 16 A.
gall gll gll gll gll gll gll gll gll gll gll gll gll gll gll gll gll gll gll gll gll gll gll gll gll gll gll gll gll gll gll gll gll gll gll gll gll gll gll gll gll gll gll gll
LgS Lgcls 2.
VZ123HD
(..

VZ103WD
y 1
LbLiBii 1y
aill
Jg jg Jg Jg Jg Jg Jg Jg Jg
LdWyI Jn 1e Gwssal lglal y IglaIag zisSall ayll
1y 1y
gilllllgljgljlllllgljglalldj
a
all 151 awwasall y
gssisso pssuysaasaaasaaasaaasaaasaaasaa
aLg aBb i 1s j/ aBb i Bgs plu
Jzalal aLas jil
jai jia jaoabii ojiie dajal aolao jilj
| 1,43,0| < | 43,12,0|
22 3
(20 15bc
a1^x = 23a0^x,b1^x = 23b0^x
.
L
J 15
31
ii 1
gall jglgksll
23*
(20 8
a
3.3.3.11
1.45
jlll Jolal jilll lgl 1
Hepa
24
(20 8j
Hepa j
aill
Hepa
y
ailllll lal yllllllllllllllll
.HEPA jili
15
gag gall gglal 1
ailll 1
a a
aill
16 3
aissall Jssy sly 1d llll aaii j aiisoll plsiil si
· = 0
1
17 3
18
Jai/ 1ggiil 2kll all yjy jy gall jlll pli
a.s.s.s
aai jai jai gall aiaal lajg. piai aaiisall
aill 1
1
jai j
19
a 1
a 10000000000000000000000000000000000000000000000
y
20 3,40
aIall aicll 1Lacil pll J 1000 11 11
y 154jS13iuiicai jy
jLg 11 jaiai jia 11 jy 20
Lac p j 2 Jus y Jusy 100 100 100 100 100 100 100 100 100 100 100 100 100 100 100 100 100 100 100 100 100 100 100 100 100 10
Siemens 25 jia 2400, 1600, 1500, 1400, 1300, 1200, 1100, 1000, 900, 800, 700, 600, 500, 400, 300, 200, 180, 160, 150, 140, 130, 120, 110, 100, 90, 80, 70, 60, 50, 40, 30, 20, 18, 17, 16, 15, 14, 13, 12, 11, 10, 9, 8, 7, 6, 5, 4, 3, 2, 1, 0
Aulu 1
1VZ6 1
y y
pui 1111 1111 1111 1111 1111 1111 1111 1111
Lalallll ball
jai jiai jiu xu zao zuiol 0
Laiill lal 2wicall piaiwl lais
AE United Arab Emirates,
BSH Home Appliances FZE
Round About 13
Plot Nr MO-0532A
Jebel Ali Free Zone -Dubai
Tel.:048814401
mailto:service-ua@bshg.com
www.siemens-home.ae
HEATHERTON, Victoria 3202
Tel.: 1300 368 339
Fax:1300306818
valid only in AUS
mailto:bshau-as@bshg.com
www.siemens-home.com.au
09/11
BA Bosnia-Herzegovina, Bosna i Hercegovina
"HIGH" d.o.o.
Gradačačka 29b
71000 Sarajewo
Info-Line: 061 10 09 05
Fax:033213513
mailto:delicnanda@hotmail.com
BE Belgique, Belgie, Belgium
BSH Home Appliances S.A.
+7 snt/min (alv 23%)
+17 snt/min (alv 23%)
Kundendienst-Zentren · Central-Service-Depots · Service Apres-Vente · Servizio Assistenza · Centrale Servicestation · Asistencia Tecnica · Servicevaerkter · Apparatservice · Huolto
FR France
BSH Electromenager S.A.S.
50 rue Ardoin-BP 47
93401 Saint-Ouen cedex
To arrange an engineer visit, to order spare parts and accessories or for product advice please visit:
www.siemens-home.cu.uk or call
Tel.:0844 892 8999*
*Calls from a BT landline will be charged at up to 3 pence per minute. A call set-up fee of up to 6 pence may apply.
GR Greece, EAAAs
BSH Ikiakes Siskeves A. B. E.
Central Branch Service
17 km E.O. Athinon-Lamias &
Potamou 20
14564 Kifisia
Greece - Athens
Tel.:2104277701
Fax:2104277669
North-Greece - Thessaloniki
Tel.: 2310 497 200
Fax:2310497220
South-Greece - Heraklion/Kreta
Tel.:2810325403
Fax:2810324585
Central-Greece - Patras
Tel.: 2610 330 478
Fax:2610331832
mailto:cs_gr_helpdesk@bshg.com
www.siemens-home.com
HK Hong Kong, 香港
BSH Home Appliances Limited
Unit 1 & 2, 3rd Floor
North Block, Skyway House
3 Sham Mong Road
Tai Kok Tsui, Kowloon
Hong Kong
Tel:25656151
Fax: 2565 6681
mailto:service.siemens@
bshg.com
www.siemens-home.com.hk
09/11
HR Hrvatska, Croatia
Andabaka d.o.o.
Kopilica 21a
21000 Split
Info-Line: 021481403
Info-Fax: 021 453 891
mailto:servis@andabaka.hr
HU Magyarorszag, Hungary
IE Republic of Ireland
BSH Home Appliances Ltd.
Unit F4, Ballymount Drive
Ballymount Industrial Estate
Waikinstown
Dublin 12
Service Requests, Spares and
Accessories
Tel.: 01450 2655
Fax:014502520
www.siemens-home.com
IL Israel,
C/S/B Home Appliance Ltd.
Uiel Building
2.Hamelacha St.
Industrial Park North
71293 Lod
Tel.: 089777222
Fax:089777245
mailto:csb-serv@zahav.net.il
www.siemens-home.com
IN India, Bharat,
BSH Customer Service
Front Office
Shop No.4, Everest Grande,
Opp. Shanti Nagar Bus Stop,
Mahakali Caves Road
Andheri East
Mumbai 400 093
IS Iceland
Smith & Norland hf.
Noatuni 4
105 Reykjavik
Tel.: 05203000
Fax:05203011
www.sminor.is
IT Italia, Italy
LT Lietuva, Lithuania
Baltic Continent Ltd.
Luk\$io g.23
09132 Vilnius
Tel.:052741788
Fax:052741765
mailto:info@balticcontinent.It
www.balticcontinent.it
LU Luxembourg
General Serviss Limited
Bullu street 70c
1067 Riga
Tel.:07424137
mailto:bt@olimpeks.lv
Elkor Serviss
Brivibas gatte 201
1039 Riga
Tel:067070520-36
Fax:067 0705 24
mailto:domoservice@elkor.lv
www.servisacentrs.lv
MD Moldova
S.R.L. Rialto-Studio
yn. LycceBa 98
2012 KnuHneB
TeJ./paKc:022 23 81 80
ME Crna Gora, Montenegro
Elektronika komerc
Ul. 27 Mart br. 2
81000 Podgorica
Tel./Fax:020662444
Mobil: 069324812
Kundendienst-Zentren · Central-Service-Depots · Service A Pres-Vente · Servizio Assistenza · Centrale Servicestation · Asistencia tcnica · Servicevaerkter · Apparatservice · Huolto
MK Macedonia, Makeonna GORENEC
Jane Sandanski 69 lok.3
1000 Skopje
Tel.: 02 2454 600
Mobil: 070697463
mailto:gorenec@yahoo.com
MT Malta
Aplan Limited
Aplan Centre
B-Kara By Pass
B-Kara BKR
Tel:021480590
Fax:021480598
mailto:lapap@aplan.com.mt
NL Nederland, Netherlands
Union Industrial Building
Block A, #01-03
577177 Singapore
Tel.67515000
Fax:67515050
mailto:bshsgp.service@bshg.com
SI Slovenija, Slovenia
BSH Hišni aparati d.o.o.
Litostrojska 48
1000 Ljubljana
Tel.: 015830887
Fax:015830889
gama-electronics.com
XS Srbija, Serbia
15th Road Randjespark
Private Bag X36, Randjespark
1685 Midrand-Johannesburg
Tel.:086 002 6724
Fax:0866171780
mailto:applianceserviceza@
bshg.com
www.siemens-home.com
DE Garantie
GB Conditions of guarantee
For this appliance the guarantee conditions as set out by our representatives in the country of sale apply. Details regarding same may be obtained from the dealer from whom the appliance was purchased. For claims under guarantee the sales receipt must be produced.
FR Conditions de garantie
"This appliance is labelled in accordance with the European directive 2002/96/EG concerning waste electrical and electronic equipment - WEEE.
The directive provides the framework for the return and recycling of used appliances as applicable throughout the EU."
fr
2002/96 a y 1a gall jall (waste electrical and electronic equipment - WEEE).
Degerli Musterimiz,