
BV4630 - Hand blender UFESA - Free user manual and instructions
Find the device manual for free BV4630 UFESA in PDF.
| Brand | UFESA |
| Model | BV4630 |
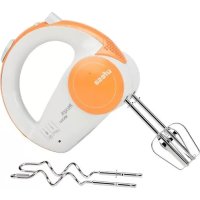
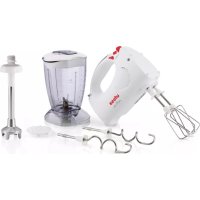
| Product type | Immersion blender with stand and rotating bowl |
| Color | White and gray (estimated) |
| Blending shaft material | Stainless steel and plastic |
| Bowl capacity | Not specified, bowl included |
| Number of speeds | 5 speeds (1-5) + turbo |
| Power | Not specified (estimated 300-500 W) |
| Included accessories | Mixer whisks, kneading hooks, blending shaft, stand with rotating bowl, protective cover |
| Main functions | Mix, beat, stir, knead, emulsify |
| Use | Handheld or on stand with rotating bowl |
| Maximum operating time (whisks) | 15 minutes continuous |
| Maximum operating time (blending shaft) | 5 minutes continuous |
| Recommended rest time | 20 minutes after continuous use |
| Cleaning the motor unit | Damp cloth, do not immerse |
| Cleaning whisks and bowl | Dishwasher or soapy water |
| Cleaning the blending shaft | Under running water, do not immerse, do not put in dishwasher |
| Safety | Whisk ejection only with motor off, turbo disabled if selector at 0, very sharp blade |
| Power supply | 220-240 V, 50/60 Hz (standard estimated) |
| Cord length | About 1 m (estimated) |
| Weight | Not specified (estimated 1.5-2 kg with accessories) |
Frequently Asked Questions - BV4630 UFESA
User questions about BV4630 UFESA
0 question about this device. Answer the ones you know or ask your own.
Ask a new question about this device
Download the instructions for your Hand blender in PDF format for free! Find your manual BV4630 - UFESA and take your electronic device back in hand. On this page are published all the documents necessary for the use of your device. BV4630 by UFESA.
USER MANUAL BV4630 UFESA
natural_image
White multifheater mixer with a hand mixer in a bowl, no visible text or symbols on the device itself.BV4625
BV4630
GEBRAUCHSANLEITUNG
natural_image
Close-up of a hand using a screwdriver to adjust a white handheld device (no text or symbols visible)
natural_image
Close-up of a hand using a screwdriver on a handheld device, no visible text or symbols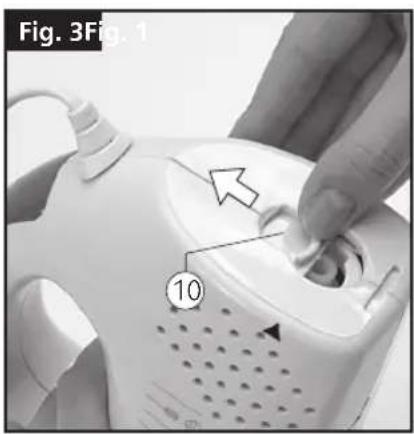

natural_image
Close-up of hands using a hairdryer to apply a spray nozzle onto a white electric fan (no text or symbols visible)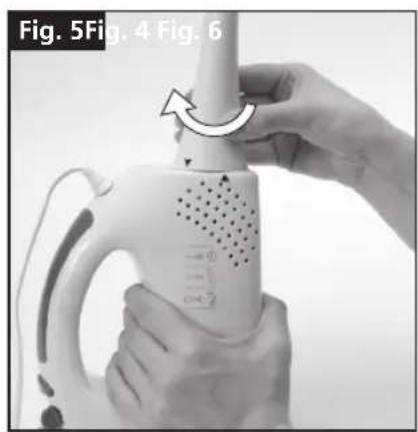
natural_image
Close-up of hands using a hairdryer with a brush applying material to a surface (no text or symbols visible)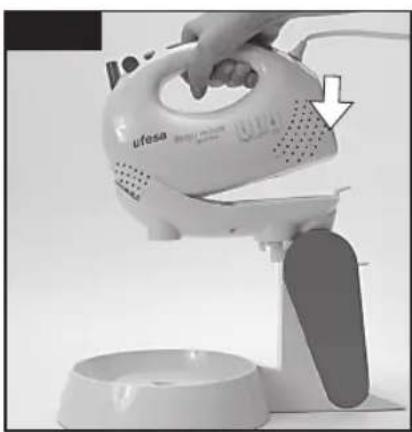
natural_image
Hand using a white Ufesa-branded hairdryer to clean or store floor (no text or symbols visible)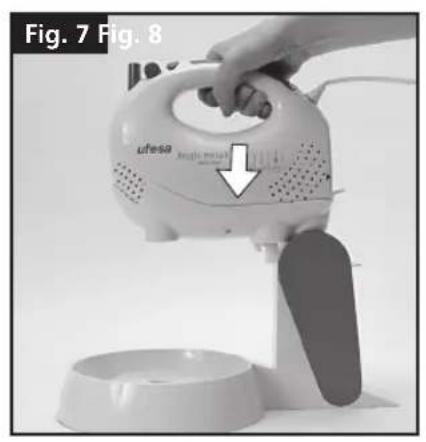
natural_image
Hand operating a white coffee maker with a lid, showing a hand holding the lid and a downward arrow indicating motion (no text or symbols on device)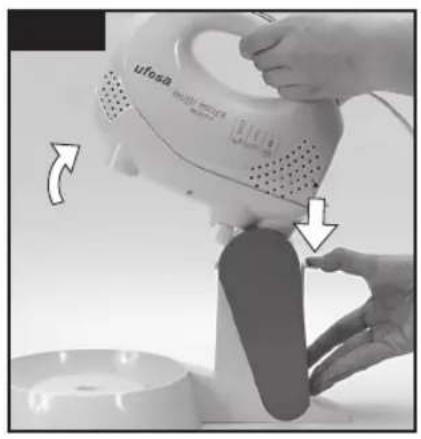
natural_image
Close-up of hands operating a white hairdryer with a hand holding the blade (no visible text or symbols)
natural_image
Hand operating a white portable blender with a side bowl nearby, labeled 'Fig. 9' (no text on device or bowl)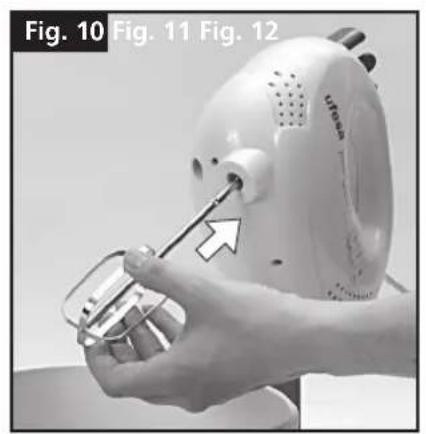
natural_image
Close-up of a hand using a white electric shaver with a screwdriver, labeled Fig. 10 to Fig. 12 (no text on device or background)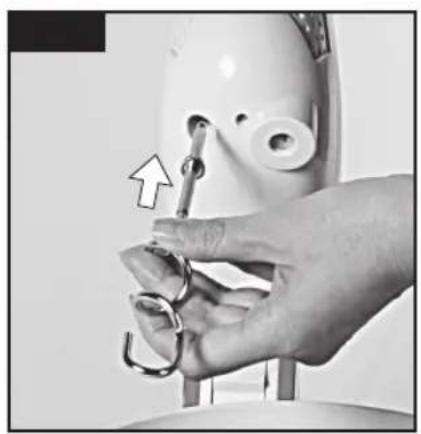
natural_image
Close-up of a hand holding a small metallic key with a white mechanical component, no visible text or symbols
natural_image
Person using a white Lufesa blender to mix a bowl with a hand, no visible text or symbols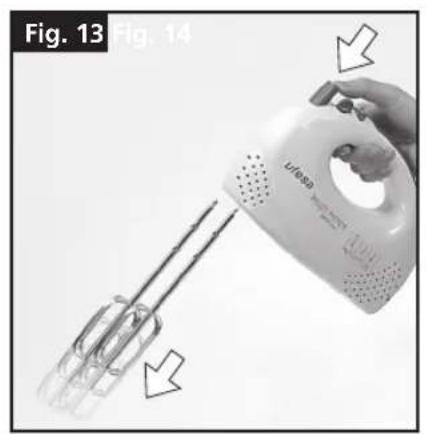
natural_image
Hand holding a white U/88A blender with whiskers, no visible text or symbols on the device itself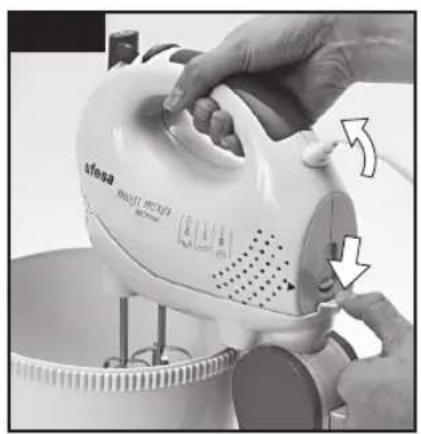
natural_image
Close-up of hands operating a white air fryer with a mixing bowl (no visible text or symbols)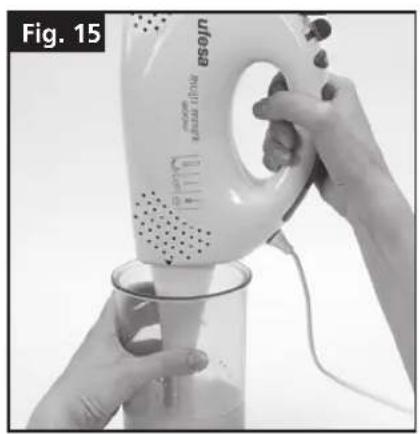
natural_image
Person using a white hairdryer to lift water from a glass cup (no text or symbols visible)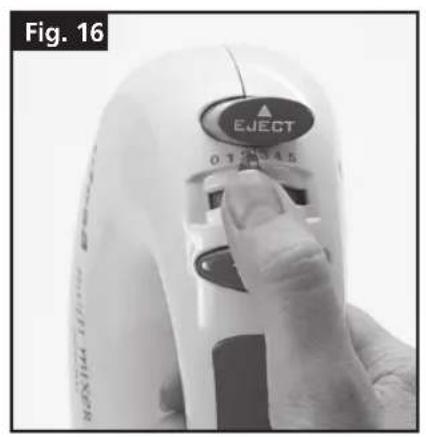
ESPAÑOL
DESCRIPTION OF THE APPLIANCE
- Motor housing
- Whisk release button
- Vent holes
- Speed selector
- Turbo speed button
- Mixer foot
- Stainless steel blade
- Whisks
- Dough hooks
- Safety cover
For model BV4630
- Support for rotating bowl
- Support retaining clip
- Hand mixer retaining clip
- Hand mixer release clip
- Rotating bowl drive wheels
- Bowl retaining clip
- Bowl
IMPORTANT NOTES
- Read through these instructions carefully before using the appliance for the first time. Safeguard them for future reference.
- Before plugging the appliance into the mains, check that the voltage corresponds to that stated on the characteristics plate. • Never immerse the appliance in water or any other liquid.
- This appliance has been designed exclusively for domestic use. For indoor use only.
- This appliance must not be used by persons (including children) with physical, sensory or mental impairments unless they have been instructed in its correct use by a responsible adult.
- Children must be supervised to ensure that they do not play with the appliance.
- To prevent the motor from overheating do not obstruct the appliance's vent holes (3) while it is operating.
- Make sure that the appliance is off before fitting or removing the mixer foot accessory (5) and the whisks (8-9).
- Unplug the hand mixer if you detect any damage on the motor housing (1) or the mains cable.
- Before switching on make sure that the mixer foot and the whisks (8-9) are fitted correctly to the motor housing (1).
- Unplug the hand mixer if:
- It does not work properly
- Before attempting to clean it
- After each use
- Never unplug it by tugging on the mains cable. Never leave the mains cable hanging freely.
- Keep the hand mixer and cable away from hot surfaces.
- Never use the hand mixer for purposes other than those stated in this manual.
- Do not handle the appliance with wet hands.
- Do not operate the appliance with the cable still coiled.
-
Use soapy water to wash all the pieces that are going to come into contact with foodstuffs.
-
This appliance is suitable for use with foodstuffs.
- Avoid contact with the moving parts
- Do not touch the blade during use, as it is very sharp. The blade will continue to spin for a short time after the appliance is switched off
- When using the mixer foot:
- The edge of the blade is very sharp. Handle it with great care to avoid injuries. Always use the plastic handle.
- Always place the jug on a flat, clean surface.
- Hold the hand mixer firmly during use.
- Never insert metal utensils, such as knives or forks, inside the jug while the appliance is operating.
- Do not operate the appliance without a workload.
- Do not use the appliance for hot oil as there is a risk of burns due to splashing.
- Never immerse the motor housing (1) in water or any other liquid.
- Continuous use for more than 15 minutes is not recommended. When using the whisks (8-9) and 5 minutes when using the mixer foot (6). If you wish to continue using the appliance, leave it to rest for 20 minutes.
- To prevent the motor from overheating, do not use speeds 1 or 2 while using the dough hooks.
- Keep your hands, hair and clothing away from the appliance during use. Never touch any moving parts (6-8-9-17) during use.
- Do not switch the appliance on if the cable or the plug are damaged or if it can be detected that the appliance is not working correctly
- Cable repairs and replacements must be carried out exclusively by an Authorised Technical Service Centre.
ACCESSORIES
1.- Whisks (8):
These are recommended for beating egg whites and cream, preparing custard, whipped cream, etc. sauces, mayonnaise, flans, batters, pancake mixes, omelettes.
You can use the whisks to start mixing the ingredients and then change over to the dough hooks (9) to mix the dough correctly.
These are recommended for mixing dry pastry (e.g. puff pastry, shortcrust pastry) and soft pastries (e.g. sponge and cake mixes).
3. Mixer foot accessory (6):
This is ideal for mixing liquids, preparing fruit and vegetable juices.
4. Hand mixer support (11) Mod. BV4630:
This hand mixer can be used independently of the mixer support depending on your needs.
USING THE HAND MIXER MANUALLY Models BV-4625 & BV-4630
Whisks and dough hooks:
Insert the whisks (8) or dough hooks (9), holding the handle of the mixer in one hand and the shank of the mixer rod in the other.
Insert the shank into the rod holes (Figure 1), turning it slightly so that it locks into position.
Do the same to attach the other rod. Before switching the hand mixer on, make sure that the rods are fitted correctly.
The whisks can be inserted into either hole.
However the dough hooks have specific holes. The dough hook with the washer fitted to the shank must be inserted into the widest hole on the food mixer. (Figure 2)
Mixer foot:
Open the safety cover (10) located at the back of the hand mixer. (Figure 3) Insert the mixer foot (6) into its housing, lining up the guide arrows. (Figure 4)
Tum the mixer foot (6) clockwise until you notice it stop. (1/4 turn) (Figure 5)
The blade on the mixer foot is protected by a small plastic cover. Make sure to remove this before attempting to use the mixer foot. The edge of the blade is very sharp, so be careful not to injure yourself.
As a safety measure make sure to remove the whisks or dough hooks before inserting the mixer foot.
USING THE HAND MIXER ON THE SUPPORT WITH ROTATING BOWL Model BV-4630
Fitting the motor housing to the support:
Rest the front of the hand mixer into its housing on the support (11). (Figure 6)
Press down on the hand mixer so that it locks in correctly. (Figure 7)
Check that the hand mixer has been fitted correctly.
Fitting the food bowl onto the support:
Press the support retaining clip (12) allowing the support to swing up. (Figure 8)
Place the food bowl (17) onto the support (11).
Swing the top of the support down onto the bowl so that it slots on correctly. (Figure 9)
Check that the bowl is slotted onto the base correctly.
Whisks and dough hooks:
To insert the whisks (8) or dough hooks (9), first swing the support (11) back up by pressing the support retaining clip (12).
Insert the shank into the rod holes, turning it slightly so that it locks into position. (Figure 10)
Do the same for the other rod and then make sure that the rods are fitted correctly.
The whisks can be inserted into either hole.
However the dough hooks have specific holes. The dough hook with the washer fitted to the shank must be inserted into the widest hole on the food mixer. (Figure 11)
Swing the top of the support down onto the bowl so that it slots on correctly. (Figure 12)
ATTENTION: Make sure that the hand mixer is unplugged and the speed switch is set to "0" before fitting the whisks or the dough hooks.
USE
Whisks and dough hooks:
Once the rods have been fitted correctly, plug the hand mixer into the electric socket and select a suitable speed, based on what you intend to mix.
To prevent splashing, insert the whisks (8) or dough hooks (9) into the food before you switch the mixer on.
Place the rods into the centre of the food that you wish to mix.
Select a suitable speed for work you intend to do.
Move the rods about constantly to ensure an even mix.
When mixing dough, it is best to start off with the liquid ingredients, adding solids gradually to obtain an even mix.
To release the rods, set the speed selector to the "0" position, unplug the appliance from the wall socket and press the whisk release button (2), (Figure 13).
Working with the support with rotating bowl: Model BV-4630
With the rods inserted correctly into the hand mixer, mounted on the support with the bowl, proceed in the same way as using the hand mixer manually.
To release the rods when using the support, set the speed selector to "0" and unplug the appliance from the mains. To release the rods, first swing the support (11) up by pressing the support retaining clip (12).
Press the whisk release button (2).
To take the hand mixer (1) off the support (11), press the hand mixer release clip (14) and lift the mixer upward (Figure 14)
Mixer foot:
Once the mixer foot has been fitted correctly, plug the hand mixer into the electric socket.
The mixer foot can only be used at maximum speed, set the speed selector "4" to any position other than "0" and activate the function using the turbo speed button "5".
The speed selector function "4" is not operative when the mixer foot is attached to the blender
Always place the mixing jug on a flat, stable surface.
Keep a firm grip on both the mixer and the jug during use. (Figure 15)
To prevent splashing, insert the mixer foot into the food before you switch it on.
Move the mixer foot about constantly to ensure an even blend.
The edge of the blade is very sharp, so be careful not to injure yourself.
As a safety measure make sure to remove the whisks or dough hooks before inserting the mixer foot.
ATTENTION: When finished, set the speed selector to the "0" position, unplug the appliance from the wall socket and take the mixer foot off the motor housing so it can be cleaned.
Make sure to close the protective cover "10" before attempting to fit the whisks or dough hooks. Once you have done this the speed selector "4" will be operative again.
SAFETY SYSTEM:
The hand mixer is fitted with a safety system that prevents the rods from being released while the motor is running. Before re-leasing the rods, set the speed selector to the "0" position and unplug the appliance from the wall socket.
The hand mixer is fitted with another safety system that prevents the "TURBO" speed setting from being used if the speed selector is set to "0".
The mixer foot can only be used with the turbo speed button, as this accessory overrides the speed selector function "4". This prevents the mixer foot from being left running continuously at a set speed, given that the user has to keep the button pressed manually.
SPEED SELECTOR
The speed can be selected by turning the speed selector (4) to any of the five different positions (Fig. 16)
Level 1-2: (Low speeds) The best speeds at which to start mixing. For continuously stirring, whisking or mixing light ingredients or liquids. They are also used for whipping egg whites or mixing flour for dough.
Level 3-4: (Medium speeds) Especially suitable for thick batters or mixes.
Level 5: (High speed) Especially suitable for beating egg whites, cake mixes and sauces. Also used for kneading heavier dough.
Turbo button: (High speed) exclusive system specially designed for increasing speed regardless of the speed setting.
"TURBO" speed cannot be used if the speed selector is set to the "0" position.
It is advisable to use this when you require high mixing speeds for very short periods.
The operating speed can be changed while it is working.
To prevent the motor from overheating, do not use the "TURBO" function for longer than one minute.
CLEANING & CARE
Before cleaning any part on the hand mixer, set the speed selector (4) to the "0" position. Then unplug the mains cable from the wall socket and release the rods (8-9). Make sure to dry all of the parts before reusing them.
Whisks and dough hooks:
The rods (8-9) can be washed in hot soapy water or in the dish - hwasher.
Mixer foot
Do not immerse the foot in water as this will ruin the bearing lubricant. Clean it under a running tap, without using harsh detergents. Do not put it into the dishwasher. Turn it upside down to drain out any water that may have got into it.
Motor housing and mixer support
The hand mixer motor housing (1), the mixer support (11) and the mains cable should be wiped clean with a damp cloth.
Never immerse these in water or any other liquid.
To remove stubborn stains, clean with a cloth slightly dampened with soapy water or a mild, non-abrasive, cleaning agent. Finish off with a clean damp cloth.
Do not use abrasive cleaning products.
DO NOT IMMERSE THE HAND MIXER OR CABLE IN WATER OR ANY OTHER LIQUID.
ADVICE ON DISPOSAL:
Our goods come in optimised packaging. This basically consists in using non-contaminating materials which should be handed over to the local waste disposal service as secondary raw materials.
This product complies with EU Directive 2002/96/CE. The crossed wheelie bin symbol shown on the appliance in - indicates that when it comes to dispose of the product it must not be included in with household refuse. It must be taken to a special refuse collection point for electric and
electronic appliances or returned to the distributor when purchasing a similar appliance. Under current refuse disposal regulations, users who fail to take discarded appliances to special refuse collection points may be penalised. Correct disposal of discarded appliances means that they can be recycled and processed ecologically, helping the environment and allowing materials used in the product to be reused. For more information on available waste disposal schemes contact your local refuse service or the shop where the product was purchased. Manufacturers and importers are responsible for ecological recycling, processing and disposal of products, whether directly or via a public system.
Your local town council can provide you with information about how to dispose of obsolete appliances.
FRANÇAIS
DESCRIPTION DE L'APPAREIL


- ESPAÑOL
- DESCRIPTION OF THE APPLIANCE
- For model BV4630
- IMPORTANT NOTES
- ACCESSORIES
- 1.- Whisks (8):
- Mixer foot accessory (6):
- Hand mixer support (11) Mod. BV4630:
- USING THE HAND MIXER MANUALLY Models BV-4625 & BV-4630
- Whisks and dough hooks:
- Mixer foot:
- USING THE HAND MIXER ON THE SUPPORT WITH ROTATING BOWL Model BV-4630
- Fitting the motor housing to the support:
- Fitting the food bowl onto the support:
- USE
- Working with the support with rotating bowl: Model BV-4630
- SAFETY SYSTEM:
- SPEED SELECTOR
- CLEANING & CARE
- Mixer foot
- Motor housing and mixer support
- ADVICE ON DISPOSAL:
- FRANÇAIS
- DESCRIPTION DE L'APPAREIL
Brand : UFESA
Model : BV4630
Category : Hand blender