
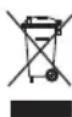
BV4610 - Hand blender UFESA - Free user manual and instructions
Find the device manual for free BV4610 UFESA in PDF.
| Product type | Immersion blender |
| Brand | Ufesa |
| Model | BV4610 |
| Power supply | 220-240V ~ 50/60Hz (grounded plug) |
| Power | 400 W (estimated) |
| Speeds | 5 speeds + turbo |
| Main functions | Mix, beat, whisk, knead |
| Included accessories | Mixing whisks, kneading hooks, resting stand |
| Motor unit | Not immersible, clean with a damp cloth |
| Whisks | Dishwasher safe |
| Eject button | Whisk ejection only when motor is off and unplugged |
| Anti-ejection safety | Prevents whisk ejection while running |
| Turbo safety | Turbo disabled if selector is on 0 |
| Max operating time (whisks) | 15 minutes without interruption |
| Max operating time (turbo) | 1 minute without interruption |
| Recommended rest | 20 minutes after prolonged use |
| Operating temperature | Do not pour hot oil |
| Resting stand | To place the appliance on pause (not in operation) |
| Warranty | See manufacturer's terms |
| Country of origin | Not specified |
Frequently Asked Questions - BV4610 UFESA
User questions about BV4610 UFESA
0 question about this device. Answer the ones you know or ask your own.
Ask a new question about this device
Download the instructions for your Hand blender in PDF format for free! Find your manual BV4610 - UFESA and take your electronic device back in hand. On this page are published all the documents necessary for the use of your device. BV4610 by UFESA.
USER MANUAL BV4610 UFESA
DESCRIPTION OF THE APPLIANCE
- Motor housing
- Whisk release button
- Vent holes
- Speed selector
- Turbo speed button
- Whisks
- Dough hooks
- Support stand
IMPORTANT NOTES
- Read through these instructions carefully before using the appliance for the first time. Safeguard them for future reference.
- Before plugging the appliance into the mains, check that the voltage corresponds to that stated on the characteristics plate. Use an electrical socket with an earth connection.
- Never immerse the appliance in water or any other liquid.
- This appliance is not intended for use by persons (including children) with reduced physical, sensory or mental capabilities, or lack of experience and knowledge, unless they have been given supervision or instruction concerning use of the appliance by a person responsible for their safety.
Children should be supervised to ensure that they do not play with the appliance. - To prevent the motor from overheating do not obstruct the appliance's vent holes (3) while it is operating.
- Make sure that the appliance is off before fitting or removing the mixer foot accessory (5) and the whisks (8-9).
- Unplug the hand mixer if you detect any damage on the motor housing (1) or the mains cable.
- Before switching on make sure that the mixer foot and the whisks (8-9) are fitted correctly to the motor housing (1).
- Unplug the hand mixer if:
- It does not work properly
- Before attempting to clean it
- After each use
- This appliance is not intended for use by persons (including children) with reduced physical, sensory or mental
capabilities, or lack of experience and knowledge, unless they have been given supervision or instruction concerning use of the appliance by a person responsible for their safety.
- Children should be supervised to ensure that they do not play with the appliance.
- The appliance is not intended to be operated by means of an external timer or separate remote-control system.
- Never unplug it by tugging on the mains cable. Never leave the mains cable hanging freely.
- Keep the hand mixer and cable away from hot surfaces.
- Never use the hand mixer for purposes other than those stated in this manual.
- Do not handle the appliance with wet hands.
- Do not operate the appliance with the cable still coiled.
- Use soapy water to wash all the pieces that are going to come into contact with foodstuffs.
- This appliance is suitable for use with foodstuffs.
- Avoid contact with the moving parts
- Never insert metal utensils, such as knives or forks, between the rods while the appliance is operating.
- Do not use the appliance for hot oil as there is a risk of burns due to splashing.
- Never immerse the motor housing (1) in water or any other liquid.
- Continuous use for more than 15 minutes is not recommended. When using the rod attachments (6-7) If you wish to continue using the appliance, leave it to rest for 20 minutes.
- To prevent the motor from overheating, do not use speeds 1 or 2 while using the dough hooks.
- Keep your hands, hair and clothing away from the appliance during use. Never touch any of the moving parts (6-7) during use.
- Do not switch the appliance on if the cable or the plug are damaged or if it can be detected that the appliance is not working correctly
- Cable repairs and replacements must be carried out exclusively by an Authorised Technical Service Centre.
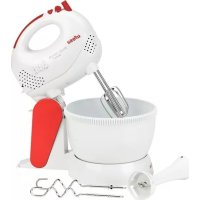
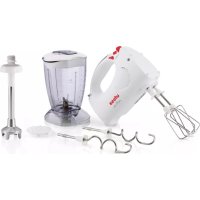
ACCESSIONS
1.-Whisks (6):
These are recommended for beating egg whites and cream, preparing custard, whipped cream, etc. sauces, mayonnaise, flans, batters, pancake mixes, omelettes.
You can use the whisks to start mixing the ingredients and then change over to the dough hooks (7) to mix the dough correctly.
These are recommended for mixing dry pastry (e.g. puff pastry, shortcrust pastry) and soft pastries (e.g. sponge and cake mixes).
Whisks and dough hooks:
Insert the whisks (6) or dough hooks (7), holding the handle of the mixer in one hand and the shank of the mixer rod in the other.
Insert the shank into the rod holes (Figure 1), turning it slightly so that it locks into position.
Do the same to attach the other rod. Before switching the hand mixer on, make sure that the rods are fitted correctly.
The whisks can be inserted into either hole.
However the dough hooks have specific holes. The dough hook with the washer fitted to the shank must be inserted into the widest hole on the food mixer. (Figure 2)
ATTENTION: Make sure that the hand mixer is unplugged and the speed switch is set to "0" before fitting the whisks (6) or the dough hooks (7).
USE
Whisks and dough hooks:
Once the rods have been fitted correctly, plug the hand mixer into the electric socket and select a suitable speed, based on what you intend to mix.
To prevent splashing, insert the whisks (6) or dough hooks (7) into the food before you switch the mixer on.
Place the rods into the centre of the food that you wish to mix.
Select a suitable speed for work you intend to do.
Move the rods about constantly to ensure an even mix.
When mixing dough, it is best to start off with the liquid ingredients, adding solids gradually to obtain an even mix.
To release the rods, set the speed selector to the "0" position, unplug the appliance from the wall socket and press the whisk release button (2), (Figure 3).
To place the appliance down between uses, the hand mixer can be rested on its stand (8), as shown in Figure 4.
However, under no circumstances must the mixer be placed in this position while operating. Set the speed selector to the "0" position to stop the rods rotating.
SAFETY SYSTEM:
The hand mixer is fitted with a safety system that prevents the rods from being released while the motor is running. Before releasing the rods, set the speed selector to the "0" position and unplug the appliance from the wall socket.
The hand mixer is fitted with another safety system that prevents the "TURBO" speed setting from being used if the speed selector is set to "0".
SPEED SELECTOR
The speed can be selected by turning the speed selector (4) to any of the five different positions (Fig. 5)
Level 1-2: (Low speeds) The best speeds at which to start mixing. For continuously stirring, whisking or mixing light ingredients or liquids. They are also used for whipping egg whites or mixing flour for dough.
Level 3-4: (Medium speeds) Especially suitable for thick batters or mixes.
Level 5: (High speed) Especially suitable for beating egg whites, cake mixes and sauces. Also used for kneading heavier dough.
Turbo button: (High speed) exclusive system specially designed for increasing speed regardless of the speed setting.
"TURBO" speed cannot be used if the speed selector is set to the "0" position. It is advisable to use this when you require high mixing speeds for very short periods.
The operating speed can be changed while it is working.
To prevent the motor from overheating, do not use the "TURBO" function for longer than one minute.
CLEANING & CARE
Before cleaning any part on the hand mixer, set the speed selector (4) to the "0" position. Then unplug the mains cable from the wall socket and release the rods (6-7). Make sure to dry all of the parts before reusing them.
Whisks and dough hooks:
The rods (6-7) can be washed in hot soapy water or in the dishwasher.
Motor housing
The hand mixer motor housing (1) and the mains cable should be wiped clean with a damp cloth.
Never immerse these in water or any other liquid.
To remove stubborn stains, clean with a cloth slightly dampened with soapy water or a mild, non-abrasive, cleaning agent. Finish off with a clean damp cloth.
Do not use abrasive cleaning products.
DO NOT IMMERSE THE HAND MIXER OR CABLE IN WATER OR ANY OTHER LIQUID.
ADVICE ON DISPOSAL:
Our goods come in optimised packaging. This basically consists in using non-contaminating materials which should be handed over to the local waste disposal service as secondary raw materials.
This product complies with EU Directive 2002/96/CE. The crossed wheelie bin symbol shown on the appliance indicates that when it comes to dispose of the product it must not be included in with household refuse. It must be taken to a special refuse collection point for electric and electronic appliances or returned to the distributor when purchasing a similar appliance. Under current refuse disposal regulations, users who fail to take discarded appliances to special refuse collection points may be penalised. Correct disposal of discarded appliances means that they can be recycled and processed ecologically, helping the environment and allowing materials used in the product to be reused. For more information on available waste disposal schemes contact your local refuse service or the shop where the product was purchased. Manufacturers and importers are responsible for ecological recycling, processing and disposal of products, whether directly or via a public system.
Your local town council can provide you with information about how to dispose of obsolete appliances.
FRANÇAIS
DESCRIPTION DE L'APPAREL
He DonyckaetcnoIb3ObaHne np60pom Nmamn (BkIouaJeTei)
HONJXeHHbIM yPOBHeM cN3ueCKoro, NCNXUeCKoro UIN yMCTBeHHOro pa3BHTn HIN HeOCTaTOHyBMn ONbITOM 3HaHnAMn, 3a NCKJIIOUeHNEM CnyAeB, B KOTOpBX NOIb3OBaHne np6opom PpOn3BOuNTcR NOI npNCMOrPOM Nua, OTBETCTBEHHORO 3a INx 6e30NaChocTB, INN daHHle Nlca ANoIyHnO T Hero COOTBeTCTByIOUne IHCTpyKUn.
XpaHntb np6op B HeOCTyHOM dIaTei MeTe. CneHtB 3a TeM, YTObI DeTn He IcNoIb3OBaJI np6Op KaK IrpyuKy.
- YcTpoIcTBo He npeHa3HaueHo dna pa60tbl OT BHeIHeRo TaMepa nn bTeBHOH CNCTEmbl DnCTaHIOHHOYnpaBLeHH.
HnKOrJa He BbIKIOuayTe npu6Op n3 Cetn pblBkOM uHypa nHTaHn. HnKOrJa He OctabnIe uHyp nHTaHn CBO6OHO Bu- CHUIM.
- Depknte pyHoi MNUKcep IN SHyP B yda-geHNOT TOPAUX NOBepxHOCTeN.
Hnkorga He noIb3yItecb pyHbIM-MK-Cepom BueJAX,OTNIHbIX OT TEX,KOTOpBIE yKa3aHbIB 3TOM pyKOBOIDCTBE NO 3KcNlya-- Taun.
He npikacaiTecb K npnbopy MOKpbIM npykamn.
He noIb3yntecb npnbopom, ecn uHypaHTAHNE eue He pa3MOTAH. - BbIMoIe BOdOc MbIOM BCE qACTN KOtOpIbe 6yDyT cOpNKacTaBcA C npOdyK-- TAMn nITaHna.
Haa 3TOT npn6op npnrodeH dna pa60tbNPOdykTaMn nTuHa.
He npKacaiTecb K DvKyuMcAa-
- HnKorJa He BCTaBJIrTe MeTaNJHcckne HNCTpyMeHTbl, HAnpIMep, HOxN NIN BUNK, MExdy CTePxHAMN BO BpeMa pa6o-TbI np6opa.
He nolb3yntcB np6opom dna TOpayero Macna, TaK KaB B IpOTNBOM Cnyae eCtbpCK nOyuHn OXOROB 3-3a 6pbI3r.
HnKorda He norpykaTe Kopnyc MoTopa (1) BBOyu nnIIObyu HNHyo KnKocTB.
- PnncnoB3OBAHn nCtepxHei (6-7) HepekomeHdyetcnoB3OBAbTcnp6bopom60nee 15 MNHT 6e3 nepepbIb. PnJKeJAnHnn pOdoNkTu bNoB3OBAHne np6oPaHaayana cdeNaTe nepepbIb Ha 20 MNHT.
- TTo6bI MOTOP He neperpenc, He nOlb3yIteCb CKOpocTAMn 1 nn 2 npn nC-- N0lb30BaHm MEcNlBhIX KpIKOB.
-Дерхиerte pa60taiou np6op B ydaIeHnOCTBOxpyK,BOONOC ODeXDbI HNKOrda He npKacaiTeCb K NOBbIXHbIM qactm (6-7) BO Bpempa60tb np6opa.
He BKJIOUaIte npi6op,ecn ero uHyp IcNOJIb3OBAHNE
HITaHn HIN BUNKa NOBpeXJeHbI, -a Xe BcLyueo6hApUKeHN HEnpaBnJbHoi pa6Otbl np60pa.
Pa60Tb no pemOHTu 3aMeHe UHypa NHTAHnI npnbopa DOJXHbI -npu3BODNTbcr TOJIbKO CNJAMn nepcoHaNA aBTOpN3OBaHHOro CEHTpa TexHueCKoro 06cnyKbAHnI.
TakC6BbAJIKN MecnIbHbIe KpOKn:
Iocne npaBnBHOYCTaHOBKn CTePxHeN BKNIOHTe pyHOB MIKCEPBPO3eTKU N Bbl--6epnte HxKHYO CKOPoCTb B 3aBNCUMOCTN OT npOdyKTOB, KOToPbIE PpeDCTOIT-CMe- WnBaTb.
YTO6bI He 6blIO 6bp3r, BCTaBBTe C6nBaJKN (6) NII MEcINbHbIe KPIOK (7) B-CMeW BaEMbie PPOdyKTbI NepeB BKJIIOueHHeM MUKCEpa.
ПИHAДLEЖHOCTN
1.-C6nbalkn(6):
PeKOMeHnyOTcA DIA B3BnBaHbR RnHbIXMbIX pOdyKTOB.
6eJIKOB n CnIBOK, PnIroTOBHeHn 3aBaAp- BbI6epNte HuxHyO cKOpocTb pa6oTbI. HOrO KpeMa I3 RnC N MoNoka, B36uTbIX HEnpepbIBHO nepemeuaTe cTeprxHN, CnIBOK, Dpyrnx BnIOB KpeMOB, coycob LTo6bl ObecneHTb paBHOMepHOe CMeWN-MaHOe3a, Cmecn DnA 6nHOB, B36ntoro BaHbe.
3aMeuBaT TECTO, Lyuue HaunHaTe C 3aBnKMOXHO NcNoB3oBaT Dnna H- XnDkN XHrpeJeHToB, NOCTeENHO -do- a 3aTEM NepeHTN K NcNoB3oBAHIO ME- 6abJra TBepIbe INHrpeJeHtbl, YTObI bONyHTb paBHomepHyO CMEcb.
3ameuBaHbTecta. 1nocbo6xdeHn CTePxHn yTaHOBn- Te CeNEKTOP cKOpOCTN B NIOJXeHne "0",
2.- MecnIbHbe KpOKn (7): BBIKIOHTpe np6op n3 CTeHHo pO3eTKn I
PeKOMHeYIOCTdIg 3ameuBaHbCyXoro HAXMNTe KHOKNy OCBO6xDeHn C6NBan- - Tecta (HaNPmep, cNoEHOro Tecta, necoy- - KN (2), KaK NOKa3aHo Ha pnc.3.
Horo Tecta) MMRKOro Tecta (HaepnHOH MOKcep B nepepbIbax MeJy NCMECN DnBCKBnTOB N KeKCOB). NOJIb3OBAHnAMMOxHO NOMEuaTb Ha cToiKy (8), KaK nOKa3aHo Ha pnc. 4.
NCIOJIb3OBAHNE PYHOROMNKCEPA
CnBaJIKn mecnIbHbIe KpIOKn:
BCTaBbTe c6nBaJIKN (6) INI MECINbHbETN B NOIOXKeHHe "0".
KPIOKN (7), DepeKacb OJHoi pyKo3a pyKy MINKCEPA, a npYrOy pKo3a CTBOJ CTePJK-- HMIKCEPA.
BcTaBbTe CTBOI B OTBepCTnA CTePxHn (cm.pnc.1), cnerka nobopaunbaer ero A ueuKa.
IobtopTe 3Ty Xe OnpaunIO dna coednHeHn BTOPOrO CTePxHn. Ipeed BKJIouHnEM pyuHOro MmKcepaY6eDITecb, YTO CTePxHn BCTaBHeHb IpabuNbHO.
C6nBaJIKNMOXHO BCTaBnAeB NIO6oeOT-BepCTne.
Ho MecnIbHbIM KpIOkAM COOTBeTCTBYIOT CKOpocTHOrO peKIma “TURBO” (Typ60),OC6bIe OTBepCTN. MecnIbHbI KpIK ecIN CEJIeKTop CKOpocTN yCTaHOBnEH BC KOJbC0M Ha CTBOJe DOJIxKeH 6blTb NIOJOxHeHne "0".
CNCTEMA BE3ONACHOCTN:
PyHoi MIKCEP 06OpYIOBAn CnCTeMoI
6e3ONaCHOCTN, KOtOpA IpeDoTbPaUaet
OcBO6OXJeHne CTepXHe np pa6oTaIO-
IeM MOTope. IpeD OCBO6OXJeHneM
4TePxHNe yCTaHOBInTE cEnEKeTOp CKOpocTN
B NpOToXHe "O" IN BBiKIOuHTe pnp6op n3
CTEHNOPO3ETKN.
PyHnMnKcepO6OpyDobAH TaKxpepyro cnCTemOn 6e3oNaChocTN, KOtopa npe- doTbpaaaet yctaHOBky uNcNoIb3OBaHne
ckopocthoro pekima "TURBO" (Typ6o), ecnn celeKTop ckopoctn yctaHOBJeH b noJooKeHe "0".
BHIMAHNE! Npey yctahOBkoC6BbAOK (6) INN MeCNbHbIX KpO(7) y6eNTecb, YTO pyHOn MUKcepBbIKIIOyeHN3 cETn HTO nepeKJIIOUaTeNBCKOPcTN yCTaHOBHeB NOIOXKeHne "0".
CEJIEKTOPCKOPOCTN
CKopoCTb MOxHO Bbl6paTb NOBOPOTOM
sceneKTopa CKopoCTn (4) B OdHo n3 Pn
pa3nnHbIX NoOKeHn (cm. pnc. 5).
YpOBeHb 1-2: (Hn3Kne ckopocTn). JyUwne ckopocTn dna Hauana CMeunBa
Hb.ДЯннeppebIBHO nepemeBnBaHb, HE NOPPYXAITE PYHON MINKCEP B36nBaHbNIM CMeuBaHbJIerKnx- HANIIN SHHP NITAHN B BOy INI rpeDneHTOBNIN KJNDKoCTe.TakKe dIJIIOByIO INHYO JNKIOCTb.
B36NBAHbI NHyhIx 6eJIKO B IN CMeUINBa- HbMyKINT TECTa.
YpoBeHb 3-4: (CpeHne CKOpocTu). Oco6eHHo roDHTcA dIa KInpHOrO B3bntoro Tecta nn KInpHbIX Cmecei.
YpOBeHb 5: (BbICOKa KcOPOCTb). Oco6eHHo npiroDHa DnB3bNBAhBa RnHbIX 6eIKOB, Cmecen JnKekCOB n COyCOB. TaKke NcNoIb3yETc DnA 3aMeuBa TReKeIbIX TINOB TcTa.
Khonka Typ60: (BbICOKaH CKOpoc7b).3TO 3KCKHIO3NIBHAR CNCTema, CNEUaJIbHO pa3- - pa6OtaHHaI INYBEINuHEHcCKOpOCTn BHe 3aBNCIMOCTH OT yCTaHOBJIeHHo CKO- - poCTn.
Ckopoocb“TURBO” (Typ60) He MoXeT UcNoIb3OBAtbc, ecn ceNekTop CKePoCTn yCTaHOBnE H NoIOxKHeNe "0".
PeKOMeHdyETcNcNoIb30BaTb 3Ty CKOpOCTb, KOrJa Tpe6yIOTcBbICOKne CKO-- poCTn CMeUWBbHa OueHb KopoTKo Bpem.
Pa6oyuO CKOpocTb MOxHO MeHrTb B npo- cece pa60Tb np6opa.
TTo6bl MOTOp He neperpeBaIcn, He nOJIb3yIteCb FyHKUnei "TURBO" 60-- Jee OJHOH MInHyTbI 6e3 nepepbIbA.
CHCTKAI YXOJ
IpeepuNTKoiJIbOoiyactnpyHOroMk-- cepa yCTaHOBnte cTeKTop ckopoctn (4) B NOIOXKeHne "0". 3aTEM BBIKIOUHTe NITaHNI3 CTEHNO po3eTKN IOCB6OOn-- Te CTEPXXHn (6-7).Bce YACTn O6h3aTeNBHO DOJXHbI 6bITb cyxIMn Ipeepnx HbIM NCNoJIb3OBaHHeM.
C6nBaIKNmMecNlbHbIe KpOKn:
CTepxHn (6-7) MoXHO MBITb rOpAeH BODo C MblOM INN B NOCyDOMOeHOn MaunHe.
Kopnyc moTopa
Kopnyc MOTopa pyHoro MKKcepa (1) Hyp NITaHn DOJXHbI IpOTnpaTbcr YNCTa C NOMOuB BLaXHO TKAHI.
HnKoIa He nOpykaTe INB BODy INNIO-6yIO INHYIO KIOKOCb.
IydaHEnr TpyHObIBOaMbIX IATEH NCNoIb3yIe TKaHb, CJIerKa CMOeHHyo B MbIbHO BOe, INN MMRKoe, Hea6pa- 3INBHOe, YnCTaUe cpeDcTBO. B KOHc npOTpTe YnCToBnaxHOHTKaHbIO.
He noJIb3yITeCb a6pa3INBbIMN YnCTAUNM cpeIcTBaMI.
PEKOMEHDAUINIPO CDAUE/ BbIBPOCYYNAKOBKN I CTAPBX ANIAPATOB

Haun TOBapbI NOCTABJIHOTcB ONTUMN3nPOBaHHo ynakOBke.B Hei
B OCHOBHOM NcNoIb3OBAHbI 3KoNOrnueckn YnCTbIe MaTePnaJIbI, KOToPbIe DOnJXHbI CdaBaTbC B MeCTHyIO Cnyk6y yTuIN3aUN OTXoD0B B KaYeCTBe BTOpuHrO CbIpBa.
JaHHoe 3JdEJIe COOTBETCTByET HOpMaM dIpeKTHbbl EC 2002/96/CE.
HMeOuNcHa np6ope,03NaayeT,TO,KoTa HAcTyPNT Bpemn 36aBnTbCnOT HeHyxHoropnp6opa OH He DOnJKeH NOMaTbCBMeCTe C 6bITOBbIMN OTXoJamn. OHDOnJKeH 6bITb DOCTabNeH CneuaJIbHOE Me--CTO yTNII3aUNN OTXoDOB 3NEKTPuecknx N3NEKTPoHHIx np6OpOB INI BO3BpaueH
npoaBuy npn nokyNke HOBOr noo6Horo npnbopa.B COOTBECTBm C DeIeCTBYOuMMn HOpMaMn yTNIN3aunn OTXODOB NOlb3OBaTe-- I, He DOCTABINBUNHe HEnyKbIe IpNbopbl B CneuaJIbHbIe MeCTa yTNIN3aunn OTXODOB, MOryt 6bITb OwTpaΦoBaHbI. PpaBInbHaer OT-- DeJbHaYTNIN3aunn BbIbPOWeHHbIX npNbopOB O3NaHaet, YTO OH NMOrYT 6bITb pe-- UKNlnpoBaHbI, Nepepa6OtaHbI nnUyHHTOKeHbI 3KOJIOrNUeCKN YnCTbIM CnOCO-- BOM, He 3arp3HNIOUM OKpyKaIOUcpeDy, HE OKa3bIBaIOUIm HeraTINBHO BO3DeiCTBVe Ha 3dOpOBBe JIODeE IN NO3BOJIAUOM IN TOPHO NCNOJb3OBaTB MaTePnaJIbI, N3 KOTopblx 6bln 3rTOBNeH npNbop. IJNAJyEHNBA Bolee NoDPoBHn INHΦopMaUnn 05 TOWIEOUXCA nporpAMMax yTNIN3aunn OTXo-- IOB 6baaainTEcb B MeCTHyO cLyX6y yTNIN3aunn OTXODOB INN B Mara3NH, B KOTO-- pom 6bln pno6peTeH npNbop. IPOIN3BOIDNTeIN INMNPTEpbI HeCyT OTBET-CTBEHHOCTB 3a 3KOJIOrNUeCKN YnCTyIO yTNIN3aunIO, Nepepa6OTky IN YHHTOKeHne BBloPoehHBx npNbopOB HAnpMyIO INN NO-- CpeCTBOM ROCyapCtBEHHOIN CnCTEMbl. D-MecThbIE MyHInCIpaJIbHbIE BlaCTN MOrYT NPdeOCTaBnT bHΦopMaUnIO O nopAKe CdaH/YHHTOKeHnE HeHyXHBIX npNbO-- POB.
CESKY
POPIS PRISTROJE
Ha MoToPa, He n3nO3BaIe TYP60
fYHKnraTa 3a no-dbIroOT MmHyta.
e
3auepkHaTnT CnMBOJ, 306pa3raBaU KoFa 3a 60knyK Ha KOJIeIua, O3NaUaba, Ye To3n IpoDyKT He Tp6Ba Da Ce N3XBbPnA 3aEHO C OTnaDbuNTe OT DomakHCTBOTO. Tp6Ba Da ce PpeJaHe H CneuAJeH NyHKT 3a Cb6InpaHe Ha N3XBbPneHOn OT yNoTpe6a eNEKTPnuCeKn I eNEKTPoHNuyeDu INn Da CE BbPHe HA DnCTPb6Tyopa, KOrATO KUYBaTe NOobEn Upei. CnopeCera ENCTBaUHTe pa3nope6n 3a N3XBbPnAHe Ha OTnAbu, NOTpe6nTeJIte, KOINTo HE PpeJaAT N3XBbPNeHn OT yNoTpe6a Upei Ha HAKoI OT CneuMaHnTE NyHKTOBe 3a Cb6InpaHe Ha OTnAbu, MoraT Da 6bDaT rNo6EHn. PpaBnHOTo N3XBbPnA He Ha N3JEznn OT yNoTpe6a Upei O3NaUaba, Ye Te Morat Da 6bDat peuKnnpaHn I npepaBoTeHn ekONOnuHo. TOba NOMara 3a
ONa3BaHETO Ha OKoJIHaTa CpeDa
5N03BOJRABa NOBTOHaTa ynoTpe6a Ha
MaTePnAJI, n3IOn3BaHn B ypea. 3a
IOBue He HOpMaUNA OTHOCHO
GbueCTByBaunTe nporpaMn 3a n3xBbpIHa
Ha OTnAdbu Cce CBbpxKeTe C MeCTHaTa
YHCTEHEI NOIDPbJXKA
Ppeu da npemHHe T KbM NOHCTBaHE
Ha Yactnte Bbpxy MMKcepa, CLOXkTe
perynatopa Ha ckopocTta (4)Ha no3nui
"0". 13BaTe 5e9cena OT KOHTaKT
ocbo6oTe 6bpkkanKe (6-7).H3cyweTe
BCNUKn Hactn, npden Da rH n3no3BaTe
OTHOBO.
jolilii (aile aee) yssy jaiill jll
i j k l n o e q uall
g( x) = | g( x) - f|
TURBO
(4) a yoll b u c l i o j 1. la liy
.0"
11 11 11 11 11
a 1
.
LJ1J1J1J1J1
JUe
a 1
1djdl liuui jia.ayli
.
a.111, 111
Jz. i by 11 0 0 0
"0" = labiy1 g ofo 4
aJ 11
(6-7)
1 1
- []
dullglal
jLALLgU(6-7)JUaill Jue
15 1
Jdla 1
110 1
11
JU Lw g U
chull 1b2.aaeul 1 LwJy
aikai g jjgLallg=U1 jno Jda Jdo
x_0 ≤ 1
:6) bui jui -1
()
()()()
J 1
1
gaiiaaiy jaii iipaaai pai
joo jol jol jol jol
ySLBbIbI bI 1
yIyI I bIbI yIyI Ie Ia
aaiy 1 y.
y1y11 b11 b1j 1j11 j1i y.
j 1j j jll y Jw . aabJg Jua J .
J 1
1 1
1 1
15 15 jJ111j j J111
11.6-7) jJ111 J111
4J111 J111 J111
20 20
2 1 1 1 1 1 1 1 1 1 1 1 1 1 1 1 1 1
1y yg 1e 10
1j 2. 1i j 6
J (6-7)
11 15 13 14 11 12 11 12 11 12 12 12 12 12 12 12 12 12 12
j4all
.1
jduai j.2
.3
.4eullj 1i i! C liio.4
j.5
.bui jiua 6
7
8
四边形 AOBC 为正方形


- DESCRIPTION OF THE APPLIANCE
- IMPORTANT NOTES
- ACCESSIONS
- 1.-Whisks (6):
- Whisks and dough hooks:
- USE
- SAFETY SYSTEM:
- SPEED SELECTOR
- CLEANING & CARE
- Motor housing
- ADVICE ON DISPOSAL:
- FRANÇAIS
- DESCRIPTION DE L'APPAREL
- ПИHAДLEЖHOCTN
- 1.-C6nbalkn(6):
- NCIOJIb3OBAHNE PYHOROMNKCEPA
- CnBaJIKn mecnIbHbIe KpIOKn:
- CNCTEMA BE3ONACHOCTN:
- CEJIEKTOPCKOPOCTN
- CHCTKAI YXOJ
- C6nBaIKNmMecNlbHbIe KpOKn:
- Kopnyc moTopa
- PEKOMEHDAUINIPO CDAUE/ BbIBPOCYYNAKOBKN I CTAPBX ANIAPATOB
- CESKY
- POPIS PRISTROJE
- YHCTEHEI NOIDPbJXKA
- a.111, 111
- x_0 ≤ 1
- j4all
- 四边形 AOBC 为正方形
Brand : UFESA
Model : BV4610
Category : Hand blender