VeroCafe Latte TES50354DE - Coffee maker BOSCH - Free user manual and instructions
Find the device manual for free VeroCafe Latte TES50354DE BOSCH in PDF.

User questions about VeroCafe Latte TES50354DE BOSCH
0 question about this device. Answer the ones you know or ask your own.
Ask a new question about this device
Download the instructions for your Coffee maker in PDF format for free! Find your manual VeroCafe Latte TES50354DE - BOSCH and take your electronic device back in hand. On this page are published all the documents necessary for the use of your device. VeroCafe Latte TES50354DE by BOSCH.
USER MANUAL VeroCafe Latte TES50354DE BOSCH
Included in delivery (see page 23)
electrical and electronic equipment -
Congratulations on purchasing
automatic.presso-machine.f28r
Included in delivery . . . . . . automatic . espresso . machine . f 28r
Safety instructions 24
Overview. . . . . . . . . . . . . . . . . . . . . . . . . . . . . . . . . . . . . . . . . . . . . . . . . . . . . . . . . . . . . . . . . . . . . P.I.ease. al. so. note. t he. encl ose d.
Controls . . . . . . . . . . . . . . . . . . . . . . . . . . . . . . . . . . . . . . . . . . . . . . . . . . . . . . . . . . . . . . . . . . . . . . . . . . . . . . . . . . . . . . . .
Display messages . . . . . . . . . . . . . . . . . . . . storage . compa. ment . ( 5c ) . 27till
aromaDouble Shot 27
Before using for the first time. 28
Water filter.. Included in delivery 29
Menu settings 31
Adjusting the grinding unit (see.overview-image.at.t34 begi
Preparation using coffee beainstruction. manual ) 31
Preparation using ground coffee 32
Dispensing hot water .. .Full.l.y. aut.omat.i.c.espr.es320 ma
Preparing milk froth and warm MES03. 32
Maintenance and daily cleaning. Qui.c.k. .r.eference 3 guide
Tips on energy saving 36
Service Programmes . Milk.frother/Rotary selector 36
Frost protection. . . . . . . . . . . . . . . . . . . . . . . . . . . . . . . . . . . . . . . . . . . . . . . . . . . . . . . . . . . . . . . . . . . . . . . . . . . . . . . . . . . . . e. Water. er. h.a.r.d.n.e.s.s. t.test.i n.g. s.t.r.i 3
Accessories .Meas.ur.ing.s.poan
Disposal
Guarantee . . . . . . . . . . . . . . . . . . . . . . . . . . . . . . . . . . . . . . . . . . . . . . . . . . . . . . . . . .
Technical data. .Mi.l.k. c.o.n.t.a.i .n.e.r. 4
Simple troubleshooting 41
Safety instructions
Please read and follow the operating instruct keep them for later reference. Enclose these you give this appliance to someone else. This designed for the preparation of normal house the home, or in household-like, non-commercial Household-like environments include staff ki offi ces, agricultural and other small businesses or for use by guests at bed- and- breakfast establishments, similar residential facilities.
Danger of electric shock!
Connect and operate the appliance only accor specifi cations. To avoid potential hazards, repairs such as replacing a damaged cable must only be carried out by personnel.
This appliance may be used by children aged by persons with reduced physical, sensory or or who lack experience and/or knowledge if t have been given instruction in the safe use have understood the dangers involved. Keep c of age away from the appliance and connectir allow them to use the appliance. Children sh appliance. Cleaning and user maintenance sha children unless they are older than 8 years
Never immerse the appliance or mains cable i power cord and appliance show no signs of da occur, pull the plug or disconnect from the
Risk of suffocation!
Do not allow children to play with packaging
Risk of scalding!
The milk frother outlet (6c) gets very hot. Milk froth or warm milk comes out of the milsure. Splashes of milk can scald. Do not touch it at anyone. After use, allow to cool down first before touching.
Use this appliance only after the milk froth assembled and installed.
Risk of injury!
Do not reach into the grinding unit.
Overview
Controls
(see overview images A, B, O powder ranoln/Eofaft switch O/1 the beginning of this instruthe opnowam usawi)tch O/1 (9) is
1 Bean container the appliance on or to switch i
2 Aroma cover (power supply off).
3 Selector for grind setting: Before switching off
4.4 Drawwer cleaning programme or use the (ground coffee/cleaning tabutetto)n (12) to switch off.
5 Brewing unit (Fig. E)
a)Brewing unit off/ibutton b)Door When the off / ibutton (12)
c) Storage compartment forbriqfly the appliance rinses and switches reference guide off. Pressing and holding down d) Eject lever for brewingoutridn (12) displays the user s e) Lock starts the descal ing and cleani
f) Cover
6Milkfrother(Fig.C)remvabulton
a) Steam valve Press the button (11) to gen
b) Air nozzle for preparing milk froth or war
c) Outlet
d) Rotary selector for warm milk/milk froth start button
e)Milk tube Press the start button (10) to
7 Coffee outlet, height - adjurspaeon or to start a servi
8 Drip tray (Fig. D) Press the start button (10) aga a) Drip tray panel drink preparation to cut the di
b) Coffee grounds containeprocess short.
c) Dri p tray for coffee outlet
d) Grate for coffee outlet“Coffee strength” rotary knob
e) FI oat
9 Power on/off switch O/1 double shot to set the coffee stre
10 start button
11 button
12 off / i button
13 "Coffee strength" rotary knob
14 "Drink selection" rotary kn68
15 Display
16 Removable water tank
17 Lid for water tank
18 Measuring spoon (insertion aid for water filter)
19 St or age compa rment for measuring spoon
20 Power cable with storage compartment
| ○ | VERY MILD MILD |
| v knob | NORMAL |
| v knoB | STRONG |
| DOUBLESHOT STRONG+ | |
| DOUBLESHOT STRONG++ | |
| double shot | With these coffees strengths the coffee i brewed in 2 stages. See “ aromaDouble Shot”. |
Only for TES503M1DE
21 Milk container
22 Water filter
"Drink selection" rotary knob
| This rotary knob (14) is used to select the required drink and the per-cup quantity. It is also used to change user settings. | |
| □ | SMALL ESPRESSO ESPRESSO |
| to | SMALL CAFÉ CRÈME CAFÉ CRÈME |
| □ | LARGE CAFÉ CRÈME |
| □ | 2 SMALL ESPRESSO 2 ESPRESSO |
| to | 2 SMALL CAFÉ CRÈME 2 CAFÉ CRÈME |
| □ | 2 LARGE CAFÉ CRÈME |
| ○ | RINSE MACHINE |
| u | RINSE MILK SYSTEM |
N.B.: If a drink is selected that cannot be prepared, INVALID COMBINATION appears in the display. Change the coffee strength or the selected drink.
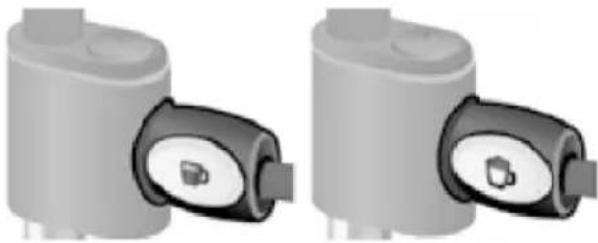
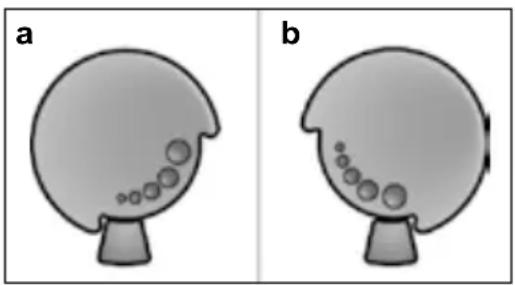
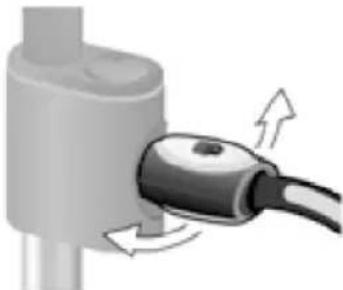
Milk frother
Pull the milk frother (6) out to open it and push it back in to close it.
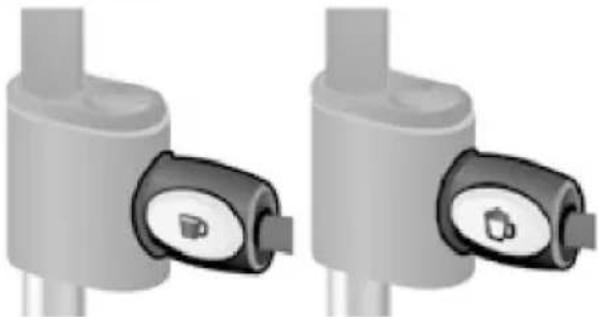
Rotary selector
To dispense milk froth - for example for a latte macchiato or cappuccino - turn the symbol to the front.
To dispense warm milk, turn the symbol to the front. To dispense hot water, set the rotary selector to the horizontal position.
Display messages
The display (15) shows not only the current operating status, but also various messages that give you status information or let you know when you need to take action. As soon as you have taken the necessary action, the message disappears and the menu for drink selection is displayed again.
aromaDouble Shot
The longer the coffee is brewed, the more bitter substances and undesired aromas are released. This has a negative effect on the taste and makes the coffee less easily digestible. So for extra strong coffee the TES503 has a special aromaDouble Shot function. When half the quantity has been prepared, coffee is ground and brewed again so that only the pleasant, aromatic scents are released.
The aromaDouble Shot function is activated with the following settings:

Before using for the first time
General
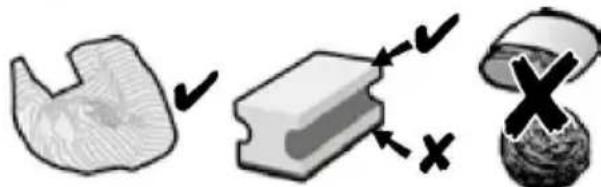
Fill the appropriate container using only pure, cold, uncarbonated water and only roasted beans (preferably espresso or coffee bean blends for fully automatic coffee machines). Do not use coffee beans that have been glazed, caramelised or treated with other additives containing sugar, since they will block the brewing unit.
The water hardness setting can be adjusted on this appliance. The factory default setting for the water hardness is 4. Check the water hardness with the enclosed test strip. If the check reveals a value other than 4, change the setting on the appliance accordingly after switching on (see "Menu settings" WATER HARDNESS).
Switching on the appliance
-
Remove the protective film.
-
Place the fully automatic espresso machine on a flat, water-resistant surface that can take its weight. Make sure that the machine's ventilation slots remain unobstructured.
Important: Only use the appliance in frost-free rooms. If the appliance has been transported or stored at temperatures below 0^ , wait at least 3 hours before operation.
-
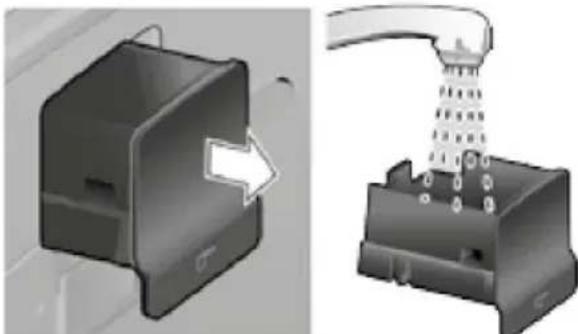
Pull the power cord out of the storage compartment (20) and plug in. Adjust the length of the cable by pushing it back in or pulling it out. The easiest way to do this is to place the appliance so that its back is flush with the edge of the counter and either pull the cable downward or push it upward.
-
Install the milk frother. Operate the machine only after the milk frother (6) has been fully assembled and installed.
-
Lift the lid of the water tank (17).
-
Remove and rinse the water tank (16) and fill it with fresh cold water. Do not fill above the max mark.
-
Replace the water tank (16) and push it firmly downward into place.
-
Close the lid of the water tank (17) again.
-
Fill the bean container (1) with coffee beans (for preparation using ground coffee, see "Preparation using ground coffee").
-
Press the power switch O/I (9). The display (15) shows the menu for setting the display language.
-
Select the required display language with the upper rotary knob (14). The following languages are available:
DEUTsCH
ENGLISH
FRANCAIS
ITALIANO
-
Press the start button (10). The language you selected is saved. The display shows PULL MILK FROther.
-
Place a receptacle under outlet (6c).
-
Carefully pull out the milk frother (6) to open it. The appliance rinses out the milk frother (6) with water. The display shows PUSH MILK FROOTHER.
-
Push the milk frother (6) in to close it. The appliance heats up and rinses. Some water will run out of the coffee outlet.
When the drink selection menu is shown in the display, the appliance is ready for use.
Switching off the appliance
The factory settings of the fully automatic.
espresso machine are programmed for
optimal performance. The appliance switches off automatically after a specific time (time span can be programmed, see "Menu settings" SHUT OFF).
Exception: The appliance switches off without rinsing if only hot water or steam were dispensed.
To switch the appliance off manually before this, press the off / i button (12). The appliance rinses and switches off.
N.B.: If the appliance is being used for the first time, a service program has been run, or the appliance has not been operated for a long period, the first beverage will not have the full aroma and should not be consumed.
When using the espresso machine for the first time, you will achieve a suitably thick and stable "crema" only after the first few cups have been dispensed.
After extended use, water droplets may form on the ventilation slots. This is normal.
Water filter
A water filter can prevent scale buildup. Before a new water filter is used, it must be rinsed. To do this, proceed as follows:
- Press the water filter firmly into the water tank with the aid of the measuring spoon (18).
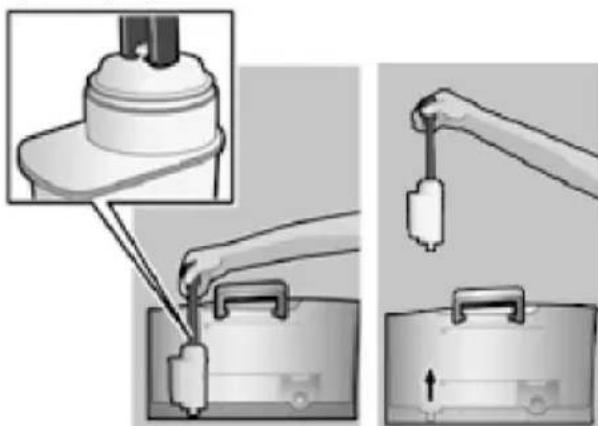
- Fill the water tank (16) with water up to the max mark.
- Press and hold the off / i button (12) for at least three seconds. The menu opens.
- Press the off / i button (12) repeatedly until the display shows No/OLD FILTER.
- Select Activate Filter with the upper rotary knob (14).
- Press the start button (10).
- Place a receptacle with a capacity of 0.5 litres under the outlet (6c).
- Press the start button (10).
- Pull the milk frother (6) to open it.
- Water will now flow through the filter to rinse it.
- Push the milk frother (6) in to close it.
- Empty the container.
The appliance is ready to use once more.
Note: Rinsing the filter simultaneously activates the setting for the CHANGE FILTER! display.
The filter is no longer effective when the CHANGE FILTER! display appears, or at the latest after 2 months. It needs to be replaced for reasons of hygiene and so that there is no build-up of limescale (this could damage the appliance). Replacement filters can be obtained from retailers or from customer service (see "Accessories"). If no new filter is used, turn the FILTER setting to No / Old.
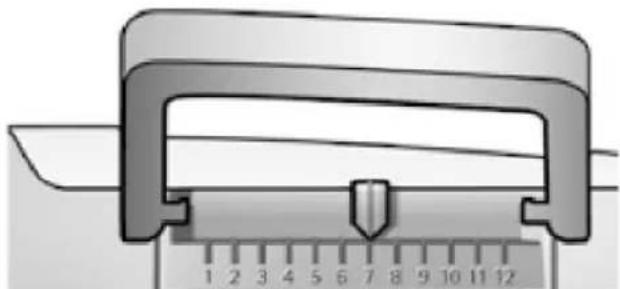
Note: You can use the filter indicator to mark the month in which you inserted the filter. You can also mark the month in which you will need to replace the filter next (at the latest after two months).
Note: If the appliance has not been used for a prolonged period (e.g. vacation) the filter should be rinsed before the appliance is used again. To do so, dispense a cup of hot water and pour it away.
Menu settings
You can adapt the appliance to your individual needs in the menu settings.
- Hold the off / i button (12) down for at least 3 seconds.
- Press the off / i button (12) repeatedly until the required menu item appears in the display.
- Select the required setting with the upper rotary knob (14).
- Confirm by pressing the start button (10).
To leave the menu without making any changes, turn the rotary selector to Exit and press the start button (10).
You can set the following:
SHUT OFF
Here you can set the time span after which the appliance automatically switches off following the last drink preparation. A time between 15 minutes and 4 hours can be set. To save power you can specify a shorter period.
FILTER
Here you can set whether a water filter is being used. If a water filter is not being used, turn the setting to No / OL. If a water filter is being used, turn the setting to ACTIVATE FILTER. New water filters have to be rinsed before use (see "Water filter").
START CALC'N'CLEAN
The service programmes (CALC'N'CLEAN / DESCALING/CLEANING) can be selected manually here. Press the start button (10) and run the selected programme (see "Service Programmes").
TEMP.
The brewing temperature (HIGH/MIDDLE/ LOW) can be set here.
LANGUAGE
The display language can be set here.
WATER HARDNESS
The water hardness setting can be adjusted on this appliance. It is important to set the water hardness correctly, so that the appliance indicates accurately when the descending programme should be run. The factory setting for the water hardness is 4. You can check the water hardness using the enclosed test strip or by asking your local water supplier.
Dip the test strip briefly in water, gently shake off any drips, and check the result after one minute.
| Level | Water | hardness |
| German | (°dH) French (° | |
| 1 | 1-7 | 1-13 |
| 2 | 8-14 | 14-25 |
| 3 | 15-21 | 26-38 |
| 4 | 22-30 | 39-54 |
Adjusting the grinding unit
The rotary selector (3) adj settings from coarse to fine.
Preparation using of febeans
This fully automatic espressgrinds beans freshly for each k
Tip: If possible, use only bean automatic coffee and expresso r For optimal quality, deep-freez or store in a cool place in sea Coffee beans can be ground while
Warning!
Adjust the grinding unit only while it is
running! Other wise the appl Diafnceer ematy dofee drinks can bedamaged. Do not reach into tqueit gisidripnly at the press of a unit.
- While the grinding unit iPs erpuanrait ngn adjust
the rotary selector (3) from fine (a: Turn The appliance must be ready for anticlockwise) to coarse (b: Turn the radio dial pre-warmed cup(s) wise) as required. coffee outlet (7).
Note: The new setting will not begin the lower rotary knot apparent until after the secondbepted coffee strength is a coffee.
4. Press the start button (10) Tip: For dark roast coffee b@cafnfsee cihs oobsreewed and then pour efiner grind, for lighter beans a coarser grind. cup(s).
N.B.:With some settings the o is prepared in two stages (see "aromaDouble Shot").
Wait until the procedure is ful
Press the start button (10) again, brewing process short.
Preparation using ground coffee
This fully automatic espresso machine can also be operated with ground coffee (not instant coffee powder).
N.B.: The aromaDouble Shot function cannot be used when coffee is prepared using ground coffee.
Important: Fill the water tank (16) with fresh water every day. The tank (16) should always contain sufficient water for operating the appliance.
Preparation
- Open the drawer (4).
- Pour in no more than 2 level measuring spoons of ground coffee. Warning: Do not use whole beans or instant coffee.
- Close the drawer (4).
- Select the required drink by turning the upper rotary knob (14) (only one cup possible).
- Press the start button (10). Coffee is brewed and then poured into the cup.
N.B.: Repeat the procedure for another cup of coffee. If no coffee is taken within 90 seconds, the brewing chamber empties automatically to avoid overfilling. The appliance rinses.
Dispensing hot water
Risk of burns!
The milk frother (6) gets very hot. Hold the milk frother (6) by the plastic part only.
The milk frother must be cleaned before drawing hot water.
The appliance must be ready for use.
- Place the pre-warmed cup or glass under the outlet of the milk frother (6c).
- Set the rotary selector (6d) to the horizontal position.
- Pull the milk frother (6) to open it. The appliance heats up. Hot water runs out of the milk frother outlet (6c) for about 40 seconds.
- Stop the process by pushing in the milk frother (6).
Preparing milk froth and warm milk
Risk of burns!
The milk frother (6) gets very hot. Hold the milk frother (6) by the plastic part only.
Tip: You can foam the milk first and then dispense coffee, or foam the milk separately and pour it onto the coffee.
The appliance must be ready for use.
- Place a pre-warmed cup under outlet (6c).
-
Insert the milk tube (6e) into a milk container.
-
Turn the rotary selector (6d) to "Warm milk" or "Milk froth".
-
Press the button (11). The button (11) flashes and the appliance now heats up for approx. 20 seconds. The display then shows PULL MILK FROOTHER.
-
Pull the milk frother (6) to open it.
Risk of burns!
Milk froth or warm milk comes out of the milk frother (6) at high pressure. Splashes of milk can scald. Do not touch the outlet (6a) or aim it at anyone.
- Close milk frother (6) by pushing it in.
Tip: For optimal milk froth quality, use cold milk with a fat content of at least 1.5% if possible.
Important: Dried milk residue is difficult to remove, so the milk frother (6) must be cleaned with lukewarm water immediately after use and rinse using the RINSE MILK SYSTEM programme.
Maintenance and daily cleaning
Risk of electric shock!
Unplug the appliance before cleaning it. Never immerse the appliance in water. Do not use a steam cleaner.
- Wipe the outside of the appliance with a soft, damp cloth.
- Do not use abrasive cloths or cleaning agents.
Always remove any limescale, coffee, milk or descending fluid residue immediately. Such residue can cause corrosion.
- New sponge cloths may contain salts. Salts can cause rust film on stainless steel and must therefore be washed out thoroughly before use.
- Pull the drip tray (8c) with the coffee grounds container (8b) forward and out. Remove the panel (8a) and the grate (8d). Empty and clean the drip tray and coffee grounds container.
- Remove drawer (4) and clean.
- Remove the float (8e) and clean with a damp cloth.


Do not put the following items in the dishwasher: drip tray panel (8a), float (8e), drawer (4), brewing unit (5a).

The following items are dishwasher-safe: drip tray for coffee outlet (8c), coffee grounds container (8b), grate for coffee outlet (8d), aroma cover (2) and measuring spoon (18).
Only for TES503M1DE:
Do not put the lid of the milk container in the dishwasher. The milk container (21) is dishwasher-safe.
- Wipe out the inside of the appliance (tray holders and drawer).
Important: Drip tray for coffee outlet (8c) and coffee grounds container (8b) should be emptied and cleaned daily to prevent mould from developing.
N.B.: If the appliance is cold when switched on with the power switch O/I (9) or if it switches off automatically after coffee has been dispensed, it rinses automatically. In other words the system cleans itself.
Important: If the appliance has not been used for a prolonged period of time (e.g. after a vacation), clean the entire appliance thoroughly, including the milk system and brewing unit.
Cleaning the milk system
If the milk system was not cleaned after milk has been dispensed, after a certain amount of time the message CLEAN MILK SYSTEM! will appear on the display.
Clean the milk system immediately after use! To clean, leave the rotary selector (6d) in the same position it was in when last used.
To pre-clean the milk system automatically: 1. Select by turning the rotary knob (14)
-
Place a tall, empty container under the outlet (6c).
-
Push the outlet as close as possible to the container.
-
Place the end of the milk tube (6e) into the container.
-
Press the start button (10).
-
Pull the milk frother (6) to open it. The machine automatically releases water into the container and vacuums it up again via the milk tube (6e) to rinse the milk system. The rinse procedure stops automatically after about 1 minute.
-
Push the milk frother (6) in to close it.
-
Empty the container and clean the milk tube (6e).
In addition to this, clean the milk system thoroughly at regular intervals (by hand or in the dishwasher).
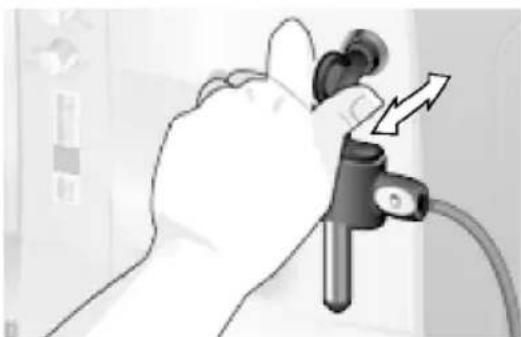
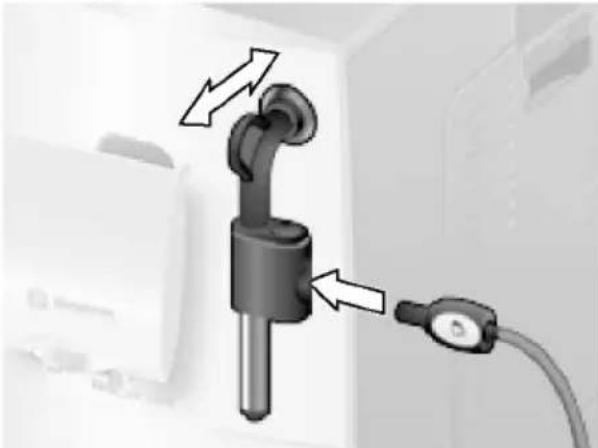
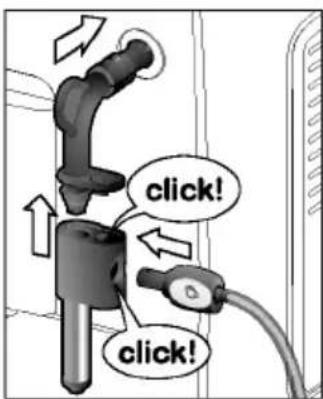
Dismantling the milk system for cleaning:
- Detach outlet (6c) from steam valve (6a) (see figure C at the start of the operating instructions).
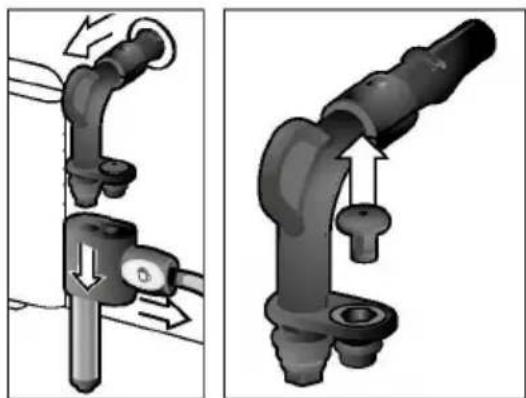
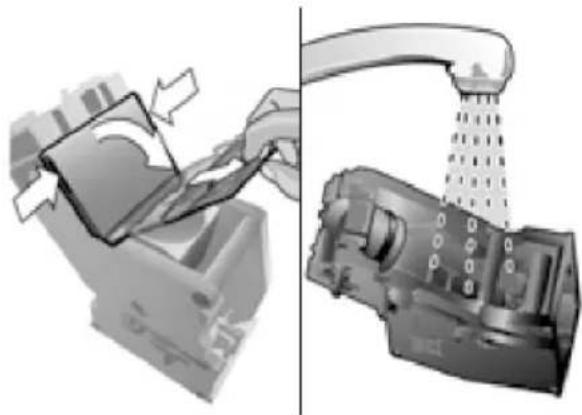
- Clean the individual parts with a detergent solution and a soft brush. If necessary, soak in a warm detergent solution.

-
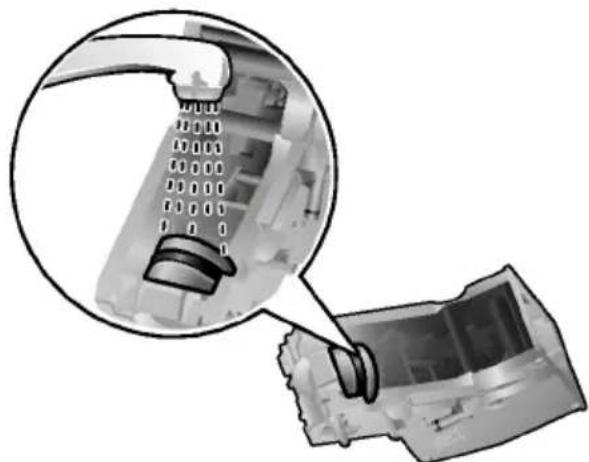
Rinse all parts with clear water and dry them.
-
Reassemble all the parts and replace fully in the appliance.
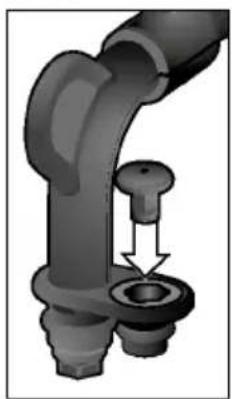
Risk of scalding!
Use this appliance only after the milk frother (6) has been fully assembled and installed.
Cleaning the brewing unit
Clean the brewing unit regularly. To pre-clean the brewing unit automatically:
- Select 念 by turning the rotary knob (14).
- Place an empty glass under outlet (7).
- Press the start button (10).
The appliance rinses.
In addition to the automatic cleaning programme, the brewing unit (5a) should be removed regularly for cleaning (see figure E at the start of the operating instructions).
- Switch the appliance off at the power on/off switch O/I (9). No buttons are lit.
- Open the door (5b) to the brewing unit.
-
Slide the red lock (5e) on the brewing unit (5a) completely to the left.
-
Press the eject lever (5d) down fully. The brewing unit is released.
- Grasp the brewing unit (5a) by the recessed grips and remove carefully.
- Remove the cover (5f) of the brewing unit and rinse the brewing unit (5a) thoroughly under running water.
- Thoroughly clean the brewing unit sieve under the running water.
Important: Do not clean with detergent or other cleaning agents and do not put it in the dishwasher.
- Wipe out the inside of the appliance thoroughly with a damp cloth and remove any coffee residues.
- Allow the brewing unit (5a) and the inside of the appliance to dry.
- Replace the cover (5f) on the brewing unit and reinsert the brewing unit (5a) fully into the appliance.
- Press the eject lever (5c) up fully.
- Slide the red lock (5e) fully to the right and close the door (5b).
Tips on energy savService Programmes
- Switch off the fully aut dInpt: iRefers also tostbe quick reference guidemachine when not in use. Tnd htheist,orage compa ment (5c)press the 念 off / i (12) button. The appliance rinses and switches ofDepending on usage, the followiwIf possible, do not intersaugpts offfleappear on the dispa milk froth dispensing. Cuttiintgertvhad scoffe or milk froth dispensing process short results in higher energy cDESAMPEQIREDand in more residual water collocting in the drip tray. CLEAN REQUIRED! -Descale the appliance reguarily to avoid a build-up of limescale. LiCnEsN'CLEANRESUIRBere results in higher energy consumption.
The appliance should be cleaned de scaled immediately using the sponding programme. You also ha option of combining both process Calc'n' Clean function (see "Call If the service programme is not instructed, the appliance may be
Warning!
Each time you run the service you should follow the instructi t h e desc a ng and cleaning ager observe the safety instru c t i n g of the cleaning agent. Never interrupt the service pro Do not drink the liquids! Never use vinegar, vinegar-base citric acid or citric acid-base Never put desc a ng tablets or ing agents in the ground coffe t he drawer for cleaning tablets
Specially developed descending a cleaning tablets are available retailers or customer service "Accessories").
Descal ng
PLACE CONTAINER
Duration: approx. 25 minutesPull Milk FROOTHER
- Place a receptacle with a c
Important: If there is a filter in the water, least 0.5 litres under the out tank (16), it needs to be removed before another brother (6) takes descending programme run.
DESCALE IN PROGRESS
If the message DESCALE REQUIRED! atthree adress caling pro gramme will r on the display, press the 2 adofut/112 bot hones.
(12) for 3 seconds and then press the start button (10). The descalng pLsA n finewWITERIANK start. PRESS START
To descale the appliance before Rinsie the water tank (16) and refill it with prompted, press the off / firestht owat(e12)upd do the max mar at least 3 seconds. Then press Phes to start button (10) button (12) briefly twice. Turn the upper
rotary knob (14) until START DBSSGAUNG PROGRESS
appears in the display. The descending programme now runs. To start the descending procedure, 300000000000000000000000000000000000000000000000000000000000000000000000000000000000000000000000000
PUSH MILK FROTHER
The display will guide you through the milk frother (6) in programme.
DESCALE IN PROGRESS
EMPTY DRIP TRAY
The descal ing pro gramme now ru about 1 minute.
INSERT DRIP TRAY
replacethem.
- Empty dri p t r a y (8) and
EMPTY DRIP TRAY
N. B.: If the water filter is activated, the display will prompt you to filter and then press the start button again. Remove the filter now if you have not already done so. Press button (10).
INSERT DRIP TRAY
removemptybedrip tray (8) and rep (Replace the filter if one is being used. The appliance has completed descali tmeasy afrd use again.
FILL DESCALER
Important: Wipe down the applica soft, damp cloth to immediate any descaler residue. Such resi
PRESS START
-
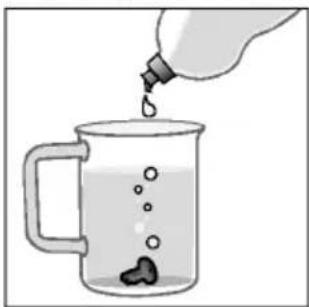
Pour lukewarm water into octahues eempyrosion. New sponge clear water tank (16) up to the 0pistain salter Saltaan cause rust film then dissolve 1 Bosch descalin ng at anblests steel and must the TCZ8002 in it. When using Twzsoe0d2, out thoroughly before use 2 tablets must be dissolved.
-
Press the start button (10).
DESCALE IN PROGRESS
The descal ing pro gramme will now run for about 10 minutes.
Cleaning
Cal c'n'Cle aen
Duration: approx. 10 minutes Duration: approx. 35 minutes.
Important: Clean the brewingCaɪn'dt'n'bGfəre combines the separ
starting the service programmneos eof descaling and cleaning
chapter "Cleaning the brewipngogumimnes are due to be run so
espresso machine automatically
If the message CLEAN REQUIRED! aptpheiasserviceprogramme. on the display, press the 念 off / i button
(12) for 3 seconds and then lmperst amte: if there is a filter in the water button (10). tank (16), it needs to be removed. The cleaning programme will tshar service programme is run. (To clean the appliance before use unit before starting the prompted, press the off / pir gnt amme (12ef chapter "Cleaning at least 3 seconds. Then prese wihreg unofff".i button (12) briefly twice. Turn the upper
rotary knob (14) until START CLIFANING message CALC'N'CLEAN REQUIRED! appears in the display. appears on the display, press to start the cleaning procedure, onpr(e12) tfor 3 seconds and the start button (10). the start button (10). The server The display will guide you to run when you start.
programme.
- Empty dri p tray (8) and
CLEANING IN PROGRESS
The appliance rinses twice.
OPEN DRAWER
- Open the drawer (4).
FILL CLEANER
- Drop a Bosch cleaning tablet Empty herip tray (8) and rep drawer (4) and close.
CLEANING IN PROGRESS
The cleaning programme will now run for about 8 minutes. OPEN DRAWER
EMPTY DRIP TRAY
INSERT DRIP TRAY
- Empty drip tray (8) and The appliance has finished cleaning is ready for use again.
CALC'N'CLEAN IN PROGRESS
The appliance rinses twice. now run for
OPEN DRAWER
- Open the drawer (4).
FILL CLEANER
repl Arcaptane Bosch cleaning table drawer (4) and close.
N. B.: If the water filter is activated, the display will prompt you to filter and then press the start button again. Remove the filter now if you have not already done so. Press button (10).
EMPTY DRIP TRAY
r l s s t r v e R i p h r a y
(10) Empty drip tray (8) and rep Replace the filter if one is being used. The t ap p l i a n c h a r s finished cleaning is ready for use again.
FILL DESCALER
PRESS START
- Pour lukewarm water into ahyed despctay er residue. Such resi water tank (16) up to the 0.a5u de mawrk r csnidon. New sponge cl o then dissolve 1 Bosch descabintaig salts bSats can cause rust film TCZ8002 in it. When using TozG02nless steel and must the 2 tablets must be dissolved washed out thoroughly before us - Press the start button (10).
CALC'N'CLEAN IN PROGRESS
The descal ing pro gramme will about 10 minutes.
PLACE CONTAINER
PULL MILK FROOTHER
Frost protection
To avoid damage from low temperatures during transport and sthe appliance must be completely emptied first.
- Place a receptacle with a capacity of at least 1 litre under the outNote: (6Tdn)e. appliance must be reas
- Pull the milk frother (6) and the watentankt (16) filled.
CALC'N'CLEAN IN PROGRESS The descal ing pro about 12 minutes.
CLEAN/FILL WATER TANK PRESS START
-
Place a large receptacle ur outlet (6c).
-
Rinse the water tank (16) and refill it with 3. Open the milk frother (6) to fresh water up to the max marikt. out and release steam for
-
Press the start button (10)1.5 seconds.
-
Switch the appliance off at Calc'n'CLEAN IN PROGRESS on/off switch O/1 (9). The descal ing pro gramme now5.runEmp toy the water tank (16) a about 30 seconds and rinses therapprance8). PUSH MILK FROTHER
-
Push the milk brother (6) into close it.
CALC'N'CLEAN IN PROGRESS
The cleaning programme will now run for about 8 minutes.
Accessories
Disposa
The following accessories can Di sspoeosotofin peakaging in an envi from retailers and customer fsire mcley manner. This appliane Accessories Ordering number in accordance with European Dir Retail/ 2012/19/EG concerning used ele Customer service and electronic appliances (wast and electronic equipment - WEEB cleanings tab ets TCZ6001 00310575 return and recycling of used ap D e as applicable determines the frame w Descaling tablets TCZ8002 00576694 return and recycling of used ap as applicable throughout the EU ask your specialist retailer ak Water filter TCZ70 03 00575491 disposal facilities.
Guarantee
The guarantee conditions for the are as defined by our representative in the country in which it is sold. De these conditions can be obtained dealer from whom the appliance chased. The bill of sale or red produced when making any claim terms of this guarantee.
Changes reserved.
Technical data
| Power connection (voltage - frequency) 220-240 V - 50/60 H | |
| Heater wattage 1600 W | |
| Maximum static pump pressure 15 bar | |
| Maximum water tank capacity (without filter) 1.7 liters | |
| Maximum capacity of the coffee bean | container 300 grams |
| Length of power cable 100 cm | |
| Dimensions (H x W x D) 385 x 280 x 479 mm | |
| Weight, empty 9.3 kg | |
| Type of grinding unit | Ceramic |
Simple troubleshooting
| Problem Cause Solution | ||
| Di spl ay showsBeans are not f alGei nng y i nt aqp the bean contREFILL BEANS!the grinding unithatche the type of coffeealthough the bean(beahai hcp oily)When the bean container (1) is full, or the grindingunit does not grind thebeans. | ||
| No hot water dispensed. The milkf oI eAmernt h(e6)mi dork if trsother (6)holder is soiled holder, see "Maintenancedaily cleaning". | ||
| Too little or no mthekmf t bthrotherQ(6)anort hiet smlk frother (6)holder is soiled holder, see "Maintenancedaily cleaning". | ||
| The milk frother(6)does notdaily cleaning". | ||
| Milk unsuitable for frothing. Use low-fatThe milk frother(6)tihse mmolk frother partcorrectly assemblpesss together firmly. | ||
| Build-up of limeDesalceai Iien three applianca described in the instructapppliance. | ||
| Coffee dispensing Cofeeewsground too finely. Adjust the grinding unitto a trickle or s Popsgrund coffeocias steao setting.Use coarfine. | ||
| Build-up of limeDesalceai Iien three applianca described in the instructapppliance. | ||
| Coffee has no "crema". Unsuitable type of coffee.Use atyproportion of robusta bea | ||
| The beans are noUsengfesh beans.fresh. | ||
| The grinding set tAjdust girs dingostetting to fine.suitable for the beans. | ||
| Coffee is too "acidic". The grindiArdjussteed grinding unist to finercoarse or the prsettingcoursle finer pre-groundcoffee is too coarse. | ||
| Unsuitable type of coffee.Use a darker ro | ||
| Coffee is too "bitter". The grindiArdjusset tihreg girs inding unittoo fine or the pre-groundcoarser setting or use cccoffeeis too fine.pre-groundcoffee. | ||
| Unsuitable type of coffee.Changte type of | ||
| Di spl ay showsThe appliance has a fault. Please call thERRORCALL HOTLINE | ||
| If you are unable to solve the problem, always call the hoYou will find the telephone numbers at the back of these instructions. | ||
| Problem Cause Solution | ||
| The water filter does not stay in position tank (16). | The water filter is not mouthbed waberectl | Firmly press the water filter straight down into the tap connection. |
| Di spl ay shows CHECK WATER TANK | Water tank has been correctly in new water filter has not been rinsed according to instructions. | Insert the water tank correction and then swirr instruction and then swirr instruction to water tank. |
| Carbonated water tank. | Fiñlthe water tank with water. | |
| The coffee ground compact and are t fine outo.coarse, or not enough ground cofofvehmeasuring spoons been used. | tAidrigusits sthegrinding unit coarser or finer setting, or use f2f evehmeasuring spoons ground coffee. | |
| Di spl ay shows CLEAN BREWING UNIT | Brewing unit (5) | Is soiled. Clean brewing |
| Too much pre-gro fee in the brewi | On afofrewing unit (5). Fmg o unoirte (t5)an 2 level measpoons of ground coffee. | |
| The brewing unit nism is stiff. | Removcand clean the brewing unit, see "Maintenance ar daily cleaning". | |
| Coffee or milk fr Buhlquabibylime deaclaien threeppliance as varies considerabapliance. | Desalcialien three appliance as described in the instruct | |
| Water dripped ont Drtbetray (8) re mawed at dew seconds after last drink was dispensed when the drip tray (8) was removed. | last drink was dispensed removing the drip tray (8) | |
| Di spl ay shows INSERT BREWING UNIT | Brewing unit (5) or was not recog | Swi tmihs siffrg the appliance bir seedng unit (5) in place three seconds and switch appliance. |
| Restore the unit to its original factory ("Reset"). | You changed some sehvgngad want them. | Tsuert- off the unit with th on ndiosdarswitch O / I (9). hold Ochoff / i (12) and t (11) button and turn the on with the power on/off O / I (9). Confirm by pressing the start button start (10). tory settings are now act |
| If you are unable to solve the problem, always call the ho You will find the telephone numbers at the back of these instructions. | ||
Sommaire
DÉMARRER CALC'N'CLEAN
CALC'N'CLEAN EN COURS
NETTOYAGE EN COURS
CALC'N'CLEAN EN COURS
CALC'N'CLEAN EN COURS
CALC'N'CLEAN EN COURS
CALC'N'CLEAN EN COURS
Sous reserve de modifications.
Call rates depend on the network used
CZ 0251 095 546
DE 0911 70 440 040
DK 44 89 89 85
EE 0627 8730 / 0651 2214
ES 902 245 255
FI 0207510700
Calls from a BT landline will be charged at up to 3 pence per minute. A call set-up fee of up to 6 pence may apply