
pureFlow DW03500 - Water dispenser SIEMENS - Free user manual and instructions
Find the device manual for free pureFlow DW03500 SIEMENS in PDF.

| Product Type | Water dispenser with 6-stage filtration |
| Brand | Siemens |
| Model | pureFlow DW03500 |
| Dimensions (H x W x D) | 510 x 260 x 440 mm |
| Weight (full) | 25 kg |
| Power supply | 220-240 V, 50 Hz |
| Heating power | 300 W |
| Total tank capacity | 6.5 L (hot water 1.2 L, cold water 2.3 L, ambient 3.0 L) |
| Hot water temperature | 89-94 °C (day), 65-75 °C (night with sensor) |
| Cold water temperature | 5-9 °C (day), 9-12 °C (night) |
| Hot water flow rate | 1.4 L/min |
| Cold/ambient water flow rate | 1.8 L/min |
| Filtration system | 6-stage: Neo Sense filter, RO membrane, post-carbon, UV |
| Required water pressure | 0.14 - 0.83 MPa (1.4 - 8.3 bar) |
| Child safety lock | Push-button locking hot water |
| Brightness sensor | Yes (reduces heating/cooling at night) |
| Maintenance and cleaning | Exterior cleaning with damp cloth; drip tray dishwasher-safe |
| Spare parts (filters) | Neo Sense (BZ00NS1), RO membrane (BZ00RO1), post-carbon (BZ00PC1) |
| Warranty | According to distributor conditions |
Frequently Asked Questions - pureFlow DW03500 SIEMENS
User questions about pureFlow DW03500 SIEMENS
0 question about this device. Answer the ones you know or ask your own.
Ask a new question about this device
Download the instructions for your Water dispenser in PDF format for free! Find your manual pureFlow DW03500 - SIEMENS and take your electronic device back in hand. On this page are published all the documents necessary for the use of your device. pureFlow DW03500 by SIEMENS.
USER MANUAL pureFlow DW03500 SIEMENS
natural_image
3D rendering of a Siemens water dispenser with ventilation slots and control panel (no visible text or symbols)Gebrauchsanleitung
Instructions for use
使用说明书
Inhalt
flowchart
graph TD
    A["UV"] --> B["Stage 1: particles dispersed"]
    B --> C["Stage 2: particles scattered"]
    C --> D["Stage 3: particles scattered"]
    D --> E["UV in glass filled with liquid"]
Montage
Sicherheitshinweise

Stromschlaggefahr!
natural_image
Close-up of a mechanical device with a circular component and a numbered label '26' (no readable text or symbols beyond the number)natural_image
Close-up of a server rack with ventilation grilles and a labeled pin (no text or symbols beyond the number 9)natural_image
3D rendering of an Siemens industrial control unit with internal casing and mounting hardware (no text or symbols visible)Abstand A: mindestens 10 cm
Wichtig
natural_image
Technical illustration of a bolt and nut assembly with an upward arrow, no text or symbols present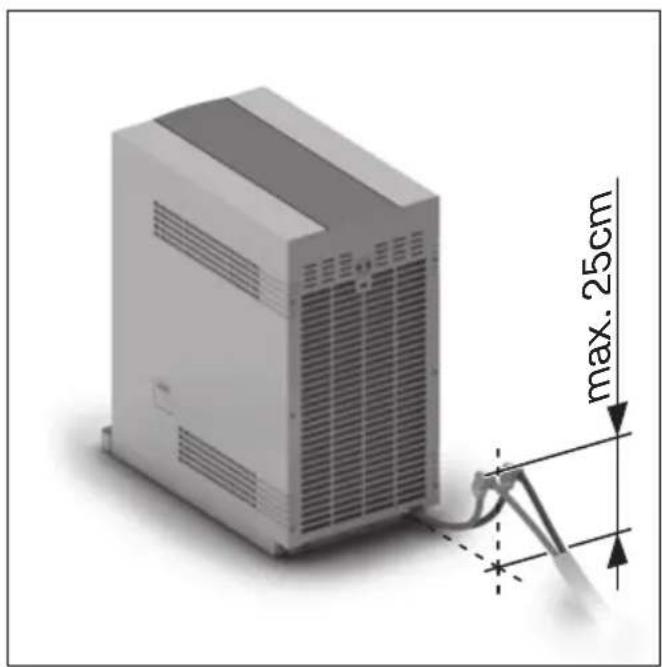
natural_image
3D rendering of a server rack with attached cable and dimension annotation (max. 25cm), no readable text or symbols beyond measurement markers
natural_image
Close-up of a white electronic device with a cable inserted into the base, showing a circular vent and a central port (no text or symbols visible)Wichtig
natural_image
Hand pointing at a kitchen control panel with buttons and a handle (no text or symbols visible)natural_image
Hand pointing at a button on a device control panel (no text or symbols visible)natural_image
Hand pressing down on a control panel with buttons and a cylindrical knob (no text or symbols visible)Energie sparen
Standort
natural_image
Illustration of a hand pressing down on a computer tower (no text or symbols visible)Safety instructions ....25
Parts and operating controls ....26
General information ......27
Installation 28
Safety information 28
Installing the appliance 29
Water installation 30
Electrical connection 32
Operating temperature.... 32
Ventilation.... 32
Start up 32
Important....32
Activating the filters 32
Draining the water tanks 33
Filling the water tanks 34
Operation....34
LED indicators for hot water and cold water ..... 35
Adjusting the standard water dispensing
volume 35
Child protection 36
Saving energy 36
Location 36
Light sensor 36
Switching the dispensing button lighting
ON/OFF 37
Switching the heating function On/Off 37
Switching the cooling function On/Off ...... 37
On/Off switch 37
Care and cleaning 38
Draining and cleaning the water tanks.... 38
Replacing the filters ....39
Transporting and storing the appliance ....40
Vacations, long weekends and holiday periods 41
Troubleshooting ....41
Disposal....43
Guarantee 43
Technical data 44

Please read this operating instruction manual carefully, then act accordingly!
Store for future reference.
This Water Purifier is designed for household use and not for commercial use.
These operating instructions describe various models whose accessories vary.
Safety instructions

Risk of electric shock!
If an error occurs, immediately disconnect the – plug from the power supply.
Only connect and operate appliance in accordance with specifications on the ratings plate.
Only use if electrical supply cable and appliance – show no signs of damage.
Only use appliance indoors at room temperature. –
Persons (including children) with diminished – bodily, sensory or mental perception, or those who lack knowledge or experience should not operate the appliance, unless they are monitored or have received instruction concerning use of the appliance by persons responsible for their safety.
Please monitor children to ensure that they do – not play with the appliance.
Repairs to the appliance, such as replacement of – a damaged electrical supply cable, has only to be undertaken by our customer service department in order to avoid potential sources of danger.
Never immerse the appliance or power cable in – water.
Do not insert the power plug with moist or wet - hands.
Immediately remove moisture from the power – plug; do not use gasoline/petrol or benzene for cleaning purposes.
If the electrical supply cable or plug is wet, – unplug the appliance (disconnect from power) and allow both to thoroughly dry before further usage.
Do not use the electrical supply cable to carry – the appliance.
Only plug the Water Purifier plug into a separate - electrical socket.
Unplug the appliance before repairing, inspecting or moving it.
If the Water Purifier is not to be used for an extended period of time (vacation), then remove the water from the tank and disconnect the appliance from the electric circuit and from the water supply.
- Do not repeatedly plug and unplug the appliance's power plug into and out of the power supply.
If the appliance leaks and water seeps out, – immediately unplug the appliance and call customer service.
- No objects are to be placed on the appliance.
- Do not place cigarettes or any other burning objects on the appliance.
- Do not place any heavy objects on the electrical supply cable and do not pinch it or otherwise damage it.
- If the appliance makes unusual noises or emits strange odours, immediately disconnect the plug from the power supply.
Only use the appliance when the water tank is – completely closed.
Do not move the appliance when it is connected – to the water supply.
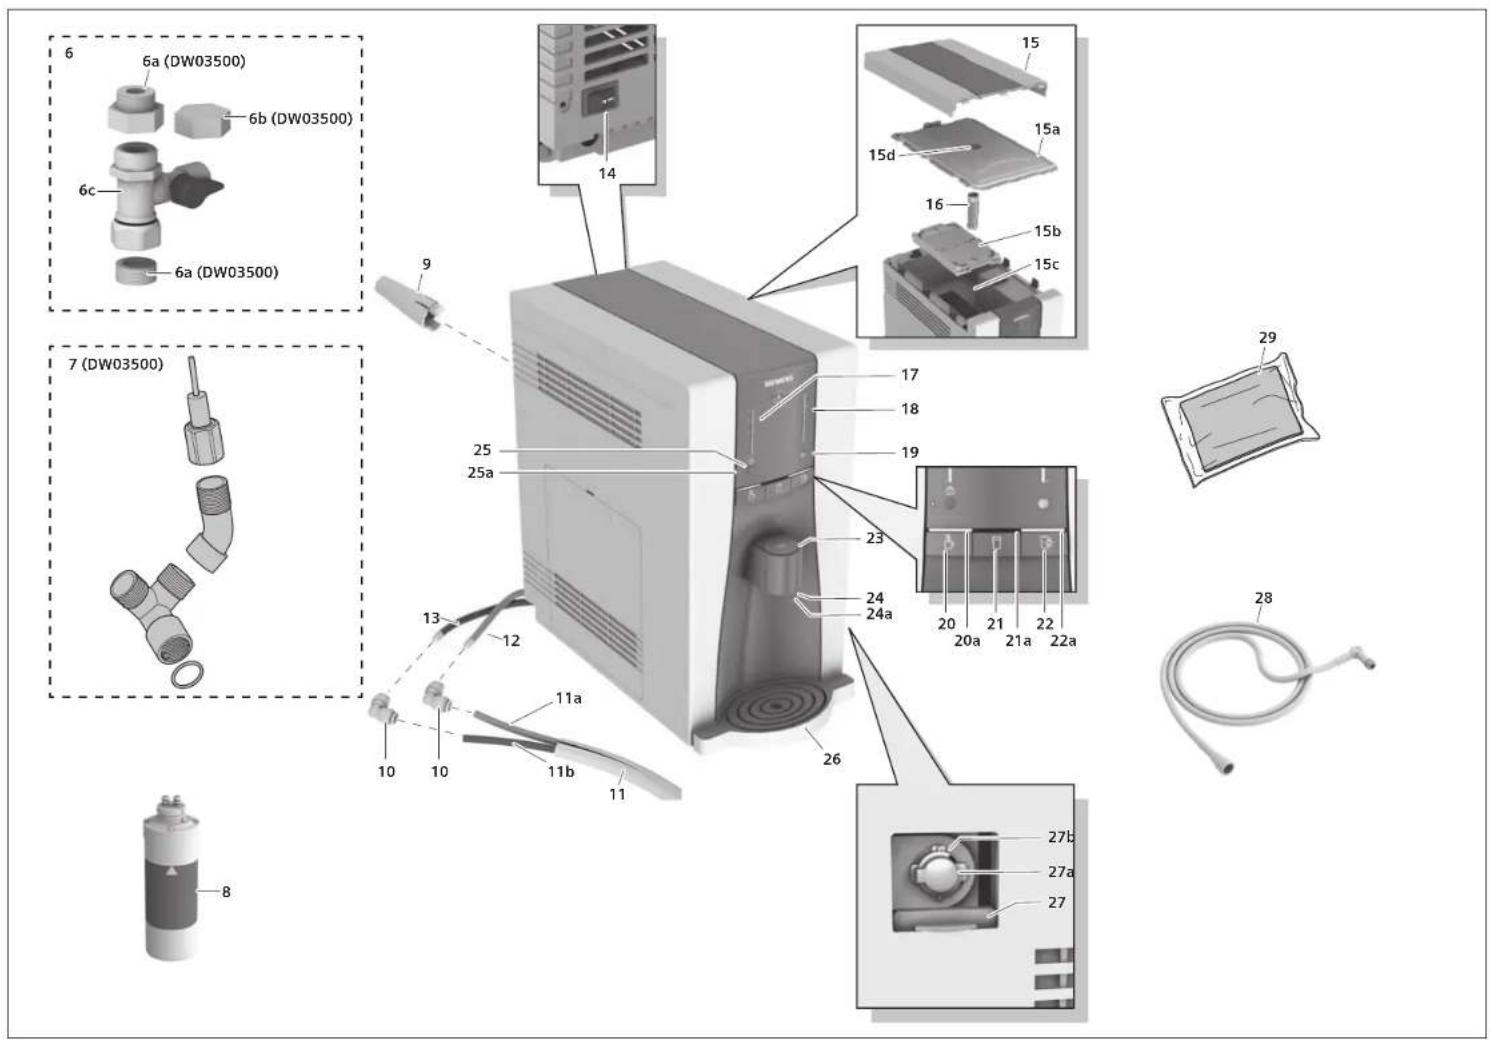
Parts and operating controls
1 Neo-Sense Filter (Filter No. 1)
2 RO Membrane Filter (Filter No. 2)
3 Post-Carbon Block Filter (Filter No. 3)
4 Filter carriage (can be swung out)
5 Filter cover (filter cartridges)
Phillips screws (for filter cover)a
6 Installation set for water connection
a 4 adapters (DW03500 only):
$$ 1 / 2 ^ {\prime \prime} \rightarrow 3 / 8 ^ {\prime \prime} $$
$$ 1 / 2" \rightarrow 3 / 4" $$
$$ 3 / 8" \rightarrow 1 / 2" $$
$$ 3 / 4 ^ {\prime \prime} \rightarrow 1 / 2 ^ {\prime \prime} $$
b Cap (DW03500 only)
c Connection valve
7 Installation set for water drain (DW03500 only)
8 Extra Neo-Sense Filter (Filter No. 1) (DW03500 only)
9 Spacer
10 Coupling
11 Hose set
a Supply hose - red (water connection)
b Waste water hose - blue
12 Supply hose - red (water connection)
13 Waste water hose - blue
14On/Offswitch
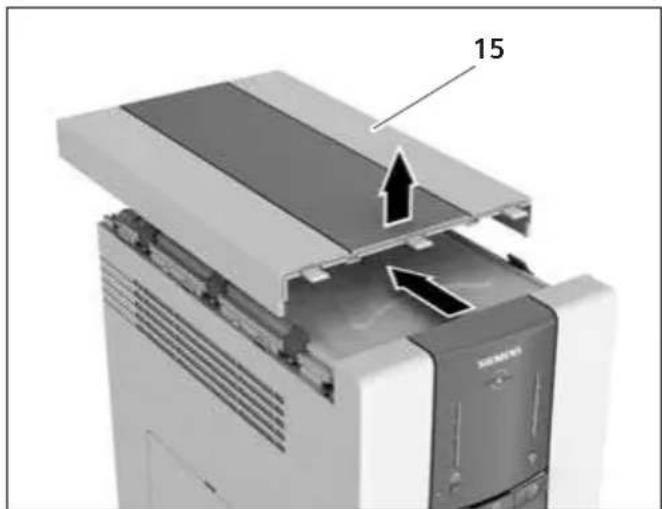
15 Appliance cover
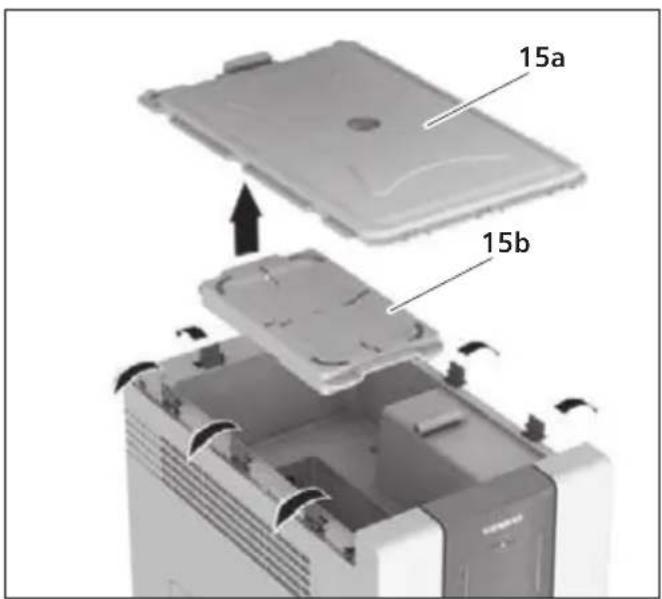
Watertankcovera
Intermediate cover (tank for cold water)b
Water tank (for ambient water)c
Pressure equalization apertured
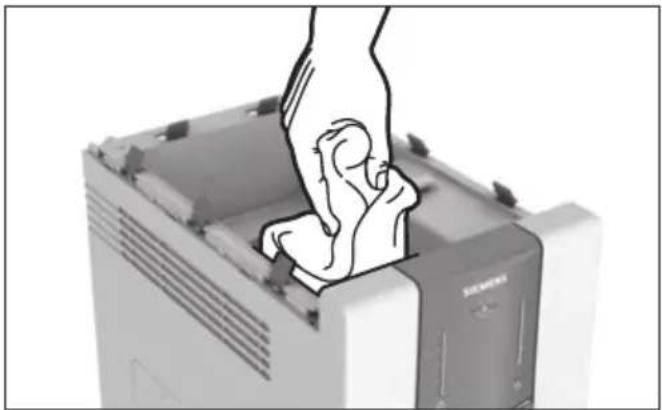
16 Press pads
17 LED indicator - red (hot water)
18 LED indicator - blue (cold water)
19 Light sensor
20 ☐ Selection button – Hot water
Status light bar – Hot water
21 ☐ Selection button – Ambient water
Status light bar – Ambient watera
22 ☐ Selection button – Cold water
a Status light bar – Cold water
B Dispensing button
24 Water outlet
a Glasslight
25 Child protection push-button
a LED - Child protection
26Collection tray with drip grate
27 Sliding doors (for drainage hose hot water)
a Safety lock - red
b Coupling (for drainage hose)
28Drainage hose (hot water)
29 Cleaning cloths
Generalinformation
Thank you for your decision to purchase our Water Purifier.
Water is essential for human beings. That's why the quality of our water is very important.
Tap water quality is increasingly degrading due to negative influences on our environment.
This Water Purifier enables you not only to significantly improve the quality of your tap water, but also to choose just the right temperature - from cold to hot.
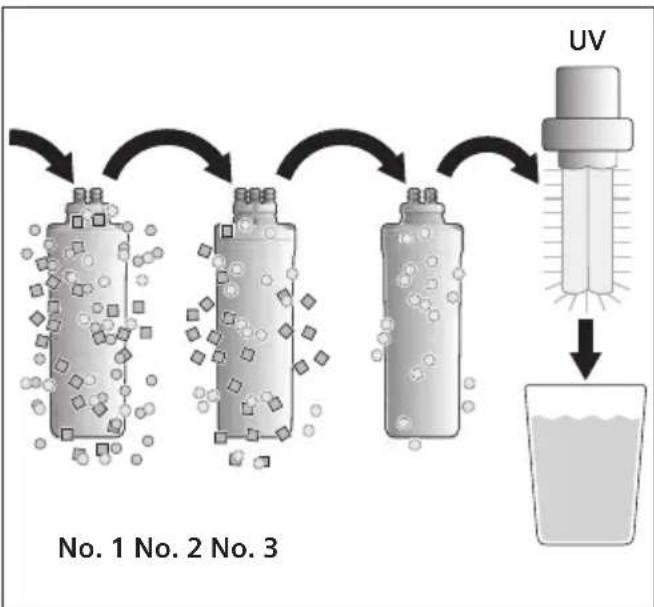
A 6-stage filtering system has been built into the appliance to improve the water quality. These filters reduce the quantity of harmful substances in the water:
flowchart
graph TD
    A["UV"] --> B["No. 1"]
    A --> C["No. 2"]
    A --> D["No. 3"]
    B --> E["Particle with particles"]
    C --> F["Particle with particles"]
    D --> G["Particle with particles"]
    E --> H["Water volume"]
    F --> I["Water volume"]
    G --> J["Water volume"]
First the water flows through the Neo-Sense – Filter (Filter No. 1). This is comprised of a combination of sediment and activated charcoal filters. The sediment filter filters out insoluble particles. The activated charcoal filter filters out chlorine and volatile organic substances from the tap water.
Subsequently, the water flows through the RO - Membrane Filter (Filter No. 2). The RO Membrane Filter consists of an element possessing the finest micro-pore structure. This phase filters out heavy metals, water-borne microorganisms or other harmful organic chemicals.
The next filter station is the Post-Carbon Block – Filter (Filter No. 3). This consists of an activated charcoal filter and a fine filter. The activated charcoal filter improves the taste of the water. The fine filter removes very small particulate matter such as dust and other impurities.
The - UV filter* ensures an additional cleaning action. It uses ultraviolet radiation (UV) to sterilise and thereby enables double protection against bacteria and viruses.
Due to these processes, you now have absolutely clean, pure water at your disposal.
Moreover, you have various temperature adjustment options at your fingertips: ambient water, cold water or even piping hot water. You can read more about these adjustment options in the chapter "Operation".
This appliance contains several replaceable filters which are of crucial importance for effectively reducing the dissolved solid particles. The individual filters must be regularly replaced in order to guarantee flawless operation of the system. To ensure the appliance's ability to reduce harmful substances, the filters are only to be replaced with original filters from the manufacturer.
Note:

Risk to health!
If you are involved in a special dietary program, consult first with a physician before ingesting filtered water.
Important
A by-product produced during tap water purification is waste water. Do not use under any circumstance the waste water for drinking or cooking purposes. It can be collected and used, for example for toilet flushing purposes.
Declarationofconformity
The filter system is tested in accordance with Standard NSF/ANSI 58 for reduction of pentavalent arsenic, barium, cadmium, mercury, selenium, radium 226/228, trivalent and hexavalent chromium and lead as well as nitrates/nitrites. The results have been confirmed by laboratory tests. The water purifier is tested in accordance with Standard NSF/ANSI 42, 53 for reduction of chlorine and volatile organic compounds, including laboratory testing which has confirmed the results. This appliance is approved for the treatment of supply water concentrations of up to a maximum of 27 mg/l nitrates and 3 mg/l nitrites (combined) and is approved for water pressure of 0.14 MPa – 0.83 MPa.

Installation
Safety information

Risk of electric shock!
The statutory regulations of the respective country, as well as those of the local electricity and water suppliers must be adhered to.
Only install the appliance in accordance with the – local rules and regulations.
First connect to the water connection and drain, – then connect the electrical power supply.
The Water Purifier must be disconnected from – the mains power network during installation.
Make sure that the house's electrical earth/ – grounding system is installed in accordance with the regulations.
Do not use extension cables. –
Only plug into a separate electrical socket. Do – not share electrical outlet with other devices.
The Water Purifier has only to be installed in a - frost-free room.
Protect plastic parts and cables from high – temperatures.
Only connect to a cold tap water line. –
Only connect to a water supply that meets – the regulatory requirements of the respective country.
Only erect in hygienically clean areas. –
Do not subject the appliance to shaking, vibra- tions or jolts.
Do not erect in the vicinity of a heating source, – or place in direct sunlight, or install in rooms that are very moist.
Erect the appliance away from flammable gases – or combustible materials.
- Make sure that there is sufficient air circulation. Do not erect in closed cabinets, closets or lockers.
-A minimum distance of 10cm must be maintained between the appliance and any wall/object. Maintain free space around the filter cover to allow for filter changes.
-Only set the Water Purifier on a level, flat surface that is designed to support such a weight.
–The electrical plug must be freely accessible after erection of the appliance.
- Unpack the appliance and check for transport-related damage.
- Please dispose of the packaging, and if applicable, the old appliance in an environmentally-friendly manner.
en
Installing the appliance
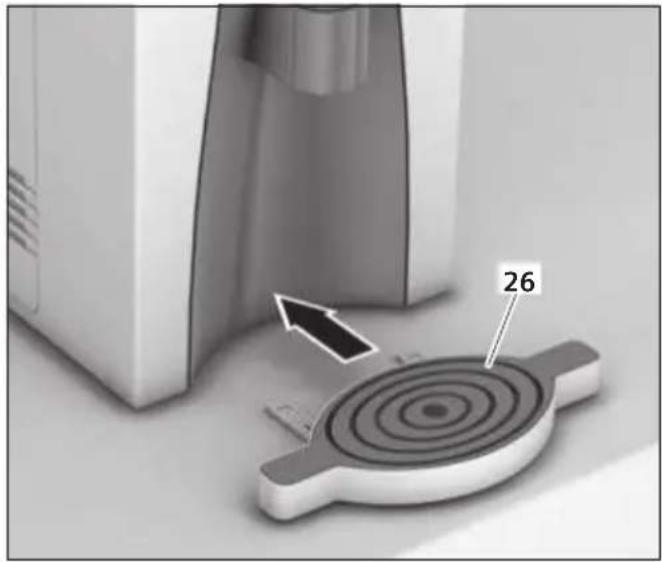
Set the collection tray with drip grate (26) in the appliance. Please make sure that the appliance's collection tray (26) is also supported by a stable surface.
natural_image
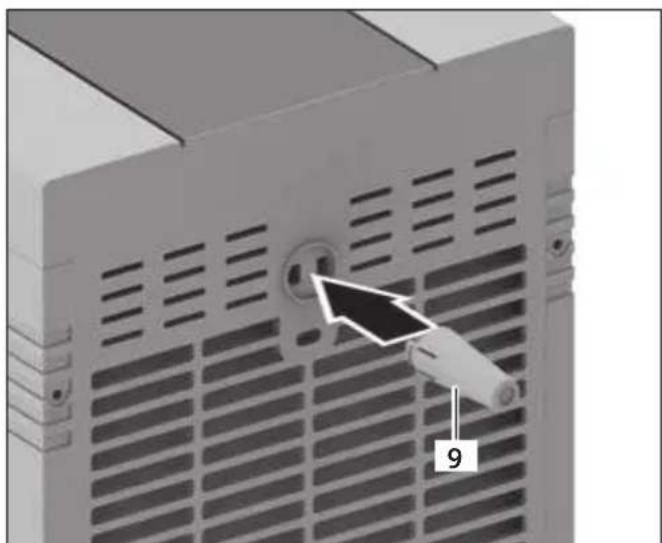
Close-up of a mechanical component with a circular target and numbered part (26), no visible text or symbolsinstall the enclosed spacer (9).

natural_image
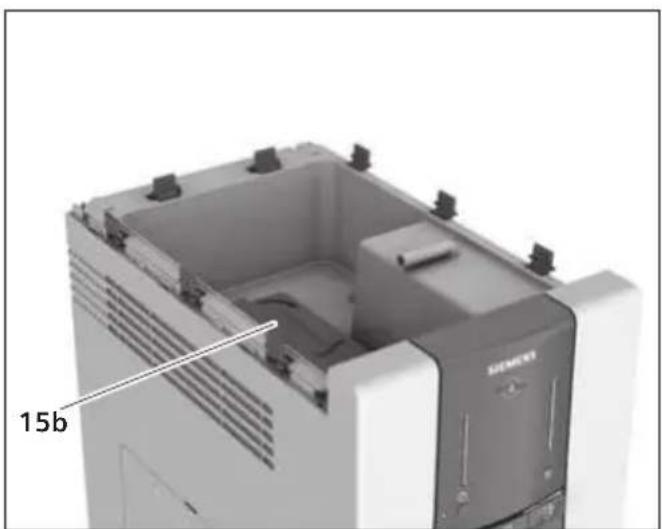
Close-up of a server rack with ventilation grilles and a circular socket, showing a numbered arrow pointing to the socket (no text or symbols on the device itself)Check whether the intermediate cover (15b) has slipped out of position during transport. To do this: Remove the appliance cover (15) and water tank cover (15a).

natural_image
Interior view of a device with a lid and labeled component '15a' (no readable text or symbols beyond label)Check whether the intermediate cover (15b) is seated correctly.

natural_image
3D rendering of a Siemens industrial control unit with visible internal components and mounting holes (no text or symbols)Place the press pads (16) located on the underside of the cover (15a) on the provided holder. Make sure that both hook clips snap into place.
Set all covers back in place.
Important
Please do not cover or otherwise impede access to the pressure equalization aperture (15d) in the water tank cover (15a).
Water installation
Important
Only use the enclosed parts for connecting to the water supply and the waste water (only DW03500).
Pull off the transparent protective caps from the waste water hose (13 – blue) and supply hose (12– red) and insert a coupling on each.
Attach the waste water hose (13 – blue) with the coupling to the blue hose set connection (11b).
Attach the supply hose (12 – red) with the coupling to the red hose set connection (11a).
Lay out and arrange the hose set up (11) to the water supply and water drain (see figure).
Distance A: at least 10 cm
Important
The total length of the entire hose set is limited to a maximum of 5 m. The waste water connection must be located below the appliance level. The height difference to the connection at the appliance must not exceed a maximum of 25 cm. Make sure that the hose set (11) is not bent or pinched. The flow of water must not be impeded.
Always use a new hose when replacing the Water Purifier. Do not reuse the current hose.
Waste water connection (DW03500 only)
■ Use the enclosed parts to connect the waste water hose blue (11b) to the drain connection of the siphon. If needed, install the siphon with a drain connection.
Water connection
Close the main tap of the house water supply.
Connect the connection valve (6c) to the cold water line of the house water supply (see figures a and b).
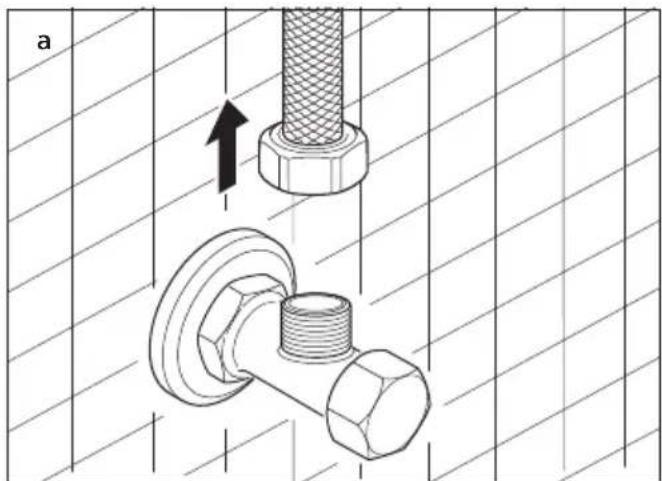
natural_image
Technical illustration of a bolt and nut assembly with directional arrows, no text or symbols present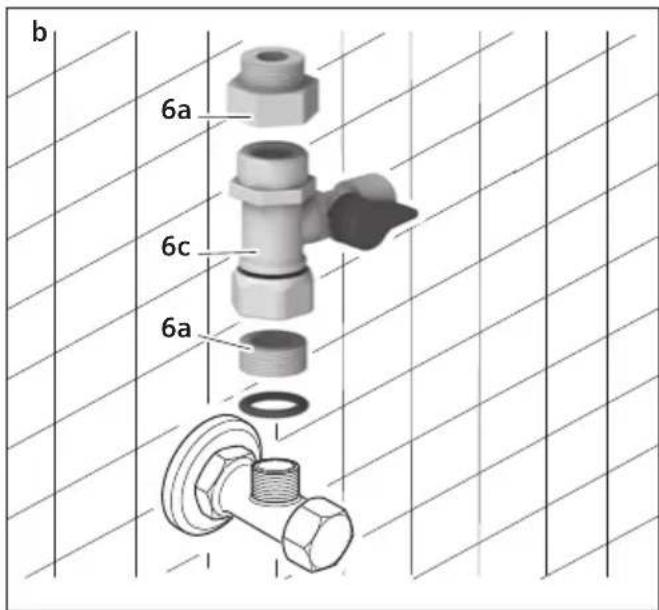
Important
Do not under any circumstances connect to the warm water supply.
DW03500 only: If needed, use the enclosed adapter (6a) (see figure b).
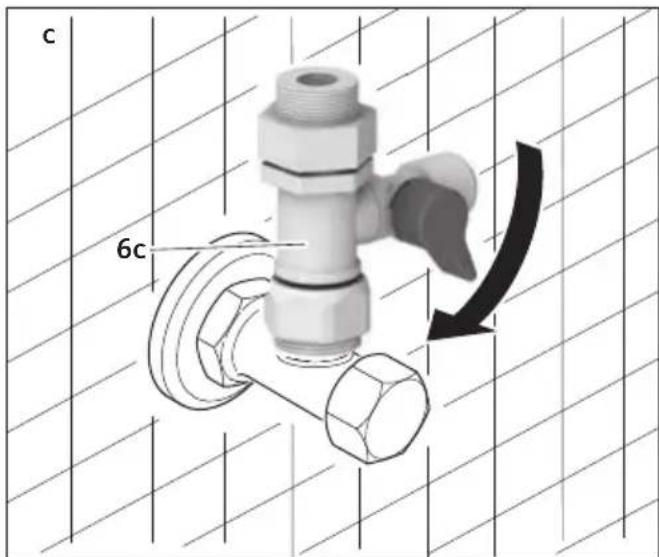
■ Close the connection valve (6c) (see figure c).
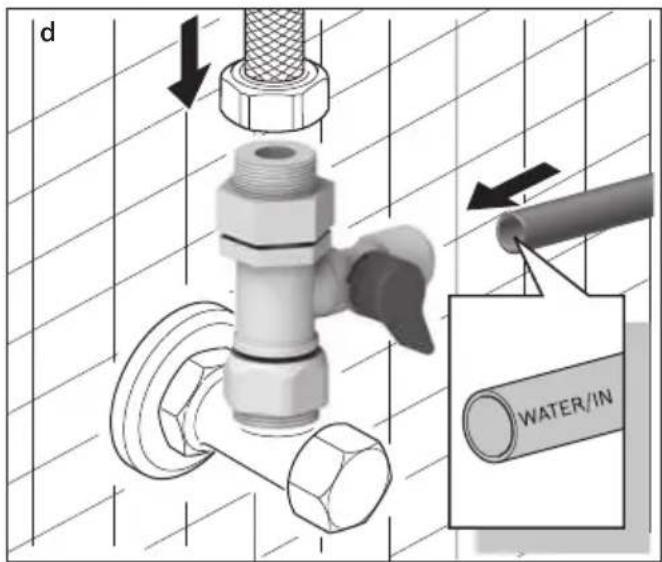
Attach the red hose of the hose set to the connection valve (6c) (see figure d).
Open the main tap of the house water supply.
Open the connection valve (6c) again and check the connection for leaks.
Water pressure:
A minimum of 0.14 MPa (1.4 bar)
A maximum of 0.83 MPa (8.3 bar)
■f the pressure is under 0.14 MPa (1.4 bar), a pressure booster pump is to be built in.
If the pressure is over 0.83 MPa (8.3 bar), a pressure reducer is to be built in.
Water temperature
Cold water line temperature: 5 - 35 °C
Info
If the water supply is very dirty, it is recommended that a pre-filter* be installed. This part is available under order number BZ00PF1.
* not WQA (Water Quality Association) certified
Electrical connection
Only plug the appliance plug into a separate electrical socket.
The socket must be located in the vicinity of the Water Purifier and be freely accessible.
■ Modifications to the connection must be made by a specialist.
Operating temperature
Permissible room temperature: + 10 to 43 °C
Ventilation
Never cover the ventilation and breather openings. Otherwise, the cooling system must work harder and more electrical power will be consumed.
Start up
Important
The appliance must be connected to the water supply line and to the waste water line.
The appliance must remain inoperative for at least 30 minutes before connecting to the electric circuit and starting up (to avoid damage to the cooling system).
Before using the appliance, please fill and completely empty out the filtered water two-times from the water tanks.
To do this, proceed as follows:
Activating the filters
Insert the plug into a separate electrical socket.
Switch the On/Off switch (14) to I. All LEDs briefly light up, then just the selected LEDs remain lit.
| LED Hot water LED Cold water | |
 |  |
The appliance now filters tap water for approx. 2 hours and fills the three tanks with purified water. The tanks are filled when both LED indicators "Hot water"(17) and "Cold water" (18) light up completely.
| LED Hot water LED Cold water | |
 |  |
Now completely empty the water from the tanks.
Draining the water tanks
Draining the cold water tank and ambient water tank
Shut off the water supply at the connection valve (6c).
Connect the straight end of the attached drainage hose (28) to the drink water outlet (24). Lay the other end in a large, clean collecting basin (min. 2 litres).
natural_image
Close-up of a computer monitor with a cable inserted, showing a circular dial and a central knob (no text or symbols visible)Important
The drainage hose (28) should slope down toward the water collecting basin. Otherwise, the flow throughput will be reduced and complete water drainage will be impeded.
☐ (Sole and hold the selection button ter) for approx. 3 seconds to switch off the cold water function.
■ Press and hold the dispensing button 3 seconds.
Water runs out of the drainage hose for 1 minute.
- Repeat the procedure until no more water flows out.
Draining the hot water tank
Switch off the Water Purifier and pull out the electrical plug.
Gently press the sliding door (27) inward and slide the handle downward.
■ Flip the red safety lock cap (27a) outward.
Lay the straight end of the attached drainage hose (28) in a large, clean collecting basin (min. 2 litres).
Important
The drainage hose should slope down toward the water collecting basin. Otherwise, complete water drainage will be impeded.

Risk of scalding!
After connection to the coupling (27b), hot water immediately runs out of the drainage hose (28).
Attach the angled end of the drainage hose (28) to the coupling (27b) and release the hot water from the tank into the basin prepared for this purpose.
Remove the drainage hose (28) and close the opening with the red safety lock cap (27a).
■ Slide the sliding door (27) upward.
Remove the collection tray with drip grate (26), then empty and rinse it.
Filling the water tanks
Open the water supply again. Insert the appliance's electrical plug in the electrical socket and switch the On/Off switch (14) to I.
Presoland hold the selection button
water) for approx. 3 seconds to switch on the cold water function.
It will take about 2 hours until all three tanks are refilled.
Drain the tanks once more and then refill as described in Chapter "Draining the water tanks" and "Filling the water tanks".
The appliance is ready to operate when both LED indicators "Hot water" (17) and "Cold water" (18) light up completely.
| LED Hot water LED Cold water | |
Operation
Important
The appliance must be connected and switched on.
By pressing the corresponding button, you can easily select between

Hot water

Ambient water

Cold water
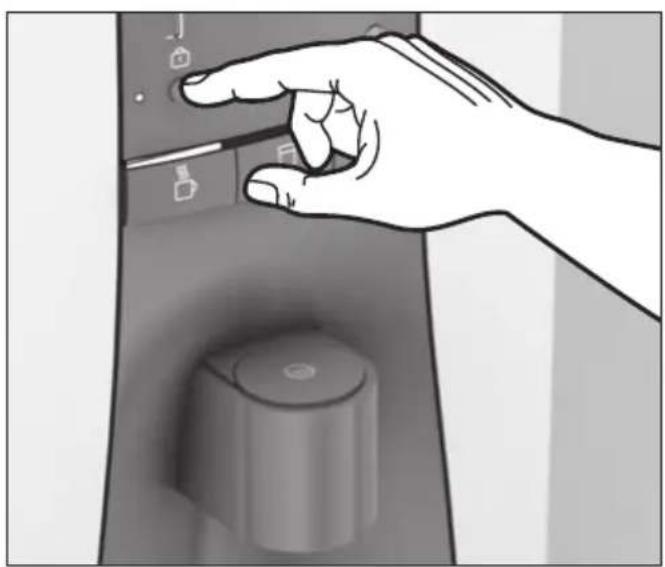
Press the desired water temperature button, e. g. the selection button (Cold water).
natural_image
Hand pointing at a kitchen control panel with buttons and a cylindrical knob (no text or symbols visible)Now, set a glass under the water outlet.
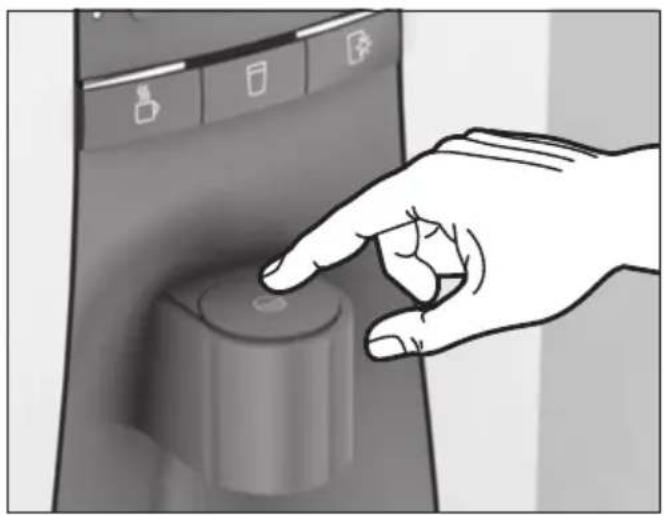
Press the dispensing 📋 button.

natural_image
Hand pressing a button on a computer control panel (no text or symbols visible)Water flows into the glass.
To interrupt the dispensing of water
■ preset the dispensing
To dispense water for 1 minute (60 seconds)
■ Press and hold the dispensing button 🌐 for 3 seconds to start.
Info
While the water runs, the glass light will remain lit and the status light bar of the chosen selection button blinks. Both blink rapidly immediately before dispensing stops.
LED indicators for hot water and cold water
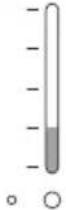
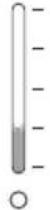
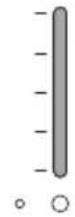
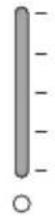
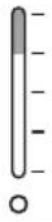
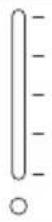
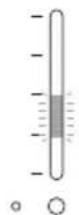
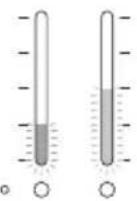
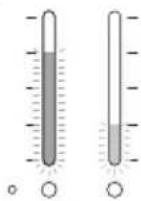
The two lowest LED indicators (red for hot water and blue for cold water) light up when the respective cooling and heating functions are operating. The other LEDs (2, 3 and 4) indicate the respective water temperature. The more LEDs lit, the hotter or colder the water is.
 |
Adjusting the standard water dispensing volume
The appliance has been adjusted at the factory to dispense a certain standard water volume: 120 ml.
This setting can be changed. There are three volumes to select from: 120 ml, 200 ml and 300 ml.
| LED Hot water Dispensing volume | |
| 120 ml | |
| 200 ml | |
| 300 ml | |
To change the setting, proceed as follows:
Presoland hold the selection buttons ☐ water) and ☐ (Hot water) simultaneously for at least 3 seconds to switch into SET mode.
One of the hot water LEDs briefly lights up and a signal tone is emitted.
■ Not present the selection button □ select the volume.
To save the setting, press and hold the selection button (Ambient) for at least three seconds.
All LEDs light up two-times. The setting has been saved.
Child protection
The user must start dispensing within 4 seconds after pressing the selection button ☐ (Hot water). Otherwise, for reasons of safety, the appliance switches automatically into the function "Cold water".
The appliance is equipped with a child protection system so that children can not be scalded by hot water.
If the child protection system is activated, hot water can not be dispensed.
To activate or deactivate the child protection system, proceed as follows:
■ frws and is sold the push-button 3 seconds.
The child protection LED (25a) lights up and indicates that this is activated.
To deactivate, press and hold the push-button again for at least 3 seconds.
The child protection LED switches off. Hot water can be dispensed once again.
natural_image
Hand pressing down of a control panel with buttons and a rotary knob (no text or symbols visible)Saving energy
Location
Selecting the right location is important in terms of energy consumption.
■ Erect the appliance in a dry, ventilated room.
Do not place in direct sunlight or in the vicinity of a heating source (e.g. radiator, oven).
Light sensor
The light sensor (19) measures the daylight and automatically reduces energy consumption when it is dark by decreasing the frequency of heating and cooling cycles. This function can be switched on and off.
| LED Cold water | |
 | Light sensor swiched on (energy-saving) |
 | Light sensor swiched off |
Prehold and hold the selection buttons (hot water) and (Hot water) simultaneously for at least 3 seconds to switch into SET mode.
One of the hot water LEDs briefly lights up and a signal tone is emitted.
Now, the light sensor can be switched on and off by pressing the selection button (Cold water).
To save the setting, press and hold the selection button (Ambient) for at least three seconds.
All LEDs light up two-times. The setting has been saved.
Switching the dispensing button lighting ON/OFF
The dispensing button illumination can also be switched off to save energy.
Pre (Col and hold the selection buttons water) and (Hot water) simultaneously for at least 3 seconds to switch into SET mode.
One of the hot water LEDs briefly lights up and a signal tone is emitted.
V(oh)ipdepsatepash-button
| Child protection LED (25a) | |
LED does not light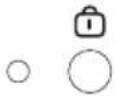 | Dispensing button illumination is switched off(energy-saving) |
| LED lights up | Dispensing button illumination is switched on |
To save the setting, press and hold the selection button (Room temperature) for at least three seconds.
All LEDs light up two-times. The setting has been saved.
Switching the heating function On/Off
To save energy, the heating function can be switched off if it is not used.
| LED Hot water | |
 | Heating function switched off (energy-saving) |
 | Heating function switched on |
To switch off, press and hold the selection button (Hot water) for approx. 3 seconds.
The LED indicator "Hot water" goes out.
To switch it on again, press and hold the selection button (Hot water) for approx. 3 seconds.
Switching the cooling function On/Off
The cold water function can also be switched off to save energy.
| LED Cold water | |
| [SEXA] | Cooling function switched off (energy-saving) |
| [W6AS] | Cooling function switched on |
To switch off, press and hold the selection button (Cold water) for approx. 3 seconds.
The LED indicator "Cold water" goes out.
To switch it on again, press and hold the selectionbutton (cold water) for approx. 3 seconds.
On/Off switch
If the appliance is not to be used for an extended period of time (vacation), the On/Off switch (14) should be switched off to save energy.
Care and cleaning

Risk of electric shock!
Before cleaning, disconnect the plug from the – power supply.
Never immerse the appliance in water. –
Do not use a steam cleaner. –
Do not use abrasive cleaning materials. –
Do not spray water or use benzene for cleaning – purposes.
Wipe off the housing with a moist cloth. –
Remove the collection tray (26) with drip grate, – then empty and rinse it. The collection tray with drip grate can also be cleaned in a dishwasher.
Draining and cleaning the water tanks
The inside of the ambient water tank can be cleaned. For hygienic reasons, only use a fresh cleaning cloth (29) to wipe the inside clean. It has been sterile-packed and does not leave any residues during cleaning.
Empty the tanks as described in Chapter "Draining the water tanks" up to the point "release the hot water from the tank into the basin prepared for this purpose".
■ Remove the appliance cover (15), water tank cover (15a) and the intermediate cover (15b).
Wipe the inside of the water tank clean with a fresh cleaning cloth (29). Do not use any chemical agent or any other cleaning materials.
natural_image
Illustration of a hand inserting a small object into a computer case (no text or symbols visible)Reinstall the intermediate cover (15b), water tank cover (15a) and the appliance cover (15).
en
Remove the drainage hose (28) and close the opening with the red safety lock cap (27a).
■ Slide the sliding door (27) upward.
Open the water supply again. Insert the appliance's electrical plug in the electrical socket and switch the On/Off switch (14) to I.
■preGoldthevsetlection button
It will take about 2 hours until all three tanks are refilled.
The appliance is ready to operate when both LED indicators "Hot water"(17) and "Cold water"(18) light up completely.
Replacing the filters
The individual filters must be replaced after a certain time period has elapsed. Replacement of the respective filter is indicated by flashing of various LED combinations:
Important:
The filter must be replaced as soon as the filter change reminder is displayed. The device must not be operated with a used filter.
The filter can be disposed of in the normal household waste.
| LEDHot water(flashes) | LEDCold water(lights up) | Filter to be replaced | Service life (based on 10 l water extracting quantity per day) |
 |  | Neo-Sense Filter(Filter No. 1)Order number BZ00NS1 | every 6 months |
 | [2XXY] | RO Membrane Filter(Filter No. 2)Order number BZ00RO1 | every 20 months |
 |  | Post-Carbon Block Filter(Filter No. 3)Order number BZ00PC1 | every 18 months |
| [3W1Z] | [XC7] | Only our customer service department is permitted to replace the UV filter. Please call customer service. | |
To replace the filters, proceed as follows:
Switch off the appliance and unplug it.
Shut off the water supply at the connection valve (6c).
■Unscrew the two screws (5a) on the filter cover (5) and remove the cover.
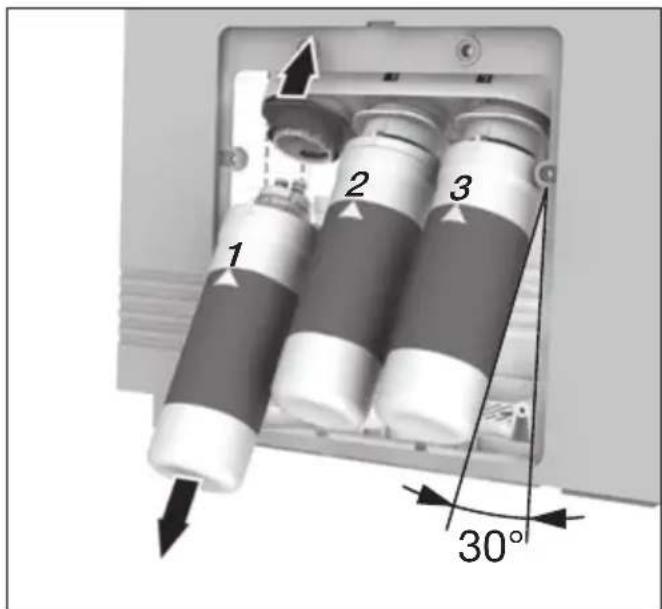
Now, swing out the filter carrier (4) by 30° and pull off the used filter cartridges. To do this, push the ring upward and pull the filter downward.
Water droplets may form and drip when replacing the filters.
Insert the new filter cartridges until they click audibly into place. The filters are marked with a small arrow on the upper edge. This indicates the front side of the filter when inserting it.
■ Swing the filter carrier (4) back in place.
Reinstall the cover (5) using the two screws (5a).
When replacing a filter, the filter must be rinsed twice and the tank is to be wiped clean with a fresh cleaning cloth. Refer to "Draining the water tanks".
Important:
After every filter replacement, the operating time-count of the respective filter must be reactivated. This is also indicated by a blinking light. To set the operating time-count, please proceed as follows.
After replacing the Neo-Sense Filter (Filter No. 1):
PreChild protect the push-button tion) and selection button (Hot water) simultaneously for at least 3 seconds.
The new operating time-count is activated.
After replacing the RO Membrane Filter (Filter No. 2):
Prechild pilot the push-button tion) and selection button (Ambient water) simultaneously for at least 3 seconds.
The new operating time-count is activated.
After replacing the Post-Carbon Block Filter (Filter No. 3):
PreChild protect the push-button tion) and selection button (Cold water) simultaneously for at least 3 seconds.
The new operating time-count is activated.
Transporting and storing the appliance
If the appliance is to be transported or stored, all water must be removed from the appliance.
Only transport or store the appliance in an upright position.
Please look up the procedure in Chapter "Draining the water tanks" and carry this out completely except for the last point (Open the water supply again, insert the appliance's electrical plug in the electrical socket and switch the On/Off switch to I).
Vacations, long weekends and holiday periods
If not used over a shorter period of time or after a long weekend of up to 5 days
■ Completely remove all the water from the appliance.
■ Refill the appliance before using again.
If not used over a longer period of time
Completely remove all the water from the appliance.
Before using again, clean the appliance and refill.
Please look up the procedure in chapter "Draining the water tanks" and carry out this procedure.
Troubleshooting
| Problem Finding the cause Solution | ||
| The water tastes peculiar Has the water | water tank not been cleaned for a long time? | Please clean the water tank. |
| Has the Water Purifier not been used for a long time? | Remove the stored water and clean the water tank. | |
| Is it time to replace one of the filters? | If necessary, replace the filter. | |
| The water flows slowly. Is it time to | replace one of the filters? | If necessary, replace the filter. |
| Is the water connection tap closed? | Open the water connection tap. | |
| Is the water very dirty? An additional pre-filter must be installed in the plumbing system. This part is available under the order number BZ00PF1 via customer service. | ||
| No cold water can be dispensed. Does at least one LED of the "Cold water" indicator light up? | If not, press and hold the selection button (Cold water) for approx. 3 seconds to switch on. | |
| Is the appliance connected to the electric power supply circuit? | ||
| Is the water connection tap closed? | ||
| Is it time to replace one of the filters? | ||
| The cooling system is malfunctioning. | ||
| No hot water can be dispensed. Does the "Child protection" LED light up? | The child protection feature is switched on. Deactivate the child protection feature. | |
| Does the "Hot water" LED light up? | ||
| Is the appliance connected to the electric power supply circuit? | ||
| The heating system is malfunctioning. | ||
| No water flows out or the set water volume varies. | Is it time to replace one of the filters? | If necessary, replace the filter. |
| Is the water connection tap closed or separated? | Open the water connection tap. | |
| The water supply hose may be bent. | Check the water supply hose. | |
| The water supply hose may be excessively long. | Shorten the water supply hose to a maximum of 5 meters. | |
| The water outlet may be defective. | Please contact customer service. | |
| All functions suddenly stop duringoperation. | Was the water suddenly shut off? | Check the water connection tap. |
| Is the appliance connected to the electric power supply circuit? | If not, connect the appliance in accordance with the specifications on the ratings plate. | |
| The appliance leaks. Is the water flowing out from the water tank cover? | Switch off the appliance and disconnect the plug from the power supply. Check the water connection. | |
| Does the water come out from the inside of the appliance? | ||
| The appliance bubbles or gurgles. The appliance was just filled with water. | This noise stops as soon as the tanks are filled. | |
| The appliance buzzes. The buzzing is generated by the compressor. | The noise can be reduced by providing sufficient clearance on the sides and to the rear. | |
| "Hot water" LED flashes, "Cold water" LED lights up. | Is it time to replace one of the filters? | If necessary, replace the filter. |
| Problem Finding the cause Solution | |||
| The following LED combinations flash: | The appliance has a defect. Please contact customer service. | ||
 |  | ||
 |  | ||
 | |||
If the problem can not be eliminated, please contact customer service.
Disposal
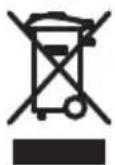
This appliance is labelled in accordance with European Directive 2002/96/EG concerning used electrical and electronic appliances (waste electrical and electronic equipment – WEEE). The guideline determines the framework for the return and recycling of used appliances as applicable throughout the EU.
The appliance contains coolant for cooling purposes. This must be correctly disposed of. Do not damage the coolant circuit tubing until disposal takes place.
Guarantee
The guarantee conditions for this appliance are as defined by our representative in the country in which it is sold.
Details regarding these conditions can be obtained from the dealer from whom the appliance was purchased. The bill of sale or receipt must be produced when making any claim under the terms of this guarantee.
Subject to change without notice.
Technical data
| Water Purifier | ||
| Heating power W 300 | ||
| Compressor characteristics A 0.6 | ||
| UV lamp power W 5 | ||
| Electrical connection V | Hz | 220-24050 |
| Tank volume - Hot water I 1.2 | ||
| Tank volume - Cold water I 2.3 | ||
| Tank volume - Ambient water I 3.0 | ||
| Tank volume - Total I 6.5 | ||
| Supply temperature °C min. 5 | max. 35 | |
| Temperature range - Cold water °C 5-9 during day | 9-12 during night * | |
| Temperature range - Hot water | °C 89- | 94 during day65-75 during night * |
| Flow rate - Cold water | l/min | 1.8 |
| Flow rate - Hot water | l/min | 1.4 |
| Flow rate - Ambient water l/min 1.8 | ||
| Heat-up time for 1.0 l to max. temperature (Supply temperature 12 °C) | min | 20 |
| Cooling time (Cold Water) min 50 | ||
| Filling time (all tanks) | min | approx. 120 |
| Operating pressure | MPa | 0.14-0.83(1.4-8.3 bar) |
| Coolant | R134a | |
| Coolant quantity | g | 40 |
| Dimensions (H x W x D) | mm | 510 x 260 x 440 |
| Weight, filled | kg | 25 |
* = if light sensor is switched on
en
目录
natural_image
Close-up of a mechanical component with a circular target and numbered part (26), no visible text or symbols.安装附上的距离保持器(9)。
natural_image
Close-up of a server rack with ventilation grilles and a labeled component (number 9), no readable text or symbols beyond the number.natural_image
Interior view of a device with a lid and labeled component '15a' (no readable text or symbols beyond label)检查中间盖(15b)安装是否正确。
natural_image
3D rendering of a Siemens industrial machine casing with internal components and mounting holes (no text or symbols visible)间距A:至少10厘米
重要提示
natural_image
Technical illustration of a bolt and nut assembly with directional arrows, no text or symbols present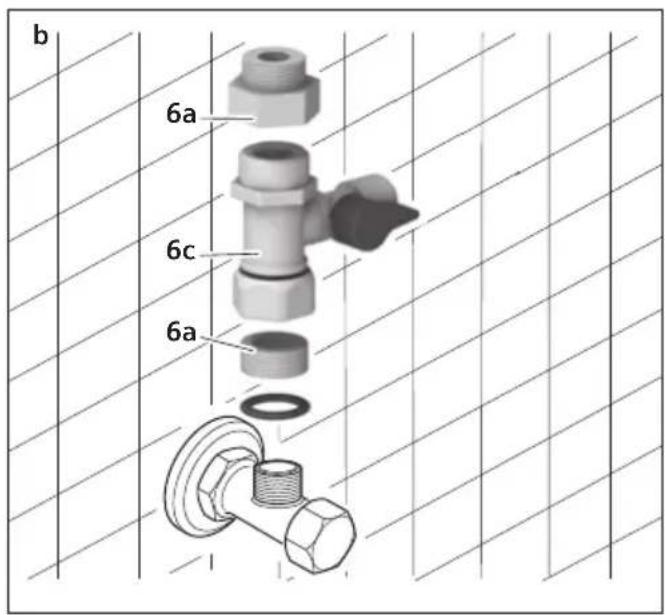
重要提示
不得连接到热水管上。
打开房屋的总水龙头。
* 未经 WQA (Water Quality Association) 认证
电气连接
natural_image
Close-up of a medical device with a white cable inserted into a circular base, showing internal components and a black arrow pointing to a component (no text or symbols visible)重要提示
natural_image
Hand pointing at a door handle mechanism (no text or symbols visible)将一杯子放在出水口下面。
按下放水按钮。
natural_image
Hand pressing a button on a device control panel (no text or symbols visible)水就流到杯字里。
如要提早停止放水,
■就再按一下按钮

要放水一分钟(60秒)
持续 3 秒钟按下放水按钮。
信息
natural_image
Hand pressing a button on a control panel (no text or symbols visible)节能
摆放位置
地点正确与否,对能量消耗很重要。
将该装置安装在干燥、通风的室内。
natural_image
Illustration of a hand pressing down on a computer tower (no text or symbols visible)Montage
natural_image
Close-up of a mechanical component with a circular target and labeled part '26' (no readable text or symbols beyond the number)natural_image
Close-up of a server rack with ventilation grilles and a labeled component (no text or symbols beyond the number 9)natural_image
3D rendering of a device with an open lid and labeled component '15a' (no text or symbols beyond label)natural_image
3D rendering of an Siemens industrial control unit with visible internal components and a labeled section '15b' (no text or symbols on the device itself)natural_image
Technical illustration of a mechanical assembly with a bolt and flange, showing a force direction (no text or symbols)
natural_image
3D rendering of a server rack with attached cable and dimension annotation (max. 25cm), no readable text or symbols beyond measurement markersImportant
natural_image
Close-up of a white electronic device with a cable inserted into the neck, showing internal components and a directional arrow (no text or symbols visible)Important
natural_image
Hand pointing at a kitchen control panel with buttons and a knob (no text or symbols visible)natural_image
Hand pointing at a button on a device panel (no text or symbols visible)natural_image
Hand pressing down of a doorbell with control buttons (no text or symbols visible)Économie d'énergie
Emplacement
natural_image
Illustration of a hand pressing down on a computer tower (no text or symbols visible)Montaggio
natural_image
Close-up of a mechanical device with a circular component and a numbered label '26' (no readable text or symbols beyond the number)natural_image
Close-up of a server rack with ventilation grilles and a labeled component (no text or symbols beyond the number 9)natural_image
3D rendering of an Siemens industrial control unit with internal casing and mounting hardware (no text or symbols visible)natural_image
Technical illustration of a bolt and nut assembly with directional arrows, no text or symbols present
Importante
natural_image
Close-up of a white electronic device with a cable inserted into the base, showing a circular vent and a central port (no text or symbols visible)Importante
natural_image
Hand pointing at a kitchen control panel with buttons and a sink (no text or symbols visible)natural_image
Hand pressing a button on a device control panel (no text or symbols visible)natural_image
Hand pressing down on a kitchen control panel with buttons and a rotary knob (no text or symbols visible)natural_image
Illustration of a hand inserting a small object into a computer case (no text or symbols visible)flowchart
graph TD
    A["UV"] --> B["Day 1: particles dispersed"]
    B --> C["Day 2: particles scattered"]
    C --> D["Day 3: particles scattered"]
    D --> E["Day 4: particles scattered"]
    E --> F["Day 5: particles scattered"]
    F --> G["Day 6: particles scattered"]
    G --> H["Day 7: particles scattered"]
    H --> I["Day 8: particles scattered"]
    I --> J["Day 9: particles scattered"]
    J --> K["Day 10: particles scattered"]
    K --> L["Day 11: particles scattered"]
    L --> M["Day 12: particles scattered"]
    M --> N["Day 13: particles scattered"]
    N --> O["Day 14: particles scattered"]
    O --> P["Day 15: particles scattered"]
    P --> Q["Day 16: particles scattered"]
    Q --> R["Day 17: particles scattered"]
    R --> S["Day 18: particles scattered"]
    S --> T["Day 19: particles scattered"]
    T --> U["Day 20: particles scattered"]
    U --> V["Day 21: particles scattered"]
    V --> W["Day 22: particles scattered"]
    W --> X["Day 23: particles scattered"]
    X --> Y["Day 24: particles scattered"]
    Y --> Z["Day 25: particles scattered"]
    Z --> AA["Day 26: particles scattered"]
    AA --> AB["Day 27: particles scattered"]
    AB --> AC["Day 28: particles scattered"]
    AC --> AD["Day 29: particles scattered"]
    AD --> AE["Day 30: particles scattered"]
    AE --> AF["Day 31: particles scattered"]
    AF --> AG["Day 32: particles scattered"]
    AG --> AH["Day 33: particles scattered"]
    AH --> AI["Day 34: particles scattered"]
    AI --> AJ["Day 35: particles scattered"]
    AJ --> AK["Day 36: particles scattered"]
    AK --> AL["Day 37: particles scattered"]
    AL --> AM["Day 38: particles scattered"]
    AM --> AN["Day 39: particles scattered"]
    AN --> AO["Day 40: particles scattered"]
    AO --> AP["Day 41: particles scattered"]
    AP --> AQ["Day 42: particles scattered"]
    AQ --> AR["Day 43: particles scattered"]
    AR --> AS["Day 44: particles scattered"]
    AS --> AT["Day 45: particles scattered"]
    AT --> AU["Day 46: particles scattered"]
    AU --> AV["Day 47: particles scattered"]
    AV --> AW["Day 48: particles scattered"]
    AW --> AX["Day 49: particles scattered"]
    AX --> AY["Day 50: particles scattered"]
    AY --> AZ["Day 51: particles scattered"]
    AZ --> BA["Day 52: particles scattered"]
    BA --> BB["Day 53: particles scattered"]
    BB --> BC["Day 54: particles scattered"]
    BC --> BD["Day 55: particles scattered"]
    BD --> BE["Day 56: particles scattered"]
    BE --> BF["Day 57: particles scattered"]
    BF --> BG["Day 58: particles scattered"]
    BG --> BH["Day 59: particles scattered"]
    BH --> BI["Day 60: particles scattered"]
    BI --> BJ["Day 61: particles scattered"]
    BJ --> BK["Day 62: particles scattered"]
    BK --> BL["Day 63: particles scattered"]
    BL --> BM["Day 64: particles scattered"]
    BM --> BN["Day 65: particles scattered"]
    BN --> BO["Day 66: particles scattered"]
    BO --> BP["Day 67: particles scattered"]
    BP --> BQ["Day 68: particles scattered"]
    BQ --> BR["Day 69: particles scattered"]
    BR --> BS["Day 70: particles scattered"]
    BS --> BT["Day 71: particles scattered"]
    BT --> BU["Day 72: particles scattered"]
    BU --> BV["Day 73: particles scattered"]
    BV --> BW["Day 74: particles scattered"]
    BW --> BX["Day 75: particles scattered"]
    BX --> BY["Day 76: particles scattered"]
    BY --> BZ["Day 77: particles scattered"]
    BZ --> CA["Day 78: particles scattered"]
    CA --> CB["Day 79: particles scattered"]
    CB --> CC["Day 80: particles scattered"]
    CC --> CD["Day 81: particles scattered"]
    CD --> CE["Day 82: particles scattered"]
    CE --> CF["Day 83: particles scattered"]
    CF --> CG["Day 84: particles scattered"]
    CG --> CH["Day 85: particles scattered"]
    CH --> CI["Day 86: particles scattered"]
    CI --> CJ["Day 87: particles scattered"]
    CJ --> CK["Day 88: particles scattered"]
    CK --> CR["Day 89: particles scattered"]
    CR --> CS["Day 90: particles scattered"]
    CS --> CT["Day 91: particles scattered"]
    CT --> CU["Day 92: particles scattered"]
    CU --> CV["Day 93: particles scattered"]
    CV --> CW["Day 94: particles scattered"]
    CW --> CX["Day 95: particles scattered"]
    CX --> CY["Day 96: particles scattered"]
    CY --> CZ["Day 97: particles scattered"]
    CZ --> DA["Day 98: particles scattered"]
    DA --> DB["Day 99: particles scattered"]
natural_image
Close-up of a mechanical device with a circular component and a numbered label '26' (no readable text or symbols beyond the number)natural_image
Close-up of a server rack with ventilation grilles and a labeled component (no text or symbols beyond the number 9)natural_image
3D rendering of an Siemens industrial control unit with internal casing and mounting hardware (no text or symbols visible)Afstand A: minstens 10 cm
Belangrijk
natural_image
Technical illustration of a bolt and nut assembly with directional arrows, no text or symbols present

| LED heet water LED | koud water |
 |  |
natural_image
Close-up of a white electronic device with a cable inserted into the base, showing a circular vent and a central port (no text or symbols visible)Belangrijk
| LED heet water LED koud water | |
Bediening
Belangrijk
natural_image
Hand pointing at a control panel with icons, no visible text or symbolsnatural_image
Hand pointing at a button on a device panel (no text or symbols visible)natural_image
Hand pressing down on a control panel with buttons and a rotary knob (no text or symbols visible)Energie besparen
Opstellingsplaats
natural_image
Illustration of a hand pressing down on a computer tower (no text or symbols visible)natural_image
Close-up of a mechanical device with a circular component and a numbered label '26' (no readable text or symbols beyond the number)natural_image
Close-up of a server rack with ventilation grilles and a labeled pin (no text or symbols beyond the number 9)natural_image
3D rendering of an Siemens industrial control unit with internal casing and mounting hardware (no text or symbols visible)natural_image
Technical illustration of a bolt and nut assembly with an upward arrow indicating motion (no text or symbols)
natural_image
3D rendering of a server rack with attached cable and dimension annotation (max. 25cm), no readable text or symbols beyond measurement markersImportante
natural_image
Close-up of a white electronic device with a cable inserted into the base, showing internal components and a circular base (no text or symbols visible)Importante
natural_image
Illustration of a hand pointing at a door panel with buttons and a sink (no text or symbols)natural_image
Hand pressing a button on a device control panel (no text or symbols visible)natural_image
Hand pressing down on a control panel with a rotary knob (no text or symbols visible)Ahorro de energía
Emplazamiento
natural_image
Illustration of a hand pressing down on a computer tower (no text or symbols visible)Montaj
Güvenlik uyarıları

natural_image
3D rendering of a mechanical device with a circular component and a labeled part '26' (no text or symbols beyond the number)natural_image
Close-up of a server rack with ventilation grilles and a labeled component (number 9), no readable text or symbols beyond the number.natural_image
3D rendering of a Siemens industrial machine with a lid and mounting base, showing internal components and a labeled component '15a' (no text beyond label)natural_image
3D rendering of a Siemens industrial machine casing with internal components and a labeled part '15b' (no text or symbols on the device itself)natural_image
3D rendering of a server rack with attached cable and dimension annotation (max. 25cm), no readable text or symbols beyond measurement lines.natural_image
Technical illustration of a bolt and nut assembly with directional arrows, no text or symbols present
Önemli
natural_image
Close-up of a white electronic device with a cable inserted into the base, showing a circular vent and a central port (no text or symbols visible)Önemli
natural_image
Illustration of a hand pointing at a control panel with buttons and a knob (no text or symbols)natural_image
Hand pointing at a button on a device panel (no text or symbols visible)natural_image
Hand pressing down on a control panel with buttons and a rotary knob (no text or symbols visible)Enerji tasarrufu
Konum
natural_image
Illustration of a hand pressing down on a computer tower (no text or symbols visible)flowchart
graph TD
    A["UV"] --> B["Day 1: particles dispersed"]
    B --> C["Day 2: particles scattered"]
    C --> D["Day 3: particles scattered"]
    D --> E["Day 4: particles scattered"]
    E --> F["Day 5: particles scattered"]
    F --> G["Day 6: particles scattered"]
    G --> H["Day 7: particles scattered"]
    H --> I["Day 8: particles scattered"]
    I --> J["Day 9: particles scattered"]
    J --> K["Day 10: particles scattered"]
    K --> L["Day 11: particles scattered"]
    L --> M["Day 12: particles scattered"]
    M --> N["Day 13: particles scattered"]
    N --> O["Day 14: particles scattered"]
    O --> P["Day 15: particles scattered"]
    P --> Q["Day 16: particles scattered"]
    Q --> R["Day 17: particles scattered"]
    R --> S["Day 18: particles scattered"]
    S --> T["Day 19: particles scattered"]
    T --> U["Day 20: particles scattered"]
    U --> V["Day 21: particles scattered"]
    V --> W["Day 22: particles scattered"]
    W --> X["Day 23: particles scattered"]
    X --> Y["Day 24: particles scattered"]
    Y --> Z["Day 25: particles scattered"]
    Z --> AA["Day 26: particles scattered"]
    AA --> AB["Day 27: particles scattered"]
    AB --> AC["Day 28: particles scattered"]
    AC --> AD["Day 29: particles scattered"]
    AD --> AE["Day 30: particles scattered"]
    AE --> AF["Day 31: particles scattered"]
    AF --> AG["Day 32: particles scattered"]
    AG --> AH["Day 33: particles scattered"]
    AH --> AI["Day 34: particles scattered"]
    AI --> AJ["Day 35: particles scattered"]
    AJ --> AK["Day 36: particles scattered"]
    AK --> AL["Day 37: particles scattered"]
    AL --> AM["Day 38: particles scattered"]
    AM --> AN["Day 39: particles scattered"]
    AN --> AO["Day 40: particles scattered"]
    AO --> AP["Day 41: particles scattered"]
    AP --> AQ["Day 42: particles scattered"]
    AQ --> AR["Day 43: particles scattered"]
    AR --> AS["Day 44: particles scattered"]
    AS --> AT["Day 45: particles scattered"]
    AT --> AU["Day 46: particles scattered"]
    AU --> AV["Day 47: particles scattered"]
    AV --> AW["Day 48: particles scattered"]
    AW --> AX["Day 49: particles scattered"]
    AX --> AY["Day 50: particles scattered"]
natural_image
Close-up of a mechanical device with a circular component and a numbered label '26' (no readable text or symbols beyond the number)natural_image
Close-up of a server rack with ventilation grilles and a labeled pin (no text or symbols beyond the number 9)natural_image
3D rendering of a Siemens industrial control unit with internal components and mounting holes (no text or symbols visible)natural_image
Technical illustration of a bolt and nut assembly with directional arrows, no text or symbols present
Ważne
natural_image
Close-up of a white electronic device with a cable inserted into the base, showing a circular vent and a central control knob (no text or symbols visible)Ważne
natural_image
Hand pointing at a kitchen control panel with buttons and a handle (no text or symbols visible)natural_image
Hand pressing a button on a device control panel (no text or symbols visible)natural_image
Hand pressing down on a control panel with buttons and a rotary knob (no text or symbols visible)natural_image
Illustration of a hand pressing down on a computer tower (no text or symbols visible)20/F, CN International Mansion
No. 129 Zhongshan Road
210005 Nanjing, Jiangsu Province
Service Tel.: 400 889 9999
Careline Tel.: 800 828 9828
Fax: 025 8470 1672
mailto:careline.china@bshg.com
www.siemens-ha.com.cn
Unit 1&2B, 3th Floor
North Block, Skyway House
3 Sham Mong Road
Tai Kok Tsui, Kowloon
Tel.: 2565 6151
Fax: 2565 6252
mailto:bshhkg.service@bshg.com
KW Kuwait, اكويت
Ali Abdulwahab, Sons & Co.
(Shuwaikh (Al-Rai) 4th Ring road)
P.O. Box 159
13002 Safat
Tel: 0481 2660
Fax: 0481 4820
mailto:AFM@AAW1.com
LU Luxembourg
BSH Home Appliances (SEA)
Pte. Ltd.
TH Prathet Thai, Thailand
BSH Home Appliances Limited
No.2974, 1st floor, room A-B
New Petchburi Road, Bangkapi,
Huay Kwang
10320 Bangkok
Tel: 02 7155 700
Fax: 02 7155 702
TR Türkiye, Turkey
BSH Ev Aletleri Sanayi
ve Ticaret A. S.
Cakmak Mahallesi,
Balkan Caddesi No: 51
34770 Ümraniye, Istanbul
Tel.: 0 216 444 6688
Fax: 0 216 528 9188
mailto:careline.turkey@bshg.com
TW Taiwan, 台湾
Achelis Taiwan Co. Ltd
6th floor, No 2. Sec. 3
Min Sheng E. Road
Taipei
Tel: 02 2321 6222
www.siemensevaletleri.com
UA Ukraine, Україна
Киев
СП "Транс-Сервис"
тел.: 044 568 51 50
BSH Home Appliances (Pty) Ltd
15 th Road, Randjespark
Private Bag X36, Randjespark
1685 Midrand – Johannesburg
Tel.: 086 002 6724
Fax: 011 265 7852
mailto.service@bsh.co.za
www.siemensappliances.co.za
www.siemens-homeappliances.com
9000382966