Omega - Electric bike Argento - Free user manual and instructions
Find the device manual for free Omega Argento in PDF.
| Product Type | Electric pedal-assisted bicycle (EPAC) |
| Brand | Argento |
| Model | Omega |
| Weight | Approximately 23 kg |
| Battery | Lithium-ion 36V 10.4Ah |
| Charging time | 4 to 6 hours |
| Charger | 230V / 50Hz |
| Motor | 250W (36V) |
| Maximum assisted speed | 25 km/h (compliant with regulations) |
| Transmission | Shimano 7 speeds |
| Brakes | Mechanical disc brakes front and rear |
| Tires | 28-inch diameter; recommended pressure 3.5 – 5.9 bar |
| Luggage rack | Maximum capacity 15 kg |
| Lighting | LED front and rear lights |
| Walk assistance | Yes, up to 6 km/h |
| Assistance levels | Configurable: 0-3, 0-5 or 0-9 levels |
| LCD screen | Display speed, range, assistance level, etc. |
| Maintenance and cleaning | Clean with a sponge; avoid high-pressure water jets; lubricate the chain regularly |
| Warranty | Legal warranty of conformity 2 years (Directive 2011/83/EU) |
| Spare parts and repairability | Original parts at www.urbanemobility.com; support from authorized ARGENTO E-MOBILITY dealer |
Frequently Asked Questions - Omega Argento
User questions about Omega Argento
0 question about this device. Answer the ones you know or ask your own.
Ask a new question about this device
Download the instructions for your Electric bike in PDF format for free! Find your manual Omega - Argento and take your electronic device back in hand. On this page are published all the documents necessary for the use of your device. Omega by Argento.
USER MANUAL Omega Argento
Use and maintenance manual
The bicycle must be correctly assembled and all the parts must be checked before using it. Any damage due to incorrect assembly and maintenance will not be covered by the warranty.
For further information or to request technical support and assistance.
To view the terms of the warranty, please contact the dealer or visit the
website: www.argentobike.it
For spare parts, go to the website www.urbanemobility.com
- Introduction
- General safety warnings
- Description of the bicycle (EPAC)
- Lifting and transport
- Assembly
- First use
- Maintenance instructions
- LCD
- LCD configuration
- Error codes
- Connection diagram
- Battery (Warnings)
- Warranty terms and conditions
1. Introduction
General information
This manual is an integral and essential part of the Electrically Power Assisted Cycle (EPAC).
Before using it for the first time, it is important that the users read, understand and scrupulously follow the instructions given below.
The manufacturer shall not be liable for any harm caused to persons and/or damage to property or the EPAC if it is used incorrectly, contrary to the instructions provided.
With a view to continuous technological development, the manufacturer reserves the right to modify the electrically power assisted cycle (EPAC) without notice, without this manual being automatically updated.
Support service
For any problem or request for clarification, please do not hesitate to contact the Support Service of your ARGENTO E-MOBILITY authorised dealer, who has skilled and specialised personnel, specific equipment and original spare parts at your disposal.
Graphic representation of safety warnings
The following graphic warning symbols will be used to identify the safety messages in this manual. These symbols are intended to draw the attention of the reader/user to the correct and safe use of the EPAC.
WARNING
Caution
This highlights the rules which should be observed to avoid damaging the EPAC and/or prevent potentially dangerous situations from arising.
HAZARD
Residual risks
This highlights the presence of hazards which cause residual risks to which the user must pay attention to avoid injury or material damage.
Legal note on use
Always respect the highway code and cycling regulations in the country of use.
2. General safety warnings
General safety rules
Even if you already know how to use an EPAC, you must follow the instructions indicated here as well as the general precautions to observe when using a motorised vehicle.

WARNING
Using the EPAC
Every user must have read this use and maintenance manual; especially, the chapter on safety indications.

WARNING
Risks related to using the EPAC
Despite the application of safety devices, you must take note of all the indications on the prevention of accidents outlined in this manual to safely use the EPAC.
Always stay focused while riding the EPAC and do not underestimate the residual risks associated with its use.
Responsibility
The rider must use the EPAC with the utmost care and in full compliance with the highway code and all the cycling regulations in force in the country of use.
Riders must also undertake to keep the EPAC clean, operating efficiently and in good condition, as well as diligently carry out the safety checks to the best of their ability, as described in the warnings and recommendations section. They must also preserve all the documentation related to EPAC maintenance.
Riders must carefully evaluate the weather conditions that could make it dangerous to use the EPAC. To this end, we recommend moderating your speed and maintaining an adequate braking distance if you are riding in adverse weather conditions and/or heavy traffic.
Warnings for users
- It is forbidden to carry a passenger. Check and comply with the regulations in force in the country of use related to the use of transport devices by minors.
- It can only be used by adults and expert teenagers.
- Do not assume alcohol or drugs before riding the EPAC.
- This EPAC model is designed and manufactured to be used outdoors on public highways or cycle paths.
- Do not make the EPAC perform to levels above those for which it was designed.
- Never ride the EPAC with any parts removed.
- Avoid uneven surfaces and obstacles.
- Ride with both hands on the handlebars.
- Replace used and/or damaged parts; check that the protective devices are working correctly before use.
Notes for maintenance
All maintenance work must be carried out with the battery disconnected.
Operators must be equipped with the required accident-prevention equipment during all maintenance work.
The tools used for maintenance must be suitable and of good quality.
Do not use petrol or flammable solvents such as detergents, but always use non-flammable and non-toxic solvents.
Limit the use of compressed air as far as possible and protect your eyes with goggles.
Never use naked flames as lighting when carrying out checks or maintenance work.
Make sure that no tools or foreign bodies have been left between the moving parts of the EPAC after all maintenance or adjustment work.
Other indications
The first thing to do when you start using the EPAC is to check that the protective and safety devices are intact and working correctly.

If you encounter any kind of defect, do not use the EPAC!
Guards
It is strictly forbidden to modify or remove the battery and chain guards, etc., as well as the warning and identification plates.
Deposit and storage
- If the EPAC needs to be stored and is not used for long periods, the following steps must be carried out:
- Store it in a dry and well-ventilated place.
- Clean the EPAC thoroughly.
- Remove the battery from its slot and turn the key to OFF.
- Leave the bike on the stand.
- Protect the exposed electrical contacts with antioxidant products.
- Grease all non-coated surfaces or those not protected by corrosion resistant treatments.
3. Description of the bicycle (EPAC)
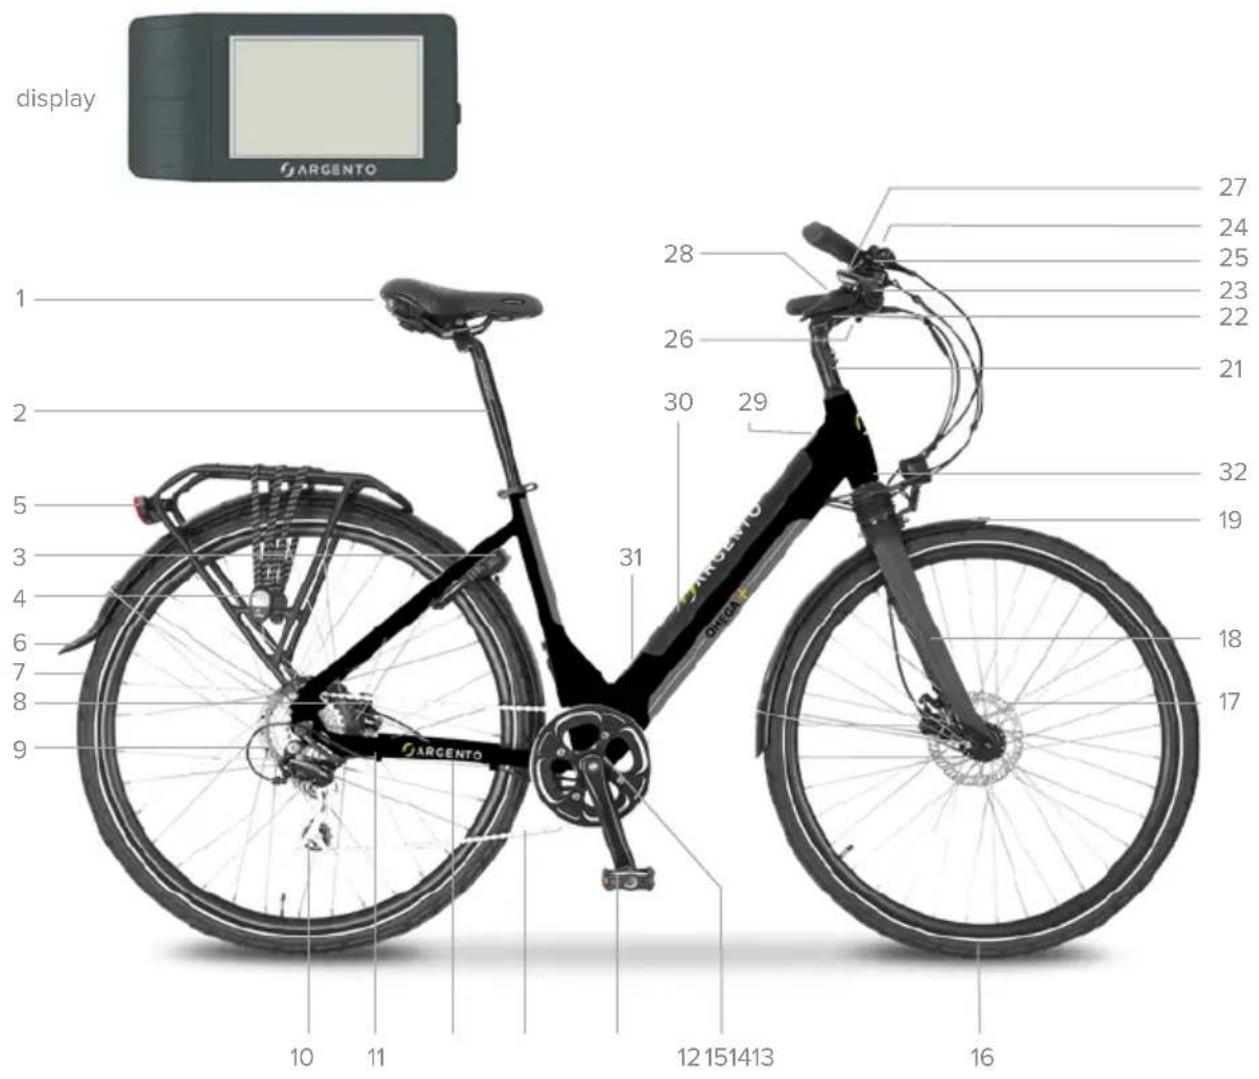
- Saddle
- Seat post
- Rear wheel padlock
- Luggage rack with bungee cords (max 15Kg)
- Rear LED light
- Rear mudguard
- Rear wheel
- Rear mechanical disc brake
- 36V 250W motor
- 7-speed Shimano derailleur
- Motor port
- Stand (opposite side)
- Chain
- Pedal (right)
- PAS
-
Front wheel
-
Front mechanical disc brake
- Front fork
- Front mudguard
- Front LED light
- Handlebar tube
- Handlebar stem
- Handlebars
- Bell
- Brake lever with motor sensor (right)
- Brake lever with motor sensor (left)
- 7-Speed Shimano gear shift control
- LCD
- Battery lock/release clamp (opposite side)
- Li-Ion 36V 10.4Ah battery
- Battery charger port (opposite side)
- Frame serial number
Conditions of use
The EPAC has been designed and manufactured to be ridden outdoors, on public highways and cycling paths, but always on tarmacked surfaces.
Any modification of the construction can compromise the behaviour, safety and stability of the EPAC and may cause an accident.
Any other type of use, or extension of use beyond the one intended, does not correspond with the purpose attributed by the manufacturer and, therefore, the manufacturer shall not assume any responsibility for any damage resulting thereof.
The battery life and, thus, the related estimated distance travelled in km, may vary significantly depending on the type of use and external factors. The following factors may be particularly significant: weight of user, pedalling frequency, level of assistance selected on the display, average speed, thickness and wear of the tread, road gradient and surface, weather conditions.
Place of use
The EPAC can be used outdoors when there are no adverse weather conditions (rain, hail, snow, strong wind, etc.).
Maximum temperature allowed: +40°C Minimum temperature allowed: +0°C Maximum humidity allowed: 80%
The EPAC must be used in a place with a flat, compact, smooth, tarmacked surface, with no potholes or depressions, free from obstacles and patches of oil.
The place must also be illuminated by the sun or artificial light to guarantee correct visibility of the route and the EPAC controls (300 to 500 lux recommended).

WARNING
Forbidden places of use
The EPAC should not be used:
• in areas at risk of fire or explosion;
- in corrosive and/or chemically active environments; in poorly lit environments;
- on ground with a gradient of more than 10% ; on uneven or non-tarmacked surfaces.
Improper use and contraindications
The actions described below, which obviously cannot cover the entire range of possible “incorrect uses” of the EPAC, should be deemed to be strictly forbidden.

WARNING
Forbidden operations
Performing forbidden operations will invalidate the warranty.
The manufacturer declines all responsibility for any damage to property or harm to persons caused by carrying out forbidden operations.

HAZARD
It is strictly forbidden to:
- Use the EPAC for any other use than the ones for which it was manufactured, i.e. by carrying a passenger.
- Ride the EPAC in areas where there is a risk of explosion.
- Ride the EPAC in adverse weather conditions (driving rain, hail, snow, strong wind, etc.). Carry a passenger.
- Ride the EPAC under the effect of alcohol or drugs. Ride the EPAC if your weight exceeds the maximum weight allowed.
- Charge the battery in places that are too hot or poorly ventilated.
- Cover the battery when it is charging.
- Smoke or use naked flames near the charging area.
- Ride or stop on surfaces with gradients over 10% or uneven ground (non-tarmacked, with potholes, depressions, obstacles, etc.).
- Carry out maintenance work with the battery connected. Use non-original spare parts.
- Put fingers or limbs between the moving parts of the bicycle.
4. Lifting and transport
Lifting
The EPAC weighs about 23 kg so it should be lifted by two adults.

Slipping and impact
When lifting the EPAC, extreme caution must be taken to avoid harm to persons and property. This operation should be carried out by two people.
The manufacturer shall not be liable for breakages due to lifting and/or transportation of the EPAC after delivery.
Transport
To guarantee safe transport in vans, the EPAC must be securely fastened to prevent it from moving. This can be done by resting it on the stand and securing it with fastening straps or chains in good condition.
To this end, the attachment devices must be installed so that they do not damage the frame and the other parts of the bicycle.
5. Assembly
- Carefully remove the bike from the packaging* and then, from all the relevant protective material taking care not to scratch the painted parts or pull any cables.
*The bike must be removed from the packaging by two adults to avoid any injuries or crushing.
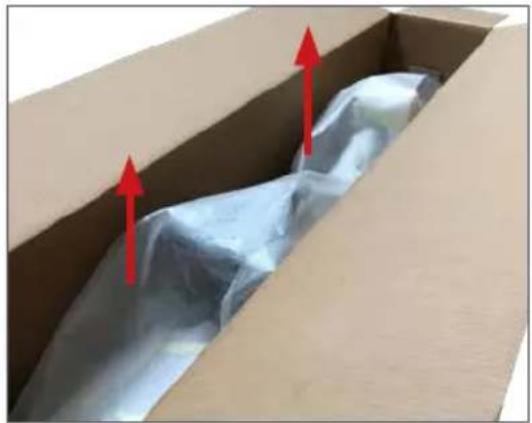
natural_image
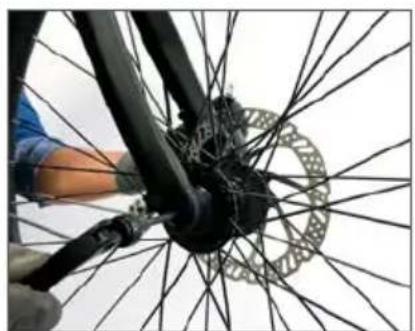
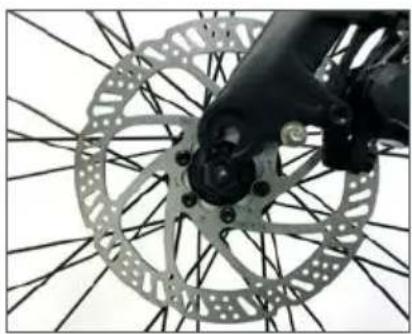
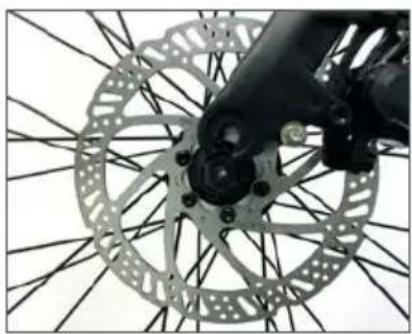
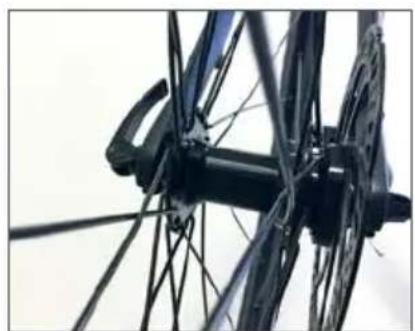
Interior view of a cardboard box with a wrapped sheet, marked by red arrows indicating upward motion (no text or symbols)- Insert the front wheel in the relevant slots on the front fork and secure the wheel with the relevant quick-release device (fig. A). (Insert the pin in the hub, with the lever on the right side of the bicycle and screw up the locking nut on the opposite side until it is flush, tighten the lever towards the fork to complete the fastening operation).
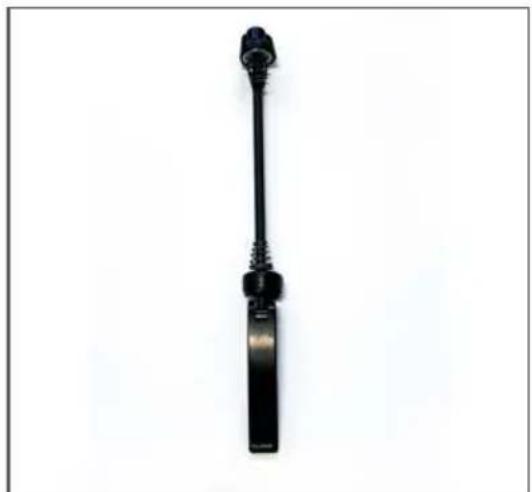
natural_image
Black mechanical component with threaded shaft and cylindrical head (no text or symbols visible)fig. A

natural_image
Close-up of a bicycle wheel with visible spokes and hub, no text or symbols present1

natural_image
Close-up of a bicycle wheel with a hand operating the steering wheel (no visible text or symbols)2

natural_image
Close-up of a bicycle wheel assembly with visible spokes and levers (no text or symbols)3
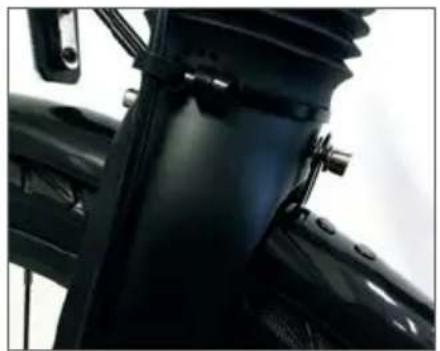
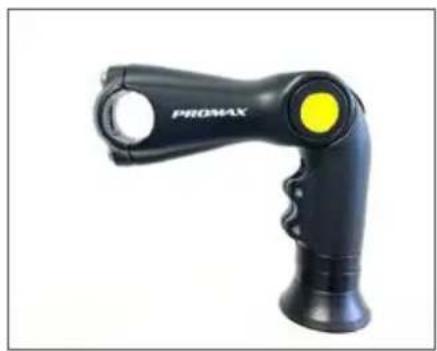
- Loosen the 2 screws on the handlebar tube to allow the handlebar stem to be turned 180^ . Align the tube with the front wheel and tighten the screws that were loosened beforehand.
Remove the plate on the end of the handlebar stem (handlebar attachment) by removing the 2 fastening screws and insert the handlebar in the relevant seat.
Position the handlebar attachment plate, that was removed beforehand, in its original position and slightly tighten the 2 fastening screws to adjust the correct position of the handlebars.
Complete the operation by tightening the screws.
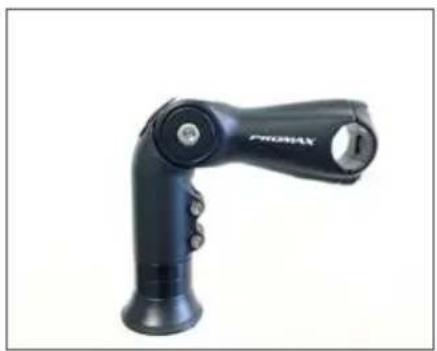
natural_image
Black handheld device with a curved arm and circular ports, no visible text or symbols on the device itself.1

natural_image
Black PROMAX handheld device with yellow highlight and black handle (no text or symbols visible)2

natural_image
Close-up of a black bicycle headlight with a yellow neon light (no text or symbols visible)3
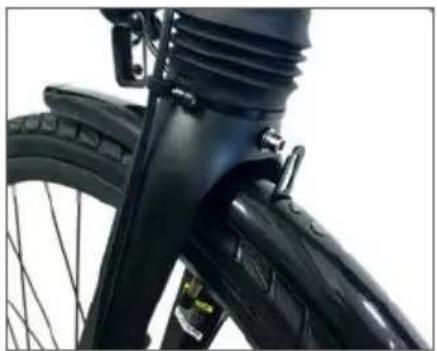
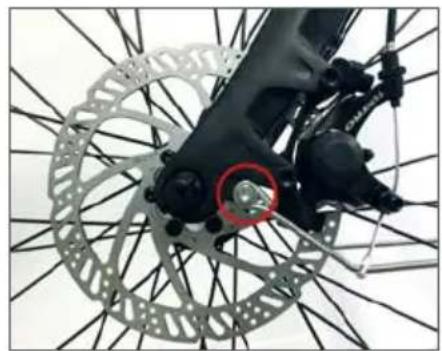
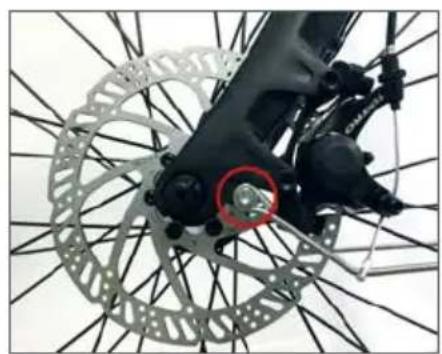
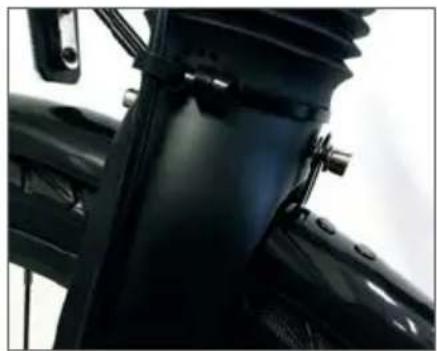
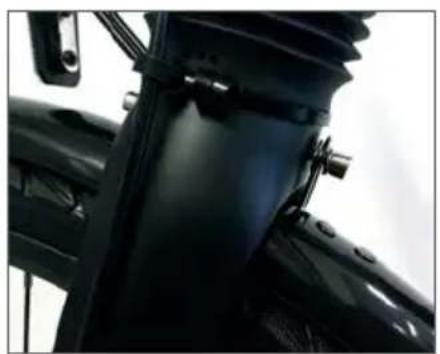
- Remove the screw on the front part of the front fork.
Insert the front mudguard so that it passes between the fork and the front wheel, then fasten it to the fork with the relevant bracket using the screw that was removed beforehand.
Fasten the side supports of the front mudguard to the relevant front fork brackets by removing and then tightening the screws on the brackets (right and left side).
natural_image
Close-up of a bicycle wheel and tire assembly (no visible text or symbols)1

natural_image
Close-up of a black mechanical component with bolts and mounting brackets (no visible text or symbols)2
natural_image
Close-up of a bicycle's front wheel and spokes, showing mechanical components and a red circular annotation (no text or symbols visible)3
- Locate the right pedal (marked with an R on the pedal shaft) and the left pedal (marked with an L on the pedal shaft).
Assemble the right pedal by inserting it in the relevant crank arm and taking care to screw it in a clockwise direction until tightened.
Assemble the left pedal by inserting it in the relevant crank arm and taking care to screw it in an anticlockwise direction until tightened.
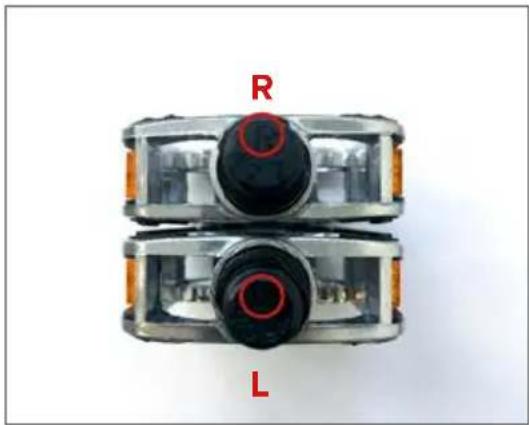
Make sure that all the nuts, bolts and pedals are correctly fastened.

Risk of injury
Check that all the bolts and pedals have been correctly tightened.
Incorrectly positioned and/or tightened pedals may damage the front gear and/or cause the pedals to detach while riding the bike with the risk of serious injury for the rider and bystanders.

Negative check
If, during the assembly, you encounter any difficulty or have any doubts about the assembly, do not ride the EPAC.
Contact the support service of your ARGENTO E-MOBILITY authorised dealer.
Maximum extraction limit of the seat post

HAZARD
The following is strictly forbidden
For structural reasons regarding the frame, it is strictly forbidden to pull the seat post out further than the limit indicated (see image), when using the bike, to avoid the risk of breaking the frame.
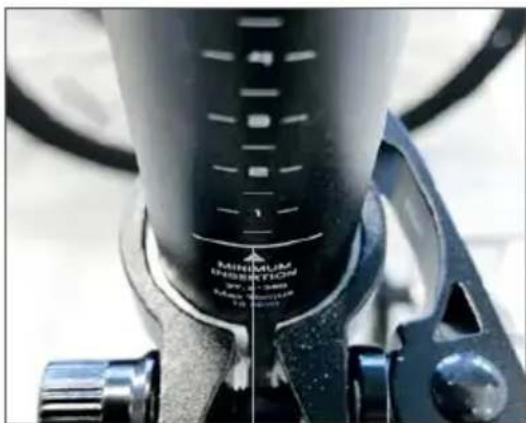
seat post extraction limit
6. First use
Battery charger
Before using the EPAC for the first time, the battery must be fully charged using the specific battery charger supplied.
The bike is powered by a 36V 10.4Ah lithium-ion battery. The average charging time is approximately 4-6 hours. To prolong the battery life, we
recommend fully charging it every thirty days even if the bike is not being used.
We recommend charging the battering with the specific battery charger after every use of the EPAC.
Charging with battery inserted
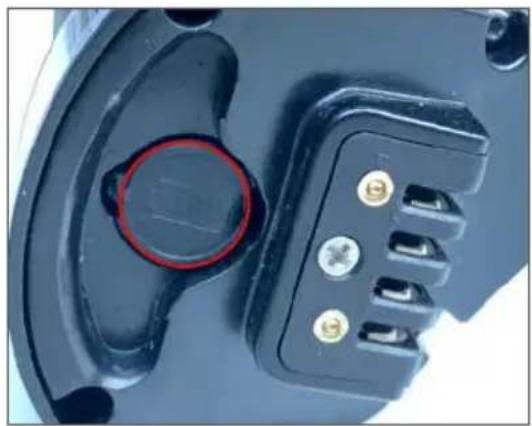
Connect the battery to the power supply (230V/50Hz) and then, insert the battery charger plug in the charger port on the frame.
The red indicator light is on while the battery is charging. When the indicator light turns green, it indicates that the battery charging cycle has been completed.
Recharging with the battery removed
Insert the key in the lock on the frame near the battery.
Turn the key anti-clockwise to release the battery and remove it from the bike frame.
Connect the battery charger to the power supply (230V/50Hz) and then, insert the battery charger plug in the socket on the battery.
The red indicator light is on while the battery is charging. When the indicator light turns green, it indicates that the battery charging cycle has been completed.
Reinsert the battery in its seat and lock it in place by turn the key clockwise in the relevant lock.
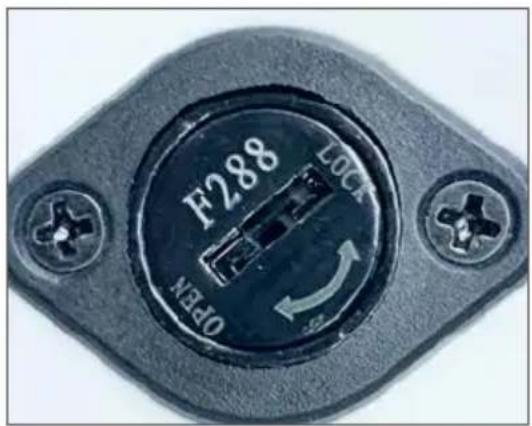
Battery lock closed/open Battery charger socket
natural_image
Close-up of a black automotive electrical connector with a red circular button and four terminal pins (no visible text or symbols)Preparing the bike for use on the road
Before using the EPAC, we recommend carefully checking all the parts to ensure it is ready to use and adjusting the relevant mechanical parts, directly or with the help of specialist technicians, see: adjustment and tightening
of the handlebars and handlebar attachment, adjustment and tightening of the saddle and seat post, adjustment of the brakes and gear change, checking of the tyre pressure, lubrication of the chain and gears, general inspection of the correct tightening of the fastening screws and general check that all the parts are in order.
Wheels
Check the correct installation, tightening of the pass-through pins and/or quick-release of the wheels.
Check the state of wear of the tyres: there must be no cuts, cracks, foreign bodies, abnormal swelling, visible inner tyre and other damage.
Check the tyre pressure by referring to the recommended value on the side of the tyre (3.5-5.9 BAR).
Braking system
Check that the brakes are working correctly by attempting to brake at low speed (max 6km/h) in an obstacle-free space.
7. Maintenance instructions
All the maintenance operations must be carried out with the battery disconnected and the bike resting on the stand.
After every routine maintenance operation, all the controls must be checked to ensure they are working correctly. This manual does not provide any details about disassembly and non-routine maintenance, as these operations must always and exclusively be carried out by the Support Service staff of your authorised ARGENTO E-MOBILITY dealer.
The support service is able to provide all the indications and answer all the requests to care for your EPAC and keep it in perfect working order.

WARNING
Negative check
If even a single check is negative, do not ride the EPAC.
Immediately take all measures to perform the necessary repairs and, if applicable, contact your dealer's support service.
Washing
Cleaning the EPAC is not just a question of decorum but also allows you to detect any defects. To avoid damaging or compromising the function of the various components, especially the electrical parts,
some precautions must be taken during cleaning. It is strictly forbidden to direct pressurised water jets at the electrical parts, motor, display and battery; use a sponge instead.
Before starting the EPAC, dry it completely with low pressure compressed air and check that there is no residual moisture left on the electrical components.
Lubricating the chain
It is important to lubricate the chain regularly to prevent excessive wear and prolong its use.
- Clean all the links with a rag.
- Spray all the links with a specific grease for drive chains.
Checking all the parts
The weight-bearing frame of the EPAC and the welding must be free from any visible defects such as, cracks, deformations, splits, corrosion, etc.
Make sure that all the bolts and pedals of the EPAC are thoroughly tightened. Make sure that the battery is correctly fastened, the cable sheaths are in good condition and the terminal clamps properly tightened and not corroded.
Check the battery charge status via the indicator on the handlebar display.
We recommend charging the battery after every use of the bike (EPAC) to ensure correct operation of the battery. Check the inner tube tyre pressure via the valve on the wheel rim using a compressor and a pressure gauge gun. Check the state of the tyre tread, rim and fastening of the wheels to the hubs. If the tyres need replacing, contact the support service or a qualified tyre specialist. Do not modify the tension of the spokes: any adjustments must be carried out by specialised staff using suitable tools. The brakes must be adjusted to ensure efficient braking and the brake lever must also allow adequate pressure to be applied to regulate the braking, i.e. the brakes must be neither too loose nor too tight.
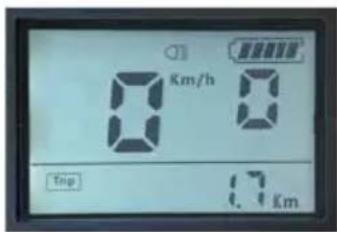
©
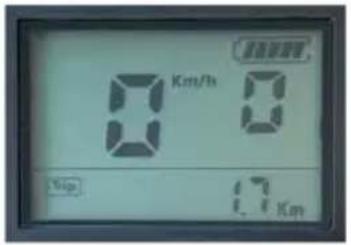

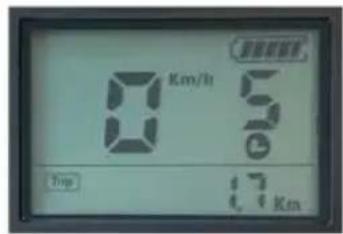
AVG SPEED - MAX SPEED - TRIP - ODO - TIME
Press the ON button to switch from the AVG SPEED - MAX SPEED - TRIP - ODO - TIME function.
The AVG SPEED function shows the average speed maintained during the last use of the bicycle, the MAX SPEED function shows the maximum speed achieved during the last use of the bicycle, the TRIP function shows the partial number of kilometres travelled on your bike, the ODO function shows the total number of Km travelled on your bike, the TIME function shows the accumulated time used after the last use of your bike.
Press the + and - buttons at the same time to reset the functions: AVG SPEED - MAX SPEED - TRIP - TIME
Controlling the lights
Press and hold the + button for at least 1 second to switch the front and rear lights on/off.
Check that the reflectors are present and tightly secured to the front and rear wheel.
Assisted pedalling
Press and hold the - button for at least two seconds to activate the assisted pedalling function. The same function can be disabled by releasing the - button. Assisted pedalling allows the bike to start the motor without having to pedal. This function allows the bike to reach a maximum speed of 6 Km/h.

WARNING
Never user assisted pedalling while you are sitting on the saddle because the electrical parts of the bike might get damaged. Always use the assisted pedalling function while walking alongside your EPAC, holding the handlebar grips firmly with both hands.

WARNING
Battery indicator
The battery indicator signals complete when your EPAC battery is fully charged. The battery indicator level decreases as you use the EPAC. The charge level of the battery indicator may fluctuate depending on the use of the EPAC. For example, if you go up a hill, the battery indicator level can drop rapidly as it consumes more of the battery power supplied on your EPAC. For good battery use and maintenance, you should charge the battery fully after each use of your EPAC.
9. LCD configuration
Press the M button for at least two seconds to enter the configuration on the LCD.
Press the + and - buttons in the display configuration to change the value of each parameter; press the M button to move to the next parameter; press the M button for at least two seconds to exit the LCD configuration.
Km/Miles
Marked by the S7 symbol, press the + and - buttons to switch from the Km/h to MPH display.
Display backlighting
Marked by the b1 symbol, values allowed: 1-5.
Automatic display switch-off
Marked by the OF symbol, values allowed: 0-15. The set values correspond to minutes. If the set value is 0, this function is not enabled.
If the value entered is a value between 1 and 15, the display will automatically switch off after a set number of minutes.
Wheel diameter
Marked by the Hd symbol, values allowed: 6-34.
The set values correspond to the wheel diameter in inches. For your model, leave the value on 28, otherwise the values shown on the display when using your bike will be incorrect.
Password - Speed limit
Marked by the Pd symbol. Enter the password "1919" using the + and - buttons; confirm each single value in the password entered using the M button.
After correctly entering the password, you access the speed limit parameter marked by the SL symbol, values allowed: 10-100.
Motor parameter
Marked by the HL symbol, make sure that the set value is the number 1. If a different value is set, the speed may not be correctly displayed.
Number of motor assisted levels (PAS)
Marked by the PA symbol, press the + and - buttons to switch between the values UBE - 3 - 5 - 9.
Do not select the value UBE (manufacturer's test value) to prevent incorrect values being displayed and compromising the normal operation of your EPAC.

WARNING
Speed allowed
The maximum speed allowed by law is 25km/h.
Any changes to the control unit, not authorised by the manufacturer, will exonerate the latter from responsibility for any harm caused to persons and/or property. It will also invalidate the warranty on the product you have purchased. The control unit has been programmed to prevent variations being made to the maximum speed parameter.

WARNING
Risk of injury
Keep to a speed and ride in line with your abilities; never use the bike above 25Km/h as this could cause serious injury and harm to yourself or to other people.
10. Error codes
If your EPAC malfunctions, this icon relevant error code.

will appear on the display together with the
Please consult the following error code table and communicate this information to the support service.
| Code Definition | |
| 01 Communication error | |
| 03 Braking system error | |
| 04 Accelerator error | |
| 06 Low voltage protection | |
| 07 High voltage protection | |
| 08 Hall sensor fault | |
| 09 Phase line fault | |
| 10 Control unit overheating | |
| 11 PAS error | |
| 12 Current sensor fault | |
| 13 Battery overheating | |
| 14 Motor overheating | |
| 21 Speed sensor fault | |
| 22 BMS fault | |
| 30 Communication error |
11. Connection diagram
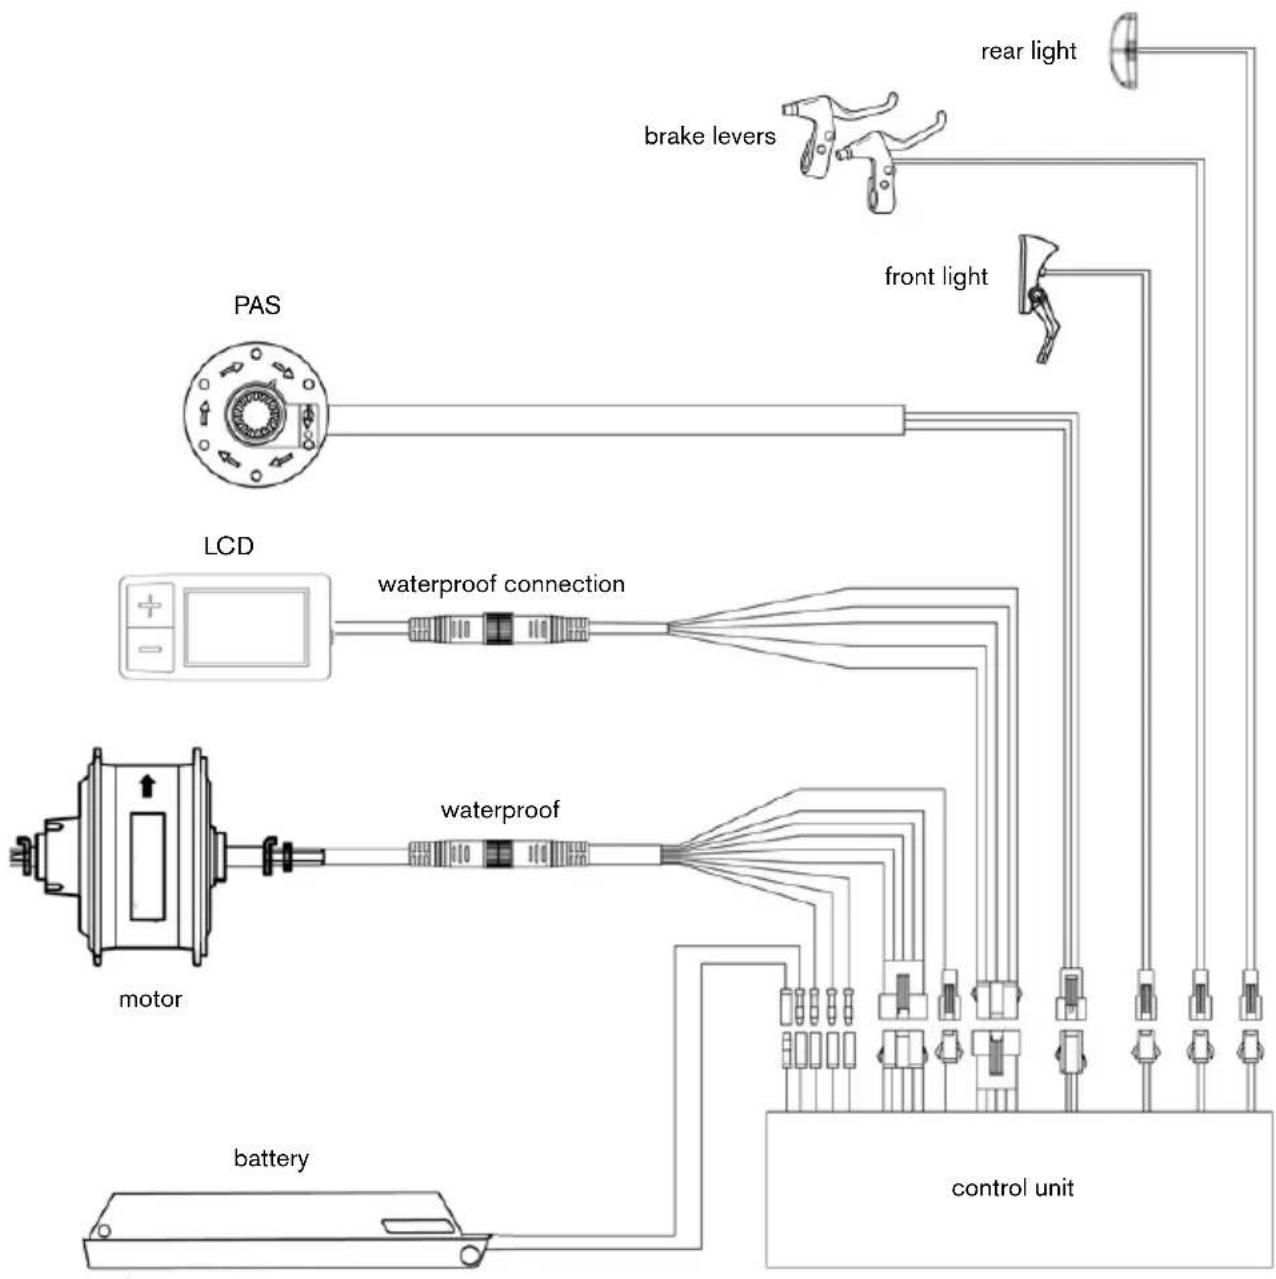
flowchart
graph TD
    A["motor"] --> B["battery"]
    B --> C["control unit"]
    D["LCD"] --> E["waterproof connection"]
    E --> F["backlight"]
    G["PAS"] --> H["waterproof"]
    H --> I["rear light"]
    J["waterproof"] --> K["stroke through control unit"]
    L["brake levers"] --> M["stroke through control unit"]
12. Battery (Warnings)
- Make sure the EPAC, charger and charging port are dry.
- When the EPAC battery is fully charged, the LED light on the charger changes from red (charging) to green (charging completed).
- Use only the original charger. Other chargers may damage your device and expose users to other potential risks.
- The battery must not be charged for prolonged periods. Overcharging reduces battery life and may cause other damage.
- Recharge the battery in a dry environment, away from flammable materials (such as materials that could burst into flames), preferably at an indoor temperature of 15-25°C, but never below 0°C or above 45°C.
- Do not charge in direct sunlight or near heat sources.
- Never leave the battery unattended while charging. Fire hazard! Never touch the charging socket with metal objects.
- Read the sections on charging to handle the battery correctly.
- Keep the battery away from naked flames or other heat sources to avoid overheating the battery.
- Do not leave the battery exposed to very cold temperatures. Both excessive heat and cold temperatures may cause the battery to lose its charge.
- Avoid completely discharging the battery.
- It is best to recharge the battery while there is still some charge left. This prolongs the life of the battery.
- Charge the battery at regular intervals even if you do not use the EPAC for a prolonged period.

HAZARD
Battery precautions
The battery consists of lithium-ion cells and chemical elements that are hazardous to health and the environment. Do not use the EPAC if it emits unpleasant odours, leaks or is excessively hot. Do not dispose of the EPAC or the battery with domestic waste. The end user is responsible for the disposal of electrical and electronic equipment and batteries in compliance with all applicable regulations.
Things you should not do
Treatment of the electrical or electronic device at the end of its service life (applicable in all countries of the European Union and in other European systems with separate collection systems)
natural_image
Symbol of a trash bin crossed with a diagonal line, no text or numbers presentThis symbol on the product or packaging indicates that the product should not be considered as normal household waste, but should be taken instead to a facility authorized to dispose of waste electrical and electronic equipment (WEEE).
By ensuring this product is disposed of correctly, you will help prevent potential negative consequences for the environment and human health, which may otherwise be caused by inappropriate disposal. Recycling materials will help to conserve natural resources.
For more detailed information about the recycling and disposal of this product, you can contact the local waste disposal service or the point of sale where you purchased it.
In any case, disposal must be carried out in accordance with the legislation in force in the country of purchase.
More specifically, consumers must not dispose of WEEE as municipal waste, but must dispose of this type of waste separately, in one of two possible ways:
1) By taking it to municipal collection centres (also called eco-collection centres or recycling facilities), directly or through the collection services of municipal companies, where these are available;
2) By taking it to shops selling new electrical and electronic equipment.
Here, very small items of the WEEE type (with the longest side less than 25 cm) can be left free of charge, while larger ones can be left on a 1-for-1 basis, i.e., you can leave the old item when you buy a new one having the same function.
In the event of illegal disposal of electrical or electronic equipment, the fines provided for by current legislation on environmental protection may be applied (Italian regulation; check the regulations in force in the country of use/disposal of the vehicle).
If the WEEE contains batteries or accumulators, they must be removed and subjected to specific separate collection.
Treatment of spent batteries (applicable in all countries of the European Union and in other European systems with separate collection systems)
natural_image
Symbol of a trash bin crossed with diagonal lines, representing waste sorting or restriction (no text present)This symbol on the product or packaging indicates that the battery pack should not be treated as normal household waste. On some types of batteries, this symbol may be used in combination with a chemical symbol.
The chemical symbols for mercury (Hg) or lead (Pb) are added if the battery contains more than 0.0005% mercury or 0.004% lead.
By ensuring that the batteries are disposed of correctly, you will help prevent potential negative consequences for the environment and human health, which may otherwise be caused by inappropriate disposal. Recycling materials will help to conserve natural resources. Where for safety, performance or data protection reasons, products require a fixed connection to an internal battery, this must only be replaced by qualified service personnel.
Deliver the product at the end of its service life to collection centres suitable for the disposal of electrical and electronic equipment: this ensures that the battery inside it is also treated correctly.
For more detailed information about disposal of the dead battery, contact the local waste disposal service or the shop where it was purchased.
In any case, disposal must be carried out in accordance with the legislation in force in the country of purchase.
13. Warranty terms and conditions
All the products are covered by a legal warranty in compliance with the Directive 2011/83/EU.
The legal warranty is reserved for consumers. Therefore, it applies exclusively to users who have purchased products for purposes unrelated to any business, commercial, artisan or professional activity carried out.
For anyone who has purchased the products and is not a consumer, the following warranties will be applied: warranties for defects related to the item sold, warranties for defects of promised and basic quality and the other warranties included in the Italian Civil Code with the relevant terms, forfeitures and limitations.
The seller (and, therefore, as regards the purchase of the products, the retailer who sold the product to the user) is liable to the consumer for any lack of conformity existing at the time of delivery of the product and that occurs within two years from the aforementioned delivery date. The lack of conformity must be reported to the seller, under penalty of forfeiture of the guarantee, within two months from the date on which it was discovered.
Unless proven otherwise, it is presumed that conformity defects that occur within six months of delivery of the product already existed as at such date, unless this assumption is incompatible with the nature of the product or lack of conformity.
Starting from the seventh month following delivery of the product, it will be the burden of the consumer to prove that the lack of conformity already existed upon delivery of the same.
In order to use the legal warranty, the purchaser must first provide proof of the purchase and delivery dates of the goods. Therefore, it is advisable for the purchaser, for such proof, to keep all documents that can certify the purchase and delivery dates (for example: receipt, invoice, order confirmation e-mail).
Any faults or malfunctions are excluded from the scope of the legal warranty of the products that are caused by accidents and/or caused by the purchaser or by use of the product that does not comply with its intended use and/or as indicated in the technical documentation attached to the product, or due to failure to adjust the mechanical parts, natural wear of materials that are worn out or caused by assembly errors, lack of maintenance and/or use of the product not in accordance with the instructions.
For example, the following are to be considered excluded from the legal warranty relevant to the products:
- damage caused by impacts, accidental falls or collisions, punctures;
- damage caused by use, exposure or storage in an unsuitable environment (e.g. presence of rain and/or mud, exposure to humidity or excessive heat, contact with sand or other substances
- damage caused by failure to make adjustments for initial road use and/or maintenance of mechanical parts, mechanical disc brakes, handlebars, tyres, etc.; incorrect installation and/or incorrect assembly of parts and/or components, except for when the installation and/or assembly have been carried out by the seller or under his responsibility and/or have been carried out by the consumer but the installation and/or assembly error is attributable to inadequate installation instructions;
- the natural wear and tear of consumable materials: mechanical disc brake (e.g. pads, callipers, disc, cables), tires, platforms, gaskets, bearings, led lights and bulbs, kickstand,
knobs, mudguards, rubber parts (platform), wiring cable connectors, grilles and stickers, etc.;
- improper maintenance and/or improper use of the product battery;
- tampering with and/or forcing parts of the product;
- incorrect or inadequate maintenance or alteration of the product;
- improper use of the product (e.g.: excess load, use in competitions and/or for commercial or rental activities);
- maintenance, repairs and/or technical interventions on the product carried out by unauthorised third parties;
- damage to the products resulting from transport, if carried out by the purchaser;
- danni ai Prodotti derivanti dal trasporto, ove effettuato a cura dell'Acquirente;
- damage and/or defects resulting from the use of non-original parts.
If a non-conformity is detected in a product that has been purchased during the validity period of the legal warranty, the purchaser must contact the seller who will carry out the necessary checks in order to ascertain whether the alleged defect exists or not and will promptly reply to the notification of the alleged non-conformity, indicating the specific procedure to be followed, whilst taking into account the category to which the product belongs and/or the defect reported.

city e-bike
natural_image
Interior view of a cardboard box with a wrapped sheet, marked by red arrows indicating upward motion (no text or symbols)natural_image
Black mechanical component with a cylindrical shaft and threaded end, isolated on white background (no text or symbols)fig. A

natural_image
Close-up of a bicycle wheel with visible spokes and hub, no text or symbols present1

natural_image
Close-up of a bicycle wheel with a hand operating the steering wheel (no visible text or symbols)2

natural_image
Close-up of a bicycle wheel assembly with visible spokes and levers (no text or symbols)3
natural_image
Black FRONAL hair dryer with adjustable handle and buttons (no visible text or symbols)1

natural_image
Black PROMAX handheld device with yellow highlight (no text or symbols visible)2

natural_image
Close-up of a black bicycle headlight with a yellow neon light (no text or symbols visible)3
natural_image
Close-up of a bicycle wheel and tire assembly (no visible text or symbols)1

natural_image
Close-up of a black mechanical component with attached fasteners and bolts (no visible text or symbols)2
natural_image
Close-up of a bicycle's front wheel and spokes assembly, showing mechanical components and a red circular annotation (no text or symbols visible)3
natural_image
Close-up of a black automotive electrical connector with a red circular button and four terminal pins (no visible text or symbols)

AVG SPEED - MAX SPEED - TRIP - ODO - TIME
natural_image
Simple line drawing of a trash bin with no text or symbolsnatural_image
Simple line drawing of a trash bin with crossed diagonal lines indicating no waste or discharge (no text or symbols)natural_image
Interior view of a cardboard box with a wrapped sheet, marked by red arrows indicating upward motion (no text or symbols)natural_image
Black mechanical component with a cylindrical shaft and threaded end, isolated on white background (no text or symbols)fig. A

natural_image
Close-up of a bicycle wheel with visible spokes and hub, no text or symbols present1

natural_image
Close-up of a bicycle wheel with a hand operating the steering wheel (no visible text or symbols)2

natural_image
Close-up of a bicycle wheel assembly with visible spokes and levers (no text or symbols)3
natural_image
Black handheld device with a curved arm and circular ports, no visible text or symbols on the device itself.1

natural_image
Black PROMAX handheld device with yellow highlight (no text or symbols on body)2

natural_image
Close-up of a black bicycle headlight with a yellow neon light (no text or symbols visible)3
natural_image
Close-up of a bicycle wheel and tire assembly (no visible text or symbols)1
natural_image
Close-up of a black mechanical component with attached bolts and mounting brackets (no visible text or symbols)2

natural_image
Close-up of a bicycle's front wheel and spokes assembly, showing a red circular component (no text or symbols visible)3
natural_image
Close-up of a black automotive electrical connector with a red circular button and multiple terminal pins (no visible text or symbols)

AVG SPEED - MAX SPEED - TRIP - ODO - TIME
natural_image
Simple line drawing of a trash bin with no text or symbolsnatural_image
Simple line drawing of a trash bin with crossed lines indicating no waste or prohibition (no text or symbols)natural_image
Interior view of a cardboard box with a wrapped sheet, marked by red arrows indicating upward motion (no text or symbols)natural_image
Black mechanical component with a cylindrical shaft and threaded end, isolated on white background (no text or symbols)fig. A

natural_image
Close-up of a bicycle wheel with visible spokes and hub, no text or symbols present1
natural_image
Close-up of a bicycle wheel with a hand operating the steering wheel (no visible text or symbols)2

natural_image
Close-up of a bicycle wheel assembly with visible spokes and levers (no text or symbols)3
natural_image
Black FRONAL hair dryer with adjustable handle and buttons (no visible text or symbols)1

natural_image
Black PROMAX handheld device with yellow highlight (no text or symbols visible)2

natural_image
Close-up of a black bicycle headlight with a yellow neon light (no text or symbols visible)3
natural_image
Close-up of a bicycle wheel and suspension bracket (no text or symbols visible)1

natural_image
Close-up of a black mechanical component with attached fasteners and bolts (no visible text or symbols)2

natural_image
Close-up of a bicycle's front wheel and spokes assembly, showing mechanical components and a red circular annotation (no text or symbols visible)3
natural_image
Close-up of a mechanical component with a red circular button and multiple pins (no visible text or symbols)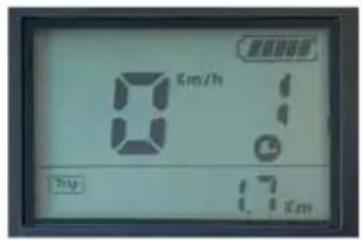

AVG SPEED - MAX SPEED - TRIP - ODO - TIME
natural_image
Simple line drawing of a trash bin with no text or symbolsnatural_image
Simple line drawing of a trash bin with crossed diagonal lines indicating no waste or plastic discharge (no text or symbols)natural_image
Interior view of a cardboard box with a wrapped sheet, marked by red arrows indicating upward motion (no text or symbols)natural_image
Black mechanical component with threaded shaft and cylindrical head (no visible text or symbols)fig. A
natural_image
Close-up of a bicycle wheel with visible spokes and hub, no text or symbols present1

natural_image
Close-up of a bicycle wheel with a hand operating the steering wheel (no visible text or symbols)2

natural_image
Close-up of a bicycle wheel and suspension bracket (no text or symbols visible)3
natural_image
Black handheld device with a curved arm and circular ports, no visible text or symbols on the device itself.1
natural_image
Black PROMAX handheld device with yellow highlight and black handle (no text or symbols on body)2

natural_image
Close-up of a black bicycle headlight with a yellow neon light (no text or symbols visible)3
natural_image
Close-up of a bicycle wheel and tire assembly (no visible text or symbols)1
natural_image
Close-up of a black mechanical component with bolts and mounting brackets (no visible text or symbols)2

natural_image
Close-up of a bicycle's front wheel and spokes assembly, showing a red circular component (no text or symbols visible)3
natural_image
Close-up of a mechanical component with a red circular button and multiple pins (no visible text or symbols)

AVG SPEED - MAX SPEED - TRIP - ODO - TIME
natural_image
Simple line drawing of a trash bin with no text or symbolsnatural_image
Simple line drawing of a trash bin with crossed lines indicating no waste or prohibition (no text or symbols)natural_image
Interior view of a cardboard box with a wrapped sheet, marked by red arrows indicating upward motion (no text or symbols)natural_image
Black mechanical component with a cylindrical shaft and threaded end, isolated on white background (no text or symbols)obr. A
natural_image
Close-up of a bicycle wheel with visible spokes and hub, no text or symbols present1

natural_image
Close-up of a bicycle wheel with a hand operating the steering wheel (no visible text or symbols)2
natural_image
Close-up of a bicycle wheel assembly with visible spokes and levers (no text or symbols)3
natural_image
Black FRONAL hair dryer with adjustable handle and buttons (no visible text or symbols)1

natural_image
Black PROMAX handheld device with yellow highlight (no text or symbols visible)2

natural_image
Close-up of a black bicycle headlight with a yellow neon light (no text or symbols visible)3
natural_image
Close-up of a bicycle wheel and suspension bracket (no text or symbols visible)1
natural_image
Close-up of a black mechanical component with attached fasteners and bolts (no visible text or symbols)2

natural_image
Close-up of a bicycle's front wheel and spokes assembly, showing mechanical components and a red circular annotation (no text or symbols visible)3
natural_image
Close-up of a black automotive electrical connector with a red circular button and four terminal pins (no visible text or symbols)Uvedení do provozu


AVG SPEED - MAX SPEED - TRIP - ODO - TIME
natural_image
Simple line drawing of a trash bin with no text or symbolsnatural_image
Simple line drawing of a trash bin with crossed lines indicating no waste or discharge (no text or symbols)Produced and imported by M.T. Distribution Srl
www.mtdistribution.it