
ProPower MFW66020 - Meat Grinder BOSCH - Free user manual and instructions
Find the device manual for free ProPower MFW66020 BOSCH in PDF.
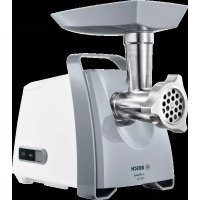


| Product Type | Meat Grinder |
| Brand | Bosch |
| Model | ProPower MFW66020 |
| Usage | Domestic, for standard quantities |
| Material | Plastic and stainless steel (depending on model) |
| Included Accessories | Meat grinder, sausage stuffing attachment, kibbeh attachment, fruit and vegetable coulis kit, grating attachment |
| Perforated Discs | 4 discs: thick (8 mm), fine (3 mm), fine (3.8 mm), medium (4.8 mm) |
| Main Functions | Grind meat, stuff sausages, prepare kibbeh, press fruits and vegetables, grate/slice |
| Safety | Thermal circuit breaker, overload protection, programmed-break drive pin, automatic shut-off in case of jamming |
| Cleaning | Base unit wiped with damp cloth; accessories hand-washed (aluminium parts not dishwasher-safe) |
| Maintenance | No maintenance required |
| Warranty | According to distributor's terms |
Frequently Asked Questions - ProPower MFW66020 BOSCH
User questions about ProPower MFW66020 BOSCH
0 question about this device. Answer the ones you know or ask your own.
Ask a new question about this device
Download the instructions for your Meat Grinder in PDF format for free! Find your manual ProPower MFW66020 - BOSCH and take your electronic device back in hand. On this page are published all the documents necessary for the use of your device. ProPower MFW66020 by BOSCH.
USER MANUAL ProPower MFW66020 BOSCH
This appliance is intended for domestic use only. Use the appliance only for processing normal quantities of food and for normal amounts of time for domestic use.
This appliance is suitable for cutting and mixing raw and cooked meat, bacon, poultry and fish. Food which is to be processed must not contain any hard components (e.g. bones). The appliance must not be used for processing other substances or objects.
Additional applications are possible if the accessories approved by the manufacturer are used. Only use the appliance with approved genuine parts and accessories.
Never use the attachments or slicing / shredding inserts on other appliances. Only use matching parts for the relevant attachments. Only use the appliance indoors at room temperature and up to 2000m above sea level.
Important safety information
Read and follow the instruction manual carefully and keep for later reference! Enclose these instructions when you give this appliance to someone else. If the instructions for correct use of the appliance are not observed, the manufacturer's liability for any resulting damage will be excluded.
This appliance can be used by persons with reduced physical, sensory or mental capabilities or lack of experience and/or knowledge if they have been given supervision or instruction concerning use of the appliance in a safe way and if they understand the hazards involved. Keep children away from the appliance and connecting cable and do not allow them to use the appliance. Do not let children play with the appliance. Cleaning and user maintenance must not be performed by children.
Risk of electric shock and fire!
- Connect and operate the appliance only in accordance with the specifications on the rating plate. Do not use the appliance if the power cord and / or appliance are damaged. Only our customer service may repair the appliance, e.g. by replacing a damaged power cord, in order to avoid hazards.
- Never connect the appliance to timer switches or remote-controllable sockets.
- Do not place the appliance on or near hot surfaces, e.g. hobs. The power cord must not come into contact with hot parts or be pulled across sharp edges.
- Never immerse the base unit in liquids or hold under running water and do not clean in the dishwasher. Do not steam-clean the appliance. Do not use the appliance with damp hands. After each use, whenever the appliance is unsupervised, prior to assembly, prior to disassembly, prior to cleaning and in the event of an error, the appliance must always be disconnected from the mains. Never leave the appliance unattended while it is switched on!
Risk of injury!
- Do not insert the mains plug until all preparations for working with the appliance are complete.
- Attachments must be completely assembled before use. Never assemble attachments on the base unit. Before replacing accessories or additional parts that move during operation, the appliance must be switched off and disconnected from the power supply. After switching off, the drive continues for a short time. Wait until the drive has come to a standstill. If there is a power cut, the appliance remains switched on and will start up again when the power is restored.
- Do not grasp the sharp blades and edges of the shredding and slicing inserts. Keep hands clear of rotating parts. Never reach into the feed chute or outlet opening. Always use the stuffer to push food down the hole.
- Never clean the sharp blades and edges of the shredding and slicing inserts with your bare hands.
Caution!
- Check that there are no foreign objects in the feed chute or attachments. Do not insert objects (e.g., knives, spoons) into the feed chute or outlet opening.
- Never press the On/Off button and reverse button at the same time. Before pressing the other button, wait until the drive has come to a complete standstill. Risk of damaging the appliance.
Risk of suffocation!
- Do not allow children to play with packaging material.
Important!
It is essential to clean the appliance thoroughly after each use or after it has not been used for an extended period. See "Cleaning and servicing" on page 18.
Congratulations on the purchase of your new Bosch appliance. You can find further information about our products on our website.
Contents
Intended use 12 Important safety information. 12 Overview. 14 Safety devices 14 Predetermined breaking point 15 Operation 15 Operating the appliance 16 Cleaning and servicing 18 Troubleshooting 18 Recipes and tips 18 Disposal. 20 Guarantee. 20
Overview
Please fold out the illustrated pages.
→Fig.A 1 Mincer 2 Drive 3 Mincer attachment 4 Filler tray Plastic or stainless steel 5 Pusher 6 Lid for pusher 7 Release button 8 Handle 9 Storage compartment with insert 10 Cover for storage compartment 11 Indicator light 12 Reverse button 13 On/Off button 14 Thermal circuit breaker 15 Cord store
Mincer attachment
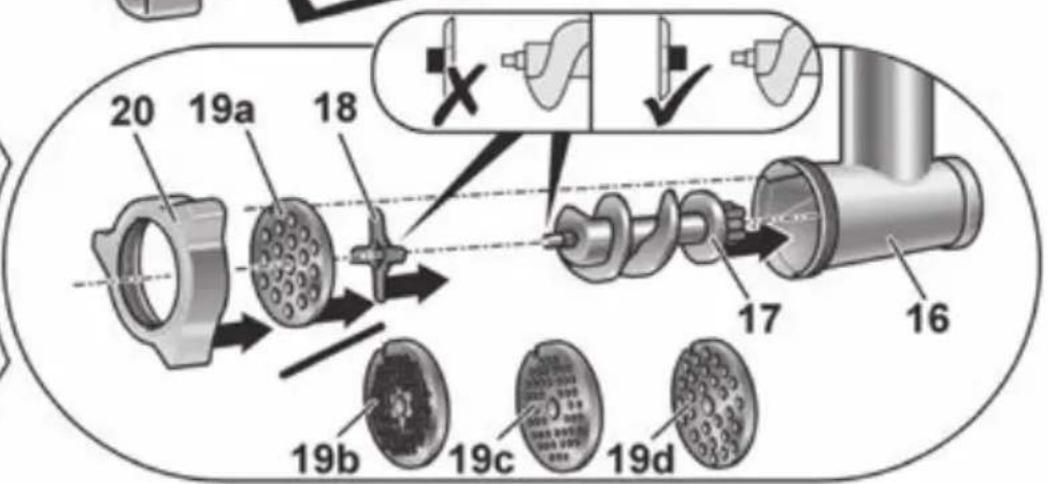
16 Casing 17 Worm gear with driver 18 Blade
19 Perforated disc
a coarse, hole diameter 8 mm b fine, hole diameter 3 mm c fine, hole diameter 3.8 mm d medium, hole diameter 4.8 mm
20 Threaded ring
Sausage filler attachment
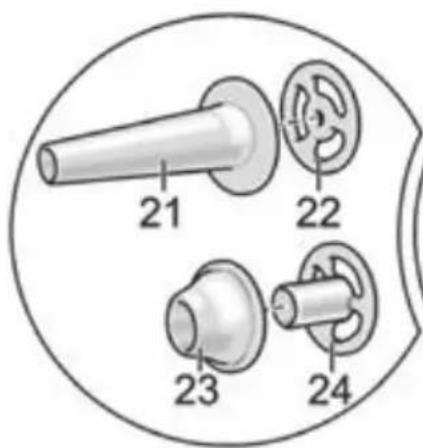
21 Nozzle 22 Bearing ring Kebbe attachment 23 Shaper 24 Conical ring
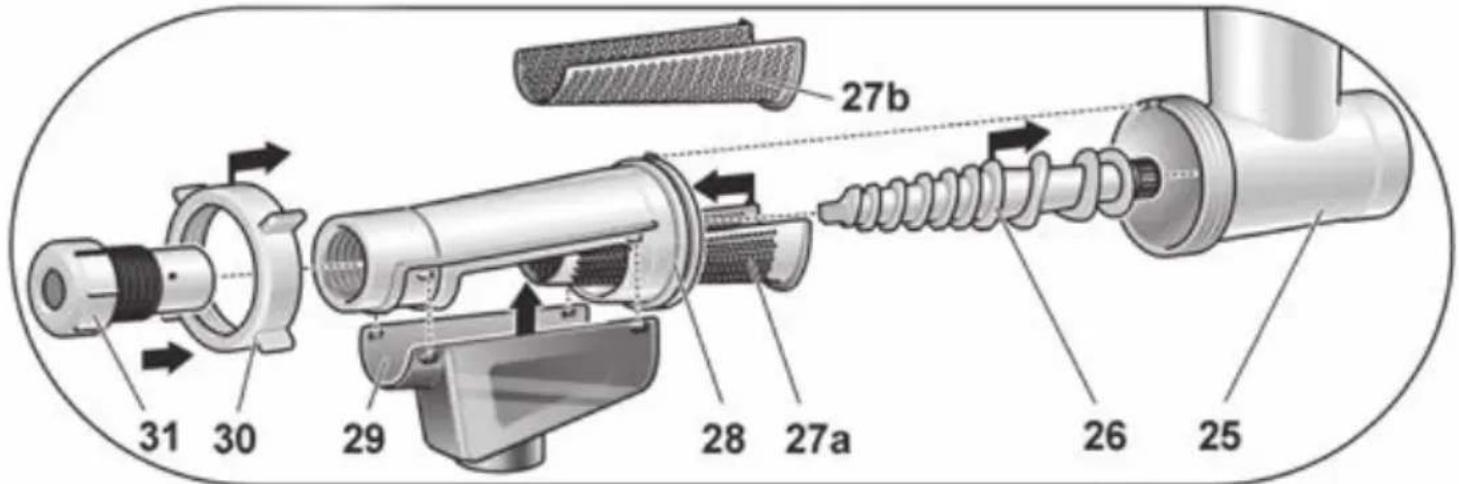
Fruit press attachment* 25 Casing 26 Worm gear 27 Filter insert
a fine b coarse
28 Filter holder 29 Outlet funnel 30 Threaded ring 31 Pulp nozzle
Shredding attachment*
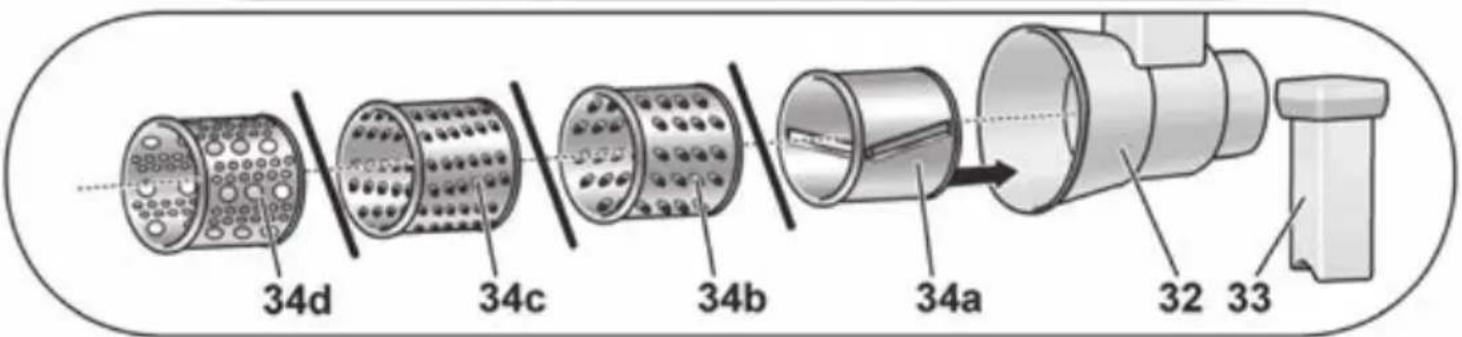
32 Casing 33 Pusher 34 Interchangeable insert
a Slicing attachment b Shredding insert - coarse c Shredding insert - fine d Grating insert
- for some models
Safety devices
Overload protection
(thermal circuit breaker)
If the motor switches itself off while the appliance is being used, the overload protection feature has been activated.
Possible causes may be the simultaneous processing of large quantities of food or a blockage caused by bones.
If a safety system is activated, see
"Troubleshooting".
Predetermined breaking point
To prevent serious damage to your appliance if the mincer is overloaded, the driver has a notch (predetermined breaking point). If an overload occurs, the driver breaks instead. However, the driver can easily be replaced.
Otherwise spare parts with a predetermined breaking point are not a component of our warranty obligations.
Such spare parts can be purchased from customer service (order no. 753348).
Operation
Risk of injury!
Do not insert mains plug until all preparations for working with the appliance are complete.
Before operating the appliance and accessories for the first time, clean thoroughly; see "Cleaning and servicing".
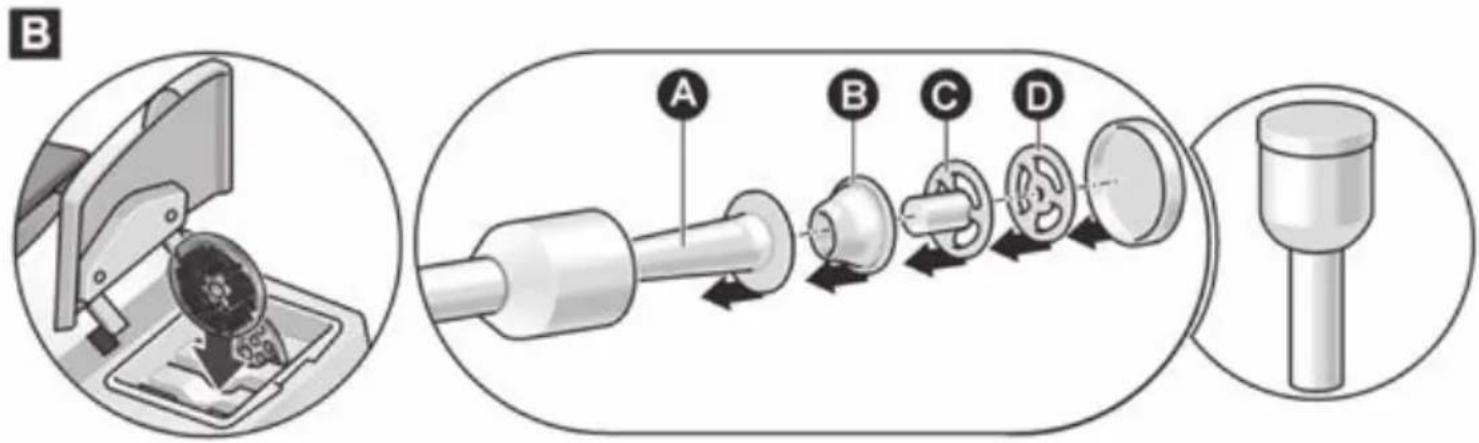
→Fig. B
Stow perforated discs in the storage compartment. Stow individual parts of the sausage filler attachment and kebbe attachment in the pusher and close the pusher with the lid.
Assembling the mincer attachment
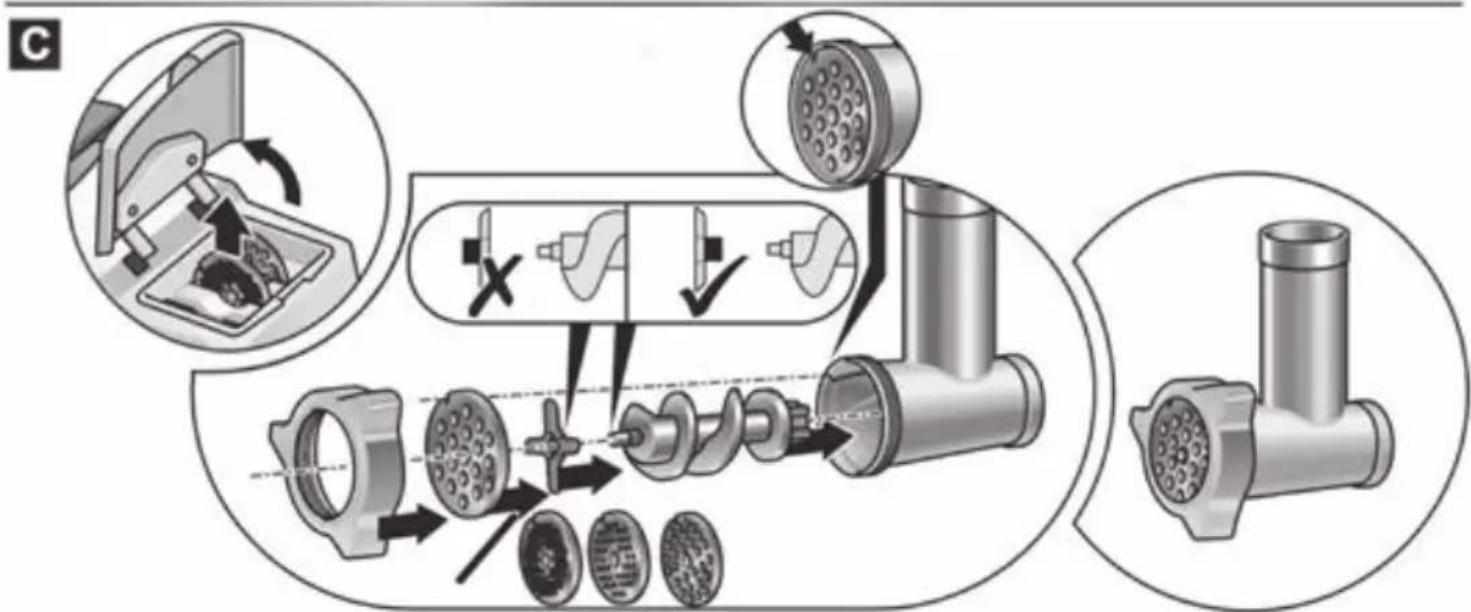
→ Fig. 6
Take perforated disc with required hole diameter out of the storage compartment. Insert worm gear into the housing. Put blade on the worm gear. Blades must face the perforated disc. Put perforated disc with the required hole diameter on the worm gear.
Recess on the perforated disc must be situated on the lug in the housing.
Screw on threaded ring clockwise. Do not tighten the threaded ring too tight. Disassembly is in reverse order.
Use for:
- processing raw or cooked meat, bacon, poultry and fish.
- Do not process bones!
- Process steak tartare through the mincer twice.
Assembling sausage filler attachment
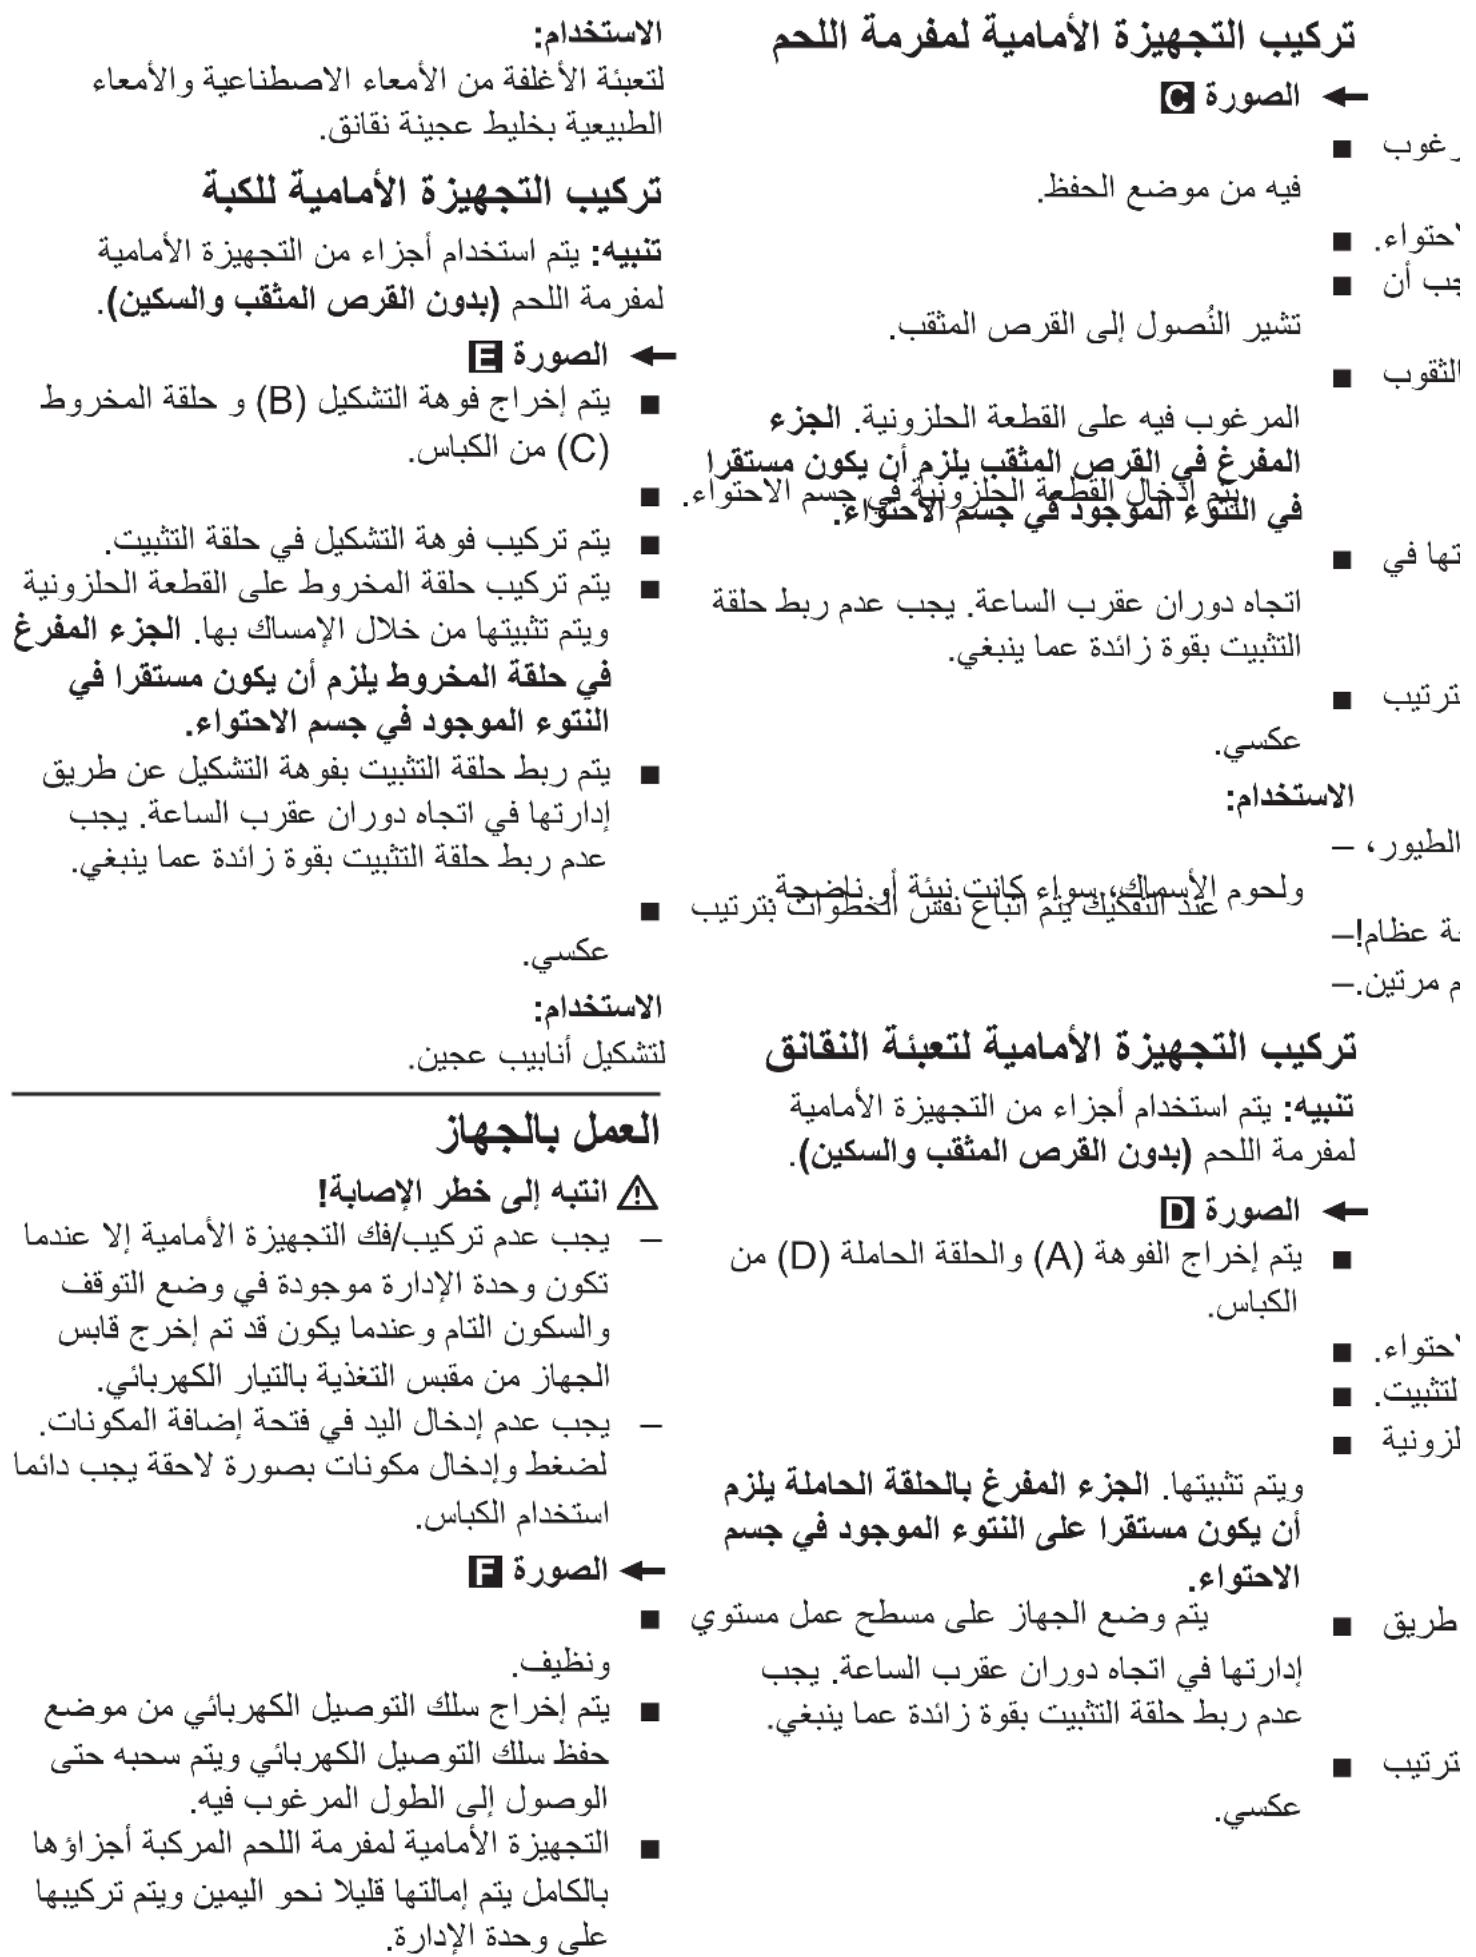
Note: The parts of the mincer attachment (without perforated disc and blade) are used.
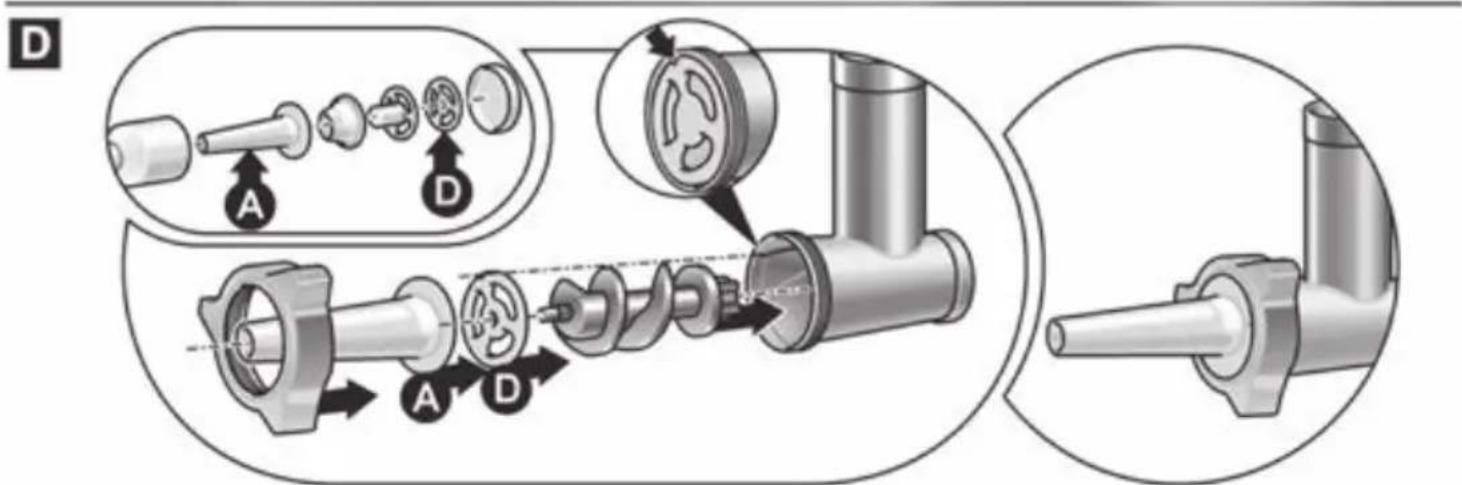
→ Fig. ①
Take nozzle (A) and bearing ring (D) out of the pusher. Insert worm gear into the housing. Insert nozzle into the threaded ring. Put bearing ring on the worm gear and hold in place. Recess on the bearing ring must be situated on the lug in the housing. Screw on threaded ring with nozzle clockwise. Do not tighten the threaded ring too tight. Disassembly is in reverse order.
Use for:
Filling artificial and natural casings with sausage meat.
Assembling kebbe attachment
Note: The parts of the mincer attachment (without perforated disc and blade) are used.
→ Fig. 1
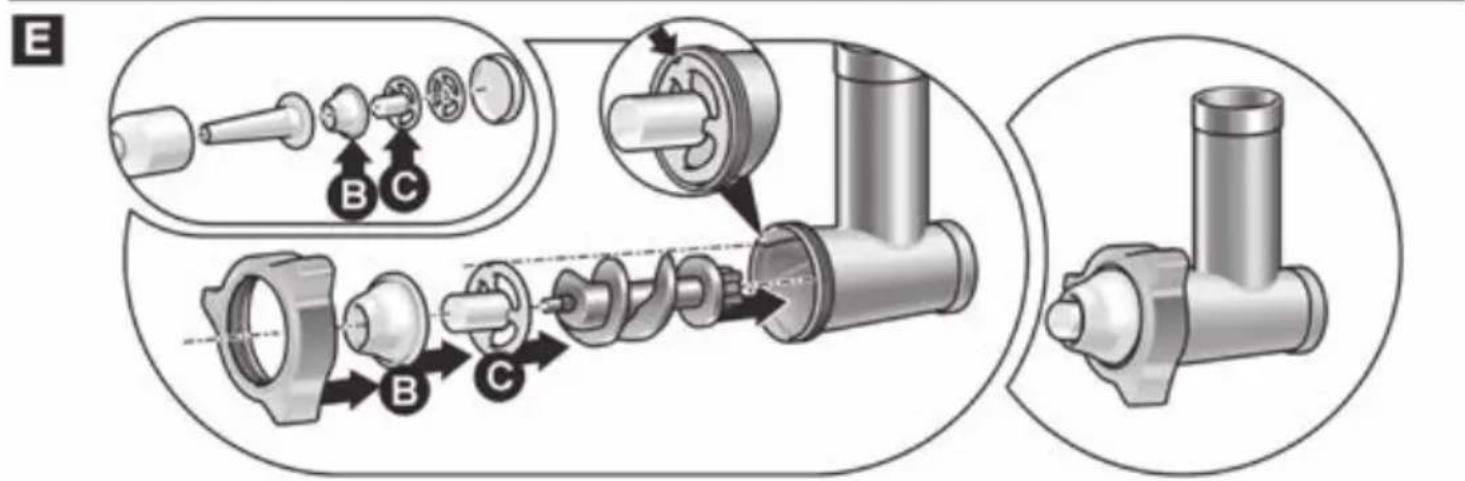
Take shaper (B) and conical ring (C) out of the pusher. Insert worm gear into the housing. Insert shaper into threaded ring. Put conical ring on the worm gear and hold in place. Recess on the conical ring must be situated on the lug in the housing. Screw on threaded ring with shaper clockwise. Do not tighten the threaded ring too tight. Disassembly is in reverse order.
Use for:
Shaping dough tubes.
Operating the appliance
△ Risk of injury
- Before fitting/removing attachment, wait until the drive has come to a standstill and pull out the mains plug.
- Do not reach into the feed tube. Always use the stuffer to push food down the hole.
→Fig. F
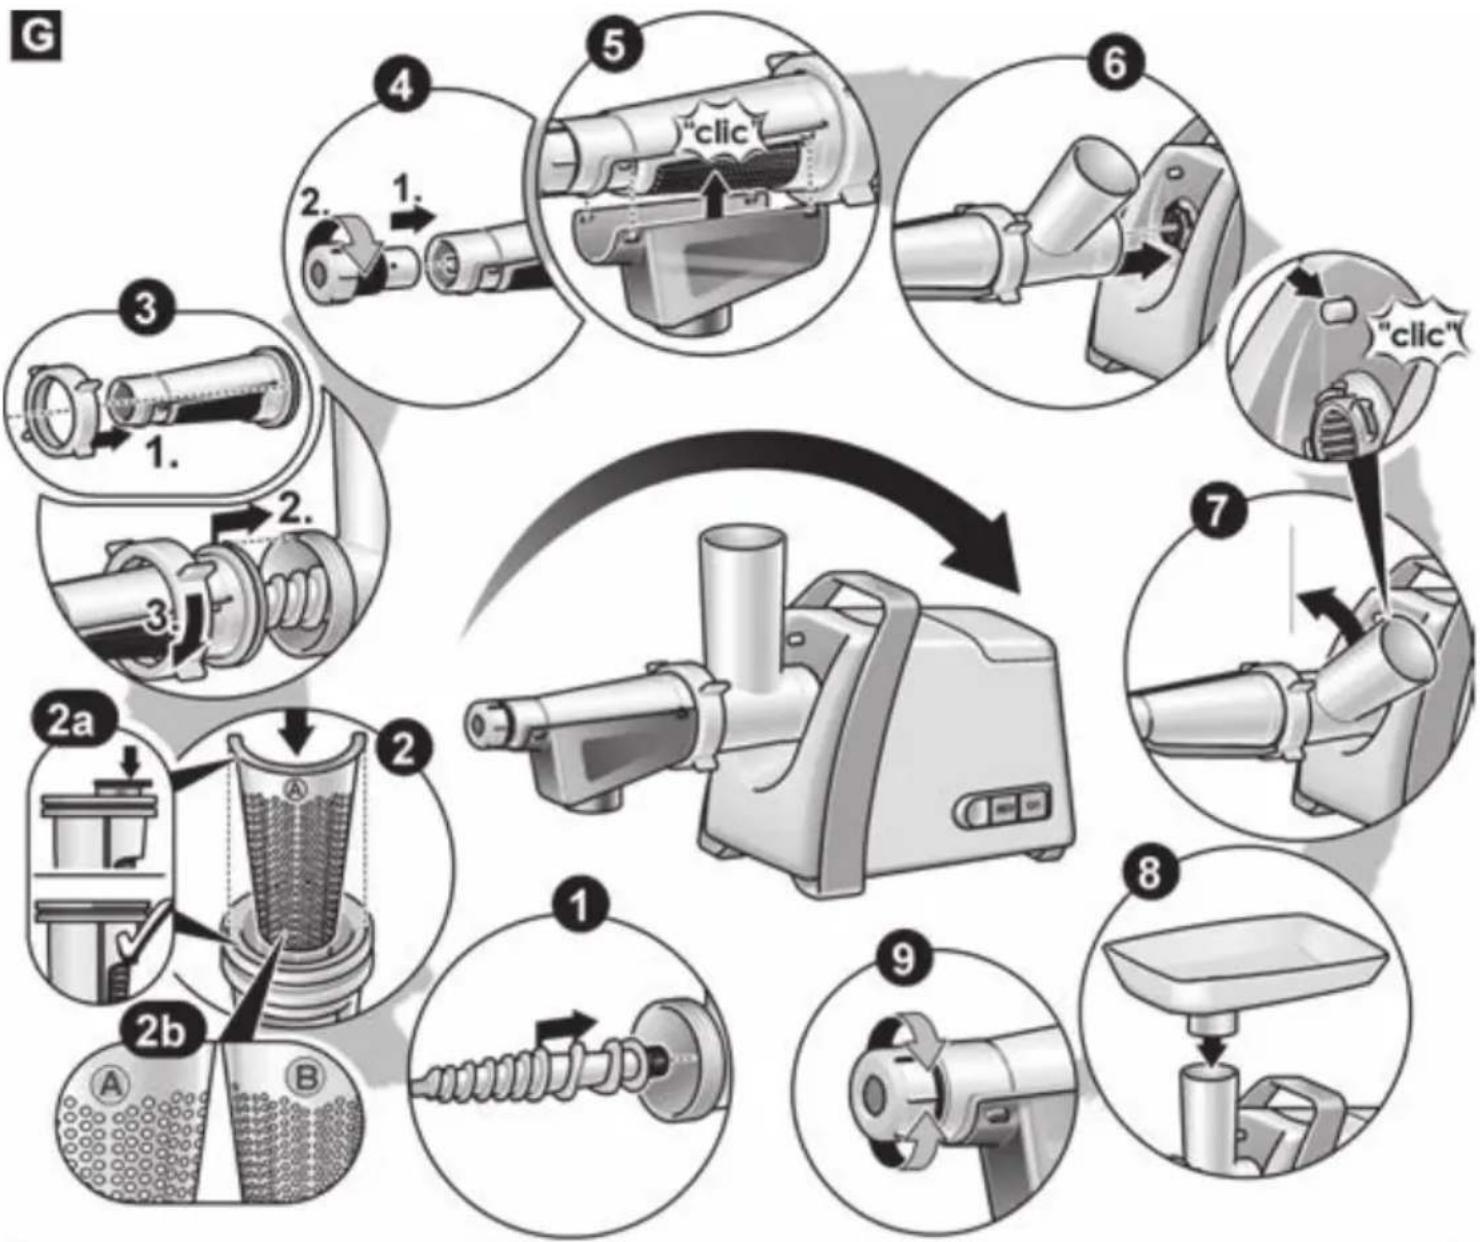
- Stand the mincer on a clean, level work surface. Take the power cord out of the cable storage and pull it out to the required length. Put the completely assembled mincer attachment, inclined slightly to the right, on the drive.
- Turn the mincer attachment upwards until it engages.
- Tighten the threaded ring on the mincer attachment.
- Attach the filling tray. Insert the pusher into the filling opening.
- Place a bowl or plate under the outlet opening. Insert the mains plug.
- Switch the appliance on with the On/Off button. Place the food to be processed in the filling tray. Only use the pusher when adding more ingredients.
Application instructions:
If the food to be chopped up jams in the worm gear: Use the reverse button to remove the blockage.
- Switch the appliance off with the On/Off button.
- Wait until the drive comes to a standstill.
- Briefly press the reverse button.
- Wait until the drive comes to a standstill.
- Switch the appliance on with the On/Off button.
After using the appliance:
- Switch appliance off with the On/Off button. Remove mains plug. Pull out the pusher. Remove filling tray.
- Remove the mincer attachment. Holding down the release button, turn the attachment to the right and remove. Disassemble mincer attachment. Clean all parts, see "Cleaning and servicing".
Fruit press attachment
(some models)
Pureeing soft fruit, tomatoes, apples, pears or rosehips. The selection of the filter insert determines the content of fruit pulp in the juice. Do not use for pureeing fruit that contains pips the same size as the holes in the filter insert of the puree attachment (e.g. raspberries).
Risk of injury
- Before fitting/removing attachment, wait until the drive has come to a standstill and pull out the mains plug.
- Do not reach into the feed tube. Always use the stuffer to push food down the hole.
Warning!
Do not process frozen fruit or vegetables. Remove stones (cherries, plums, apricots, etc.).
See Fig. 6
Insert worm gear into the housing. Insert filter insert into the filter holder. Press in filter insert all the way. Insert filter holder into threaded ring. Screw on threaded ring with filter holder clockwise. Lug on the filter holder must be situated in the recess in the housing. Do not tighten the threaded ring too tight. Screw pulp nozzle into the filter holder. - Attach outlet funnel to the filter holder and engage.
Operating the appliance
Put the completely assembled fruit press attachment, inclined slightly to the right, on the drive. Turn fruit press attachment upwards until it engages. - Tighten threaded ring on the fruit press attachment. - Attach filling tray. - Place suitable container under the juice outlet opening. Place bowl or plate under the opening of the pulp nozzle. Insert the mains plug. Place the food to be processed in the filling tray. - Switch appliance on with the On/Off button. Press food down using the pusher. Do not exert too much pressure! Filter insert may be damaged.
Application instructions:
- First loosen the pulp nozzle until the pulp (solid constituents) is still moist when it flows out.
- Then slowly close the pulp nozzle until juice and pulp come out in the required form.
After using the appliance:
Switch appliance off with the On/Off button. Remove mains plug. Pull out the pusher. Remove filling tray. - Remove the fruit press attachment. Holding down the release button, turn the attachment to the right and remove. Disassemble fruit press attachment. Disassembly is in reverse order. Clean all parts, see "Cleaning and servicing".
Shredding attachment
(some models)
For shredding and slicing cheese, fruit, vegetables, nuts, almonds, dried bread rolls and pieces of bread, chocolate and other hard foods.
Risk of injury
Before fitting/removing attachment, wait until the drive has come to a standstill and pull out the mains plug. - Do not grip the sharp blades and edges of the shredding and slicing inserts. - Do not reach into the feed tube. Always use the stuffer to push food down the hole.
Fig. H
Place required insert in the housing of the shredding attachment. The insert is automatically locked when the appliance is switched on. Put the shredding attachment, inclined slightly to the right, on the drive. Turn shredding attachment upwards until it engages. - Place a bowl or plate under the outlet opening. Insert the mains plug. - Place the food to be processed in the feed tube. Insert pusher and hold in place.
Note:
Pusher can be inserted in one direction only. Note position of the curve!
- Switch appliance on with the On/Off button. Press food down using the pusher. Do not exert too much pressure!
After using the appliance:
- Switch appliance off with the On/Off button. Remove mains plug. Pull out the pusher.
- Remove the shredding attachment. Holding down the release button, turn the attachment to the right and remove. Disassemble shredding attachment. Clean all parts, see "Cleaning and servicing".
Cleaning and servicing
Important information
The appliance requires no maintenance. Thorough cleaning protects the appliance from damage and keeps it functional.

Electric shock risk
- Never immerse the base unit in liquids and do not clean in the dishwasher.
- Before cleaning the appliance, pull out the mains plug!
Warning!
Do not use abrasive cleaning agents. Surfaces may be damaged. Do not clean the aluminium parts (housing, worm gear and threaded ring of the mincer attachment) in the dishwasher. Harmless discolouration may occur over time.
Cleaning the appliance
Pull out the mains plug. Wipe the mincer clean with a damp cloth. If required, use a little detergent.
Cleaning the attachments
Rinse housing, worm gear and threaded ring of the mincer attachment by hand. Dry metal parts straight away and apply a little edible oil to protect them from rust.
- Fig. ① gives an overview of how to clean the individual parts.
Troubleshooting
Fault
Appliance stops but does not switch off.
Cause
Appliance overloaded, e.g. mincer blocked.
Remedial action
- Switch appliance off and wait until it comes to a standstill. Press reverse button to remove the blockage. Wait until the drive comes to a standstill. Switch on appliance again.
Fault
Appliance switches off during use.
Cause
Appliance overloaded. Overload protection feature has been activated.
Remedial action
Switch off the appliance. Remove mains plug. Leave the appliance to cool down for approx. 60 minutes. - Lift appliance and press the thermal circuit breaker on the underside of the appliance (Fig. A, 14). Insert the mains plug. Switch on appliance again.
Important information
If the fault cannot be eliminated, please contact customer service.
Recipes and tips
Mincer attachment
Perforated disc, fine (3 mm/3.8 mm): cooked chicken, pork, beef, cooked liver, cooked fish for soups; raw pork and beef for meat loaf; raw liver, meat and bacon for liverwurst; pork for Mettwurst
Perforated disc, medium (4.8 mm): Pork and beef for pâté and Cervelat sausage.
Perforated disc, coarse (8 mm): roast pork for goulash soup; leftovers (joint, sausage, ...) for casserole
Bread dumplings
Using the perforated disc 8 mm
- 300 g of fresh white bread
- 40 g of butter or margarine -200 ml of milk -2 eggs
- 1 tbs. of finely chopped onions
- Parsley, salt -A little flour
Processing ingredients
Using the mincer, chop up the white bread. Add the finely chopped onions, a little parsley and butter and mix. Whisk eggs, milk and salt and mix into the bread dough. Leave the dough to prove for several minutes. Then knead again. Shape the dumplings with wet hands. Roll dumplings in flour. Place dumplings in boiling water and leave to simmer for approx. 20 minutes. Do not bring to the boil!
Ground cheese
Basic recipe
- 500-600g Gouda cheese. To make Gouda cheese easier to process, cut into cubes, 2.5 x 2.5 x 2.5 cm, and freeze for 24 hours to -20°C. Process frozen Gouda using the mincer (perforated disc, fine).
Operation time: 1 minute
Minced meat rolls with Gouda
Basic recipe
- 500 g beef, cut into strips
- 500 g pork, cut into strips
- 200 g cheese (Gouda)
- 10 g salt
- 2 g freshly ground black pepper
- Garlic (optional). Oil for deep frying. First process the frozen Gouda (see "Ground cheese"), followed by the beef and pork using the mincer (perforated disc, fine).
- Add the salt, pepper and garlic (optional) and mix. Make rolls approx. 10 cm in length either using your hands or with the sausage stuffing attachment. Heat a little oil in a frying pan and fry the minced meat rolls for approx. 5 minutes. Turn several times until everything is cooked through.
Sausage filler attachment
Soak natural casing in lukewarm water for approx. 10 minutes before processing. Do not overfill sausages, otherwise the sausages may burst while they are being boiled or fried. The nozzles can also be used without casings! Coat sausage meat with breadcrumbs and then fry.
Kebbe attachment
Recipe for stuffed kebbe
Dough pocket:
- 500 g of lamb, cut into strips
- 500 g of bulgur wheat, washed and drained
- 1 small onion, chopped
Pass lamb and wheat alternately through the fine perforated disc of the mincer attachment. Mix the dough thoroughly, mix in the onion. Pass the mixture twice more through the mincer attachment.
Filling:
- 400 g of lamb, cut into strips
- 2 medium-sized onions, chopped
- 1 tablespoon of oil
- 1 tablespoon of flour
- 2 teaspoons of pimento. Salt and pepper. Pass lamb through the fine perforated disc of the mincer attachment. Fry onions until golden brown. Add lamb and fry until well done. Add remaining ingredients. Braise everything for approx. 1-2 minutes. Pour off excess fat. Leave the filling to cool down.
Preparing the kebbe:
Pass mixture for dough pockets through the kebbe attachment. Divide the hollow strand of dough into pieces approx. 7.5 cm in length. Seal one end of the dough pocket.
Disposal
Press a little stuffing into the opening and also seal the other end of the dough pocket. Heat oil (approx. 180°C) and deep-fry the dough pockets for approx. 6 minutes until golden brown.
Shredding attachment
Slicing insert
for onions, cabbage, apples, carrots
Shredding insert - coarse
for nuts, chocolate, cheese, hard bread / bread rolls
Shredding insert - fine
for nuts, chocolate, cheese
Grating insert
for potatoes, Parmesan cheese
Disposal
Dispose of packaging in an environmentally-friendly manner. This appliance is labelled in accordance with European Directive 2012/19/EU concerning used electrical and electronic appliances (waste electrical and electronic equipment - WEEE). The guideline determines the framework for the return and recycling of used appliances as applicable throughout the EU. Please ask your specialist retailer about current disposal facilities.
Guarantee
The guarantee conditions for this appliance are as defined by our representative in the country in which it is sold. Details regarding these conditions can be obtained from the dealer from whom the appliance was purchased. The bill of sale or receipt must be produced when making any claim under the terms of this guarantee.
Changes reserved.
For forming tubes of paste.
Subject to modifications.
Correct use
23 Former 24 Cone ring
Fruit press attachment*
25 Housing 26 Worm 27 Sieve insert
a fine b coarse
28 Sieve holder 29 Outlet funnel 30 Screw ring 31 Crushing nozzle
Grater attachment*
32 Housing 33 Stopper 34 Change insert
a Cutting insert b Grater insert, coarse c Grater insert, fine d Shredder insert
- Not all models
Safety equipment
Overload protection (thermal protection switch)
a Grating insert b Coarse grating insert c Fine grating insert d Slicing insert
- depending on model
for onions, potatoes, apples, carrots
Coarse grating insert
This appliance is intended for household use only.
Juice extractor attachment*
25 Body 26 Worm 27 Strainer insert
a fine b coarse
28 Strainer holder
www.bosch-home.com/tr
www.bosch-yetkiliservisi.com
Use the appliance only at indoor temperatures and at altitudes not exceeding 2000 m above sea level.
Recommended usage:
First, turn the handle slightly in the opposite direction so that the ingredients (solid parts) are pressed out of the water. Then close the handle completely until the juice and ingredients come out in the desired form.
After use:
Unplug the appliance by pressing the on/off button. Remove the plug from the socket. Remove the attachments. Remove the bowl. Remove the chopper/grinder attachment. To remove the chopper/grinder attachment, turn it clockwise and remove it. Disassemble the chopper/grinder attachment. Disassembly is done in reverse order. Clean all parts, see "Cleaning and Maintenance".
Chopper/grinder attachment
(on some models)
For chopping and slicing food, fruits, vegetables, nuts, almonds, dried fruits, breadcrumbs, chocolate, and other hard products.
Safety instructions
-The attachment can only be installed/removed after the appliance has been switched off and the plug has been removed from the socket. -Do not touch the sharp blades and edges of the inserts for chopping and slicing. -Do not put your hands near the chopper/grinder attachment. Use the pusher for safety.
→Figure H
Insert the desired insert into the body of the chopper/grinder attachment. The insert is fixed automatically when the appliance is switched on.
Chopper/grinder attachment with insert for slicing. Turn the chopper/grinder attachment clockwise until it stops. ■Connect the hose to the opening between the bowl and the lid. Plug the appliance into the socket. Load the products for processing into the loading opening. Insert the pusher and hold it in the horizontal position.
Note:
The inserts can only be inserted in one position. Pay attention to the shape of the rounding!
Unplug the appliance by pressing the on/off button. Prepare the products for processing with the pusher. Do not press too hard!
Operation:
Unplug the appliance by pressing the on/off button. Remove the plug from the socket. Remove the pusher. Remove the chopper/grinder attachment. To remove the chopper/grinder attachment, turn it clockwise and remove it. Disassemble the chopper/grinder attachment. ■Clean all parts, see "Cleaning and Maintenance".
Cleaning and Maintenance
Follow the requirements of the technical passport. Detailed instructions are given before the first use to ensure its safe operation.

Safety when working with electric current
current
- Never immerse the base in water and do not put it in the dishwasher. - Before starting cleaning, unplug the appliance!
Attention!
Do not use any abrasive agents for cleaning surfaces, as they may cause damage to parts made of aluminum (housing, neck and ring with different attachments-meat grinder). Do not put in the dishwasher. Over time, unsightly stains may appear on the surface.
Cleaning the appliance
Unplug the appliance from the socket. Wipe the appliance with a damp cloth. If necessary, you can use a small amount of mild detergent.
Cleaning accessories
The housing, neck and threaded ring of the meat grinder attachment can be washed by hand. Wipe metal parts immediately and dry them, and lubricate them with vegetable oil to protect against rust.
The figure shows an overview of individual parts.
Sausage attachment
Soak the natural sausage casing in warm water for about 10 minutes before processing. Do not overfill the casing, otherwise the sausage may burst during cooking or serving. You can also use the attachment without the casing! The sausage mass should be stuffed and then twisted.
Kebbe attachment
Filling for tubes:
-500 g of lamb cut into strips -500 g of large onions, washed and peeled -1 teaspoon -1 small bowl, used for soaking the lamb and onions, loading alternately, through the fine disc of the meat grinder. The mass should be mixed well, then add the onion. Pass the mass twice through the meat grinder.
Filling:
-400 g of lamb cut into strips -2 onions of medium size, peeled -1 tablespoon of oil -1 tablespoon of flour -2 cloves of garlic -salt and pepper. Soak the lamb through the fine disc of the meat grinder. Mix well until a golden-brown color. Add the lamb and fry. Add the remaining ingredients. Mix everything thoroughly for 1-2 minutes. Remove from heat. Cool the filling.
Forming the kebab:
- Pass the filling for the tubes through the kebab nozzle. Cut the hollow sausage from the filling into 7.5 cm pieces, leaving one end of such a tube. Slightly press the filling into the hole and leave the other end of the tube. Heat the oil (approx. 180 °C) and fry the tubes in the deep fryer for about 6 minutes until golden-brown.
Nozzle for cookies
Insert for slicing
For onions, cabbage, apples, carrots
Insert for shredding, coarse for nuts, chocolate, cheese, hard bread/rolls
Insert for shredding, fine for nuts, chocolate, cheese
Grater insert
For potatoes, Parmesan cheese
The product is marked in accordance with the European Directive 2012/19/EU regarding waste electrical and electronic equipment (WEEE). The directive defines the requirements that apply within the European Union for the disposal and recycling of used appliances. For current disposal options, please contact your specialized dealer.
Warranty conditions
For this appliance, the warranty conditions published by the competent representative in the country where you purchased the appliance apply. You can obtain the warranty conditions at any time from the specialized dealer where you purchased the appliance, or directly from our representative in your country. The warranty conditions for Germany and the address can be found on the last pages of the brochure. In addition, the warranty conditions are also available on the Internet at the specified address. To use warranty services, it is necessary in any case to show the purchase receipt.
Possible changes.
Intended use
This appliance is intended solely for domestic use. The appliance may only be used for processing such quantities of food and for such periods of time as are typical for domestic households. This appliance is intended for chopping and mixing raw and cooked meat, lard, poultry, and fish. Hard components (e.g., bones) must be completely removed from the products to be processed. The appliance is prohibited from being used for processing other substances or objects.
When using other accessories approved by the manufacturer, other application options are possible.
The appliance may only be used with the supplied parts and accessories.
Never use attachments, cutting discs, or grinding discs from other appliances. Use only matching parts and accessories that fit together.
Use the appliance only indoors at room temperature and at an altitude not exceeding 2000 m above sea level.
Important safety instructions
Read the operating instructions carefully. When working, follow the instructions in this manual and keep it for future use! When passing the appliance on to other persons, include this manual.
The manufacturer is not liable for damages resulting from failure to observe the instructions for proper use of the appliance.
This appliance may be used by persons with reduced physical, sensory, or mental capabilities or lack of experience and knowledge, if they are supervised or have been instructed in the safe use of the appliance and understand the dangers involved. Children must not be allowed to play with the appliance. Cleaning and user maintenance must not be performed by children.
Danger of electric shock and fire!
When connecting the appliance and during its operation, follow the data given on the nameplate. The appliance may only be used if the cable and the appliance are not damaged. To avoid a dangerous situation, repair of the appliance, for example, replacing a damaged power cord, may only be carried out by our service department. It is strictly forbidden to connect the appliance to sockets with remote control. Never place the appliance on hot surfaces, for example, on an electric stove, or near them. The power cord must not come into contact with hot parts or pass over sharp edges. Never immerse the base in liquid, do not wash it under running water or in a dishwasher. Do not use steam cleaners. Do not use the appliance with wet hands. After each use, if not supervised, before assembly, disassembly, or cleaning, and in case of malfunction, always disconnect the appliance from the mains. Always watch the appliance during operation!
Danger of injury!
The mains plug may only be inserted into the socket after preparation for work with the appliance is fully completed. The attachments may only be used when fully assembled. Never assemble the attachments on the base unit. Before replacing accessories or additional parts that move during operation, the appliance must be disconnected from the mains. After switching off, the drive still moves for some time. Wait for the drive to come to a complete stop. In case of power failure, the appliance remains switched on and resumes operation after power is restored. Do not touch sharp blades and edges on the cutting and shredding attachments with your hands. Never touch moving parts. Never insert hands or fingers into the feed tube or the outlet opening. Always use the pusher. Never touch sharp blades and edges on the cutting and shredding attachments with bare hands.
Attention!
Make sure that no foreign objects are in the feed tube or in the attachments. Do not use objects (e.g., knife, fork) in the feed tube or in the outlet opening. Never use the on/off button and the reverse button at the same time. Before pressing another button, wait until the drive has come to a complete stop. Risk of damage to the appliance.
Danger of burns!
Do not let children play with the packaging material.
! Important!
Safety systems
Overload protection (thermal cut-out)
If the motor switches off automatically during operation, this means that the overload protection has been activated. Possible causes may be simultaneous processing of too large a quantity of food or jamming of a bone. For behavior when one of the safety systems is activated, see "Troubleshooting".
Overload protection
To avoid significant damage to the device during overload or jamming, the attachment has a designated breaking point. In case of overload, the attachment breaks at this point. However, it can be easily replaced. Replacement of other spare parts with the designated breaking point is not covered by our warranty. Such spare parts can be purchased from the service department (order no. 753348).
Operation
Risk of injury!
The plug may only be inserted into the socket after preparation for working with the device has been fully completed.
Before first use, carefully read the device and accessories, see "Cleaning and care".
→Figure
Store the forming discs in the compartment for their storage. Place the individual parts of the "Sausage filler" and the "Kebbe" attachment into the container and close it with the lid.
Assembling the mincer attachment
→Figure
Remove the forming disc with the holes of the required diameter from the storage compartment. Insert the insert into the housing. Slide the knife onto the shaft. The blade must face the forming disc. Slide the forming disc with the holes of the required diameter onto the shaft. The recess on the forming disc must be positioned on the housing lug. Screw the threaded ring clockwise. Do not tighten the threaded ring too tightly. Disassembly is carried out in reverse order.
Application:
- Processing of raw and cooked meat, lard, poultry, and fish.
- Do not process bones!
- Pass the tartare through the mincer twice.
Assembling the "Sausage filler" attachment
Note: Use the meat grinder attachments (without the forming discs and knife).
→Figure D
■Remove the nozzle (A) and the support ring (D) from the pusher. Insert the auger into the housing. Insert the nozzle into the ring with the thread. Put the support ring on the auger and hold it. The recess on the support ring should be positioned on the nose of the housing. Screw the ring with the thread together with the nozzle clockwise. Do not tighten the ring with the thread too much. Disassembly is carried out in the reverse order.
Application:
For making sausages with natural or artificial casings.
Assembly of the “Kebbe” attachment
Note: Use the meat grinder attachment parts (without the forming disc and knife).
→Figure
■Remove the forming disc (B) and the cone ring (C) from the pusher. Insert the auger into the housing. Insert the forming disc into the ring with the thread. Put the cone ring on the auger and hold it. The recess on the cone ring should be positioned on the nose of the housing.
Screw the ring with the thread together with the forming disc clockwise. Do not tighten the ring with the thread too much. Disassembly is carried out in the reverse order.
Application:
Do not process frozen fruits and vegetables. Remove the pits (from cherries, plums, apricots, etc.).
→Figure
Insert the auger into the housing. Insert the strainer insert into the strainer holder. Press the strainer insert until it stops. Insert the strainer holder into the ring with the thread. Screw the ring with the thread together with the strainer holder clockwise. The nose of the strainer holder should be positioned in the recess of the housing. Do not tighten the ring with the thread too much. Screw the head for the discharge of pulp into the strainer holder. Put the discharge spout on the strainer holder and fix it in the groove. Put the assembled press attachment for juice extraction on the drive with a slight tilt to the right. ■Turn the press attachment for juice extraction upward until it locks in the groove. Tighten the ring with the thread on the press attachment for juice extraction. Install the loading tray.
Place a suitable container under the discharge opening for the juice. Place a plate or dish under the opening of the head for the discharge of pulp. Insert the plug into the socket. Put the products intended for processing into the loading tray. Turn on the appliance with the on/off button. Push the products down with the pusher. Do not apply too much force! The strainer insert may be damaged.
Instructions for use:
First, tilt the juicer head back enough so that the pulp (solid parts) still comes out moist. Then slowly close the pulp outlet head until the juice and pulp come out in the desired form.
After work:
Turn off the appliance with the on/off switch. Remove the plug from the socket. Remove the pusher. Remove the loading tray. Remove the juice extractor attachment. To do this, while pressing the unlock button, turn the attachment to the right and remove it. Disassemble the juice extractor attachment. Disassembly is performed in reverse order. ■Clean all parts, see "Cleaning and care".
Shredding attachment
(on some models) For shredding and slicing vegetables, fruits, nuts, almonds, dry rolls and breadcrumbs, chocolate and other hard products.
Risk of injury
- The attachment can only be installed/removed after the drive has stopped and after the plug has been removed from the socket. -Do not touch the sharp blades or edges of the inserts or the shredding disc. -Do not put your hands into the feed tube. Always use the pusher for pushing.
→Figure H
Insert the desired insert into the body of the shredding attachment. The insert locks automatically when the appliance is switched on. Place the shredding attachment onto the drive with a slight tilt to the right. ■Turn the shredding attachment upwards until it stops. I Place a plate or bowl under the outlet opening. Insert the plug into the socket. Load the products to be processed into the feed opening. Insert the pusher and hold it.
Note:
The pusher can only be inserted in one direction. Pay attention to the position of the rounded part!
■ Turn off the appliance with the on/off switch. Push the products down with the pusher. Do not apply too much force.
After work:
Turn off the appliance with the on/off switch. Remove the plug from the socket. Remove the pusher. Remove the shredding attachment. To do this, while pressing the unlock button, turn the attachment to the right and remove it. Disassemble the shredding attachment. ■Clean all parts, see "Cleaning and care".
Important note
This device does not require technical maintenance. Careful cleaning protects the device from damage and maintains its functionality.
Danger of electric shock
Never immerse the main unit in liquid. Do not wash it in a dishwasher.
- Before cleaning, unplug the device from the power outlet!
- Attention!
Do not use abrasive cleaning agents. The surface of the device may be damaged. Parts made of aluminum (housing, shaft and ring of the threaded attachment for the meat grinder) should not be washed in a dishwasher. Over time, harmless stains may appear.
Cleaning the device
Unplug the device from the power outlet. Wipe the device with a damp cloth. If necessary, use a little dishwashing liquid.
Cleaning the attachments
Rinse the housing, shaft and ring of the threaded attachment for the meat grinder. Immediately wipe the metal parts dry and lightly oil them with edible oil to prevent rust.
In the figure you will find an overview of how to clean the individual parts.
The device stops but does not switch off.
The pump stops but does not switch off.
The appliance is overloaded. The waste disposal is blocked by a product.
Remedy
Switch off the appliance and wait for it to stop completely. To remove the blockage, press the reset button on the motor. Wait for the drive to stop. Switch the appliance on again.
Fault
The appliance switches off during use.
Cause
The appliance is overloaded. The overload protection has tripped.
Remedy
Switch off the appliance. Remove the plug from the socket. Allow the appliance to cool down for approximately 60 minutes. Press the thermal overload switch located on the underside of the appliance (figure A, 14). Insert the plug into the socket. Switch the appliance on again.
Important note
If you are unable to rectify the fault, contact the service department.
Recipes and recommendations
Waste disposal attachment
Moulding disc, fine, 3 mm/3.8 mm:
Boiled chicken, pork, beef, boiled ham, boiled fish for soup; fresh pork and beef for goulash from the grill; fresh liver, meat and lard for liver sausage; pork for smoked sausage
Molding disc, medium, 4.8 mm: pork and beef for pate and cervelat
Molding disc, coarse, 8 mm: roasted pork for goulash soup; leftovers (roast, sausage, etc.) for leftover casserole
Bread dumplings
Use molding disc 8 mm
-300 g of stale white bread -40 g of butter or margarine -200 ml of milk -2 eggs -1 tbsp. finely chopped onion - parsley, salt - a little flour
Processing of ingredients
Grind the white bread in a meat grinder. Add finely chopped onion, parsley, butter and mix. Beat eggs with milk and salt and add to the bread mixture. Let the dough rest for a few minutes. Then knead again. For making dumplings, always wet your hands with water. Roll the dumplings in flour. Drop the dumplings into boiling water and let them sit in hot water for about 20 minutes. Do not let it boil!
Blender
Basic recipe
Round-the-clock service hotline*: 8 (800) 200-29-61
Official website on the Internet: www.bosch-home.ru
Addresses of authorized service centers, as well as all information on service maintenance, are available on the official website on the Internet: www.bosch-home.ru.
We recommend that you use the services of only authorized service centers.
Original accessories and care products for Bosch household appliances can be purchased in our online store: www.bosch-home.ru/store. You can familiarize yourself with the terms of payment and delivery on the website. Also, original accessories and care products can be purchased at authorized service centers.
1. Product
- Model
Item 1-2. Fill in only if this data is not contained in the purchase documents of the product (cash receipt and/or sales receipt, sales invoice).
3. This data applies to small household appliances of the Bosch trademark: coffee makers, coffee machines, coffee grinders, scales, kitchen machines, blenders, vacuum cleaners, knives, toasters, irons, hair dryers, hair straighteners, electric toothbrushes, juicers, choppers, blenders, ironing boards, irons, steam stations, ironing boards and similar products.

- Dear ladies and gentlemen, we inform you that confirmation of conformity of our products with mandatory requirements in accordance with the legislation is carried out in the form of mandatory certification and declaration of conformity.
Information on mandatory confirmation of conformity of relevant products, including data on the certificate of conformity number (declaration of conformity) and its validity period, you can obtain on the website "All Household Appliances".
The manufacturer exercises control over the production of the trading company "BSH Hausgeräte GmbH", address of the headquarters: 81739 Munich, Carl-Wery-Straße 34, Germany (BSH Hausgeräte GmbH, Carl-Wery-Str. 34, 81739 München, Germany).
The manufacturer's authorized representative, performing the functions of a foreign manufacturer, authorized by the manufacturer on the basis of an agreement with it, is LLC "BSH Household Appliances", 198515, St. Petersburg, Peterhof, st. Karl Siemens, 1, letter A, additionally in Moscow, 119071, st. Malaya Kaluzhskaya, 1, phone (495) 737-2777, fax (495) 737-2798.
- Mandatory information on the technical characteristics of the device is given in the device table or on its label and/or in the accompanying documentation.
6. Accessories and care products
Functional care products do not recommend using non-original accessories and care products. Original accessories are developed by the manufacturer, they are ideal for your device. Original accessories and care products meet the highest quality requirements of the Bosch trademark, they undergo factory tests to ensure maximum reliability in operation. For all questions related to accessories and care products for your household appliance, you can contact authorized service centers or by phone support service.
7. Manufacturer's warranty
The manufacturer provides a warranty for the household appliance purchased by you in the Russian Federation in accordance with the current legislation of the Russian Federation for a period of 1 year. For household appliances purchased in the Republic of Belarus, for which a warranty card was issued at the time of purchase, the warranty conditions apply that do not contradict the legislation of the Republic of Belarus.
8. Attention! Important norm for the consumer
This device is intended for use exclusively for personal, family, household and other needs not related to entrepreneurial activity to meet household needs in the sphere of enterprise, institution or organization. Use of the device for purposes other than those specified is a violation of the rules of proper operation of the device.
The rating plate on the appliance must be kept! Please make sure it is present and keep it on the appliance for the entire service life of the appliance. Removing the plate leads to decommissioning of the appliance and to possible violations of its operating rules.
The manufacturer is not liable for defects in the appliance if the service department determines that they arose after the appliance was transferred to the consumer as a result of violation of the rules of use, transportation, storage, actions of third parties, force majeure (fire, natural disasters, etc.), ingress of household insects and rodents, exposure to external factors, as well as as a result of significant violations of technical requirements specified in the operating instructions, including instability of electrical network parameters established by GOST 32144-2013.
To confirm the date of purchase of the appliance for warranty repair or presentation of other claims provided by law, we kindly ask you to keep the purchase documents (receipt, invoice, other documents confirming the date and place of purchase).
Following the recommendations set out in the operating instructions (rules of use) will help to avoid problems in the operation of the appliance and its maintenance.
Faulty components of the appliance during the warranty period are repaired free of charge or replaced with new ones. The decision on the feasibility of replacement or repair remains with the service department.
9. Service information
After the warranty period expires, the service department, as well as the workshops of our partners, are always ready to offer you their services. The list of addresses of authorized service centers is available on the official website of the manufacturer: www.bosch-home.ru.
The service life of small household appliances (except for cooker hoods and vacuum cleaners) is 2 years. The service life of cooker hoods and vacuum cleaners is 5 years. The service life of the product is calculated from the date of its purchase, and if it is impossible to determine, from the date of manufacture of the product indicated on the rating plate of the product in accordance with the manufacturer's standard. The date of manufacture is marked as YYMM, where YY is the year of manufacture (e.g., 1920) and MM is the month of manufacture. To determine the date of manufacture of the appliance, add the number 1920 to YY.
*Free round-the-clock telephone calls within the territory of the Russian Federation.
B34C065N1-1M00 03/2017
Information about household appliances manufactured under the control of the concern BSH Hausgeräte GmbH, Carl-Wery-Str. 34, 81739 Munich, Germany, in accordance with the requirements of technical regulation legislation and consumer protection legislation of the Russian Federation
The product is intended for use at temperatures above 0°C and relative humidity not exceeding 93%.
If the product is intended for operation and has been exposed to negative temperatures for a long time, it must be kept at room temperature for several hours.
The rules for the sale of products are determined by retail enterprises in accordance with the requirements of current legislation.
The specified product information is contained in the operating instructions and may be clarified by municipal executive authorities.
For products manufactured during the validity period of the conformity certificate, this certificate remains valid upon their supply, sale, and use (application) during the service life established in accordance with Article 183 of the Law on Protection of Consumer Rights. The product service life is indicated by the manufacturer in the section "Information from the Manufacturer on Warranty and After-Sales Service".
The product can be identified by its model designation (field "E-Nr."), type (field "Type"), and trademark, applied to the product, packaging, and/or contained in the operating documents. In accordance with the manufacturer's internal standard, household appliances are identified according to the following scheme:
E-Nr. /
The material number is an alphanumeric designation of the product, no more than 10 characters, used when selling (the model designation of the household appliance) under the Bosch trademark. The material number (model) is indicated between the code word "E-Nr." and the slash "/".
The service index is a two-digit numeric designation assigned to each product unit during the production process and used for after-sales service.
The operating documents are developed in a unified form for the entire product range, so the manufacturer provides for the indication of the product designation in the operating documents both in full and in part, provided that this allows identifying the relevant operating document for a specific product, accompanied by these operating documents. The identification procedure in the production process corresponds to the characteristics of the specific product and the set of operating documents attached to it, carried out by the manufacturer through the analysis of information contained in the operating documents.
The composition of the operating documents provided by the manufacturer for the product may include this information, operating instructions (manual), information on warranty and service conditions.
Product marking is carried out by the manufacturer on the product rating plate, on the packaging label, directly on the product packaging, and can also be done in other ways that ensure accessible and clear presentation of information about the product at points of sale.

Products that have passed the conformity assessment procedure in accordance with the technical regulations of the Customs Union and/or the technical regulations of the Eurasian Economic Union are marked with a single mark of product circulation on the market of the member states of the Customs Union (Eurasian Economic Union).
The product complies with the following technical regulations of the Customs Union:
TR CU 020/2011 Electromagnetic compatibility of technical equipment - TR CU 004/2011 On safety of low-voltage equipment - TR EAEU 037/2016 On restriction of hazardous substances in electrical and electronic products
Operational documents for the product are available in Russian. Operational documents in the official languages of the member states of the Eurasian Economic Union, other than Russian, may be obtained from the seller or the manufacturer's representative in the respective member state of the Eurasian Economic Union, if required by the legislation of that state.
Information about the product configuration, delivery, and sales terms can be requested via the toll-free hotline (800) 200-2961, and is also available on the manufacturer's website at http://www.bosch-home.ru.
| Toproboe обзauthende | Алproбальский ТП | Сергдемпат соютовстеня | Стона- ноготовель | Ну*, В Ну*, Гс HM*, BT | ||||
| Рг.nomer Дата в指导下 дουtestу do | ||||||||
| Масорбki | ||||||||
| MFW2500W | CNFW4 | C-DE.AR46.B.06079/19 | 18.07.2019 | 17.07.2024 | Китай | 50/60 | 220-240 | 350 |
| MFW2510W | CNFW4 | C-DE.AR46.B.06079/19 | 18.07.2019 | 17.07.2024 | Китай | 50/60 | 220-240 | 350 |
| MFW2514W | CNFW4 | C-DE.AR46.B.06079/19 | 18.07.2019 | 17.07.2024 | Китай | 50/60 | 220-240 | 350 |
| MFW2515W | CNFW4 | C-DE.AR46.B.06079/19 | 18.07.2019 | 17.07.2024 | Китай | 50/60 | 220-240 | 350 |
| MFW2517W | CNFW4 | C-DE.AR46.B.06079/19 | 18.07.2019 | 17.07.2024 | Китай | 50/60 | 220-240 | 350 |
| MFW2520W | CNFW4 | C-DE.AR46.B.06079/19 | 18.07.2019 | 17.07.2024 | Китай | 50/60 | 220-240 | 350 |
| MFW3520G | CNFW3A | C-DE.AR46.B.82954 | 24.11.2017 | 23.11.2022 | Посьша | 50/60 | 220-240 | 500 |
| MFW3520W | CNFW3A | C-DE.AR46.B.82954 | 24.11.2017 | 23.11.2022 | Посьша | 50/60 | 220-240 | 500 |
| MFW3540W | CNFW3A | C-DE.AR46.B.82954 | 24.11.2017 | 23.11.2022 | Посьша | 50/60 | 220-240 | 500 |
| MFW3600W | CNFW3A | C-DE.AR46.B.82954 | 24.11.2017 | 23.11.2022 | Посьша | 50/60 | 220-240 | 500 |
| MFW3630A | CNFW3B | C-DE.AR46.B.82954 | 24.11.2017 | 23.11.2022 | Посьша | 50/60 | 220-230 | 500 |
| MFW3630I | CNFW3B | C-DE.AR46.B.82954 | 24.11.2017 | 23.11.2022 | Посьша | 50/60 | 220-230 | 500 |
| MFW3640A | CNFW3B | C-DE.AR46.B.82954 | 24.11.2017 | 23.11.2022 | Посьша | 50/60 | 220-230 | 500 |
| MFW3710B | CNFW3A | C-DE.AR46.B.82954 | 24.11.2017 | 23.11.2022 | Посьша | 50/60 | 220-240 | 500 |
| MFW3850B | CNFW3B | C-DE.AR46.B.82954 | 24.11.2017 | 23.11.2022 | Посьша | 50/60 | 220-230 | 500 |
| MFW3910W | CNFW3A | C-DE.AR46.B.82954 | 24.11.2017 | 23.11.2022 | Посьша | 50/60 | 220-240 | 500 |
| MFW3X10B | CNFW3B | C-DE.AR46.B.82954 | 24.11.2017 | 23.11.2022 | Посьша | 50/60 | 220-230 | 500 |
| MFW3X10W | CNFW3B | C-DE.AR46.B.82954 | 24.11.2017 | 23.11.2022 | Посьша | 50/60 | 220-230 | 500 |
| MFW3X13W | CNFW3B | C-DE.AR46.B.82954 | 24.11.2017 | 23.11.2022 | Посьша | 50/60 | 220-230 | 500 |
| MFW3X14B | CNFW3B | C-DE.AR46.B.82954 | 24.11.2017 | 23.11.2022 | Посьша | 50/60 | 220-230 | 500 |
| MFW3X14W | CNFW3B | C-DE.AR46.B.82954 | 24.11.2017 | 23.11.2022 | Посьша | 50/60 | 220-230 | 500 |
| MFW3X18B | CNFW3B | C-DE.AR46.B.82954 | 24.11.2017 | 23.11.2022 | Посьша | 50/60 | 220-230 | 500 |
| MFW3X18W | CNFW3B | C-DE.AR46.B.82954 | 24.11.2017 | 23.11.2022 | Посьша | 50/60 | 220-230 | 500 |
| MFW4500 | CNFW5 | C-DE.AR46.B.06079/19 | 18.07.2019 | 17.07.2024 | Китай | 50/60 | 220-240 | 500 |
| MFW45020 | CNFW5 | C-DE.AR46.B.06079/19 | 18.07.2019 | 17.07.2024 | Китай | 50/60 | 220-240 | 500 |
| MFW45120 | CNFW5 | C-DE.AR46.B.06079/19 | 18.07.2019 | 17.07.2024 | Китай | 50/60 | 220-240 | 500 |
| MFW66020 | CNFW6 | C-DE.AR46.B.06079/19 | 18.07.2019 | 17.07.2024 | Китай | 50/60 | 220-240 | 600 |
| MFW67440 | CNFW7 | C-DE.AR46.B.06079/19 | 18.07.2019 | 17.07.2024 | Китай | 50/60 | 220-240 | 700 |
| MFW67450 | CNFW7 | C-DE.AR46.B.06079/19 | 18.07.2019 | 17.07.2024 | Китай | 50/60 | 220-240 | 700 |
| MFW67600 | CNFW7 | C-DE.AR46.B.06079/19 | 18.07.2019 | 17.07.2024 | Китай | 50/60 | 220-240 | 700 |
| MFW68100 | CNFW6 | C-DE.AR46.B.06079/19 | 18.07.2019 | 17.07.2024 | Китай | 50/60 | 220-240 | 600 |
| MFW68640 | CNFW8 | C-DE.AR46.B.06079/19 | 18.07.2019 | 17.07.2024 | Китай | 50/60 | 220-240 | 800 |
| MFW68660 | CNFW8 | C-DE.AR46.B.06079/19 | 18.07.2019 | 17.07.2024 | Китай | 50/60 | 220-240 | 800 |
| MFW68680 | CNFW8 | C-DE.AR46.B.06079/19 | 18.07.2019 | 17.07.2024 | Китай | 50/60 | 220-240 | 800 |
| Соковынмалки | ||||||||
| MCP3000N | CNZP3 | C-DE.AR46.B.0250/18 | 19.12.188 | 18.12.2023 | Босни и Геровина | 50/60 | 220-240 | 25 |
| MCP3500N | CNZP3 | C-DE.AR46.B.0250/18 | 19.12.188 | 18.12.2023 | Босни и Геровина | 50/60 | 220-240 | 25 |
| MCP72GPB | CNZP4 | C-DE.AR46.B.82955 | 24.11.2017 | 23.11.2022 | Китай | 50/60 | 220-240 | 40 |
| MES25A0 | CNCJ03 | C-DE.AR46.B.73451 | 08.02.2016 | 07.02.2021 | Китай | 50/60 | 220-240 | 700 |
| MES3500 | CNCJ03 | C-DE.AR46.B.73451 | 08.02.2016 | 07.02.2021 | Китай | 50/60 | 220-240 | 700 |
| MES4010 | CNCJ05 | C-DE.AR46.B.73451 | 08.02.2016 | 07.02.2021 | Китай | 50/60 | 220-240 | 1200 |
| MESM500W | CNSJ01 | C-DE.AR46.B.80092 | 24.05.2017 | 23.05.2022 | Китай | 50/60 | 220-240 | 150 |
| MESM731M | CNSJ01 | C-DE.AR46.B.80092 | 24.05.2017 | 23.05.2022 | Китай | 50/60 | 220-240 | 150 |
| Белendрь | ||||||||
| MBM21P0R | CNSM10 | C-DE.AR46.B.84228 | 27.02.2018 | 26.02.2023 | Китай | 50/60 | 220-240 | 500 |
| MBM21P1W | CNSM10 | C-DE.AR46.B.84228 | 27.02.2018 | 26.02.2023 | Китай | 50/60 | 220-240 | 500 |
| MBM42G0B | CNSM11 | C-DE.AR46.B.84228 | 27.02.2018 | 26.02.2023 | Китай | 50/60 | 220-240 | 700 |
| MBM42G1B | CNSM11 | C-DE.AR46.B.84228 | 27.02.2018 | 26.02.2023 | Китай | 50/60 | 220-240 | 700 |
| MBM43G2B | CNSM12 | C-DE.AR46.B.84228 | 27.02.2018 | 26.02.2023 | Китай | 50/60 | 220-240 | 700 |
| MBM66G5M | CNSM13 | C-DE.AR46.B.84228 | 27.02.2018 | 26.02.2023 | Китай | 50/60 | 220-240 | 800 |
| MBM66G5M | CNSM15 | C-DE.AR46.B.84228 | 27.02.2018 | 26.02.2023 | Китай | 50/60 | 220-240 | 900 |
| MBM66G7M | CNSM15 | C-DE.AR46.B.84228 | 27.02.2018 | 26.02.2023 | Китай | 50/60 | 220-240 | 900 |
| МБH6P6B | CNSM16 | C-DE.AR46.B.82171 | 22.09.2017 | 21.09.2022 | Китай | 50/60 | 220-240 | 1600 |
| МБM401W | CNSM14 | C-DE.AR46.B.80114 | 25.05.2017 | 24.05.2022 | Китай | 50 | 220-240 | 350 |
| МБM4G6K | CNSM14 | C-DE.AR46.B.80114 | 25.05.2017 | 24.05.2022 | Китай | 50 | 220-240 | 350 |
| МБM7G2M | CNSM14 | C-DE.AR46.B.80114 | 25.05.2017 | 24.05.2022 | Китай | 50 | 220-230 | 350 |
| МБM7G3M | CNSM14 | C-DE.AR46.B.80114 | 25.05.2017 | 24.05.2022 | Китай | 50 | 220-230 | 350 |
| МБM7P100 | CNSM14 | C-DE.AR46.B.80114 | 25.05.2017 | 24.05.2022 | Китай | 50 | 220-230 | 350 |
| МБM7P15M | CNSM14 | C-DE.AR46.B.80114 | 25.05.2017 | 24.05.2022 | Китай | 50 | 220-230 | 350 |
- UN - rated frequency or range of rated frequencies of the supply voltage in hertz ** UN - rated voltage or range of rated voltages in volts *** PN - rated power input or range of rated power inputs in watts
This product is marked in accordance with the European Directive 2012/19/EU on waste electrical and electronic equipment (WEEE). This symbol indicates that this product must not be disposed of with other household waste. Please dispose of this product at an appropriate collection point for recycling of electrical and electronic equipment. By doing so, you help to prevent potential negative consequences for the environment and human health, and contribute to the recycling and other forms of reuse of electrical and electronic equipment. For more information about where you can drop off your waste equipment for recycling, please contact your local city office, your household waste disposal service, or the shop where you purchased the product.
1
)
()
()
J 1
Therefore, b1 b2 = 1
1 10 1
.
5 5
1
iil 1
e 1
10 10
.
500
500
1
a
.
Lg 10
1
J 1
.
1
- 3
- 5
Therefore, in right triangle ABN:
/
Therefore, the original inequality holds.
i 1
| Clalalil clalil clalil clalil clalil clalil clalil clalil clalil clalil clalil clalil clalil clalil clalil clalil clalil clalil clalil clalil clalil clalil clalil clalil clalil clalil CLL CLL CLL CLL CLL CLL CLL CLL CLL CLL CLL CLL CLL CLL CLL CLL CLL CLL CLL CLL CLL CLL CLL CLL CLL CLL CLL CLL CLL CLL CLL CLL CLL CLL |
| Jablal dajiyyi yia jia yia jia yia jia yia jia yia jia yia jia yia jia yia jia yia jia yia jia yia jia yia jia yia jia yia jia yia jia yia jia yia jia yia jia yia jia yia jia yia jau yia jau yia jau yia jau yia jau yia jau yia jau yia jau yia jau yia jau yia jau yia jau yia jau yia jau yia jau yia jau yia jau yia jau yia jau yia jau yia jaa yia jau yia jau yia jau yia jau yia jau yia jau yia jau yia jau yia jau yia jau yia jau yia jau yia jau yia jau yia jau yia jau yia jau yia jau yia jau yia jAU yia jau yia jau yia jau yia jau yia jau yia jau yia jau yia jau yia jau yia jau yia jau yia jau yia jau yia jau yia jau yia jau yia jau yia jau yia jau yia juu yia juu yia juu yia juu yia juu yia juu yia juu yia juu yia juu yia juu yia juu yia juu yia juu yia juu yia juu yia juu yia juu yia juu yia juu yia juu yia jUU yia juu yia juu yia juu yia juu yia juu yia juu yia juu yia juu yia juu yia juu yia juu yia juu yia juu yia juu yia juu yia juu yia juu yia juu yia juu yia jau yia jau yia jau yia jau yia jau yia jau yia jau yia jau yia jau yia jau yia jau yia jau yia jau yia jau yia jau yia jau yia jau yia jau yia jau yia jiu yia jiu yia jiu yia jiu yia jiu yia jiu yia jiu yia jiu yia jiu yia jiu yia jiu yia jiu yia jiu yia jiu yia jiu yia jiu yia jiu yia jiu yia jiu yia jiu yia juu yia juu yia juu yia juu yia juu yia juu yia juu yia juu yia juu yia juu yia juu yia juu yia juu yia juu yia juu yia juu yia juu yia juu yia juu yia jvu yia juu yia juu yia juu yia juu yia juu yia juu yia juu yia juu yia juu yia juu yia juu yia juu yia juu yia juu yia juu yia juu yia juu yia juu yia juu yia jyu yia juu yia juu yia juu yia juu yia juu yia juu yia juu yia juu yia juu yia juu yia juu yia juu yia juu yia juu yia juu yia juu yia juu yia juu yia juu yia joo yia juu yia juu yia juu yia juu yia juu yia juu yia juu yia juu yia juu yia juu yia juu yia juu yia juu yia juu yia juu yia juu yia juu yia juu yia juu yia j uu yia juu yia juu yia juu yia juu yia juu yia juu yia juu yia juu yia juu yia juu yia juu yia juu yia juu yia juu yia juu yia juu yia juu yia juu yia juu yia jju yia juu yia juu yia juu yia juu yia juu yia juu yia juu yia juu yia juu yia juu yia juu yia juu yia juu yia juu yia juu yia juu yia juu yia juu yia juu yia jsu yia juu yia juu yia juu yia juu yia juu yia juu yia juu yia juu yia juu yia juu yia juu yia juu yia juu yia juu yia juu yia juu yia juu yia juu yia juu yia jqu yia juu yia juu yia juu yia juu yia juu yia juu yia juu yia juu yia juu yia juu yia juu yia juu yia juu yia juu yia juu yia juu yia juu yia juu yia juu yia jingu yia juu yia juu yia juu yia juu yia juu yia juu yia juu yia juu yia juu yia juu yia juu yia juu yia juu yia juu yia juu yia juu yia juu yia juu yia juu yia ju yia juu yia juu yia juu yia juu yia juu yia juu yia juu yia juu yia juu yia juu yia juu yia juu yia juu yia juu yia juu yia juu yia juu yia juu yia juu yia jku yia juu yia juu yia juu yia juu yia juu yia juu yia juu yia juu yia juu yia juu yia juu yia juu yia juu yia juu yia juu yia juu yia juu yia juu yia juu yia jnu yia juu yia juu yia juu yia juu yia juu yia juu yia juu yia juu yia juu yia juu yia juu yia juu yia juu yia juu yia juu yia juu yia juu yia juu yia juu yia jiu yia juu yia juu yia juu yia juu yia juu yia juu yia juu yia juu yia juu yia juu yia juu yia juu yia juu yia juu yia juu yia juu yia juu yia juu yia jUU yia jUU yia jUU yia jUU yia jUU yia jUU yia jUU yia jUU yia jUU yia jUU yia jUU yia jUU yia jUU yia jUU yia jUU yia jUU yia jUU yia jUU yia jUU yia jUU yia juu yia jUU yia jUU yia jUU yia jUU yia jUU yia jUU yia jUU yia jUU yia jUU yia jUU yia jUU yia jUU yia jUU yia jUU yia jUU yia jUU yia jUU yia jUU yia juu yia juu yia juu yia juu yia juu yia juu yia juu yia juu yia juu yia juu yia juu yia juu yia juu yia juu yia juu yia juu yia juu yia juu yia jUU yia jvu yia juu yia juu yia juu yia juu yia juu yia juu yia juu yia juu yia juu yia juu yia juu yia juu yia juu yia juu yia juu yia juu yia juu yia juu yia jUU yia juv yia juu yia juu yia juu yia juu yia juu yia juu yia juu yia juu yia juu yia juu yia juu yia juu yia juu yia juu yia juu yia juu yia juu yia juu yia juu yia jtu yia jtu yia jtu yia jtu yia jtu yia jtu yia jtu yia jtu yia jtu yia jtu yia jtu yia jtu yia jtu yia jtu yia jtu yia jtu yia jtu yia jtu yia jtu yia jtu yia jTU yia jtu yia jtu yia jtu yia jtu yia jtu yia jtu yia jtu yia jtu yia jtu yia jtu yia jtu yia jtu yia jtu yia jtu yia jtu yia jtu yia jtu yia jtu yia jtu yia juu yia juu yia juu yia juu yia juu yia juu yia juu yia juu yia juu yia juu yia juu yia juu yia juu yia juu yia juu yia juu yia juu yia juu yia juu yia jhu yia jhu yia jhu yia jhu yia jhu yia jhu yia jhu yia jhu yia jhu yia jhu yia jhu yia jhu yia jhu yia jhu yia jhu yia jhu yia jhu yia jhu yia jhu yia jhu yia juu yia juu yia juu yia juu yia juu yia juu yia juu yia juu yia juu yia juu yia juu yia juu yia juu yia juu yia juu yia juu yia juu yia juu yia juu yia j'u yia j'u yia j'u yia j'u yia j'u yia j'u yia j'u yia j'u yia j'u yia j'u yia j'u yia j'u yia j'u yia j'u yia j'u yia j'u yia j'u yia j'u yia j'u yia j'u yia jUU yia jUU yia jUU yia jUU yia jUU yia jUU yia jUU yia jUU yia jUU yia jUU yia jUU yia jUU yia jUU yia jUU yia jUU yia jUU yia jUU yia jUU yia jUU yia jU yia jUU yia jUU yia jUU yia jUU yia jUU yia jUU yia jUU yia jUU yia jUU yia jUU yia jUU yia jUU yia jUU yia jUU yia jUU yia jUU yia jUU yia jUU yia jUU yia jIU yia jUU yia jUU yia jUU yia jUU yia jUU yia jUU yia jUU yia jUU yia jUU yia jUU yia jUU yia jUU yia jUU yia jUU yia jUU yia jUU yia jUU yia jUU yia jUU yia jNU yia jUU yia jUU yia jUU yia jUU yia jUU yia jUU yia jUU yia jUU yia jUU yia jUU yia jUU yia jUU yia jUU yia jUU yia jUU yia jUU yia jUU yia jUU yia jUU yia jOO yia jUU yia jUU yia jUU yia jUU yia jUU yia jUU yia jUU yia jUU yia jUU yia jUU yia jUU yia jUU yia jUU yia jUU yia jUU yia jUU yia jUU yia jUU yia jUU yia jLU yia jUU yia jUU yia jUU yia jUU yia jUU yia jUU yia jUU yia jUU yia jUU yia jUU yia jUU yia jUU yia jUU yia jUU yia jUU yia jUU yia jUU yia jUU yia jUU yia jAU yia jUU yia jUU yia jUU yia jUU yia jUU yia jUU yia jUU yia jUU yia jUU yia jUU yia jUU yia jUU yia jUU yia jUU yia jUU yia jUU yia jUU yia jUU yia jUU yia jGU yia jUU yia jUU yia jUU yia jUU yia jUU yia jUU yia jUU yia jUU yia jUU yia jUU yia jUU yia jUU yia jUU yia jUU yia jUU yia jUU yia jUU yia jUU yia jUU yia jMU yia jUU yia jUU yia jUU yia jUU yia jUU yia jUU yia jUU yia jUU yia jUU yia jUU yia jUU yia jUU yia jUU yia jUU yia jUU yia jUU yia jUU yia jUU yia jUU yia j/U yia jUU yia jUU yia jUU yia jUU yia jUU yia jUU yia jUU yia jUU yia jUU yia jUU yia jUU yia jUU yia jUU yia jUU yia jUU yia jUU yia jUU yia jUU yia jUU yia jSU yia jUU yia jUU yia jUU yia jUU yia jUU yia jUU yia jUU yia jUU yia jUU yia jUU yia jUU yia jUU yia jUU yia jUU yia jUU yia jUU yia jUU yia jUU yia jUU yia j### |
Thank you for buying a Bosch Home Appliance!
Register your new device on MyBosch now and profit directly from:
- Expert tips & tricks for your appliance
- Warranty extension options
- Discounts for accessories & spare-parts
- Digital manual and all appliance data at hand
- Easy access to Bosch Home Appliances Service
Free and easy registration - also on mobile phones:
www.bosch-home.com/welcome

Looking for help? You'll find it here.
Expert advice for your Bosch home appliances, need help with problems or a repair from Bosch experts.
Find out everything about the many ways Bosch can support you:
www.bosch-home.com/service
Contact data of all countries are listed in the attached service directory.
BSH Hausgeräte GmbH
Carl-Wery-Straße 34
81739 München, GERMANY
A Bosch Company
www.bosch-home.com

8001147471
(010818)
Valid within Great Britain:
Imported to Great Britain by
BSH Home Appliances Ltd.
Grand Union House
Old Wolverton Road
Wolverton, Milton Keynes
MK12 5PT
United Kingdom
A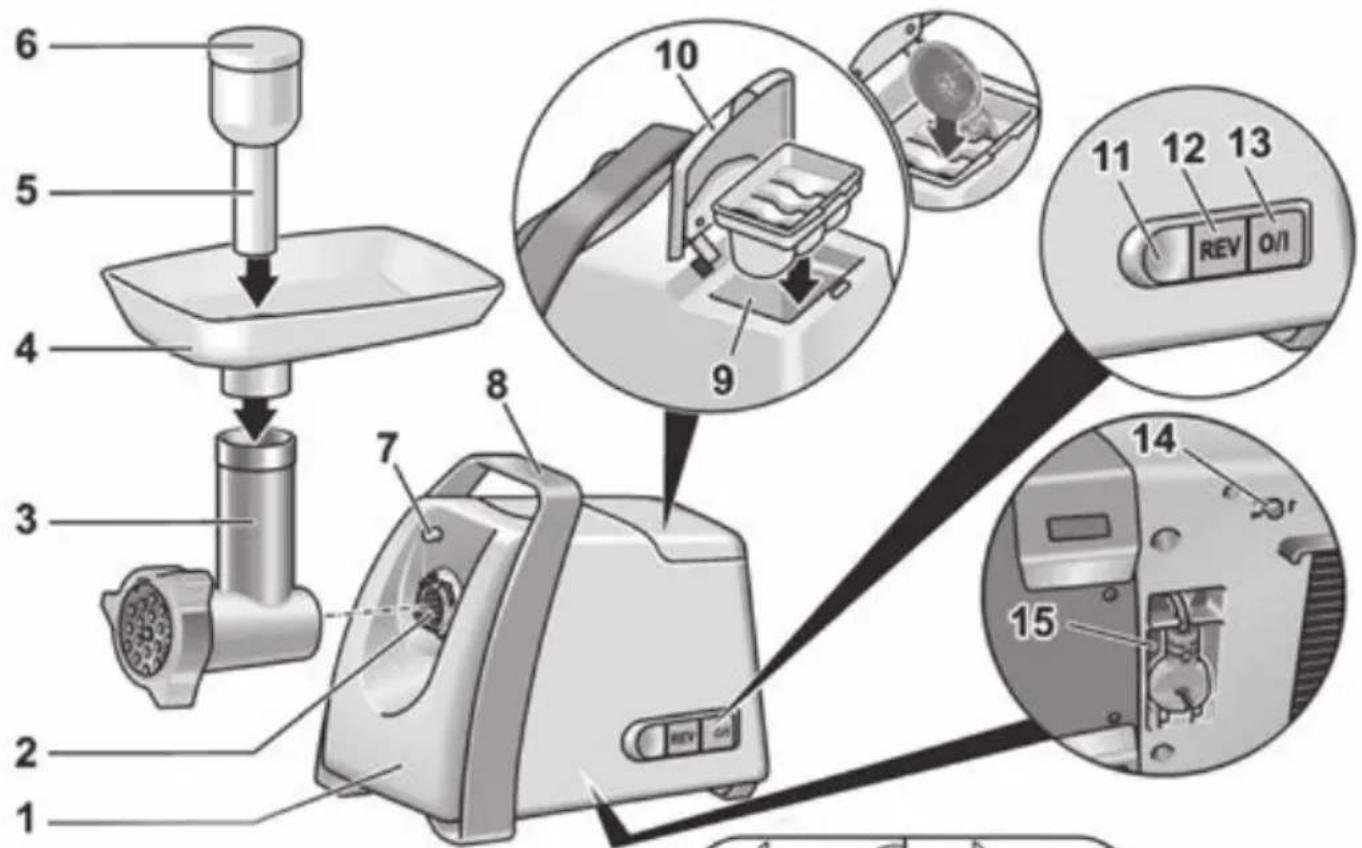



- IMPORTANT SAFETY INFORMATION
- RISK OF ELECTRIC SHOCK AND FIRE
- RISK OF INJURY
- CAUTION
- RISK OF SUFFOCATION
- IMPORTANT
- CONTENTS
- OVERVIEW
- SAFETY DEVICES
- PREDETERMINED BREAKING POINT
- OPERATION
- →FIG. B
- ASSEMBLING THE MINCER ATTACHMENT
- → FIG
- RECESS ON THE PERFORATED DISC MUST BE SITUATED ON THE LUG IN THE HOUSING
- USE FOR
- ASSEMBLING SAUSAGE FILLER ATTACHMENT
- → FIG. ①
- ASSEMBLING KEBBE ATTACHMENT
- OPERATING THE APPLIANCE
- △ RISK OF INJURY
- →FIG. F
- APPLICATION INSTRUCTIONS
- AFTER USING THE APPLIANCE
- FRUIT PRESS ATTACHMENT
- (SOME MODELS)
- WARNING
- SEE FIG
- SHREDDING ATTACHMENT
- FIG. H
- NOTE
- CLEANING AND SERVICING
- IMPORTANT INFORMATION
- ELECTRIC SHOCK RISK
- CLEANING THE APPLIANCE
- CLEANING THE ATTACHMENTS
- TROUBLESHOOTING
- FAULT
- CAUSE
- REMEDIAL ACTION
- RECIPES AND TIPS
- MINCER ATTACHMENT
- BREAD DUMPLINGS
- PROCESSING INGREDIENTS
- GROUND CHEESE
- BASIC RECIPE
- MINCED MEAT ROLLS WITH GOUDA
- SAUSAGE FILLER ATTACHMENT
- KEBBE ATTACHMENT
- RECIPE FOR STUFFED KEBBE
- DOUGH POCKET
- FILLING
- PREPARING THE KEBBE
- DISPOSAL
- GUARANTEE
- CORRECT USE
- GRATER ATTACHMENT
- SAFETY EQUIPMENT
- OVERLOAD PROTECTION (THERMAL PROTECTION SWITCH)
- COARSE GRATING INSERT
- RECOMMENDED USAGE
- AFTER USE
- CHOPPER/GRINDER ATTACHMENT
- SAFETY INSTRUCTIONS
- →FIGURE H
- CLEANING AND MAINTENANCE
- SAFETY WHEN WORKING WITH ELECTRIC CURRENT
- CURRENT
- ATTENTION
- CLEANING ACCESSORIES
- SAUSAGE ATTACHMENT
- FILLING FOR TUBES
- FORMING THE KEBAB
- NOZZLE FOR COOKIES
- INSERT FOR SLICING
- WARRANTY CONDITIONS
- INTENDED USE
- IMPORTANT SAFETY INSTRUCTIONS
- DANGER OF ELECTRIC SHOCK AND FIRE
- DANGER OF INJURY
- DANGER OF BURNS
- SAFETY SYSTEMS
- OVERLOAD PROTECTION
- →FIGURE
- APPLICATION
- ASSEMBLING THE "SAUSAGE FILLER" ATTACHMENT
- →FIGURE D
- ASSEMBLY OF THE “KEBBE” ATTACHMENT
- INSTRUCTIONS FOR USE
- AFTER WORK
- IMPORTANT NOTE
- DANGER OF ELECTRIC SHOCK
- NEVER IMMERSE THE MAIN UNIT IN LIQUID. DO NOT WASH IT IN A DISHWASHER
- DO NOT USE ABRASIVE CLEANING AGENTS. THE SURFACE OF THE DEVICE MAY BE DAMAGED. PARTS MADE OF ALUMINUM (HOUSING, SHAFT AND RING OF THE THREADED ATTACHMENT FOR THE MEAT GRINDER) SHOULD NOT BE WASHED IN A DISHWASHER. OVER TIME, HARMLESS STAINS MAY APPEAR
- UNPLUG THE DEVICE FROM THE POWER OUTLET. WIPE THE DEVICE WITH A DAMP CLOTH. IF NECESSARY, USE A LITTLE DISHWASHING LIQUID
- RINSE THE HOUSING, SHAFT AND RING OF THE THREADED ATTACHMENT FOR THE MEAT GRINDER. IMMEDIATELY WIPE THE METAL PARTS DRY AND LIGHTLY OIL THEM WITH EDIBLE OIL TO PREVENT RUST
- REMEDY
- RECIPES AND RECOMMENDATIONS
- WASTE DISPOSAL ATTACHMENT
- MOULDING DISC, FINE, 3 MM/3.8 MM
- MOLDING DISC, MEDIUM, 4.8 MM: PORK AND BEEF FOR PATE AND CERVELAT
- PROCESSING OF INGREDIENTS
- BLENDER
- ROUND-THE-CLOCK SERVICE HOTLINE*: 8 (800)
- ACCESSORIES AND CARE PRODUCTS
- MANUFACTURER'S WARRANTY
- ATTENTION! IMPORTANT NORM FOR THE CONSUMER
- SERVICE INFORMATION
- INFORMATION ABOUT HOUSEHOLD APPLIANCES MANUFACTURED UNDER THE CONTROL OF THE CONCERN BSH HAUSGERÄTE GMBH, CARL-WERY-STR. 34, 81739 MUNICH, GERMANY, IN ACCORDANCE WITH THE REQUIREMENTS OF TECHNICAL REGULATION LEGISLATION AND CONSUMER PROTECTION LEGISLATION OF THE RUSSIAN FEDERATION
- IIL
- THANK YOU FOR BUYING A BOSCH HOME APPLIANCE
- LOOKING FOR HELP? YOU'LL FIND IT HERE
Brand : BOSCH
Model : ProPower MFW66020
Category : Meat Grinder