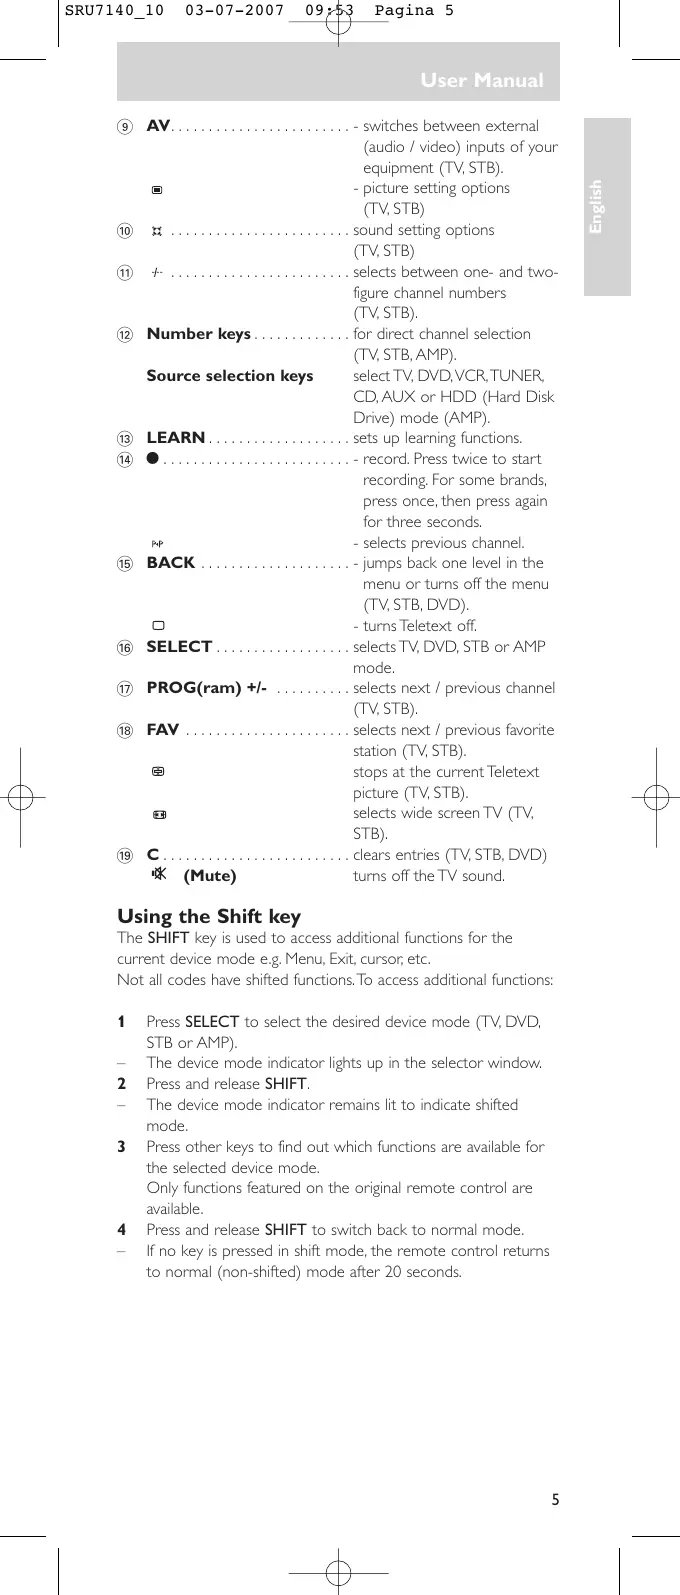
USER MANUAL SRU7140 PHILIPS
Register your product and get support at
SRU 7140
www.philips.com/welcome
| EN | User Manual | 4 |
| FR | Manuel d’utilisation | 11 |
| DE | Bedienungsanleitung | 18 |
| NL | Gebruikershandleiding | 25 |
| DK | Brugervejledning | 32 |
| SV | Använderhandbok | 39 |
| NO | Brukerhändbok | 46 |
| SU | Käyttöohje | 53 |
| IT | Manuale d'uso | 60 |
| ES | Guía de usuario | 67 |
| PR | Manual do utilizador | 74 |
| GR | Οδηγίες χρήσεως | 81 |
| RU | Руководство по эксплуатации | 88 |
| TR | Kullanım kılavuzu | 95 |
Quick, Clean & Easy Setup
www.philips.com/urc
PHILIPS
Your Remote Control
Congratulations on your purchase and welcome to Philips!
To fully benefit from the support that Philips offers, register your product at www.philips.com/welcome
| DIGIT | TV | VCR/DVD | CABLE/SAT |
| 1 | PHILIPS | PHILIPS | PHILIPS |
| 2 | SONY, AKAI, PANASONIC, SHARP, TOSHIBA, JVC, DAEWOO | SONY, AKAI, PANASONIC, SHARP, TOSHIBA, JVC, DAEWOO | PACE, ECHOSTAR |
| 3 | THOMSON, BRANDT | THOMSON, BRANDT | THOMSON, UNIVERSUM, LASAT |
| 4 | FERGUSON, BAIRD, TELEFUNKEN, SABA, NORMENDE | FERGUSON, TELEFUNKEN, SABA, NORMENDE | FERGUSON, TELEFUNKEN, SABA, NORMENDE |
| 5 | GRUNDIG, BLAUPUNKT | GRUNDIG, BLAUPUNKT | GRUNDIG |
| 6 | NOKIA, FINLUX, ITT, LUXOR, DANTAX, BEKO, PROSONIC | NOKIA, FINLUX, ITT | NOKIA, FINLUX, ITT, HIRSCHMANN |
User Manual
Table of contents
- Introduction ...... 4
- Key functions 4-5
- Installing the remote control 6-7
Inserting the batteries 6
Setting the remote control 6-7
- Advanced features 8-9
Volume control punch through....8
Code learning 8-9
Clearing all learned functions for a device mode ....9
- Troubleshooting 10
- Information for the consumer ....102
1. Introduction
Congratulations on your purchase of this Philips universal remote control. After installing the remote control it can operate the most commonly-used functions of almost any brand of TV, DVD player/recorder, video recorder, amplifier/receiver, CD player and STB (set-top box, satellite or cable decoder).
You can find information about how to prepare this remote control for use in the section ‘Installing the remote control’.
2. Key functions
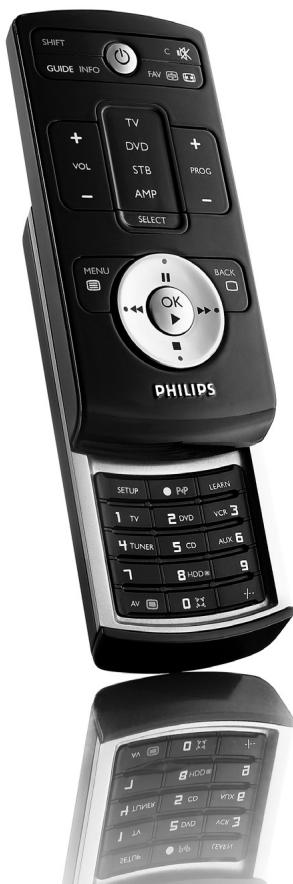
The illustration on page 3 gives an overview of all the keys and their functions. This remote control can only operate features that are installed on your devices.
General controls
① ⏻ (Standby) .... turns TV, DVD player/ recorder; video recorder; amplifier/receiver, CD player or STB (set-top box, satellite or cable decoder) on or off.
② SHIFT...... accesses extra functions.
③ GUIDE ...... - displays Electronic Program Guide (TV, STB).
INFO - displays on-screen channel information (TV, STB, DVD).
④ VOL(ume) +/- ...... changes the volume level of the TV.
⑤ MENU.... - displays the menu screen.
- turns Teletext on (TV, STB).
⑥ Cursor keys. . . . . . . . . . . - cursor up, down, left, right in a menu.
VCR/DVD control keys - operate your VCR / DVD even when TV is selected.
- pause.
- rewind / wind
- stop.
⑦ OK - confirms your selection.
▶ - play (VCR, DVD).
⑧ SETUP ....used to set up the remote control.
User Manual
⑨ AV.... switches between external (audio / video) inputs of your equipment (TV, STB).
- picture setting options (TV, STB)
⑩ ✗ sound setting options (TV, STB)
⑪ +...... selects between one- and two-figure channel numbers (TV, STB).
⑫ Number keys....for direct channel selection (TV, STB, AMP).
Source selection keys select TV, DVD, VCR, TUNER, CD, AUX or HDD (Hard Disk Drive) mode (AMP).
⑬ LEARN......sets up learning functions.
14 ● .... record. Press twice to start recording. For some brands, press once, then press again for three seconds.
P•P - selects previous channel.
⑮ BACK ....- jumps back one level in the menu or turns off the menu (TV, STB, DVD).
- turns Teletext off.
⑯ SELECT .... selects TV, DVD, STB or AMP mode.
⑰ PROG(ram) +/- . . . . . . . . . selects next / previous channel (TV, STB).
⑱ FAV . . . . . . . . . . . . . . . . . . . . . . . . . . . . . . . . . . . . . . . . . . . . . . . . . . . . . . . . . . . . . . . . . . . . . . . . . . . . . . . . . . . . . . . . . . . . . . . . . . . . selects next / previous favorite station (TV, STB).
stops at the current Teletext picture (TV, STB).
selects wide screen TV (TV, STB).
⑲ C .... clears entries (TV, STB, DVD)
※ (Mute) turns off the TV sound.
Using the Shift key
The SHIFT key is used to access additional functions for the current device mode e.g. Menu, Exit, cursor, etc.
Not all codes have shifted functions. To access additional functions:
1 Press SELECT to select the desired device mode (TV, DVD, STB or AMP).
– The device mode indicator lights up in the selector window.
2 Press and release SHIFT.
- The device mode indicator remains lit to indicate shifted mode.
3 Press other keys to find out which functions are available for the selected device mode.
Only functions featured on the original remote control are available.
4 Press and release SHIFT to switch back to normal mode.
- If no key is pressed in shift mode, the remote control returns to normal (non-shifted) mode after 20 seconds.
Installing the remote control
Inserting the batteries
1 On the remote control bottom part you will find a little recess. Place a finger(nail) in the recess and pull out the battery compartment.
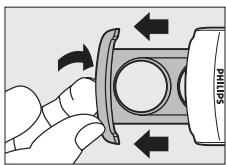
2 Place two CR2032 Lithium batteries into the battery compartment as shown. Make sure to place the text side of the batteries upwards.
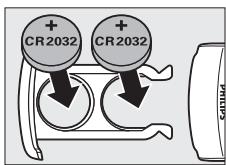
3 Slide the compartment back and click it firmly into place.
Notes:
- The remote control automatically turns off if buttons are pressed for more than 30 seconds.
- Codes are stored in the remote control memory while you are changing batteries so you will not lose any codes.
Setting the remote control
This is only necessary if your device does not respond to the SRU7140. If that is the case, the SRU7140 does not recognize the brand and / or model of your device and you need to program the remote control to do so.
You can set up the remote control either by entering the code for your brand of device directly, or by searching through the library of codes until you find a code that works for your device.
You can store any kind of code under any device mode (except TV). E.g. you can store a VCR code under AMP, or a DVD code under STB, etc. However, you can only store TV codes under TV. Setting a device mode with any code will automatically delete any previously learned commands for that device mode.
Manual code entry
1 Look up the brand of your device in the code list (separate sheet). One or more codes are shown for each brand. Make a note of the first code.
2 Manually switch on the device.
3 Press SELECT to select the desired device mode (TV, DVD, STB or AMP).
— The device mode indicator lights up in the selector window.
4 Press and hold SETUP until the device mode indicator blinks and then remains lit, then release the key.
5 Use the number keys to enter the 4 digit code, noted in step 1.
- After a valid code entry, the indicator turns off. If the code is invalid, the indicator flashes.
6 Point the remote control at the device and check that it responds as it should.
- If the device responds, no further programming is required. The remote control is now ready to operate your device.
7 Make a note of your code!
- If some buttons do not operate your device, try one of the other codes for your brand.
Code Search
If your device does not respond after you have tried all the codes for your brand, or if your brand is not listed, try searching for your code using code search. Code Search starts from the currently stored code.
Automatic Code Search
The remote control will automatically search for the right code for your device.
1 Manually turn on the device.
2 Press SELECT to select the desired device mode (TV, DVD, STB or AMP).
— The device mode indicator lights up in the selector window.
3 Press and hold SETUP until the device mode indicator blinks and then remains lit, then release the key.
4 Press and release PROG + once.
- The remote control now starts emitting all known Program + commands to your device one by one. The device mode indicator turns off with each command sent.
- If the device does not use a PROG+ key then the ⏻ (Standby) key can be used instead.
- If you accidentally go past the code required, press PROG - to go back until the device responds.
5 Press and release ✗ (Mute) to install the code.
- When all the codes for a specific brand have been searched the device mode indicator blinks rapidly for 3-seconds.
Programming with Brand Search
Allows you to search for a code for a specific brand in the code library for a particular manufacturer.
• You can find the table of the code library on page 2.
1 Manually turn on the device.
2 Press SELECT to select the desired device mode (TV, DVD, STB or AMP).
— The device mode indicator lights up in the selector window.
3 Press and hold SETUP until the device mode indicator blinks and then remains lit, then release the key.
4 Press the numeric key (1-6) corresponding to the desired brand (see table).
- Pressing '0' performs Code Search as described before.
5 Press and release PROG + (or ▶ (in case of VCR) or ⏻) repeatedly until the device responds.
— The device mode indicator turns off with each command sent.
- If you accidentally go past the code required, press PROG - to go back until the device responds.
6 Press and release ✉ (Mute) to install the code.
- When all the codes for a specific brand have been searched the device mode indicator blinks rapidly for 3-seconds.
Programming combo device codes
Some combo devices (e.g. TV/VCR, TV/DVD, DVD/VCR, etc.) require you to set up two different source selection keys to control both parts of the combo device. For example, if you have a TV/DVD combo, you might need to set up one code under the TV key to control the TV and a separate code under the DVD key to control the DVD.
Advanced features
Volume control punch through
In most home entertainment systems, the volume is controlled by one device only (usually TV or amplifier). This means you always have to switch to TV or AMP mode to adjust the volume of any other device.
If the sound comes from e.g. the TV speakers, the remote control should be in TV mode to adjust the volume of e.g. the set-top box.
The 'Volume control punch through' feature enables you to set the remote control's VOL +/- and ✗ (Mute) keys to also adjust the sound of other devices in your system, even those that do not have a volume control of their own.
1 First decide which source selection key you wish to set up for volume control (e.g. AMP).
2 Press SELECT to select the device mode to set for volume control (TV, DVD, STB or AMP).
– The device mode indicator lights up in the selector window.
3 Press and hold SETUP until the device mode indicator blinks and then remains lit, then release the key.
4 Press and hold ✕ (Mute) until the device mode indicator blinks once, then release the key.
5 Press and release ✉ (Mute).
– The device mode indicator turns off.
– All other devices will now punch-through to the selected source (AMP) for volume/mute control.
- The indicator blinks rapidly for 3 seconds if the source you have selected has no volume/mute control.
- Reset Volume/Mute control to factory default by repeating above sequence.
Code learning
If you miss certain functions from your original remote control, this remote control can learn these functions from the original remote control.
Tips on learning functions
- Only one original remote type should be learned per individual mode.
- First clear all learned functions for a device mode (TV, DVD, STB or AMP) to make sure there are no previously learned functions for that mode. For this, refer to 'Clearing all learned functions for a device mode'.
- Place the remote controls head-to-head so the IR transmission LED's on both remote controls are directly in line with each other. You may need to adjust the height of either remote to achieve this.
- Do not move or change the distance between the remote controls while learning.
- You can store a function under any of the available keys, except under LEARN, SELECT, SHIFT and SETUP.
- Some functions of some types of remote control might not be learned.
- Use fresh batteries for both the learning and the original remote control.
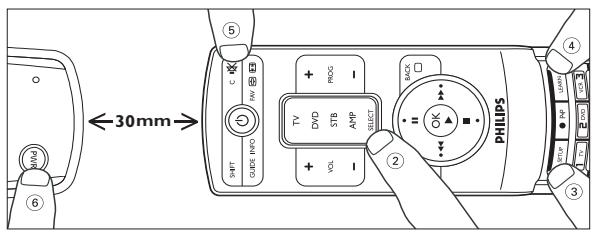
1 Place both remote controls on a flat surface (like a coffee table) and aim them head-to-head with about 30 mm in between. You may need to adjust the height of one of the remote controls to achieve this.
2 Press SELECT to select the desired device mode (TV, DVD, STB or AMP).
— The device mode indicator lights up in the selector window.
3 Press and hold SETUP until the device mode indicator blinks and then remains lit, then release the key.
4 Press LEARN.
— The device mode indicator blinks once, then remains lit.
5 Press the key you wish to learn a new function to (target key). E.g. ⏻ (Standby).
For additional (shifted) functions, first press SHIFT, then press the function key. See 'Using the SHIFT key'.
6 Press and hold the key you wish to copy on the original remote control (learn key, e.g. POWER) until the device mode indicator blinks once and then remains lit.
- If there is a learning problem, the indicator blinks for 3 seconds and then remains lit.
If this happens, repeat steps 5 to 6.
7 Repeat steps 5 to 6 for other functions from the selected device you wish to learn to this remote control.
8 Press and release SETUP when all desired functions are learned. Code learning is now complete.
9 Repeat above steps for other devices you wish your remote control to learn from.
Clearing all learned functions for a device mode
1 Press SELECT to select the device mode (TV, DVD, STB or AMP) of which you wish to clear all learned functions.
– The device mode indicator lights up in the selector window.
2 Press and hold SETUP until the device mode indicator blinks and then remains lit, then release the key.
3 Press and release LEARN twice.
– The device mode indicator blinks.
4 Press and release digit key 1.
- The device mode indicator turns off and all learned functions for this mode are now cleared from the remote control memory.
User Manual
English
Troubleshooting
| Problem | Solution |
| Remote control does not operate your product. | Learn the device button for the product to operate the required functions of the product.See 'Code learning'.Program the remote control with a new code.Install new batteries (you might have to reprogram your remote control after installing new batteries). |
| Remote control does not operate some features of your product. | Remote control may not be compatible with your product.Program the remote control with a new code. |
| Device mode indicator blinks for 3 seconds after you program a product code. | Remote control may not be able to operate all features of your product or key names might be different than on your product.Remote control did not accept the code.Try to program the code again or try a different code. |
Sommaire
Kodeinnhenting 50-51
Disposal of your old product
Your product is designed and manufactured with high quality materials and components, which can be recycled and reused.
When this crossed-out wheeled bin symbol is attached to a
product it means the product is covered by the European Directive 2002/96/EC.
Please inform yourself about the local separate collection system for electrical and electronic products.
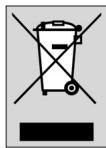
Please act according to your local rules and do not dispose of your old products with your normal household waste.
The correct disposal of your old product will help prevent potential negative consequences for the environment and human health.
Guarantee certificate
Certificat de garantie
Garantieschein
Garantiebewijs
Garantibevis
Garanticertifikat
Garantibevis
Takuutodistus
Certificato di
garanzia
Certificado de
garantia
Certificado de
garantia
Εγγύηση
Гарантия
Garanti belgesi

year
année
Jahr
jaar
ano
år
vuosi
año
anno
χρόνος
ГОД
sene
warranty
garantie
Garantie
garantie
garantia
garanti
takuu
garantía
garanzia
εγγύηση
гарантия
garanti
Type:
Serial nr.:
Date of purchase - Date d'achat - Kaufdatum - Koopdatum - Inköpsdat - Køpedatum - Kjøpedato - Ostopäivä -
Dealer's name, address and signature