
G935 - Headphones LOGITECH - Free user manual and instructions
Find the device manual for free G935 LOGITECH in PDF.
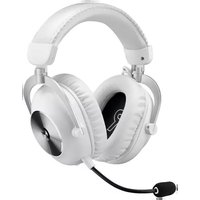
| Product type | Wireless gaming headset |
| Brand | Logitech |
| Model | G935 |
| Power | Integrated rechargeable battery, up to 12 hours battery life (lights off) / 8 hours (default lighting), full charge in about 3.5 hours |
| Audio transducers | Pro-G (40 mm) |
| Surround sound | 7.1 (via Logitech G HUB software) |
| Microphone | Retractable with automatic mute when raised |
| Programmable buttons | G1, G2, G3 (customizable via Logitech G HUB) |
| Volume wheel | Integrated on the earcup |
| RGB lighting | LIGHTSYNC, two zones (G logo and band) |
| Wireless connectivity | Wireless USB adapter, range up to 15 m |
| Wired connectivity | 3.5 mm jack input |
| Charging port | Micro-USB |
| Included accessories | USB/micro-USB cable (2 m), 3.5 mm cable (1.5 m), wireless USB adapter, removable custom stickers |
| Compatibility | PC, PlayStation 4/5, Nintendo Switch, Xbox One (3.5 mm cable), mobile devices |
| Software | Logitech G HUB (audio, lighting, button customization) |
| Ear cushion maintenance | Removable and washable with clean water, air dry |
| Approximate weight | 379 g (without cable) |
| Dimensions (L x W x H) | approximately 19 x 10 x 22 cm |
| Warranty | 2 years (depending on country) |
Frequently Asked Questions - G935 LOGITECH
User questions about G935 LOGITECH
0 question about this device. Answer the ones you know or ask your own.
Ask a new question about this device
Download the instructions for your Headphones in PDF format for free! Find your manual G935 - LOGITECH and take your electronic device back in hand. On this page are published all the documents necessary for the use of your device. G935 by LOGITECH.
USER MANUAL G935 LOGITECH
natural_image
Black and white photo of a Logitech 3G headset with blue accent highlights (no text or symbols visible)
logitech™
M/N: A-00079, A-00080
CONTENTS
English .....3 Español .....35
natural_image
Pure electrical circuit lines without any symbols- Charging cable (USB to Micro-USB, 2m)
- 3.5mm cable (1.5m)
3 ENGLISH
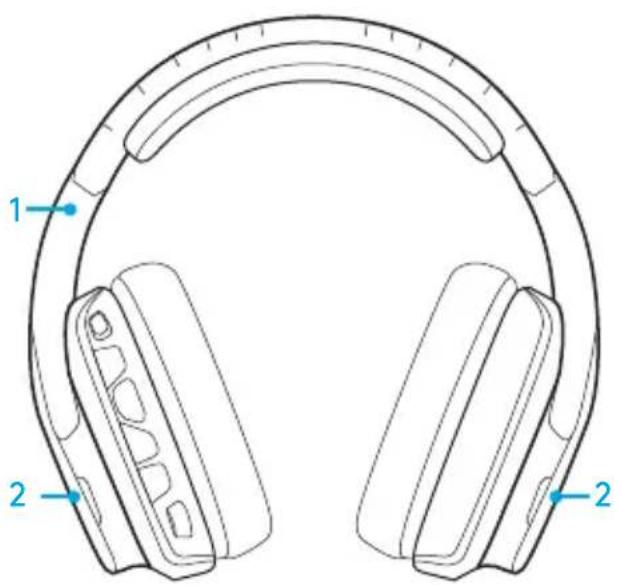
FEATURES
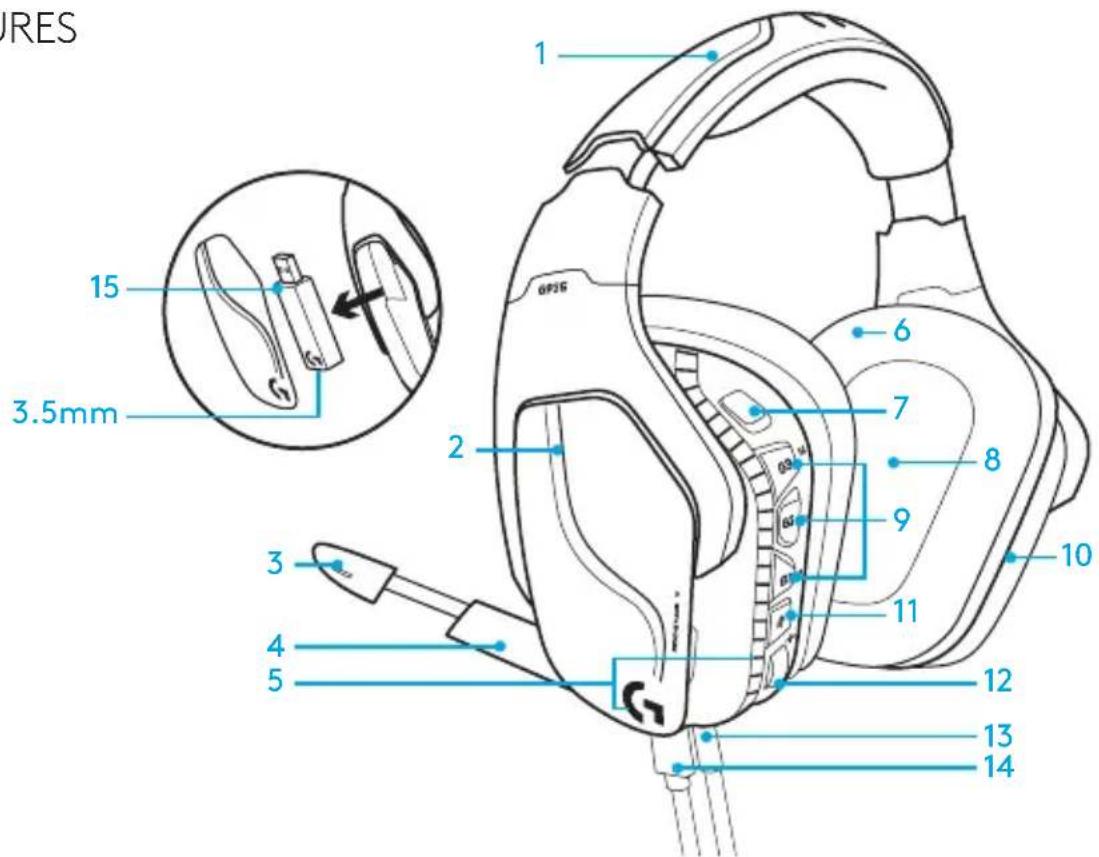
- Adjustable padded leatherette headband
- Removable backlit custom tags
- Boom mic mute indicator LED
- Retractable boom microphone Automatically mutes in "up" position
- Lighting zones (G logo + light strip)
- Wipeable leatherette earpads
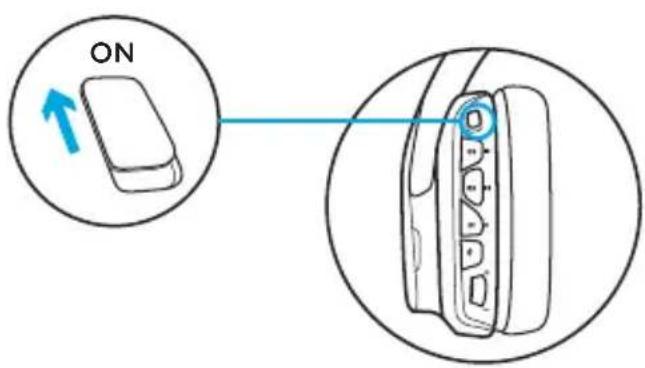
- Wireless On/Off switch
-
Pro-G Audio Drivers
-
Programmable buttons (G1/G2/G3)
- Battery housed in earcup
- Microphone Mute
- Volume Wheel
- 3.5mm (mobile) connection
- USB charging connection
- USB Wireless Adapter
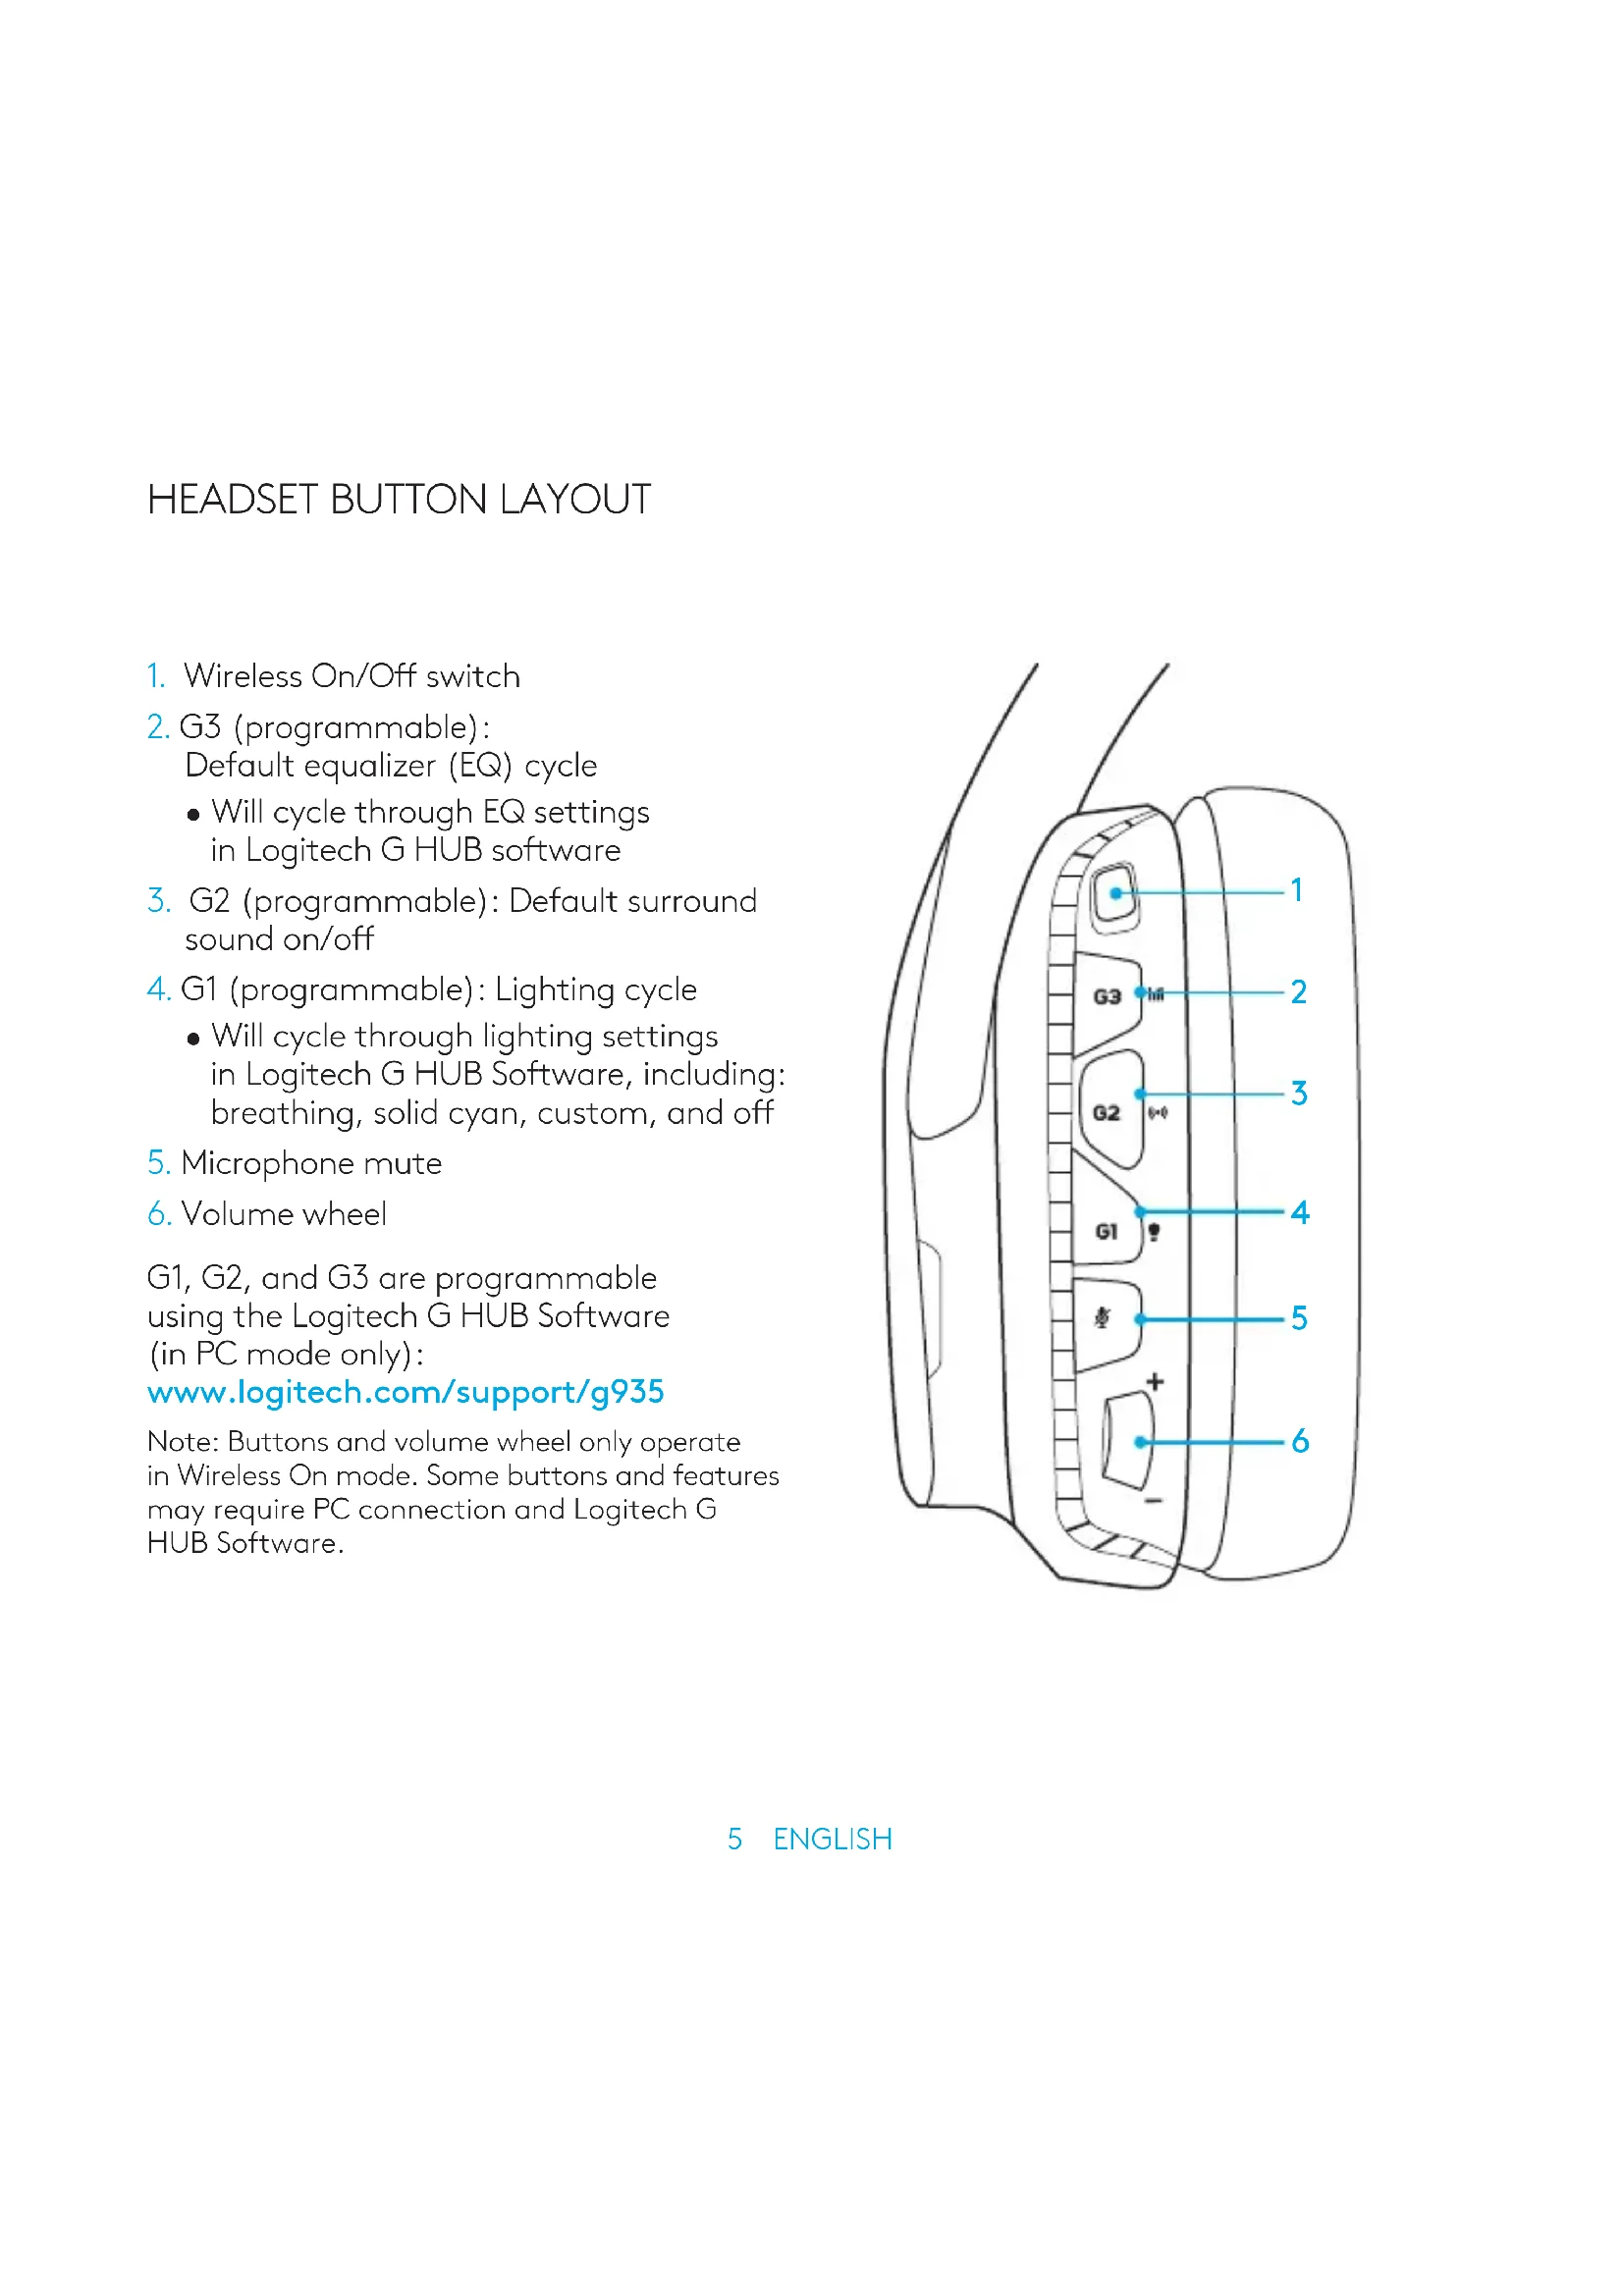
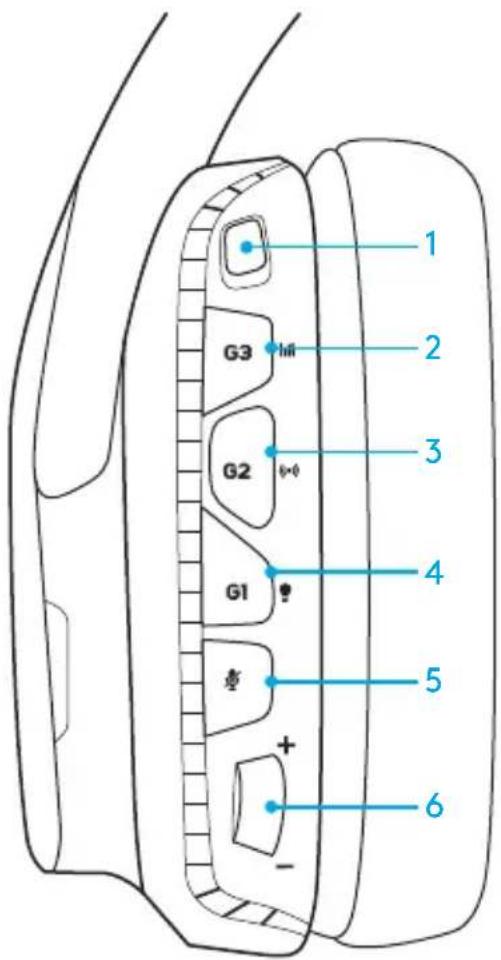
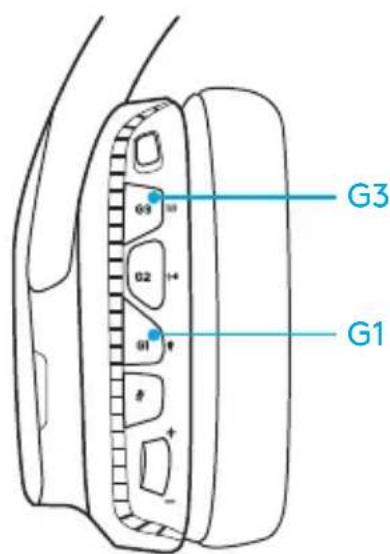
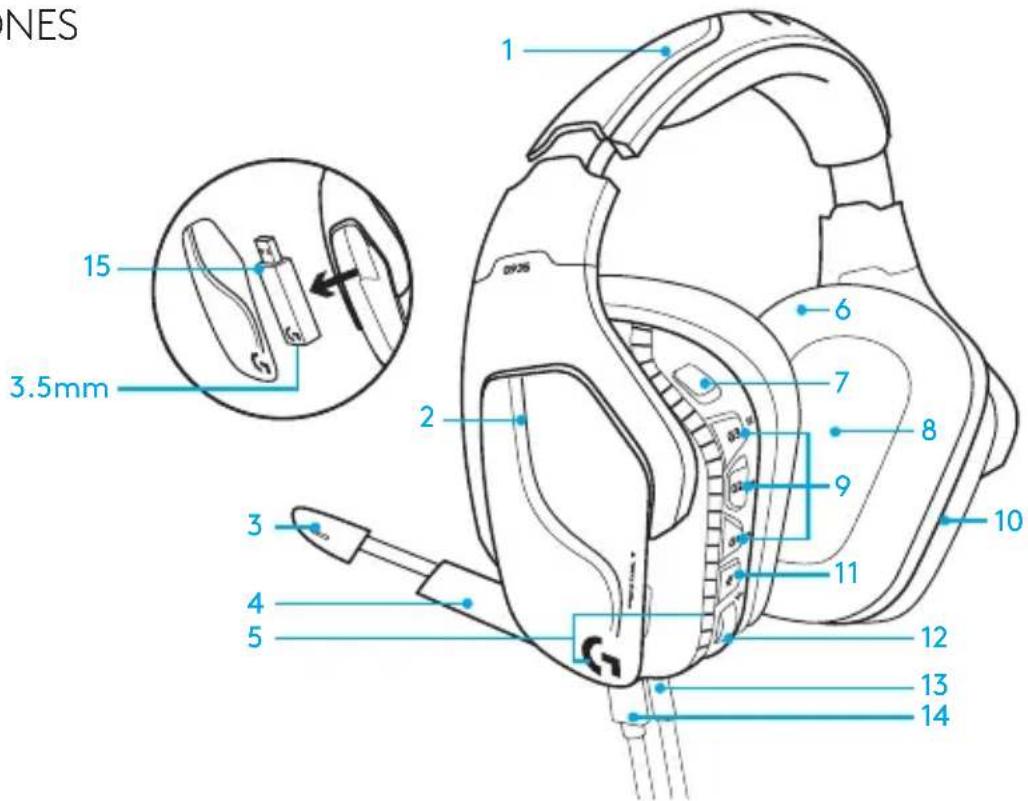
HEADSET BUTTON LAYOUT
- Wireless On/Off switch
- G3 (programmable): Default equalizer (EQ) cycle
- Will cycle through EQ settings in Logitech G HUB software
- G2 (programmable): Default surround sound on/off
- G1 (programmable): Lighting cycle
- Will cycle through lighting settings in Logitech G HUB Software, including: breathing, solid cyan, custom, and off
- Microphone mute
- Volume wheel
G1, G2, and G3 are programmable using the Logitech G HUB Software (in PC mode only):
www.logitech.com/support/g935
Note: Buttons and volume wheel only operate in Wireless On mode. Some buttons and features may require PC connection and Logitech G HUB Software.
BATTERY MANAGEMENT
G935 wireless headset is powered via a battery housed in the right earcup. When you are not using your G935 wireless headset, plug it in via the USB port on the bottom of the unit to charge. When fully depleted, the battery takes approximately 3.5 hours to reach full charge on standard USB output. For the optimal experience, plug in your unit and allow it to charge fully before first use.
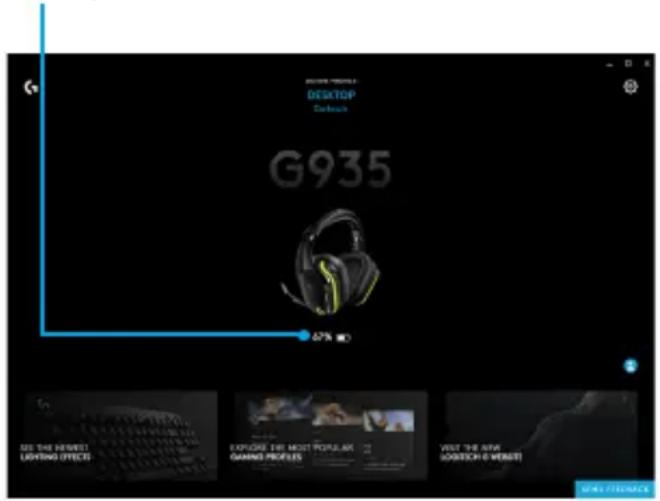
Logitech G HUB Software
The home screen in Logitech G HUB Software has a battery charge level indicator:
When using battery, this will indicate charge level
This indicates the unit is charging
Critical Battery Warning
G935 gaming headset will play a tone at low charge. The headset's lighting will also dim when at low charge. At critical charge level, the unit will play a tone and lighting will turn off. Use USB charging cable to plug in headset immediately if you hear these tones to ensure uninterrupted listening or gaming.
Charge indicator
IDLE SLEEP MODE ON/OFF TONES AND LIGHTS
G935 will go into sleep mode to conserve battery power when it has not received an audio signal in 15 minutes.
In idle sleep mode, the unit's lighting will change to the breathing mode, and it will disconnect from the USB wireless adapter.
Your G935 will wake up from sleep mode if you press a button on the headset.
After 30 minutes in sleep mode your headset will fully power off in order to conserve your battery. In order to wake up your headset you will need to move the power switch to the off position and then back to the on position. If you plan to leave your headset idle for an extended period of time, turn off your headset and plug it in via USB to charge.
When your headset is turned on, it will play a tone to indicate that your headset has turned on. The lights will perform a power on light cycle sequence, then switch to the currently selected lighting.
When the unit is turned off, lights will switch to blue and fade out while it powers down.
WIRELESS ON/OFF
G935 has two operation modes, Wireless On, and Wireless Off.
Wireless On
In Wireless On mode, most headset features are available ^1 , including custom sound profiles, RGB lighting, microphone, mic mute, wireless, and audio mixing. When battery charge is low, lighting will dim and low battery notification tone will play. When battery charge level is critical, lighting will turn off.
Wireless range ^2
Indoor: 15 meters
Battery life ^3
No lighting: 12 hours
Default lighting: 8 hours
1 Some features may require Logitech G HUB Software.
2 Range may vary with environmental conditions.
3 Rechargeable batteries have a limited number of charge cycles. Battery life measured at 50% volume.
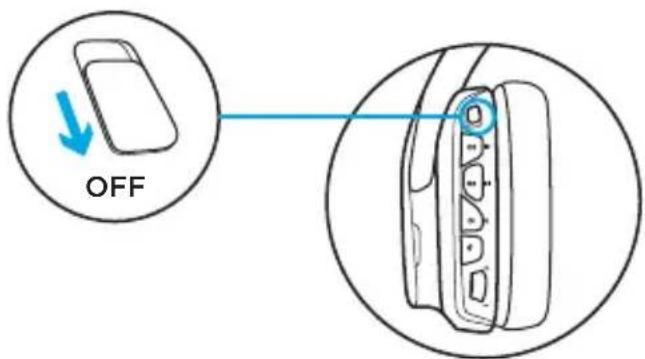
Wireless Off (passive mode)
In Wireless Off (passive mode), your headset will operate in passive unpowered mode. Your headset will play audio from any device connected through the 3.5mm input on the headset.
Features that require power, including 7.1 surround sound, custom sound profiles, on-headset buttons, volume wheel operation, and button/lighting customization functions are not available in this mode.
Boom mic is not available for devices connected through the on-headset 3.5mm audio port in this mode.
This mode can be used to preserve battery life.
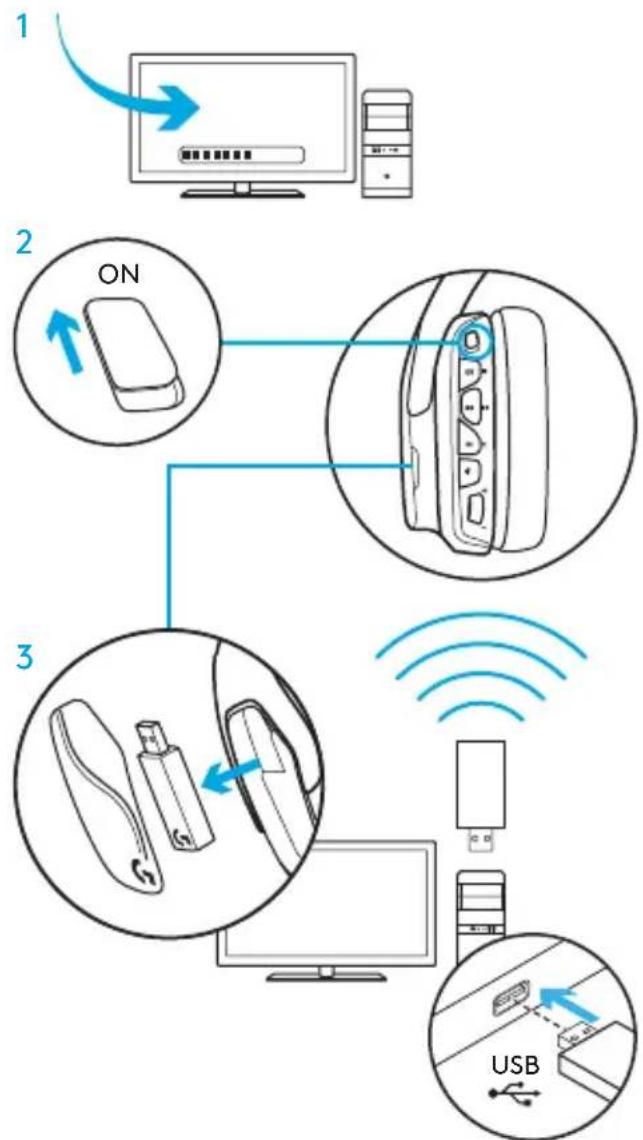
SETUP FOR PC (PC MODE)
- Download and install Logitech G HUB: www.logitech.com/support/g935
- Set switch to Wireless On position.
- Connect USB Wireless Adapter to PC. Headset will automatically connect.
Mixing audio sources
While connected via USB Wireless Adapter, the G935 can also use the 3.5mm cable to connect to another audio source (ex. smartphone). Both audio sources can be played simultaneously.
flowchart
graph TD
    A["Computer"] -->|1| B["Switch"]
    B --> C["Router"]
    C --> D["USB"]
    D --> E["USB"]
    style A fill:#f9f,stroke:#333
    style B fill:#ccf,stroke:#333
    style C fill:#cfc,stroke:#333
    style D fill:#fcc,stroke:#333
    style E fill:#ffc,stroke:#333
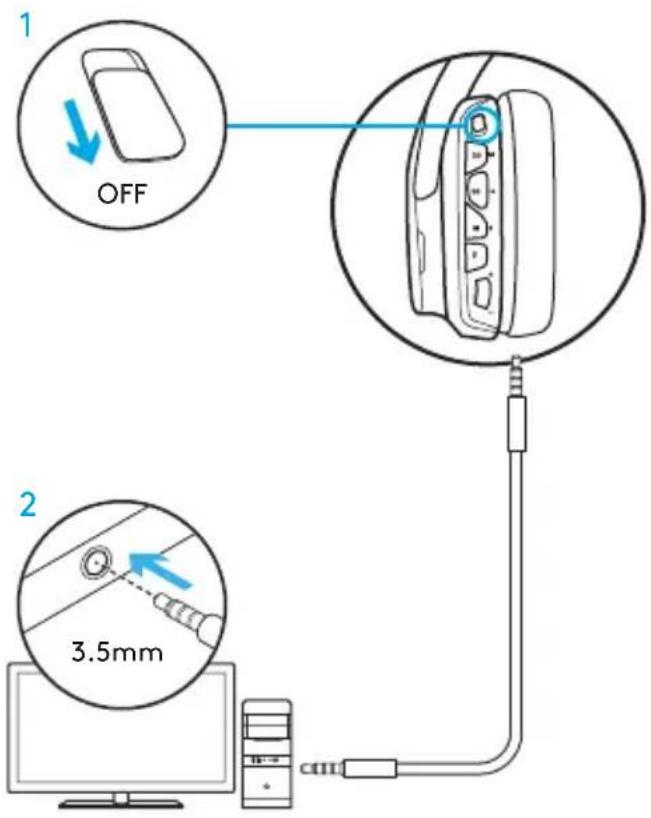
SETUP FOR PC (3.5MM CONNECTION)
SETUP FOR PC (3.5MM CONNECTION)
The G935 can also connect to audio devices solely via 3.5mm cable.
- Set switch to Wireless Off mode for passive audio mode, or set to Wireless On mode for active audio mode with additional features (see "Wireless On/Off" section).
- Connect to PC using the 3.5mm cable
Some features, including 7.1 surround sound, on-headset buttons, volume wheel operation, and customization of lighting and button functions are not available without USB connection. Boom mic is not available for 3.5mm device while in Wireless Off mode.
Some PCs may require a 3.5mm 4-pole to mic/stereo splitter adapter (not included) to use microphone features in this mode.
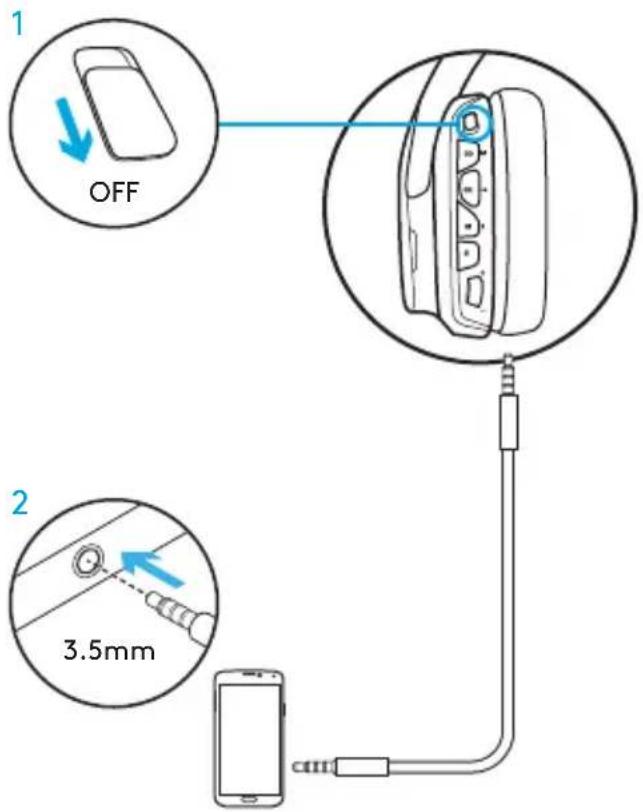
SETUP FOR MOBILE
- Set switch to Wireless Off mode for passive audio mode, or set to Wireless On mode for active audio mode with additional features (see "Wireless On/Off" section).
- Connect the headset to the mobile device via the 3.5mm cable.
Boom microphone is only available in Wireless On mode.
12 ENGLISH
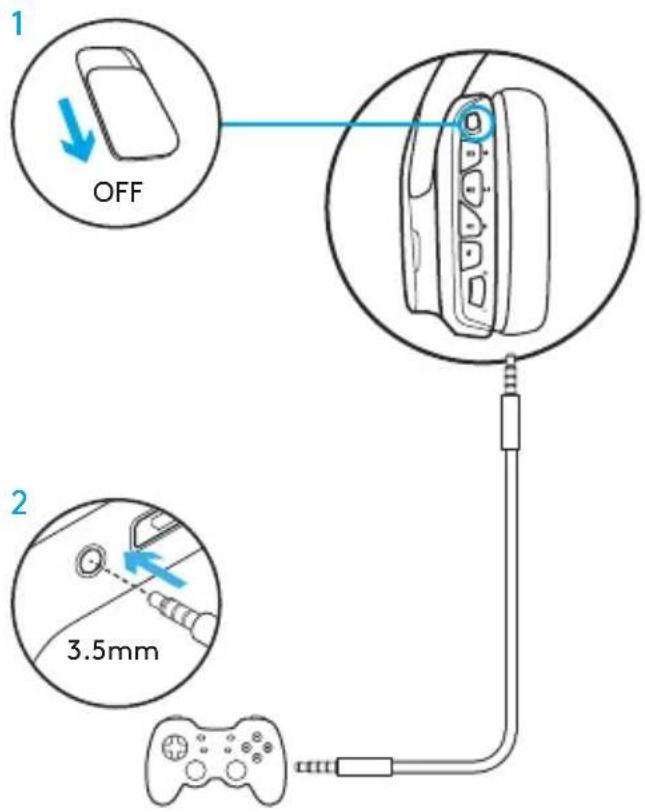
SETUP FOR CONSOLE: XBOX ONE™, PS4™ OR SWITCH™
-
Set switch to Wireless Off mode for passive audio mode, or set to Wireless On mode for active audio mode with additional features (see "Wireless On/Off" section).
-
Connect the headset to the console controller using the 3.5mm cable.
- Xbox One may require Xbox One headset adapter (sold separately).
PlayStation setup (settings)
- Connect headset
- Open Settings
- Select "Sound and Screen"
- Select "Audio Output Settings"
- Set "Output to Headphones" to "All Audio"
Headset will not operate via USB Wireless Mix Adapter on Xbox One.
Boom microphone is only available in Wireless On mode.
ALTERNATE SETUP FOR SONY PLAYSTATION® 4 & NINTENDO SWITCH™
Wireless operation
- Set switch to Wireless On position.
- Connect the headset to the console using the USB Wireless Adapter.
Note: Some buttons and functions may not operate when connected to the PlayStation 4. Programming of lighting and buttons is not possible on the PlayStation. 7.1 surround sound is not available while connected to PlayStation.
PlayStation setup (settings)
- Plug in headset via USB or 3.5mm cables
- Open Settings
- Select "Sound and Screen"
- Select "Audio Output Settings"
- Set "Output to Headphones" to "All Audio"
Nintendo Switch setup (settings)
- Set Switch to Wireless On position
- Connect the USB Wireless Adapter into the USB port inside the Switch TV Dock
- Audio output will change to your headset automatically
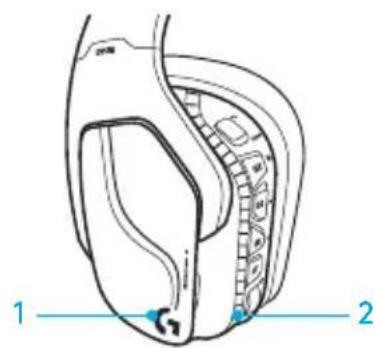
RGB LIGHTING ZONE CUSTOMIZATION
- Zone 1: G logo
- Zone 2: Lighting strip
Each lighting zone can be programmed with the Logitech G HUB (PC mode only). www.logitech.com/support/g935
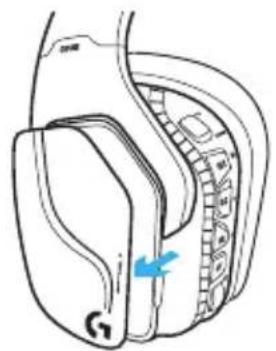
TAG CUSTOMIZATION
The left and right custom tags can be removed and replaced with custom tags.
LOGITECH G HUB SOFTWARE
G-key buttons, lighting, equalizer, and surround sound profile programming is possible through the Logitech G HUB Software.
- LIGHTSYNC Lighting
- Assignments
- Acoustics
- Equalizer

natural_image
Diagram of a mechanical device with a blue arrow indicating a directional component (no text or symbols present)
COLOR/EQUALIZER CYCLING
G1 and G3 buttons are pre-programmed by default to cycle through lighting and equalizer profiles.
When the headset is connected to a system with Logitech G HUB Software running, it will cycle through all equalizer or lighting options programmed into Logitech G HUB Software.
When the headset is not connected to a system with Logitech G HUB Software running, it will cycle through the custom lighting or equalizer profiles stored in the headset's onboard memory. These profiles can be programmed via Logitech G HUB Software
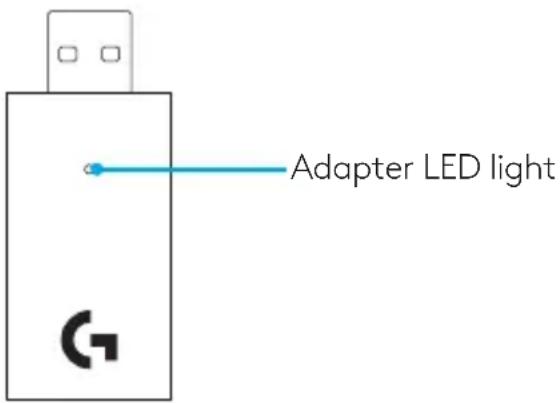
PAIRING INSTRUCTIONS
If your device becomes unpaired or you receive a replacement USB Wireless Adapter, follow these instructions to pair your device with the USB Wireless Adapter:
- Plug in USB Wireless Adapter
- Insert pin into reset port on adapter to initiate pairing mode
- Light on adapter will blink
- Turn on headset
- Hold "Microphone mute" button for 15 seconds to initiate pairing mode
- Headset G logo will blink green to indicate pairing mode
- Logo will turn to solid color and then return to currently selected lighting when paired
EARPAD CLEANING
- Removal 2. Washing

natural_image
Diagram of a mechanical device with a blue arrow indicating direction, no text or symbols presenta. Once removed, the earpads can be wiped clean with a damp cloth. Do not use detergent.
b. Press with soft towel to dry, do not wring.
c. Allow to air dry before reattaching.
- Replacement

natural_image
Line drawing of a washing machine with blue arrow indicating rotation (no text or symbols)CONTENU DU COFFRET

CONFIGURATION POUR MOBILE
CONFIGURATION POUR CONSOLE: XBOX ONE™, PS4™ OU SWITCH™

natural_image
Diagram of a mechanical device with a blue arrow indicating a directional component (no text or symbols present)
natural_image
Diagram of a spray bottle with blue arrow indicating direction (no text or symbols)natural_image
Line drawing of a washing machine with blue arrow indicating rotation (no text or symbols)CONTENIDO DE LA CAJA
natural_image
Pure electrical circuit lines without any symbols-
Cable de carga (USB a micro USB, 2 m)
-
Cable de 3,5 mm (1,5 m)
FUNCIONES
CONFIGURACIÓN PARA CONSOLAS: XBOX ONE™, PS4™ O SWITCH™
CONFIGURACIÓN ALTERNATIVA PARA SONY PLAYSTATION®4 Y NINTENDO SWITCH™

natural_image
Diagram of a mechanical device with a blue arrow indicating a directional component (no text or symbols present)
natural_image
Diagram of a plastic bag with a blue arrow indicating direction (no text or symbols)natural_image
Line drawing of a spray bottle with blue arrow indicating direction (no text or symbols)(somente no modo PC): www.logitech.com/support/g935
CONFIGURAÇÃO PARA DISPOSITIVO MÓVEL
CONFIGURAÇÃO PARA CONSOLE: XBOX ONE™, PS4™ OU SWITCH™
CONFIGURAÇÃO ALTERNATIVA PARA O SONY PLAYSTATION®4 E NINTENDO SWITCH™
Operação sem fio
natural_image
Diagram of a mechanical device with a blue arrow indicating a directional component (no text or symbols present)
63 PORTUGUÊS
CICLAGEM DE CORES E DO EQUALIZADOR
natural_image
Diagram of a spray bottle with blue arrow indicating direction (no text or symbols)natural_image
Line drawing of a washing machine with blue arrow indicating rotation (no text or symbols)
logitech™
© 2018 Logitech, Logi and the Logitech Logo are trademarks or registered trademarks of Logitech Europe S.A. and/or its affiliates in the U.S. and other countries. All other trademarks are the property of their respective owners. Logitech assumes no responsibility for any errors that may appear in this manual. Information contained herein is subject to change without notice.


- CONTENTS
- ENGLISH
- HEADSET BUTTON LAYOUT
- BATTERY MANAGEMENT
- Logitech G HUB Software
- Critical Battery Warning
- IDLE SLEEP MODE ON/OFF TONES AND LIGHTS
- WIRELESS ON/OFF
- Wireless On
- Wireless range 2
- Battery life 3
- Wireless Off (passive mode)
- SETUP FOR PC (PC MODE)
- Mixing audio sources
- SETUP FOR PC (3.5MM CONNECTION)
- SETUP FOR MOBILE
- SETUP FOR CONSOLE: XBOX ONE™, PS4™ OR SWITCH™
- PlayStation setup (settings)
- ALTERNATE SETUP FOR SONY PLAYSTATION® 4 & NINTENDO SWITCH™
- Wireless operation
- Nintendo Switch setup (settings)
- RGB LIGHTING ZONE CUSTOMIZATION
- TAG CUSTOMIZATION
- COLOR/EQUALIZER CYCLING
- PAIRING INSTRUCTIONS
- EARPAD CLEANING
- CONTENU DU COFFRET
- CONFIGURATION POUR MOBILE
- CONFIGURATION POUR CONSOLE: XBOX ONE™, PS4™ OU SWITCH™
- CONTENIDO DE LA CAJA
- FUNCIONES
- CONFIGURACIÓN PARA CONSOLAS: XBOX ONE™, PS4™ O SWITCH™
- CONFIGURACIÓN ALTERNATIVA PARA SONY PLAYSTATION®4 Y NINTENDO SWITCH™
- CONFIGURAÇÃO PARA DISPOSITIVO MÓVEL
- CONFIGURAÇÃO PARA CONSOLE: XBOX ONE™, PS4™ OU SWITCH™
- CONFIGURAÇÃO ALTERNATIVA PARA O SONY PLAYSTATION®4 E NINTENDO SWITCH™
- Operação sem fio
- PORTUGUÊS
- CICLAGEM DE CORES E DO EQUALIZADOR
Brand : LOGITECH
Model : G935
Category : Headphones