AUDEO 106 - Speaker Ecler - Free user manual and instructions
Find the device manual for free AUDEO 106 Ecler in PDF.

User questions about AUDEO 106 Ecler
0 question about this device. Answer the ones you know or ask your own.
Ask a new question about this device
Download the instructions for your Speaker in PDF format for free! Find your manual AUDEO 106 - Ecler and take your electronic device back in hand. On this page are published all the documents necessary for the use of your device. AUDEO 106 by Ecler.
USER MANUAL AUDEO 106 Ecler
Congratulations! You are the owner of a carefully designed and manufactured piece of equipment. We thank you for choosing our AUDEO106P set of self-amplified speakers.
To achieve maximum operating capacity and performance it is VERY IMPORTANT to read the remarks specified in this manual very carefully and bear them in mind before connecting the speakers. To guarantee optimum operation, we recommend that maintenance be carried out by our Authorised Technical Services.
2. PRECAUTIONS

There are no user adjustable parts inside the unit.
Never use this unit in proximity to water.
Do not expose the unit to splashed water.
Avoid placing liquid containers on it.
Avoid placing the unit next to sources of heat, spotlights or heaters.
Use only the accessories specified by the manufacturer, adapted for each application.
3. INTRODUCTION
AUDEO106P embodies the success of the prestigious AUDEO series with its simple formula: cost-effective, easy to use and ideal for an enormous variety of multimedia and audiovisual applications. A pair of stereo self-amplified speakers with excellent performance and a unique design, fitting easily into training classes, schools, meeting and multimedia presentation spaces, shops, etc.
Main features:
- Pair of self-amplified speaker + passive speaker
- “Full-range” speakers, 2 channels (6” + 1”)
- Euroblock balanced stereo input in MASTER unit
- RCA unbalanced stereo input in MASTER unit
- Connection between MASTER and SLAVE unit through Euroblock connectors.
• Built-in amplifier, 2 x 20 W RMS (MASTER unit)
• Built-in power supply (MASTER unit) - Auto stand-by function (sleep mode / energy saving without needing to turn the unit on daily)
• 2 band tone control and volume control
• Built-in Anti-Clip system
• ON / STD. BY, Signal Present and CLIP LED display - Reinforced ABS construction
• Available in black or white - Includes wall mount supports and steel safety cable
- Compatible with AUDEO series accessories for desktop and microphone stand set-up
4. POSITION, ASSEMBLY AND START-UP

The following should be followed as general rules:
• Always install the unit on hard, firm surfaces.
- For good sound playback there must not be obstacles between the unit's position and the audience.
- Adjust the sound pressure levels to the playback needs. Despite its small size, AUDEO106P has a much better performance than domestic speakers.
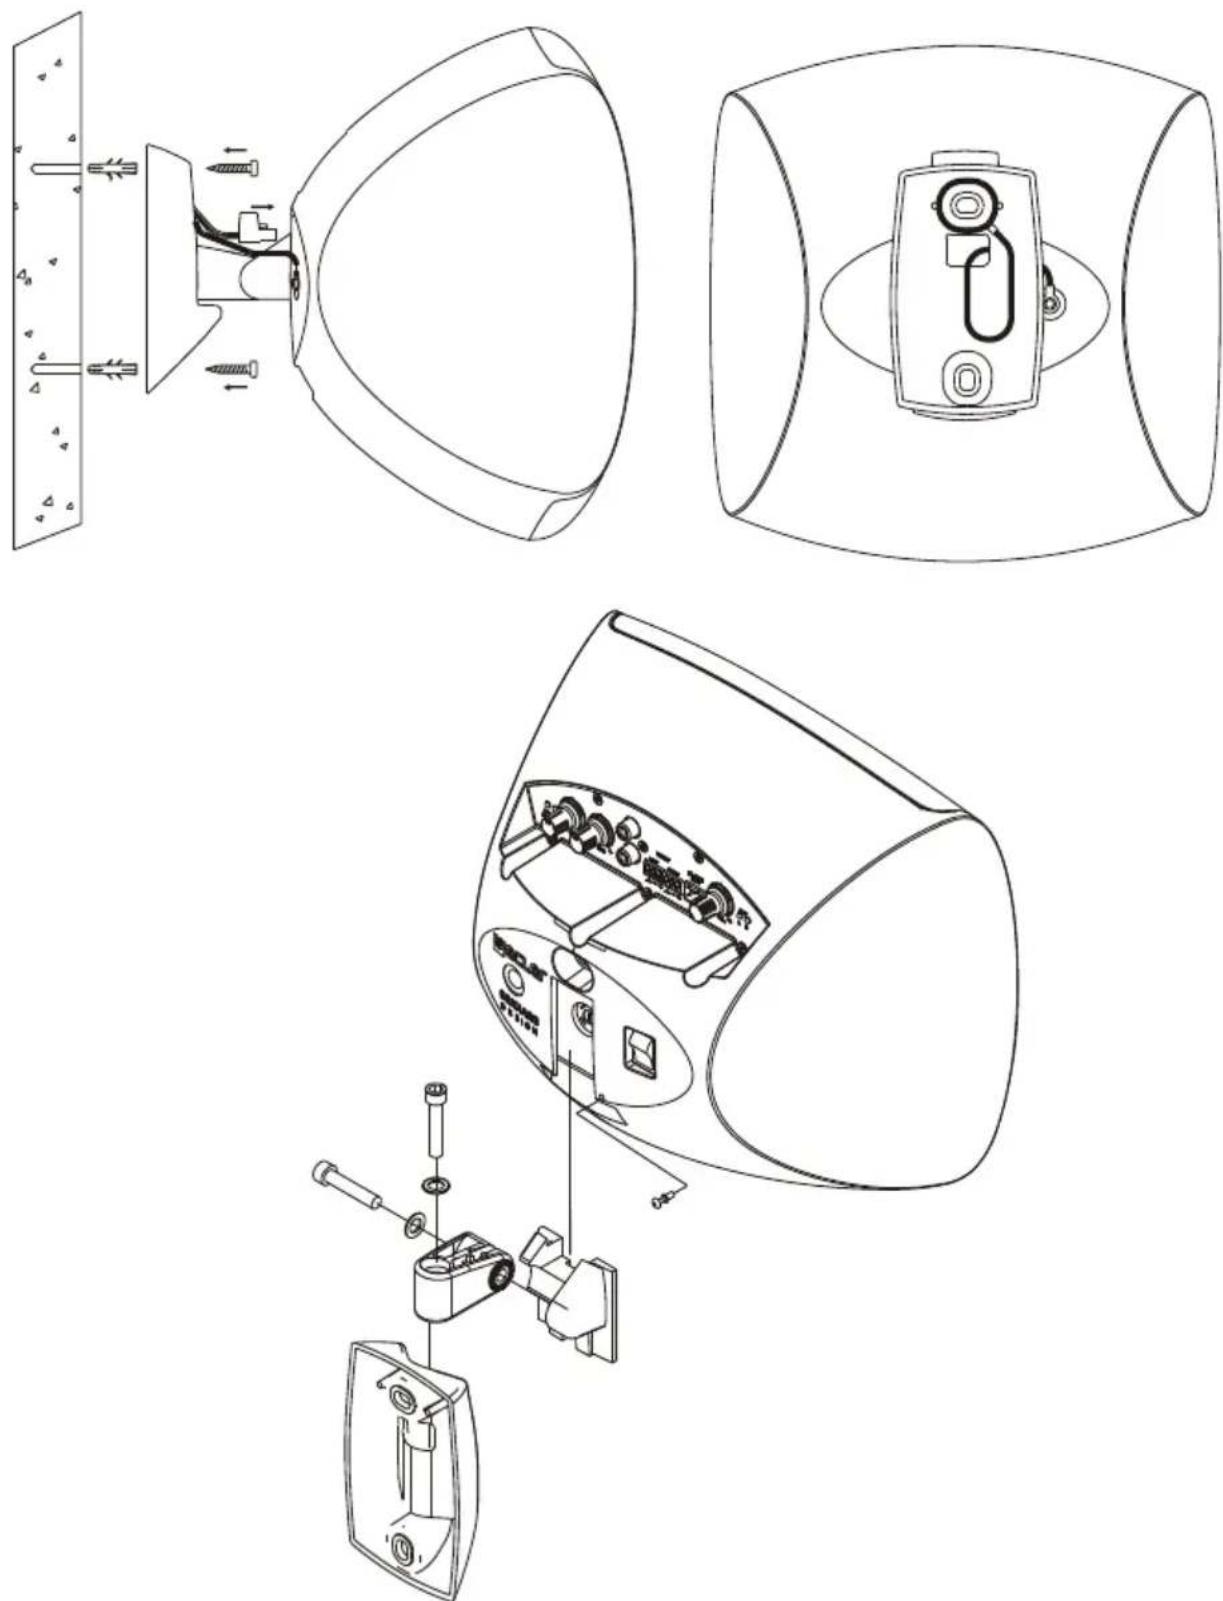
In the packaging of the AUDEO speakers, you will find everything you need to complete the installation of the two units:
- Two wall mount brackets (one per cabinet)
- Four screws and four 6 mm wall plugs (two per cabinet)
• Two plastic rivets to lock the loudspeakers to the brackets - 5 mm Allen wrench
- Two steel safety cables to prevent the speakers from eventually falling down (one per box) with their corresponding screws and washers.
- Two 2 terminal Euroblock connectors and a piece of corresponding speaker cable for MASTER-SLAVE connection
- Two 3 terminal Euroblock connectors for stereo balanced INPUT
• Two jumpers for configuring the input sensitivity. - A mains cord for the MASTER unit through
- Instruction manual
- Warranty card
Wall mount set-up:
- Drill two 6 mm. holes in the wall, matching the position of the bracket's holes.
- Insert two 6 mm. wall plugs.
- Hold the safety cable on the rear of the bracket (see diagram).
- Place the bracket in its position, previously passing the safety cable and the signal cable through the square hole of the bracket. Insert and tighten the screws, firmly holding on to the wall mount bracket.
- Connect the power cables, signal input and connection between the two units to the connectors on the rear of the speaker. Pay attention to the correct polarity of the Euroblock terminals.
- Place the speaker in its final position by vertically sliding it down so that the guide on the back fits with the guide on the rear of the bracket. Insert the plastic rivet into the hole in the rear of the speaker.
- Attach the safety cable to the rear of the speaker so it does not accidentally fall down and cause material or personal damage.
- Turn the box to the desired position both vertically and horizontally. Tighten the Allen screws to secure this position on both axes.
To operate the speakers, turn on the MASTER (L) unit with the switch on the rear panel, adjust the volume and equalize the sound to the desired position. The CLIP indicator warns of power amplifier saturation due to an excess of signal. To avoid distortion and preserve the sound quality, it is important that this indicator is not constantly lit while the unit is in normal operation. It should light up periodically, based on the rhythm of the music's bass frequencies.
NOTE: To protect the system from eventual overloads in the power line, there is a T1A 250V 5x20 mains fuse in the MASTER unit in a fuse holder located in the rear slot. In the event that the fuse blows, unplug the unit, remove the wall mount bracket, unscrew the fuse holder, remove the fuse and replace it with an identical one. If the new fuse blows immediately, please contact our Technical Services.
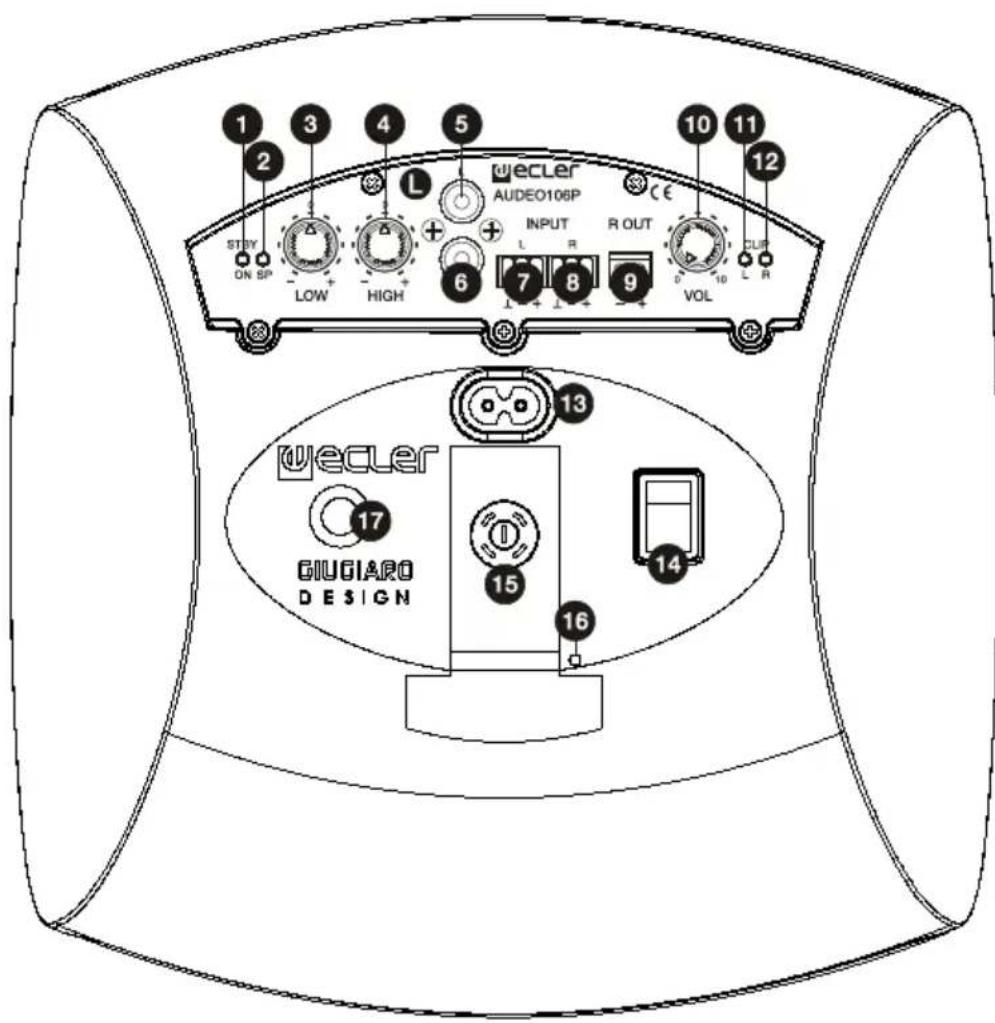
5. LIST OF FUNCTIONS
- ON/STANDBY indicator light
- SIGNAL PRESENT indicator light
- LOW bass control
- HIGH treble control
- RCA unbalanced input in line 1 left L channel
- RCA unbalanced input in line 1 right R channel
- Euroblock balanced input in line 2 left L channel
- Euroblock balanced input in line 2 right R channel
- Amplified output right R channel
- VOL output volume control
- Mains socket (220-240VAC)
- On/Off switch
- Fuse holder
- Hole for the locking rivet
-
Safety cable anchoring point
-
Indicator light for left channel clipping CLIP 12. Indicator light for right channel clipping CLIP
6. DIAGRAM OF FUNCTIONS
text_image
1 2 3 4 5 wecler AUDEO106P STEP ON SP LOW HIGH L + + INPUT R OUT L R 9 VOL 10 11 12 wecler GIUGIARO DESIGN 13 17 15 16 14INSTRUCTION MANUAL
natural_image
Technical line drawing of a device's internal components and assembly, showing exploded and assembled views (no text or symbols)natural_image
Technical line drawing of a device with internal components and mounting bracket (no text or symbols)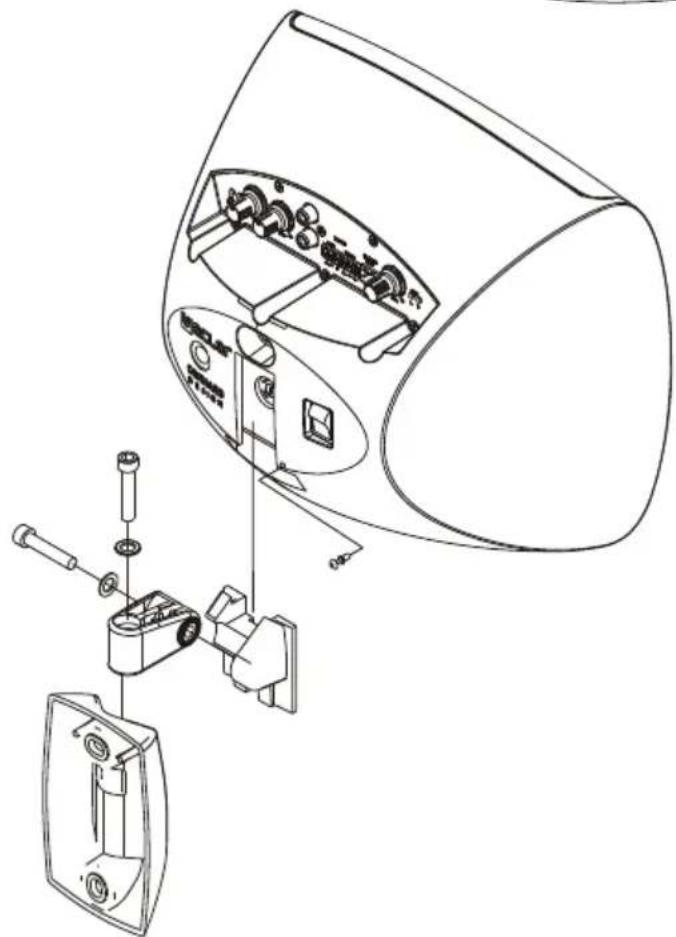
text_image
Technical diagram of a device's internal components with Chinese labels, showing exploded view and assembly steps.5. LISTE DES FONCTIONS
natural_image
Technical line drawing of a device with two views: top shows internal components, bottom shows a mounted device (no text or symbols)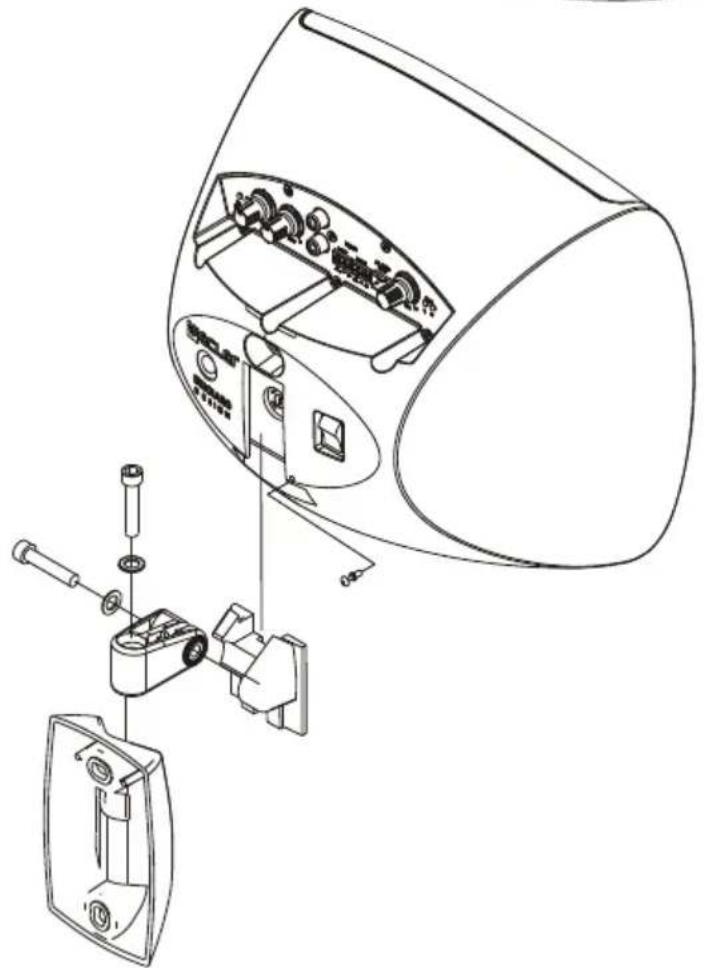
natural_image
Technical line drawing of a device's internal components and assembly, showing exploded view with no text or symbols5. LISTE DER FUNKTIONEN
text_image
Auto Stdby on off Gain -10dB 0dB8. TECHNICAL CHARACTERISTICS 8. CARACTÉRISTIQUES TECHNIQUES
8. CARACTERÍSTICAS TÉCNICAS 8. TECHNISCHE DATEN
POWER
2x18W@4Ω 1% THD
2x22W@4Ω 10% THD
Frequency response
40Hz - 50kHz (-3dB)
THD+Noise @ 1kHz Full Pwr.
<0.15%
Inputs Sensitivity nom/Impedance
LINE UNBAL 0dBV (-10dBV*)/>22kΩ LINE BAL -10dBV/>22kΩ
CMRR
LINE BAL >60dB @ 1kHz
Tone control
BASS 100Hz ±10dB TREBLE 10KHz ±10dB
Signal Noise Ratio
LINE >75dB
Auto Standby*
Power consumption (pink noise, 1/8 power @ 4ohm)
15VA/10W
Power consumption (pink noise, 1/3 power @ 4ohm)
24VA/18W
Power consumption Standby
<3W
Mains power
Integrated 220-240VAC power supply
Dimensions WxDxH
242x242x163mm
Weight
Active cabinet 2,5kg Passive cabinet 1,7kg
*Internally selectable
-
BLOCK DIAGRAM 9. DIAGRAMA DE BLOQUES
-
SCHÉMA FONCTIONNEL
-
BLOCKSCHALTBILD

flowchart
graph TD
    A["LIN 1"] --> B["GAIN SELECT 0/-10dBV"]
    B --> C["NOT"]
    D["LIN 2 LEFT -10dBV"] --> E["NOT"]
    F["LIN 2 RIGHT -10dBV"] --> G["NOT"]
    H["TONE CONTROL"] --> I["BASS TREBLE"]
    I --> J["VOLUME"]
    J --> K["POWER AMPLIFIER"]
    K --> L["OUT L INTERNAL SPEAKER"]
    K --> M["OUT R PASSIVE SPEAKER"]
    K --> N["CLIP R"]
    O["STANBY CONTROL"] --> P["ON STBY"]
    P --> Q["SP"]
    Q --> R["AUTO STBY ON OFF"]
    R --> S["OUT L INTERNAL SPEAKER"]