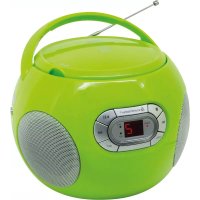
SCD2120GR - Cd player/recorder Soundmaster - Free user manual and instructions
Find the device manual for free SCD2120GR Soundmaster in PDF.



| Product type | CD player/recorder with FM radio |
| Brand | Soundmaster |
| Model | SCD2120GR |
| Mains power supply | 230 V ~ 50/60 Hz |
| Battery power supply | DC 6V, 4 x 1.5V type C batteries (UM-2) |
| Radio frequency range | 87.5 - 108 MHz (FM) |
| CD functions | Play, Pause, Stop, Next/Previous track |
| CD programming | Up to 20 tracks |
| Repeat mode | 1 track or whole disc |
| Resume function | Resumes playback where it stopped (switch) |
| Automatic standby | After 10 minutes without signal |
| Headphones | 3.5 mm stereo jack (not supplied) |
| FM antenna | Telescopic, for better reception |
| Laser type | Class 1 |
| Cleaning | With a dry cloth only, no detergents |
| Safety | Do not open the device, risk of electric shock; refer servicing to qualified personnel |
| Protection against humidity | Use only indoors in a dry place |
| Operating temperature | Moderate climate, not suitable for tropical climates |
| Disconnection device | Mains plug or appliance coupler, must remain accessible |
| Importer | Wörlein GmbH, Gewerbestrasse 12, D 90556 Cadolzburg, Germany |
| Customer service | Tel.: +49 9103 71 67 0, Email: service@woerlein.com |
Frequently Asked Questions - SCD2120GR Soundmaster
User questions about SCD2120GR Soundmaster
0 question about this device. Answer the ones you know or ask your own.
Ask a new question about this device
Download the instructions for your Cd player/recorder in PDF format for free! Find your manual SCD2120GR - Soundmaster and take your electronic device back in hand. On this page are published all the documents necessary for the use of your device. SCD2120GR by Soundmaster.
USER MANUAL SCD2120GR Soundmaster
Do not dispose of this product with the normal household waste at the end of its life cycle. Return it to a collection point for the recycling of electrical and electronic devices. This is indicated by the symbol on the product, user manual or packaging
The materials are reusable according to their markings. By reusing, recycling or other forms of utilization of old devices you make an important contribution to the protection of our environment.
Please contact your local authorities for details about collection points.
| 警告 | WARNING | |
| Risk of electric shock Do not open! | ||
| Caution: To reduce the risk of electric shock, do not remove the cover (or back). There are no user serviceable parts inside. Refer servicing to qualified service personnel. | ||

This symbol indicates the presence of dangerous voltage inside the enclosure, sufficient enough to cause electric shock.
This symbol indicates the presence of important operating and maintenance instructions for the device

Used batteries are hazardous waste and NOT to be disposed of with the household waste! As a consumer you are legally obligated to return all batteries for environmentally responsible recycling - no matter whether or not the batteries contain harmful substances*)
Return batteries free of charge to public collection points in your community or shops selling batteries of the respective kind.
Only return fully discharged batteries
*) marked Cd = cadmium, Hg = mercury, Pb = lead
- Only use mercury and cadmium-free batteries.
- Used batteries are hazardous waste and NOT to be disposed of with the household waste!!!
- Keep batteries away from children. Children might swallow batteries.
- Contact a physician immediately if a battery was swallowed.
- Check your batteries regularly to avoid battery leakage.
- Batteries shall not be exposed to excessive heat such as sunshine, fire or the like.
- CAUTION: Danger of explosion if battery is incorrectly replaced
- Replace only with the same or equivalent type

CAUTION - INVISIBLE LASER RADIATION WHEN OPENING THE COVER OR PRESSING THE SAFETY INTERLOCK. AVOID EXPOSURE TO THE LASER BEAM.
To prevent possible hearing damage, do not listen at high volume levels for long periods
- Use the device in dry indoor environments only.
- Protect the device from humidity.
- This apparatus is for moderate climates areas use, not suitable for use in tropical climates countries.
Safety, Environmental and Setup Instructions
- No objects filled with liquids, such as vases, shall be placed on the apparatus.
- The mains plug or an appliance coupler is used as the disconnect device, the disconnect devices shall remain readily operable.
- Connect this device to a properly installed and earthed wall outlet only. Make sure the mains voltage corresponds with the specifications on the rating plate.
- Make sure the mains cable stays dry during operation. Do not pinch or damage the mains cable in any way.
- A damaged mains cable or plug must immediately be replaced by an authorized service center.
- In case of lightning, immediately disconnect the device from the mains supply.
Children should be supervised by parents when using the device. - Clean the device with a dry cloth only.
- Do NOT use CLEANING AGENTS or ABRASIVE CLOTHS!
- Do not expose the device to direct sunlight or other heat sources.
- Install the device at a location with sufficient ventilation in order to prevent heat accumulation.
- Do not cover the ventilation openings!
- Install the device at a safe and vibration-free location.
- Install the device as far away as possible from computers and microwave units; otherwise radio reception may be disturbed.
- Do not open or repair the enclosure. It is not safe to do so and will void your warranty. Repairs only by authorized service/ customer center.
- No naked flame sources, such as lighted candles, should be placed on the unit.
- When you are necessary to ship the unit store it in its original package. Save the package for this purpose.
- In case of malfunction due to electrostatic discharge or fast transient (burst), remove and reconnect the power supply.
- If the unit is not using for a long period of time, disconnect it from the power supply by unplugging the power plug. This is to avoid the risk of fire.
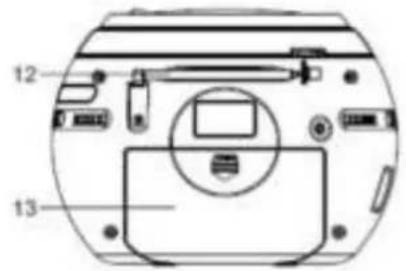
LOCATION OF CONTROLS



1 CD door
2 STOP button
3 SKIP BACK button
4 PROG button
5 Speaker
6 PLAY/PAUSE button
7 SKIPUP button
8 REPEAT button
9 Dial scale
10 Tuning knob
11 RESUME switch
12 Antenna
13 Battery Compartment
14 Volume knob
15 3.5mm headphone jack
16 Function switch
17 AC socket
AC OPERATION
Before operation, please make sure that the VOLTAGE mentioned on the unit is same as the voltage of your local area. Unravel the AC power cord, insert one end into the AC socket on the set, and the other end into a standard AC outlet.
Attention
- Do not plug or unplug the power cable while you have wet hands.
- When planning not to use this unit for a long time, disconnect the power cable from the wall outlet.
- When disconnecting the power cord from the wall outlet, do not pull on the cord in order to avoid shock risks caused by damaged cable.
BATTERY OPERATION
Disconnect the AC cord set completely. Open the battery compartment door and insert 4 pieces UM-2 "C" size batteries into the battery compartment with battery polarity as shown inside the battery compartment.
HEADPHONE
- Insert the headphone cable (requires 3.5mm stereo plug, not supplied) into the headphones jack on the unit.
- Tune the desired volume level on the main unit.
RADIO
- Set the FUNCTION switch to FM position.
- Rotate the TUNING control to tune to your desired radio station.
- Adjust the sound level by rotating the VOLUME control.
- To turn off the radio, set the FUNCTION switch to OFF position.
For best reception, fully extend the FM Antenna to receive FM stations.
CD MODE
- Set the FUNCTION switch to the CD position.
- Insert the CD disc in the CD compartment and close the CD door, the unit will start reading the disc, the LED display will show the total number of tracks of the entire disc after reading.
- To start playing the CD, press the button and display LED indicator light on.
- To pause CD playback, press the button again and display LED indicator is blinking.
- Adjust the VOLUME Control to the desired volume level.
- To stop playing the CD, press the STOP button.
Skip Mode
- During play or pause mode, press the button to go to the next track.
- During play or pause mode, press the button to go back to the beginning of the track.
- During play mode, press the 串串 button twice will go back to the previous track.
Programming the CD Player
The programming of the CD player should be done during STOP mode.
2. Press the PROG button, the LED display will show '01' and flash continuously.
3. Press the or buttons to select the desired track.
4. Press the PROG button again to store this track in memory, the LED will show '02' and flash continuously.
5. Repeat steps from 2 to 3 to store more tracks in memory. You can store up to 20 tracks in the memory.
6. Press the button to play the disc in the programmed order.
7. To stop playing, press the STOP button.
8. To cancel the programming list, press the STOP button and open the CD door or set the FUNCTION switch to OFF position.
Repeat Mode
Repeat 1: Press the REP button once, the repeat LED indicator will light and flash continuously. This single track will be repeated.
Repeat All: Press the REP button twice, the repeat LED indicator will stay lighted. The whole disc will be played continuously.
To Cancel Repeat Function: Press the REP button until the lighted repeat LED indicator turned off.
CD resume function

RESUME - continuing from where you have stopped
- Set the FUNCTION switch to CD position and set the RESUME switch to ON position
- To start playing the CD, press the button.
- Press STOP in once whenever you want to stop playback.
- Press to resume playback.
- Playback continues from where you have stopped.
To deactivate RESUME, set the RESUME to OFF position.
Note:
The RESUME function is still activated when the FUNCTION switch is set off.
Opening the CD lip during playback, RESUME function is also activated.
Important Note
Automatic standby switching
To comply with the ERP2 directive, the unit automatically switches to standby after approximately 10 minutes without a signal. To switch the unit on again, press the button on the unit.
If the button is pressed continuously for 5 seconds, the unit switches to standby mode. To switch the unit on again, press the button on the unit.
TECHNICAL SPECIFICATION
Power supply
:230V\~50/60Hz
Battery supply
:DC6V-4x1.5V“C”size/UM-2
FM range
:87.5-108MHz
IMPORTER
CLASS 1 LASER PRODUCT
KLASSE 1 LASER PRODUKT
LUOKAN 1 LASER LAITE
KCLASS 1 LASER APPARAT
PRODUCTO LASER CLASE 1
WAARSCHUWING-ONZICTBARE LASERSTRALING WANNEER DE BEHUIZING GEOPEND WORDT OF DE INTERNE BEVEILIGING UITGESCHAKELD. VERMIJD BLOOTSTELLING AAN DE LASERSTRAAL.

CLASS 1 LASER PRODUCT
KLASSE 1 LASER PRODUKT
LUOKAN 1 LASER LAITE
KCLASS 1 LASER APPARAT
PRODUCTO LASER CLASE 1
PRECAUCION - RADIACION INVISIBLE DE LASER AL ABRIR LA TAPA O PULSAR EL INTERBLOQUEO DE SEGURIDAD. EVITE LA EXPOSICION AL HAZ DE LASER.

CLASS 1 LASER PRODUCT
KLASSE 1 LASER PRODUKT
LUOKAN 1 LASER LAITE
KCLASS 1 LASER APPARAT
PRODUCTO LASER CLASE 1
ATENTIE - RADIATII LASER
INVIZIBLE CAND SE DESCHEME
CAPACUL SAU SE APASA
CLAMA DE SIGURANTA. EVITATI
EXPUNEREA LA RAZA LASER.

4 Buton PROGRAM 13 Compartment baterie
Hereby, Wörlein GmbH declares that this device is in compliance with the essential requirements and other relevant provisions of Directive 2014/53/EU.
A copy of the Declara on of Conformity may be obtained at the following loca on:
Wörlein GmbH, Gewerbestrasse 12, D 90556 Cadolzburg, Germany
Email: info@woerlein.com
Tel.: +49 9103 71 67 0
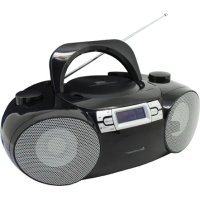
Brand : Soundmaster
Model : SCD2120GR
Category : Cd player/recorder