
UR8600 - Radio Soundmaster - Free user manual and instructions
Find the device manual for free UR8600 Soundmaster in PDF.

| Product type | FM radio with alarm |
| Brand | Soundmaster |
| Model | UR8600 |
| Main power supply | AC adapter 100-240 V AC, 50/60 Hz, output 5 V DC 1.5 A |
| Backup battery | Lithium CR2032 (3 V) |
| FM reception range | 87.5 - 108 MHz |
| Number of presets | 10 stations |
| Alarm functions | Dual alarm with choice of buzzer/radio, snooze (9 min), frequency (daily, weekdays, weekends) |
| Sleep function | Sleep timer from 10 to 90 minutes |
| Clock projector | Wall projection, rotation ±90°, flip 180° |
| USB charging port | Yes (output 5 V, for smartphone/MP3) |
| Antenna | Telescopic FM antenna |
| Display | LCD screen with brightness adjustment (high, low, off) |
| Approximate dimensions | 200 × 100 × 100 mm |
| Approximate weight | 0.5 kg |
| Care and cleaning | Soft damp cloth, no abrasive products |
| Safety instructions | Do not open (risk of electric shock), protect from moisture, keep batteries out of reach of children |
| Repairability | Take to an authorized service center |
Frequently Asked Questions - UR8600 Soundmaster
User questions about UR8600 Soundmaster
0 question about this device. Answer the ones you know or ask your own.
Ask a new question about this device
Download the instructions for your Radio in PDF format for free! Find your manual UR8600 - Soundmaster and take your electronic device back in hand. On this page are published all the documents necessary for the use of your device. UR8600 by Soundmaster.
USER MANUAL UR8600 Soundmaster
text_image
22:46 22:46DEUTSCH
ENGLISH
FRANÇAIS
NEDERLANDS
ITALANIO
PORTUGUÊS
SLOVENSKÝ
ČEŠTINA
text_image
Diagram showing connection between a device and an electrical panel with warning symbols and a magnified view of the person's silhouette.Gangreserve
Do not dispose of this product with the normal household waste at the end of its life cycle. Return it to a collection point for the recycling of electrical and electronic devices. This is indicated by the symbol on the product user manual or packaging.
The materials are reusable according to their markings. By reusing, recycling or other forms of utilization of old devices you make an important contribution to the protection of our environment.
Please contact your local authorities for details about collection points.

WARNING
Risk of electric shock Do not open!

Caution: To reduce the risk of electric shock, do not remove the cover (or back). There are no user serviceable parts inside. Refer servicing to qualified service personnel.
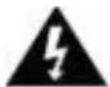
This symbol indicates the presence of dangerous voltage inside the enclosure, sufficient enough to cause electric shock.

This symbol indicates the presence of important operating and maintenance instructions for the device.
Safety, Environmental and Setup Instructions
- Use the device in dry indoor environments only.
- Protect the device from humidity.
• Do not open the device. RISK OF ELECTRIC SHOCK! Refer opening and servicing to qualified personnel.
- Connect this device to a properly installed and earthed wall outlet only. Make sure the mains voltage corresponds with the specifications on the rating plate.
• Make sure the mains cable stays dry during operation. Do not pinch or damage the mains cable in any way.
• A damaged mains cable or plug must immediately be replaced by an authorized service center.
- In case of lightning, immediately disconnect the device from the mains supply.
• Children should be supervised by parents when using the device.
- Clean the device with a dry cloth only.
Do NOT use CLEANING AGENTS or ABRASIVE CLOTHS!
- Do not expose the device to direct sunlight or other heat sources.
• Install the device at a location with sufficient ventilation in order to prevent heat accumulation.
- Do not cover the ventilation openings!
• Install the device at a safe and vibration-free location.
• Install the device as far away as possible from computers and microwave units; otherwise radio reception may be disturbed.
- Do not open or repair the enclosure. It is not safe to do so and will void your warranty. Repairs only by authorized service/ customer center.
- Only use mercury and cadmium-free batteries.
- Used batteries are hazardous waste and NOT to be disposed of with the household waste!!! Return the batteries to your dealer or to collection points in your community.
- Keep batteries away from children. Children might swallow batteries. Contact a physician immediately if a battery was swallowed.
- Check your batteries regularly to avoid battery leakage.
- Batteries shall not be exposed to excessive heat such as sunshine, fire or the like.
- CAUTION: Danger of explosion if battery is incorrectly replaced
- Replace only with the same or equivalent type

WARNING
DO NOT INGEST BATTERY, CHEMICAL BURN HAZARD
This product contains a coin/button cell battery. If the coin/button cell battery is swallowed, it can cause severe internal burns in just 2 hours and can lead to death. Keep new and used batteries away from children. If the battery compartment does not close securely, stop using the product and keep it away from children. If you think batteries might have been swallowed or placed inside any part of the body, seek immediate medical attention.

Used batteries are hazardous waste and NOT to be disposed of with the household waste! As a consumer you are legally obligated to return all batteries for environmentally responsible recycling - no matter whether or not the batteries contain harmful substances *).
Return batteries free of charge to public collection points in your community or to shops selling batteries of the respective kind.
Only return fully discharged batteries.
*) marked Cd = cadmium, Hg = mercury, Pb = lead
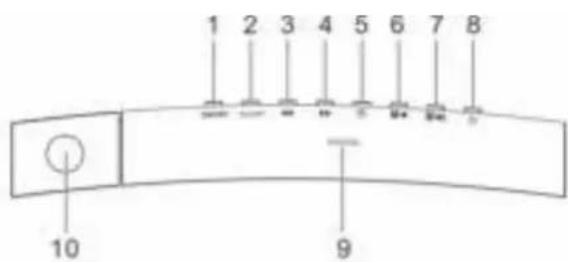
LOCATIONS OF CONTROLS
- PROJECTOR ON/OFF / 180° FLIP button
- SLEEP / DIMMER button
- ◀◀ BACKWARD button
- ▶▶ FORWARD button
- CLOCK / MEM/M+ / SET / Y-M-D button
- ALARM 1 / VOL DOWN ALARM OFF button
- ALARM 2 / VOL UP ALARM OFF button
- POWER / ALARM OFF button
- SNOOZE button
- Projector
- Display
- Alarm 2 indicator (alarm)
- Alarm 2 indicator (radio)
- Alarm 1 indicator (radio)
- Alarm 1 indicator (alarm)
- USB charging port
- DC IN jack
- Backup battery compartment
- Antenna
- Speaker
text_image
1 2 3 4 5 6 7 8 9 10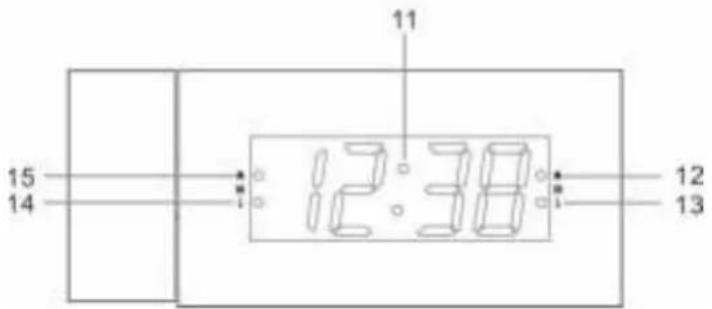
text_image
11 12:38 12 13 15 14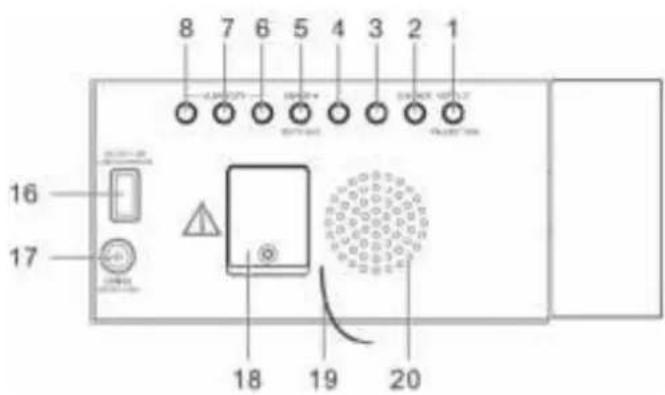
text_image
8 7 6 5 4 3 2 1 16 17 18 19 20GETTING STARTED
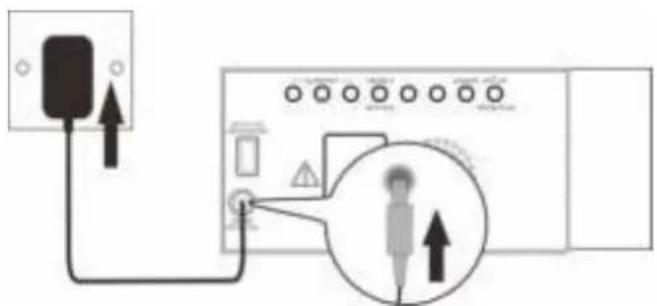
Connecting to power
- Connect the cord of the power adapter to the "DC IN" jack (17) of the radio.
- Connect the plug of the power adapter to a wall socket.
The radio is powered and in standby mode when you see the display is switched on.
text_image
Diagram showing connection between a device and a control panel with an icon of a person inside a circle, indicating signal or operation.Backup system
- The radio is equipped with a backup system. It requires a 3 V lithium battery (type: CR2032). Insert the battery into the battery compartment and make sure the positive and negative (+ or -) sides of the battery are in contact with the corresponding terminals in the battery compartment (18).
- If a power cut occurs, the radio automatically switches to the battery power supply and keeps the clock and timer settings.
- To open the battery compartment, use a screwdriver to detach the screw on the compartment door.
- When replacing the battery, do not disconnect the power adapter. Otherwise, all clock and alarm settings will be lost.
Setting the clock
In standby mode, press and hold the "CLOCK" button (5) until the year starts to flash.
- Setting year: Press the ◀◀ or ▶▶ button (4 or 3). Press the "CLOCK" button (5) to enter the date setting.
- Setting month/day: Press the ◀◀ button (4) to set the month and the ▶▶ button (3) to set the day.
- Press the "CLOCK" button (5) to enter the time setting.
- Setting the time: Press the ◀◀ button (4) button to set the hour time and ▶▶ button (3) to set the minute time.
- Press the "SET" button (5) to confirm each setting option.
Using the antenna
Unroll and extend the antenna (19) to improve FM signal reception.
Listening to radio
- Press the "POWER" button (8) to switch the radio on.
- Press the ◀◀ or ▶▶ button (4 or 3) to adjust frequency.
- Press and hold the ◀◀ or ▶▶ button (4 or 3) to automatically tune to the next available FM station.
- Press the "POWER" button (8) to switch the radio off.
Controlling the sound volume
While listening to the radio, press the "VOL UP" (7) or "VOL DOWN" (6) button to control the volume.
Setting preset stations
You can store up to 10 preset stations.
- Tune to a station.
- Press and hold the "MEM/M+" button (5) until "P01" (or the next available preset slot) shows on the display.
- Press the ◀◀ or ▶▶ button (4 or 3) to select a preset number (P01-P10).
- Press the "SET" button (5) to confirm. The preset station has been set up.
- Press the "MEM/M+" button repeatedly while listening to the radio to select a preset station. Alternatively, press the "MEM/M+" button (5) once and then press the ◀◀ button (4) or ▶▶ button (3) to select a preset station.
USING THE ALARMS
Setting alarms
The radio lets you have 2 alarm settings. To set the alarms:
In standby mode, press and hold the "ALARM 1" or "ALARM 2" button (6 or 7) until the alarm time starts to flash.
- Setting alarm time: Press the ◀◀ (4) to set the hour time and ▶▶ button (3) to set the minute time.
Press the "ALARM 1" or "ALARM 2" button (6 or 7) to enter the alarm source mode.
- Setting alarm sound source: Press the ◀◀ or ▶▶ button (4 or 3) to select the alarm or radio as the alarm sound source. The corresponding alarm indicator will turn on according to your selection.
Press the "ALARM 1" or "ALARM 2" button (6 or 7) to enter the alarm frequency mode.
- Setting alarm frequency: Press the ◀◀ or ▶▶ button (4 or 3) to select an alarm frequency (1-5 = Monday to Friday, 1-7 = Everyday, 6-7 = Weekend only).
Press "ALARM 1" or "ALARM 2" button (6 or 7) again for store and activating the alarm function, the corresponding alarm indicator (alarm or radio) is switched on.
Turning the alarms on or off
When the clock time is displayed, press the "ALARM 1" or "ALARM 2" button (6 or 7) to enable or disable the respective alarm. The corresponding Alarm 1 or Alarm 2 indicator (alarm or radio) will switch on when the alarm is enabled.
Deactivating a sounding alarm
- Press any "ALARM OFF" button (6, 7 or 8) to switch off a sounding alarm.
- When the alarm sounds, the corresponding Alarm 1 or Alarm 2 indicator (alarm or radio) flashes on the display.
- The Alarm function is still active and the signal will appear at the next set alarm time.
Snooze
- To temporarily silence a sounding alarm, press the "SNOOZE" button (9). The alarm will sound again when the snooze period (9 minutes) is over.
- The corresponding Alarm 1 or Alarm 2 indicator (alarm or radio) flashes on the display during the snooze period.
- To cancel the snooze period and the alarm, press any "ALARM OFF" button (6, 7 or 8).
Sleep
- This sleep function defines the duration of time before the radio switches itself off automatically.
- When the radio is switched on, press the "SLEEP" button (2) repeatedly to select a sleep period (Options: Off, 10, 20, 30, 40, 50, 60, 70, 80 and 90 minutes).
- The radio will automatically switch off when the sleep period is over.
- Press the "SLEEP" button (2) to check the remaining time before the radio switches off.
- Press the "POWER" button (8) to cancel this function.
DISPLAY INFORMATION
- In standby mode, press the "Y-M-D" button (5) repeatedly to change showing the year, date, time and day of the week (d1 = Monday, d2 = Tuesday, d3 = Wednesday, d4 = Thursday, d5 = Friday, d6 = Saturday and d7 = Sunday).
- In radio mode, press the ◀◀ or ▶▶ button (4 or 3) once to briefly change the display from the clock time to the current radio frequency.
DISPLAY BRIGHTNESS
- In standby mode, press the "DIMMER" button (2) to change the brightness level of the display (low level, high level or off).
PROJECTOR
- Press the "PROJECTOR" button (1) to project the current clock time on a wall.
- Swivel the projector (+/- 90°) to adjust the projection angle.
- Press and hold the "180° FLIP" button (1) to flip the projected image.
Note: The effective projection distance is 0.5 – 3 meter, the projected time is only in dark environment visible.
CHARGING EXTERNAL DEVICE
Connect an external device (e.g. smartphone, mp3 player) via a USB cable (not provided) to the USB jack on the back of the radio for charging. The radio cannot access the contents in the connected external device.
Care and maintenance
- Clean the radio with a soft damp cloth and let all parts dry completely after cleaning.
- Do not use any aggressive cleaners, brushes with nylon bristles, sharp or metallic cleaning utensils, knives, hard scrapers and the like. They could damage the surfaces of the radio.
- Do not immerse the radio in water and do not let water getting into the housing of the radio.
Storage
- Unplug the power adapter and clean the radio before storage.
• Always store the radio in a dry and clean place.
TECHNICAL SPECIFICATIONS
Tuner Range: FM: 87.5 – 108 MHz
Number of preset radio stations: 10
AC power adaptor: Input: AC 100-240 V, 50/60Hz
Output: DC 5 V 1.5A


Features and specifications are subject to change without prior notice.
