BT1308SI - Radio Soundmaster - Free user manual and instructions
Find the device manual for free BT1308SI Soundmaster in PDF.
Questions des utilisateurs sur BT1308SI Soundmaster
0 question sur cet appareil. Repondez a celles que vous connaissez ou posez la votre.
Poser une nouvelle question sur cet appareil
Download the instructions for your Radio in PDF format for free! Find your manual BT1308SI - Soundmaster and take your electronic device back in hand. On this page are published all the documents necessary for the use of your device. BT1308SI by Soundmaster.
USER MANUAL BT1308SI Soundmaster
soundmaster® high line
DEUTSCH
ENGLISH
FRANÇAIS
NEDERLANDS
ESPANOL
PORTUGUES
NORSK
SVENSK
SUOMI
CE

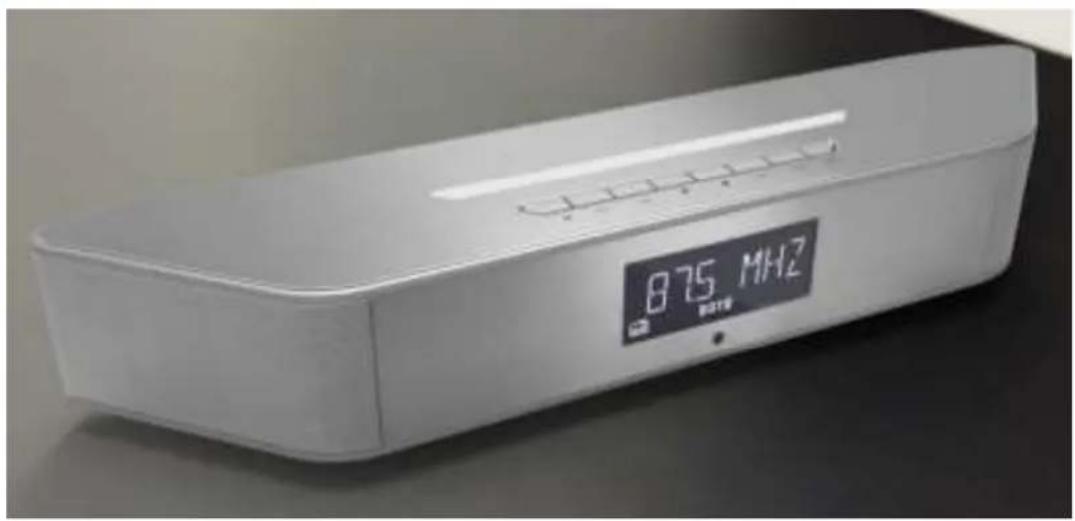
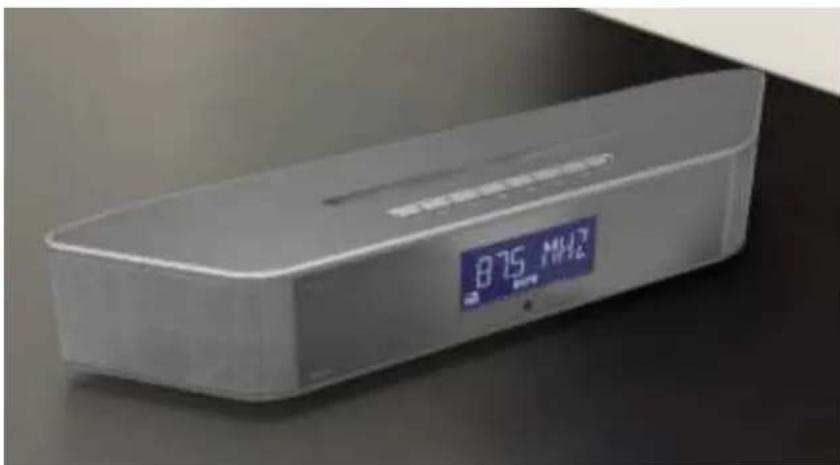
FM 87.50 MHz ~ 108.00 MHz
Do not dispose of this product with the normal household waste at the end of its life cycle. Return it to a collection point for the recycling of electrical and electronic devices. This is indicated by the symbol on the product, user manual or packaging.

The materials are reusable according to their markings. By reusing, recycling or other forms of utilization of old devices you make an important contribution to the protection of our environment.
Please contact your local authorities for details about collection points.


Caution: To reduce the risk of electric shock, do not remove the cover (or back). There are no user serviceable parts inside. Refer servicing to qualified service personnel.

This symbol indicates the presence of dangerous voltage inside the enclosure, sufficient enough to cause electric shock.
This symbol indicates the presence of important operating and maintenance instructions for the device.
Safety, Environmental and Setup Instructions
- Use the device in dry indoor environments only.
- Protect the device from humidity.
- Do not open the device. RISK OF ELECTRIC SHOCK! Refer opening and servicing to qualified personnel.
- Connect this device to a properly installed and earthed wall outlet only. Make sure the mains voltage corresponds with the specifications on the rating plate.
Make sure the mains cable stays dry during operation. Do not pinch or damage the mains cable in any way. - A damaged mains cable or plug must immediately be replaced by an authorized service center.
- In case of lightning, immediately disconnect the device from the mains supply.
- Children should be supervised by parents when using the device.
- Clean the device with a dry cloth only.
Do NOT use CLEANING AGENTS or ABRASIVE CLOTHS!
- Do not expose the device to direct sunlight or other heat sources.
Install the device at a location with sufficient ventilation in order to prevent heat accumulation. - Do not cover the ventilation openings!
- Install the device at a safe and vibration-free location.
- Install the device as far away as possible from computers and microwave units; otherwise radio reception may be disturbed.
- Do not open or repair the enclosure. It is not safe to do so and will void your warranty. Repairs only by authorized service/ customer center.
- Only use mercury and cadmium-free batteries.
- Used batteries are hazardous waste and NOT to be disposed of with the household waste!!
- Return the batteries to your dealer or to collection points in your community.
- Keep batteries away from children. Children might swallow batteries. Contact a physician immediately if a battery was swallowed.
- Check your batteries regularly to avoid battery leakage.
- Batteries shall not be exposed to excessive heat such as sunshine, fire or the like.
- CAUTION: Danger of explosion if battery is incorrectly replaced
- Replace only with the same or equivalent type

Used batteries are hazardous waste and NOT to be disposed of with the household waste! As a consumer you are legally obligated to return all batteries for environmentally responsible recycling - no matter whether or not the batteries contain harmful substances!).
Return batteries free of charge to public collection points in your community or to shops selling batteries of the respective kind.
Only return fully discharged batteries.
*1 marked Cd = cadmium, Hg = mercury, Pb = lead
ENVIRONMENTAL PROTECTION

Do not dispose of this product with the normal household waste at the end of its life cycle. Return it to a collection point for the recycling of electrical and electronic devices. This is indicated by the symbol on the product, user manual or packaging.

The materials are reusable according to their markings. By reusing, recycling or other forms of utilization of old devices you make an important contribution to the protection of our environment.
Please contact your local authorities for details about collection points.


Caution: To reduce the risk of electric shock, do not remove the cover (or back). There are no user serviceable parts inside. Refer servicing to qualified service personnel.

This symbol indicates the presence of dangerous voltage inside the enclosure, sufficient enough to cause electric shock.
This symbol indicates the presence of important operating and maintenance instructions for the device.
Safety, Environmental and Setup Instructions
- Use the device in dry indoor environments only.
- Protect the device from humidity.
- Do not open the device. RISK OF ELECTRIC SHOCK! Refer opening and servicing to qualified personnel.
- Connect this device to a properly installed and earthed wall outlet only. Make sure the mains voltage corresponds with the specifications on the rating plate.
Make sure the mains cable stays dry during operation. Do not pinch or damage the mains cable in any way. - A damaged mains cable or plug must immediately be replaced by an authorized service center.
- In case of lightning, immediately disconnect the device from the mains supply.
- Children should be supervised by parents when using the device.
- Clean the device with a dry cloth only.
Do NOT use CLEANING AGENTS or ABRASIVE CLOTHS!
- Do not expose the device to direct sunlight or other heat sources.
Install the device at a location with sufficient ventilation in order to prevent heat accumulation. - Do not cover the ventilation openings!
- Install the device at a safe and vibration-free location.
- Install the device as far away as possible from computers and microwave units; otherwise radio reception may be disturbed.
- Do not open or repair the enclosure. It is not safe to do so and will void your warranty. Repairs only by authorized service/ customer center.
- Only use mercury and cadmium-free batteries.
- Used batteries are hazardous waste and NOT to be disposed of with the household waste!!
- Return the batteries to your dealer or to collection points in your community.
- Keep batteries away from children. Children might swallow batteries. Contact a physician immediately if a battery was swallowed.
- Check your batteries regularly to avoid battery leakage.
- Batteries shall not be exposed to excessive heat such as sunshine, fire or the like.
- CAUTION: Danger of explosion if battery is incorrectly replaced
- Replace only with the same or equivalent type

Used batteries are hazardous waste and NOT to be disposed of with the household waste! As a consumer you are legally obligated to return all batteries for environmentally responsible recycling - no matter whether or not the batteries contain harmful substances!).
Return batteries free of charge to public collection points in your community or to shops selling batteries of the respective kind.
Only return fully discharged batteries.
*1 marked Cd = cadmium, Hg = mercury, Pb = lead
BT-1308 Wall Mount Lamp Clock Radio With Bluetooth Sound System

1. General Description
- Digital Tuning System (DTS) with PLL technology.
- RDS feature provides radio station name display& automatic clock update.
- Automatic/manual search Up/Down features are provided.
- 64 station memories are provided.
- A.M.S.(automatic memory store) function provided.
- Pre-programmable radio station listening function provided.
- Bluetooth with sounding system function can play any music sources which used and transferred by Bluetooth. Such as: smart phone, tablet computer.
- It's unnecessary password for above version 3.0 to use Bluetooth.
- LED wall mount lamp.
- 24 levels lightness control provided.
- When lightness in the room gets darken suddenly, intelligent lamp will be lighting for one minute and then shutting up slowly.
- The lamp will be turned off after two hours if no any keys have been pressed or operated during lamp is lighting for two hours.
- Lamp function can be turned off by setting sleep timer function.
- Dual alarms can be setting to four modes, daily, workday, weekend and one day independently.
- Alarm can be setting to Bell, Radio or Natural Music.
- Ascending volume of alarm.
- Alarm can be setting the way of lamp lightness ascending in advance and imitating sun-raising to wake up user.
- Sleep time can be setting independently by alarm.
- LCD display.
20, 32 levels electronic volume control in total. - 6 kinds of EQs provided.
- Sleep timer function provided, the max. Sleep timer is 120 minutes.
Technical Data:
Rated Voltage: DC12V 1.5A
Power consumption: 18W
Radio frequency range:
FM 87.50 MHz~108.00 MHz 50 KHz/step
Operating temperature: +5 +35^ C
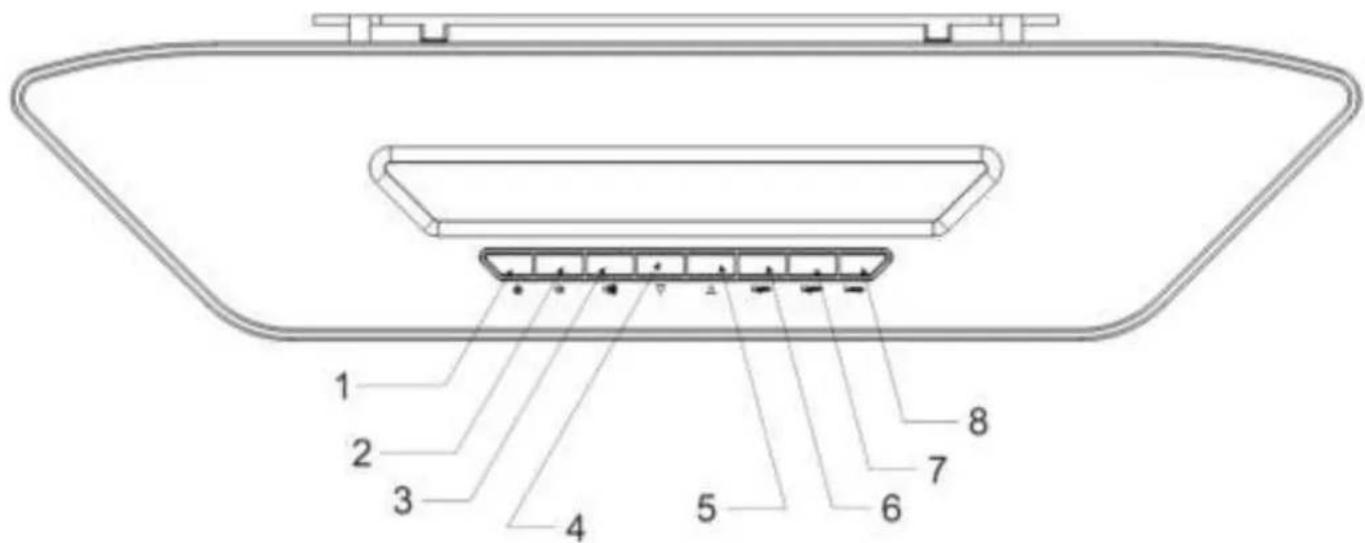
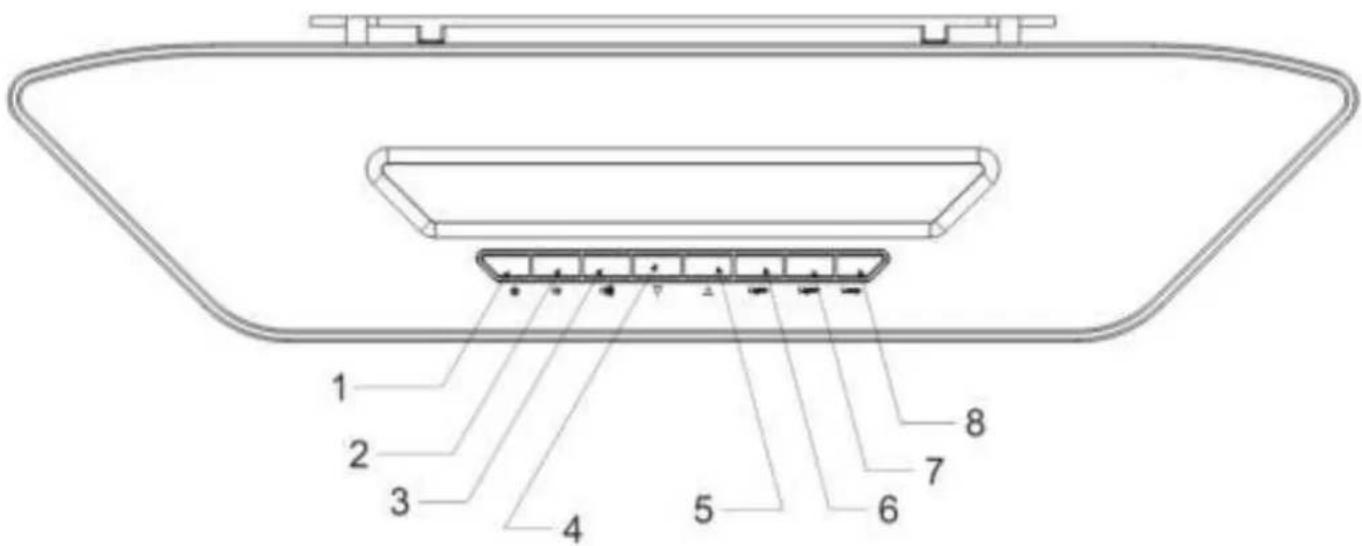
Keys Operating Instruction
- POWER
Turn on or turn off the unit.
- VOL-
Decrease volume/Alarm2/Decrease
- VOL+
Increase volume/Alarm1 / Increase
- DOWN
Tuning down/Seeking down/Play last music/Decrease
- UP
Tuning up/Seeking up/Play next music/Increase
- LIGHT
Decrease lightness
- LIGHT+
Increase lightness
- LAMP
Turn on or turn off lamp
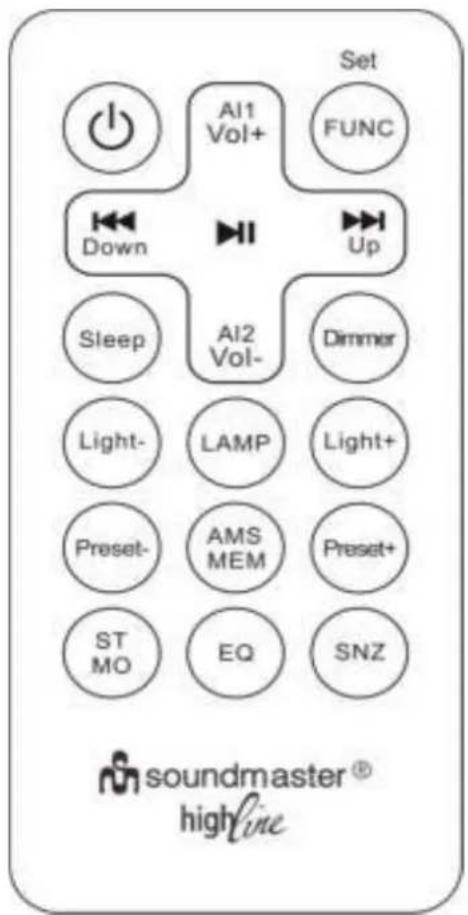
Remote Control Key List
| POWER | AI1/VOL+ | FUNC |
| Down | PLAY | Up |
| Sleep | AL2/VOL- | Dimmer |
| LIGHT- | LAMP | LIGHT+ |
| PRESET- | AMS/MEM | PRESET- |
| ST/MO | EQ | SNOOZE |

Graphic 1: Use drill and screws to fix the plastic holder.
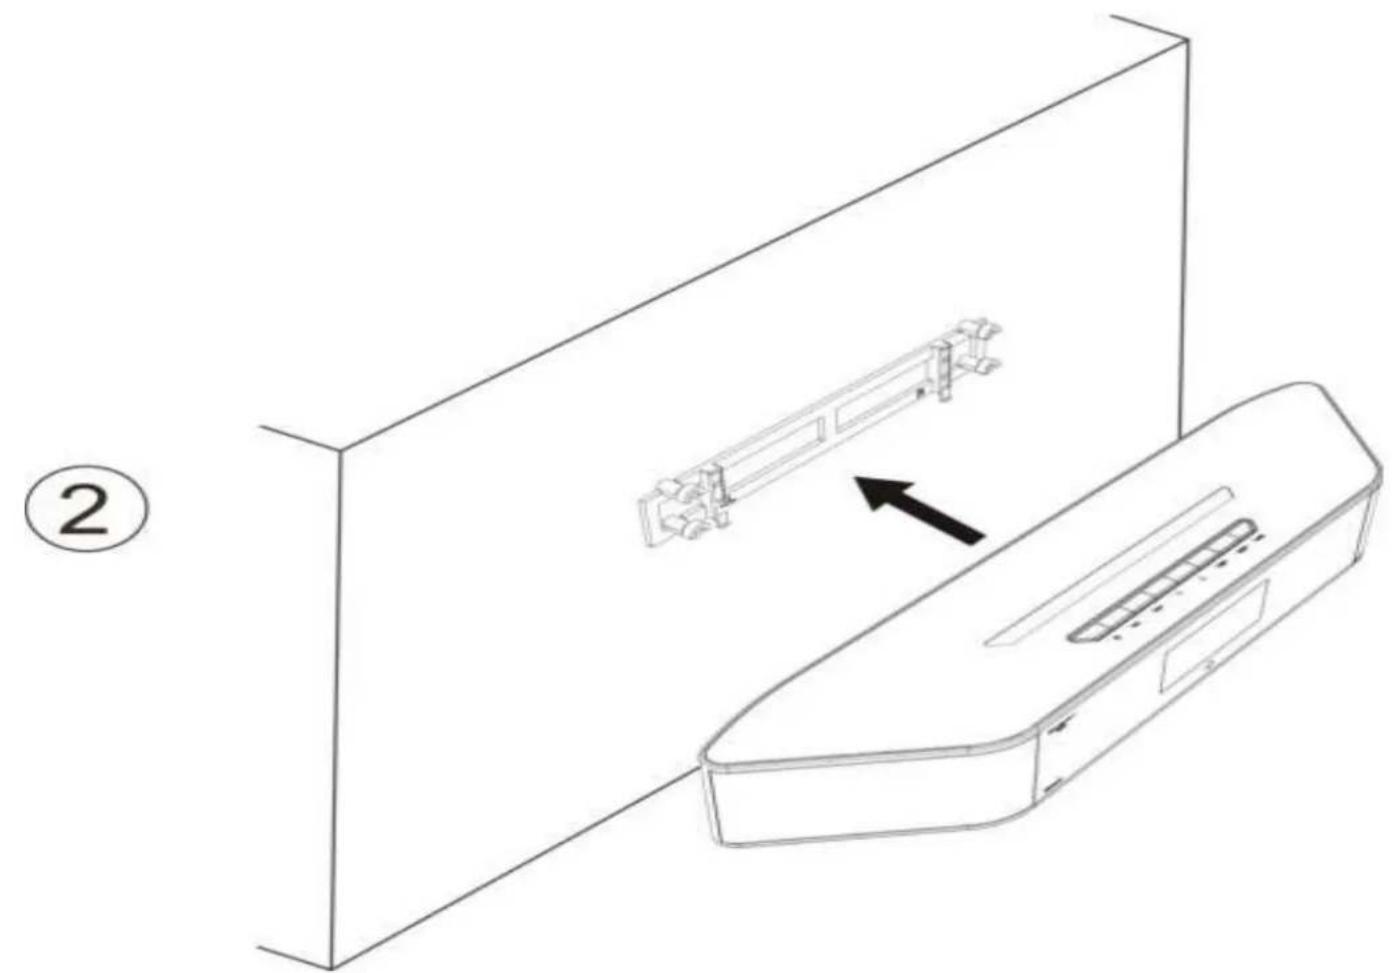
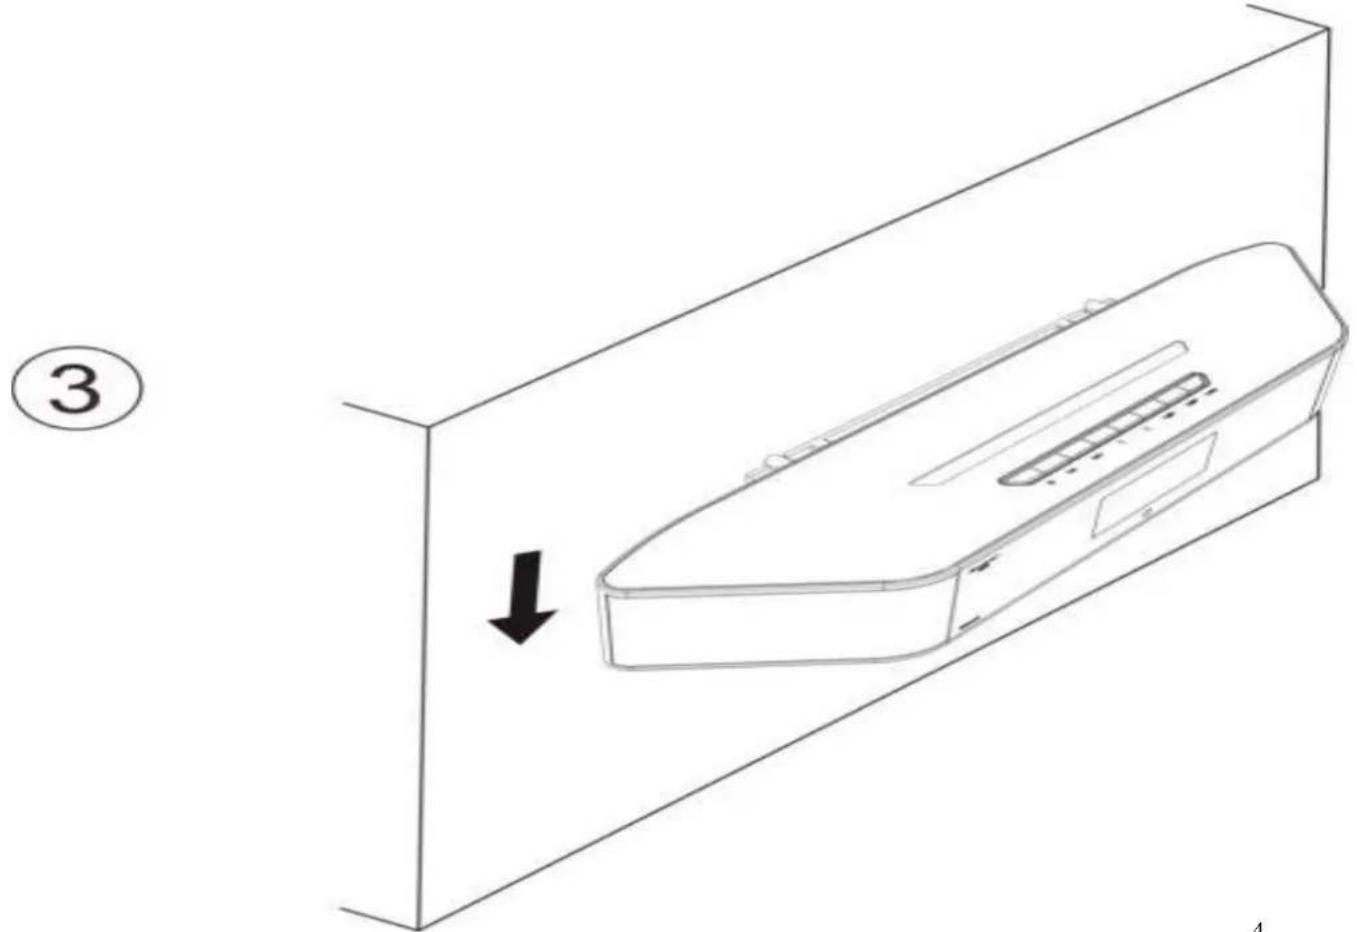
Graphic 2 and 3: Put unit to four fixers, then push unit and toward below direction.
2. How to Use
When the unit is powered up first time, the words of "PLEASE WAIT FOR SETTING THANKS" will be rolling and flashing on LCD display and automatic update time function will start automatically as well as store stations at the same time. The user can press any keys to terminate automatic setting.
The defaulted date& time is 2014.01.01, 0:00 after the automatic update is canceled.
- Alarm defaulted is off and defaulted time is 0:00.
2.1 How to Set Up (Use Remote Control)
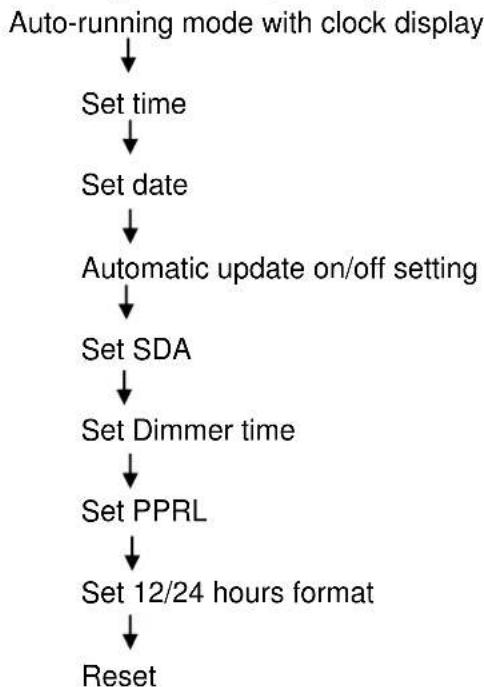
Press【FUNC|SET】key to enter into setting mode under standby mode and then press【FUNC|SET】 repeatedly to enter into all setting modes sequentially.
Note: The unit will be exited or inactivated setting mode if no any keys have been pressed for 15 seconds during setting mode.
2.2 Set Time
Press【Func】key once into setting time mode under auto-running mode.
- Press [Vol_+] key once shortly, minute value increase one time correspondingly.
- Press and hold [Vol+] key to increase time by ten minutes in a fast mode.
- Press 【Vol-】 key once shortly, minute value decrease one time correspondingly.
- Press and hold 【Vol-】 key to move back time by ten minutes in a fast mode.
- Press 【Func】 key once shortly into setting date mode.
2.3 Set Date
Press【Func】key once into setting date mode under setting time mode.
- Press [Vol + ] key once shortly, date value increase one time correspondingly.
- Press and hold [Vol_+] key to increase date by ten days in a fast mode.
- Press 【Vol-】 key once shortly, date value decrease one time correspondingly.
- Press and hold 【Vol-】 key to decrease date by ten days in a fast mode.
- Press 【Func】 key once shortly into setting 12/24 hours format mode.
2.4 Set Update On/Off Mode
- Press [Vol + ] or [Vol - ] key to select On or Off.
- Press 【 Func 】key once into setting SDA mode.
2.5 Set SDA
- Press 【 Func 】 key into setting SDA mode under 12/24 hours format mode.
- Press 【Up】 or 【Down】 key to select and set SDA mode, SDA On/Off mode and SDA date mode.
- Press [Vol+] or [Vol-] shortly to select SDA1, SDA2, SDA3, SDA4, SDA5 and SDA6 under setting SDA mode.
- Press [Vol+] or [Vol-] shortly to select ON/OFF under setting SDA On/Off mode.
- Press [Vol+] or [Vol-] key to increase date or decrease date by one day. Press and hold [Vol+] or [Vol-]
key to increase or decrease date by ten days in a fast mode.
- Press【Func】key shortly into setting wake up time mode.
2.6 Set Dimmer Timer
- Press 【Up】 or 【Down】 key to select and set DT switch mode, DT start mode and DT end mode.
- Press [Vol+] or [Vol-] key shortly to select DT ON/OFF during setting DT switch mode.
- Press [Vol + ] or [Vol - ] key shortly to increase or decrease time by one minute and hold them to increase or decrease by ten minutes in a fast mode under set DT START and DT End modes.
- Press 【Func】 key shortly into setting PPRL.
2.7 Set Pre-Programmable Radio Station Listening (Abbreviation:PPRL)
- Press [Up] or [Down] key to select and set PPRL switch mode,PPRL start Time mode,PPRL End Time mode or radio station frequency mode.
- Press [Vol + ] or [Vol - ] key shortly to select PPRL On or Off under DT switch setting mode.
- Press [Vol+] or [Vol-] key shortly, minute value increase or decrease value one, press and hold them to increase or decrease time by ten minutes in a fast mode under setting PPRL Start and PPRL End modes. Press [Vol+] or [Vol-] key shortly, frequency increase 0.1MHz or decrease 0.1MHz. Press and hold [Vol+] or [Vol-] key to increase 10MHz or decrease 10MHz continually when setting PPRL station frequency.
- Press [Func] key to enter into setting 12/24 hours mode.
2.8 Set 12/24 Hours Format
Press [Func] key into 12/24 hours setting mode under setting PPRL mode.
- Press [Vol+] or [Vol-] key to select 12 or 24 hours format alternatively.
- Press【Func】key into RESET mode.
2.9 Set RESET Mode
- Press [Vol+] or [Vol-] key into RESET mode.
- Press【Func】key shortly to exit setting mode.
2.10 Alarm Setting
- Press【AL1】key to enter into Alarm 1 mode under standby condition.
- Press【AL1】key to toggle alarm setting mode, alarm ring output setting mode, sleep time setting mode or setting LAMP wake-up time.
- Press【Up】or【Down】key to select setting content.
When the unit stays on alarm setting mode:
Press【Up】or【Down】key to increase or decrease time by one minute.
Press and hold [Up] or [Down] key to advance or move back by ten minutes in a fast mode.
When the unit stays on alarm ring output setting mode:
,Press【Up】or【Down】key shortly and select to turn off alarm,BUZZ,RADIOand natural wake-up modes.
When the unit stays on setting alarm wake-up mode:
- Press [Up] or [Down] key shortly and select to wake up everyday, wake up workdays, wake up f weekend and wake up one day repeatedly.
- When the unit stays on setting sleep timer and LAMP wake-up time modes:
- Press【Up】or【Down】key shortly, time increase value one or decrease value one.
- Press and hold [Up] or [Down] key, time increase value ten or decrease value ten.
Note: The way of setting for AL2 is the same as AL1.
3.1 How to Turn On/Off Radio, Bluetooth and Natural Music
- Press【Power】key to select Radio, Bluetooth or Natural Music under standby condition.
- Press【Power】key once again to turn off radio, Bluetooth or natural music.
3.2 How to Adjust Volume
- As press [Vol+] key once the volume increase one level, press and hold it to increase volume in a fast mode.
As press [Vol-] key once the volume decrease one level, press and hold it to decrease volume in a fast mode.
3.3 EQ Setting
Press [EQ] key shortly to select EQ mode, FLAT ,POP, JAZZ,ROCK,BASS and CLASSICS, six styles in total.
3.4 How to Use Radio
3.4.1 Tune Radio Receiving Station Frequency Manually
The unit stays on radio condition.
- Press【Up】key to tune up frequency by 100KHz.
- Press【Down】key to tune down frequency by 100KHz.
3.4.2 Automatic Searching Stations
- Press and hold [Up] key to search up valid stations.
- Press and hold 【Down】 key to search down valid stations.
3.4.3 How to Use AMS
- Press and hold [MEM] key to enter into AMS and show station name&position.
- Pressing any keys can terminate or exit AMS mode.
- When the unit finishes searching stations and turning off automatically, it will play every station.
3.4.4 How to Store Sation Memories
- Press and hold [MEM] key to enter into memory condition and show station name&position.
- Press [PRESET+] or [PRESET-] key to select memory position.
- Press【MEM】key shortly to finish setting memories.
3.4.5 How to Use Station Memories
- Press [PRESET+] key to read the next memory frequency position and jump to it.
- Press 【PRESET-】 key to read the last memory frequency position and jump to it.
3.4.6 How to Turn On Stereo
- Press 【ST/MO】 key t shortly once to view the current setting and press it once again to toggle STERO ON/OFF.
3.5 How to Use Bluetooth
3.5.1 How to Connect to Bluetooth Music Resource
The unit stays on Bluetooth condition and turn on music resource equipment with Bluetooth function. Then search for WL-1308BT, the mark "WL-1308" will be shown on LCD display if found music resource and then it will remind connecting successfully.
Note:It is necessary for below version 3.0 Bluetooth to enter password and the defaulted password is 0000.
3.5.2 How to Play Music
- Press【PLAY/ST】key to start playing and press it once again to terminate playing.
- Press 【Up】 key to play the next music.
- Press 【Down】 key to play the last music.
3.6 How to Play Natural Music
- Press【PLAY/ST】key to start playing and press it once again to terminate playing.
- Press【Up】key to play the next natural music.
- Press【Down】key to play the last natural music.

soundmaster
English Instruction Manual
3.7 How to Use SLEEP Function
- When the unit stays on standby mode, using sleep function can terminate LAMP.
- When the unit tums on, using sleep function can terminate unit and LAMP.
- Press【Sleep】key to turn on sleep function and the defaulted time is 120 minutes.
Press【Sleep】key to adjust sleep time value by five minutes. - Pressing and holding【Sleep】key can cancel sleep function.
- When the sleep time is 5 minutes, press【Sleep】key once again to cancel sleep function.
3.8 How to Control Backlight
- Press [Dimmer] key shortly to turn on or off Dimmer function. When it's powered up, backlight will gets darken if no any keys have been pressed.
3.9 Alarm Wake-Up
- Press [SNOOZE] key to enter into sleeping mode and the alarm mark will be flashing on LCD display. It will wake up alarm again after presetting sleeping time.
- When unit turns on sleeping mode and stays on standby mode, press [AL1] to cancel Alarm1 and press [AL2] to cancel Alarm2.
The unit will stop waking up alarm if no any keys have been pressed after waking up alarm within ten minutes.
3.10 SDA Wake-Up
- When SDA presetting date wakes up press any keys to terminate it. If no keys have been pressed while SDA wakes up, it will be waking up at the beginning of next hour and terminating after 22 hours.
3.11 LED Light
Press【LAMP】to turn on or turn off LED light. Press【light+】to increase lightness and press【light-】 to decrease lightness, press and hold them to increase or decrease lightness rapidly.
3.12 EU Directive on Eco-Design (ErP)
When device work with a media source by Bluetooth, it's should be automatic power off and change to
PROTECTION DE L'ENVIRONNEMENT

2.4.4.10.3 stations in hot gehouen on to slown

soundmaster
Nominell spenting: 12 V DC, 1.5 A
Strømforbruk: 18 W
- Track [Vol] - aller [Vol] - taster for RESET mode

soundmaster
*) markerade Cd = kadmium, Hg = kvicksilver, Pb = bly
BT-1308 Vaggmonterad lampklockradio med Bluetooth-ljudsystem
1. Allman beskrivning
FM 87.50 MHz~108.00 MHz 50 kHz/steq
Drifttemperature: +5 +35^ C