Comfortcook 99329 - Oven TREBS - Free user manual and instructions
Find the device manual for free Comfortcook 99329 TREBS in PDF.

User questions about Comfortcook 99329 TREBS
0 question about this device. Answer the ones you know or ask your own.
Ask a new question about this device
Download the instructions for your Oven in PDF format for free! Find your manual Comfortcook 99329 - TREBS and take your electronic device back in hand. On this page are published all the documents necessary for the use of your device. Comfortcook 99329 by TREBS.
USER MANUAL Comfortcook 99329 TREBS
natural_image
Black Trecos portable toaster with a golden-brown baked chicken on its side, no visible text or symbols on the device itself.Handleiding elektrische oven Bedienungsanleitung Elektrobachofen Instrucon manual electric oven Mode d'emploi four électrique
Index
Nederlands 3
Deutsch....14
English 25
Français....35
Nederlands
BELANGRIJKE VEILIGHEIDSVOORSCHRIFTEN
text_image
Exploded view diagram of a microwave oven with labeled parts from O to Hnatural_image
Pure structural diagram of a horizontal beam with flanged ends and evenly spaced circular supports (no text or symbols)CORRECT

natural_image
Pure diagram of a horizontal pipe or beam with two flanged ends and evenly spaced circular holes (no text or symbols)FOUT
text_image
Exploded view diagram of a microwave oven with labeled parts from O to Htext_image
Warning symbol with three steam lines inside a triangle, indicating heat or smoke hazard.IMPORTANT SAFETY INSTRUCTIONS
When using your Electric Oven, basic safety precautions should always be observed, including the following:
- Read all instrucons.
- Do not touch hot surfaces. Always use handles or knobs.
- Close supervision is necessary when any appliance is used by or near children.
- To protect against electric shock, do not immerse cord, plug or any parts of the oven in water or any other liquids.
- Do not let cord hang over edge of table or counter, or touch hot surfaces.
- Do not operate the appliance with damaged cord or plug, or aer the appliance malfuncons or has been damaged in any manner. Return the appliance to the nearest authorized service facility for examinaon, repair or adjustment.
- The use of accessory aachments are not recommended by the appliance manufacturer they may cause hazard or injury.
- Do not place on or near a hot gas or electric burner.
- The rear surface of the appliance which, according to the instrucons, shall be placed against a wall; and are not accessible with test probe 41 of EN61032.
- Unplug from outlet when not in use and before cleaning. Allow to cool before installing or taking o parts, and before cleaning.
- To disconnect, turn the me control to OFF, then remove the plug. Always hold the plug, and never pull the cord.
- Extreme cauon must be used when moving a drip pan containing hot oil or other hot liquids.
- Do not cover any part of the oven with metal foil. This may cause the oven to overheat.
14.
Use extreme cauon when removing the tray, racks or disposing of hot grease or other hot liquids.
- Do not clean the inside of the oven with metal scouring pads, pieces can break o the pad and touch electrical parts, creang a risk of electric shock.
- Oversized foods or metal utensils must not be inserted in a toaster oven as they may cause a re or pose electric shock hazards.
- A re may occur if the oven is covered or touching ammable material, including curtains, draperies, walls, and the like, when in operaon. Do not store any item on top of the appliance when in operaon.
- Extreme cauon should be exercised when using cooking or baking containers constructed of anything other than metal or ovenproof glass.
- Be sure that nothing touches the top or boom elements of the oven.
- Do not place any of the following materials in the oven: cardboard, plasc, paper, or anything similar.
- Do not store any materials other than manufacturer's recommended accessories in this oven when not in use.
- Always wear protecve, insulated oven gloves when inserng or removing items from the hot oven.
- This appliance has a tempered, safety glass door. The glass is stronger than ordinary glass and more resistant to breakage. Tempered glass can sill break around edges. Avoid scratching door surface or nicking edges.
- This appliance is OFF when the Timer Control buon is in the "OFF" posion.
- Do not use outdoors.
- Do not use appliance for purposes other than those that were originally intended for.
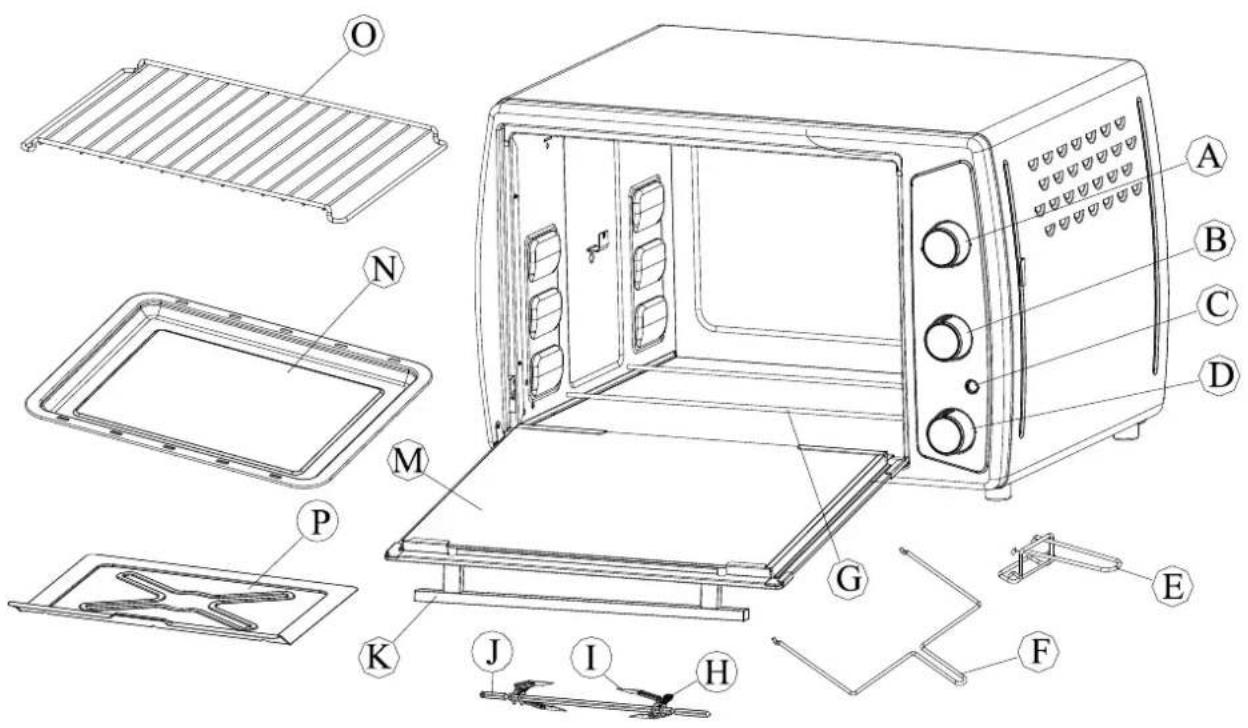
MAIN COMPONENTS
text_image
Exploded diagram of a microwave oven with labeled parts from O to HA: Temperature Control Knob
B: Funcon Control Knob
C: Indicator Light
D: Timer Control Knob
E: Tray Handle
F: Rosserie Sha Handle
G: Heang Element
H: Thumbscrew
I: Fork
J: Rosserie Sha
K: Door Handle
M: Glass Door
N: Bake Tray
O: Wire Rack
P: Crumb Tray
THE USE OF THE OVEN
▲ Before using your oven for the rst me, be sure to:
- Read all of the instrucon included in this manual.
- Make sure the oven is unplugged and all the control knobs are in the "OFF" posion.
- Wash all the accessories in hot, soapy water or in a dishwasher.
- Thoroughly dry all accessories and re-assemble in oven, plug oven into outlet and you are ready to use your new electric oven.
- Aer re-assembling your oven, we recommend that you run it at the highest temperature (230°C) on the temperature control knob (A) for approximately 15 minutes to eliminate any packing residue that may remain aer shipping. This will also remove all traces of odour initially present.
Please Note:
Initial start-up operaon may result in minimal smell and smoke (about 15 minutes). This is normal and harmless. It is due to burning of the protecve substance applied to the heang elements in the factory.
Using your hotplate oven
Please familiarize yourself with the following oven funcons and accessories prior to rst use:
-
Temperature Control Knob (A): This oven will only turn on when you acvate this thermostat. Turn to the right (clockwise) to choose the desired temperature from 90^ to 230^ for baking, broiling or toasng.
● Funcon Control Knob (B): This oven is equipped with 6 posions for a variety of cooking needs: -
OFF.
-
☐: For baking cakes, pies, cookies, poultry, beef, pork, etc. (upper & lower heang with convecon)
- ☐: For broiling sh, steak, poultry, pork chops, etc. (upper heang with convecon)
- For toasng bread, muns, frozen waes, pizza, etc. (upper & lower heang)
- For roast or chicken, etc. (upper heang with rosserie)
- For roast or chicken, etc. (upper & lower heang with rosserie and convecon)
- Timer Control Knob (D): When you acvate the mer segment of the control, turn to the right (clockwise) to toast or use as a mer. This funcon also has a bell ring at the end of the programmed me. If you expect a longer cooking me of more than 60 minutes, you can turn to the le (anclockwise) to choose "stay on", in this case the oven will keep working until you manually turn it to the o posion.
● Bake Tray (N): For use in broiling and roasng meat, poultry, sh and various other foods.
● Wire Rack (O): For toasng, baking, and general cooking in casserole dishes and standard pans.
● Tray Handle (E): Allows you to pick up the wire rack and bake tray when they are hot.
- Crumb Tray (P): Always keep crumb tray in place to collect crumbs and drips during cooking. Clean regularly.
About Convecon Cooking
Convecon cooking combines hot air movement by means of a fan with the regular features (broil, bake and toast). Convecon cooking provides faster cooking in many cases than regular radiant type toaster ovens. The fan gently sends air to every area of the food, quickly browning, crisping and sealing in moisture and avour. It produces even more temperature all around the food by air movement, so that food cooks/bakes/broils more evenly when compared to the hot and cold spots in normal ovens. The convecon feature allows cooking/baking at lower temperatures, which saves energy and helps to keep the kitchen cooler. Convecon air is superheated and it circulates around the food so it cooks the food significantly faster than convenonal ovens.

CAUTION:
To avoid the risk of injury or burns, do not touch hot surfaces when the oven is in use. Always exercise extreme cauon when removing bake tray, wire rack or any hot containers from a hot oven. Always use the tray handle, or an oven mi when removing hot items from the oven.
ROTISSERIE
We recommend that you do not cook a roast larger than 4-5 lbs. on the rosserie sha. The Chicken should be bound with a string to prevent the chicken legs or wings from unravelling during roasng and so that the rosserie assembly will rotate smoothly. For a good result we recommend that you preheat the oven for 15 minutes on 230°C.
Operaon
- Set the temperature control to 230°C.
- Insert the meat or poultry that you are going to cook onto the rosserie sha (J) making sure that the meat or poultry is secured ghtly onto the sha with the forks (I) and thumbscrews (H). Make sure that the meat or poultry is centred onto the sha.
- Insert the pointed end of the rosserie sha into the drive socket located on the right hand side of the oven wall. Make sure that the square end of the rosserie sha rests on the rosserie sha support located on the le hand side of the oven wall.
- Slide the bake tray onto the lowest posion to catch the food drippings.
- Turn funcon control to the 5 ^th or 6 ^th posion.
● Turn the mer control knob to the desired posion. - If you set the funcon control to the 6 ^th posion, please ll up enough water into the bake tray to avoid burning the tray boom.
- When cooking is completed, turn the mer control knob to the "OFF" posion.
- Remove the rosserie sha from the oven by placing the hooks of the rosserie sha handle (F) under the grooves on either side of the rosserie sha, li the le side of the rosserie sha rst by liing it
up and out. Then pull the rosserie sha out of the drive socket and carefully remove the roast from the oven.
● Take the meat or poultry o the rosserie sha and place it on a cung board or plaer.
Rosserie Guide
Cooking results may vary. Adjust these mes to your individual requirements.
| MEAT | OVEN TEMP | TIME PERLB. |
| PORK ROAST | 200°C | 45-50min |
| HAM | 200°C | 45-50min |
| CHICKEN | 230°C | 30-40min |
| TURKEY | 230°C | 30-40min |
Note: All roasng mes are based on meats at refrigerator temperature. Frozen meats may take considerably longer. Therefore, use of a meat thermometer is highly recommended.
BROIL
For the best results, it is recommended that you preheat the oven for 15 minutes on 230°C.
Operaon
- Set the temperature control to 230°C.
- Turn the funcon control to the 3 ^rd posion and preheat the oven.
- Place the wire rack on top of the bake tray.
● Place food on the wire rack.
● Food should be placed as close as possible to the top heang element without touching it. - Set temperature control to appropriate temperature.
● Turn the mer control knob to desired posion.
● Brush the food with sauces or oil, as desired. - It is advisable to leave the door slightly ajar.
● Turn the food over midway through the desired cooking me. - When broiling is completed, turn the mer control knob to the "OFF" posion.
Broiling Guide
Cooking results may vary. Adjust these mes to your individual requirements. Also, check oen during broiling to avoid overcooking.
| MEAT | OVEN TEMP | COOKING TIME |
| RIB STEAK | 230°C | 25-30 min |
| T-BONE STEAK | 230°C | 25-30 min |
| HAMBURGER | 230°C | 25-28 min |
| PORK CHOPS | 230°C | 40-45 min |
| LAMB CHOPS | 230°C | 30-40 min |
| CHICKEN LEGS | 230°C | 30-35 min |
| FISH FILETS | 200°C | 20-25 min |
| SALMON STEAKS | 200°C | 20-25 min |
Note: All roasng mes are based on meats at refrigerator temperature. Frozen meats may take considerably longer. Therefore, use of a meat thermometer is highly recommended.
TOAST
Please note that the TOAST funcon uses all the heang elements. This large capacity oven allows for toasng 4 to 6 slices of bread, 6 muns, frozen waes or frozen pancakes. When toasng only 1or 2 items, place food on the bake rack in the centre of the oven.
Operaon
- Set the temperature control to 230°C.
- Turn the funcon control knob to the 2 ^nd or 4 ^th posion.
● Place food on the wire rack.
● Turn the mer control knob to the desired posion. - When toasng is completed, turn the mer control knob to the "OFF" posion.
Note: Wire Rack should be posioned in the middle of the oven with the indentations poinng down.
BAKE
Please note that the BAKE funcon mainly uses the heat from the boom heang elements. For the best results, it is recommended that you preheat the oven for 15 minutes on 230°C.
Operaon
- Set the temperature control to 230°C.
- Turn the funcon control to the 2 ^nd posion and preheat the oven.
- Place the wire rack on the lowest or middle rack support guide.
- Place the food on the wire rack.
● The food should be placed as close as possible to the lower heang element without touching it. - Set the temperature control to the appropriate temperature.
● Turn the mer control knob to the desired posion.
● Brush food with sauces or oil, as desired. - It is advisable to leave the door slightly ajar.
● Turn the food over midway through the desired cooking me. - When baking is completed, turn the mer control knob to the "OFF" posion.
POSITION OF WIRE RACK
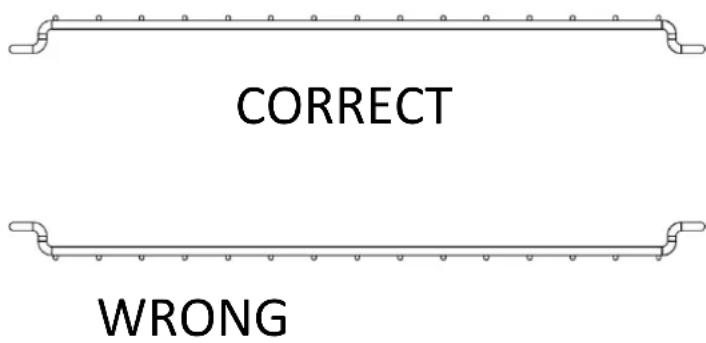
text_image
CORRECT WRONGCookies – Use boom and middle support guides.
Layer Cakes – Use boom support guide only.
Pies – Use boom and middle support guides.
TECHNICAL SPECIFICATIONS
| Model | 99329 |
| Voltage | 220-240V~ 50/60Hz |
| Power | 2200W |
| Max. capacity | 63L |
CLEANING AND MAINTENANCE
Warning: Be sure to unplug the oven and allow it to cool before cleaning.
Your oven features a clean coang that automacally cleans itself during normal operaon. Any splaering that occurs while cooking and comes into contact with the connuous coang is oxidized while the oven is in operaon. If desired, wipe the walls with a damp sponge, cloth or nylon scouring pad and mild detergent. DO NOT use steel wool scouring pads, abrasive cleaners or scrape the walls with a metal utensil, as all of these methods may damage the connuous clean coang.
All accessories should be washed in hot soapy water or cleaned in a dishwasher. The door can be wiped with a damp sponge and wiped dry with a paper or cloth towel. Clean the outside with a damp sponge. DO NOT use an abrasive cleaner as it may damage the exterior nish.
DO NOT use an abrasive cleaner or steel wool scouring pad on the drip pan as it may damage the porcelain enamel nish.
Let all parts and surfaces dry thoroughly prior to plugging oven in and using.
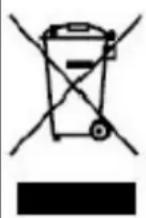
This symbol indicates that the relevant electrical productor baery should not be disposed of as general household waste in Europe. To ensure the correct waste treatment of the product and baery, please dispose them in accordance to any applicable local laws of requirement for disposal of electrical equipment or baeries. In so doing, you will help to conserve natural resources and improve standards of environmental protecon in treatment and disposal of electrical waste (Waste Electrical and Electronic Equipment Direcve).
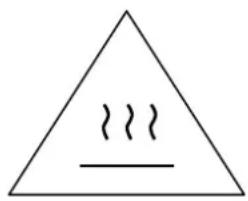
SPECIAL WARNING
text_image
Warning symbol with three steam lines inside a triangle, indicating heat or smoke hazard.Cauon: The temperature of the accessible surface may be high when the appliance is operaon.
IMPORTANT PRECAUTIONS
- This appliance is not intended to be put in operaon using an external mer or an external remote control system.
- This appliance is not aimed to be used by persons (including children) whose physical, sensitive or mental abilities are reduced, or who don't have knowledge or experience of its use, unless they have been previously instructed about the use of this appliance, or are under surveillance of someone responsible for their safety.
- This appliance can be used by children from 8 years old and the people with little experience or knowledge or whose physical, sensorial or mental abilities are reduced, if they have been trained and supervised regarding the safe use of this appliance and are aware of the risks. Children should not play with this appliance. The cleaning and maintenance by the user should not be made by children unless they are over 8 years old and under supervision.
- Keep this appliance and the power cord away from children under 8 years old. Your appliance was intended for domestic use only. It was not designed to be used in the following cases which are not covered by the warranty:
- In kitchen spaces for the sta in shops, oces and other work environment;
- In farm houses;
- By the guests in hotels, motels and other residential type environments;
- In environments such as Bed & Breakfasts.
If the power cable is damaged, it must be replaced by the producer, its support service centre or persons with similar qualicaon so as to prevent any risk.
- We provide a 24 month guarantee for this product, commencing from the date of sale, for faults which are attributable to producon or material faults.
- Your legal guarantee entitlements in accordance with § 439. BGB-E remain unaacted by this.
- The guarantee does not include damages, which were incurred as a result of improper handling or use, as well as malfuncons which only have a minor eect on the funcon or the value of the device.
Consumables, transit damages, inasmuch as we are not responsible for these, as well as damages, which were incurred as a result of any repairs that were not performed by us, are also excluded from the guarantee entlements. - This device is designed for use in domesc situaons and has the appropriate performance levels.
- Any use in commercial situations is only covered under the guarantee to the extent that it would be comparable with the stresses of being used in a domestic situation. It is not intended for any additional, commercial use.
- In the event of jused complaints, we will repair the faulty device at our discretion or replace it with a trouble-free device.
Any pending faults must be reported within 14 days of delivery. All further claims are excluded.
To enforce a guarantee claim, please contact us prior to returning the device (always provide us with proof of purchase).
SERVICE
If you have any further quesons about the product aer reading this manual, please contact the Trebs customer service: info@trebs.nl
Telephone: 0900-TREBSbv (0900-873 27 28), € 1,00 each call exclusive the regular costs.
Trebs BV
Thermiekstraat 1a, 6361 HB, Nuth, the Netherlands, Email: info@trebs.nl, Internet: www.trebs.nl
Trebs oers service and warranty in accordance to European law, which means that in case of repair (both during and aer the warranty period), you should contact your local dealer.
Please note: It is not possible to send products directly to Trebs for repair.

Products with the CE marking comply with the EMC Directive (2004/108/EC) and the Low Voltage Directive (2006/95/EC) issued by the Commission of the European Community.
®All rights reserved