Comfortcook 99375 - Oven TREBS - Free user manual and instructions
Find the device manual for free Comfortcook 99375 TREBS in PDF.
| Product type | Contact grill / Panini press |
| Brand | Trebs |
| Model | Comfortcook 99375 |
| Power supply | 220-240 V ~ 50/60 Hz, 750 W |
| Main functions | Contact cooking, automatic preheating, temperature indicator light, safety latch |
| Care and cleaning | Clean with a damp cloth and mild soap; do not immerse; do not use abrasive cleaners or metal utensils |
| Safety | Do not touch hot surfaces; use gloves; unplug before cleaning; do not use near water; do not leave unattended |
| Spare parts and repairability | No user-serviceable parts; contact Trebs customer service for repairs |
| General information | Household use, 24-month warranty, recipes included |
Frequently Asked Questions - Comfortcook 99375 TREBS
User questions about Comfortcook 99375 TREBS
0 question about this device. Answer the ones you know or ask your own.
Ask a new question about this device
Download the instructions for your Oven in PDF format for free! Find your manual Comfortcook 99375 - TREBS and take your electronic device back in hand. On this page are published all the documents necessary for the use of your device. Comfortcook 99375 by TREBS.
USER MANUAL Comfortcook 99375 TREBS
natural_image
Two black grating machines with diamond-shaped covers and one open with food cutlery (no visible text or symbols)Handleiding Handtas contactgrill
natural_image
Black handbag with diamond pattern and two labeled accessories (1 and 2), no visible text or symbols on body.natural_image
Close-up of a black kettlebell with diamond pattern and handle, featuring a small orange bow on the handle (no text or symbols visible)natural_image
Close-up of a hand using a spatula to apply yellow substance on a black griddle (no text or symbols visible)natural_image
Stacked sandwich with lettuce, tomato, and greens on a white plate (no text or symbols visible)Bereidingswijze
READ ALL INSTRUCTIONS BEFORE USING THIS APPLIANCE!
IMPORTANT SAFETY INSTRUCTIONS
When using electrical appliances, basic safety precautions should always be followed, including the following:
Read all instrucons before using
- Do not touch hot surfaces. Use handles or knobs.
- To protect against electrical shock, do not immerse the cord, plugs, or the appliance in water or other liquid.
- Unplug from outlet when not in use and before cleaning. Allow to cool before pung on or taking o parts.
- Do not operate any appliance with a damaged cord or plug or aer the appliance malfuncons or has been damaged in any manner. No user-serviceable parts inside. Return appliance to the nearest authorized service facility or call our toll-free customer service number for informaon on examinaon, repair, or adjustment.
- The use of accessory aachments not recommended by the appliance manufacturer may cause injuries.
- Do not use outdoors.
- Do not let the cord hang over the edge, table or counter, or touch hot surfaces.
- Do not place on or near a hot gas or electric burner, or in a heated oven.
- When appliance is ready aer about 3 minutes, the temperature indicator light (the green one) will be o.
- This appliance is for household use only.
- Close supervision is necessary when any appliance is used by or
near children.
- Do not use the unit near gas or other inammable materials (such as benzene, paint thinner, sprays, etc.)
- Warning: Do not use this appliance near water.
- This product should not be used in the immediate vicinity of water, such as bathtub, washbowls, swimming pool etc. where the likelihood of immersion or splashing could occur.
- The use of aachments or accessories not recommended or sold by the product distributor may cause personal or property hazards or injuries.
- Do not leave the appliance unaended when switched on.
- Do not use the appliance for other than intended use.
- Always attach the plug to the appliance rst, then plug the cord in the wall outlet.
- To disconnect, remove the plug from the wall outlet.
- Extreme cauon must be used when moving an appliance containing hot oil or other hot liquids.
- The appliance is only to be operated in the closed posion.
WARNING: To prevent electric shock, unplug before cleaning.
-
If the supply cord is damaged, it must be replaced by the manufacturer, its service agent or similarly qualified persons in order to avoid a hazard.
-
This appliance is not intended for use by persons (including children) with reduced physical, sensory or mental capabilities, or lack of experience and knowledge, unless they have been given supervision or instrucon concerning use of the appliance by a person responsible for their safety.
-
Children should be supervised to ensure that they do not play with the appliance.
-
The appliance is not intended to be operated by means of an external mer or separate remote-control system.
- The temperature of accessible surfaces may be high when the appliance is operang.
THIS APPLIANCE IS INTENDED FOR INDOOR HOUSEHOLD USE ONLY.
DO NOT OPERATE APPLIANCE IF THIS LINE CORD SHOWS ANY DAMAGE, OR IF APPLIANCE WORKS INTERMITTENTLY OR STOPS WORKING ENTIRELY
SAVE THESE INSTRUCTION
THE PARTS
- Housing
- Heat indicator lamp
- Safety cover

natural_image
Black handbag with diamond pattern and a bow tie, labeled 1, 2, and 3 (no text or symbols on the bag itself)OPERATING INSTRUCTIONS
NOTE: When using the appliance for the rst me, aer unpacking, open the lid, clean the cooking surfaces thoroughly by whipping with a damp sponge and dry the surfaces with a paper towel. For best results, prepare the non-sck surfaces by using a paper towel to wipe a thin layer of vegetable shortening or oil onto the non-sck surfaces of the appliance.
CAUTION: always use protecve, heat-resistant, gloves or mis when handing this product to avoid steam or other burns.
Example: how to make food
- Always preheat before use. Plug the cord into a rang 220-volt AC power outlet while preparing the llings.
- The indicator light will illuminate when the plug is connected to the main outlet; it will stay on during preheang, the indicator light shut o when the appliance has preheated.

natural_image
Close-up of a black handbag with triangular mesh and a small colorful bow on the side (no text or symbols visible)CAUTION: always preheat before use.
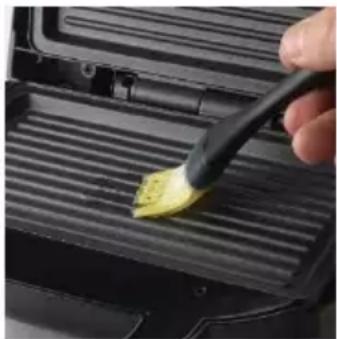
- Lightly glaze both heang plates with a small amount of vegetable oil or a non-sck spray, and close the casing for the appliance to heat up.
natural_image
Close-up of a hand using a brush to apply yellow paint on a black griddle (no text or symbols visible)-
Begin heang. Aer about 3 minutes, the orange light will turn o, indicang that the appliance is ready for use.
-
When preparing paninis; buer the bread on outer surfaces and placing desired ingredients within. Li safety cover and open the appliance. Place the paninis on the heang plates.
CAUTION: cooking surface is hot; handle with care.
- Close the casing to ensure that the panini is placed evenly. Lock the safety cover. Normal cooking mes will be 3 to 6 minutes for each panini. The orange light will turn on and o, as the thermostat ensures the appliance will have the proper baking
temperature.
CAUTION: the appliance is not to be operated in the open posion.
- Remove the paninis from the heang plates with a plasc or wooden spatula. Be careful with your paninis, the llings will be quite hot. Allow to cool for a few minutes before enjoying.
- Unplug the power supply cord aer cooking, and allow the appliance to cool down.
Of course you can also prepare other dishes on this grill such as vegetables, meat and sh.
MAINTENANCE
This appliance requires lile maintenance. It contains no user serviceable parts. Do not try to repair it yourself. Refer it to qualified personnel if servicing needed.
CLEANING
Always unplug this appliance from the power source and wait until it cools down before cleaning.
There is no need to take your appliance apart for cleaning. Dry with a paper towel to absorb the excess oil. Brush crumbs from the grooves, and wipe with a damp cloth and mild soap.
Never immerse in water. Avoid using scratching or sharp utensils, as they will scratch the non-sck surface.
Do not use cleansers or oven cleaners on the heang plates.
To clean handles and other parts, use a damp cloth with mild soap.
Should any lling be dicult to remove, pour a lile cooking oil onto the plate and wipe o aer 5 minutes, when the lling has soened.
CAUTION: DO NOT IMMERSE IN WATER
TROUBLESHOOTING
1. The light indicator keeps shung o.
This is normal. During the cooking process, the heang element will automacally turn on and o to regulate the temperature to ensure the cooking surface does not get too hot or cold. When it occurs, the indicator light turns on and o.
2. How do I know when the appliance is ready to use?
The green indicator will turn on and that means you are ready to get cooking.
3. How do I turn the appliance o and on?
Simply plug in the power cord. When done cooking, turn o by unplugging.
4. When using the appliance the cover gets hot. Is this normal?
Yes it is. When using, always li and lower the cover by the cover handle. To prevent personal injury, do not li the cover so that your arm is over the cooking surface as it is hot and may cause injury. Li from the side.
5. The ingredients are scking to the surface.
There may be a build-up of burnt food residue on the cooking surface. So allow the appliance to cool down and pour a lile cooking oil and let it be for about 5-10 minutes. Scrub with a non-abrasive sponge or so bristled brush and use a damp, soapy cloth to wipe down the cooking surface. Rinse the cloth and wipe again. If food remains, pour on cooking oil and let it be for a few hours, then scrub and wipe clean.
6. The appliance is making a hissing sound.
If you overll the appliance, it will make noise as extra steam is released.
7. The indicator light will not turn on and the cooking surface is failing to heat.
Ensure the power cord is plugged into the power outlet. Check to make sure the power outlet is operang correctly. Determine if a power failure has occurred in your home, apartment or building.
DISPOSAL OF THE OLD DEVICE
Old electric and electronic devices frequently sll contain valuable materials. However, they also contain damaging substances, which were necessary for their funconality and safety. If these were put in the non-recyclable waste or were handled incorrectly,
they could be detrimental to human health and the environment. Therefore, do not put your old device into the non-recyclable waste under any circumstances.
PLEASE NOTE
- Ulize the collecon point, established in your town, to return and recycle old electric and electronic devices. If necessary, contact your town hall, local refuse collecon service or your dealer for informaon.
- Ensure that your old device is stored safely away from children until it is taken away.
GUARENTEE
- We provide a 24 month guarantee for this product, commencing from the date of sale, for faults
- which are aributable to producon or material faults.
- Your legal guarantee entitlements in accordance with § 439. BGB-E remain unaected by this.
- The guarantee does not include damages, which were incurred as a result of improper handling or use, as well as malfuncons which only have a minor eect on the funcon or the value of the device. Consumables, transit damages, inasmuch as we are not
responsible for these, as well as damages, which were incurred as a result of any repairs that were not performed by us, are also excluded from the guarantee entlements.
- This device is designed for use in domesc situaons and has the appropriate performance levels.
- Any use in commercial situaons is only covered under the guarantee to the extent that it would be comparable with the stresses of being used in a domesc situaon. It is not intended for any additional, commercial use.
- In the event of jused complaints, we will repair the faulty device at our discreon or replace it with a trouble-free device.
Any pending faults must be reported within 14 days of delivery. All further claims are excluded.
To enforce a guarantee claim, please contact us prior to returning the device (always provide us with proof of purchase).
TECHNICAL DATA
| Device | Handbag contactgrill |
| Model | 99375 |
| Mains data | 220-240V~50/60Hz |
| Power consumpon | 750 W |
SERVICE
If you have any further quesons about the product aer reading this manual, please contact the Trebs customer service.
Trebs BV
Thermiekstraat 1a
6361 HB Nuth
Nederland
natural_image
Close-up of a layered sandwich with lettuce, tomato, and lettuce topped with herbs (no text or symbols visible)How to make
Use a basng brush and coat the upper and lower cooking surface with melted buer. Place the boom pieces of bread on the lower cooking surface. Add 1.5 ounces of Gruyere cheese to each slice and then stack with 3 pieces of ham. Top o with 1 tablespoon of Dijon mustard on each panini and place the top piece of bread onto your panini and close the press. Latch and let it grill for 2-3 minutes.
GOUDACHEESE WITH PEAR PANINI
Ingredients
4 slices white bread
4 slices gouda cheese
1 Asian pear
How to make
Spray the surface with some cooking spray and place 2 pieces of bread on the lower cooking surface. Add the Gouda cheese and distribute the pear slices evenly on both paninis. Place the top pieces of bread on the paninis, then close and latch the press. Let it grill for 2-3 minutes.
SALMON PANINI
Ingredients
4 slices whole grain bread
4 slices Havar cheese
2 slices smoked salmon
2 tbsp fresh dill
How to make
Spray the cooking surface with some cooking oil. Place 2 pieces of bread on the lower cooking surface. Distribute 2 slices of cheese on each slice, followed by a slice of smoked salmon. Add a tablespoon of fresh dill on each panini. Place the top pieces of bread onto each panini, then shut and latch the press. Let it grill for 2-3 minutes.
ADVOCADO PANINI
Ingredients
4 slices whole wheat bread
1 avocado, thinly sliced
2 tbsp sun-dried tomato pesto
4 slices Provolone cheese
How to make
Heat up your press and spray the cooking surfaces with some cooking spray. Place 2 pieces of bread on the lower cooking surface. Add 2 slices of Provolone on each panini, then evenly distribute the avocado slices. Smear 1 tablespoon of sun-dried tomato pesto on the top slices of bread, with the pesto side facing down, add the top pieces of bread to the panini and close/latch the press. Let it grill for 2-3 min.
PEAR-HAM PANINI
Ingredients
4 slices white bread
1 pear, thinly sliced
3 oz (85gr)Manchego cheese
6 slices ham
How to make
Heat up your press and spray the cooking surfaces with some cooking spray. Place 2 pieces of bread on the lower cooking surfaces. Add the Manchego cheese on each bottom slice followed by 3 slices of ham on top. Then distribute the pear slices evenly on both paninis. Add the top pieces of bread then close and latch the press. Let it grill for 2-3 minutes.
CHEESE-JAM PANINI
Ingredients
4 slices white bread
4 slices Taleggio or Gruyere cheese
2 tbsp jam
How to make
Heat up your press and spray the cooking surfaces with some cooking oil. Place 2 pieces of white bread on the lower cooking surface.
Distribute 2 slices of cheese on each slice, followed by a tablespoon of jam. Place the top pieces of bread onto the paninis to shut and latch the press. Let it cook for 2-3 minutes.
SAUERKRAUT PANINI
Ingredients
8 ounces (230gr )sauerkraut
1 tbsp buer
4 slices pastrami
How to make
Use a basng brush and coat the upper and lower cooking surface with melted buer. Place 2 pieces of bread on the lower cooking surface.
Add 2 slices of Swiss cheese onto each slice, followed by the pastrami and sauerkraut. Place the top slices of bread onto your panini, then close and latch your press. Let it grill for 2-3 minutes.
MOZZARELLA PANINI
Ingredients
4 slices of mul-grain bread
4 slices Mozzarella cheese
14 cup fresh basil leaves
2 slices tomato
How to make
Heat up your press and spray the cooking surface with some cooking spray. Place 2 pieces of bread on the lower cooking surface and add the Mozzarella cheese on each boom slice. Distribute the tomato slices evenly on both paninis. Add the top pieces of bread and close and latch the press. Let it grill for 2-3 minutes.