
KGS3721IE - Fridge BOSCH - Free user manual and instructions
Find the device manual for free KGS3721IE BOSCH in PDF.

User questions about KGS3721IE BOSCH
0 question about this device. Answer the ones you know or ask your own.
Ask a new question about this device
Download the instructions for your Fridge in PDF format for free! Find your manual KGS3721IE - BOSCH and take your electronic device back in hand. On this page are published all the documents necessary for the use of your device. KGS3721IE by BOSCH.
USER MANUAL KGS3721IE BOSCH
Safety and environmental advice, regulations 12
Installing the unit 13
Getting to know the unit 13
Control lights - Connection and temperature selection 14
Food distribution. Freezing and Storing 15 Freezing and storing 16
Freezing and storing - Defrosting 16
Cleaning the unit 18
Saving energy 18
Minor breakdowns which you can repair yourself 19
Normal refrigerator noises 20
Technical assistance 20
ES
Indices
Subject to modification
Safety and environmental advice, regulations
Safety instructions
This unit contains the coolant isobutane (R 600a),
a natural gas which is very environmentally friendly but also combustible. When transporting and installing the unit care must be taken to ensure that none of the refrigeration circuit components become damaged. In the event of damage avoid naked flames or ignition sources and ventilate the room in which the unit is placed for a few minutes.
How to dispose of the old unit
Before disposing of an old, scrap unit no longer in use, it is imperative to render it safe and inoperative at once. Disconnect power supply plug and cut off connection lead. Remove or destroy all spring, latch or bolt-locks, ensuring that these have been made totally unserviceable. This will prevent the danger of children locking themselves in inadvertently.
Please observe refrigeration and freezer units contain insulating gases and coolants which require specialised waste disposal. They also contain valuable materials which can be recycled. Entrust the disposal of a scrap unit categorically to the competence of your local waste disposal service and contact your local authority or your dealer if you have any questions. Please ensure that the pipework of your refrigerating unit does not get damaged prior to being picked-up by the relevant waste disposal service, and contribute to environmental awareness by insisting on an appropriate, anti-pollution method of disposal.
Our contribution towards a cleaner environment- we use recycled paper.
Disposing of the packaging of your new appliance
All the packaging materials employed in the packing of your new appliance may be disposed of without any danger to the environment.
The cardboard box may be broken or cut into smaller pieces and given to a waste paper disposal service. The wrapping foil is made of polyethylene and the polysterene pads and stuffing contain no fluorochloric hydrocarbons.
All these valuable materials may be taken to a waste materials collecting center and used again after adequate rework. (Recycling). Consult your local authorities for the name and address of the waste materials collecting centers and waste paper disposal services nearest to your home.
Regulations
The unit is designed for the chilling and freezing of foodstuffs, and ice-making. It is destined for domestic use.
For industrial use, the regulations laid down for industry must be met.
The appliance is interference-protected in accordance with standard 76/889, and with supplementary standard 82/499/EWG.
It conforms to the accident prevention standard (VBG 20) for refrigerating units. The circulatory cooling system is tested against leaks.
This unit conforms to the safety regulations for household electrical appliances.
Repairs to household electrical appliances should only be carried out by specialized staff. Serious risks to the user can be caused by inadequate repair work.
The unit is perfectly suitable for expose to +16^ to +32^ ambient temperature (SN-models: +10^ to +32^ ; ST-models +18^ to +38^ , see identification plaque).
Installing the unit Getting to k
Placing
The appropriate site for the installation of the unit is a dry and well-ventilated position. It should not be affected by direct sunlight, or be placed near a source of heat such as a cooker, radiator etc. If it is inevitable that the unit be installed next to a source of heat, fit a suitable insulation plate or respect the following distances from the source of heat:
For electric cooker 3cm
For oil-or coal-fired ranges 30~cm
If the unit is to be installed next to another refrigerator or freezer, a lateral distance of 2 cm. between the appliances should be left, which is necessary in order to avoid the formation of water vapour.
Clean the inside of the appliance thoroughly, before using the first time (see cleaning).
Installation and changing the opening direction of the doors
See enclosed assembly instructions.
Electrical connection
Connect the appliance to an alternating current of 220-240 V (SN/N), 220-230 V (ST) 50Hz and only to a plug socket which has been installed in accordance with the corresponding regulations.
The plug must be protected by a circuitbreaker of 10A or more.
Ventilation
The warm air must be able to escape freely at the back of the unit. If this is not the case, the condenser has to work harder as a result, and this increases electricity consumption.
Therefore, under no circumstances cover the ventilation grills or aeration vents.
EN
the unit
Before reading, please open out the illustrated pages at the back of this booklet. The instructions for use apply to various models, and variations in the illustrations are possible.
Picture of the appliance
Fig 1
1-9 Controls
10 Shelves
11 Bottle rack
12Yoghurt drawer
13 Outlet for defrost water
14 Tray
15 Vegetable drawer
16 Egg rack
17 Cheese and butter compartment
18 Bottle shelf
19 Ice tray
20 Drawers for frozen products
21 Freezing calendar
22 Skirting
23 Outlet for defrost water
24 Fan
A Refrigerator
B Freezer
Control panel
Figure 2
1 Refrigerator compartment on/off button
2 Refrigerator compartment temperature selector
3 Refrigerator compartment temperature selection indicator
4 Interior light switch
5 Freezer compartment on/off button
6 Freezer compartment temperature selector
7 Freezer compartment temperature selection indicator
8 Fast freeze control button
9 Freezer compartment temperature warning light (red)
EN
Control lights - Connection and temperature selection
Fast freeze control light (yellow)
Figure 2/8
This light comes on when the fast freeze function is connected.
It goes off when the fast freeze function is disconnected.
Freezer compartment temperature warning light (red)
Figure 2/9
This flashes on and off when the temperature in the freezer compartment is too high, and also when the frozen food is at risk. It could flash temporarily with no risk to the frozen food: when the unit is first switched on, when a large quantity of fresh food is introduced, when the door of the unit is open for too long, and when the temperature selector is moved to a higher setting (colder temperature).
The refrigerator compartment and the freezer compartment can function independently.
Refrigerator compartment connection and temperature selection
Connection figure 2
The refrigerator is connected with control button 1.
When this is pressed, a green light will shine around its outside edge, and the interior light will come on.
When selector 2 is turned from left to right, the thermostat position may be selected, and thus the required interior temperature.
The position may be read on indicator scale 3; the coldest temperature is indicated with the + sign.
Freezer compartment connection and temperature selection
Connection figure 2
The freezer is connected with control button 5. When this is pressed, a green light will shine around its outside edge.
The thermostat position may be selected, and thus the required interior temperature, by turning selector 6 from left to right.
The position may be read on indicator scale 7; the coldest temperature is indicated with the + sign.
When connecting the unit for the first time, it is advisable to select the coldest position.
You will see that warning light 9 comes on, wich means that the necessary temperature has not yet been reached; the light will go off after a few hours.
Once the light has gone off, an intermediate thermostat position may be selected.
Warning:
Pearls of water or drips form in the evaporator in the refrigerator compartment while the condenser is in operation, indicating that the refrigerator is working. It is not necessary to scrape off the layer of frost, nor to remove the pearls of water.
The evaporator defrosts automatically.
The defrosted water is collected in the drainage duct, figure 1/13, and is channelled to the condenser, where it is evaporated.
EN
Food distribution. Freezen and Storing
Interior layout modification options
The position of the refrigerator compartment shelves may be changed according to requirements. To change the position of a shelf, pull it towards you, tilt it downwards and then remove and place in the required position.
Figure 4
The position of the door containers and racks (Figure 1/15 and 16) may be interchanged, or they may be removed from the unit for use at the table.
To remove them, lift the container or rack.
Figures 5 and 6.
When arranging food in the refrigerator, the following points should be taken into account
- Allow hot food and drinks to cool before placing in the unit.
- Where possible, wrap foodstuffs or cover them. In this way, the aroma, colour, moisture and freshness will all be maintained, and the transmission of smells is avoided.
Vegetables, fruit and salad items may be store in the vegetable drawer without being wrapped or put into containers.
- Do not allow oil or fat to come into contact with either the plastic parts, or with the door seal (this can cause deterioration).
- Do not store any explosive materials in the unit.
- Highly-concentrated alcohol should be hermetically sealed and stored in an upright position.
The coldest part of the refrigerator compartment is located near the wall at the bottom, and on the shelf over the vegetable drawer. Use this zone for delicate food.
Glass containers and liquids which may be frozen must not be stored in the freezer compartment. The glass container will explode.
Note refrigeration zones in the refrigerator compartment!
The air circulation in the refrigerator compartment means that there are zones at different temperatures.
Depending on the model, the zone for sensitive foods is right at the bottom between the arrow on the side and the glass surface below (fig. 15/1 and 2) or between the two arrows (fig. 16/1 and 2). Ideal for storing meat, fish, sausage and salad mixtures, etc.
Storage recommendation
Figure 1
Refrigerator compartment (A)
On the shelves (10), from top to bottom, bread and pastries, cooked food, milk products.
On the bottle rack (11), positioning of bottles.
In the yoghurt drawer (12), milk products.
On the tray (14), meat, sausages and cold meats.
In the vegetable drawer (15), fruit and vegetables.
On the egg rack (16), eggs.
On the door compartments (17), cheese and butter.
On the door shelves (18), small bottles and tins. Large bottles.
Freezer compartment (B)
In the ice tray (19), production of ice cubes.
In the upper and middle drawers (20), freezing of fresh products.
In the lower drawer (20), storage of frozen products.
Maximun freezer output
You may freeze a maximum of 16 kg of foodstuffs within a period of 24 hours, in one go. Freezing should be preferably accomplished in the upper compartment, directly on the freezer grid. Of course, you may also use the frozen food bins to freeze fresh products. Notice, however, that in this case you will need to slightly reduce the quantity of food.
EN
Freezing and storing
Observe that fresh products should not be mixed with deep frozen food.
Note
The bottom frozen food bin should be used exclusively for the storage of frozen food. If possible, avoid using bin to freeze fresh food.
Wrapping the food
Use only top quality food products. Place them in airtight containers in order that none of the taste is lost, and to prevent them from drying out. Label the frozen containers/packs and add the date
Freezing the food
If you need to freeze very large quantities of food, you may find it convenient to remove the frozen food bins (botton bin may not be removed) from the unit and to stack your products directly on the freezing grids. To remove bins, pull forwards until they catch, tilt upwards and remove. Figure 8.
Observe that food should not project over the border line, Figure 8/A, otherwise the air circulation within the unit will be adversely influenced.
Fast freeze
Connect the fast freeze function a few hours before introducing the fresh food.
In general 4-6 hours are sufficient. If maximum freezing power is necessary, 24 hours are required.
Small quantities of food (up to 2 kg.) may be frozen without the fast freeze function.
To connect the fast freeze function, simply press the button. (Figure 2/8).
The yellow control light indicates that the function is in operation. The condenser will now stay on permanently, and a low temperature will be reached in the freezer compartment. After introducing the fresh food, the fast freeze may be disconnected (by pressing the fast freeze button -the yellow lighth will go off).
The freezing-process is controlled automatically by the unit, which means to say that the function changes to the normal storage setting when appropriate, which saves energy.
Preseparation of products
It is sometimes necessary to store a large amount of products in the freezer. When required, it is possible to remove all the drawers except the lowest one from the freezer compartment and place products directly on the freezing panels.
To remove the drawers, pull these, out to their limit without forcing them, then push upwards and remove. Fig 6.
When placing products in the freezer compartment, it is important to ensure that these do not pass the overload line, Fig. 8, so as not to affect the free circulation of air within the freezer compartment.
Chart showing storage periods for products
Figure 9/18
To avoid deterioration of the frozen product, it is important not to exceed the permitted storage period.
The length of time a product may be stored depends on the type of food being frozen.
The numbers next to the symbols indicate the storage period in months for the frozen product For commercial preprepared frozen food products it is necessary to note the date of manufacture and the use-by date.
Defrosting the frozen product
Depending on the type and end use, one can choose from the following options:
at room temperature
in the refrigerator compartment
in an electric oven with/without hot air fan in the microwave oven
EN
Freezing and storing - Defrosting
Making ice
Figure 10
Fill the ice-making trays with water to three-quarters full, and place them in the freezing tray.
To remove the ice cubes easily, gently bend the tray.
Artificial ice blocks
(Fig. 4/30).
This accessory is only included with certain models, so if yours does not contain one, disregard this section.
The artificial ice blocks prevent food from warming-up too quickly in the event of a power cut or failure.
They are most effective if they are placed in the upper drawer directly on top of the products.
The artificial ice blocks may be taken out of the appliance and used as a practical means to keep food temporarily cool, e.g. in an insulated cooling bag.
Defrosting the refrigerator compartment
The refrigerator compartment defrosts automatically. On doing so, the water runs along a drainage duct figure 3/11, to the drainpipe, figure 3/21, and is collected at the back of the unit in the evaporation trough, where it is then evaporated.
Defrosting the freezer compartment
To defrost the freezer compartment, please disconnect the unit from the mains or remove the fuse.
The accumulation of thick layers of frost or ice in the freezer compartment trays is detrimental to the operation of the unit, and increases the consumption of electricity.
When the layer of ice is approximately 1/2 cm. thick, it is necessary to defrost the freezer; as a rule, two or three times a year.
It is best to do so when there is a small amount of food, or none at all, in the freezer compartment. If there are products in the freezer, connect the fast freeze function approximately 4 hours before defrosting in order to ensure that the food is at a very low temperature, and will therefore remain cold for longer at room temperature.
Then take out the freezer drawers, complete with their contents. Wrap the food in several sheets of newspaper and put them in a cool place. Leave the door of the unit open, and unplug or take out the fuse.
The defrosting operation should be carried out quickly. (The durability of frozen products diminishes according to the length of time they spend at room temperature).
To collect the water during the defrosting process, change the position of the part which fits into the orifice of the empty lower drawer (fig 1), placing it in the drain.
After defrosting, dry the water resulting from the process, and clean the inside of the unit.
Tips for defrosting
To accelerate the defrosting process, the best thing to do is place a pan of hot water on one of the freezing trays.
Take care with the use of defrosting sprays, as these could form explosive gases, or contain solvents and propellants which damage the plastic parts, or which are damaging to the health.
If possible, do not scrape the frost or ice, as this could damage the freezing trays.
It is best to leave the unit to defrost naturally.
EN
Cleaning the unit Saving energy
Before carrying out a thorough cleaning, disconnect the unit from the mains, or unscrew the use.
Clean the refrigerator compartment once a month. The freezer compartment should be cleaned after each defrosing.
The water used for cleaning must not reach either the control unit or the illumination.
Warm water and a weak disinfectant detergent are recommended for cleanins the whole unit, with the exception of the door seal. Do not use abrasive or gritty cleaning products, acids or chemical solvents.
Clean the door seal with clean water only, and dry completely afterwards.
Clean the drainage duct regularly, figure
3/11, and the drainpipe, figure 3/21, in order that the defrosted water may run freely. Open the drainage orifices with a thin rod or similar object. Take care that the water used for cleaning the unit does not run into the drainage orifices to the evaporation trough.
The exterior walls can be cleaned using a detergent. Close the door to prevent the detergent form reaching the plastic parts of the unit.
- Install the unit in a cool or well-ventilated place, protected from direct sunlight, and away from any source of heat (radiators, etc.).
- Leave hot food to cool before placing it in the unit.
- To defrost frozen products, put them in the refrigerator compartment. In this way the cold air given off by the frozen products will be used to cool the food in the refrigerator.
- Defrost the freezer compartment when ice has formed. A thick layer of ice impedes the passage of cold air to the frozen products and increases electricity consumption.
- When introducing or removing food, keep the door open as short a time as possible. The less time the door of the unit remains open, the less ice will form on the shelves of the freezer.
EN
Minor breakdowns which you can repair yourself
Not all breakdowns require attention by the Technical Service Agent. Often the problem is insignificant. Before calling the Technical Service Agent, please try to rectify the fault using the following guidelines.
Please note that even during the period of guarantee, you will be required to meet the Service Agent's expenses.
In the case of strange noises:
Either the unit is not properly levelled, or there is a foreign body in the area of the condensor, meaning that one of the parts in the back wall of the unit cannot move freely and is touching the unit or the wall.
-Very carefully, bend this part slightly.
If the doors do not run parallel to the body of the unit:
Both doors can be adjusted by moving the support between the two doors, figure 1
If none of the control lights come on:
Please check that the electricity is on, that the plug is properly plugged into in the socket, and that the unit is switched on.
If the refrigerator compartment light does not work:
The switch is jammed, figure 2/4, check whether it can be moved. If not, call the technical service agent.
Fused or faulty bulbs:
To change, remove the case by pressing the back part downwards (figure 12), and replace the BULB with a new one: 220-240 V, max. 15 W, base E 14.
If the performance reduces:
The vents at the top of the unit or the ventilation grills at the base are covered. There is a foreign body between the refrigerator and the wall.
The door has been opened too often, or a large quantity of food has been introduced
There is a layer of ice in the freezer which is too thick. Defrost the unit!
If the red light flashes on and off after a long period in operation:
Breakdown!
There is too much heat in the freezer compartment.
The ventilation grill at the top of the unit or at the base is covered.
The freezer door is not properly closed.
Too much fresh food has been introduced into the freezer at once (in this case the red light will go off again after a while).
The condensor is faulty.
If, having followed these guidelines the breakdown or fault cannot be repaired, please call the technical service agent.
Do not open the door unnecessarily in order to avoid the escape of cold air.
Do not carry out any other type of work yourself, and even less on the electrical parts of the unit.
Warning:
If, due to a breakdown or a power cut, the temperature of the unit increases, it is necessary to check that the food is still frozen.
Frozen products which have been defrosted can be re-frozen if the meat or fish has not been exposed to temperatures of more than 3^ for more than one day, or three days for other products.
If this is not the case, and providing the taste, smell or appearance of the food has not altered, cook it, or prepare a pre-cooked dish, and re-freeze it. From now on, the maximun freezing period does not apply.
EN
Normal refrigerator noises Te
Refrigerating system:
The gas coolant can produce gurgling sounds while it circulating round the pipes. At the same time, the material used for isolating the appliance tends to amplify theses noises.
Compressor:
This can generate buzzing and/or slight rattling.
Materials:
Due to the different types of materials used in the construction of the appliance, clicking sounds are produced by the various dilations and contractions.
cal assistance
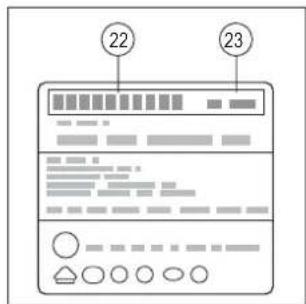
When calling the Technical Service Agent, please indicate the number of the unit, 22, and the serial number, 23.
Both numbers are to be found in the box outlined in back on the identification plate which is located at the bottom lefhand side of refrigerator compartment, next to the vegetable drawer.
The address and telephone number of your nearest Technical Service Agent is to be found on the list of Technical Service Centres, or in the telephone directory.
FR
Branchement: Illustration
Branchement: Illustration
Assistance technique
Se先进技术 - Se先进技术 - In the future, we will have new technologies to improve the technology of the market.
Guasto!
Ee nepiTOWn nov npokAnov npaoEvoi
Ipoketai yia ealtojatkiyekataotao ngsoukeun nyia kanoio avtkeiyeo rou oupiakteke Kovto ooumuotn,avto to yeovocmuodigein doynon eo ta koumaiaoubpikovtaoto niowepoc,to onolo pokaletipbn otouokeun no tov toixo.
-²avtytny nepintwo,10wote npoektko to koumuio nov npokalei rpBn.
Eav o npotes dev eiv a npapaaanae 1e to oma tns oukeo
Evoypauiote kai tis doo npotc metatoniovtoa tov kevtipko eVTEGE, Dyoopa 1.
