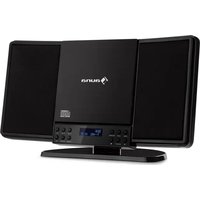
Reference 802 - Cd player/recorder Auna - Free user manual and instructions
Find the device manual for free Reference 802 Auna in PDF.
Frequently Asked Questions - Reference 802 Auna
User questions about Reference 802 Auna
0 question about this device. Answer the ones you know or ask your own.
Ask a new question about this device
Download the instructions for your Cd player/recorder in PDF format for free! Find your manual Reference 802 - Auna and take your electronic device back in hand. On this page are published all the documents necessary for the use of your device. Reference 802 by Auna.
USER MANUAL Reference 802 Auna
https://www.spotify.com/connect/third-party-licenses
Berlin Brands Group UK Limited PO Box 42
272 Kensington High Street
London, W8 6ND
United Kingdom
Congratulations on your purchase. Please read the following instructions carefully and follow them to prevent potential damage. We accept no liability for damage caused by disregarding the instructions or improper use. Please scan the QR code to access the latest operating instructions and for further information about the product.

CONTENTS
Technical Data 42
Safety Instructions 42
Button functions 44
Remote control 46
Device Overview 48
General operation 50
Network Assistant 52
Further settings 57
Connecting smartphone to the radio with UNDOK app 58
Internet radio 59
Spotify Connect 62
DAB radio (optional) 63
FM radio 66
AUX mode 68
BT mode 68
USB playback 69
CD playback 69
Alarm setting and sleep timer 70
Software update 72
Reset to factory settings 72
Troubleshooting 73
Disposal Considerations 76
Declaration of conformity 76
TECHNICAL DATA
| Item number | 10032244, 10032245, 10032246, 10032247, 10032248, 10032249, 10032250 |
| Power supply 100-240 V ~ 50/60 Hz | |
| Output power 2 x 40 W (RMS) | |
| Dimensions (W x H x D) 196 mm x 166 mm x 220 mm | |
| Weight 2.9 kg | |
| Display 2.8" TFT display | |
| Radio | DAB, DAB+, DMB, FM and internet radio (WiFi) |
| CD playback formats: | Audio CD, MP3 CD, WMA CD, CD-R and CD-RW |
| WLAN frequency 2.4 GB Band (2402) | 2483.5 MHz |
| WLAN transmission power (max.) 20 dBm | |
| BT frequency: 2402-2480 MHz | |
| BT transmission power (max.) +2 dBm (typical) Class | |
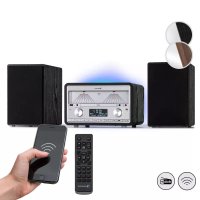
| Package contents | 1x CD receiver 1x telescopic antenna 1x power cable 1x remote control 1x user manual |
SAFETY INSTRUCTIONS
Read all instructions carefully before use and keep the user manual in a safe place for future reference.
- Do not use the radio near water or steam.
- Only clean the radio with a dry cloth. Unplug the radio from the wall socket before cleaning.
- Place the radio on a stable surface.
-
Do not place the radio in closed shelves or cabinets where the airflow to the ventilation openings is obstructed.
-
Do not place the radio near any heat sources such as radiators, heat registers, stoves or other appliances that produce heat.
- Position the power cord in a way that no one can step on it and that it does not get pinched. This applies in particular to places near the appliance or where it comes out of the power cord.
- If the radio is defective, do not remove the casing or attempt to repair the radio yourself. Instead, contact our customer service department with a brief description of the problem and they will be happy to help you.
- Do not overload wall sockets, extension cords and multiple sockets to prevent fire or electric shock.
- Make sure that no objects or liquids enter the radio.
- Only connect the radio to power sockets that are suitable for the voltage of the appliance.
Information on this is provided on the appliance or under "Technical data". - If you change the source while a CD is playing, playback stops. Playback resumes as soon as CD is re-selected as the source.
- The sound quality of MP3, CD-R, CD-RW and commercial CDs can vary greatly. The same applies if portable MP3 players are connected.
- Do not use cleansing CDs unless they are specifically designed for CD slots.
- Be careful not to bend the CD while it is being pulled in or ejected.
- Do not move the device while a CD is playing and do not transport the device.
while a CD is still inside. - Do not attempt to insert a CD while there is still a CD in the appliance.
- Do not insert specially shaped CDs or 3'' single CDs.
- If you insert an MP3 or WMA CD, there may be a delay in playback because the player has to read the directory first.
- Attached CD labels made of paper could come off and damage the CD player.
- Scratched CDs may not play properly.
- Do not insert anything other than CDs into the CD slot.
- If you notice an error, unplug the appliance and wait 60 seconds. Then put the plug back into the socket and start playback again.
BUTTON FUNCTIONS
To use the rotary control on the housing (top)
-
Rotate the knob to scroll through a menu or list. The selected option is displayed in dark letters on a light background. Press the control button to select the option.
-
To adjust the volume during music playback, rotate the control. During playback, press the controller to mute the music. When the alarm sounds, press the control to activate the snooze function.
-
Press and hold the control to switch off the unit.
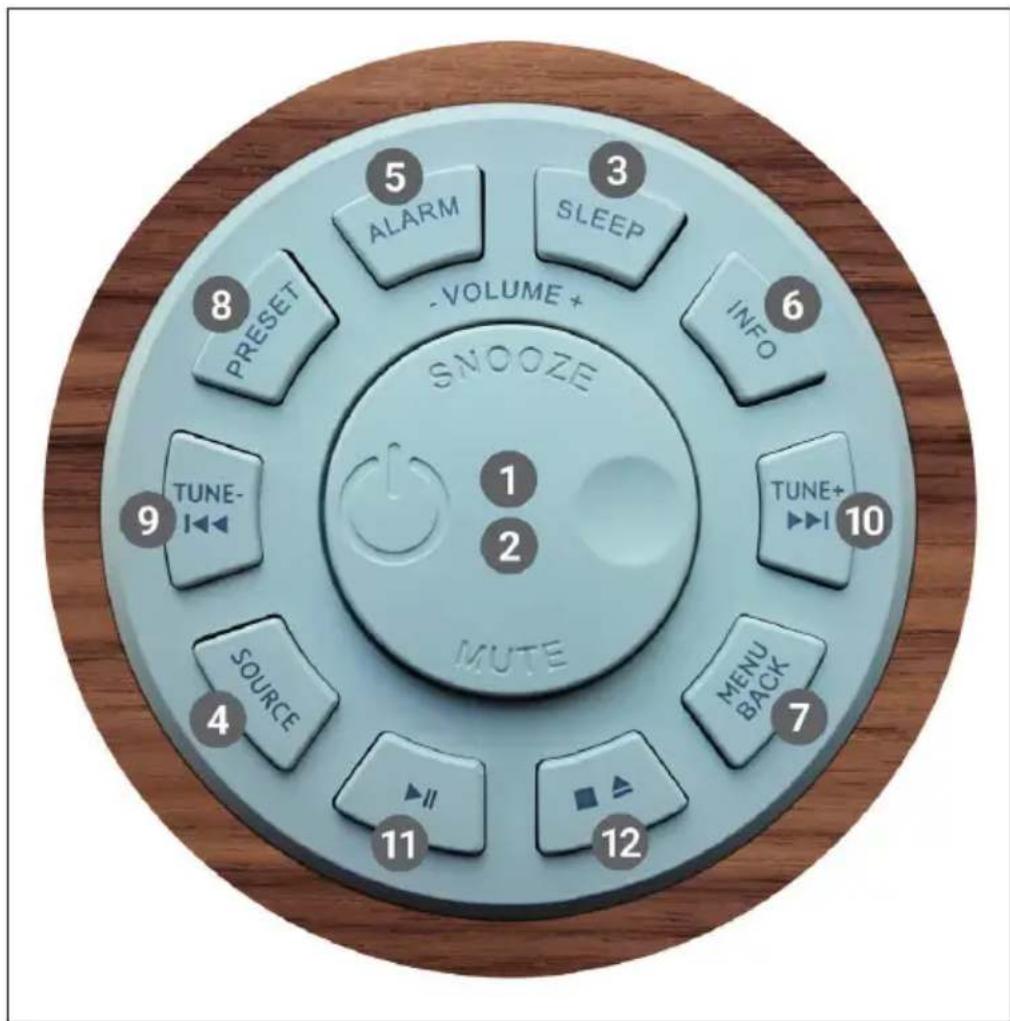
| 1 Selection / Volume / Snooze / Mute |
| 2 Switching on and off |
| 3 Setting the sleep timer |
| 4 Selecting music source |
| 5 Alarm function / alarm |
| 6 Further information |
| 7 Menu / One step back in the menu |
| 8 Saving a radio channel |
| 9 Channel search / previous track / back button |
| 10 Channel search / next track / forward button |
| 11 Play / pause (in different modes) |
| 12 Press 1 x: Stop CDPress 2 x: Eject CDPress 3 x: Load CD |
REMOTE CONTROL
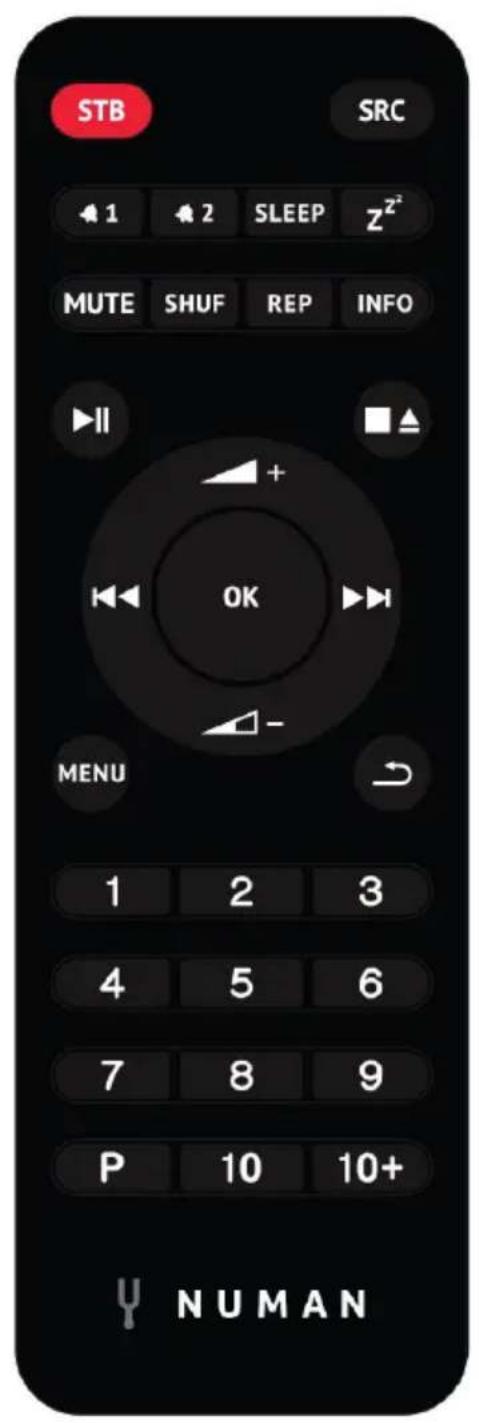
Number buttons 1-10+
Use the buttons 1-10+ on the remote control to call up a preset station.
Play / Pause
Press this button to start or pause playback.
- / vol1 -e up / down
Use the buttons to increase or decrease the volume.
/ /tion or title forward / backward
In playback mode, press left or right to select a station or track.
[P] Saving a radio station
To save an FM station, press and hold PRESET until the display shows "Save preset". Then use the control dial or the remote control to select one of the 20 memory locations. To recall a stored station, briefly press PRESET and select one of the listed stations. As soon as you play the station, the memory number (1, 2, etc.) is displayed at the bottom of the screen.
[SHUF] Random playback
During CD playback, press the button once briefly to play the tracks in random order.
[REP]Playback settings
During CD playback, press this button once repeat the track. Press the button twice to repeat the entire CD. Press the button a third time to cancel the repeat. When shuffle play is active, no single track can be repeated.
DEVICE OVERVIEW
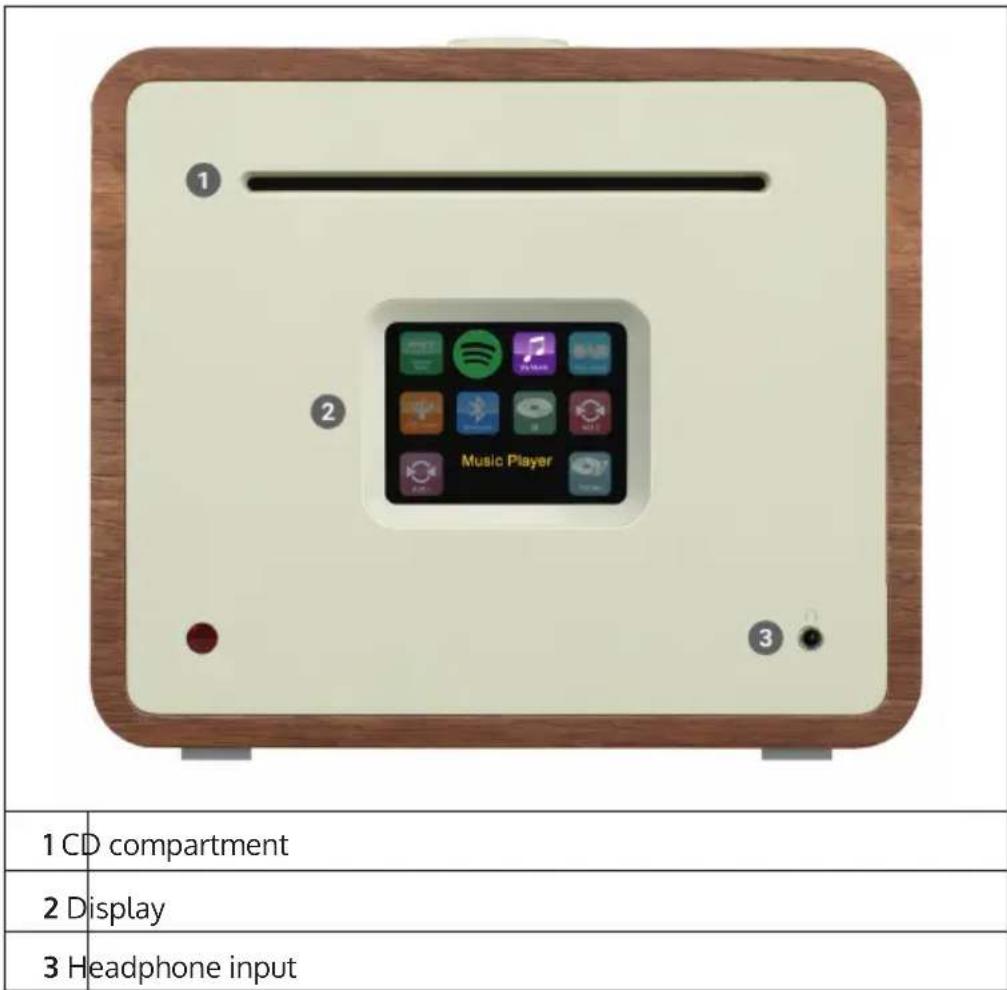
External antenna connection
On the back of your Unison you will find a connector for an external antenna. There are different models for external antennas, the connection is typically established via screwing on the external antenna.
Loudspeaker connection
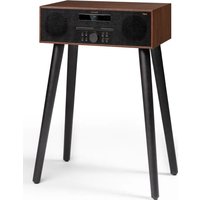
We recommend using speaker cables with a diameter of at least 1.5mm^2 for your shelf speakers. The shorter the cable, the better the sound. Cables up to about 5m in length are absolutely safe to use. First connect one end of the cable to your speaker. When connecting the other end to the Unison, make sure that you connect the PLUS pin (red) of the Unison to the PLUS pin of the speaker and the MINUS pin of the Unison (black) to the MINUS pin of the speaker.
Incorrect connections to individual speakers will not damage your Unison or your loudspeakers, merely the sound will be excessively "wide" and very low in bass at the same time. Therefore, if you are dissatisfied with the sound characteristics after connecting, please check all connections!
The speaker connections are designed for speakers with 4 Ohm impedance. Speakers with an impedance of 8 ohms can be connected to the Unison without any risks, but in this case the full power of the Unison will not be used. The Unison was developed in coordination with the in-house passive loudspeakers and unfolds its best sound when used together. We therefore recommend using Unison with our Retrospective, Octavox and Reference Series speakers and selecting the EQ preset that matches the speaker model under MENU > System Settings > Equaliser.
Subwoofer Output
You can connect your Unison to a subwoofer using the SUB OUT output.
Attaching the rubber feet
Four rubber feet are included, which you can attach to prevent scratches on the underside of the Unison. Please note the following instructions for attaching the feet:
| First you have to put the rubber foot into the insert. | |
| Then turn the rubber foot clockwise to fix it in the insert |
GENERAL OPERATION
After the initial setup, the device can be used in most modes. To select a mode, press the SOURCE button until the desired mode is displayed on the screen. Press SELECT to select the desired mode. The last channel or track selected in this mode is selected. If this is not possible, the device searches for relevant channels, networks or requests you to make a valid entry. The modes are described in detail later in the operating instructions. In all playback modes, the controls for volume adjustment, mute and play/pause are the same.
Menu navigation
The rotary control is the main control to select the different menus and options. Turn the rotary control to move up or down in the menu. Press the control dial when the desired option is highlighted to confirm your selection. All menus and lists function as a loop, which means that if you continue to turn the rotary control at the first or last item, you move to the other end of the menu/list. So if you turn the rotary control to the left at the first entry, you will get to the last menu entry, etc. The symbol > is displayed on the right side of the screen if there are other options above or below the visible options.
To access the main menu in a particular mode, press the MENubutton. Press the BACK button to return to the previous option in the menu. Press the MENU button again to exit the menu. Each mode has its own mode menu with specific options. For example, the FM menu has a search setting and an audio setting.
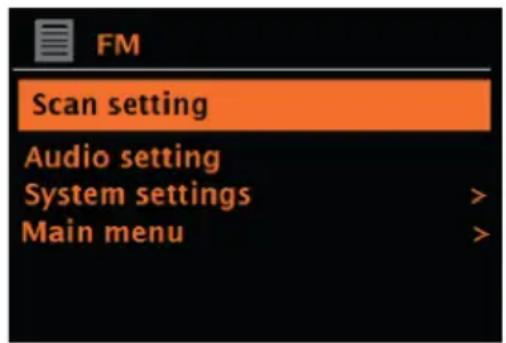
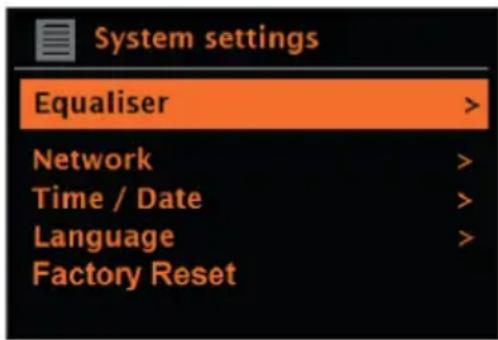
In addition, each menu has two final options: System settings > and Main menu >. The symbol "(>" indicates options that lead to further menus. All individualised settings can be made in the system settings menu. This includes equalizer, network, time/date, language, factory setting and software update.
The main menu is an alternative to mode selection. In addition, alarms and the time until the device switches off automatically can be set in the main menu.

First use and setup
The device is easy to use. For DAB or FM radio playback, the mains adapter is required. Internet-connected modes, such as Internet radio, require a broadband Internet connection.
NETWORK ASSISTANT
When using the device for the first time, the network wizard is started and runs through the settings for date/time and network. Once this is completed, the device can be used in most modes.
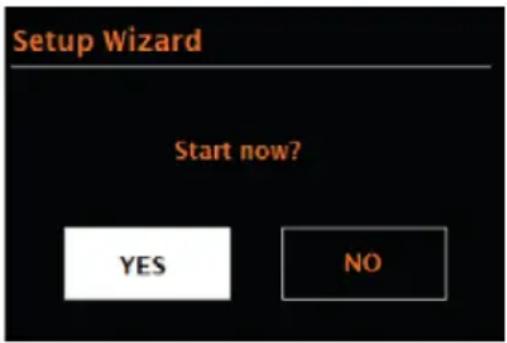
Important notes on the network wizard
- If you want to change these settings later, go to Menu > System settings >. If you want to go through the network wizard again, select Menu > System settings > Setup wizard. Select "Yes" to start the network wizard.
- If you select "No", the next screen will ask if you want to run the Network Wizard automatically the next time you start the device. The device is then started without time/date and network settings and displays the main menu.
- If the power connection is disconnected while the network wizard is activated, it is called up again as soon as the device is started.
12/24 hour format
Select "Set 12/24 hour" to set either 12- or 24-hour format.
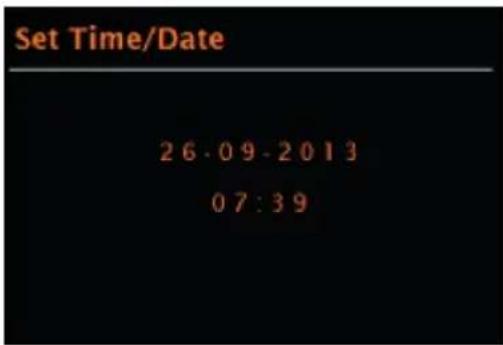
Setting time/date
The date and time are displayed as DD-MM-YYYY and hh:mm AM/PM. The first value "DD" is active (flashing). Adjust each value with the rotary control and confirm your selection by pressing the rotary control. As soon as a value has been confirmed, the next value is activated and can be set.
Automatic updating of the time
Automatic updating sends data via DAB, FM or the network. The time is only updated in the corresponding mode. Therefore, a mode should be selected which you use regularly.

DAB and FM use time signals that are transmitted together with the radio broadcast. With the network, time signals are used which are sent from the Internet radio portal as soon as the device is connected to the network.
- Select the type of update source (DAB, FM, network or no update).
- Set the time zone if you have selected the update via network.
- If the country in which you are located uses summer and winter time, the time received from the network may be wrong by one hour. Activate the daylight saving time option to correct this.
Note: If the time is updated by DAB or FM mode, the summer time setting has no effect on the time. The device updates the time automatically as soon as the time information is available.
Manual time setting
If you have selected "No Update", the network wizard will request you to enter the time and date manually. The date and time are displayed as DD-MM-YYYY and hh:mm AM/PM. The first value "DD" is active (flashing). Adjust each value with the rotary control and confirm your selection by pressing the rotary control. As soon as a value has been confirmed, the next value is activated and can be set.
Network
The device is compatible with all conventional network protocols and encryption methods, including WLAN protected setting (WPS). In order for your device to connect to a network, a WLAN router is required and, if applicable, a password (if set). Select WLAN region/country > WiFi network (SSID) and then select the desired network from the list.
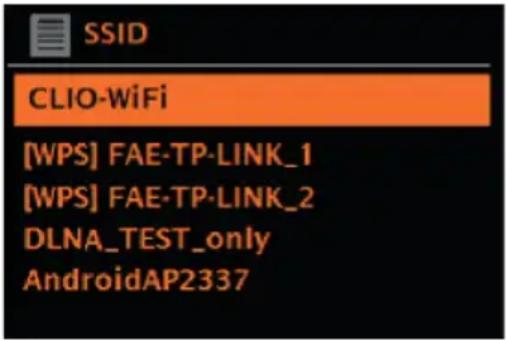
If a network is open (unencrypted), the device connects to the network and no further input is required.
Standard encrypted network
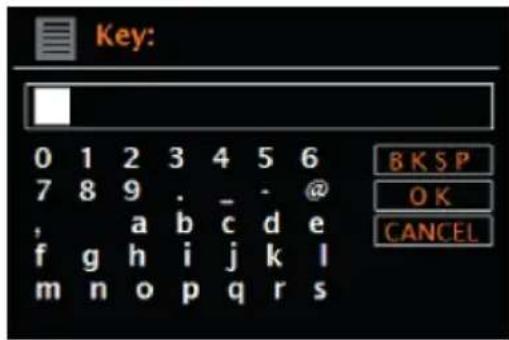
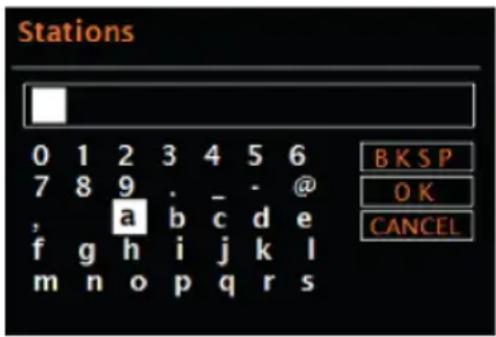
To enter the password, turn the Rotary encoder to select the letters/ numbers and press the Rotary encoder to confirm each letter/number. Your entry is displayed at the top of the screen under "Key".
The input screen also has the options "BKSP" (back), OK, and CANCEL. These can also be accessed with the rotary control. Pressing the INFO button directly selects the "BKSP" option.
WPS setting
WPS encrypted networks are identified by "[WPS]" at the beginning of the network name and have 2 connection methods. Select one and follow the instructions on the screen. If you use the Network Wizard, another option to skip WPS is available. Select one and follow the instructions on the screen.
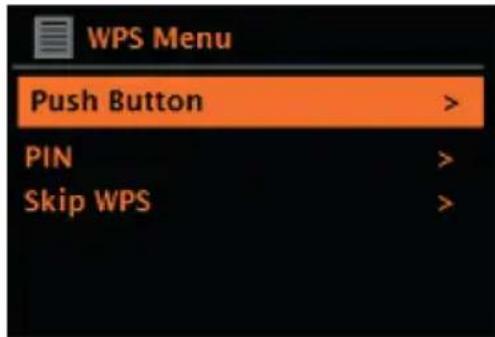
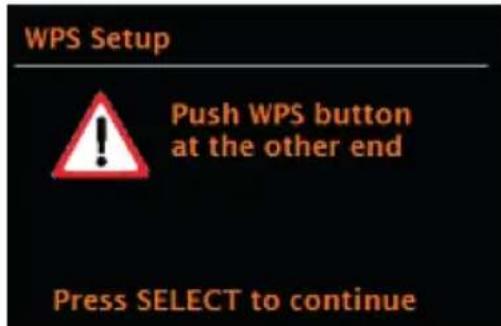
Connection button: The device requests you to press the connection button on the router. Then confirm by pressing the control knob.
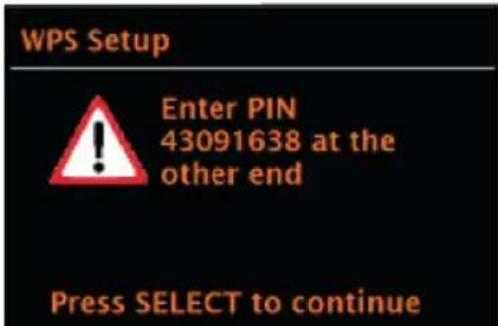
Pin: The device generates an 8-digit code that you must enter in the WLAN router as the access point.
Skip WPS: Enter the pin for a standard encrypted network. Consult your router's instruction manual for more information on setting up a WPS encrypted network.
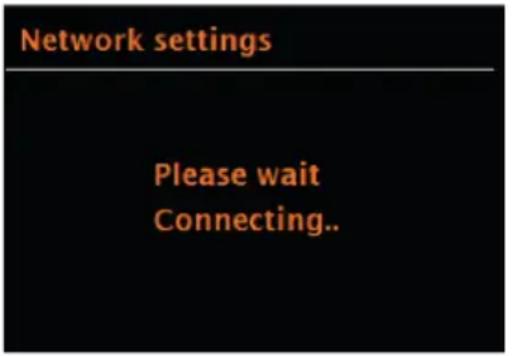
Completion: The device connects to the selected network. If the connection cannot be established, the device returns to the previous screen to try again. Press the BACK/MENU button to exit the setting.
FURTHER SETTINGS
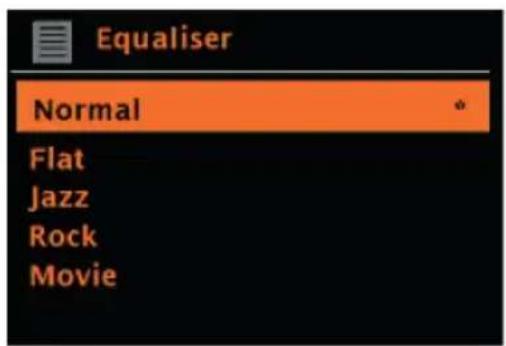
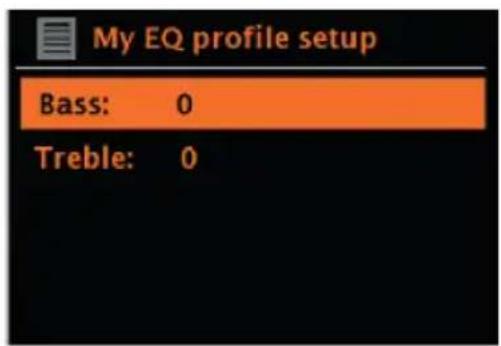
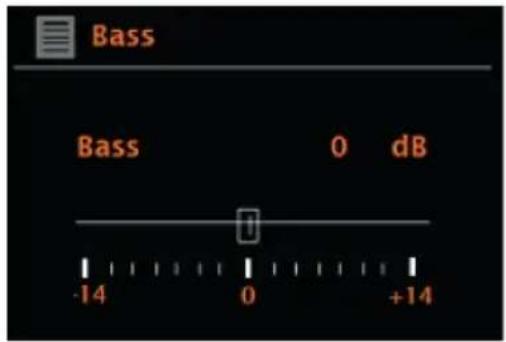
Equaliser
Several EQ modes are available. To select the desired equaliser setting, first go to Menu > System settings > Equaliser. You can choose from a variety of preset modes and the customisable "My EQ" mode. The My EQ option allows you to save your own bass and pitch settings.
Network
The device can recall the last 4 wireless networks it was connected to and automatically attempts to connect to one of these networks. To view the list of connected networks, go to Menu > System settings > Network > Network profile. Unwanted networks can now be selected and deleted using the rotary control by selecting "Delete Yes" after selecting the network. It is also possible to view and manually adjust the network settings via Menu > System settings > Network.
Note: For users who are familiar with networks, this option can be helpful in diagnosing and resolving network problems.
Language
The factory-set language is English. The language can be changed by selecting Menu > System settings > Language > and selecting the desired language.
CONNECTING SMARTPHONE TO THE RADIO WITH UNDOK APP
To be able to connect your smartphone to the device Two, you need the app "UNDOK", which is available free of charge in the iTunes Store or Google Play Store. Important: The mobile phone must be in the same WiFi network as the radio.
- Download the app and open it.
- The app automatically searches for available devices. Select this unit from the list.
- Under SOURCE, you can choose between the different input signals.
- Under SEARCH, you will get a list of the available stations. Select the desired station.
- You can find more information about the current station under NOW PLAYING.
- In the settings, you can conveniently set e.g. equalizer, sleep timer and other functions.
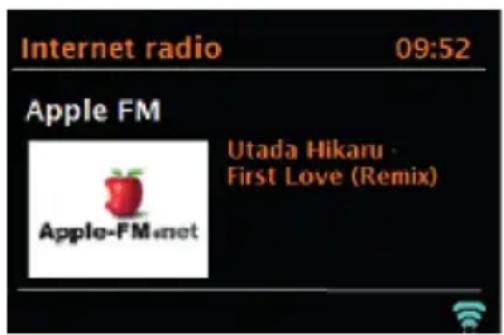
INTERNET RADIO
The unit can play thousands of radio channels and podcasts from around the world using a broadband internet connection. By selecting the internet radio mode, the device will automatically contact the Frontier Silicon Internet radio portal. A channel list is provided, which is divided into various categories, such as Country, Most Popular and Genre. As soon as you have selected a channel, the device automatically connects to it.
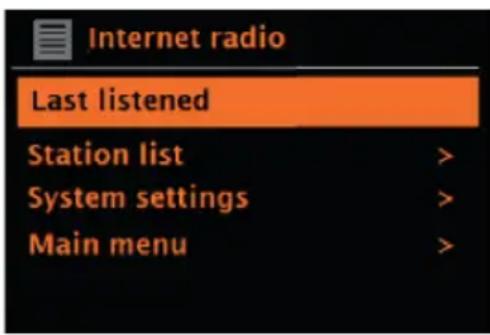
To enter internet radio mode, either press the SOURCE button until the screen displays Internet Radio mode or select Menu > Main menu > Internet radio.
Note: The channel list menu is provided by the internet radio portal and is therefore only available when the device is connected to the internet. Channel lists and sub menus may change from time to time.
The channel list is divided into different categories and search functions:
- Country - this option is available for each country. For example, if "China" is set, update the country setting accordingly.
History
Search - Location
- Popular
Discover
Country:
Specific channels are available for each country. For example, for "UK", update the country accordingly. With this option, a sub menu is available in which you can search for channels. There are various categories to choose from for the channel search, such as local channels, BBC channels, genres or channels from a specific city. Once you have selected the desired search category, either a list of subcategories is displayed or (if there are no subcategories) the channels available in the category are listed.
History:
As soon as the internet radio mode is restarted, the channels last listened to are selected. If you want to access another channel that you have recently listened to, select Menu > History and select one of the channels listed there. The last channels listened to are displayed at the top of the history.
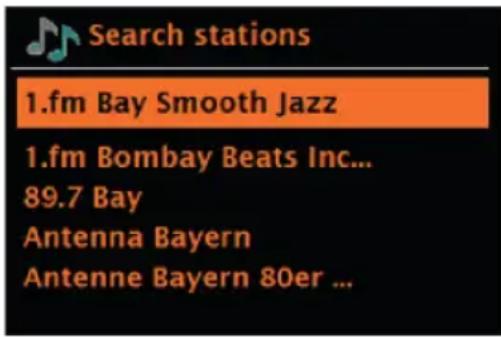
Search:
You can also search for stations or podcasts using specific keywords. To do this, select Menu > Search. Enter a keyword and confirm your entry with "OK". The search screen is similar to the Wi-Fi password entry screen. Select a channel from the list. With podcasts, it may be possible to select a specific episode.
Location:
To listen to a location-specific station, select Menu > Location >. Select a continent. A country list of the selected continent is then displayed. Select a country and the available internet radio channels are displayed.
Popular:
A list of the world's most popular internet radio stations is displayed.
Discover:
Allows you to select from a list of channels defined either by their origin (country), genre (music style) or language. Once you have selected a category, the number of channels available in the category is displayed. Press the number of available channels to display the channel list.
Current playback information
During stream playback, the screen displays its name and description. If artist and title information is available, it is also displayed. To view more information, press the INFO button. Each time you press the INFO button, various information is displayed in the following order:
- Slogan (factory set; if available)
Language/ Location - Codec and sampling frequency
- Playback buffer
Current date
SPOTIFY CONNECT
Your new device has Spotify Connect
Use your phone, tablet or computer as a remote control for Spotify. Go to Spotify.com/connect to learn how.

Licences
The Spotify software is subject to third-party licences, which can be found here:
https://www.spotify.com/connect/third-party-licenses
All brands listed are trademarks of the respective companies. Errors and omissions excepted and subject to technical change. Our general terms and conditions apply.
DAB RADIO (OPTIONAL)
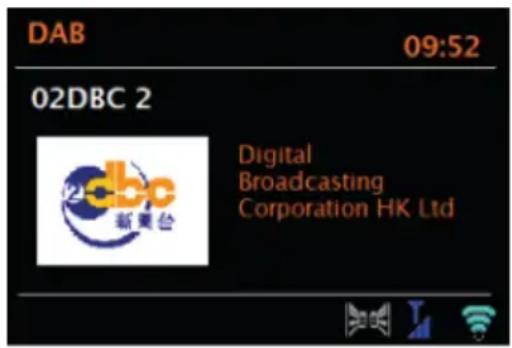
In DAB radio mode, DAB/DAB+ digital radio is received and information about the station, stream and track being played is displayed. To enter DAB mode, either press the SOURCE button until DAB mode is displayed on the screen or select Menu > Main menu > DAB.
Channel search
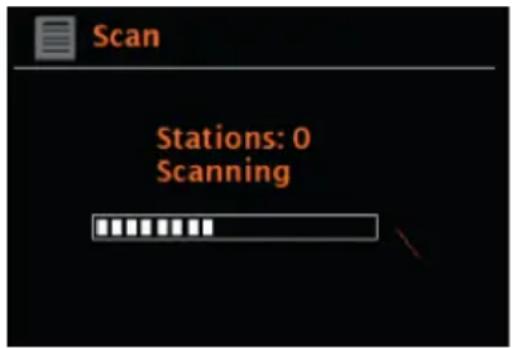
If you have selected DAB mode for the first time or if the channel list is empty, the device automatically initiates a full channel search for available broadcasters. It is also possible to perform the channel search manually to update the channel list for one of the following reasons:
Important instructions
Available channels may change.
- If the reception was not good during the first channel search (because the antenna was not extended, for example), this can lead to an empty or incomplete channel list.
If you have poor reception (noise) with some stations, it is recommended that you only
- display stations with good reception.
- To start the manual channel search, select Menu > Scan.
- As soon as the channel search is complete, the internet radio displays a list of available stations.
- To remove channels that are listed but not available, you can select Menu >
- Prune invalid (delete invalid).
Channel selection
To listen to a channel or change the channel, turn the rotary control to display a channel list and press the rotary control to select. Once a channel has been selected, it will play and the screen will display information about the station, title or show, etc.
Saving a radio channel
To save a DAB station, press and hold the PRESETS button until the screen displays "save preset". Select one of the 20 memory locations (on the remote control) to store the currently playing channel.
To play back a saved channel
To recall a saved radio channel, briefly press the PRESETS button and then select a channel from the memory list. When a stored station is played back, the star symbol and the corresponding memory location number are displayed at the bottom centre of the screen.
Current playback information
During playback, the screen displays the name and DLS information provided by the broadcaster in real time, such as programme name, playback title and contact details. Stereo broadcasts are indicated by a symbol on the top of the screen. To view more information, press the INFO button. Each time you press this button, the following information is displayed on the screen in the following order: DLS text, programme type, ensemble name / ensemble frequency, signal strength / error rate, bit rate / codec / station and the current date.
Dynamic Range Compression (DRC)
Some DAB stations offer dynamic range compression. This allows the radio to compress the dynamic range of the music output, making soft sounds louder and loud sounds softer. This can be especially helpful if you listen to music with a high dynamic range in a noisy environment (for example, classical music while cooking). To change the DRC setting of the internet radio, select Menu > DRC and then DRC high, DRC low or DRC off.
Note: If no DRC information is provided by the broadcaster, the DRC setting on the internet radio has no effect.
Channel order
You can select either alphanumeric, ensemble or available stations as the order of DAB channels. Selecting "Ensemble" lists groups of channels that are broadcast together, such as BBC or South Wales local. When "valid" (available channels) is selected, first all available channels are listed alphabetically and then the channels that are not available.
To change the channel order, select Menu > Station order, then select Alphanumeric, Ensemble or Valid (available stations).
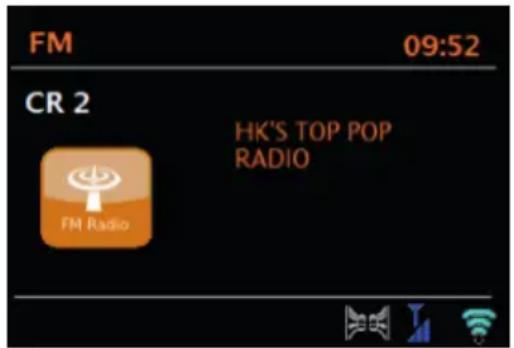
FM RADIO
FM radio mode receives analogue FM radio and displays RDS (Radio Data System) information about the station and programme (where broadcast).
To enter FM mode, either press the SOURCE button until FM mode appears on the screen or select Menu > Main menu > FM.
Channel selection
To search for a radio channel, press the rotary control. The frequency display starts counting upwards on the screen while the FM stations are being scanned. Alternatively, you can search for stations by holding down the buttons , mally tune in stations by briefly pressing these buttons, or turn the rotary control.
Saving a radio channel
To save an FM radio channel, press and hold the PRESETS button until "save preset" is displayed on the screen. Select one of the 20 presets (on the remote control) to save the currently playing radio station.
To play back a saved channel
To recall a saved radio channel, briefly press the PRESETS button and then select a channel from the memory list. When a stored station is played back, the star symbol and the corresponding memory location number are displayed at the bottom centre of the screen.
Current playback information
During FM playback, the screen displays the RDS information, if available. The channel name is displayed in the factory setting. By pressing the INFO button, you can display further RDS information. Each time you press the INFO button, the following information is displayed in this order: RDS radio text, RDS broadcast type, frequency and current date. If no RDS information is available, only the set frequency is displayed.
Search setting
Factory set, the FM search stops at any available radio channel. This may cause radio stations with poor signal reception to hiss. You can change this by selecting only radio channels with good signal reception in the search settings.
To do this, select Menu > Scan setting > Strong stations only? (only stations with good reception?) > Yes.
Audio settings
Set at the factory, all stereo stations are played back in stereo. This may cause interference with channels that have poor reception. To play stations with poor reception in mono, select Menu > Audio setting > FM weak reception: Listen in mono only > Yes.
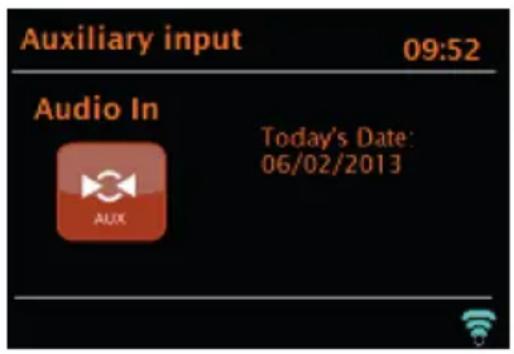
AUX MODE
In AUX mode, audio can be played from external sources such as an MP3 player. To play music in AUX mode, proceed as follows:
- Connect the external audio device to the AUX-IN connector.
- Select AUX mode by pressing the SOURCE button or select Menu > Main menu > AUX IN.
- Adjust the volume on the internet radio (and on the external audio device if necessary).
BT MODE
Before pairing, make sure that the Internet radio is not already connected to another BT device. External devices may differ in the way they connect.
The following is a general guide on establishing a connection:
- Press the SOURCE button to select BT mode. This activates BT. Rotate the volume control to approx. 14 of the available volume and also turn up the volume of the external BT device used.
- Activate BT on the external BT device.
- Call up the device list of the external BT device and select MS5 to establish the connection.
- Once connected, you can play music files from your external BT device via Internet radio. Adjust the volume, if necessary, on both devices.
It should not be necessary to reconnect the device after it has been successfully connected. Depending on the external BT device, several attempts may be necessary to connect to the Internet radio. Allow time for the devices to connect before repeating the process.
USB PLAYBACK
To play music from a USB flash drive, select Main menu > USB. The folders on the USB stick are now displayed on the screen of the Internet radio. Browse folders with the rotary control and the BACK button. The screen displays the folder and the file name (not necessarily the title name).
CD PLAYBACK
Note: Incorrect handling can lead to property damage! Only insert media that conforms to the standard CD format into the CD compartment. Otherwise, playback and output, for example when using mini discs, may not be correct.
- Only insert one CD in the CD compartment at a time.
- Insert the CD into the CD compartment with the labelled side facing up. The CD is automatically loaded and playback starts. "Loading" is displayed on the screen. No controls can be used during the charging process.
- Playback starts automatically after the charging process.
- If there is no CD in the CD compartment, "No Disc"
- is displayed on the screen after switching to CD mode.
When you have inserted a CD in the CD compartment, the following information is displayed on the screen in CD mode:
- CD mode
Time - Past playback time in minutes
- Title number
- Playback status (play/pause)
Operation
| Press the button to pause or resume playback. |
| Press the button to go to the next track. |
| Press and hold to fast forward within a track. |
| Press the button to go to the previous track. |
| Press and hold the button to rewind within a track. |
| Press the button to stop playback. |
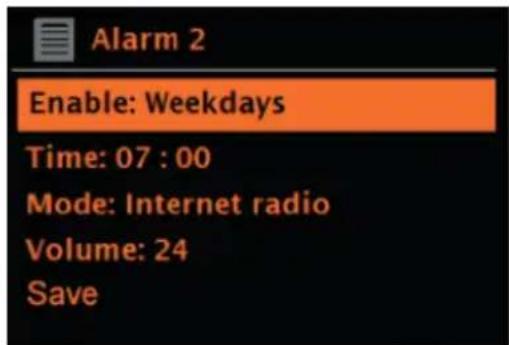
ALARM SETTING AND SLEEP TIMER
In addition to the time/calendar setting, the device features two independent alarm clocks with snooze function, as well as a sleep function, which automatically switches the device off after a preset time. A specific mode can be selected for each alarm clock.
Alarm clock
To change an alarm, either press the ALARM button or select Menu > Main Menu > Alarms. Select the number of the alarm clock (1 or 2) and then set the following parameters:
- Activate/ frequency: off, daily, once, weekend or weekdays
Time
Mode: Hum, Internet radio, DAB, FM
Volume:0-32
Save
Scroll down to activate the new setting and select "Save".
EN
On the screen, active alarms are indicated with an icon on the lower left side of the screen.
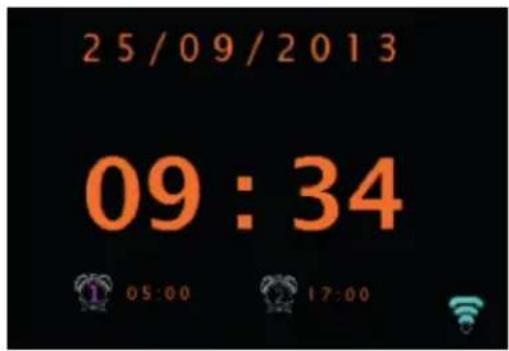
The alarm clock will ring at the preset time. To mute it temporarily, press the SNOOZE button. You can adjust the snooze time with the rotary control if you wish. The device returns to standby mode for the set snooze time. The alarm symbol flashes on the screen during this time.
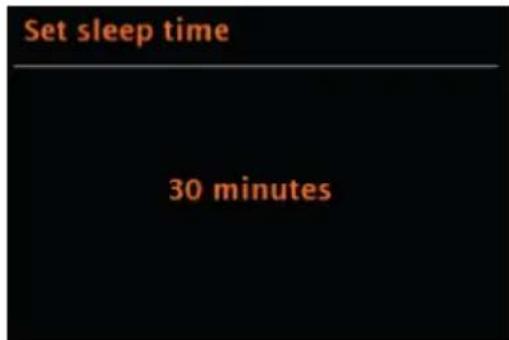
Setting the sleep timer
For setting the time until the device switches off automatically, select Menu > Main menu > Sleep. You can then choose between Sleep OFF, 15 min, 30 min, 45 min or 60 min.
Once you have set the time until automatic switch-off, the device returns to the main menu. Press the MENU button to return to the current playback screen.
SOFTWARE UPDATE
The manufacturer provides software updates containing bug fixes and/or additional features on an occasional basis. You can either check for updates manually or configure your device to check for updates at regular intervals (factory setting). If the device detects that a more recent software version is available, the screen will ask you if you want to proceed with the update. If you agree, the newer software will be downloaded and installed. All user settings are retained after a software update.
Note: Before starting the software update, make sure that the power cord of the device is plugged in and that the power connection is stable. Disconnecting the power connection during a software update may cause permanent damage to the unit.
You can activate/deactivate the automatic check for software updates as follows: Select Menu > System settings > Software update > Auto check.
RESET TO FACTORY SETTINGS
When resetting to factory settings, all user settings such as time/date, network setting, stored stations etc. are deleted. However, the current software version of the radio is retained, as is the registration in the Internet radio portal.
Internet radio favourites are therefore retained unless you log into the Internet radio portal with another account.
To reset to factory settings, proceed as follows: Select Menu > System settings > Factory reset > proceed > Yes.
TROUBLESHOOTING
| Problem Potential cause | Possible solution | |
| Failed to connect (connection cannot be established) | Correct password entered, but the router rejects the request | The MAC filter has been activated on the filter |
| Format error The file format cannot be recognised, regardless of the network | A WMA file was sent, but it cannot be recognised as a WMA file when decoding | |
| Network error The data received from the network is incorrect (router-independent) | The data received from the server cannot be read | |
| Network not ready (network not accessible) | Connection problem with router | The router is switched off |
| Network timeout No response is received from the network (router-independent) | The Internet radio station that is being streamed is suddenly no longer available | |
| DAB Service not available (DAB service not available) | No DAB reception | |
| No USB device found No USB device has been connected | ||
| USB device unsupported (The USB device is not supported) | The format of the USB stick is not supported | |
| USB error General USB problems | ||
| USB read error (USB cannot be read) | Certain files of the USB stick cannot be read | There are faulty files on the USB stick |
| USB underpowered (USB connection without power) | The USB connection is not supplied with power- remove the USB stick | |
| Waiting for users Spotify | mode - No Spotify account has been connected to the device. Connect a Spotify account to the device via Spotify Connect | |
| Press play... Spotify mode | e - waiting for playback information; for example, when audio playback is diverted from the Spotify app to another audio speaker or the smartphone itself. | |
| FM: Noise DAB: Noise / interrupted playback | Weak signal Check/move the antenna. Move the radio to another location. Search exclusively for radio stations with strong signal reception | |
| DAB: No stations available | Weak signal Search exclusively for radio stations with strong signal reception | |
| Network connection not possible | Network failure Make sure that the network connection between the router and the Internet radio can be established | |
| The router restricts access to listed MAC addresses | Access the MAC address of the internet radio via Menu > System settings > Network > View settings and add them to the router list. | |
| Insufficient WLAN signal strength | Check the distance to the router; check if other device can connect to the WLAN network from the location of the Internet Radio | |
| A firewall prevents network access | Check that the following ports are open on the router: UDP and TCP ports 80 and 123; DNS port 53. Windows shares: Port 135 - 139 and 445. | |
| Internet connection cannot be established | No internet connection Check if | the internet connection works on other devices in the network |
| A firewall is preventing access | Check that the following ports are open on the router: UDP and TCP ports 80 and 123; DNS port 53. For some internet radio stations it may be necessary to open additional ports | |
| A specific internet radio station cannot be played back | The transmitter is not transmitting or is transmitting insufficient bandwidth; the transmitter is using an unknown CODEC; | Attempt to access another radio station; try accessing the station on the computer using the internet radio portal; try again later |
| The link is not up to date | ||
| CD playback does not start | CD format is not compatible Use | another CD |
| CD is damaged Use another CD | ||
| CD is dirty Clean the CD | ||

If there is a legal regulation in your country regarding the disposal of electrical and electronic equipment, this symbol on the product or on the packaging indicates that this product must not be disposed of with household waste. Instead, it must be taken to a collection point for the recycling of electrical and electronic equipment. By disposing of this product in accordance with the regulations, you protect the environment and the health of those around you from negative consequences. For information on recycling and disposal of this product, contact your local government or household waste disposal service.
This product contains batteries. If there is a legal regulation in your country regarding the disposal of batteries, the batteries must not be disposed of in household waste. Consult your local regulations for the disposal of batteries. By disposing of this product in accordance with the regulations, you are protecting the environment and the health of those around you from negative consequences.
DECLARATION OF CONFORMITY

Manufacturer:
Chal-Tec GmbH, Wallstrasse 16, 10179 Berlin, Germany.
Importer for Great Britain:
Berlin Brands Group UK Limited
PO Box 42
272 Kensington High Street
London, W8 6ND
United Kingdom
For Great Britain: Hereby, Chal-Tec GmbH declares that the radio equipment type Unison Retrospective is in compliance with the relevant statutory requirements. The full text of the EU declaration of conformity is available at the following internet address: use.berlin/10032250
Cher client, chere clientele,
https://www.spotify.com/connect/third-party-licenses
RADIO DAB (EN OPTION)
Berlin Brands Group UK Limited PO Box 42
272 Kensington High Street
London, W8 6ND
United Kingdom
https://www.spotify.com/connect/third-party-licenses
Berlin Brands Group UK Limited PO Box 42 272 Kensington High Street London, W8 6ND United Kingdom
https://www.spotify.com/connect/third-party-licenses
Berlin Brands Group UK Limited
PO Box 42
272 Kensington High Street
London, W8 6ND
United Kingdom