
CTL7181W0 - Coffee maker BOSCH - Free user manual and instructions
Find the device manual for free CTL7181W0 BOSCH in PDF.

| Product type | Automatic coffee machine |
| Brand | Bosch |
| Model | CTL7181W0 |
| Dimensions (W x H x D) | 59.4 x 45.5 x 37.7 cm |
| Net weight | 20.6 kg |
| Power supply | 220-240 V ~, 50/60 Hz |
| Power | 1500 W |
| Maximum pump pressure | 20 bar |
| Water tank capacity | 2.2 L |
| Bean hopper capacity | 400 g |
| Grinder type | Ceramic |
| Power cord length | 170 cm |
| Connectivity | Home Connect (Wi-Fi) |
| Display | Color screen |
| Control panel | Touch |
| Special functions | DoubleShot, TripleShot, Slow Brew, Cold Brew |
| Milk beverage preparation | Yes (with milk container) |
| Two-cup preparation | Yes |
| Maintenance programs | calc'nClean, descaling, cleaning, frost protection |
| Child safety | Yes (lock) |
| Water filter | Intenza (optional) |
| Included accessories | Water filter, hardness test strip, milk container |
| Availability of spare parts | 7 years after market launch |
Frequently Asked Questions - CTL7181W0 BOSCH
User questions about CTL7181W0 BOSCH
0 question about this device. Answer the ones you know or ask your own.
Ask a new question about this device
Download the instructions for your Coffee maker in PDF format for free! Find your manual CTL7181W0 - BOSCH and take your electronic device back in hand. On this page are published all the documents necessary for the use of your device. CTL7181W0 by BOSCH.
USER MANUAL CTL7181W0 BOSCH
m = 311
12

14

16

18

m = 311

20
22
24

26
28
5-GHz-Band (5150-5350 MHz +
5470-5725 MHz): max. 200 mW

BE BG CZ DK DE EE IE EL ES
FR HR IT CY LI LV LT LU HU
MT NL AT PL PT RO SI SK FI
SE NO CH TR IS UK (NI)
Further information and explanations are available online:

Table of contents
1 Safety 42
1.1 General information 42
1.2 Intended use 42
1.3 Restriction on user group 42
1.4 Safe installation 42
1.5 Safe use 43
2 Preventing material damage .... 46
3 Environmental protection and saving energy 46
3.1 Disposing of packaging 46
3.2 Tips for saving energy 46
4 Installation and connection.... 46
4.1 Scope of delivery.. 46
4.2 Installing and connecting the appliance 47
4.3 Connecting the appliance to the electricity supply.. 47
5 Familiarising yourself with your appliance. 47
5.1 Appliance 47
5.2 Control panel 48
6 Accessories 48
7 Before using for the first time .. 49
7.1 Preparing and cleaning the appliance 49
7.2 Checking the water hardness 49
7.3 Overview of water hardness levels 50
7.4 Water filter 50
7.5 Performing initial start-up 51
7.6 General information 51
8 Basic operation 51
8.1 Switching the appliance on or off 51
8.2 Dispensing beverages 52
8.3 DoubleShot and tripleShot 52
8.4 Slow Brew and Cold Brew 52
8.5 Dispensing a coffee drink with milk 52
8.6Dispensing two cups at once..53
9Grinder 53
9.1 Setting the grinding level... 53
10 Milk container shelf. 54
10.1 Using the milk container shelf 54
10.2 Using your own milk container 54
11 Childproof lock 54
11.1 Activating the child-proof lock. 54
11.2 Deactivating the childproof lock 54
12 Favourites. 54
12.1 Creating favourites from Favourites menu 55
12.2 Create favourites from Classic or Coffee World 55
12.3 Changing a favourite.. 55
12.4 Deleting a favourite 55
12.5 Sorting favourites 55
13 Home Connect 55
13.1 Setting up the Home Connect app 56
13.2 Setting up Home Connect.... 56
13.3 Home Connect settings.. 56
13.4 Data protection.. 57
14 Basic settings. 57
14.1 Changing settings 57
14.2 Overview Settings.. 57
14.3 Setting the time 59
15 Cleaning and servicing. 60
15.1 Dishwasher-safe components 60
15.2 Cleaning agent 60
15.3 Cleaning the appliance 61
15.4 Cleaning the drip tray and coffee dregs container 61
15.5 Cleaning the milk container .. 61
15.6 Service programmes 61
16 Troubleshooting 63
17 Transportation, storage and disposal 68
17.1 Activating frost protection .... 68
17.2 Disposing of old appliance ... 68
18 Customer Service 68
18.1 Product number (E-Nr.), production number (FD) and consecutive numbering (Z-Nr.) 68
19 Technical specifications... 69
19.1 Information regarding Free and Open Source Software... 69
20 Declaration of Conformity 69
20.1 Statement of Compliance for Great Britain 70

1 Safety
Observe the following safety instructions.
1.1 General information
- Read this instruction manual carefully.
- Keep the instruction manual and the product information safe for future reference or for the next owner.
- Do not connect the appliance if it has been damaged in transit.
1.2 Intended use
Only use this appliance:
for preparing hot drinks.
To make cold-brewed drinks.
- in private households and in enclosed spaces in a domestic environment.
up to an altitude of max. 2000m above sea level.
1.3 Restriction on user group
This appliance may be used by children aged 8 or over and by people who have reduced physical, sensory or mental abilities or inadequate experience and/or knowledge, provided that they are supervised or have been instructed on how to use the appliance safely and have understood the resulting dangers.
Do not let children play with the appliance.
Children must not perform cleaning or user maintenance unless they are at least 8 years old and are being supervised.
Keep children under the age of 8 years away from the appliance and power cable.
1.4 Safe installation
WARNING - Risk of electric shock!
Incorrect installation is dangerous.
- Connect and operate the appliance only in accordance with the specifications on the rating plate.
Always use the supplied power cable for the new appliance.
- Connect the appliance to a power supply with alternating current only via a properly installed socket with earthing.
The protective conductor system of the domestic electrical installation must be properly installed.
If the appliance or the power cord is damaged, this is dangerous.
- Never operate a damaged appliance.
- Never operate an appliance with a cracked or fractured surface.
- Never pull on the power cord to unplug the appliance. Always unplug the appliance at the mains.
- If the appliance or the power cord is damaged, immediately unplug the power cord or switch off the fuse in the fuse box.
- Call customer services. Page 68
Improper repairs are dangerous.
- Repairs to the appliance should only be carried out by trained specialist staff.
- Only use genuine spare parts when repairing the appliance.
- If the power cord or the appliance power cable of this appliance is damaged, it must be replaced with a special power cord or special appliance power cable, which is available from the manufacturer or its Customer Service.
1.5 Safe use
WARNING - Risk of suffocation!
Children may put packaging material over their heads or wrap themselves up in it and suffocate.
- Keep packaging material away from children.
- Do not let children play with packaging material.
Children may breathe in or swallow small parts, causing them to suffocate.
- Keep small parts away from children.
- Do not let children play with small parts.
WARNING - Risk of electric shock!
An ingress of moisture can cause an electric shock.
- Never immerse the appliance or the power cord in water.
- Liquids must not be spilled on the appliance plug connection.
en Safety
- Only use the appliance in enclosed spaces.
- Never expose the appliance to intense heat or humidity.
- Do not use steam- or high-pressure cleaners to clean the appliance.
WARNING - Risk of fire!
The appliance will become hot.
- Ventilate the appliance adequately.
- Never operate the appliance with the cupboard door closed. It is dangerous to use an extended power cord and non-approved adapters.
- Do not use extension cables or multiple socket strips.
- Only use adapters and power cords approved by the manufacturer.
- If the power cord is too short and a longer one is not available, please contact an electrician to have the domestic installation adapted.
WARNING - Risk of burns!
Some parts of the appliance become very hot.
- Never touch hot appliance parts.
After use, allow hot appliance parts to cool down before touching.
WARNING - Risk of scalding!
Freshly prepared drinks are very hot.
- Leave drinks to cool down if necessary.
- Do not let escaping liquids or steam come into contact with your skin.
A remote start via the Home Connect app while the appliance is unattended may cause scalding to third parties.
- Do not reach under the beverage outlet when dispensing drinks.
- Keep persons, particularly children, away from the appliance.
WARNING - Risk of injury!
Improper use of the appliance may endanger the user.
- To avoid injuries, only use the appliance for its intended purpose.
Trapped fingers when closing the appliance door.
- Be careful of your fingers when closing the appliance door.
The grinder rotates.
- Never reach into the grinder.

WARNING - Danger: Magnetism!
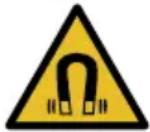
Caution: Magnetism!

Warning for wearers of pacemakers
The appliance contains permanent magnets. They may affect electronic implants, e.g. pacemakers or insulin pumps.
- People with electronic implants must stand at least 10cm away from the appliance and appliance door.
- Keep a minimum distance of 10cm from the water tank, milk container, coffee dregs container, beverage outlet cover, beverage dispenser, beverage outlet, milk system holder, brewing chamber cover and brewing unit.

WARNING - Risk of harm to health!
Soiling on the appliance may be harmful to health.
- To ensure hygiene, follow the cleaning instructions for the appliance.
Water from the hot water circuit can be harmful to health.
- Only ever use the appliance with fresh, cold, non-carbonated drinking water.
2 Preventing material damage
ATTENTION!
Risk of damage to the appliance. If the appliance is not started up correctly, it may be damaged.
- Use the appliance in frost-free rooms only.
If the appliance has been transported or stored below 0^ , wait 3 hours at room temperature before starting it up.
After plugging in, always wait approx. 5 seconds.
Improper installation may cause material damage.
Observe the installation instructions for the appliance installed above or below.
- When installing the appliance above a warming drawer, observe a niche height of 590~mm . Unsecured units may fall over.
- Secure units to the wall using a standard bracket.
3 Environmental protection and saving energy
3.1 Disposing of packaging
The packaging materials are environmentally compatible and can be recycled.
- Sort the individual components by type and dispose of them separately.
3.2 Tips for saving energy
If you follow these instructions, your appliance will use less energy.
Set the interval for automatic switchoff to the smallest value.
- If the appliance is not being used, it will switch itself off earlier.
"Basic settings", Page 57
Do not interrupt the dispensing process prematurely.
- The amount of water or milk that is heated is used optimally.
Descale the appliance regularly. - Limescale deposits increase the appliance's energy consumption.
4 Installation and connection
4.1 Scope of delivery
After unpacking all parts, check for any damage in transit and completeness of the delivery.
Note: Different accessories are enclosed depending on the appliance model. This accessory is shown in a frame with a dashed line.
Fig. 1
| A | Fully automatic coffee machine |
| B | Milk container |
| C | Installation instructions |
| D | Water filter1 |
| E | Water hardness testing strip |
| F | User manual |
1 Depending on the appliance specifications
4.2 Installing and connecting the appliance
The installation instructions describe various models that may differ with regard to scope of supply and installation.
Note: Observe the information on safety Page 42 and preventing material damage Page 46.
Install and connect the appliance properly in accordance with the installation instructions enclosed in the box.
4.3 Connecting the appliance to the electricity supply
- Insert the non-heating appliance plug of the power cable into the appliance.
- Insert the mains plug of the appliance's power cable in a socket nearby.
- Check the mains plug is inserted properly.
5 Familiarising yourself with your appliance
5.1 Appliance
You can find an overview of the parts of your appliance here.
Note: Individual details and colours may differ, depending on the appliance model.
Exterior view
Fig. 2
1 Shelf, removable
2 Lights
| 3 | Control panel |
| 4 | Beverage outlet, height-adjustable |
| 5 | Cup lighting |
| 6 | Appliance door |
| 7 | Beverage dispenser |
| 8 | Beverage outlet cover |
Interior view
Fig. 3
| 9 | Collecting tray |
| 10 | Rating plate |
| 11 | Water tank with lid |
| 12 | Mains switch |
| 13 | Accessory drawer |
| 14 | Bean container with lid |
| 15 | Interior lighting1 |
| 16 | Grinding level adjustment |
| 17 | Brewing chamber cover |
| 18 | Brewing unit |
| 19 | Milk container |
| 20 | Milk system |
| 21 | Milk container shelf, removable |
| 22 | Coffee dregs container |
| 23 | Drip tray |
| 24 | Drip tray cover |
1 Depending on the appliance specifications
5.2 Control panel
You can use the control panel to configure all functions of your appliance and to obtain information about the operating status.
| Switch the appliance on or off. | |
| ■ Exit the menu settings. ■ Return to the Start menu. | |
| start stop | Start or stop the programme. |
| Favourites | Select saved beverages with personal settings. → Page 54 |
| Classic Select standard beverages. | |
| Coffee World | Select basic beverages which can be extended in conjunction with Home Connect. |
| Care & maintainence | Call up service programmes. |
| Settings Open or exit the settings. | |
Quick selection in beverage selection
| Quick selection directly to "Favourites" | |
| Quick selection directly to "Classic" | |
| Quick selection directly to "Coffee World" | |
| Information | |
| Customer service |
| Appliance is connected to Home Connect. | |
| Appliance is not connected to Home Connect. | |
| Appliance is not connected to the server. | |
| ArrayList function is activated in the Home Connect app. | |
| Check the milk container. | |
| Add beans. | |
| Fill with water. | |
| "Demo mode" is activated. |
Beverage settings
| Quantity |
| Strength |
| Aroma |
| Share of milk |
| Temperature |
Operation
| < | Go back in the menu. |
| ☆ | Add favourite. |
| ★ | Delete favourite. |
| □ | Dispense two cups. |
| Quick selection | |
| : | Open quick selection. |
| Activate or deactivate childproof lock. | |
| Switch WiFi on or off. | |
6 Accessories
Use original accessories. These have been made especially for your appliance.
| Accessories Retail Customer service |
| Cleaning tablets TCZ8001A 00312096 |
| Descaling tablets TCZ8002A 00312093 |
| Water filter TCZ7003 17000705 |
| Microfibre cloth - 00312289 |
| Care set TCZ8004A 00312107 |
| Milk container made of glass - 12043068 |
| Limit stop for 92° opening angle - 10020041 |
| Power cord extension Europe, 5 m - 12022522 |
7 Before using for the first time
Prepare the appliance for use.
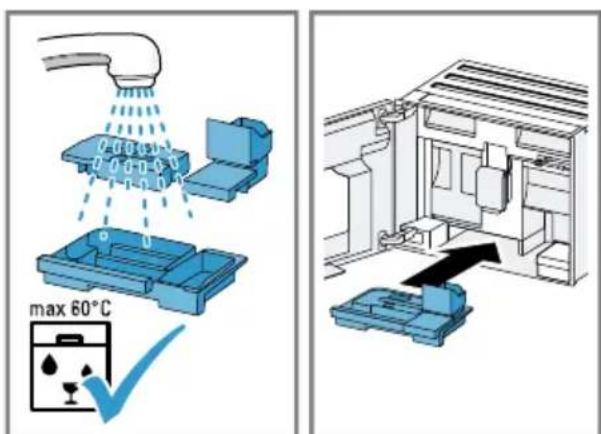
7.1 Preparing and cleaning the appliance
Clean the appliance and individual parts. Follow the illustrated instructions at the beginning of this manual.
ATTENTION!
Unsuitable beans can block the grinder.
- Only use pure, roasted bean mixes that are suitable for use in fully automatic coffee or espresso machines.
- Do not use glazed coffee beans.
- Do not use caramelised coffee beans.
- Do not use coffee beans that have been treated with additives containing sugar.
Do not add instant coffee.
Fig. 4 - 23
Note: Fill the water tank with fresh, cold, non-carbonated drinking water every day.
Tip: To keep the coffee beans at their best, store them in a sealed container in a cool place. You can keep the coffee beans in the bean container for several days without them losing their aroma.
7.2 Checking the water hardness
It is important to set the water hardness correctly so that your appliance indicates in good time that it needs descaling. You can use the enclosed test strip to check the water hardness or ask your local water company.
- Briefly dip the test strip in fresh tap water.
- Allow the water to drain off the test strip.
- Read the water hardness off the test strip after 1 minute.
"Overview of water hardness levels", Page 50
Note: If a water softening system is installed in your house, you can select "Water softening system".
Tips
- You can change the settings at any time.
"Basic settings", Page 57
en Before using for the first time
If the water hardness exceeds 21^ (3.8 mmol/l), you can fill the water tank with prefiltered water to reduce limescale deposits.
7.3 Overview of water hardness levels
The table shows allocation of the levels to the different degrees of water hardness.
| Setting Ring setting on INTENZA filter | German degrees in °dH | Total hardness in mmol/l | |
| 1 A 1 - 7 < 1.3 | |||
| 2 A 8 - 14 1.3 - 2.5 | |||
| 3 B 15 - 21 2.5 - 3.8 | |||
| 4¹ | C 22 - 30 > 3.8 | ||
| ¹Factory setting | |||
7.4 Water filter
You can use a water filter to minimise limescale deposits and reduce impurities in the water.
The limescale content of the water influences the aroma and crema of coffee. There is an aroma ring on the underside of the BRITA INTENZA water filter. Turn the aroma ring to set the optimum aroma level for your mains water.
Inserting the water filter
ATTENTION!
Possible damage to the appliance due to limescale build-up.
- Change the water filter in good time.
-
Change the water filter after 2 months at the latest.
Observe the display messages. -
Select "Care & maintenance".
- Select "INTENZA filter" and follow the instructions on the display.
Changing or removing the water filter
You can also operate your appliance without a water filter.
- Select "Care & maintenance".
- Select "INTENZA filter".
- Select "Replace" or "Remove" and follow the instructions on the display.
Notes
- Dispose of spent water filters according to local regulations.
Always store replacement water filters in a cool and dry place in their original sealed packaging.
Tips
- You should also change your water filter for reasons of hygiene.
- With a water filter you need to descale your appliance less frequently.
If you use a water filter, your coffee will be more flavoursome.
If your appliance has not been used for a long time, for example if you were on holiday, you should rinse the water filter before use by dispensing a cup of hot water.
The water filter can be purchased from retailers or customer service. "Accessories", Page 48
7.5 Performing initial start-up
After connecting the appliance to the power supply, configure the settings for first use. First use appears when switching on for the first time or after resetting to the factory settings.
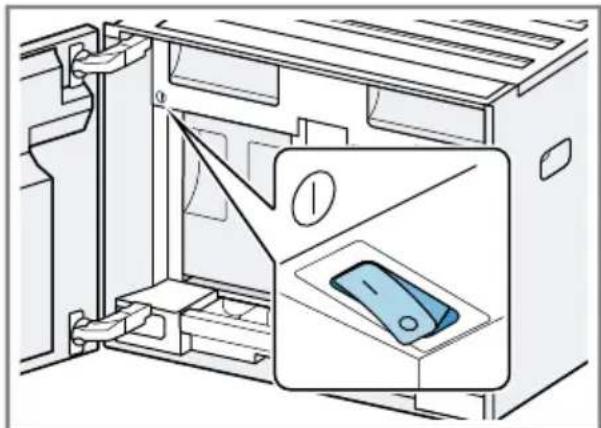
- Open the appliance door.
-
Check that the mains switch is set to I. Fig. 24
-
Close the appliance door.
- Press to switch the appliance on and wait until the appliance has rinsed.
- Follow the instructions on the display.
The display will guide you through the programme.
Tip: To call up brief information, press i.
Notes
If you want to set up Home Connect now, follow the instructions in the Home Connect app. "Setting up Home Connect", Page 56
If "Demo mode" is selected, only the displays will work. You cannot dispense a beverage or run a programme.
7.6 General information
Please bear this information in mind so that you can get the best out of your appliance.
Notes
The appliance has been programmed at the factory with standard settings for optimum operation.
- The integrated fan switches on each time a beverage is dispensed and switches off again after around 5-7 minutes.
The grinder has been factory-set for optimum operation. If coffee is only dispensed drop by drop or is too thin and with too little crema, you can adjust the grinding level. "Setting the grinding level", Page 53
If you do not perform any actions on the appliance for a certain period, it will switch off automatically. You can change the duration in the basic settings. Page 57
The first beverage will not yet have its full aroma if:
- You are using the appliance for the first time.
- You have run a service programme.
- You have not used the appliance for a long time.
Do not drink the beverage.
8 Basic operation
8.1 Switching the appliance on or off
Notes
- Do not press the power switch while the appliance is operating.
Before switching off the power switch, switch the appliance off with . This is the only way for the appliance to rinse automatically.
Press
en Basic operation
When the appliance switches on, the display shows the logo. When the appliance is switched on or off, it will rinse itself automatically. When switched off, the appliance will emit steam into the drip tray for cleaning. The appliance will not rinse itself if the appliance is still warm when switched on or if no beverage was dispensed before it was switched off.
8.2 Dispensing beverages
Find out how to prepare a drink of your choice.
WARNING
Risk of scalding!
Freshly prepared drinks are very hot.
- Leave drinks to cool down if necessary.
- Do not let escaping liquids or steam come into contact with your skin.
Notes
- With a number of settings your coffee is prepared in several steps. Wait until the process is fully completed.
If you are dispensing a beverage with milk, always connect a container filled with milk to the milk hose and suction pipe. - The milk container is specially designed for this appliance. Only use the milk container for storing milk in the refrigerator and in the house.
If the milk system has not been cleaned, small amounts of milk may escape when hot water is dispensed.
8.3 DoubleShot and tripleShot
Your appliance grinds the coffee two or three times.
To ensure that only pleasant-tasting and easily digestible aromatic substances are released, coffee beans are freshly ground and brewed again by the appliance.
The longer coffee brews, the more bitter substances and undesirable aromas are released. These bitter substances and undesirable aromas affect the taste and digestibility of coffee.
Note: The functions "DoubleShot" and "tripleShot" depend on the beverage strength and beverage size selected.
8.4 Slow Brew and Cold Brew
Slow Brew and Cold Brew are slowly brewed beverages that your appliance dispenses in a pulsating beverage flow that is not continuous. This type of coffee preparation exists as a hot and a cold version. Dispensing of the beverage takes several minutes.
Note: Fill the water tank with fresh, cold, non-carbonated drinking water before dispensing drinks.
8.5 Dispensing a coffee drink with milk
An example explains how to make a latte macchiato.
WARNING
Risk of burns!
The milk system can become extremely hot.
- Never touch the milk system when it is hot.
- Allow the hot milk system to cool down before touching it.
Requirements
The milk container is inserted.
The milk system is connected to the beverage dispenser.
The milk container has been filled with sufficient milk.
- Place a glass underneath the beverage outlet.
- Select "Classic" and press "Classic".
- Select "Latte macchiato" and press "Latte macchiato".
-
Set the beverage parameters.
-
To change the per-cup quantity , press the segments.
- To change the strength, press and set the strength via the segments.
-
To change the milk ratio, press 日 and set the milk ratio via the segments.
-
Press start stop
-
To completely stop dispensing the beverage, press start stop
- To only stop the current dispensing step, press "Skip".
The beverage is prepared and then runs into the glass.
Notes
If you do not change any settings for approx. 30 seconds, the appliance will exit settings mode.
The appliance saves the settings automatically.
Tips
- You can also pre-heat cups before dispensing using hot water.
- You can also use plant-based alternatives to milk, e.g. soya milk.
The quality of the milk froth depends on the type of milk or plant-based alternative used.
8.6 Dispensing two cups at once
Depending on your beverage, you can make 2 cups at the same time.
Note: If the "DoubleShot" or "tripleShot" function is active, the function for dispensing two cups at once is not possible.
- Select the required beverage.
- Press
The display shows the setting.
- Place two cups on the left and right underneath the beverage outlet.
- Press start stop.
The drink is prepared in 2 steps. The beans are ground in 2 grinding operations.
- The beverage is brewed and then runs into the cups.
- Wait until the process is complete.
9 Grinding
Your appliance has an adjustable grinder, which you can use to customise the grinding level of your coffee beans.
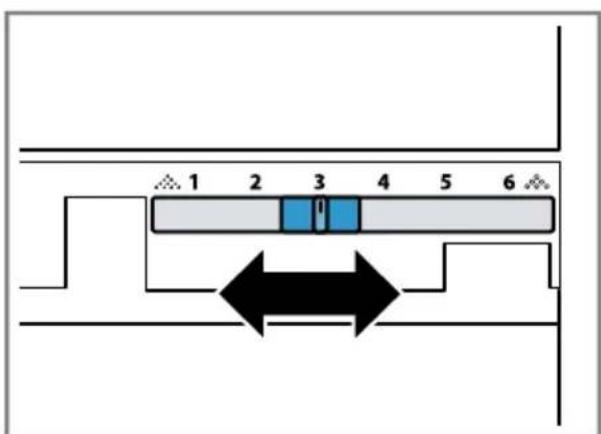
9.1 Setting the grinding level
Use the slider to set the grinding level to between very fine . and very coarse
Fig. 25
Only change grinding level setting slightly.
The grinding level setting only takes effect after the second cup.
Tip: If the coffee is only dispensed drop by drop, set a coarser grinding level.
If the coffee is dispensed too quickly and with too little crema, set a finer grinding level.
10 Milk container shelf
Your appliance detects when there is a milk container on the shelf.
Note: If you are using the milk container supplied or a milk carton, the appliance detects this automatically.
10.1 Using the milk container shelf
- Connect the milk container or milk carton and place it on the shelf.
- Start dispensing.
Note: If the message "Please insert milk container." appears, dispensing is not possible.
10.2 Using your own milk container1
With certain appliance series, you can use your own milk container.
- Put out your own milk container.
- Tare your own milk container. "Overview Settings", Page 57 The appliance uses the weight to detect the quantity of milk in the milk container or the milk carton. If there is not enough milk in the milk container, a message will appear.
Note: If you use the standard milk container or a milk carton, the appliance detects this automatically.
11 Childproof lock
You can lock the appliance, to protect children against scalding and burns.
11.1 Activating the childproof lock
Requirement: The appliance is switched on.
- Press :
- Press
The childproof lock is activated.
11.2 Deactivating the childproof lock
- Press
- Move your finger along the ring until it is filled.
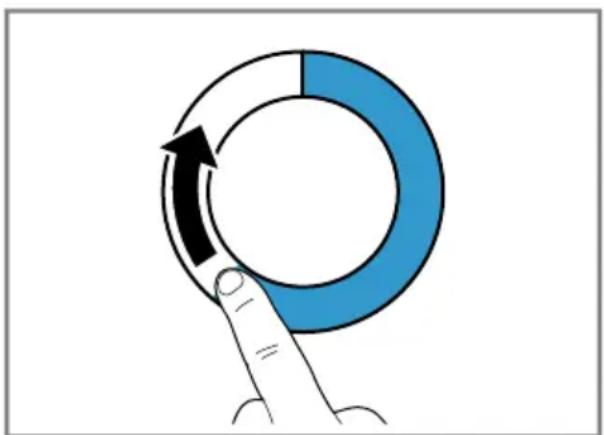
The childproof lock is deactivated.
12 Favourites
Save individual beverages as favourites so that you can dispense them more quickly.
A favourite is a beverage with personal settings. You can change the settings at any time.
Note: To exit the settings, press or start dispensing the beverage.
12.1 Creating favourites from Favourites menu
- Press "Favourites".
- Press +.
- Select a beverage.
- Set the beverage parameters.
- Press ☆
- Enter the name.
- Press "Save".
12.2 Create favourites from Classic or Coffee World
- Select a beverage from "Classic" or "Coffee World".
- Set the beverage parameters.
- Press ☆.
- Enter the name.
- Press "Save".
12.3 Changing a favourite
- Press "Favourites".
- Select favourite.
- Make the changes.
- Press
- Press "Save".
12.4 Deleting a favourite
- Press "Favourites".
- Select favourite.
- Press ★.
- Press "Delete".
12.5 Sorting favourites
You can change the sequence of your favourites.
-
Press "Favourites".
-
Select favourite.
-
The display shows all favourites, which can be moved using your finger.
The appliance saves the new sequence automatically.
Tip: You can also use the Home Connect app to create, change, delete, or sort favourites.
13 Home Connect
This appliance is network-capable. Connecting your appliance to a mobile device lets you control its functions via the Home Connect app, adjust its basic settings and monitor its operating status.
The Home Connect services are not available in every country. The availability of the Home Connect function depends on the availability of Home Connect services in your country. You can find information about this at: www.home-connect.com. To be able to use Home Connect, you must first set up the connection to the WLAN home network (Wi-Fi1) and to the Home Connect app.
The Home Connect app guides you through the entire login process. Follow the instructions in the Home Connect app to configure the settings.
Tip: Please also follow the instructions in the Home Connect app.
Notes
- Please note the safety precautions in this instruction manual and make sure that they are also observed when operating the appliance via the Home Connect app. "Safety", Page 42
en Home Connect
- Operating the appliance on the appliance itself always takes priority. During this time it is not possible to operate the appliance using the Home Connect app.
13.1 Setting up the Home Connect app
- Install the Home Connect app on your mobile device.
- Start the Home Connect app and set up access for Home Connect. The Home Connect app guides you through the entire login process.
13.2 Setting up Home Connect
Requirements
The Home Connect app has been installed on your mobile device.
The appliance is receiving signals from the WLAN home network (WiFi) at its installation location.
- Open the Home Connect app and scan the following QR code.

- Follow the instructions in the Home Connect app.
13.3 Home Connect settings
Adapt Home Connect to your needs. You can find the Home Connect settings in the basic settings for your appliance. Which settings the display shows will depend on whether Home Connect has been set up and whether the appliance is connected to your home network.
Overview of the Home Connect settings
You can find an overview of the Home Connect settings and network settings here.
| Basic setting Selection Description | ||
| Home Connect assistant | Start Disconnect | Add mobile device. Disconnect appliance from network. |
| WiFi On | Off | Switch off the wireless module during long absences or to save energy. Note: In networked standby mode your appliance requires max. 2 W. |
| Remote start On | Off | Switch remote start on the appliance on and off. Note: With the Home Connect app only switch-off is possible. |
| Software update - Note: This setting is only available with a software update. | ||
Note: When "WiFi" and remote start are switched on, appears on the display.
13.4 Data protection
Please see the information on data protection.
The first time your appliance is registered on a home network connected to the Internet, your appliance will transmit the following types of data to the Home Connect server (initial registration):
- Unique appliance identification (consisting of appliance codes as well as the MAC address of the installed Wi-Fi communication module).
- Security certificate of the Wi-Fi communication module (to ensure a secure data connection).
- The current software and hardware version of your appliance.
Status of any previous resetting to factory settings.
This initial registration prepares the Home Connect functions for use and is only required when you want to use the Home Connect functions for the first time.
Note: Please note that the Home Connect functions can only be utilised with the Home Connect app. Information on data protection can be retrieved in the Home Connect app.
14 Basic settings
You can configure the basic settings for your appliance to meet your needs and call up additional functions.
14.1 Changing settings
- Select "Settings".
The display shows the list of settings. - Change the required setting.
The appliance saves the setting automatically. - To go back to the menu, press <.
- To exit the settings, press
Tip: To call up brief information, press i
14.2 Overview Settings
See here for an overview of the "Settings".
| Language Set language. | |
| Home Connect Home Connect assistant | → "Setting up Home Connect", Page 56 |
| Time Set the current time or | automatically display via Home Connect. |
| Display settings Brightness Set the brightness in | steps. |
| 1 Depending on the appliance specifications | |
| Clock display Set the clock display so it is limited or unlimited in terms of time or switch off. Note: If you do not limit the clock display in terms of time, the energy consumption will in- crease. | |
| Clock display Set the clock display so it is limited or unlimited in terms of time or switch off. Note: If you do not limit the clock display in terms of time, the energy consumption will in- crease. | |
| Clock Set the time display. | |
| Adjustment ▪ Set the horizontal and vertical alignment of the display. □ Adjust the optimisation and centring of the display to the viewing angle. | |
| Sounds Button tone Switch sound off and on. | |
| Volume Adjust volume in steps. | |
| Signal tone Switch sound off and on. | |
| Welcome tune Switch sound off and on when the appliance is started. | |
| Beverage setting Brewing temperature Set the brewing temper- ature. | |
| Milk sequence Select the sequence for milk and coffee. | |
| Latte macchiato pause Select the pause between milk and coffee. | |
| Appliance settings Illumination Adjust the illumination | |
| brightness in steps. | |
| 1 Depending on the appliance specifications | |
| Automatic switch-off Set the time after which the appliance switches off. | ||
| Water hardness Set the water hardness. | ||
| Milk container1 | Set milk carton or individual milk container. Note: If you use the standard milk container, the appliance automatically detects it. | |
| Personalisation Start category Set the menu display | after switching on, e.g. "Classic". | |
| Factory settings Reset appliance to factory settings? | Reset personal settings to the factory settings. | |
| Demo mode Mode for demo purposes | Switch "Demo mode" on or off. | |
| Appliance information Beverage counter Display the number of beverages dispensed. | ||
| Cleaning information Time | until the water filter should next be changed or a service programme started. | |
| Version information Display appliance information. | ||
| Network information Display network information. | ||
1 Depending on the appliance specifications
14.3 Setting the time
- Press "Settings" in the menu.
- Press "Time".
-
To set the time, press the hour display or the minute display.
-
The selected value is marked in blue.
-
Use the setting ring to set the time.
-
The minutes are counted in 5-minute increments. To set it to the precise minute, press and hold the corresponding area in the setting ring for around 1-2 seconds. The minutes are shown in dots. Use the setting ring to set the minutes.
- To exit the basic settings, use to go back to the main menu or switch off the appliance using .
The time is saved.
15 Cleaning and servicing
To keep your appliance working efficiently for a long time, it is important to clean and maintain it carefully.
15.1 Dishwasher-safe components
Here you can find an overview of the components you can clean in the dishwasher.
ATTENTION!
Some components are sensitive to heat and may be damaged if they are cleaned in a dishwasher.
-
Follow the operating instructions of the dishwasher.
-
Only clean dishwasher-safe components in the dishwasher.
Only use programmes that do not heat the components above 60^
Suitable:
Drip tray
Drip tray cover
- Coffee dregs container
Collecting tray
- Milk container with lid and base
Milk container shelf
- Beverage dispenser
Milk system
Not suitable:
Water tank
Water tank lid
Brewing unit
- Beverage dispenser cover
Brewing unit cover
- Bean container
- Bean container lid
Shelf
15.2 Cleaning agent
Only use suitable cleaning agents.
ATTENTION!
Unsuitable cleaning products may damage the surfaces of the appliance.
- Do not use harsh or abrasive detergents.
- Do not use cleaning agents containing alcohol or spirits.
- Do not use hard scouring pads or cleaning sponges.
Unsuitable cleaning and descaling agents may damage the appliance.
- Do not use pure citric acid, vinegar or any vinegar-based agents to descale the appliance.
- Do not use descending agent with phosphoric acid.
Only use cleaning tablets and descaling tablets that have been specially developed for the appliance. "Accessories", Page 48

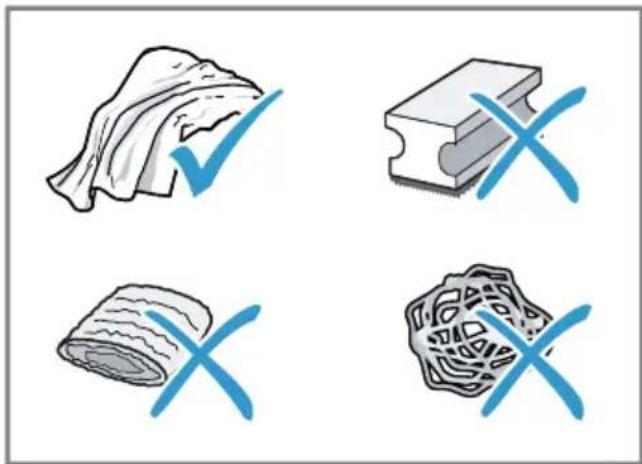
Tips
- Wash new sponge cloths thoroughly to remove any salt adhering to them. Salt can cause rust film to develop on stainless steel surfaces.
Always remove any residues of limescale, coffee, milk and cleaning/descaling solutions immediately to prevent corrosion.
15.3 Cleaning the appliance
WARNING
Risk of electric shock!
An ingress of moisture can cause an electric shock.
- Never immerse the appliance or the power cord in water.
- Liquids must not be spilled on the appliance plug connection.
- Do not use steam- or high-pressure cleaners to clean the appliance.
WARNING
Risk of burns!
Some parts of the appliance become very hot.
-
Never touch hot appliance parts.
After use, allow hot appliance parts to cool down before touching. -
Clean the housing, the high-gloss surfaces and the control panel with a microfibre cloth.
- Clean the beverage outlet with a soft, damp cloth after beverages have been dispensed.
- Rinse the water tank with fresh, clean water.
- If the appliance has not been used for a long time, e.g. after a holiday, clean the entire appliance, including moving parts such as the brewing unit or water tank.
Note: The appliance will rinse itself automatically if you switch it on when it is cold or switch it off after it has dispensed coffee. The system is therefore self-cleaning.
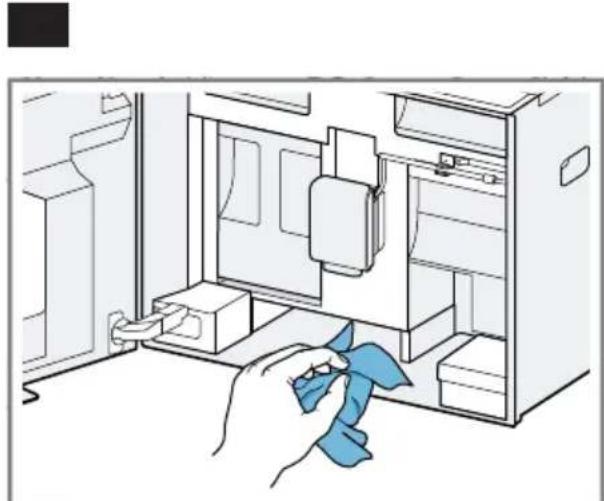
15.4 Cleaning the drip tray and coffee dregs container
Clean and empty the drip tray and coffee dregs container every day to prevent deposits. Follow the illustrated instructions at the beginning of this manual.
$$ \rightarrow \text {F i g .} \boxed {2 6} - \boxed {2 8} $$
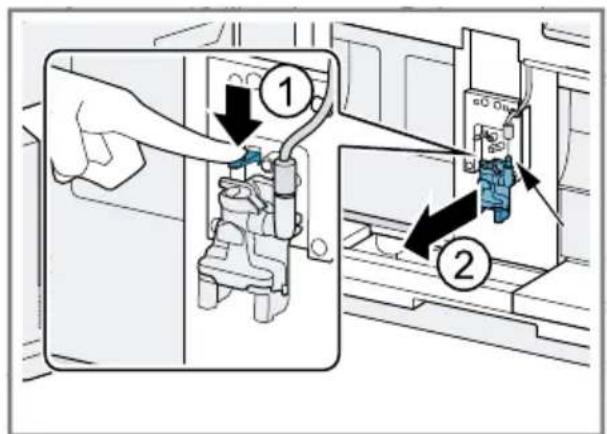
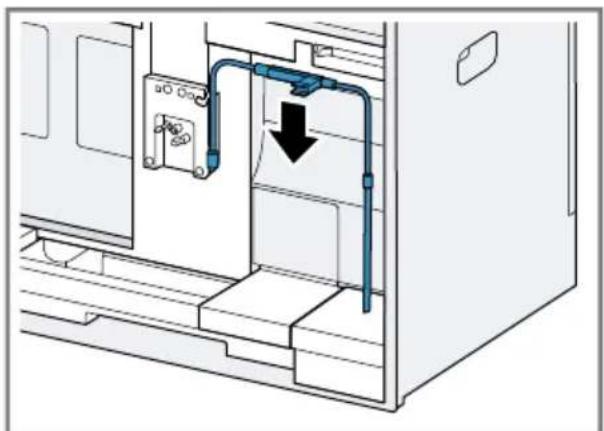
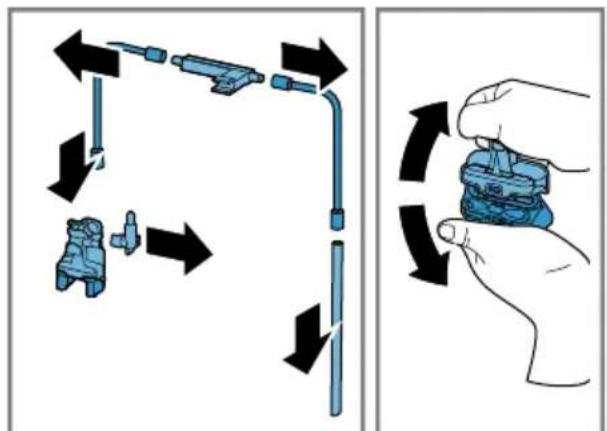
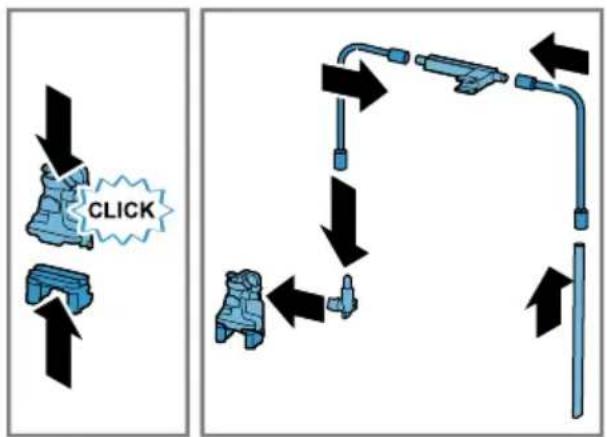
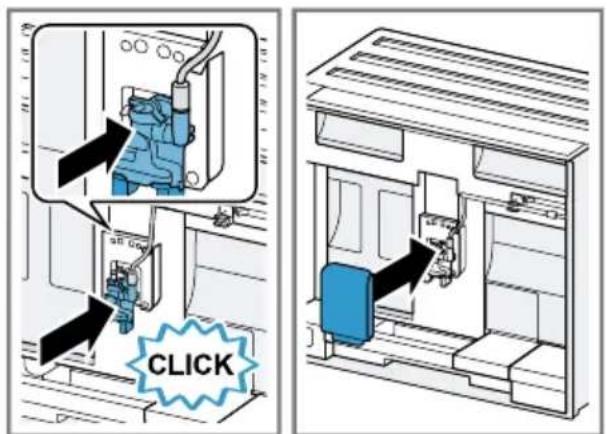
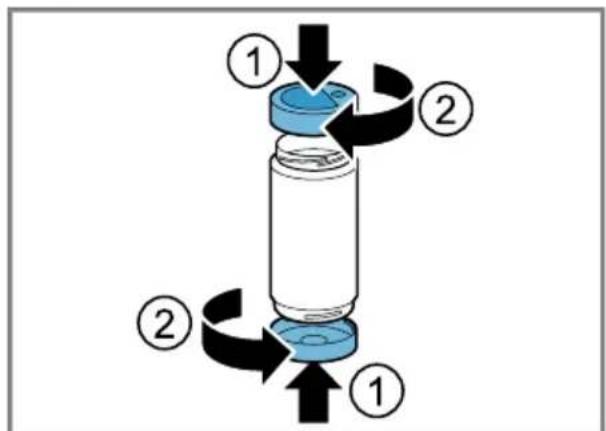
15.5 Cleaning the milk container
Clean the milk container regularly for hygiene reasons. You can clean the milk container in the dishwasher. Follow the illustrated instructions at the beginning of this manual.
$$ \rightarrow \text {F i g .} \boxed {1 9} - \boxed {2 2} $$
15.6 Service programmes
Use the service programmes if you insert or remove a water filter or in order to clean your appliance thoroughly. Your appliance will tell you when you need to perform a service programme, e.g. cleaning.
ATTENTION!
Improper cleaning and descaling or a delay in doing so may damage the appliance.
- Immediately perform the descending process in accordance with the instructions.
- Only put cleaning tablets in the brew chamber of the brewing unit.
- Do not put descending tablets or other products in the brew chamber of the brewing unit.
en Cleaning and servicing
Notes
The display indicates the progress of the descending or cleaning process.
If your appliance has been locked, you can only operate it again once the descending process has been carried out.
Tip: In addition to the automatic rinsing process, regularly also remove and clean the brewing unit.
Using the service programmes
- Select "Care & maintenance".
- Press "Care & maintenance".
The display shows a list.
3. Press the required programme.
Display indicates progress of the programme.
Overview of service programmes
You can find an overview of the service programmes here.
Note: The start image shows the remaining number of beverages that can be dispensed until running the programme and the duration.
| INTENZA fil-ter | Insert, replace or re-move the water filter. |
| Cleaning milk system | Rinse the milk sys-tem automatically. |
| calc'nClean Combine cleaning and descaling. Remove residues of limescale and coffee from the pipes. | |
| Cleaning Remove residues of coffee from the pipes. | |
| Descaling Remove residues of limescale from the pipes. | |
| Frost protection | Drain the pipes to protect the appliance during transport or storage. |
| Cleaning brewing unit | The display shows optimum cleaning of the brewing unit step by step. |
| Cleaning beverage system | The display shows optimum cleaning of the outlet step by step. |
| If a service programme is interrupted, e.g. due to a power failure, the appliance will rinse it- self automatically. The appliance is then ready for use again. |
Tips
If you are starting the "Dscaling" or "calc'nClean" programme, keep a container with a capacity of min. 0,5 l at the ready.
If you use a water filter, this will prolong the time until you have to run a service programme.
- You can combine "Descending" and "Cleaning" with the "calc'nClean" service programme.
16 Troubleshooting
You can rectify minor faults on your appliance yourself. Read the troubleshooting information before contacting after-sales service. This will avoid unnecessary costs.

WARNING
Risk of electric shock!
Improper repairs are dangerous.
- Repairs to the appliance should only be carried out by trained specialist staff.
- Only use genuine spare parts when repairing the appliance.
- If the power cord or the appliance power cable of this appliance is damaged, it must be replaced with a special power cord or special appliance power cable, which is available from the manufacturer or its Customer Service.
Fault Cause and troubleshooting
| Home Connect is not working properly. | Different causes are possible. → Go to www.home-connect.com. |
| Appliance only dis-penses water, not cof-fee. | Empty bean container is not detected by the appli- ance. → Pour in coffee beans. |
| Coffee shaft on brewing unit is blocked. → Clean the brewing unit. | |
| Coffee beans are too oily and do not fall into the grinder. → Gently tap the bean container. → Change the coffee variety. → Do not use oily beans. → Clean the empty bean container with a damp cloth. | |
| Brewing unit is not inserted properly. 1. Check whether the brewing unit is inserted correctly and is securely locked. 2. Push the red lever up to the left. 3. Insert the brewing unit cover. | |
| Appliance is not dis-pensing milk froth. | Milk system is soiled. → Clean the milk system in the dishwasher. |
| Milk tube not immersed in milk. → Use more milk. → Check whether the milk tube is immersed in the milk. |
Heavy build-up of limescale in the appliance.
| Fault Cause and troubleshooting | |
| Appliance is not dis-pensing milk froth. | • Descale the appliance. |
| No milk intake by the milk system. | The milk system is assembled incorrectly. • Assemble the milk system correctly. |
| Milk tube not immersed in milk. • Use more milk. • Check whether the milk tube is immersed in the milk. | |
| Milk froth is too cold. Milk is too cold. • Use lukewarm milk. | |
| Cold-brewed beverage is not cold enough. | Water in water tank is warm. 1. Fill the water tank with fresh, cold, non-carbonated drinking water. 2. You can add ice cubes to cool the beverage down even more. |
| Appliance is not dis-pensing hot water. | Beverage dispenser is soiled. • Clean the beverage dispenser in the dishwasher. |
| Appliance is not dis-pensing drinks. | Air is in the water filter. 1. Immerse the water filter in water with the opening facing upwards until no more air bubbles escape. 2. Reinsert the filter. • Firmly press the water filter straight down into the tank connection. |
| Residues of limescale remover are blocking the water tank. 1. Remove the water tank. 2. Clean the water tank thoroughly. | |
| There is dripping water on the inner floor of the appliance. | Drip tray was removed too soon. • Wait a few seconds after the last drink was dispensed before removing the drip tray. |
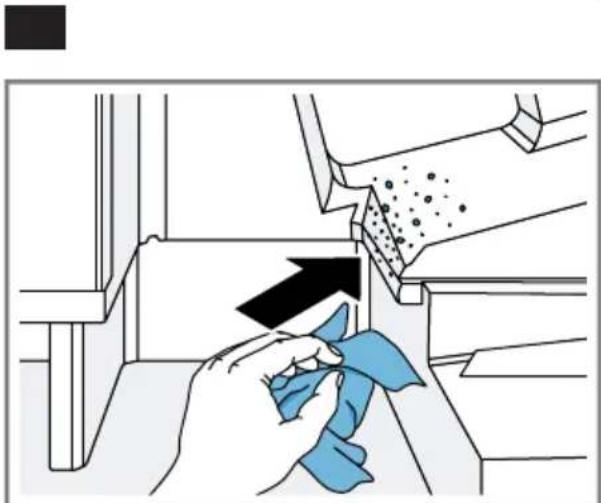
| There is brown water under the coffee grounds container or the drip tray. | Coffee grounds on the invisible side of the drip edge causes water to run under the coffee grounds container or the drip tray. 1. Remove the drip tray and the coffee grounds container. 2. Remove the brewing unit cover. 3. Remove the coffee grounds on the drip edge.→Fig. 29 |
| Brewing unit cannot be removed. | Locking device cannot be released, brewing unit is jammed. • Switch the appliance off and back on after 3 minutes. |
| Grinder won't start. Appliance is too hot. 1. Disconnect the appliance from the mains. 2. Wait 1 hour so the appliance can cool down. | |
| Grinder is not grinding any coffee beans despite full bean container. | Coffee beans are too oily and do not fall into the grinder. • Gently tap the bean container. • Change the coffee variety. • Do not use oily beans. • Clean the empty bean container with a damp cloth. |
| Coffee or milk froth quality varies widely. | Build-up of limescale in the appliance. • Descale the appliance. |
| Milk froth quality varies widely. | Milk froth quality depends on the type of milk or plant-based alternative used. • Optimise the result through the selection of the milk or vegetable-based drink type. |
| Coffee is not dispensed or has slowed to a trickle. Set quantity is not reached. | Grinding level is set too fine. • Set a coarser grinding level. |
| Heavy build-up of limescale in the appliance. • Descale the appliance. | |
| Air is in the water filter. 1. Immerse the water filter in water with the opening facing upwards until no more air bubbles escape. 2. Reinsert the filter. | |
| Appliance is soiled. • Clean the brewing unit. • Descale and clean the appliance. | |
| Coffee has no crema. | Type of coffee is not optimal. • Use a coffee variety with a higher proportion of Robusta beans. • Use beans with a darker roast. |
| Coffee beans are no longer freshly roasted. • Use fresh coffee beans. | |
| Grinding level is not appropriate for coffee beans. • Adjust the grinder to a finer setting. | |
| Coffee is too acidic. Grinding level is set too coarse. • Adjust the grinder to a finer setting. | |
| Type of coffee is not optimal. • Use a coffee variety with a higher proportion of Robusta beans. • Use beans with a darker roast. | |
| Coffee is too bitter. Grinding level is set too fine. • Set a coarser grinding level. | |
| Type of coffee is not optimal. • Change the coffee variety. | |
| Coffee tastes burnt. Grinding level is set too fine. • Set a coarser grinding level. | |
| Type of coffee is not optimal. • Change the coffee variety. | |
| Brewing temperature is too high. • Set the brewing temperature lower. | |
| Coffee grounds are not compact and are too wet. | The grinding level is not set optimally. • Adjust the grinder to a coarser or finer setting. |
| Coffee beans are too oily. • Use a different type of bean. | |
| Display shows "Please insert brewing unit". | Brewing unit is not inserted properly. 1. Check whether the brewing unit is inserted correctly and is securely locked. 2. Push the red lever up to the left. 3. Insert the brewing unit cover. |
| Display shows "Please fill water tank." despite the fact that the water tank is full. | Water tank is wrongly inserted. • Insert the water tank correctly. |
| Carbonated water is in the water tank. • Fill the water tank with fresh drinking water. | |
| Float is stuck in the water tank. 1. Remove the water tank. 2. Clean the water tank thoroughly. | |
| New water filter was not rinsed as per instructions. 1. Rinse the water filter according to the instructions. 2. Place the water filter into operation. | |
| Air is in the water filter. 1. Immerse the water filter in water with the opening facing upwards until no more air bubbles escape. | |
| Display shows "Please fill water tank" despite the fact that the water tank is full. | 2. Reinsert the filter. |
| Water filter is old. ► Insert a new water filter. | |
| Limescale deposits in the water tank are blocking the system. 1. Clean the water tank thoroughly. 2. Start the descaling programme. | |
| Display shows "E61: Please clean brewing unit". | Brewing unit is soiled. ► Clean the brewing unit. |
| Mechanism of brewing unit is stiff. ► Clean the brewing unit. | |
| Display shows "Incorrect voltage". | There are problems with the power supply. ► Only operate the appliance at 220 - 240 V. |
| Display shows "Restart appliance". | Appliance has a fault. 1. Set the mains switch to C and wait 60 seconds. 2. Set the mains switch to J |
| Display shows calc'nClean very frequently. | Decalcified water still contains small amounts of lime. 1. Insert a new water filter. 2. Set the corresponding water hardness. |
| Incorrect or too little descaling agent used. ► When descaling, only use suitable tablets. | |
| Service programme has not been carried out in its entirety. ► Start the "Special rinsing step /" service programme. → "Service programmes", Page 61 | |
17 Transportation, storage and disposal
17.1 Activating frost protection
Protect your appliance from frost during transport and storage.
ATTENTION!
Residues of liquid in the appliance may damage it during transport or storage.
-
Empty the pipe system before transport or storage.
-
Run the "Frost protection" programme.
"Overview of service programmes", Page 62
- Disconnect the appliance from the power supply.
17.2 Disposing of old appliance
Valuable raw materials can be reused by recycling.
- Unplug the appliance from the mains.
- Cut through the power cord.
- Dispose of the appliance in an environmentally friendly manner. Information about current disposal methods are available from your specialist dealer or local authority.

This appliance is labelled in accordance with European Directive 2012/19/EU concerning used electrical and electronic appliances (waste electrical and electronic equipment - WEEE).
The guideline determines the framework for the return and recycling of used appliances as applicable throughout the EU.
18 Customer Service
Function-relevant genuine spare parts according to the corresponding Ecodesign Order can be obtained from Customer Service for a period of at least 7 years from the date on which your appliance was placed on the market within the European Economic Area.
Note: Under the terms of the manufacturer's warranty the use of Customer Service is free of charge.
Detailed information on the warranty period and terms of warranty in your country is available from our after-sales service, your retailer or on our website.
If you contact Customer Service, you will require the product number (E-Nr.), the production number (FD) and the consecutive numbering (Z-Nr.) of your appliance.
The contact details for Customer Service can be found in the enclosed Customer Service directory or on our website.
18.1 Product number (E-Nr.), production number (FD) and consecutive numbering (Z-Nr.)
You can find the product number (ENr.), the production number (FD) and the consecutive numbering (Z-Nr.) on the appliance's rating plate.
Make a note of your appliance's details and the Customer Service telephone number to find them again quickly.
19 Technical specifications
| Voltage 220- | 240 V ~ |
| Frequency 50 / 60 Hz | |
| Connection rating 1500 W | |
| Maximum static pump pressure | 20 bar |
| Maximum capacity of water tank (without filter) | 2,2 l |
| Maximum capacity of bean container | 400 g |
| Length of the power cable | 170 cm |
| Appliance height 45,5 cm | |
| Appliance width 59,4 cm | |
| Appliance depth 37,7 cm | |
| Weight, empty 20,6 kg | |
| Type of grinder Ceramic |
This product contains light sources from energy efficiency classes D and F. These light sources are available as spare parts and may only be replaced by trained specialist staff.
19.1 Information regarding Free and Open Source Software
This product includes software components that are licensed by the copyright holders as free or open source software.
The applicable licence information is stored on your home appliance. You can also access the applicable licence information via your Home Connect app: "Profile -> Legal information -> Licence Information".1 You can download the licence information on the brand product website. (Please search on the product website for your appliance model and additional documents). Alternatively, you can request the relevant information from oss-request@bshg.com or BSH Hausgeräte GmbH, Carl-Wery-Str. 34, 81739 Munich, Germany.
The source code will be made available to you on request.
Please send your request to ossrequest@bshg.com or BSH Hausgeräte GmbH, Carl-Wery-Str.34, 81739 Munich, Germany.
Subject: „OSSREQUEST“
The cost of performing your request will be charged to you. This offer is valid for three years from the date of purchase or at least as long as we offer support and spare parts for the relevant appliance.
20 Declaration of Conformity
BSH Hausgeräte GmbH hereby declares that the appliance with Home Connect functionality conforms to the
essential requirements and other relevant provisions of Directive 2014/53/EU. A detailed RED Declaration of Conformity can be found online at www.bosch-home.com among the additional documents on the product page for your appliance.

Hereby, BSH Hausgeräte GmbH declares that the appliance with Home Connect functionality is in compliance with relevant statutory requirements.
A detailed Declaration of Conformity can be found online at www.bosch-home.co.uk among the additional documents on the product page for your appliance.

2.4 GHz band (2400-2483.5 MHz): Max. 100 mW
5 GHz band (5150-5350 MHz + 5470-5725 MHz): max. 200 mW

BE BG CZ DK DE EE IE EL ES
FR HR IT CY LI LV LT LU HU
MT NL AT PL PT RO SI SK FI
SE NO CH TR IS UK (NI)
5 GHz WLAN (Wi-Fi): For indoor use only.
5 GHz WLAN (Wi-Fi): For indoor use only.
20.1 Statement of Compliance for Great Britain
The full Statement of Compliance according to the Product Security and Telecommunications Infrastructure (Security Requirements for Relevant Connectable Products) Regulations 2023 can be found online at www.bosch-home.co.uk among the additional documents on the product page for your appliance.
Product type
This statement of compliance covers the products described in this information for use whose model identifier group is seen on the title page. The
full model identifier is made up of the characters before the slash in the product number (E no.) which can be found on the rating plate. Alternatively, you can also find the model identifier in the first line of the UK Energy Label.
Name and address of manufacturer
This statement of compliance is prepared by the manufacturer.
The manufacturer, BSH Hausgeräte GmbH deems that it has complied with
provision 5.1-1 of ETSI EN 303 645 v2.1.1 and, where relevant, provision 5.1-2 of ETSI EN 303 645 v2.1.1;
provision 5.2-1 of ETSI EN 303 645 v2.1.1;
provision 5.3-13 of ETSI EN 303 645 v2.1.1.
Support period
BSH Hausgeräte GmbH will provide security updates that are necessary to maintain the main functions free of charge until at least 28/02/2034.
it
8.3 DoubleShot e TripleShot
8.4 Slow Brew e Cold Brew
1.4 Installation sure
13.2 Configurer Home Connect
Conditions
usages (waste electrical and electronic equipment - WEEE).
WAARSCHUWING - Kans op verstikking!
5-GHz-band (5150-5350 MHz +
5470-5725 MHz): max. 200 mW

BE BG CZ DK DE EE IE el ES
FR HR IT CY LI LV LT LU HU
MT NL AT PL PT RO SI SK FI
SE NO CH TR IS UK (NI)
1.1 Advertencias de character general
8.4 Slow Brewy Cold Brew
13.1 BcTaHOBJIeHHaCTOCyHky Home Connect 228
13.2 HanaTbAHnHaHome Connect 228
13.3 Napametpn Home Connect. 228
13.4 3axnct daHnx 229
14 OchoBhi npaMeTpH 229
14.1 3miHa HaJaTaYBaHb..... 229
14.2OrIaI:napameTpni 230
14.3 BCTaHOBJIeHHI NOTOuHOrO uacy 232
15 YuHcENHa Ta DOrJaD 233
15.1 PnpaTHicTb DO MNTTBA nocydomnHi MaunHi..... 233
15.2 3acobn IJy ouHJHHJ..... 233
15.3 YnueHH npnilaNy 234
15.4 YnueHn npDOnHa dIy Kpanelb i KOHTeHepa dIy KaBOBoi rUsi 234
15.5 YIeHHa KOHTeHepa JIy MoIoka 235
15.6 CepBicHi nporpaMn 235
16 YcyHeHH HeCnpaBHOcte... 237
17 TpaHcnpTyBaHHa, 36epiraHHa n yTnIi3aui 243
17.1 AkTnBaucia 3axncty BiD mOpO3y 243
17.2 Ytulizauia cIapnx npnilaib. 243
18 Cepbicii ceHTpn 243
He TopkaTecr rapuX deTaJe npilaIy.
He nepepeBaIte npriToyBaHnHaHOIB nepeDuaCHO.
Harpita kiIbKicTb BOi n a6o MoIoka 6ynde BnKOpNCTaHa ONTImaJIbHO.
PeryIaRHO BuaJrTe 3 npJaNy HauN.
BiKlaHnHaKnnyPiBnUyOTb eHeperocNoXnBaHHa.
4 YcTaHOBJIeHHa IiD-KJIIOUeHHa
4.1 KompaneKT noctabkn
Picra po3naKyBaHHn nepeBipTe, uKOMnIeKT NOHm i nn He noKoNIOrKicb qactuHn nId qac TpaHCnOpTyBaHHa.
3ayBaKeHHa: 3aJIeKHO BiD MoJeI npUaNy B KOMnIeKT BXOJrTb pi3Hi akCecCyap. IodatKoBi akCecCyap n0-3HaueHi NyHKTnpHO paMKoIO.
→MaJI. 1
A
KabomaaHnHa
1 3aIeJHOBiKOMnJIeKTAuI npHa- dy
4.2 MoNTaJiPiKJIIOUeHnI npJaIy
B iHCTpyKci 3 MOHTaKy OINcaHo pI3Hi MoJeI, IIO MOKytb MaTn pI3Hy KOMNJIeKTaCiIHO I BiIMiHHOCTi B npo- ceCi MOHTaKy.
3ayBaJKeHHa: 3BaJaTe Ha iHOpMa- zuo zoDo 6e3neKn CToP.212 ta yHNKHeHHa N0sKOJKeHHa MaHa CToP.217.
3MOHTyIte I nIiKJIIOUcITb npuIaI HAneJHm UINHom BiINOBIDHO Do IHCTpyKci 3 MOHTaJy, IIO DOJaETbcr Do npuIaNy B Kopo6ci.
4.3ПiДКЛЮЧЕНЯпрILAуdo eIeKTpOmepeжI
- BCTaBTe ⅦTekep KaBeJIIO XnVBLeHnRA B npUlaI.
- Tencbny Bnky KaebIO XNBHeHHBCTaBte Bpo3ETKy HeNoDAIkBID npnaNy.
- IpepeBipTe, uMiuHO BCTaBHeHO wTeKepe y po3eTu.
5 3HaHOMCTBO
5.1 ПрILAД
Tyt moxHa nO3HaIOMnTnC8 3i CKlaHnKamn npnaJy.
3ayBaKeHHa: 3aJIeXHO BiD MoJeI npUlaNy MOKInBi DeAki BiIMHOCtI KOlbOpy Ta DetaleN.
BnD 3OBHi
→MaJI. 2
BnDkn Bn6ip y Bn6opi HanoIO
uk Ipeed nepuIM BnKOpncTaHHaM
MOKHa BCTaHOBHTN ONTtMaJIbHn apomat 3aIeJxHO BiX XapaKTepnCTNK BaIoI BOiN.
BctabIeHnIpbTpa IJRA BODN
YBAGA!
Moklne BoKoJKeHH npIaNy BHaCJIIOK NOBn HaKnny.
CboeacHO 3aMIHIOHTe fIbTp IJIY BOIN.
3amHrtn pijbTp dny BOnn Notpi6Ho He Ni3Hiwe HIX uepe3 2 Mic..
3BaKaIte Ha dIncPneHy iHdNka- zuio.
- Bn6epiB "IorIaI o6cnyroByBaHHa".
- Bn6epiTb "PhiIbTp INTENZA" i BnKoHyIe Bka3IBKN, IIO 3'YBnIaTmMyTbcr Ha dncnJIeI.
3amHa a6o BndaJeHHa iNbTpapdJIbBOH
Приладом можна Користесь 6e3 Флърдя ВдИ.
- Bn6epitb "IorIaI o6cIyroByBaHnI".
- Bn6epiB "DiIbTp INTENZA".
3.Bu6epiB "3amHnt" a6o "Pn- 6paT" i BnKOHyTe Bka3IBKN, IIO 3'ABNATMUTbCra Ha DnCnIeI.
Bka3iBKN
BidnpaucboBaHn BOJHn 0jIbTp yTNI3yIte 3riDHO 3 MicUeBMN HOpMaMn.
3anachi BOJHi fIbtpn 36epi-raiTe B 3aBOcBki ynaKOBci B xOIOHOMY i cyXOMy Micu.
Iopapn
3amHnIeBtpIaBNOcIaTakoxi3 ririEHIuHNx MIPkyBaHb.
3a HaBHOCTI BOHOrO fIbTp a BuaTn HAKIN i3 npunaDy MoXHa piJe.
3a HaBHOCTi fIbTpA DnB ODoN KaBOBi HANO'BHXOJrTb CMaUHiuMn.
■HKUO BN DOBRO He KOpNCyBaJIncnC npIaIOM (HaNPKlaIad,6yIu y BiDnyctci),TO nepei KOpNCyBaHHm IpomnITe BCTaHOBLeHn BOJHn IpbTp, npriOTyBaBUn YaShKy rapaYoi BOIN.
■ПиДбати ФільТР ДЯ ВODИ можнав МагаЗиHi a6O cepBicHOMy ceHTpi. "ПиЛаДЯ", CToP. 220
7.5 Першевскорисанни приладу
Iicna nikloueHndo eJeKtpomepeXi halaTuYte npnilad IJn nepwoBOVKOpncTahn. KOnn Bn Bnepwe BMnKaete npnilad a6o BiHOBIOeTe3aBOcby KOHfIgypauio, 3'ABHe-Tabc MeHIO BBeDeHHB EKCnnyatauio.
- Bidkpnite DBepuTa npuJaNy.
-
Bumkaay KINBHeHHa Mae 6yTu B noJoxKeHHi I. Man. 24
-
3aunHITb DBePraTa npnlaNy.
- YbIMKHiTb npnlaq KHONKOIO Ga 3auekaTe, nOKn npnaq npomneTbcra.
- BnKohyIe Bka3iBKn, 3'YBnTmMyTbcHa DnCnJIe.
Ha nucnlei 3'ABnTmMytbcra iHCTpyKcii 3 BnKOHaHH npoPpam.
Iopada:ДяЗаптуКорOTkoi iHΦopMaцii HATNCHiTb i.
Bka3iBKN
YKso Teneb Bn Home Connect XOueTe BIKoHaTu HalaTByBaHHa, DOTpIMyIteCBA3iBOK 3aCTOCuHkyHomeConnect. "HalaTByBaHHaHomeConnect", CToP.228
Якso Вибрано ВAPIANT "Демонстрацийни реким", пацюе тькдиспейна iHнkaця. Готуbatи habои ви Канокуbatи nporpaMuH HEMOxKlnBO.
7.6 3araJIbHi Bka3iBKN
Ioo oTnMaJIbHo KOpNCTyBaTINcA npIaIOM, 3BaJkaIte Ha Bka3iBKn.
Bka3IBKN
Ha 3aBoDi BCTaHOBNeHO CTAHdapTHi npametpn Ira ONTmAlbHoRo peKIMy po6OTn npnaIay.
■Пд уас кожного пигOTуВаHHЯ
HANOIO BMNKaETbCSIHTERpoBaHn
BEHTINJATOP, lo BmNKaETbCSIpn-
6ln3HO 3a 5-7 XB nICJI npNirotyBa-
HHa HANOIO.
Kabomolky BiDpeYIbOBAHO Ha 3aBOi IJIr ONTImaJIbHOI PO6OTn. Kkuo KaBa Teue IINe KpaIJIaMn a6o HAnTo PiKa N MaE 3aMaLo NiHKN, MoXHa NiIDKOpNryBaTu CTyPiHb NOMeNy. "PeyIIOBaHHra ToHKOCTI NOMeNy", CToP.225
■ЯкwoHiyoro HepoBHTn 3 npuIaDOM ynpoIOBx NeBHOrO uacy,BiHaBTOMaTNUHO BUMKHeTbcra.TpNBAJIcTB cboRo nepioDy MOxHa3MiHNTu B OCHOBHnx napametpax. Ctop.229
■Перший пи��тованн haи He Byde MaTN BnpaKeHOr apOMaTy, RKIO:
- Bn kopncTyetec npnilaom ynpse.
- Bn ⅢoHOBVKOHaJInc cepBicHy npoRpaMy.
- Bn DoBro He BMnKaIi npIaI. He nnTe cboRo hanoI.
8 Ochobhi BiDOMOCTi npo KopnctyBaHHa
8.1 YbIMKHeHHa6o BnMKHeHHa npHaNy
Bka3iBKN
■Пд уас роботи ппаладу He КористуITEСА ГOLOBHIM BIMNKaчem.
■ Nepsh Hix BnMkata T OJOBHn BnMkau, BnMKHiTb npUaBnMkaueM .Iiue TaK npua aBToMaTHNo npOMNEbCra.
HaTnCHiB
PiД yac yBIMKHeHHaДиCnIeI 3'ABNTbCSILOrOTnI.ПiД yac yBIMKHeHHN BIMKHeHHN pUlaD aBTOMaTNUHO nPOMNBaCTbcR.
BnMkaIOUcNb, npIaJ uNCTntbCra, BnNyckaIOuN napy B nIDOn. RaKIo npIaJ Ha MOMeHT yBIMKHeHHЯ Ie TeIIn a6O nepei BnMKHeHHaH HanoI He roTyBaJI, npIaJ He npOMnBaCTbcR.
8.2 Ппготуваннаноь
Tyt Bn Di3HaCTeC8, k nprirotyBatn Bn6paHn Hani.
yBArA!
He6e3neka oniky!
IoiHNo npirotoBahi hanoi dyke ra-paui.
Y pa3i notpe6n daBaIte HanoM OXOJHOHTN.
YHnKaIte nOtpaJIaHHHa shKipy pIDINi napn, 0BHXoJrTb i3 npNlaNy.
Bka3iBKN
3a DeaKnx napametpiB kaba roTyetbC8 B KInbKa etanIB. 3auekaIte, DOKN pOuEc npnroTyBaHHn NobHicTHo 3aBepwnTbcra.
uk OCHOBHI BiIDOMOCTI npo KOpNCTyBaHHA
LIO6 npiroToyBaTu Hani 3 MOLOKOM,do npilady NotpiHO npneDHaTu 3aONBHeHm MOLOKOM KOHTeINHeP 3 MOLOUHM IJIaHROM i BCMOKTyBaJIbHOIO TpyOKOIO.
KoHTeHepIJI MOLOKa PO3po6JIeHn CneuaJIbHO Id UeN npUlaI. KoHTeHepIJI MOLOKa PpU3HaueHn TIIbKn IJIrTO, 0o6 36epiraT N MOLOKO B NOyTOBux yMOBax i B XOJOnJIbHnKy.
Якшо молоча систema He NOчишега,налITA rapяua BODa MОже МICTИТи He3HaЧи ДOMiшКИ MOLOKa.
8.3 DoubleShot ta TripleShot
IpnlaMeJe Kaby IbiviaO Tpnui.
UoB BnBilbHnnc TaIbKn npEmHi Ha
cMaK i Do6pe 3acBOHOBaHi apOMaTHuHi peOBNH, Ppnaad 3aHOBO MeJe
3epHa N 3abapIOe KaBy.
Io DOBwe 3aBapIOeTbcra KaBa, To
6IbWe ripkNx peOBNi HebaxaHnx apomatIB BnBilbHnctbcr. ripKi peOBOHN H HebaxaHi apOMaTHn NoriPswOTb CMAK i 3acBOIOBAHicTB KaBN.
3aybaKeHHa: Dukii "DoubleShot" i "TripleShot" 3aJekatb BiD Bn6paHnx MiHocTi Ta 06'Emy HanoH.
8.4 Slow Brew ta Cold Brew
Hikon He TopkaTecra rapyoi MOIouHOI CNCTEMN.
- Persh Hix TopKaTnC MOnOuHOI CNCTeMn, DaIte I'N OxOJohyTN.
BHMORH
KoHTeHepДЯMOLOKaBCTaBneHnI.
Molouha cnctema nID'edHaHa do p03noiNbHnKa HanoiB.
KoHTeHepIaMOLOKa 3aNoBHeHO MOLOKOM y DoCTaTHi KJIbKOCTi.
- NocTaBTe cKJIaHky NiI dO3aTOp.
- BnbepiTb "Klacnka" iHaTnCHiTb "Klacnka".
- Bubepitb "Latte macchiato" i HauChiTb "Latte macchiato".
-
HanaityBaHHnnapaMeTpib HanoB
-
3mHnO6'Em O, HATNCKaIte CeMHeTN.
- 3MiHHTN MiHICTb, HATNCKaITe OTa HanaWtYnTe MiHICTb 3a DOnOMOHO CERMeHTIB.
-
3MiHHTu YaCTKy MoIOKa, HATNCKaIe Ta HalaWtYIte YaCTKy MOLOKa 3a DOIOMOIO CErMeHTiB.
-
Hatncihtb start stop
-
Lio6 NOBHiCTIO 3yHnHHTI NpIro-TyBaHHHaHO, HATNCiTb start
- 3yynHNTiNbKn nOToHn eTan npNroTyBaHHa,HaTNCHTb "PpOnyCTntn".
Hani rotyeTbcra, a NOTIM HanaBaeTbCRA BCKJAHky.
Bka3iBKN
Якшо He 3MiHHTN JKOДHOrO napametpa npOTrOM npIN6JIIM3HO 30c, npINA BnIe 3 peKIMy HalaSTyBaHHa.
- Пплад 3берiraе napametpn abToMaTnUH0.
Поради
■ Npeed nprirotyBaHHa HanoiB ya- shKN TAKoK MoXHa NiirpiBAtn Ra-paHO BOIOI.
3amictbMOJOKaMOXHaBnKOpNCTOByBaTIN HaOIOPOCSINHHORO NOXODKeHHa,HaPnKlaD COEBe MOJOKO.
■ЯкICTb MOnOuHoiПiHKn 3aJIeKHTb BiI COPTy BnKOpNCTOByBaHOro MoIoka a60HaNoIO pocInHHOro IOXODJKeHHa.
8.6 Ondohyache npnroTyBaHn HdBOx YaWoK
Длдядякнх HaNoiB MoXHa roTyBaTn BOdHocA DBi YaShKn.
3ayBaKeHHa:KolnakTnBHaФyHKcIa "DoubleShot"abo "TripleShot", OndHocHe npriToYBaHHaDBOXa- WOK He NiITpIMyETbCra.
- Bn6epitb 6axaHni Hani.
- HataNCHiTb
Ha nCnIe i 3'ABNTbcra HalaWtYBaH
3.ПocTaBTeДВiЧашКипдДоЗaTOp, liBopyu i npabopyu.
4. HATNCHTb
PnroTyBaHHa HanoIO CKlaJaAcTbC3 TaKoi KInbKocTi etanIB: 2.3epHaMeIHTbcTaKy KInbKiCTb pa3iB: 2.
Hani3aBapIOeTbcra, a NOTIM Teue B YauKn.
5.Доуекайтесязавершени поцecy.
9 Kabomolka
Ley npnaI oIaHaHn peyIbOBHO KaBOMOJIKOIO, 0o DaE 3MOry iHdNBIyAalbHO KOpIgYBaTn CTyniHb NOMeLy KaBOBHX 3epeH.
9.1 PeryJIIOBaHHaToHkoCTi nOmeIy
3a DOnOMOIO NOB3yHKOBORo pe-ryIaTOPa Bn6epiTB 6aXaHy TOHKiCTb NOMEly: BiD IyKe TOHKOrO .do dyke rpyo
→MaJI. 25
3MiHIOte TOHKICTb NOMeLy TiIbKN He3HaUHO MipoIO.
YCTaHOBLeHn CTyPiHb NOMeLy 3a-CTOCOByETbcra TIlbKn NiCna Dpyrooi YauKn.
Iopada: KaKaBA Teue IInwe KpaIIaMn, yCTaHOBITb rpyoIiN CTynIHb NOMEly.
KaBA NaTbCn HAnTO WnKO N Mae 3amano NiHKn, YCTaHOBtB ToHsN CTyniNb NOMeNy.
10.2 BnKOpNcTaHnBnacHOro KOHTeHepa JnMOnOka
I3 neBnMn cepiMaN npuJaIB MOxHa BnKOpNCTOByBaTn BlaChn KOHTeHepa dna MoLoKa.
1.ПригOTуITEВlaChNKOHTeHepДЯ MOLOKa.
2. BiTapuTe BnacHn KOHTeHep
mMOLOka. "Orna: Napametpu", Ctop. 230
PpIaB Bu3Naue KJIbKICTb MOLOkA B KOHTeHepi DnA MoLOKa aOo B
PaKeTI MOLOka 3a BaroIO. RaIO B
KOHTeHepi 3aMaIO MoLOKa,
3'ABIIETbcr NOBIOMLeHHra.
3ayBaKeHHa:KIO BV Bn KOpNCTOByTe CTaHApTHNI KOHTeHepIaMoloka aO NaKeT MoLoka, npIaD BN3Haue c e aBTOMaTuHO.
11БлokуваньВIDdoctynyдITEI
3axnCTNTIteBID OwnapeHnTa onIKIB, npnaMoxHa 3a6JOKyBATN.
11.1 AkTnBaCiIyHkcii 6JOKyBaHHaBIDIOCTyny dITei
Bmora: PpnilaIyBIMKHeHo.
-
HataNCHiTb:
-
HATNCiTb

ΦyHKciIO «БлOKyBaHHBiДdoCTyny DiTei» aKtNBOBaHO.
11.2 DeaKTHBaCiI 6JIoKyBaHnHaB iD doCTyn dyTei
12.5 CopTyBaHHa yJIIO6JIeHnx HaIOIB
3MiHa nopAky noka3y yIIO6JIeHX HanoiB.
- Hatachitb "Yliobnehe".
- Bn6epitb yIIO6JIeHn Hani.
Ha dincnei BiOobpaKaIObCBAci yIIOBLeHi Hanoi, BN MoKeTe nepeMiUyBatn yIIOBHe nalbUeM.
Пилад 3берже HOву послдовнICTb aBTOMaTnUH.
Iopada:CTBOPIOBAtN,BuJaJIaTIi COPTyBaTn yIbOJIeHI HANOIMoXHa TaKoJ3a DOnOMoROIO 3aCTOCyHky Home Connect.
13 Home Connect
Ley npna MoxHa niknHouHTn do
Mepeki. Lio6 kepyBaTn 0yHKcIaMn 3
MoibHoO dOaTkY Home Connect,
3miHOBAtn OCHOBHi napametpn a6o
KoHTPOJIbOATn IOTouHm CTan npna-
dy, 3'edNaTe NOrO 3 MOiNbHM pni-CTPOEM.
CnyXbHome Connect DOctynHi He
B ycx KpaIHax. DocTyNHicTB 0yHK-
ciHome Connect 3aJeKtB BID Do-
ctynHocti cny6 Home Connect y Ba-
wiKpaIHi. DOKlaHHy iHOpMaizIO
MOxHa 3HaHTn TyT:www.home-
connect.com
Lio6 MoxHa 6ylo KopncTyBaTn-
cHrHome Connect, cnepuy
BCTaHOBITb 3B'3OK i3 DomaunHboIO
MepeKeIo WLAN (Wi-Fi) i MOiNbHO
nporpamO IoHome Connect.
Доаtok Home Connect Дономоже npoitn Bci Крокп рeeстрацii. Дян haIaHTyBaHHЯ ВИКОнуTe iHCTpyKuzi, ио 3'ЯВЯТИМУТьСЯВ 3aCTOCYHKy Home Connect.
Iopada:BukohyTe TaKoX Bka3iBKN, 3'ABJIOTbcB 3aCTOCyHKy Home Connect.
Bka3IBKN
Дотримуитecя павил texhikn 6e3nekn, HabedeHnx y ciin HCTpykui 3 ekCnnyatauii; ci npabnla MaHTb ByTN DoTpImaHI y pa3i, kIIO BV KepyTe PnPnaIOM 3a DOnOMOTOO 3aCTOCyHky Home Connect. "Be3neka", CToP.212
YnpabHnHa 6e3nocepEnHo Ha npnilaI 3aBkIn MaE npebary. Y ue ynpabHHa 3a DOnOMo- roIO MOiIbHOI nporpaMn Home Connect hemoxJIne.
13.1 BcTaHOBJIeHHa3acTocyHky Home Connect
- 3acTocyHok Home Connect BCTaHOBJIeHn Ha MObIbHOMy npNcTpoi.
- 3anyctitb 3actocyHOK Home Connect Ta hanaTsyte doctyn Do Home Connect. 3actocyHok Home Connect donomoke npoTn Bci kpOKn peectpauii.
13.2 HanaштуванHA Home Connect
BHMORN
Ha MobiHOMy KInCeBOMy npNCTpoI BCTaHOBNeHo 3actocyHOK Home Connect.
Ha micci BCTaHOBJeHHn npuJa npnMae CnHaN DomaunHboI MepeKi WLAN (Wi-Fi).
- BiДКрИTe 3aCTOCyHOK Home Connect Ta npocKaHyIte NaCTyUnHi QR-KoДn.

- BnKohyIe iHCTpyKcii, 3o 3'YBnTnMyTbC8 B 3aCTOCyHKy Home Connect.
13.3 Паразу Home Connect
AaantyteHomeConnectdo cboix notpe6.
IapametpnHome Connect moxna 3HaHTN B MeHIO OCHOBHX
napametpiB npilaNy. Jki napametpn BiO6paXkATmYbC8 Ha dinCnJIeI, 3aJekITb BiTTOrO, uHaHa-
StToBaHoHomeConnecti nnPiKluOyeHO npilaD do DomaShhBoi Mepexi.
Orla napametpiB Home Connect
Tyt haVeDeHn oIyI napaMeTpIB Home Connect i mepeXi.
Bn Moxete BCTaHOBNTN OCHOBHi yCTaHOBKn BaWOrO npIaNy BiINOBiH NO Do BlaChNX Notpe6, a TaKoX BNKInKaTn DoTaTKOBI yHKciI.
14.1 3miHa haJaawTyBaHb
- Bn6epitb "Iapametpn".
Ha nncnnei BiOobpaxaOTbcn CnN COK HanaTsyBaHb.
2.3miHITb 6aKaHi HalaIHTyBaHHra.
Пилад 3берірас Налаштувань abTOMaTNUHO.
uk OCHOBHi napaMeTpni
- Lio6 noBepHyTnC B MeHIO, HATNCHiTb<
- トob BnTn 3 MeHIO HaIaHTyBaHH, HATNCITb
Iopana:ДяЗаиTu KOpOTkoi iHΦopMaцii HATNCHiTb i
14.2 Orla: Napametpn
Tyt Bn 3naIeTe OrlaD "Papametpn".
14.3 BcTaHOBJIeHHI NOToUHO- ro yacy
- Y MeHIO HaTnCHiTb Ha "Iapametpn".
-
HATNCiTb Ha "IToOuHn Yac".
3.ДЯTOROIIOBBCTaHOBUNI NO-TOUHnYac,TopKHITbCnIHINKaUII FOINH aOXBnINH.
Bnopahe 3HaueHHnNo3HaayacTbCnHIM KOJbOpOM. -
BctaHOBIb IOTouHn Yac 3a DOnOMOIO PeYJIbAJIbHOrO KIJIbUra.
-
XBUNHpaxyOTbc3 KpOKOM y 5 XBUNH.ДЯ TOrO O6 BCTAHOBNTI NOTOUHN Yac 3 TOUCHICTIO DO XBUNH, TOPK-HITbCAYTPMMyTe BiIDNOBIDHy OblaCTb BpeYJHOBAJIbHOMy KiIbci IprN6JIIN3HO IPOTAROM 1-2 cekyn. XBUNHn BiD
O6paKaIObC8 y BnIJI ToyOK. BCTaHOBITb XBNINH 3a DOnOMo- roIO peYJIOBaJIbHOr KInbU.
- LIO6 BnITn 3 OCHOBHnx yCTaHOBOK, NOBepHiTbCn Ha3aJy MeHIO 3a DOnOMOrOIO a6o BmKHiTb npI- IaI, HATNCHyBUn
IontouHn yac 36epexeHo.
15 YnueHnTa DOrJa
O6 npiaD npaIOBab DOBRO, cIi peTeNbHO uNCTNTu NOro N DOrJaTn 3a HmM.
He BuaJTe HaKn3a DOnOMoTIOU YNCTOJI NIMOHHOI KNCLOTU, OUY a60 3acOIB Ha OCHOBI OUY.
uk YnueHH Ta DoIaI
He BnKOpNCTOBuYTe 3acO6n IJIaBnJaIeHHHaKIny, IIO MICTaTbocDopHy KNCLOTy.
BukopncToByte Iiue cneuaJIbHo po3po6IeHi iKoHKpeTHn npIaTaeTKn dNBAeHHHaKnny uHsEHHa. "PpnaA,CTop.220
Iopadn
PeteIbHO MInTe HOBi rY6Kn, 106 BnDaJIHTN MOXJIINBI peWTKn CoJe. CoJI MoKyTb CnpuHrTn NOBBy HaIbOTy ipKi Ha MeTaJIeBnx NOBepxHx.
Ioo6 3anobirtn Kopo3i, 3aBXn HeBiklaadno npnbpaTe 3aIIuKn HaKIny, KaBn, MOlOKa, PO3UnHIB IJI OUYueHHry BndaJeHHra HaKIny.
15.3Чишина рпладу
yBATA!
He6e3neKa ypaJHexHNe eJeKtpnUHM cTpyMOM!
PidnHa, 0BTEKna, MoKe CnpuHnTN ypaJkeHH eJeKTPuHm CTpymOM.
Hikon He 3aHypOHTe Hi npnila, Hi Ka6eIb KINBLeHHY V BODV.
Ha po3HIMn 3'eHyBaU npuJaY He MaE NOTpAnJIrTn PiINHa.
He MoxHa uNCTHTn npIa3a IOnOMoTOH npOBTo a6O BnCOKOTNCKOBTo pUlaV.
yBAGA!
He6e3neka onikib!
Дяк уасин npnilaу dyxe ha-rgiBaIOTbC.
He TopkaTecr rapuNX Detaley npnndy.
IicnKOpntyBaHHaTe rapHUM Detanm npnaDv OxOJohyTN.
- Kopnyc, Блинckус nobepxhi nanahe ly npablinnna pOtnpaTe cepBETKOIO 3 MIKPOBOJOKHa.
2.ПригOTуВаBши Hani,протираTeДОЗТOP HANOIB M'ЯКою BOLOГою ГанчIPKOJO.
3.ПомиTe pe3epByap CBIXOu UNCTOHO BOIOHO.
4.Якwo npilaom doBRO He KopnCTyBaIINcH (HaPnKlaI,piJ uac BiDnyctKN),noUncTbTe NOrO BeCb (3OKpeMa n pyxomi DetaJI,rk-OT 3aBapHOBaJIbHn bloK abo pe3eBPvAp dIra BoN).
3ayBaKeHH: Ppnila aBtOMaTnUHO npOMnBaetbCra, kKIO BBIMKHyTN NOrOB XOJODHomy CTAHI a60 BmMKHyTN nICnI npNroTyBaHn KaBN. TaKIM uHOM BiDyBaETbCra CamOoUnSeHHr CNCTEMN.
15.4Чишени пдюнда Кpaneль i KOHTeHepa ДЯ KaBOBoI rUsi
IodnCnpoKHOte OunuYte
PiOndN KpaneJI KoHTeHep DnA
KaBOOITyU, 063anObiTn
YTBOpEHNO BiKlaIb. KepuTeCn
rpaquHOIO IHCTpyKciEO Ha NoaATky
UbOTo DOkymeHTa.
→MaJ. 26 - 28
16 YcyHeHHa HeCnpaBHOCTeH
He3NaHi HeCnpaBHOCTI npnlaMy MOxHa yCyBaTn Blnachopyu. IepH HIX 3BeptaTnca Do cepBicHOi CnyK6n, CKOpNCtaItecR BiIDOMOCTMn Ipo yCyHeHHr HeCnpaBHOCTe. TaK MOxHa yHnKHHTn 3aBnX BVtpaT.
yBABA!
He6e3neKa ypaKeHHra eJeKtpnHm cTpyMOM!
PemOHTHi pO6OTn, BnKoHaHI HeHaJIeXHm YInHom, MoKyTb CKJaIaTn He6e3neKy IJI KOpNCtUBaaya.
PemohTyBaTn npnilad DO3BOJeHO TIlbKn qaxiBcIaM.
- Д�� ремонту пиладу доЗвяетсь викоростовыbatи лише opигиньни зашисти.
- -
- -
- -
- -
- -
- -
- -
- -
- -
- -
- -
- -
- -
- -
- -
- -
- -
- -
- -
- -
- -
- -
- -
- -
- -
- -
- -
- -
- -
- -
- -
- -
- -
- -
- -
- -
- -
- -
- -
- -
- -
- -
- -
- -
- -
- -
- -
- -
- -
-
-
- -
- -
- -
- -
- -
- -
- -
- -
- -
- -
- -
- -
- -
- -
- -
- -
- -
- -
- -
- -
- -
- -
- -
- -
- -
- -
- -
- -
- -
- -
- -
- -
- -
- -
- -
- -
- -
- -
- -
- -
- -
- -
- -
- -
- -
- -
- -
- -
- -
-
. . . . . . . . . . . . . . . . . . . . . . . . . . . . . . . . . . . . . . . - . - - - - - - - - - - - - - - - - - - - - - - - - - - - - - - - - - - - - - - - - - - - - - - - - - - - - - - - - - - - - - - - - - - - - - - - - - - - - -
- + . . . . . . . . . . . . . . . . . . . . . . . . . . . . . . . . . . . . . . . . . . . . . .
.
Y pa3i noWKoJKeHHa MepeXHOrO a6o 3'EnHyBaJIbHOrO Ka6eIIO cboRo npila- dy IHO NOptioHO 3amIHnTn CneuaJIbHM MepeXHm A6o 3'EnHyBaJIbHm Ka6eIeM, kN moKHa 3AMOBHTu y Bnpo6Hnka a6o B cepBicHOMy LcHTpi.
Hecnpabhictb PnunHa Ta ycyHeHH HecnpaBHOCTe
8.3 DoubleShot ve TripleShot
8.4 Slow Brew ve Cold Brew
Cihazinizin uzun sure isler durumda kalmasini是我国的名优品牌,它在印度尼西亚、东南亚、中东和非洲等地区拥有超过100000000000000000000000000000000000000000000000000000000000000000000000000000000000000000
| INTENZA filtresi | Su filtresini takın,dehyşirin veyaçınin. |
| Süt sistemi temizkıngı | Süt sistemi nitomatik olarak yıKayın. |
| calc'nClean Temizlik ve kireççozme ilemlerini birleşirin. Borulardaki kireç ve kahve artıkarıtemizleyin. | |
| Temizleme Borulardaki kahve artıkarı temizleyin. | |
| Kireçten arindırma | Borulardaki kireç artıkarı temizleyin. |
| DonmayaXXXXXXXXXXXXXXXXXXXXXXXXXXXXXXXXXXXXXXXXXXXXXXXXXXXXXXXXXXXXXXXXXXXXXXXXXXXXXXXXXXXXXXXXXXXXXXXXXXXXXXXXXXXXXXXXXXXXXXXXXXXXXXXXXXXXXXXXXXXXXXXXXXXXXXXXXXXXXXXXXXXXXXXXXXXXXXXXXXXXXXXXXXXXXXXXXXXXXXXXXXXXXXXXXXXXXXXXXXXXXXXXXXXXXXXXXXXXXXXXXXXXXXXXXXXXXXXXXXXXXXXXXXXXXXXXXXXXXXXXXXXXXXXXXXXXXXXXXXXXXXXXXXXXXXXXXXXXXXXXXXXXXXXXXXXXXXXXXXXXXXXXXXXXXXXXXXXXXXXXXXXXXXXXXXXXXXXXXXXXXXXXXXXXXXXXXXXXXXXXXXXXXXXXXXXXXXXXXXXXXXXXXXXXXXXXXXXXXXXXXXXXXXXXXXXXXXXXXXXXXXXXXXXXXXXXXXXXXXXXXXXXXXXXXXXXXXXXXXXXXXXXXXXXXXXXXXXXXXXXXXXXXXXXXXXXXXXXXXXXXXXXXXXXXXXXXXXXXXXXXXXXXXXXXXXXXXXXXXXXXXXXXXXXXXXXXXXXXXXXXXXXXXXXXXXXXXXXXXXXXXXXXXXXXXXXXXXXXXXXXXXXXXXXXXXXXXXXXXXXXXXXXXXXXXXXXXXXXXXXXXXXXXXXXXXXXXXXXXXXXXXXXXXXXXXXXXXXXXXXXXXXXXXXXXXXXXXXXXXXXXXXXXXXXXXXXXXXXXXXXXXXXXXXXXXXXXXXXXXXXXXXXXXXXXXXXXXXXXXXXXXXX | |
| Demleme Ünitesini temizlere | Ekranda demlere ünitesinin en iyi seksilde{nasılemizlene bilecekigi adım adım gocterilir. |
| İçecek sistemi temizkıngı | Ekranda;cık,isin en iyi seksilde{nasılemizlene bilecekigi adım adım gocterilir. |
| Örneğin bir elektrik kesintisi nedeniylebir servis programıkesildiğinde, cihaz | |


- Further information and explanations are available online:
- Table of contents
- Home Connect 55
- Basic settings. 57
- Cleaning and servicing. 60
- Troubleshooting 63
- Transportation, storage and disposal 68
- Customer Service 68
- Technical specifications... 69
- Declaration of Conformity 69
- Safety
- General information
- Intended use
- Restriction on user group
- Safe installation
- WARNING - Risk of electric shock!
- Safe use
- WARNING - Risk of suffocation!
- en Safety
- WARNING - Risk of fire!
- WARNING - Risk of burns!
- WARNING - Risk of scalding!
- WARNING - Risk of injury!
- WARNING - Danger: Magnetism!
- WARNING - Risk of harm to health!
- Preventing material damage
- ATTENTION!
- Environmental protection and saving energy
- Disposing of packaging
- Tips for saving energy
- Installation and connection
- Scope of delivery
- Installing and connecting the appliance
- Connecting the appliance to the electricity supply
- Familiarising yourself with your appliance
- Appliance
- Exterior view
- Interior view
- Control panel
- Accessories
- Before using for the first time
- Preparing and cleaning the appliance
- → Fig. 4 - 23
- Checking the water hardness
- Tips
- en Before using for the first time
- Overview of water hardness levels
- Water filter
- Inserting the water filter
- Changing or removing the water filter
- Notes
- Performing initial start-up
- General information
- Basic operation
- Switching the appliance on or off
- en Basic operation
- Dispensing beverages
- WARNING
- Risk of scalding!
- DoubleShot and tripleShot
- Slow Brew and Cold Brew
- Dispensing a coffee drink with milk
- Risk of burns!
- Requirements
- Dispensing two cups at once
- Grinding
- Setting the grinding level
- Milk container shelf
- Using the milk container shelf
- Using your own milk container1
- Childproof lock
- Activating the childproof lock
- Deactivating the childproof lock
- Favourites
- Creating favourites from Favourites menu
- Create favourites from Classic or Coffee World
- Changing a favourite
- Deleting a favourite
- Sorting favourites
- Home Connect
- en Home Connect
- Setting up the Home Connect app
- Setting up Home Connect
- Home Connect settings
- Overview of the Home Connect settings
- Data protection
- Basic settings
- Changing settings
- Overview Settings
- Setting the time
- Cleaning and servicing
- Dishwasher-safe components
- Cleaning agent
- Cleaning the appliance
- Risk of electric shock!
- Cleaning the drip tray and coffee dregs container
- Cleaning the milk container
- Service programmes
- en Cleaning and servicing
- Using the service programmes
- Overview of service programmes
- Troubleshooting
- Fault Cause and troubleshooting
- Transportation, storage and disposal
- Activating frost protection
- Disposing of old appliance
- Customer Service
- Product number (E-Nr.), production number (FD) and consecutive numbering (Z-Nr.)
- Technical specifications
- Information regarding Free and Open Source Software
- Declaration of Conformity
- Statement of Compliance for Great Britain
- Product type
- Name and address of manufacturer
- Support period
- DoubleShot e TripleShot
- Slow Brew e Cold Brew
- Installation sure
- Configurer Home Connect
- Conditions
- WAARSCHUWING - Kans op verstikking!
- Advertencias de character general
- Slow Brewy Cold Brew
- OchoBhi npaMeTpH 229
- YuHcENHa Ta DOrJaD 233
- YcyHeHH HeCnpaBHOcte... 237
- TpaHcnpTyBaHHa, 36epiraHHa n yTnIi3aui 243
- Cepbicii ceHTpn 243
- YcTaHOBJIeHHa IiD-KJIIOUeHHa
- KompaneKT noctabkn
- MoNTaJiPiKJIIOUeHnI npJaIy
- 4.3ПiДКЛЮЧЕНЯпрILAуdo eIeKTpOmepeжI
- 3HaHOMCTBO
- ПрILAД
- BnD 3OBHi
- uk Ipeed nepuIM BnKOpncTaHHaM
- BctabIeHnIpbTpa IJRA BODN
- YBAGA!
- 3amHa a6o BndaJeHHa iNbTpapdJIbBOH
- Bka3iBKN
- Iopapn
- Першевскорисанни приладу
- 3araJIbHi Bka3iBKN
- Ochobhi BiDOMOCTi npo KopnctyBaHHa
- YbIMKHeHHa6o BnMKHeHHa npHaNy
- Ппготуваннаноь
- yBArA!
- He6e3neka oniky!
- DoubleShot ta TripleShot
- Slow Brew ta Cold Brew
- BHMORH
- Поради
- Ondohyache npnroTyBaHn HdBOx YaWoK
- Kabomolka
- PeryJIIOBaHHaToHkoCTi nOmeIy
- BnKOpNcTaHnBnacHOro KOHTeHepa JnMOnOka
- 11БлokуваньВIDdoctynyдITEI
- AkTnBaCiIyHkcii 6JOKyBaHHaBIDIOCTyny dITei
- DeaKTHBaCiI 6JIoKyBaHnHaB iD doCTyn dyTei
- CopTyBaHHa yJIIO6JIeHnx HaIOIB
- BcTaHOBJIeHHa3acTocyHky Home Connect
- HanaштуванHA Home Connect
- BHMORN
- Паразу Home Connect
- Orla napametpiB Home Connect
- 3miHa haJaawTyBaHb
- uk OCHOBHi napaMeTpni
- Orla: Napametpn
- BcTaHOBJIeHHI NOToUHO- ro yacy
- YnueHnTa DOrJa
- uk YnueHH Ta DoIaI
- Iopadn
- 15.3Чишина рпладу
- yBATA!
- He6e3neka onikib!
- 15.4Чишени пдюнда Кpaneль i KOHTeHepa ДЯ KaBOBoI rUsi
- YcyHeHHa HeCnpaBHOCTeH
- yBABA!
- He6e3neKa ypaKeHHra eJeKtpnHm cTpyMOM!
- -
- DoubleShot ve TripleShot
- Slow Brew ve Cold Brew
Brand : BOSCH
Model : CTL7181W0
Category : Coffee maker