USER MANUAL 307 Fluval
PYKOBOCTBO NOJIb3OBATEJIA
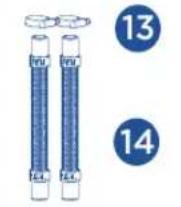
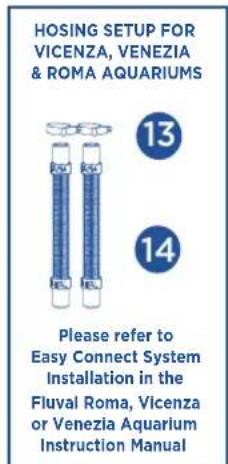
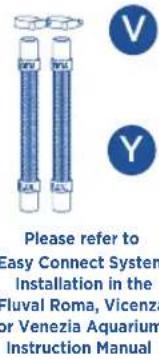
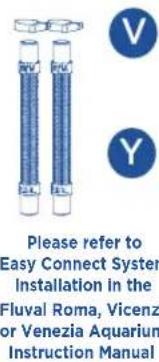
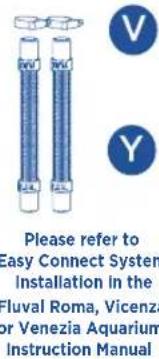
HOSING SETUP FOR VICENZA, VENEZIA & ROMA AQUARIUMS
Please refer to Easy Connect System Installation in the Fluval Roma, Vicenza or Venezia Aquarium Instruction Manual
207107
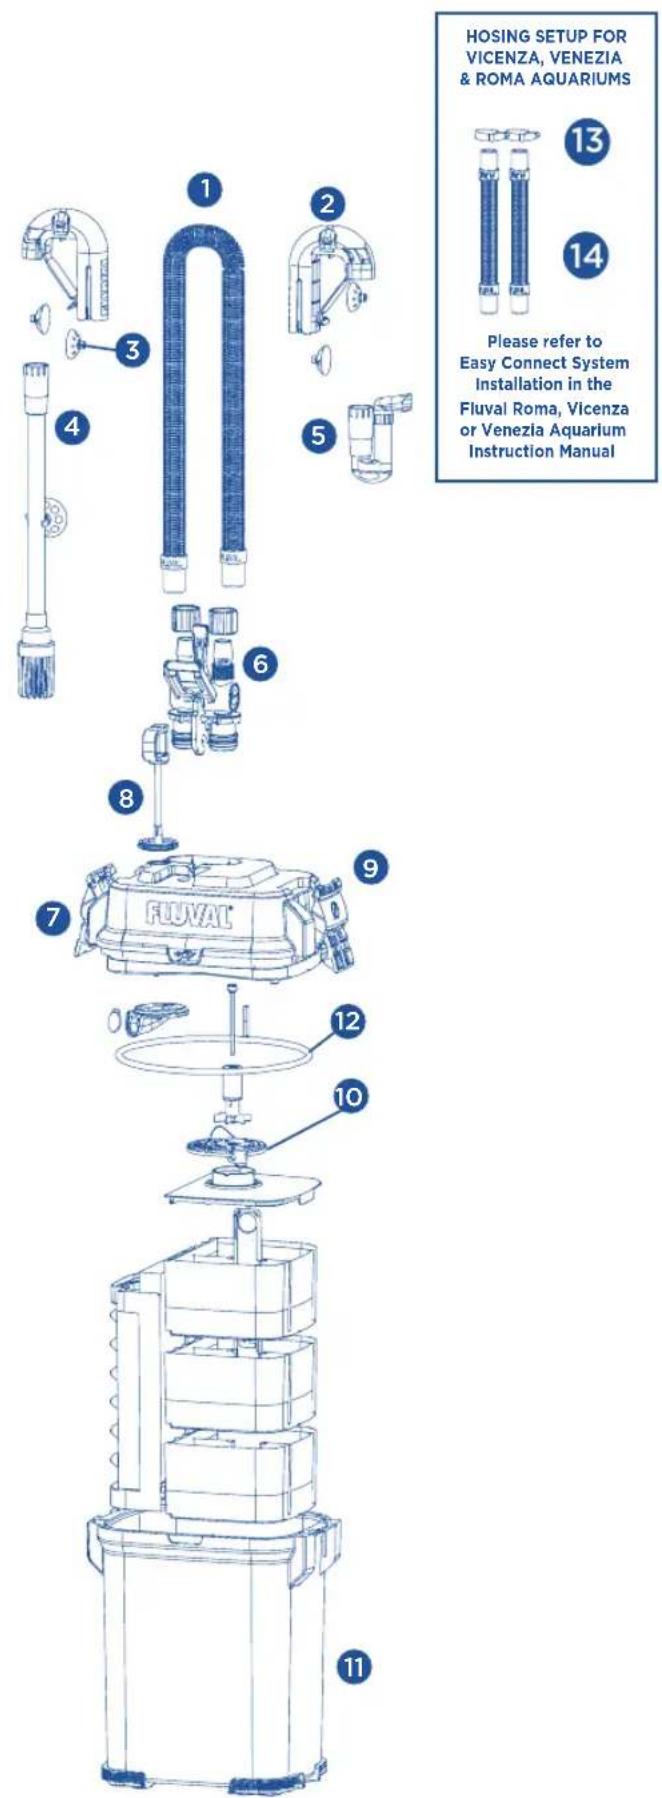
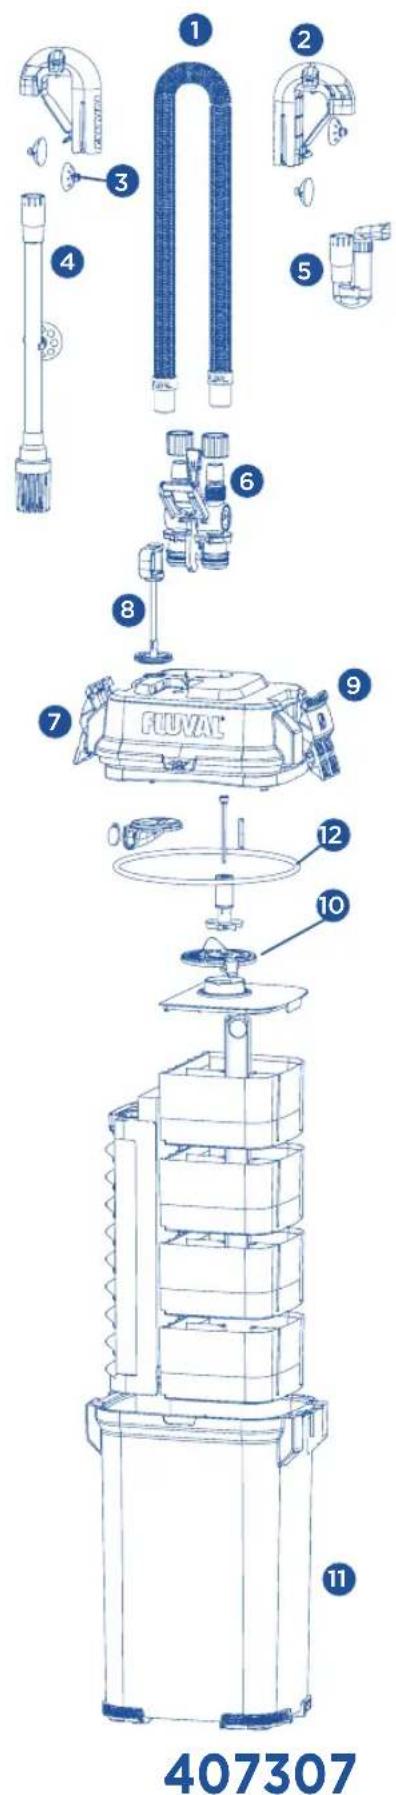
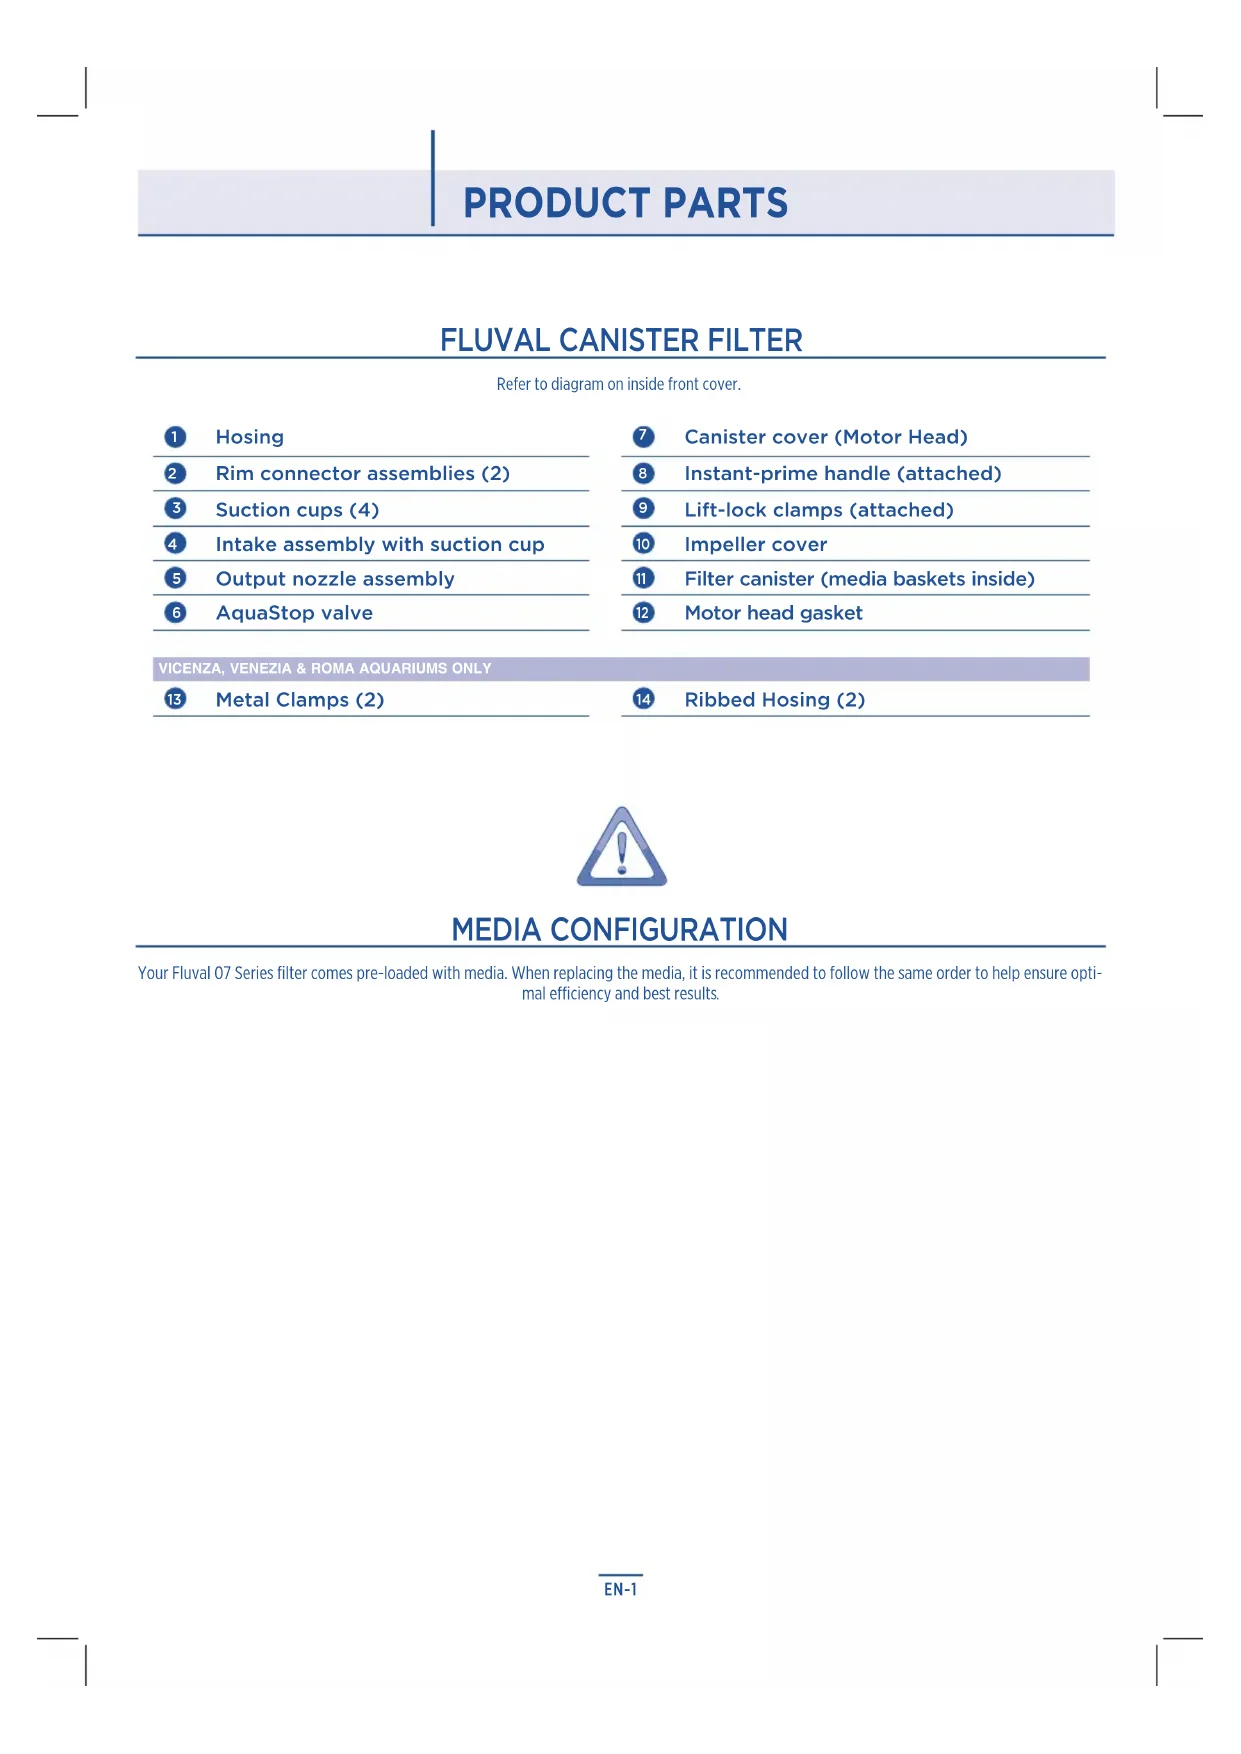
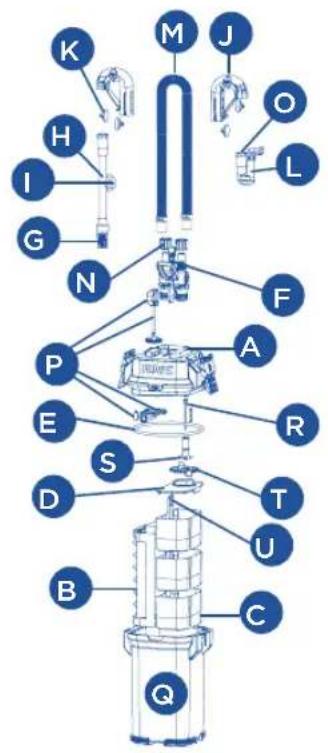
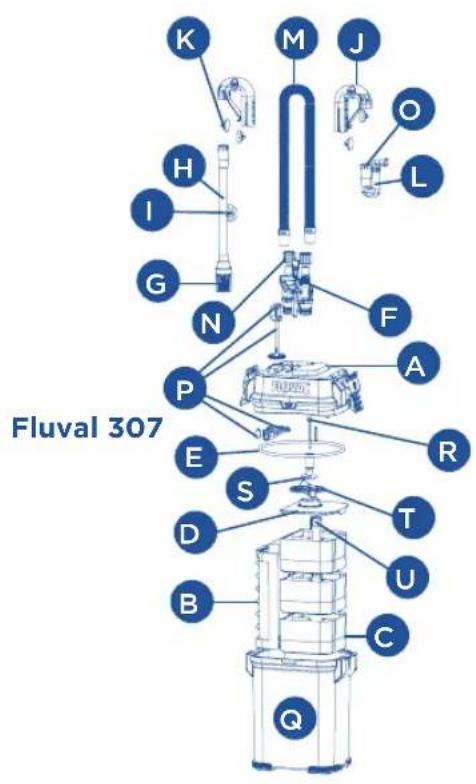
PRODUCT PARTS
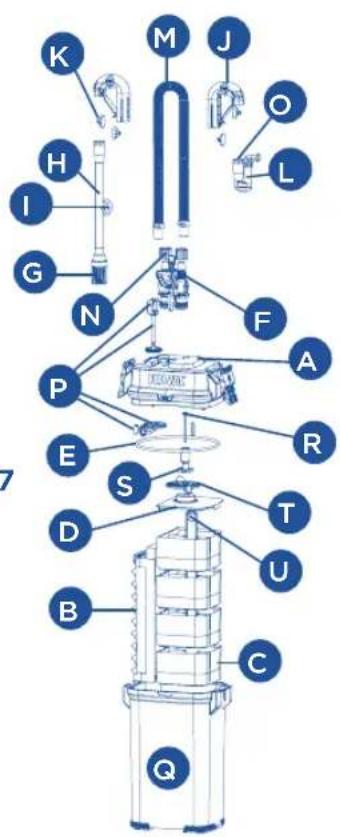
FLUVAL CANISTER FILTER
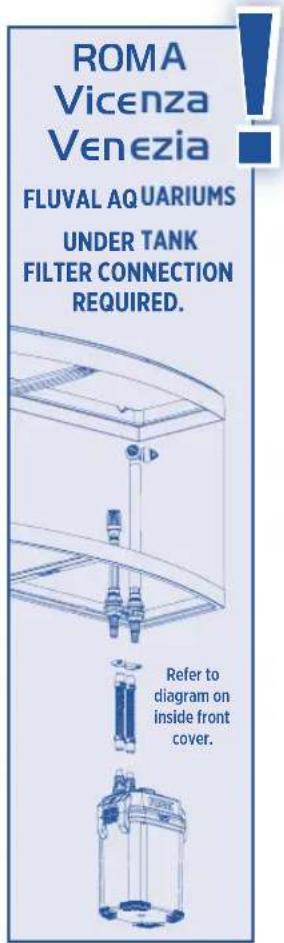
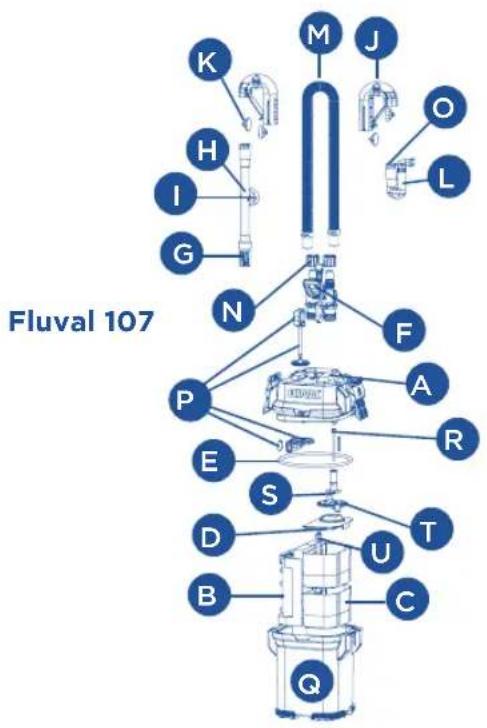
Refer to diagram on inside front cover.
Hosing
2 Rim connector assemblies (2)
3 Suction cups (4)
4 Intake assembly with suction cup
5 Output nozzle assembly
6 AquaStop valve
7 Canister cover (Motor Head)
8 Instant-prime handle (attached)
9 Lift-lock clamps (attached)
10 Impeller cover
Filter canister (media baskets inside)
12 Motor head gasket
VICENZA, VENEZIA & ROMA AQUARIUMS ONLY
Metal Clamps (2)
14 Ribbed Hosing (2)

Your Flual 07 Series filter comes pre-loaded with media. When replacing the media, it is recommended to follow the same order to help ensure optimal efficiency and best results.
IMPORTANT SAFETY INSTRUCTIONS
WARNING - To guard against injury, basic safety precautions should be observed including the following:
1. READ & FOLLOW ALL SAFETY INSTRUCTIONS
and all the important notices on the appliance before using. Failure to do so may result in the loss of fish life and/or damage to the appliance.
- DANGER - To avoid possible electric shock, special care should be taken since water is employed in the use of aquarium equipment. For each of the following situations, do not attempt repairs yourself, return the appliance to an authorized service facility for service or discard the appliance.
A. If the appliance falls into the water, DON'T reach for it! First unplug it and then retrieve it. If electrical components of the appliance get wet, unplug the appliance immediately.
B. If the appliance shows any sign of abnormal water leakage or if RCD (or GFCI - Ground Fault Current Interruptions) switches off, disconnect the power supply cord from the mains.
C. Carefully examine the appliance after installation. It should not be plugged in if there is water on parts not intended to be wet.
D. Do not operate any appliance if it has a damaged cord or plug, or if it is malfunctioning or it is dropped or damaged in any manner. The power cord of this appliance cannot be replaced. If the cord is damaged, the appliance should be discarded. Never cut the cord.
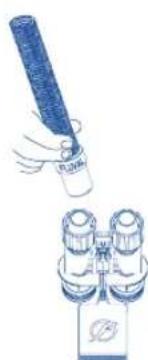
E. To avoid the possibility of the appliance plug or receptacle getting wet, position the appliance to one side of a wall mounted receptacle. To prevent water from dripping onto the receptacle or plug, a "drip loop" (see picture) should be arranged by the user in the cord connecting appliance to a receptacle. The "drip loop" is that part of the cord below the level of the receptacle
or the connector, to prevent water travelling along the cord and coming in contact with the receptacle. If the plug or receptacle does get wet, DON'T unplug the cord. Disconnect the fuse or circuit breaker that
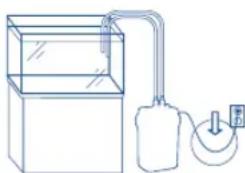
supplies power to the appliance. Then unplug and examine for presence of water in receptacle.
- WARNING - Close supervision is necessary when any appliance is used by or near children. This appliance can be used by children ages 8 years and above and persons with reduced physical, sensory or mental capabilities or lack of experience and knowledge if they have been given supervision or instruction concerning use of the appliance in a safe way and understand the hazards involved. Children shall not play with the appliance. Cleaning and user maintenance shall not be made by children without supervision.
- To avoid injury, do not touch moving parts or hot parts.
- CAUTION - Always unplug or disconnect all appliances in the aquarium from electricity supply before placing hands in water, before putting on or taking off parts and while the equipment is being installed, maintained or handled. Grasp the plug and pull to disconnect. Never yank cord to pull plug from outlet. Always unplug an appliance from an outlet when not in use.
- This is an AQUARIUM FILTER-PUMP INTENDED FOR DOMESTIC and INDOOR use only. It is intended for use in ornamental household aquariums. It may be used with fresh or salt water. Maximum water temperature 35^ . Do not use this appliance for other than intended use (ie: DO NOT use in swimming pools, bathrooms etc.). The use of attachments not recommended or sold by the appliance manufacturer may cause an unsafe condition and will invalidate your warranty.
- This appliance is not a submersible aquarium filter pump. Do not install or store this appliance where it will be exposed to the weather or temperatures below freezing.
- Make sure that this appliance is securely installed before operating it and that the electrical connection is in accordance with the data on the rating label. Do not allow filter pump to run dry.
- If an extension cord is necessary, a cord with proper rating should be used. A cord rated for less amperes or watts than the appliance rating may overheat. Care should be taken to arrange the cord so that it will not be tripped over or pulled. The connection should be carried out by a qualified electrical installer.
10. SAVE THESE INSTRUCTIONS
for future reference.

IMPORTANT
To ensure optimal and proper functioning of your 07 Series Fluval External Filter, regular maintenance is required. Failure to do so may result in the failure of the filter and will invalidate your warranty. Additionally, regular cleaning and maintenance will greatly reduce or completely prevent faults and reduction in performance. Please refer to the maintenance schedule below.
- Ensure Impeller Cover is fitted right way up when replacing.
- Lubricate Motor Head ("O" Ring) gasket using an inert lubricant (i.e. Fluval Silicone Lubricant #A325 or vegetable oil). Do NOT use petroleum jelly based products.
- Pipes will gradually block with protein slime and waste.
To ensure constant presence of beneficial bacteria, never replace all media at the same time.
-
Yearly replacement ensures optimal performance.
-
The Motor Head Gasket ("O" Ring) will deteriorate over time and must be replaced yearly to avoid the potential for leaks.
-
Impeller will wear out over time. As a preventative step, replace yearly.
| MODEL | 107 | 207 | 307 | 407 |
| AQUARIUM* | 10-30 US Gal
40-130 L | 20-45 US Gal
60-220 L | 40-70 US Gal
90-330 L | 50-100 US Gal
150-500 L |
| PUMP PERFORMANCE | 145 US Gal/h
550 L/h | 206 US Gal/h
780 L/h | 303 US Gal/h
1150 L/h | 383 US Gal/h
1450 L/h |
| VERTICAL PRE-FILTER | 514 cm² | 803 cm² | 803 cm² | 1074 cm² |
| BASKET VOLUME | 1.2 L | 1.8 L | 3.1 L | 4.2 L |
| TOTAL CHAMBER VOLUME | 2.0 L | 3.1 L | 4.5 L | 6.0 L |
| CANISTER VOLUME | 3.9 L | 5.3 L | 7.3 L | 9.2 L |
| FILTER DIMENSIONS | 7.5" x 7" x 13.7"
19 x 18 x 35 cm | 7.5" x 7" x 16.5"
19 x 18 x 42 cm | 9.5" x 7" x 16.5"
24 x 18 x 42 cm | 9.5" x 7" x 19.3"
24 x 18 x 49 cm |
| FILTER CIRCULATION** | 95 US Gal/h
360 L/h | 121 US Gal/h
460 L/h | 206 US Gal/h
780 L/h | 245 US Gal/h
930 L/h |
| MAX WATER COLUMN HEIGHT | 1.45 m | 1.45 m | 1.75 m | 2.25 m |
| WATTAGE - 120V/60Hz:
WATTAGE - 230-240V/50Hz: | 10 W | 10 W | 16 W
15 W | 23 W
20 W |
*Aquarium recommendations are based on North American (US Gal) or European (L) standard aquarium usage
**Flow rates were measured with intake and output hoses of the same length
INSTALLATION AND USE
IMPORTANT: Read all instructions before beginning.
- Ensure water level remains below output nozzle during setup.
- Allow 30-45 minutes for setup and installation.
- Tools required: Utility knife. (Note: For an unusually shallow aquarium, the intake tube may need to be cut; this requires a hacksaw.)
DO NOT PLUG IN FILTER UNTIL SETUP IS COMPLETE AND UNIT IS FILLED WITH WATER.
1. Unpack and identify all parts
Use the diagram on the inside front cover as a guide. A parts guide can also be found at the end of this manual.
2. Prepare the aquarium
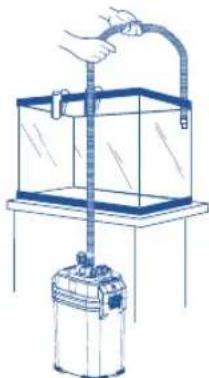
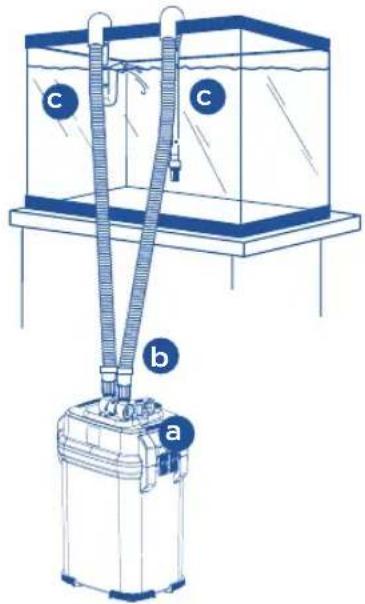
- Decide on filter placement. Remember, this is a gravity-fed system. For it to work properly, all the Installation Requirements below must be adhered to.
Installation Requirements
The canister base must never be more than 4.5 ft. (1.4 m) below the water level.
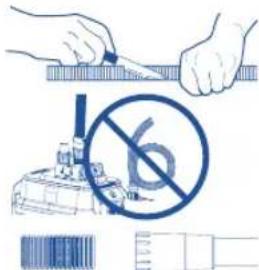
- Hosing must follow a straight path from the filter to the aquarium rim, with no loops and very little slack.
The water level should never be more than 7 in. (17.5 cm) below your aquarium rim.
- The filter must ALWAYS be positioned below the aquarium.
- Intake tube should not be positioned in close proximity to an air source.
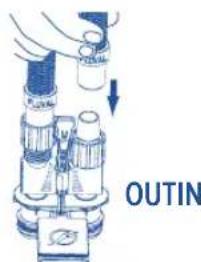
2. Place the two rim connector assemblies over the back top edge of the aquarium.
Place one just above the spot where you want to position the intake tube; place the other just above the spot where you want to position the output nozzle. Be sure the longer section of
each connector is on the outside of the aquarium. Attach suction cups to the outside and inside section of each connector.
IMPORTANT: Be sure to position the intake tube away from any air source—an air stone, an aeration device, or the output valve. Air entering the intake strainer will diminish filter efficiency.

OUTIN
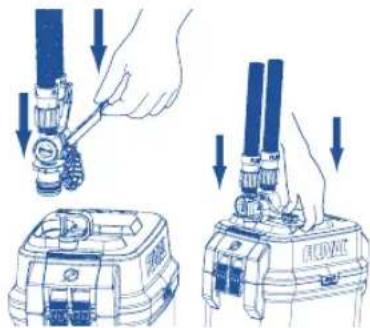
3. Prepare intake connections
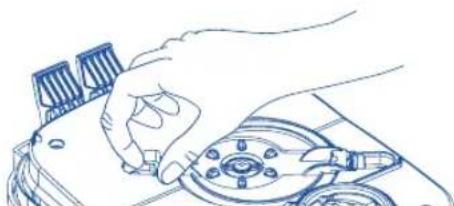
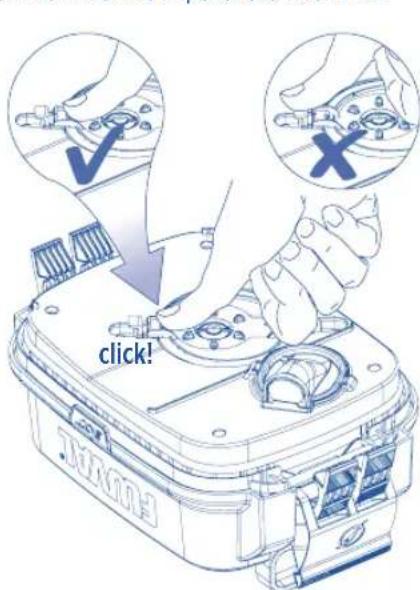
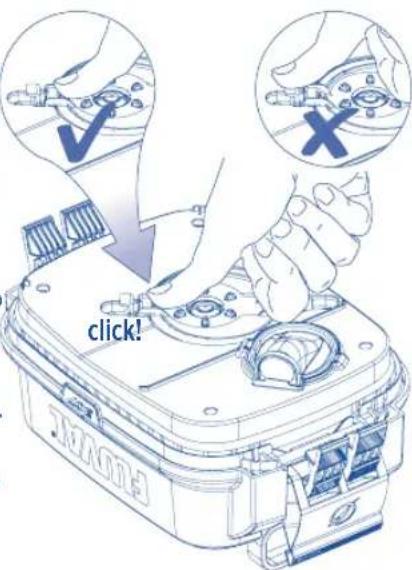
- Insert the AquaStop valve into the intake and output connectors on the cover, and push down on the locking lever to lock it in place.
a. Position the filter below the aquarium where it will sit while operating.
b. Attach hosing to the intake connector (IN) on the AquaStop valve; the input connector will be on your left.
c. Push one end of the hosing onto the valve; push it all the way, as far as it will go.
d. Turn the lock nut counter clockwise until it is as tight as you can make it without forcing.
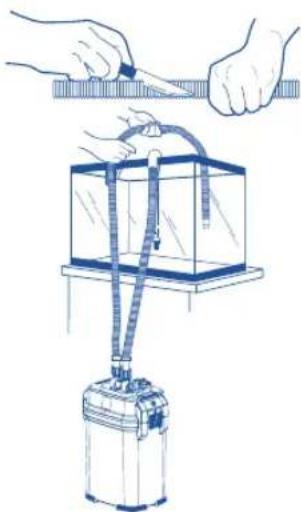
- Measure and cut the hosing. You will need a length of hosing that reaches comfortably from the filter canister to inside the aquarium.
a. Stretch out the hosing up to the top of the aquarium so it rests over the "intake" rim connector assembly.
b. At a spot about 4 in. (10 cm) beyond the aquarium rim, use a utility knife to cut the hosing. Do not cut the hosing too short.
IMPORTANT: You will want the hosing to be long enough so that its connection point with the intake assembly is always about 3 in. (7.5 cm) below the water line. Remember, you can always cut hosing shorter during final installation, if necessary.
INSTALLATION AND USE
- Push the cut end of this "intake" hosing into the rubber connector on the intake tube. Push the hosing in by at least 1 in. (2.5 cm) without twisting it.
IMPORTANT:
- Hosing must follow a straight path with no kinks or loops and very little slack.
- If the hosing is too long, the filter will not work properly.
The factory-finished end of the hosing must connect to the AquaStop valve.
- To ensure a watertight seal, the cut end of the hosing, which connects to the intake assembly, must be kept under water.
- Clip the suction cup onto the intake assembly near the strainer and place the assembly in the tank, making sure the strainer is at least 3 in. (7.5 cm) from the bottom. (If the tube is too long for the height of your aquarium, remove the strainer from the intake assembly, cut the tube with a hacksaw, and then replace the strainer.) Once the intake assembly is properly positioned, lock it in place by pressing the suction cups against the glass.
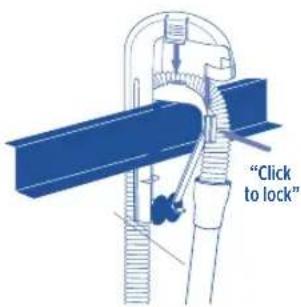
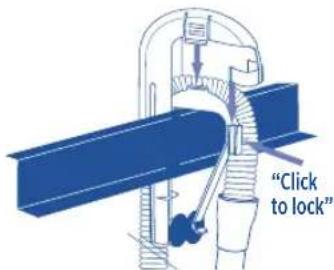
- Position the top half of the rim connector assembly over the hosing and push down until it "clicks" to lock the hosing in place.
4. Prepare output connections
- The remaining length of hosing will be used for output. Attach the hosing to the output connector (OUT) on the right side of the AquaStop valve.
a. Push the factory-finished end of the hosing onto the valve; push it all the way, as far as it will go.
b. Turn the lock nut counter clockwise until it is as tight as you can make it without forcing.
- Measure and cut the hosing. Again, you will need a length of hosing that reaches comfortably from the filter canister to inside the aquarium.
a. Stretch out the hosing so it rests over the "output" rim connector assembly.
b. At a spot about 4 in. (10 cm) beyond the aquarium rim, use a utility knife to cut the hoseDo not cut the hose too short. Remember, you can always cut it shorter during final installation, if necessary.
IMPORTANT: Remember, to maintain a watertight seal, the connection point between the hosing and the output nozzle should be kept below the water line.
- Push the cut end of this "output" hosing into the rubber connector at the top of the output
nozzle assembly. Push the hosing in by at least 1 in. (2.5 cm) without twisting it.
- Place the output nozzle in the tank about 0.8 in. (2 cm) below the anticipated final water level; then push the top half of the rim connector assembly down until it "clicks" to lock the hosing in place.


INSTALLATION AND USE
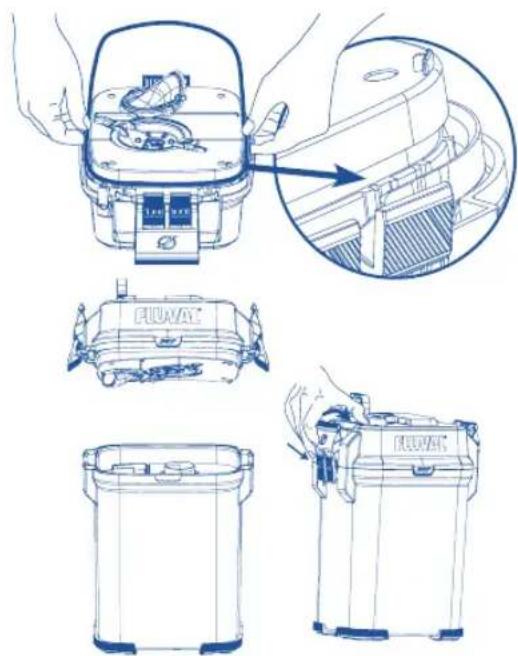
5. Prepare the Filter
First, disconnect the AquaStop valve from filter and bring the filter to a sink making sure there are no soaps or chemicals which could contaminate the filter.
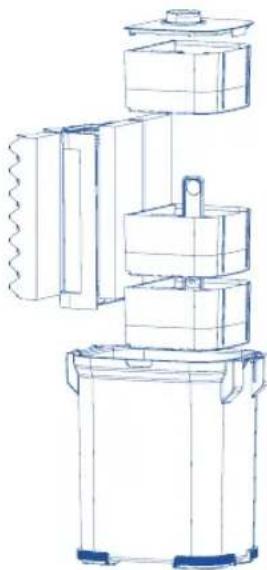
IMPORTANT: The filter media supplied with your Fluval filter have been deliberately placed in Upper, Mid, and Lower level baskets to indicate their recommended placement for optimal basic filtration. Be sure to note this positioning and place media in baskets at the same levels as you prepare the filter for use.
- Remove the pre-filter basket, media cover, and media baskets from the filter canister. As you remove the media, note which levels they were packed in. Then remove media from plastic packaging; do not remove carbon from porous bag(s). Use the integrated center handle to lift media baskets out of the filter body.
- Rinse baskets and media materials under running tap water to remove any dust, and place media in baskets. Or, if you prefer, select other media of your own choosing.
- Place rinsed and filled media baskets back in canister, and put the media cover back on top basket.
IMPORTANT: Make certain that each kind of media is positioned at the same level it was packaged in, unless you are deliberately choosing a different filtration plan than the recommended basic setup. Never overfill baskets. If baskets or cover are out of position, cover may not close properly.
-
Rinse both sides of the foam screen frame under tap water before initial use to remove any possible contaminants, and slide it back into position in the canister, flat end down. If the screen does not seem to fit properly, be sure it is not upside down.
-
Complete canister cover assembly: Lay the canister cover on a flat surface with its topside down. Remove the lubricated rubber gasket from its plastic bag. To seal the cover opening properly, the gasket must be moist but it need not be wet. Carefully fit the gasket into the channel around the base of the motor head.
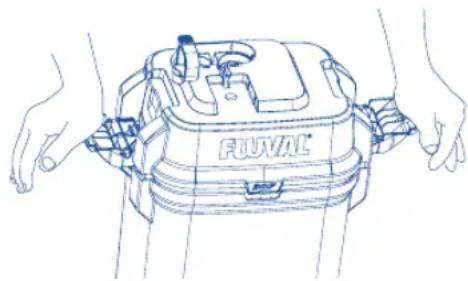
- Place the cover on the canister. Be sure to position it properly. There is only one orientation possible.
- Lock the cover in place. Push the double tabs of the lift-lock clamps under the rim; then press the upper tabs firmly against the cover. DO NOT FILL CANISTER WITH WATER.
- Place the unit in its final position.
IMPORTANT REMINDERS:
- This is a gravity-fed system. For it to work properly, the filter must be positioned vertically below the aquarium.
- The distance between the bottom of the canister and the maximum water level must not exceed 4.5 ft. (1.4 m).
- Hosing must follow a straight path from the filter to the aquarium rim, with no loops and very little slack.
If hosing is too long, filter will not work properly.
- The water level should never be more than 7 in. (17.5 cm) below your aquarium rim.
- NEVER install the filter above the water level.
INSTALLATION AND USE
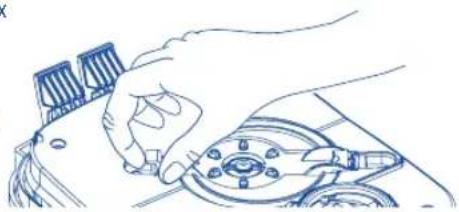
- Insert the AquaStop valve into the intake and output connectors on the cover, and push down on the locking lever to lock it in place.
- Open the AquaStop valve by pushing the valve lever all the way down. (The valve must be fully open before the unit is turned on or primed.)

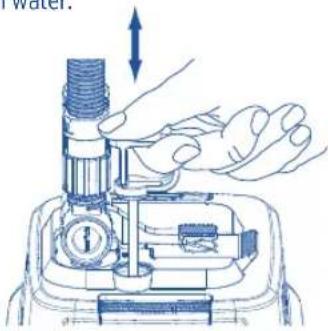
6. Start the filter
- Check your installation.
a Be sure lift-lock clamps are securely closed.
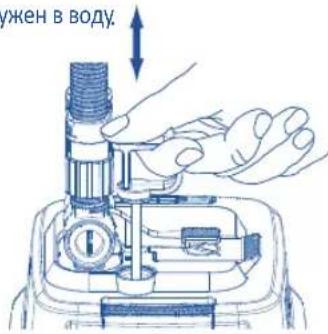
Make certain that the AquaStop valve is fully open and pushed all the way down.
Check that the intake assembly is fully submerged in water.
- Pump the instant-prime handle by pulling it up and pushing it down 3 to 4 times until you hear water being drawn into the unit. Return the instant-prime handle to the down position. As water flows through the intake hosing, it will fill the canister, pushing air out of its way. Air will be expelled through the output nozzle, which should be located slightly above the water surface. To expel all the air in the system as quickly as possible, the AquaStop valve must be fully open. Be sure the lever is all the way down.
- Once the bubbling in the tank stops, you'll know the air is out of the system, and the canister is full; plug the power cord into an electrical outlet.
THE PUMP WILL START IMMEDIATELY. Water should flow from the output nozzle continuously. If it does not, check your installation to be sure of the following:
- No kinks or loops in the hosing.
The base of the canister is not more than 4.5 ft. (1.4 m) below the water level.
- The water is not more than 7 in. (17.5 cm) below the aquarium rim.
- The intake assembly is securely attached to the aquarium wall.
- No air is bubbling into the water at points where the intake assembly and the output nozzle connect to the hosing.
- No water is escaping from the hosing at the AquaStop valve connection points.
- The canister cover is securely closed.
- The AquaStop valve must be fully open before the unit is turned on or primed.
IMPORTANT: To prevent damage, never plug the filter in unless the canister is completely full of water.
Adjusting Water Flow
Once the filter is operating continuously, you can use the top lever on the AquaStop to regulate the water flow. To reduce the water flow, lift the lever up to halfway, but no higher. This can be done once the unit is fully operational, and will not harm the motor. However, never run the filter with the lever up (closed) more than half way.
Air in the Filter
Some air will become trapped in the canister as it fills; air may also be released by new media. Eventually, the filter will expel all air pockets. If you notice excessive bursts of bubbling over an extended period of time, check all hosing and connections for air leaks. Also, make sure there is no air source (such as an airstone or aeration device) near the intake strainer.
MAINTENANCE
WARNING: ALWAYS DISCONNECT ALL APPLIENCES IN THE AQUARUM FROM THE ELECTRICAL SUPPLY BEFORE PLACING HANDS IN THE WATER, BEFORE PUTTING ON OR TAKING OFF PARTS, AND WHENEVER THE FILTER EQUIPMENT IS BEING INSTALLED, MAINTAINED OR HANDLED.
Filter Media must be periodically replaced or cleaned in accordance with instructions on individual packages. Actual life span of any type of media will vary based on usage and the specific characteristics of each aquarium. To remove and replace media, follow the instructions below.
IMPORTANT: Never replace all media at the same time. Stagger filter media changes so that some older media remains in use. This ensures re-seeding of beneficial bacteria, so that colonies discarded with old media will be replaced by vigorous new ones. To enhance bacterial action, use Fluval Cycle Biological Aquarium Supplement each time you change the media. All rubber parts, cover gasket, primer stem, AquaStop Valve and seal rings should be periodically lubricated using an inert lubricant such as Fluval Silicone lubricant (Item #A325) or vegetable oil.
1. Drain the filter
- Close the AquaStop valve by lifting the lever all the way up. This seals off the input and output hosing connections to maintain the vacuum that is necessary in order to restart the filter without priming.
- Unplug the power cord.
- Lift the locking lever to release the AquaStop valve. It is not necessary to remove the hosing from the AquaStop valve unless the hosing, the AquaStop valve or both require cleaning. (Periodic cleaning is recommended to ensure optimal water flow. A good time to do this is during a major water change. To clean, rinse under running tap water; if necessary use an appropriate Fluval Cleaning brush).
- Hold the unit by the canister, not the cover, and move it to an appropriate flat surface near a sink or other drain. (Be sure to keep it upright to avoid spills).
- Release the lift-lock clamps; then push down on clamps to lift the cover/pump housing off the canister and set it aside.
- Remove media cover, then using the center handle remove media baskets from canister. Next, lift and remove prefilter basket and place all media components in a sink or bucket.
- Tilt the canister over a sink or drain and pour out all remaining water.
- Rinse the interior of the canister with clear water. NEVER use soap or detergents when cleaning canister or rinsing prefilter or media baskets. Traces of cleaning products may remain on surfaces and damage sensitive fish tissues.
- Rinse the interior of the priming cylinder with clear water. Be sure the cylinder has no debris trapped in the red flapper valve and it is sitting flush in a closed position.
- Replace chemical media (if included) as needed. Chemical media cannot be cleaned.
- Rinse biological media with aquarium water, never tap water, or replace as required.
Never replace all biological media at one time, as valuable colonies of beneficial bacteria would be lost.
- Rinse foams using aquarium or de-chlorinated tap water or replace foams as needed.
For the most thorough cleaning possible, rinse each piece separately. Be sure that the bio-foam is protruding from the top of the pre-filter basket. Rinse any other mechanical media also.
NEVER use soap or detergents as traces of cleaning products could harm fish.
MAINTENANCE
3. Reassemble unit - DO NOT FILL CANISTER WITH WATER WHEN RE-ASSEMBLING UNIT
- Place rinsed and filled media baskets back in canister and put cover back on top basket.
- Replace pre-filter basket in canister. (Insert with flat end down.)
- Always lubricate motor head gasket using an inert lubricant (i.e. Fluval Silicone Lubricant #A325 or vegetable oil).
- Replace the cover. Be sure to position it properly. There is only one orientation possible.
- Use the lock-lift clamps to close the cover securely.
- Place the unit back in position; re-insert the AquaStop valve, and push down the locking lever to lock it in place.
- Push down on the valve lever to open the AquaStop valve. Water should start flowing immediately.
IMPORTANT: If the hosing has been disconnected from the AquaStop valve, or if the system has lost its vacuum for some other reason, the canister will not fill automatically. Use the instant-prime handle to fill the canister.
- Allow the canister to fill completely, then plug the power cord back into the electrical outlet.
IMPORTANT: If the canister is not full before the filter is plugged in, it may not work properly. The filter unit should never be allowed to run dry. Running the unit dry may result in damage to the motor.
Impeller Care
The impeller well has an effective self-cleaning feature. However, it is recommended that you remove the impeller cover and inspect the impeller as part of your routine maintenance. Keeping the impeller clean lengthens its life and the life of the motor.
IMPORTANT: The impeller fan has a ceramic shaft, which is resistant to wear and tear in use, but is still fragile. Handle carefully during maintenance.
- Remove the impeller cover: Pull the tab over and gently pry off.
- If the impeller needs cleaning, grasp the fan and draw it gently from the well. Rinse it under clean water.
- If the well needs cleaning, wipe gently with a Fluval Cleaning Brush.
- Replace the impeller in the well: Slide the impeller cover tab into the tab receptacle on the rim of the impeller chamber. Push down the opposite side of the impeller cover making sure the impeller starts to seat itself in the center of the impeller cover. Continue to push down until the retailing tab "clicks" and locks into position.
on the rim of the impeller chamber. Push
NOTE: The ceramic impeller shaft is held on the bottom of the impeller well by a rubber support. The shaft can be easily extracted and reinserted by hand; however, pay close attention to be certain the rubber support does not become unseated. (Always replace the impeller cover to ensure proper alignment).
The impeller will wear out over time. A replacement may be ordered from your local Fluval dealer or by contacting Fluval/Rolf C Hagen Inc. customer service.
Primer
Please note Primer handle can only be replaced in the event of breakage of the stem or handle.
Recycling
This product bears the selective sorting symbol for waste electrical and electronic equipment (WEEE). This means that this product must be handled pursuant to European Directive 2012/19/EU in order to be recycled or dismantled to minimize its impact on the environment. Check with your local Environmental Agency for possible disposal instructions or take to an official council registered refuse collection point. Electronic products not included in the selective sorting
process are potentially dangerous for the environment and human health due to the presence of hazardous substances.
QUESTIONS?
If you have product questions or require replacement parts, please first consult your local Fluval retailer. Should you require technical support, please contact Fluval before returning the product under the warranty terms. Most matters can be handled promptly with a phone call, or you can also contact us via www.fluvalaquatics.com. Our website also features a detailed FAQ section, where you can find helpful answers and how-to videos on common queries.
CANADA
CALL US TOLL-FREE AT:
1-800-554-2436
between 9:00 a.m. and 4:00 p.m.
Eastern Standard Time.
Ask for Customer Service.
FOR AUTHORISED
GUARANTEE
REPAIR SERVICE:
Return with dated receipt to:
Rolf C. Hagen Inc.
Service and Repair
20500 Trans-Canada Hwy
Baie-D'Urfe, Quebec H9X 0A2
USA
CALL US TOLL-FREE AT:
1-800-724-2436
between 9:00 a.m. and 4:00 p.m.
Eastern Standard Time.
Ask for Customer Service.
FOR AUTHORISED
GUARANTEE
REPAIR SERVICE:
Return with dated receipt to:
Rolf C. Hagen (USA) Corp
Consumer Repairs
305 Forbes Blvd
Mansfield, MA 02048
UK
CALL US AT:
01977 521015
between 9:00 AM and 5:00 PM,
Monday to Thursday and 9:00 AM
and 4:00 PM on Friday
(excluding Bank Holidays).
Ask for Customer Service.
FOR AUTHORISED
GUARANTEE
REPAIR SERVICE:
Return to your retailer with suitable proof of
purchase and reason for return.
Rolf C. Hagen (UK) Ltd
California Drive, Whitwood Ind Est.,
Castleford, West Yorkshire WF10 5QH
For more information on our products, please visit www.fluvalaquatics.com
THREE (3) YEAR WARRANTY
Fluval 07 Series External Filters are warranted against defects in material and workmanship under normal aquarium usage and service for three (3) years from date of purchase. Non-replaceable and non-serviceable parts will be repaired or replaced at Hagen's discretion, free of charge, when the complete filter is returned with all components along with a valid proof of purchase and postage paid. The warranty does not cover wear and tear parts such as the impeller assembly or motor seal ring. The warranty does not cover wear and tear or parts which have not been adequately or correctly maintained. The warranty is limited to repair or replacement only and does not cover consequential loss, loss or damage to livestock, personal property or damage to animate or inanimate objects, irrespective of the cause thereof. This warranty is valid only under normal operating conditions for which the unit is intended. This excludes any damage caused by unreasonable use, negligence, improper installation, tampering, abuse or commercial use. Before returning the filter under warranty terms, please ensure that all setup and maintenance instructions have been followed. If you are in doubt, please contact your local aquatic specialist retailer for further advice before returning the product.
WARRANTY IS ONLY VALID WITH PROOF OF PURCHASE FROM AN AUTHORIZATION FLUVAL DEALER.
WARRANTY DOES NOT AFFECT YOUR STATUTORY RIGHTS.

REPLACEMENT PARTS
| PARTS FLUVAL 107 FLUVAL 207 FLUVAL 307 FLUVAL 407 |
| A Motor Head A20101 A20102 A20103 A20104 |
| B Pre-Filter Basket A20122 A20123 A20123 A20124 |
| C Media Basket A20046 A20046 A20043 A20043 |
| D | Media Basket Cover | A20042 | A20042 | A20067 | A20067 |
| E | Motor Head Gasket | A20038 | A20038 | A20064 | A20064 |
| F | AquaStop Valve | A20062 | A20062 | A20062 | A20062 |
| G | Intake Strainer | A20007 | A20007 | A20008 | A20008 |
| H | Intake Stem with Intake Strainer | A20010 | A20010 | A20011 | A20011 |
| I | Suction Cup with clip (40 mm) | A15520 | A15520 | A15520 | A15520 |
| J | Aquarium Rim Connector | A20026 | A20026 | A20026 | A20026 |
| K | Suction Cup (30 mm) | A15041 | A15041 | A15041 | A15041 |
| L | Output Nozzle | A20053 | A20053 | A20053 | A20053 |
| M | Ribbed Hosing | A20014 | A20014 | A20015 | A20015 |
| N | Hose-Lock Nuts | A20059 | A20059 | A20059 | A20059 |
| O | Rubber Hose Connector | A20016 | A20016 | A20017 | A20017 |
| P | Primer Assembly with Primer Cover | A20126 | A20126 | A20126 | A20126 |
| Q | Filter Canister | A20183 | A20188 | A20193 | A20198 |
| R | Ceramic Impeller Shaft & Rubber Bushing | A20039 | A20039 | A20039 | A20039 |
| S Magnetic Impeller with Ceramic Shaft & Rubber Bushing | A20109 | A20109 | A20149 | A20169 |
| T | Impeller Cover | A20113 | A20133 | A20148 | A20148 |
| U | Media Basket Handle | A20071 | A20072 | A20072 | A20073 |
| 07 Motor Head Maintenance Kit |
| Magnetic Impeller |
| Ceramic Shaft & Rubber Support | A20094 | A20095 | A20096 | A20097 |
| Impeller Cover |
| Motor Head Gasket |
| 07 Series Intake / Output Kit |
| AquasStop Valve |
| Intake Stem / Strainer / Hose Connector |
| Output Nozzle | A20051 | A20051 | A20052 | A20052 |
| Motor Head Gasket |
| Aquarium Rim Connector x 2 |
| Suction Cup 30 mm x 4 |
| Suction Cup with Clip (40 mm) |
VICENZA, VENEZIA & ROMA AQUARIUMS ONLY
| PARTS | FLUVAL 207 FLUVAL 307 FLUVAL 407 |
| V Metal Clamp | A20013 A20013 A20013 |
| Y | Ribbed Hosing | A20012 | A20012 | A20012 |
See following page for diagrams.
Fluval 207
HOSESING SETUP FOR VICENZA, VENEZIA & ROMA AQUARIUMS
HOSING SETUP FOR VICENZA, VENEZIA & ROMA AQUARIUMS
Fluval 407
HOSESING SETUP FOR VICENZA, VENEZIA & ROMA AQUARIUMS
See previous page for descriptions.
PIÉCES
FILTRE EXTERIEUR FLUVAL
Cologne: Cantoque, a second translation of the German translation of the German translation of the Italian translation.
- PpOBePbTe yCTaHOBky.
a Y6eHntecb TOM, YTO 3aXmbl Lift-Lock HAdexHO 3akpbTbl.
IpoBepbTe,YTO6bl KlanahAquaStop 6bln NOIHOCtBIO OTKpbIT NOnyueH BHN3 Do ynopa.
y6eHntecb,yTO BOO3a6OpHbY y3eI NOHOCbIO norpyKeH B VOy.
- BbInonHnIe HakaunBaIOUne DmKHeHH pyKOaTkoN
MTHOBEHNO NOkauK, NOHIMae ee BBepx N onyckA Bn3 3-4 pa3a, noka He ycblwnte, kak B yCTpoIcTBO Hauana NoctynaBbOda. Bo3bpATne pykoRTKY MTHOBEHNO NOkaCKn B HnXHee noIOKeHne. INo Mepe npoxKeHEn BAoBI IO npHemHomY lHaHry KaHcTpa 3anoJIHReTc, a BO3dyx ydaJIaTeCt.BO3dyx 6yET ydaJIaTbCz uepe3 BbInyCKHoe cNO, KOtOpoe DoJIKHO paCnOLaTaBC Ha He6oJIbWOM pAcCToHm HAD NOBepxHOCTbO BOdBi. YTObki KAK MOKHO CKopee ydaJIb BEcb BO3dyx IN3 CnCTeMbI, KlaanAH AquaStopdoJKeH 6bITb NOHOCTbIO OKpBT. Y6eINTECb TOM, YTO pbHar ON
- KaTToIbKO npEkpAATnTcR O6pa3OBAHHe Ny3bIpbKOB B EMKoCTN AKBAPNYMa, 3TO 6yET
O3Haatb, YTO BO3dYx NOLHOCTbU ydaIeH n3 CnCTeMb I KaHnCTpa HAnOJIHeHa. NOpKnIOHTe UHyp nITaHnK 3JekTpueckoP03eTke.
HACOC CPA3Y HE 3ANYCTNTCA.BoDa DOJIHKHa NocToHHO BbITEKaTb N3 BbIyCKHOro cOnla.EcIn 3TOr He npOxCxOHT, y6eIITecB nPpABINbHOCTn YcTaHOBKN, pOBepNB yKa3aHHoe HnKe.
- MoTtax xHaRa BbInoJHEn 6e3 nepeKpyuBaHn n neTeIb.
PacCTOARHHe OT OCHOBAHNA KaHnCTpbI DO yPOBbN BoDJI CoCTaBnE He 6oJee 1,4 M (4,5 cyTa).
PacctoHne OT ypOBH BOdy Do KpOMKn AKBAPnMa COCTaBnEe He 60nee 17,5 cm (7 DHOIMOB).
-Пиemьузелнаджно рпкpenнК CTeHKe aKbapuMa.
B BOte OTCyTCTByIOT N3bIbpKbN BO3dyxa B MeCtax CoeINHeHn npMeHORo y3na H BbInyCKHOrO cOnla co 1HaROM.
B MecTax coeHHe HnHa c KnaHApAquaStop He BbITEKaET B0da.
Kpbilka KaHnctPbHaJeKHO 3aKpbita.
-До ВКлоченя устpoиCTBA ИИ ПОДКачКВ OБы HeO6xOДМО ПОЛHOCТь OTOKpbIb KJIanaHbAquaStop.
BAXHOE PIMMEAHNE. Bo n36eKaHne noBpeKdEnn HnKOrda He noDKnUoayTe fNbTp, eCIn KaHnCTpa nOHHocTbHO He HanoJIHeHa BOdoi.
PerylnopBka notoKa Bdo
Iocne yctahOBJIeHHeHpepbIBHO rEKMpa 6oBt bIbIbMaMOHpo perynipoBaT NOTOK BODc NOMOuBuBepxHrHa KaIanaheAquaStOp. YTO6bCHN3HTb NOtOK BObl, NOHMmTE pbHar BBepx HAnOLOBNHy, HO He Bblwe. To MOxHO DeLaTb TOLbKO Ha NoHOM Xdy pa60bY cTPOJcTB, He HAnOc YUePbMoTOpy. OHaKo HIKOrda He NcNoIb3yIte FIOBTP C NOHrTaIM BBePx PbHAROM BoJe eH HanoobHry (3aKpbIToe noLoKeHne).
Bo3aYbΦnJIbIte
He6oIbIou o6bEM Bo3Dyxa 6yET 3aepKnBaTcB KaHNCTe P0 Mepe ee HanoHHeH; BO3DyX MoKe TaKHe CoepKaTcBcB HOBOM HanoHInTeNe. Co BpeMeHem FInlTp ydaNIT BCE 03DyUHbIe KApMaHbI. Ecn Bbl 3aMeNTe Ype3MepHbIe Bblpocbl Ny3bIpkbOB 03Dyxa B TeueHne IpOdoJnxTeJIbHoro BpeMeHn, npoeBpeTe IlaHr Nce coEINHeHn dIra BblBHeHn npoteek BO3Dyxa. Kpome TorO, y6eInTeCb B OTCyTCTBUN NtOCHNkA Bo3Dyxa pADOM C pIeMHbIM CeTaTbIM FInlTpom (HaNPmEp, a3paTopa nn a3paLIOHHOY cTaHOBKn).
IPEyPExDEHNE.IPEEDTEM KAK ONYCTNtB PYKIN B BOyU, YCTAHOBNTb NIN CHRTb KAKNE-JIMBO DETAJIN,A TAKKE BblIOHNHTb
TEXHnueCKOE OBCJyXINBAHNE
JIIOBbIE OIIEPAUINI IOYCTAHOBKE,OBcJyKBAHNIIO NII INPEHOCKE OOBPOJDOBAHIA,OB3ATEJIbHO OTKJIIOHTNE IINIOTCOEDHNITE BCE YCTPOICTBA B AKBAPNME OT JIIEKTPOCETN.
YxOa 3a HanoJHnteNem
HaonHntb HnoBtpa Heo6xOIMO nepHOJNcckn 3ameHt b nnuCHTnb B COOTBeTcBN C INHCTpyKunmYKa3aHHbIMn Ha ININBnDaYbHbIX ynaOBkax. PakTNueckn cpoK cnjXbI HanoHNTeJIIO6O Ro Bda 6yETB aBpNPOBaTcBc R 3aBNCIMoCTn OT nCIOJb3OBAHnN KOHKpeTHbIX xapaKTEPNC KAKDOra akBapNyMa. YTO6bI N3BLeCb N 3ameHt b HanoHNTeB, BblONHnTe npNBedeHNbE HNXe INHCTpyKUnn.
BAKHOE PIPMEUHHe. HIKoRda He 3aMeHnTe BeCb HAnOJHnTeJIb 3a OIN pa3. PaBHomePHO paCnpdeJIte 3aMeHy HAnOJHnTeJIg
fNtIbtpa, YTObblOJbOoi OOBem 6Olee CTaporo HAnOJHnTeJIa NcNOJb3OBaICr n DaJIbWe. 3To oBeCneHT pepeCB NOe3HbIX 6aKTeprn,
KOrDa KIOJHmN, yJaJIeHNbIe BMeCTe CO CTApBIM HAnOJHnTeJIeM, 3aMeHnOTcR HOBIMN KIN3HeCnOCbHbIMN 6aKTeprnMI. IyA kTNBn3aUIn
KIN3HeJeTAEbNoCTn 6aKTeprn INcNOJb3yIte 6IOIoYueCKy IO6aBky IyA kBapuyma Fluval Cycle npi KaJDoI ZaMeHe HAnOJHnTeJIa. Ha
Bce pe3HOBbIe DeTAln, PpOKNaJdKy KpbIshKn, CTEpKeHb Y3la NODkaCkN BoDbI, KLnanAH aquaStop u yIpOTnHtBHe bKe KolbaIa Heo6xOdmIO
pePiOnDnueckn HAnocNTb INhepTHyIO cMa3Ky, HApnPmeP cnIKkoHOByIO cMa3Ky Fluval (apTKyI N e A325) nn pactntelhoe MaIIO.
1. OnopokHHTe qHJbTp.
- 3akpoTe Klanah AquaStop, noINB BpHar BBex Do ynpa. 3To o6ceuHT repMeTHaUIO npHeMHO I BbIpyckHO Ro HROBIX coeHNHeN DnnoepKaHnBaKyMa, Heo6xOIMoro Iype3ayncKa MlbTpa 6e nOkaKn BObl.
- OToCoeHNHTe WHyp nHTaHnA.
- POnHMnTe 6IokpOBOuHb pyHar IIOOCbo6JDeHnKlanaHaAquaStop. He oB3aTeNbHO uBLeKaTb uHaHr N3 KlananaHa AquaStop; 3TO Heo6xOdmo DeLaTb, ToIbKO eCIn UHaHr, Klanan H AquaStop nIO Obe 3TN dTaJIIN Tpe6yOT OChTKn. (IepNoDunCeKAn OChTka peKomeHdyetc IIOObecneHEn OITMaIbHoro OTOKa BDoI. LyUwe BCero DeLaTb 3TO BO BPEM OCHOBHm CMeHb BObl. IIN OChTkn COnIoCHnTe DetAlb NOd CTpye IpotoHOrn BoBl; eCIn Heo6xOdmo, IcNoJIb3yIte POxOdaTuO uNCTauYIO uElykFluval.)
- ydepnmba yctpoiCTBO 3a KaHnCTpy, a He 3a KpbIbky, nepeMeCTne ero Ha noXdoIyIO NIOCKYIO NOBepxHOCTb pIOM c paKOBHoi nn Ipym CInBbIM npncnOc6JIeHHeM. (O6raTeIbHO ydepnBaIte yctpoiCTBO B BepTKaIbHOM nIoJKeHHN BO n36eKaHne pa3INBOB.)
- Ocb6o7e 3axmbi Lift-Lock; 3aTeM HaadaBte Ha 3axmbi, yTO6bI NOHrTB KpbIky I KOpNc HAcOca C KaHnCTpbI N OTLOXHTB CTopoHy.
- CHIMITE KpbiHKy IaHanoHInTeJIa, a 3aTEM C NOMOuHcH cHTpaJIbHOpyKoRTKN I3BLeKIne KOp3HNbI IaHanoHInTeJIa N3 KaHnCTpbl. DaJIee NODHMITE IN I3BLeKIne EKpaH r6Kn; NOMeCTNte BCE KOMNOHeHTbl HanoHInTeJIa B paKOBHy IIN BeDpo.
- OnpOKnHbTe KaHNCTpy HaIpaKOBuHOI INI ONOpOXHHTe ee, BblINB BCHO OCTaBlyOcR BDOy.
8.CnoIOnCHHe BHTpeHHIOU qaTb KaHnCTpbl YHcTOB OBOH.NHKOTDA He NcNoJIb3yIteMbIIO HIN MOIOUne CpeCTBA PnO ONUCTKe KaHnCTpbl HIN cNoJIaCKuBaHmN 3KpaHa Tg6Kn IIno KoP3H DJa HAnOIHNTeJr.Ha NOBepxHOCTX MoKET OCTaTBc He6OJIbwoe KOINueCTBO YnCtAUXxCpeCTB, YTO HaHEcET BpeD YVBCTBNTeJIbHbIM TKaHAM pbl6.
- Cnolochte BHTpeHHIOUaTb cIINHpa NOkauKu YCToB Odo. 63aTeIbHO pOBopebTe, YTOb b KpaCHb I NaCTNHaTbI OTKnIHoi KJIaH a NcJINHpa He 3a6nIcMycop INTOb b 3aKpbITOM PNOJOeHN DeTaIb paCNoIarJaIacb 3aIOJInO.

2. OuHCTHTe HIN 3aMeHHTe HAIOHNHTeIb.
- PnHHeo6xOaMIOCTN 3aMeHHTe XIMNUeCKn HAnOIHNTeJIb (ecNI BxOaNT B KOMNNEKT NOCTABKN).XIMNUeCKn HAnOIHNTeJIb He NOJdEeKNT OCHNTKe.
- CnoIocNHte 6nOIOHnueckn HAnOIHNTEb BODo n3 AKBapuMa (Hn B KOem clyuae He nCNOJIb3yIte DIA TTO rpoTOHyO BODy) nn 3aMeHInTe erO B clyuae Heo6xOJIMOCtN. HNKOrda He 3aMeHnTe BeCb 6nOIOHnueckn HAnOIHNTEb 3a Odn pa3, noCKoJIbky ceHHbIe KOLOHn IOne3HbIX 6aKTeprn 6dyt ytpaHebl.
- CnoJIOCHNTE y6Kn 3KpaHa n y6Kn Bio-FoAM BoOOn n3 aKBapnMa nIIN oBeCxIopEnHO npoToOH BOoON IIn60 npH Heo6XoIMOCTH 3aMeHNTE y6Kn. Dn HAn6OJe TtateNBHO uCTKN N3BLeKeTIte y6Kn n3 paMbI eKpaHa n CnoJIOCHNTE kAnDyHO dTeAIB NO OTeJIb HOCTNI; CnoJIOCHNTE n IpOTpNTe 3KpaHa, a 3aTEM BblONHnTE c6OpKy. Y6eIeTcB b TOM, QTO y6Ka BbICTyNaET n3 BepxHeu Chn 3KpaHa. CnoJIOCHNTE TAKKE BeCb OCTaIBHO mexAHueckn HAnOIHNTEJB.
HNKOTDA He mncnoB3yIe MbIIO IIN MOIOUne cpeCTBa IIN r6Kn IIN 3KpaHa, NocKOJIbky OCTaTK NcCTRAUX CpeCTB MOrTy HAnecTn BpeD pbl6am.
TEXHnueCKOE OBCnyJINBAHNE
-
BbnoHnnte c6opky yctpoCTBA.(HE HANOJIHrTE KAHNCTPY BOIOI PNI C6OPKE YCTPOINCTBA.)
-
IomecHTe npomblte HnHnHeHHbI KOp3HbI DnHnOHmTeIa HnOInHmTeIa B KaHnCTpy N yCtAHOBITE KpbIky O6paTHo Ha BepxHIOKOp3HvY.
- NomeCTHe 3KpaH ty6Kn B KaHnCTpy. (BCTaBIAIte IIOCKM KOHcOM BHN3.)
- Bcerda haHocnte Ha topondaIbHbIe npoklaadkn HHeptHyIO cMa3ky (HaNPmep, cnIKHOBOyIO cMa3ky Fluval (apTKyI N A325) nIpaCTneBHOe MaIIO).
- UcTahOBHTe KpbIshky Ha MeTO. IpoBepbTe, npaBnIbHO IIN OHa paCNoJIOKeHa. Bo3MoKHa ToIbKO OHa npaBnIbHaaOpneHTaUHA.
- C nomoBIO 3axnMoB Lock-Lift NaDeKHO 3aKpOJIe KpbIshy.
- YctaHOBnTe yCTPOIcTBo B n3HaUaJIbHoe nOIOKeHHe; BCTaBBte Ha MeTO KlanAH AquaStop n ONTe 6NOKIpOBOHbI pyHAR BH3
- Onyctnte BnH3 pbyar KlananaAquaStop, yTo6bl OTKpbItb KlananH. DOnJHa cpa3y JHe HauTaB NoCTynaTb BOda.
BAKHOE PIPMEAHNE. Ecn nlaHr 6bn OTcoeHNHe O KlananaAquaStop nIe cIn B CnCTme 6bl HApyeH BakyM no Ka-KoJ-NIOBO INOH INPUNHHe, HANOHNHe NKAHCTpbI He 6yETOCUeCTBnTbCn ABTOMaTHeCKN. IIN HAONHeHHa KAHNCTpBnNCNOB3yTe pyKOATky MRHOBEHHO NOkauKN.
- Doxndtecb nonHoro HanoHHeHn KaHncptbI, nocLe Yero CHOBA noKJIIOHTe SHyP NITaHn K 3JeKtpuYecko pO3eTke.
BAXHOE PIPMEAHNE. Ecnn do noKIOHHe HINbTa KaHcTpa NoHocTbHO He HANOnHeHa, HINbTp MoKet pa6oTaB HenpaBnBHO. Hn B KOem Cnyae HENb3aONyckatb, YTObIbTPaUNOHoe yCTpoCTBO pa6oTANO BCxyIO. Ecnn 3anyctntb yCTpOCTBO be3 BObl, 3TO MOKET pINBEcN K NOBPExKeHHIO MOTopa.
Yxod3aKpbblbauTkOu
Theo KpbIbTuKIN Meet 000EeKTHBHyO FyHKUIO CAMOOHCTKN. OHaKO B paMkax PnAHOBOrTexHnueCKOrO 6cnyKnBaHnpeKOMeHNyETC HmMaTb KpbIbTuKy KpbIbTuKIn NOCmatPnBaTb KpbIbTuKTy. IopepKaHne YnCTOTb KpbIbTuKIn pOdJIeBaET e cpoK cnJx6bl, KaN CpOK cnJx6bl MoTopa.
BAKKHOE PIMMEAHNE. BeHTINATOP C KpbIbuaTko IMeET KepaMHeCkN BaI, CTOKK N H3HOCY B npocece 3KcIIyatauHn HO BCE XpyNKn. Pp npoBeJeHH TeHXueckoro O6cIyHKBaHnO6paaTaTeCb C HmOCTOpOJHo.
- CHMNTe KpbIuKy KpbIbYaTKn.ДЯ 3TOrO NOTAHTE 3a Ra3bHOK n AKKypaTHo ero NOJ- DeHbTe.
- Ecn Tpe6yETcOuHCTKa KpbIbUaHTKn, BO3bMNTecb 3a BEHTnIaTOp n OCTopoXHO H3BLeKNTe n3 rHe3a.CnoIOCHNte DeTaJb B uCToB BOe.
- Ecn Tpe6yeTc8 ouHCTKa rHe3da, octopoXHO NOUHCTHTe erC NOMOu HIO uHCTaueI eTkn Flualval.
- YctahOBITE KpbIbUaTKY B rHe3do.ДЯ 3TORO CmCTNe TReBIOK HA KpbIbIe KpbIbUaTKN B DEpXaTeJIb IaBlyIcKa Ha KpOMKe KamepeIb KpbIbUaTKn. HAdABte HA IpOTINBOIOnIOKHyTO qACTb KpbIbIK N KpbIbUaTKn, y6eINBUnCb TOM, qTO KpbIbUaTKa pa3MeCTnAcb NO CEHTpy KpbIuKN. IpoJIoJIkaTe HAdABInBaTb Do Tex nop, pOKa He pa3DaCTcR IeJIHOK 3AmbIKAIO-UIero RaBlyIcKa, CBnTeJIbCTByIOuN O OIKCaUN DeTaN B HxHOM NIOJOKeHN.
PIMMEYAHNE. Kepamueckn BaI KpbIbuaTKn ydepknBaetcB HnHexn qactn rHe3da KpbIbUaTK n NOMOsbIO pe3HHOBOnOpbl.BaI MOHNO IERKO nBLeuepyko IN BCTaBtNb o6paTHo.HBHNMaTeJbHO CLEINTE 3a TEM, YTO6blpe3HHOBaONopa OCTaBaNac Ha CBOEM MeTe. (BcerdaYCTaHABINBaHTe HA MecTo KpbIuKy KpbIbuaTKn, YTO6bl ObecneuNTb npabInbHoce COBMeueHne).
Co BpeMeHem KpbIbuaTka 6yTeN 3HaWnBaTbca. 3aNaChyO DeTaJIb MoXHO 3aKa3aTb, o6paTINB Wncb K MeCTHOMy DInepy Fluval NnB OToDen 0cbnyKunBaHHa KNHeHTOB FlUval /Rolf C.Hagen Inc.
Y3eI NOKauKN BODbI
Obaaem Baue BHMaHne Ha To, yTo pyKoTky 3la noKaUBObMoXHO 3aMeHrToB TOnbKO B Clyae NOIOMKn CTepHH nnpyKoRTkn.
Ipepe6otka
Ha 3To H3dJIeH He HHeCn CmB0n pa3dJIbHOcOpTnOBKn OTXoIOB 3JeKTPnueCKOrO IN3JeKtpOHOrO 6OpUdoBaHn (WEEE). 3To O3Haaet, 4To nepepa6OTka nn DEmoHTax 3TOrO 3dJIeNIA DOJXHBIO CYAeCTBnTBC B COOTBeCTBn C Tpe6oBaHnAMn EBponeckoi DupeKTNBbl 2012/19/EC, 4To6bl CBecTN K MNHNMy My erO 8O3dEChTBne Ha OKpyKaiouOy CupeNy. 3a NHCTpyKzIaMn No HAdNeJaee yTuINHaaun ObaPaaIteCB B MeCTHOe AREHTCTBO NO OxpaHe
okpykaioe cpebl nIIN nepedaIte n3dJIe N B OphiunalbHO 3aperncTpnpoBaHbMyHUnnabHbN nyHKTc6opa oTxOIOB.
3neKtpOHbIe H3dJIIN, He BkHIOUeHHbIe B IPOuecc pa3deIbHO copTIPOBKn, NOTeHuaJIbHO onaChbl dIg OKpyKaIOUe Cpebl 3doPobBra YcIOBeka H3-3a HANuONaCHbIX BeueCTB.
BONPOCbl
Ecn y BAC BO3HKnBONpOcbl 6n3dennnnn Bam Heo6xOummb 3aNaChbte deTann, Chauana o6paTntecb 3a KOHCyIbTaunne K MeCTHOMy po3HNHOMy npoabuy o6opdyobAHnFluval.
EcnBam HyxHa Texnuecka noDepkka, obaaaiTecb B KomnaHIO Fluval do Bo3bpata n3dJIa B COOTBeTCTBm C rapaHTnHBIMN yCIOBnMn. BolbunctBO BOpocOB MOHO peWntb 6e3 npomeJenHra B TelefoHOM pexHMe. INo BO bI MOKeTe TAKHe ObaPITbcr K Ham no aDpecy: www.fluvalaquatics.com.
Ha haem Be6-caTe TaKHe NMeetc NoDpo6HbI pa3dE BonpocOB n OTBeTob, rDe MoJHo HaHTn NOJIe3Hbe OTBeTbI Ha cacto 3aDaBaemble BONPOcB I BNdeO3anNC C npaKTNUeCKMn COBETAMN INHCTpyKUmaMn.
Baie-D'Urfe, Quebec H9X 0A2
Tel: 514-457-0914
USA
Rolf C. Hagen (USA) Corp.
305 Forbes Blvd.
Mansfield, MA 02048
Tel: (800) 724-2436
UK
Rolf C. Hagen (UK) Ltd.
California Drive
Whitwood Industrial Estate,
Castleford WF10 5QH
West Yorkshire
Tel: 01977 521015
GERMANY