imagePRESS C10000VP - Controller CANON - Free user manual and instructions
Find the device manual for free imagePRESS C10000VP CANON in PDF.
| Technical Features | Canon imagePRESS C10000VP print controller, designed for high-quality printing. |
|---|---|
| Print Resolution | 1200 x 1200 dpi |
| Print Speed | 100 pages per minute in color and black and white. |
| Supported Paper Sizes | A4, A3, SRA3, and various custom sizes. |
| Feed Capacity | Up to 10,000 sheets with multiple feed trays. |
| Usage | Ideal for commercial and production printing environments. |
| Maintenance | Regular maintenance recommended, with maintenance kits available. |
| Security | Advanced security features to protect print data. |
| Consumables | Uses specific Canon toners for optimal performance. |
| Dimensions | Compact dimensions suitable for workspaces. |
| Weight | Approximately 300 kg, requiring a sturdy support. |
| General Information | Product designed for intensive use, with technical support available. |
Frequently Asked Questions - imagePRESS C10000VP CANON
User questions about imagePRESS C10000VP CANON
0 question about this device. Answer the ones you know or ask your own.
Ask a new question about this device
Download the instructions for your Controller in PDF format for free! Find your manual imagePRESS C10000VP - CANON and take your electronic device back in hand. On this page are published all the documents necessary for the use of your device. imagePRESS C10000VP by CANON.
USER MANUAL imagePRESS C10000VP CANON
Read this guide first.
Please read this guide before operating this product. After you finish reading the guide, store it in a safe place for future reference.
Guide rapide
Auto Gradation Adjustment for Various Paper Types
The Auto Adjust Gradation function adjusts the gradation, density, and colour tone of images, and only requires you to scan the test page. This function can be used for various weights of paper so that a high quality print result can be obtained in different paper types.
"Adjustment for Image Quality and Finishing (Calibration)" in the User's Guide
Achieve High Quality Colour Reproduction with Auto Colour Tone Correction
Compared to the Auto Adjust Gradation function, which adjusts CMYK, the Auto Correct Colour Tone function adjusts mixed colours that are expressed with multiple toner. By using these functions together, you can perform the precise colour adjustment.
"Adjustment for Image Quality and Finishing (Calibration)" in the User's Guide
Optimum Print Result for Each Paper Type
Paper information, which includes the basis weight, finish, fixing, and curl correction level, can be registered as the paper characteristics. As the detailed information can be specified for each different paper type, you can obtain the fine print result with considering the paper characteristics. This function is also effective for improving paper conveyance and print quality.
"Paper Type Management" in the User's Guide
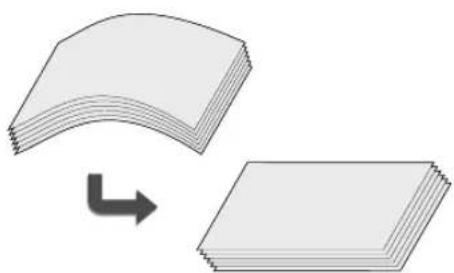
Curl Correction for Stable Paper Conveyance
The machine constantly corrects the paper curl which occurs due to the pressure applied when toner is fixed. Moreover, by correcting the paper curl during outputting, the machine reduces the risk of a paper jam, and achieves the stable paper conveyance. The curl correction can be specified for each paper type you want to use.
"Adjustment for Image Quality and Finishing (Calibration)" in the User's Guide
"Paper Type Management" in the User's Guide
Easy Operation for Adjusting Image Position
You can adjust the image positions easily with this machine. All you need is measuring marks on the test page and then entering the measured values on the touch panel display. After that, the machine will automatically adjust the image positions. You can make the complicated adjustment easily by entering values for each edge of front and back sides on a single screen.

"Paper Type Management" in the User's Guide

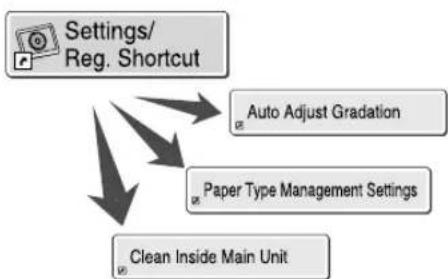
Quick Access to Frequently Used Settings
Different settings are required, depending on the printing purpose or paper types, but accessing setting items located in various menus every time is a quite complicated operation. In this case, register frequently used settings in "Settings/Registration Shortcut" button. You can directly access to the setting screen with this button and save the effort to search necessary setting items.

"Settings/Registration" in the User's Guide
Alternative Settings for Your Needs, "Productivity" or "Quality"
You can set a priority to either print productivity or image quality. For instance, select "Productivity Priority" when printing a large number of documents to achieve speedy printing. On the other hand, select "Quality Priority" when printing documents which contain many pictures to obtain precisely printed images. This function can be set for each paper type to suit your various needs for printing.

"Settings/Registration" in the User's Guide
Contents
Thank you for purchasing this Canon product. Please read this manual thoroughly before operating the machine to familiarize yourself with its capabilities, and to make the most of its many functions. For more information on the detailed settings for the functions, see the User's Guide. After reading this manual, store it in a safe place for future reference.
Important Safety Instructions 6
Installation 6
Power Supply. 9
Handling 10
Maintenance and Inspections. 14
Consumables 15
Safety-Related Symbols 16
Parts and Their Functions 17
External View 17
Internal View (Marking Engine) 18
Internal View (Fixing Station) 19
Control Panel (Upright Control Panel-F1) OPTION 20
Status Monitor/Cancel Screen 22
How to Turn ON the Main Power 23
Turning ON the Main Power 23
Shutting Down the Machine 24
Loading Paper 25
Available Paper. 25
Registering Paper Types in the Paper Database 27
Loading Paper into the Paper Deck 28
Selecting Paper Types from the Paper Database 31
Cleaning and Maintenance 33
Cleaning the Platen Glass 33
Cleaning the Original Scanning Area 33
Cleaning the Feeder 34
Automatic Feeder Cleaning 35
Cleaning the Inside of the Main Unit 35
Refreshing the Fixing Roller 36
Cleaning the Touch Panel Display 36
Inspection of the Breaker 37
Consumables 39
Troubleshooting 41
Clearing Paper Jams and Staple Jams 41
Reducing the Frequency of Paper Jams 41
When an Error Message Is Displayed 42
Contacting Your Local Authorized Canon Dealer 43
If the Main Power Does Not Turn ON 44
If Memory Becomes Full 44
Specifications 45
Symbols Used in This Manual


IMPORTANT
NOTE
OPTION
Indicates a warning concerning operations that may lead to death or injury to persons if not performed correctly. To use the machine safely, always pay attention to these warnings.
Indicates a caution concerning operations that may lead to injury to persons if not performed correctly. To use the machine safely, always pay attention to these cautions.
Indicates operational requirements and restrictions. Be sure to read these items carefully to operate the machine correctly, and avoid damage to the machine or property.
Indicates a clarification of an operation, or contains additional explanations for a procedure. Reading these notes is highly recommended.
Indicates an optional product which can be used with this machine.
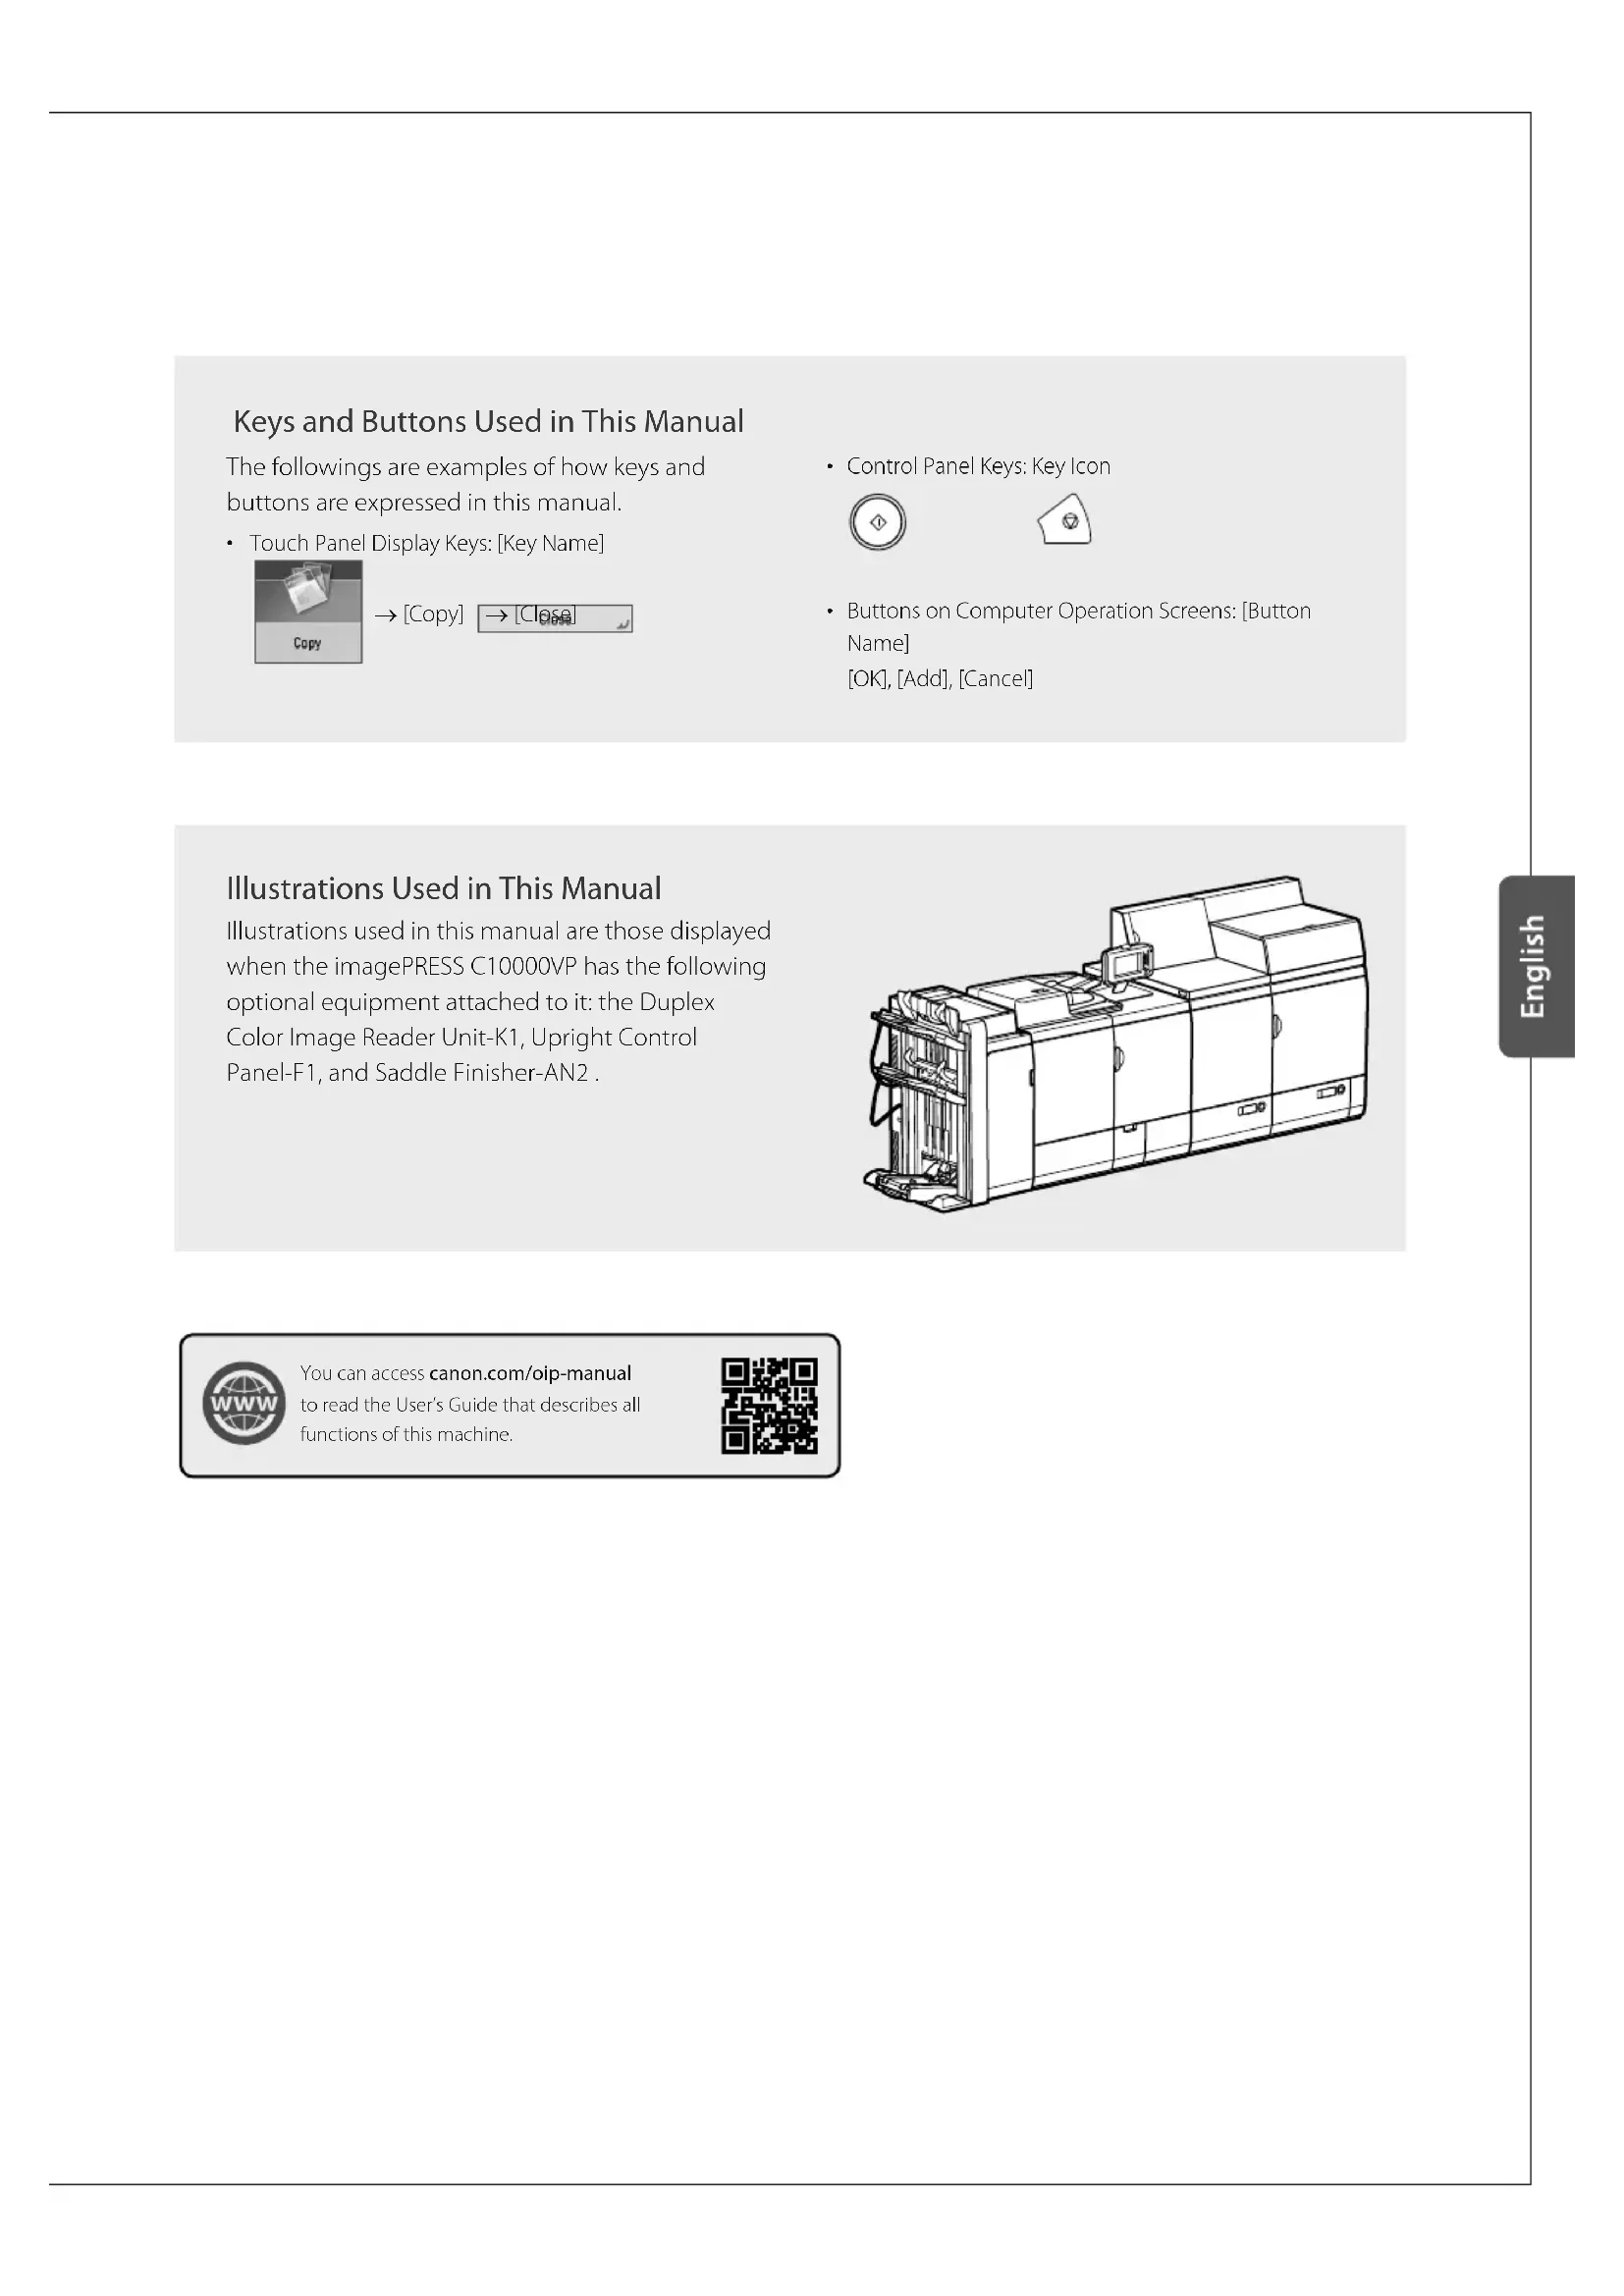
Keys and Buttons Used in This Manual
The followings are examples of how keys and buttons are expressed in this manual.
- Touch Panel Display Keys: [Key Name]
[Copy]

Control Panel Keys:Key Icon


- Buttons on Computer Operation Screens: [Button Name]
[OK], [Add], [Cancel]
Illustrations Used in This Manual
Illustrations used in this manual are those displayed when the imagePRESS C10000VP has the following optional equipment attached to it: the Duplex Color Image Reader Unit-K1, Upright Control Panel-F1, and Saddle Finisher-AN2.

You can access canon.com/oip-manual to read the User's Guide that describes all functions of this machine.

Important Safety Instructions
These "Important Safety Instructions" are intended to prevent injury to user or other persons or destruction of property. Please read these instructions thoroughly before operating the machine. Also, since it may result in unexpected accidents or injuries, do not perform any operation unless otherwise specified in the manual. Improper operation or use of this machine could result in personal injury and/or damage requiring extensive repair that may not be covered under your Limited Warranty.
Installation
Read the following installation precautions thoroughly to maintain a comfortable and safe working environment, in areas of machine operation.

WARNING
Do not install the machine in locations where there are risks of a fire or electrical shock
- A location where the ventilation slots are blocked (i.e. by the walls, on the soft surface such as a bed, sofa, or rug)
A damp or dusty location
A location exposed to direct sunlight
A location subject to high temperatures
A location near open flames - A location near alcohol, paint thinner, or other flammable substances
OtherWarnings
- Do not place jewelry and other metal objects, or containers filled with water or liquids on the machine. If these items come into contact with a high-voltage area inside the machine, it may result in a fire or electrical shock.
- Do not use the machine near any medical equipment. Electric waves emitted from the machine may interfere with medical equipment, which may result in a malfunction or personal injury.
- If objects are dropped or spilled inside the machine, immediately turn OFF the main power switch, and disconnect the power cord from the power outlet. Then, contact your local authorized Canon dealer.

CAUTION
Do not install the machine in unstable locations
Installing the machine in the following locations my cause the machine to fall or tip over, resulting in personal injury.
An unsteady platform
A location subject to excessive vibrations
Do not remove the leveling feet
Do not remove the machine's leveling feet after the machine has been installed, as this may cause the machine to fall or tip over, resulting in personal injury.
Avoid installing the machine at high altitudes of about 3,000 metres above sea level, or higher.
Machines with a hard disk may not operate properly when used at high altitudes of about 3,000 metres above sea level, or higher.
Avoid installing the machine near computers or other precision electronic equipment.
Electrical interference and vibrations generated by the machine while printing can adversely affect the operation of such equipment.
Avoid installing the machine near televisions, radios, or similar electronic equipment.
The machine might interfere with sound and picture signal reception. Insert the power plug into a dedicated power outlet, and maintain as much space as possible between the machine and other electronic equipment.
IMPORTANT
Do not install the machine in the following locations
- A location subject to rapid changes in temperature and humidity
- A location near equipment that generates magnetic waves or electromagnetic waves
- A location where chemical reactions occur, such as a laboratory
- A location exposed to corrosive gas or toxic gas
- A location where the floor may be warped due to the weight of the machine, such as on a carpet
Avoid poorly ventilated locations
This machine generates a slight amount of ozone etc. during normal use. Although sensitivity to ozone etc. may vary, this amount is not harmful. Ozone etc. may be more noticeable during extended use or long production runs, especially in poorly ventilated rooms.
It is recommended that the room be appropriately ventilated, sufficient to maintain a comfortable working environment, in areas of machine operation. In addition, do not install this machine where it exhausts directly onto a person.
Do not install the machine in a location where condensation occurs
If the room where the machine is installed is heated rapidly, or the machine is moved from a cool, dry location to a hot, humid location, water droplets (condensation) may form inside the machine. This may result in paper jams, poor print quality, or a malfunction. To prevent these problems, wait at least two hours before using the machine in order to adapt the machine to the ambient temperature and humidity.
Provide Adequate Installation Space
Provide enough space on each side of the machine for unrestricted operation.
When the Finisher-AN1, Duplex Color Image Reader Unit-K1, Upright Control Panel-F1, and POD Deck-D1 are attached.
When the Two-Knife Booklet Trimmer-A1, Booklet Trimmer-D1, Saddle Finisher-AN2, Paper Folding Unit-J1, High Capacity Stacker-H1 x 2, Perfect Binder-E1, Multi Function Professional Puncher-A1, Document Insertion Unit-N1, Duplex Color Image Reader Unit-K1, Upright Control Panel-F1, and POD Deck-D1/Secondary POD Deck-D1 are attached.
PowerSupply
Plug the machine into an outlet that is 380 to 415 V AC 18 A or greater.

WARNING
- Do not use power supplies with voltages other than those specified herein, as this may result in a fire or electrical shock.
- Do not use power cords other than the provided power cord, as this may result in a fire or electrical shock.
- The provided power cord is intended for use with this machine. Do not connect the power cord to other devices.
- Do not damage, modify, pull on, or excessively bend the power cord. Also do not place heavy objects on the power cord, as this could cause electrical damage and result in a fire or electrical shock.
-
Do not connect or disconnect the power plug with wet hands, as this may result in electrical shock.
-
Do not connect the power cord to a multiplug power strip, or do not use extension cords, as this may cause a fire or electrical shock.
- Do not bundle up or tie the power cord in a knot, as this may result in a fire or electrical shock.
- Insert the power plug completely into the power outlet, as failure to do so may result in a fire or electrical shock.
- When there is thunder and lightning, disconnect the power plug from the power outlet, as failure to do so may result in a fire, malfunction, or electrical shock.

CAUTION
- Do not connect any unauthorized optional products to the outlet for connecting optional products, as this could result in a fire or smoke.
IMPORTANT
Power supply connection
- Do not connect the power cod to an uninterrupted power source.
- If the machine is connected to the power outlet with multiple sockets, do not use the remaining sockets to connect other devices.
- It is recommended that the power outlet wired to an indoor circuit breaker is used.
-
When disconnecting the power cord, wait at least 5 seconds before connecting the power cord again.
-
Install this machine near the power outlet and leave sufficient space around the power plug so that it can be unplugged easily in an emergency.
OtherPrecautions
Electrical noise and excessive voltage drop may cause a malfunction or loss of data in the machine and computers.
Handling

WARNING
- If the machine makes strange noises, or gives off smoke, heat, or strange smells, immediately turn OFF the main power switch, and disconnect the power cord from the power outlet. Then, contact your local authorized Canon dealer. Continued use of the machine in this condition may result in a fire or electrical shock.
-
Do not attempt to disassemble or modify the machine. There are high-temperature and high-voltage components inside the machine, and contact with those components may result in a fire or electrical shock.
If you are using a cardiac pacemaker and feel abnormalities, please move away from the product immediately. This product emits low level magnetic flux. -
Do not use highly flammable sprays near the machine. If gas from these sprays comes into contact with the electrical components inside the machine, it may result in a fire or electrical shock.
- When moving the machine, always turn OFF the main power switch, disconnect the power plug from the power outlet, and then unplug the interface cable. Otherwise, the power cord or interface cable may be damaged, resulting in a fire or electrical shock.

CAUTION
- Do not place heavy objects on the machine, as they may fall or tip over, resulting in personal injury.
- For your safety, disconnect the power cord when the machine will not be used for an extended period of time.
- When opening and closing covers, be careful not to get your hands caught, as this may result in personal injury.
- Keep your hands, hair, clothing, etc. away from the rollers in the output area, as your hand, hair, or clothing may get caught in the rollers which may result in personal injury.
- In order to prevent burns, do not touch the fixing transport unit and its surroundings and output area when using the machine, as these areas are very hot during use. Also, be careful when handling printed paper as it may be hot especially during continuous printing.
-
Paper that has just been output from the machine may be hot. Be careful when removing or aligning paper from the output tray. Touching paper right after it is output may result in low-temperature burns.
-
Do not press down the feeder forcefully when using the platen glass to make copies of thick books. Doing so may damage the platen glass and result in personal injury.
- Close the feeder gently to avoid catching your hands, as this may result in personal injury.
- Be careful not to put your hands or fingers into the feeder. Otherwise, you may be injured.

- Be careful not to drop heavy object, such as a dictionary, on the platen glass. Doing so may damage the platen glass and result in personal injury.
- There are high-voltage components inside the machine. Do not touch the labeled component and its surroundings when removing jammed paper or inspecting the inside of the machine, as doing so may result in an electrical shock.
Paper drawer (only for products with a paper drawer)
- Do not insert your hand into the machine while the paper drawer is removed, as this may result in personal injury.
Energy Saver key (only for products with an Energy Saver key)
- Press (Energy Saver) for safety when the machine will not be used for a long period of time, such as overnight. Also, turn OFF the main power switch, and disconnect the power cord for safety when the machine will not be used for an extended period of time, such as during consecutive holidays.
Finisher (only for products with a finisher)
- Do not place your hands in the part of the tray where stapling is performed (near the rollers), especially pay careful attention to the sharp staples, as this may result in personal injury.
Laserbeam
The laser beam can be harmful to human bodies. Since radiation emitted inside the product is completely confined within protective housings and external covers, the laser beam cannot escape from the machine during any phase of user operation. Read the following remarks and instructions for safety.
- Never open covers other than those instructed in the manuals for this machine.
Controlling, adjusting, or operating the machine in ways not mentioned in the manuals for this machine may cause dangerous radiation to escape from the machine. If the laser beam escapes from the machine, exposure may cause serious damage to your eyes.
IMPORTANT
- Follow the instructions in the caution label attached to the machine.
- Do not shake the machine or do not apply shock to the machine.
- Do not forcibly open and close covers and other parts of the machine. Doing so may result in damage to the machine.
During printing, do not turn OFF the main power, open and close covers, or load and remove paper, in order to prevent a paper jam. - Do not use this product for uses other than as a colour digital multitasking machine.
Transporting the machine
If you intend to move the machine over a long distance, contact your local authorized Canon dealer beforehand. Do not attempt to move the machine yourself.
■Maintenance and Inspections
Clean this machine regularly. The machine may not operate properly if dust accumulates. Make sure to read the followings when cleaning the machine.

WARNING
- When cleaning the machine, first turn OFF the main power switch, then disconnect the power cord. Failure to observe these steps may result in a fire or electrical shock.
- Clean the machine using a cloth which is wrung after being damped in water. Do not use alcohol, benzene, paint thinner, or other flammable substances. Do not use tissue paper or paper towels. If these substances come into contact with a high-voltage area inside the machine, it may result in a fire, electrical shock, or generating of static electricity.
- Disconnect the power cord from the power outlet regularly, and clean the area around the base of the power plug's metal pins and the power outlet with a dry cloth to ensure that all dust and grime is
removed. If the power cord is connected for a long period of time in a damp, dusty, or smoky location, dust can build up around the power plug and become damp. This may cause a short circuit and result in a fire.
- Check the power cord and power plug regularly to see if there are any excessive heat generation, rust, deformation, scratches, or cracks. Using the power cord and power plug under these conditions may result in a fire or electrical shock.

CAUTION
-
If a paper jam occurs, follow the instructions displayed on the touch panel display to remove any jammed paper from inside the machine. Make sure to remove any piece of paper inside the machine. Do not insert your fingers into any parts not indicated on the touch panel display, as doing so may result in personal injury or burns.
-
When loading paper or removing jammed paper, take care not to cut your hands or injure yourself on the edges of the paper.
IMPORTANT
When removing jammed paper or replacing the toner cartridge, take care not to allow the toner to come into contact with your hands or clothing, as this will dirty your hands or clothing. If toner gets onto your hands or clothing, wash it off immediately with cold water. Washing it off with warm water will set the toner, and make it impossible to remove the toner stains.
Consumables

WARNING
If you accidentally spill or scatter toner, carefully wipe up the loose toner with a damp, soft cloth and avoid inhaling any toner dust. Do not use a vacuum cleaner that is not equipped with safety measures to prevent dust explosions to clean up loose toner. Doing so may cause damage to the vacuum cleaner or result in a dust explosion due to static discharge.
- Do not burn or throw toner cartridges in open flames. Do not store toner cartridges in places exposed to open flames.

CAUTION
- Be careful not to inhale toner. If toner is inhaled, consult a physician immediately.
- Be careful not to allow toner to get into your eyes and mouth. If toner gets into your eyes or mouth, wash them immediately with cold water and consult a physician immediately.
-
Be careful not to allow toner to directly touch your skin. If toner touches your skin, wash it away with soap and water. If your skin still feels irritated after washing it, consult a physician immediately.
-
Keep toner and other consumables out of the reach of small children. If these items are ingested, consult a physician immediately.
- Do not dismantle the toner cartridge, as doing so may cause toner to fly out.
IMPORTANT
When discarding used toner cartridges
Put the used toner cartridges into a bag to prevent the toner remaining inside the cartridges from scattering, and dispose of them in a location away from open flames.
Safety-RelatedSymbols
Power switch:"ON" position
Power switch:"OFF" position
Power switch: "STAND-BY" position
Push - push switch "ON" "OFF"
Protective earthing terminal
Dangerous voltage inside. Do not open covers other than instructed.
CAUTION: Hot surface. Do not touch.
Class II equipment
Moving parts: Keep body parts away from moving parts
NOTE
Some of symbols shown above may not be affixed depending on the product.
Parts and Their Functions
This section provides you with the names and functions of all the parts of the machine. The keys and display on the control panel are also described. Read this section to use the machine's various functions smoothly.

"Optional Products" in the User's Guide
ExternalView
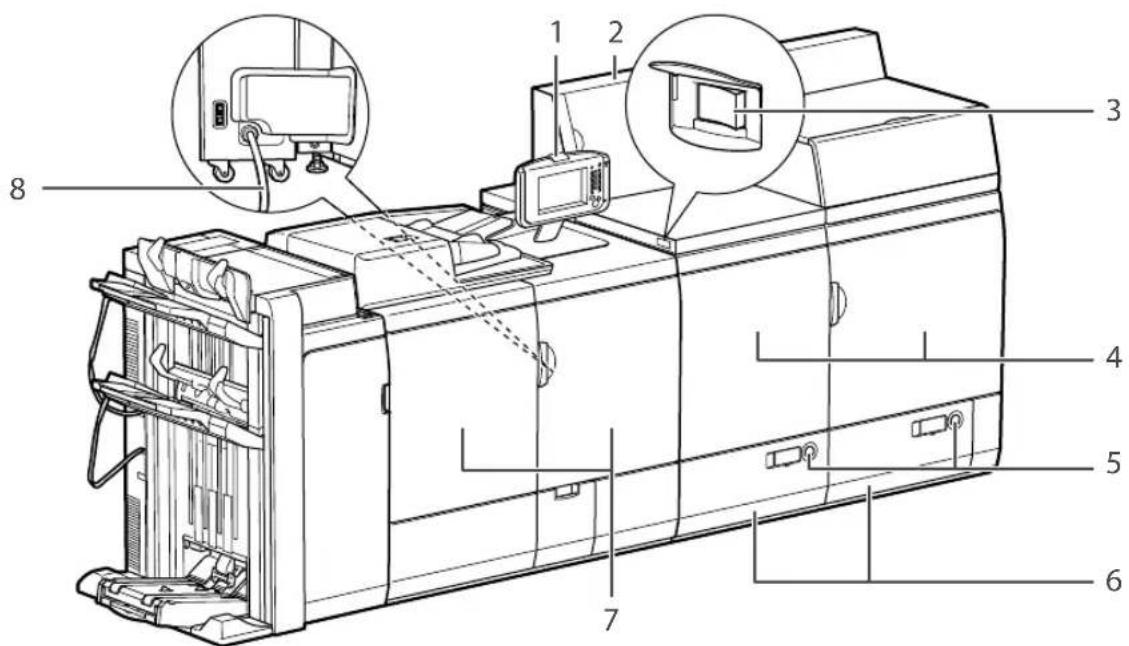
1Upright Control Panel-F1
Includes the keys, touch panel display, and indicators required for operating the machine.
2Power Supply Unit
Provides power to the marking engine and fixing station.
3Main Power Switch
Press to the "l" side to turn the power ON.
4Marking Engine Front Right Cover/Front Left Cover
Open these covers to clear a paper jam inside the marking engine.
5 Open Button
Press to open the paper deck when you need to load paper or check for a paper jam.
The paper supply indicator enables you to check the amount of paper remaining in the paper deck.
6Right/Left Paper Deck
Holds up to 1,000 sheets of paper (80 g/m²) for each paper deck.
7Fixing Station Front Right Cover/Front Left Cover
Open these covers to clear a paper jam inside the fixing station.
8Power Cord
Supplies power from an AC outlet to the main unit and Duplex Color Image Reader Unit-K1 (option).
Internal View (Marking Engine)
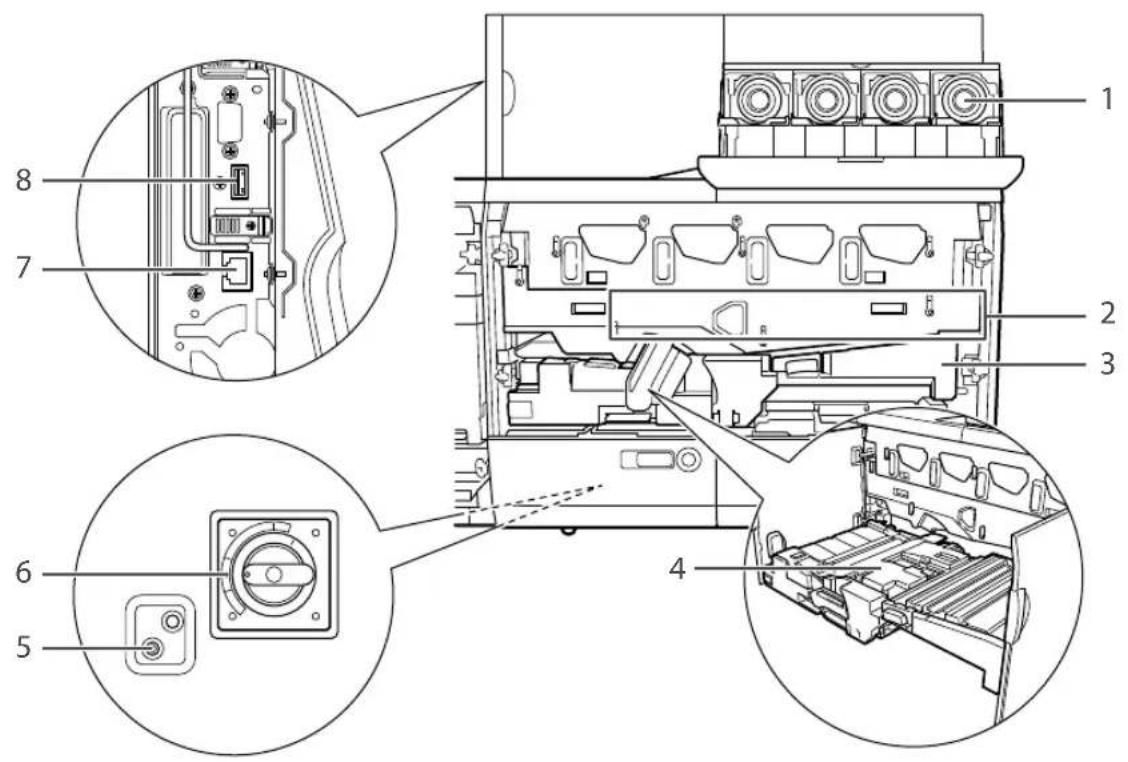
1Toner Cartridge
Open the cover to replace the toner cartridge.
2ITB (Intermediate Transfer Belt)
Transfers the toner to the paper.
3Feeding Unit
Delivers paper that is fed from the paper deck to the fixing station via the toner transfer position. Also, the Feeding Unit delivers paper from the fixing station when the 2nd side of 2-Sided pag mode is set. Pull out this unit to clear a paper jam inside the unit.
4Skew Correction Roller
Compensates for paper skewing or dispersion of side edges.
5Test Button
Located on the back of the power supply unit. Press this button to periodically test the circuit breaker.
6Breaker
Located on the back of the power supply unit. Detects excess current or leakage current.
7Network Connector
Located on the upper left area of the marking engine. This port supports 1000/100/10 BASE-T. Use this port to connect the machine to the network (imagePRESS Server).
8USB Connector
Located on the upper left area of the marking engine. This connector is not normally used as it is for service representatives.
Internal View (Fixing Station)
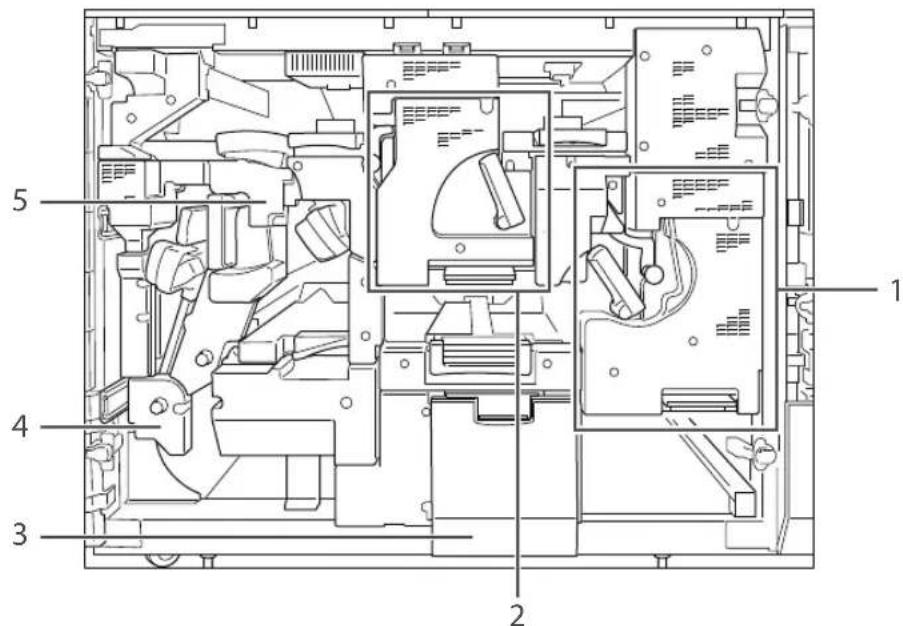
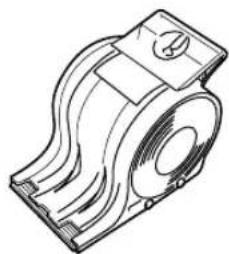
1 Primary Fixing Assembly
Fixes toner that has transferred to paper. Pull out the primary fixing unit to clear a paper jam inside the assembly.
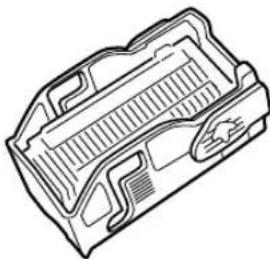
2Secondary Fixing Assembly
Some paper types need to pass through the secondary fixing assembly after passing through the primary fixing assembly to fix the toner securely. Pull out the secondary fixing unit to clear a paper jam inside the assembly.
3Waste Toner Container Tray
Pull out this tray to replace the waste toner container.
4Reverse Unit
Reverses paper and returns it to the marking engine when performing two-sided printing. This unit also reverses paper to output the printed side face up or down according to the Face Up/Face Down mode settings.
Pull out the delivery/reverse unit to clear a paper jam inside the unit.
5Decurler Unit
Corrects paper curling caused by heat. Pull out this unit to clear a paper jam inside the unit.
Control Panel (Upright Control Panel-F1) OPTION
1 Processing/Data Indicator
Blinks green when the machine is performing operations, and maintains a steady green light when received data is stored in memory.
2Error Indicator
Blinks or lights if there is an error in the machine. When the Error indicator blinks, follow the instructions that appear on the touch panel display. When the Error indicator maintains a steady red light, contact your local authorized Canon dealer.
3Settings/Registration key
Press to register and specify settings.
4Energy Saver key
Press to set the Energy Saver mode or Sleep mode. The mode activated after pressing the Energy Saver key can be selected beforehand. This key lights when the machine enters either mode. To reactivate the machine, press this key again.
5Counter Check key
Press to display the copy and print count totals.
6Numeric keys
Press to enter numerical values.
7Clear key
Press to clear entered values or characters.
8Main Power Indicator
Lights when the main power is turned ON.
9Edit Pen
Use when operating the touch panel display, such as to enter characters.
10 Stop key
Press to stop a job in progress.
11 Start key
Press to start an operation, such as scanning or copying.
12 Reset key
Press to restore the standard settings of the machine.
13 ID (Log In/Out) key
Press to log in/out when a login service such as Department ID Management has been set.
14 Touch Panel Display
The settings screen for each function is shown on this display.
15 Brightness Adjustment Dial
Use to adjust the brightness of the touch panel display.
16 Volume Settings key
Press to display the screen to specify the audible tones.
17 Status Monitor/Cancel key
Press to check the status of jobs or to cancel print jobs. Also, press to check status of the machine, such as checking the amount of paper remaining.
18 Quick Menu key
Press to retrieve favorite functions stored in Quick Menu. Also, if you are using authentication, Quick Menu set for each individual user can be displayed.
19 Main Menu key
Press to return to the Main Menu screen, such as when you want to switch functions.

Setting the Energy Saver mode/Sleep mode to minimize energy consumption
You can save energy consumption by using the Energy Saver mode/Sleep mode when the machine is not being used for a prolonged period of time, such as a lunch time. To use these modes, press [Energy Saver] after pressing on the control panel. If the machine is idle for a certain period of time, the machine will enter the Sleep mode (Auto Sleep mode). For more information on the mode which activates after is pressed, and detailed information on the Auto Sleep mode, see the User's Guide.
"Basic Operations" > "Energy Saving Features" in the User's Guide
Status Monitor/Cancel Screen
If you press the Status Monitor/Cancel screen appears, and you can confirm the status of jobs and consumables on this screen. By obtaining information, such as the completion time of the current job or the amount of paper remaining, you can perform smooth printing operation without interruption.

useful situations
- When you want to know the completion time of jobs
- When you want to check the amount of paper remaining for efficient paper loading
- When you want to cancel a job which is registered by mistake
[Job] screen
The [Job] screen enables you to check the status of jobs in the job list. On this screen, you can cancel a job in progress and change the order of waiting jobs to print your job prior to others.
![CANON imagePRESS C10000VP - [Job] screen - 1](/content/2026/03/445125/images/6a9d58c4017f2d7bb720c5a2702e346d29021775563341ac324dabecfa30fa0c.jpg)
[Paper] screen
You can check the paper information and the remaining amount of paper in all paper sources. You can also specify the paper type for each paper source in [Paper Settings].
![CANON imagePRESS C10000VP - [Paper] screen - 1](/content/2026/03/445125/images/bb25e5f1d611825a227957b15ac7d00072107e58d8673c59df62d4a9d1c40d06.jpg)
[Toner/Other] screen
The remaining amount of toner is displayed in illustrations. You can also check the remaining amount of staples, the amount of punch waste, and the percentage of memory usage.
![CANON imagePRESS C10000VP - [Toner/Other] screen - 1](/content/2026/03/445125/images/a9cbd4fe996100b4dca7f912968d786022e8b447b535eed6f57317f5361b45a4.jpg)
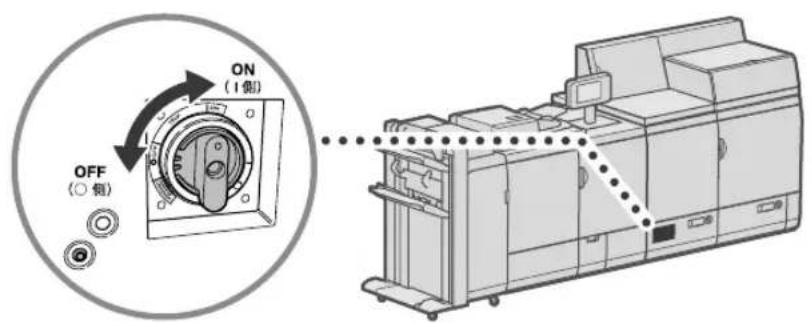
How to Turn ON the Main Power
This section explains how to turn ON the main power.
Turning ON the Main Power
Make sure that the power plug is firmly inserted into the power outlet, and the breaker is turned ON.
1 Open the main power switch cover.
2 Press the main power switch to the "||" side.
- The main power indicator on the control panel lights.
IMPORTANT
If you want to turn ON the main power again, wait for at least 10 seconds after the main power and the main power indicator are turned OFF.
NOTE
The response of the keys and buttons may not be optimal immediately after turning ON the main power of the machine.
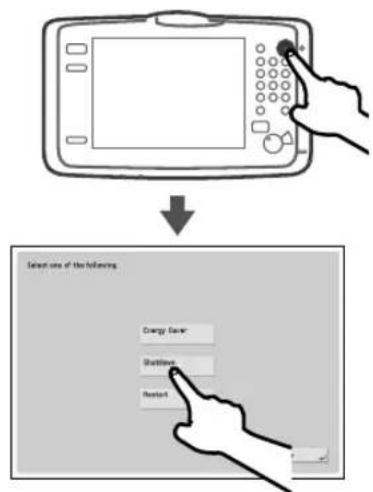
Shutting Down the Machine

Do not turn OFF the main power in the following situations
- When using the I-Fax function
- When the message
is displayed - When operating scan or print function
1
Press


2
Press [Shutdown].
- The main power indicator on the control panel turns OFF.
LoadingPaper
Load paper by following the procedure below. In this section, A4 custom size paper is used as an example.
Confirmation
Confirm the paper types that can be loaded.
"Available Paper," on p. 25
Preparation
Register all paper types you are going to use.
"Registering Paper Types in the Paper Database," on p. 27
Operation
Load paper in the paper deck.
"Loading Paper into the Paper Deck," on p. 28
Registration
Specify the loaded paper size and type for the paper deck.
"Selecting Paper Types from the Paper Database," on p. 31
AvailablePaper
This section describes the available paper for this machine. Paper that can be loaded differs, depending on the paper sources. The following description includes the optional products as well as the standard paper decks. The optional products are indicated with OPTION icon.
Basic Operations" > "Available Paper Stock" in the User's Guide
Paper Deck of the Main Unit
Paper Capacity Left and right decks: 1,000 sheets (80 g/m ^2 ) each
PaperType Thin 1 to 2, Plain, Heavy 1 to 8, Colour, Recycled 1 to 3, Pre-Punched 1 to 2, Transparency, Clear Film, Translucent Film, Labels, Tab 1 to 2, Bond, 1-Sided Coated Thin, 1-Sided Coated 1 to 9, 2-Sided Coated Thin, 2-Sided Coated 1 to 9, Matte Coated Thin, Matte Coated 1 to 9, Textured 1 to 7, and Vellum 1 to 2
Paper Size 330 mm x 483 mm, 320 mm x 450 mm (SRA3), 305 mm x 457 mm, A3, A4, A4R, and Custom Size (182 mm x 182 mm to 330.2 mm x 487.7 mm)
POD Deck-D1/Secondary POD Deck-D1 OPTION
Paper Capacity Upper and middle decks: 1,000 sheets (80 g/m ^2 ) each, lower deck: 2,000 sheets (80 g/m ^2 )
Paper Type Thin 1 to 2, Plain, Heavy 1 to 8, Colour, Recycled 1 to 3, Pre-Punched 1 to 2, Transparency, Clear Film, Translucent Film, Labels, Tab 1 to 2, Bond, 1-Sided Coated Thin, 1-Sided Coated 1 to 9, 2-Sided Coated Thin, 2-Sided Coated 1 to 9, Matte Coated Thin, Matte Coated 1 to 9, Textured 1 to 7, and Vellum 1 to 2
Paper Size 330 mm x 483 mm, 320 mm x 450 mm (SRA3), 305 mm x 457 mm, A3, A4, A4R, and Custom Size (182 mm x 182 mm to 330.2 mm x 487.7 mm)
Document Insertion Unit-N1 OPTION
Load paper you want to use as a cover of a booklet in the document insertion unit, such as coated paper.
Paper Capacity Upper and Lower trays: 200 sheets (80 g/m ^2 ) each
Paper Type Thin 1 to 2, Plain, Heavy 1 to 6, Colour, Recycled 1 to 3, Pre-Punched 1 to 2, Tab 1 to 2, Bond, 1-Sided Coated Thin, 1-Sided Coated 1 to 7, 2-Sided Coated Thin, 2-Sided Coated 1 to 7, Matte Coated Thin, Matte Coated 1 to 7, Textured 1 to 7, and Vellum 1 to 2
Paper Size 330 mm x 483 mm, 320 mm x 450 mm (SRA3), 305 mm x 457 mm, A3, A4, A4R, and Custom Size (182 mm x 182 mm to 330.2 mm x 487.7 mm)
LONGSHEETTRAY-A1 OPTION
Paper Capacity 1 sheet (80 g/m)
PaperType Thin 1 to 2, Plain, Heavy 1 to 5, Colour, Recycled 1 to 3, Bond, 1-Sided Coated Thin, 1-Sided Coated 1 to 6, 2-Sided Coated Thin, 2-Sided Coated 1 to 6, Matte Coated Thin, Matte Coated 1 to 6, and Textured 1 to 6
Paper Size Custom Size (210 mm x 487.8 mm to 330.2 mm x 762 mm)
POD Deck Lite-C1 OPTION
Paper Capacity 3,500 sheets (80 g/m ^2 )
Paper Type Thin 1 to 2, Plain, Heavy 1 to 8, Colour, Recycled 1 to 3, Pre-Punched 1 to 2, Transparency, Clear Film, Translucent Film, Labels, Tab 1 to 2, Bond, 1-Sided Coated Thin, 1-Sided Coated 1 to 9, 2-Sided Coated Thin, 2-Sided Coated 1 to 9, Matte Coated Thin, Matte Coated 1 to 9, Textured 1 to 7, and Vellum 1 to 2
Paper Size 330 mm x 483 mm, 320 mm x 450 mm (SRA3), 305 mm x 457 mm, A3, A4, A4R, A5R, and Custom Size (139.7 mm x 182 mm to 330.2 mm x 487.7 mm)
Registering Paper Types in the Paper Database
Register all paper types you are going to use with this machine. You can register paper types by selecting paper types from the Paper Database.
NOTE
If you load paper which is already registered in the machine, such as plain or recycled paper, this step is not necessary. Proceed to the next step "Loading Paper into the Paper Deck".
1 Press
2 Press [Preferences] [Paper Settings] [Paper Type Management Settings].
3 Press [Paper Database].
4 Select the paper type from the list press [OK].
5 Confirm that the selected paper type is displayed in the
- If the desired paper type is not listed in the Paper Database, select and duplicate a paper type that closely matches the characteristics of the desired paper type, and then change the necessary settings.
"Paper Type Management" in the User's Guide
Loading Paper into the Paper Deck
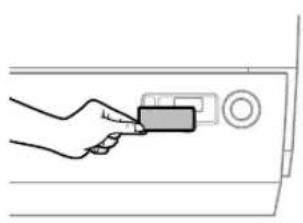
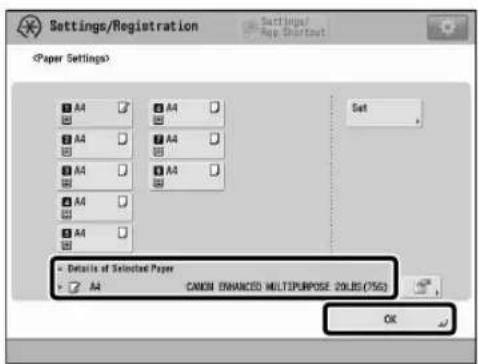
1 Register the paper size for the paper deck at [Paper Settings] in [Preferences] (Settings/Registration).
"Settings/Registration" > "Preferences" > "Paper Settings" > "Registering the Paper Size and Type for a Paper Source" in the User's Guide
![CANON imagePRESS C10000VP - Register the paper size for the paper deck at [Paper Settings] in [Preferences] (Settings/Registration). - 1](/content/2026/03/445125/images/3ce0e209ec191362eb5b5ce58122ec8e8dc9b6524c2528c5f2a547352533c7c1.jpg)
2 Open the paper deck.
Press the button on the paper deck.
Pull out the paper deck until it stops.
- Check that the inside lifter descends to the paper loading position.
IMPORTANT
If the machine is in the Sleep mode (the touch panel is not displayed, and only is lit), you may be unable to open the paper deck. In this case, press to reactivate the machine, and then press the open button on the paper deck.
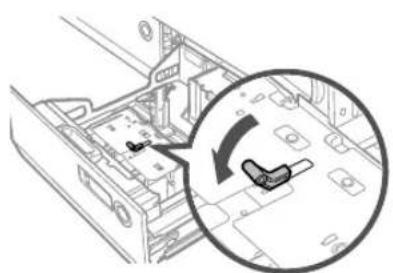
3 Squeeze the lever on the paper holder plate as shown below. Without releasing the lever, slide the paper holder plate until it does not catch on the paper to set.
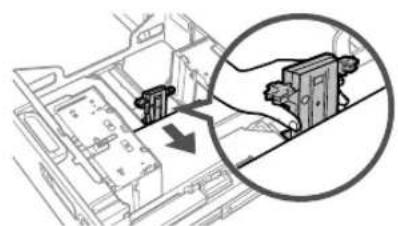
4 Move the size change plates to a position where it does not catch on the paper.
1 Remove the size change plates lock.
Slide the size change plates to a position where it does not catch on the set paper.
5 Adjust the position of the size change plates to align with paper.
1 Set the paper of the target size to approximately 10mm high.
Slide the size change plates (front) and size change plates (back) to match the paper size.
IMPORTANT
- Do not give a strong shock to the paper holder plate when loading paper into the paper deck, as this may result in a malfunction or damage to the machine.
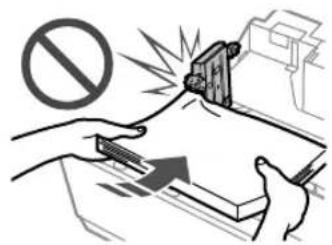
- Adjust the guides correctly to avoid causing a paper jam, dirty prints, or making the inside of the machine dirty.
6 Lock the lever of the size change plate and fix it.
7 Squeeze the lever on the paper holder plate as shown below. Without releasing the lever, slide the paper holder plate to align it with the desired paper size.
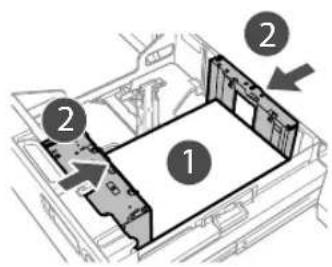
8 Load all remaining paper into the paper deck.
9 Change the paper deck's size plate to match the new paper size.
10 Gently push the paper deck back into the machine until it clicks into place in the closed position.
- The inside lifter automatically rises, and prepares the paper deck for printing.
CAUTION
When returning the paper deck to its original position, be careful not to get your fingers caught, as this may result in personal injury.
NOTE
- Make sure to fan the paper stack, and align the edges before loading paper.
- Curled paper must be straightened out prior to use.
Make sure that the height of the paper stack does not exceed the loading limit mark ( ). - When loading pre-punched paper, transparencies/clear film, and tab paper, make sure to load paper in an appropriate orientation as the paper orientation differs, depending on the paper source.
If there are instructions on the package of paper about which side of the paper to load, follow those instructions. - When the paper is loaded into the paper deck, the side facing down is the one printed on.
If problems occur, such as poor print quality or paper jams, try turning the paper stack over, and reload it. However, you cannot turn the 1-Sided Coated paper over. Change to the new paper.
For more information on the print direction of preprinted paper (paper which has logos or patterns already printed on it), see the User's Guide. - When loading paper, make sure that the height of the paper stack does not exceed 20mm . If the height of the paper stack exceeds 20mm , the edges of the paper stack may become curled or creased, and poor print quality may result.

"Maintenance" > "Loading Paper" in the User's Guide

"Copy" > "Appendix" in the User's Guide
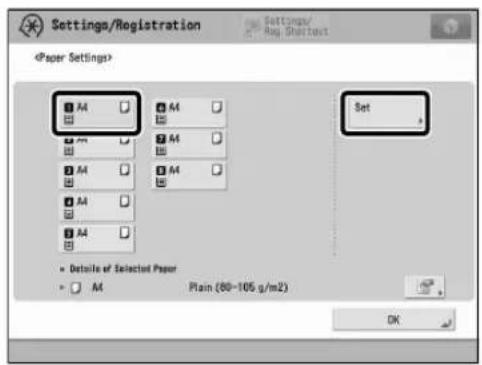
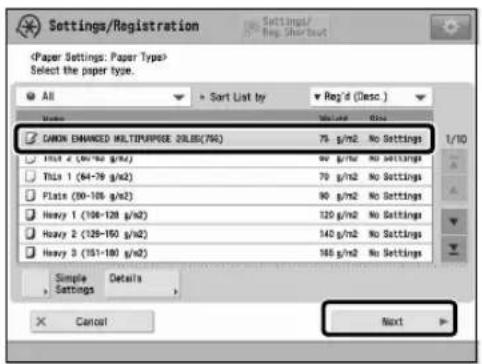
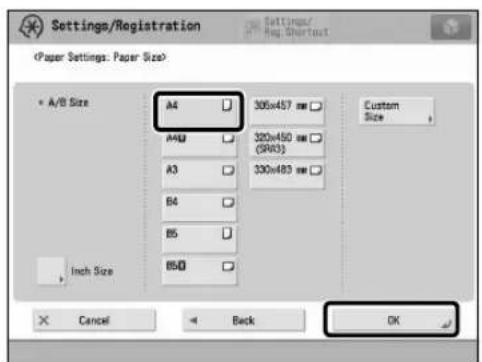
Selecting Paper Types from the Paper Database
Select the loaded paper type from the Paper Database.
1 Press
2 Press [Preferences] [Paper Settings] [Paper Settings].
3 Select the paper deck in which you loaded paper press [Set].
4 Select the same paper type as the one you loaded press [Next].
5 Select the same paper size as the one you loaded press [OK].
- If you load paper other than standard paper, select [Custom Size].
6 Confirm that the selected paper type and size are displayed in
Cleaning and Maintenance
For optimum operation of the machine, we recommend to clean and check the machine regularly.
Cleaning the Platen Glass
If originals cannot be scanned properly, follow the cleaning procedure below. Clean with a cloth which is wrung after being dampened in water, and then clean with a soft and dry cloth. Use the provided glass cleaning cloth for simple cleaning.
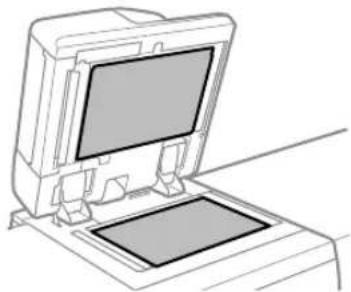
Clean the Platen Glass.
- Clean the platen glass and the underside of the feeder.
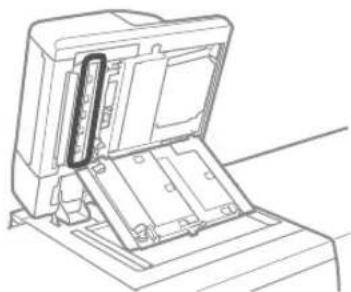
Cleaning the Original Scanning Area
If originals which are fed from the feeder cannot be scanned properly, follow the procedure below.
1 Press
2 Press [Adjustment/Maintenance] [Maintenance] [Original Scanning Area Cleaning Method].
3 Follow the cleaning instructions on the touch panel display.
Cleaning the Feeder
If originals which are fed from the feeder become dirty, follow the cleaning procedure below. Clean with a cloth which is wrung after being dampened in water, and then clean with a soft and dry cloth. Use the provided glass cleaning cloth for simple cleaning.
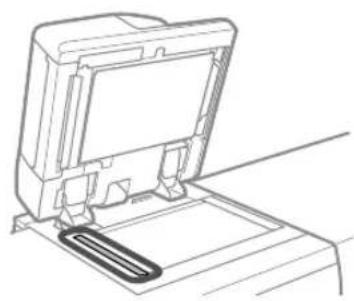
1 Clean the original scanning area.
- Open the feeder and clean the original scanning area (thin glass strip).
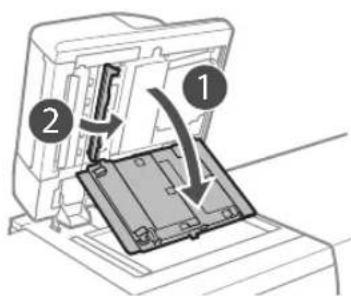
2 Open the covers.
Pull the lever above the feeder, and open the cover.
2 Open the inside cover.
3 Clean the original scanning area of the feeder.
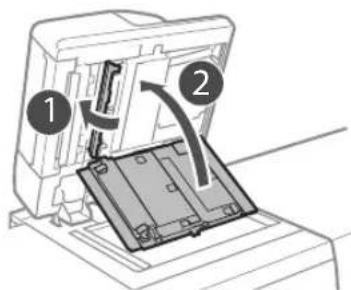
4 Close the covers.
1 Close the inside cover.
2 Close the cover.
Automatic Feeder Cleaning
If originals which are fed from the feeder become dirty, follow the procedure below.
1 Place 10 sheets of blank paper into the feeder.
Use A4 plain paper.
2 Press
3 Press [Adjustment/Maintenance] [Maintenance] [Clean Feeder].
4 Press [Start].
Cleaning the Inside of the Main Unit
If output paper becomes dirty, follow the procedure below.
1 Press
2 Press [Adjustment/Maintenance] [Maintenance] [Clean Inside Main Unit].
3 Press [Start].
NOTE
Similarly perform [Adjustment/Maintenance] [Maintenance] [Clean Wire] and [Adjustment/Maintenance] [Maintenance] [Clean Roller].
Refreshing the Fixing Roller
If streaks appear on the output paper, or gloss unevenness occurs in the high density area of the printed heavy paper, follow the procedure below.
IMPORTANT
This function is displayed only if the settings are made available by your local authorized Canon dealer. Even if this function is displayed, do not allow anyone to change the settings except for the system manager. For more information on changing the settings, contact your local authorized Canon dealer.
1 Press
2 Press [Adjustment/Maintenance] [Maintenance] [Refresh Fixing Roller].
3 Press [Start].
NOTE
The fixing roller is refreshed automatically every several sheets of paper is printed. You can adjust the refresh frequency and time in [Fixing Roller Auto Refresh Level].
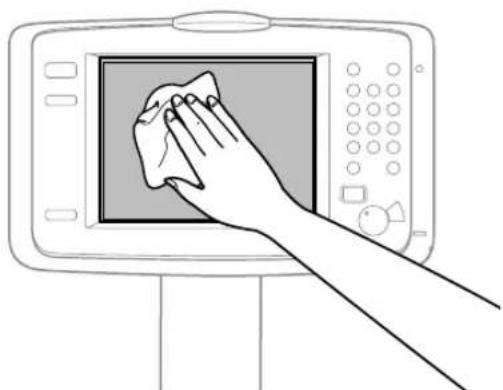
Cleaning the Touch Panel Display
Wipe the touch panel display with a cloth dampened in water or a mild cleaning agent, and then wipe with a soft, dry cloth.
■Inspection of the Breaker
This machine has a breaker that detects excess current or leakage current. Make sure to test the breaker once a month by following the procedure below.
1 Turn OFF the main power.
- Make sure that the main power is turned OFF, before inspecting the breaker.
2 Push the test button located on the rear of the machine.
- Push the test button with the tip of a ball-point pen or a similar object. Briefly push the test button.
3 Confirm that the breaker dial is in the OFF ("Side) position.
- If the breaker dial does not turn to the OFF position, repeat step 2. If the breaker dial does not turn to the OFF position, despite carrying out the above procedure two or three times, contact your local authorized Canon dealer.
4 Turn the breaker dial all the way down until it stops.

5 Turn the breaker dial to ON ("|" side).
6 Turn ON the main power.
Consumables
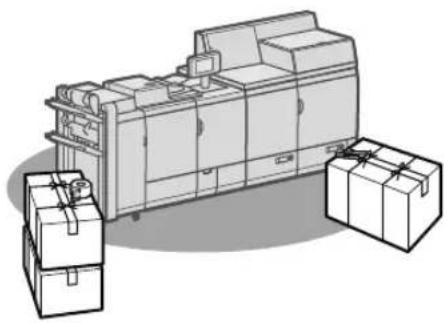
The following consumables are available for this machine. For more information, contact your local authorized Canon dealer. For information on using and storing consumables, see "Consumables," on p. 15.
Recommended Paper
In addition to plain paper, other types of paper stock are available, such as recycled paper, colour paper, transparencies/clear film (recommended for this machine)/translucent film (recommended for this machine), and labels. For high-quality printouts, use paper recommended by Canon.
Toner
If a message prompting you to replace the toner cartridge appears on the touch panel display, replace the used toner cartridge with a new one. For information on how to replace the toner cartridge, see the User's Guide. For optimum print quality, using Canon genuine toner is recommended.
"Maintenance" > "Replacing the Toner Cartridge" in the User's Guide
Supported Canon Genuine Toner
Canon imagePRESS Toner T02 Black
Canon imagePRESS Toner T02 Cyan
Canon imagePRESS Toner T02 Magenta
Canon imagePRESS Toner T02 Yellow


Be careful of counterfeit toners
Please be aware that there are counterfeit Canon toners in the marketplace. Use of counterfeit toner may result in poor print quality or machine performance. Canon is not responsible for any malfunction, accident or damage caused by the use of counterfeit toner. For more information, see canon.com/counterfeit.
Staple Cartridge for the Stapler Unit
The Staple-N1 can be attached to the Finisher-AN1/Saddle Finisher-AN2 for stapling. For information on how to replace the staple cartridge, see the User's Guide.

"Maintenance" > "Replacing the Staple Cartridge (For Optional Products)" > "Replacing the Staple Cartridge in the Stapler Unit (Finisher-AN1/Saddle Finisher-AN2)" in the User's Guide.
Staple-N1
Staple Cartridge for the Saddle Stitcher Unit
The Staple-P1 can be attached to the Saddle Finisher-AN2 for saddle stitching. For information on how to replace the staple cartridge, see the User's Guide.

"Maintenance" > "Replacing the Staple Cartridge (For Optional Products)" > "Replacing the Staple Cartridge in the Saddle Stitcher Unit (Saddle Finisher-AN2)" in the User's Guide.
Staple-P1
GenuineConsumables
Canon continuously develops technology innovations in Canon manufactured Toner, Cartridge, and Parts, specifically designed for use in Canon Multi-Functional machines.
Experience the benefits of optimal print performance, print volume and high quality outputs, achieved through Canon's new advanced technologies. Therefore, the use of Canon genuine consumables is recommended for your Canon Multi-Functional machines.

CANON
Genuine
TONER, CARTRIDGE & PARTS
Troubleshooting
This section explains how to solve problems when paper jam occurs frequently or error messages are displayed. For information on the detailed procedures and precautions, see the User's Guide.
"Problem Solving" in the User's Guide
Clearing Paper Jams and Staple Jams
If a paper jam or staple jam occurs, follow the instructions displayed on the touch panel display to clear the jam. If you press [Close], you can continue operations, such as scanning originals, even if the jammed paper is not removed.
Paper Jam screen
The location of a paper jam is displayed with animations.
Staple Jam screen
The location of a staple jam and procedures for clearing the jam are displayed.
Reducing the Frequency of Paper Jams
If paper jams occur frequently, the following reasons may be the cause.
There are torn pieces of paper left inside the machine.
As a result of pulling jammed paper out by force, torn pieces of paper may be left inside the machine.
Remove all of the torn pieces.
Paper which does not match with the setting is loaded.
Make sure that the paper loaded in the paper drawer matches the paper size and type registered in [Paper Settings] in [Preferences].
Selecting Paper Types from the Paper Database," on p. 31
Paper jams occur frequently only when using the specific custom paper.
The paper information may be registered incorrectly.
Confirm the paper information settings for the paper you are using.
"Paper Type Management" in the User's Guide
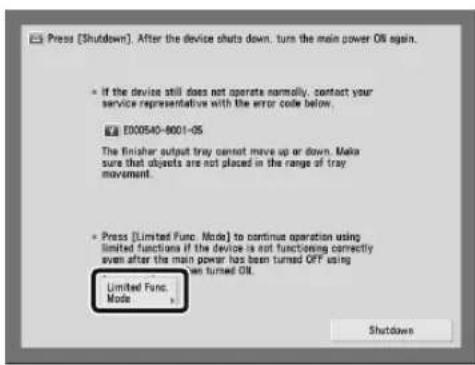
When an Error Message Is Displayed
If a malfunction occurs and the machine cannot operate normally, a screen shown on the right appears. If the machine cannot operate normally after turning the main power OFF and then ON, contact your local authorized Canon dealer.

"Contacting Your Local Authorized Canon Dealer," on p. 43
If a key for the Limited Functions mode is displayed:
If [Limited Functions Mode] is displayed, you can temporally set the Limited Functions mode to continue to use some functions.

"Problem Solving" > "Service Call Message" in the User's Guide
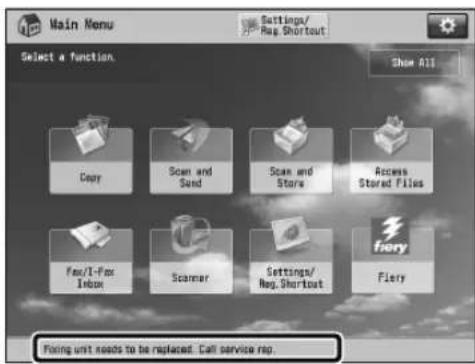
If a message is displayed on the bottom of the screen:
If an error message appears on the bottom of the screen, printing and scanning functions are restricted, but some functions may still be available.

"Problem Solving" > "Service Call Message" in the User's de
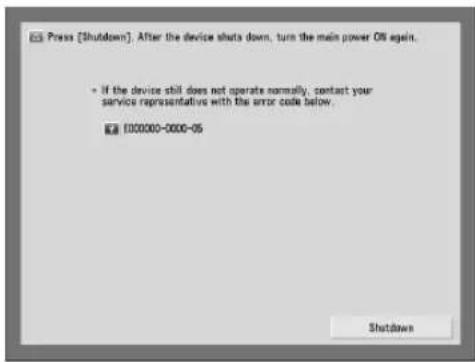
■ Contacting Your Local Authorized Canon Dealer
If you cannot operate the machine normally after turning the main power OFF and then ON, contact your local authorized Canon dealer by following the procedure below.
1 Note the error code.
Write down the error code "XXXXXXXX-XXXX".
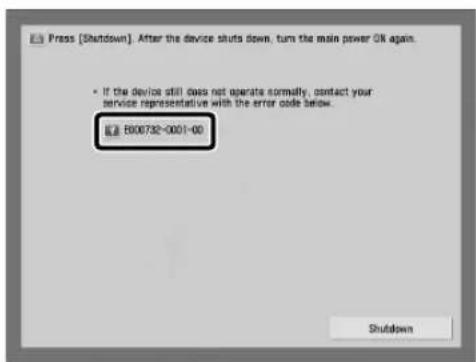
2 Turn OFF the main power.
- Press [Shutdown] on the touch panel display.
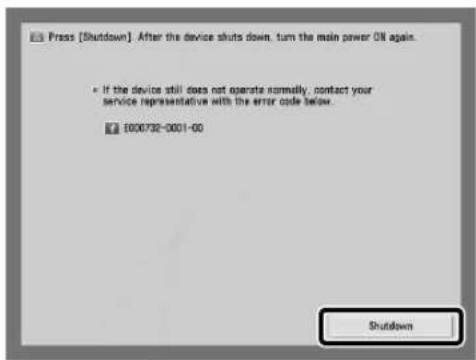
3 Remove the power plug from the power outlet.
4 Confirm the product name, and contact your local authorized Canon dealer.
■f Memory Becomes Full
If memory becomes full during scanning, the following messages appear on the touch panel display. Follow the procedures on the screen, and then delete unnecessary files stored in the Mail Box and Fax/I-Fax Inbox to make more memory available.
Scanning will be canceled because the memory is full. Do you want to print (send, store)* the scanned pages?
- A part of the message differs, depending on the function used.
[Yes]: A job for the pages scanned into memory is processed. After processing the job, scan the remaining pages.
[No]: A job for the pages scanned into memory is cancelled. Scan the whole pages again.
Scanning will be canceled because the memory is full. Wait a moment, then try again.
[OK]: Scan the whole pages again after the current operation is complete.
Could not perform the operation because the memory is full.
[OK]: Delete unnecessary data from memory, and then scan the whole pages again.
If the Main Power Does Not Turn ON
If the machine cannot operate when the main power is turned ON, check the breaker. If the breaker is switched to the OFF position, do not attempt to turn ON the breaker yourself, and be sure to contact your local authorized Canon dealer.
Specifications
Specifications are subject to change without notice for product improvement or future release.
For more information on the specifications of the following optional equipment, consult the relevant guide.
High Capacity Stacker-H1
- BookletTrimmer-D1
Two-KnifeBookletTrimmer-A1
PerfectBinder-E1
Multi Function Professional Puncher-A1
MainUnit
Item Specifications
| Name Canon imagePRESS C10000VP/C8000VP | |
| Type Reader Print | er Separated, Console type |
| Colour Supported Full Colour | |
| Resolution for Writing 2400 dpi x 2400 dpi | |
| Paper Weight / Type Right/Left Paper Deck: | Weight:60 g/m² to 350 g/m²Type:Thin 2 (60 g/m² to 63 g/m²), Thin 1 (64 g/m² to 79 g/m²), Plain (80 g/m² to 105 g/m²),Heavy 1 (106 g/m² to 128 g/m²), Heavy 2 (129 g/m² to 150 g/m²), Heavy 3 (151 g/m² to 180 g/m²), Heavy 4 (181 g/m² to 209 g/m²), Heavy 5 (210 g/m² to 256 g/m²), Heavy 6 (257 g/m² to 300 g/m²), Heavy 7 (301 g/m² to 325 g/m²), Heavy 8 (326 g/m² to 350 g/m²), Colour, Recycled, Pre-Punched, Transparency, Tab *, Bond paper, Textured *Vellum, Clear Film, Translucent Film, 1-Sided Coated, 2-Sided Coated, Matte CoatedThe printing conditions may vary, depending on the paper type. For more information on paper types, see User's Guide > Basic Operations.*1Tab Feeding Attachment-F1 is needed for Tab Paper**2Textured paper that is 221 g/m² or more in weight cannot be used. |
| Print Sizes Paper sizes: | 330 mm x 483 mm, 320 mm x 450 mm (SRA3), 305 mm x 457 mm, A3, A4, A4R, A5R, Custom Size (182.0 mm x 182.0 mm to 330.2 mm x 487.7 mm) |
| Warm-Up Time After powering ON | 7 minutes |
| First Copy Time | Full colour:25 seconds*Black-and-White:25 seconds*When "Color Priority" is selected,*When "Black & White Priority" is selected. |
| Item Specifications | |||
| Print Speed | Direct (sheet/minute) | ||
| (Plain paper (80 g/m2)) | imagePRESS | imagePRESS | |
| C10000VP | C8000VP | ||
| 330 mm x 483 mm 51 39 | |||
| 320 mm x 450 mm | 54 42 | ||
| (SRA3) | |||
| 305 mm x 457 mm 53 41 | |||
| A3 57 44 | |||
| A4 100 80 | |||
| A4R 77 61 | |||
| The print speed may vary, depending on the settings for paper type, paper size, and the sending method. | |||
| When continuously printing, adjustments for machine temperature or image quality may cause machine operations to pause or become slow. | |||
| Margin Top: 2.5 mm ±0.5 mm | |||
| Left and Right: 2.5 mm ±0.5 mm (left side)/(2.5 mm) (right side) | |||
| Bottom: 2.5 mm (reference value) | |||
| Paper Feeding System / Capacity Right/Left Paper Deck: | |||
| 1,000 sheets x 2 cassettes (80 g/m2) | |||
| Multiple Copies 1 to 9,999 sheets | |||
| Power Source 3-phase 5-wires 380-415 V AC, 50/60 Hz, 18 A | |||
| Power Consumption Maximum Power Consumption: | |||
| 13,000 W maximum | |||
| Memory Capacity Standard: | |||
| System domain | |||
| RAM: 1.5GB | |||
| Image handling domain | |||
| RAM: 2GB | |||
| Hard Disk Capacity* Standard: 250 GB | |||
| * The hard disk capacity is subject to change in future release. | |||
| Dimensions (W x D x H) | 2,586 mm x 1,152 mm x 1,456 mm | ||
| (Marking Engine, Fixing Station, and Power Supply Unit) | |||
| Weight | Approximately 1,200 kg | ||
| Installation Space (W x D) | 3,391 mm x 1,152 mm | ||
| (When the Duplex Color Image Reader Unit-K1, the Upright Control Panel-F1, and the Finisher-AN1 (or the Saddle Finisher-AN2) are attached) | |||
Duplex Color Image Reader Unit-K1
Item Specifications
| Type Printer separated, Stream feed (Feeder), No stream (Reader) | |
| Resolution for Reading 600 dpi x 600 dpi | |
| Number of Tones 256 | |
| Acceptable Originals Sheet, book, three dimensional object (up to 2 kg) | |
| Size and Weight of Originals Size: A3, A4, A4R, A5, and A5R Weight: 1-sided scanning: 38 g/m² to 220 g/m² 2-sided scanning: 50 g/m² to 220 g/m² (Black and White Original) 64 g/m² to 220 g/m² (Colour Original) | |
| Magnification Regular paper size: Same Ratio: 1:1 Reduction: 1:0.70 (A3 → A4R) 1:0.50 (A3 → A5R) 1:0.25 Enlargement: 1:1.41 (A4R → A3) 1:2.00 (A5R → A3) 1:4.00 Copy Ratio: 25 % to 400 % (in 1 % increments) | |
| Original Feeding Mechanism Automatic Document Feeder | |
| Original Tray Capacity 300 sheets (80 g/m | 2) |
| Original Scanning Speed Copying: 1-sided scanning: 120 sheets/minute* (A4 in Black-and-White at 600 dpi) 70 sheets/minute (A4 in Full Colour at 600 dpi) 2-sided scanning: 60 sheets/minute (120 pages)*† (A4 in Black-and-White at 600 dpi) 35 sheets/minute (70 pages) (A4 in Full Colour at 600 dpi) Scanning: 1-sided scanning: 120 sheets/minute (A4 in Black-and-White/Full Colour at 300 dpi) 2-sided scanning: 100 sheets/minute (200 pages)*† (A4 in Black-and-White at 300 dpi) 70 sheets/minute (140 pages) (A4 in Full Colour at 300 dpi) *† When "Speed Priority" is selected. * The scanning speed may vary, depending on the scanning mode and original type. | |
| Dimensions (W x D x H) 633 mm x 603 mm x 179 mm | |
| Weight | Approximately 27.5 kg |
POD Deck Lite-C1
| Item Specifications | |
| Paper Size / Weight / Type Size: | |
| A3, A4R, A4, A5, 330 mm x 483 mm, 320 mm x 450 mm (SRA3), 305 mm x 457 mm, Custom Size (139.7 mm x 182.0 mm to 330.2 mm x 487.7 mm) | |
| Weight:60 g/m² to 350 g/m²Type:Thin paper (60 g/m² to 79 g/m²), Plain paper (80 g/m² to 105 g/m²), Thick paper (106 g/m² to 350 g/m²), Recycled paper, Colour paper, Transparency, Label, Film, Post card, Coated paper (70 g/m² to 350 g/m²), Textured paper, Bond paper, Pre-punched paper, Vellum paper, Tab paper | |
| Paper Deck Capacity 4,000 sheets (64 g/m | 2; 385 mm)3,500 sheets (80 g/m²; 385 mm) |
| Power Source / Maximum Power Consumption | 220-240 V AC, 50/60 Hz, 1.2 A/480 W or less |
| Dimensions (W x D x H) 656 mm x 686 mm x 570 mm | |
| Weight Approximately 68 kg | |
| Installation Space Including the Main Unit(W x D) | 4,029 mm x 1,152 mm(When the Duplex Color Image Reader Unit-K1, the Upright Control Panel-F1, and the Finisher-AN1 (or the Saddle Finisher-AN2) are attached) |
POD Deck-D1/Secondary POD Deck-D1
| Item Specifications | |
| Paper Size / Weight / Type Size: | |
| A3, A4R, A4, 330 mm x 483 mm, 320 mm x 450 mm (SRA3), 305 mm x 457 mm, Custom Size (182.0 mm x 182.0 mm to 330.2 mm x 487.7 mm) | |
| Weight: 60 g/m2to 350 g/m2 | |
| Type: Uncoated Paper (60 g/m2to 350 g/m2), Coated Paper (70 g/m2to 350 g/m2), Emboss | |
| Paper, Tab Paper, Film | |
| * Tab Feeding Attachment-El is needed for Tab Paper | |
| Paper Deck Capacity <Output Capacity> | |
| 1,000 x 2 + 2,000 sheets (80 g/m2) | |
| <Escape Tray Capacity> | |
| 150 sheets (80 g/m2; 15 mm) | |
| Power Source / Maximum Power Consumption | 220-240 V AC, 50/60 Hz, 5.0 A/1000 W or less |
| Dimensions (W x D x H) POD Deck-D1 only: | |
| 982 mm x 792 mm x 1,095 mm | |
| POD Deck-D1 and Secondary POD deck-D1: | |
| 1,793 mm x 792 mm x 1,095 mm | |
| Weight POD Deck-D1 only: | |
| Approximately 250 kg | |
| POD Deck-D1 and Secondary POD deck-D1: | |
| Approximately 480 kg | |
Item Specifications
| Installation Space Including the Main Unit | 4,378 mm x 1,152 mm |
| (W x D) | (When the Duplex Color Image Reader Unit-K1, the Upright Control Panel-F1, and the Finisher-AN1 (or the Saddle Finisher-AN2) are attached) |
LONGSHEETTRAY-A1
Item Specifications
Paper Size / Weight / Type Size:
Custom Size (210.0 mm x 487.7 mm to 330.2 mm x 762.0 mm)
Weight:
60g / m^2 to 256g / m^2
Type:
paper (60g / m^2 to 79g / m^2) , Plain paper (80g / m^2 to 105g / m^2) , Thick paper (106
g/m^2 to 256g/m^2) , Recycled paper, Colour paper, Coated paper (80g/m^2 to 256g/m^2)
Textured paper, Bond paper
Paper Capacity 1 sheet (60 g/m)
to 256 g/m)
Dimensions (W x D x H) 650 mm x 550 mm x 480 mm
Weight (including the Extension output tray) Approximately 8.6 kg
Tab Feeding Attachment-E1
Item Specifications
Paper Size A4 / LTR
Weight 0.1 kg
Document Insertion Unit-N1
Item Specifications
Paper Size / Weight / Type Size:
Insert path:
A3,A4R,A4,330 mm x 483 mm, 320 mm x 450 mm (SRA3), 305 mm x 457 mm
Custom Size (182.0 mm x 182.0 mm to 330.2 mm x 487.7 mm)
Through path:
All paper type engines supports
Weight:
60 g/m² to 300 g/m²
Type:
Insert path:
Thin paper (60g / m^2 to 79g / m^2) Plain paper (80g / m^2 to 105g / m^2) Thick paper (106
g/m^2 to 300 g/m^2 ),Recycled paper,Coated paper,Colour paper,Tab paper,Textured
paper, Prepunched paper, Vellum, Bond paper
Through path:
All paper type engines supports
Paper Capacity 200 sheets × 2 (80 g/m
3
| Item Specifications | |
| Power Source / Maximum Power | 100-240 V AC, 50/60 Hz, 1.0 A/120 W or less |
| Consumption | |
| Dimensions (W x D x H) 746 mm x 793 mm x 1,407 mm(Including the Inserter Option controller Kit-A1) | |
| Weight Approximately 61 kg | |
| Installation Space Including the Main Unit(W x D) | 3,732 mm x 1,152 mm(When the Duplex Color Image Reader Unit-K1, the Upright Control Panel-F1, and theFinisher-AN1 (or the Saddle Finisher-AN2) are attached) |
Paper Folding Unit-J1
| Item Specifications | |
| Paper Size / Weight / Type Size: | |
| Z fold: A3, A4R | |
| Letter fold in (C fold): A4R | |
| Letter fold out: A4R | |
| double parallel fold: A4R | |
| Half fold: A4R | |
| Weight: | |
| Z fold, Letter fold in (C fold), Letter fold out, Half fold: 60 g/m2to 105 g/m2 | |
| double parallel fold: 60 g/m2to 90 g/m2 | |
| Through path: | |
| All substrates engines supports | |
| Type: | |
| Thin paper (60 g/m2to 79 g/m2), Plain paper (80 g/m2to 105 g/m2), Recycled paper, | |
| Colour paper, Coated paper, Bond paper, Textured paper | |
| Through path: | |
| All substrates engines supports | |
| Power Source / Maximum Power | From the finisher/150 W or less |
| Consumption | |
| Dimensions (W x D x H) 336 mm x 793 mm x 1,190 mm | |
| Weight Approximately 71 kg | |
| Installation Space Including the Main Unit(W x D) | 3,732 mm x 1,152 mm(When the Duplex Color Image Reader Unit-K1, the Upright Control Panel-F1, and theFinisher-AN1 (or the Saddle Finisher-AN2) are attached) |
■Finisher-AN1
Item Specifications
Paper Size/Weight/Type Size:
A3, A4R, A4, A5, 330 mm x 483 mm, 320 mm x 450 mm (SRA3), 305 mm x 457 mm,
Custom Size (148.0 mm x 182.0 mm to 330.2 x 762.0 mm)
A3,A4R,A4,330 mm x 483 mm, 320 mm x 450 mm (SRA3), 305 mm x 457 mm.
Custom Size (182.0 mm x 182.0 mm to 330.2 mm x 487.7 mm)
- No neat in case of shifting with width 178.5 mm or less
Weight:
Plain Paper: 60g / m^2 to 350g / m^2 , Coated Paper: 70g / m^2 to 350g / m^2
Plain Paper: 60g / m^2 to 350g / m^2 , Coated Paper: 70g / m^2 to 350g / m^2
Type:
All paper type engines supports
All paper type engines supports
Capacity Per Tray
Non Staple
Non Sort (Normal Stacking/Mixed Stacking)
If it reaches either condition below, motion stops;
All size: 147 mm (1,000 sheets) * No high volume stack mode
Z-fold: A3: 10 sheets per 1 set or 30 sheets
Half-fold: A4: 50 sheets
Bunch Shift
If it reaches either condition below, motion stops;
All size (182.0 mm x 182.0 mm to 304.8 mm x 457.2 mm): 147 mm (1,000 sheets) * No
high volume stack mode
Z-fold: A3: 10 sheets per 1 set or 30 sheets
Half-fold:A4:50 sheets
Item Specifications
Capacity Per Tray < Lower Tray>
Non Staple
Non Sort (Normal Stacking/Mixed Stacking)
If it reaches either condition below, motion stops;
A4 size: 285 mm (2,000 sheets)
A4R/A3/330 mm x 483 mm/320 mm x 450 mm (SRA3) size: 147 mm (1,000 sheets)
Z-fold: A3: 10 sheets per 1 set or 30 sheets
Half-fold: A4: 50 sheets
- In case of high volume stack mode
A4: 490 mm (4,000 sheets; 80g/m² or less),
A4: 423 mm (3,000 sheets; 80.1g/m² or more)
A4R:285 mm (2,000 sheets)
A3:216 mm (1,500 sheets*),
330 mm x 483 mm, 320 mm x 450 mm (SRA3): 147 mm (1,000 sheets)
* In case of coated paper, 147 mm (1,000 sheets)
In case of less than 64g / m^2 1,000 sheets
Bunch Shift
If it reaches either condition below, motion stops;
A4 size: 285 mm (2,000 sheets)
A4R/A3/330 mm x 483 mm, 320 mm x 450 mm (SRA3) size: 147 mm (1,000 sheets)
Z-fold: A3: 10 sheets per 1 set or 30 sheets
Half-fold: A4: 50 sheets
*In case of high volume stack mode,
A4: 490 mm (4,000 sheets; 80g/m² or less),
A4: 423 mm (3,000 sheets; 80.1g/m² or more),
A4R:285 mm (2,000 sheets)
A3: 216 mm (1,500 sheets*)
330 mm x 483 mm/320 mm x 450 mm (SRA3): 147 mm (1,000 sheets)
* In case of coated paper, 147 mm (1,000 sheets)
In case of less than 64g / m^2 1,000 sheets
Staple
One point at front/One point at back (diagonal)
Two points in center (parallel)
If it reaches either condition below, motion stops;
A4 (Minimum size: 182 mm x 210 mm): 423 mm (3,000 sheets) or 200 sets
A4R: 285 mm (2,000 sheets) or 200 sets
A3: 216 mm (1,500 sheets*1)
Z folder: 10 sheets per 1 set or 30 sheets per 1 job
^*1 In case of coated paper, 147 mm (1,000 sheets)
Item Specifications
Max. Stapling Capacity / Available Staple Size A4 Size:
| Plain Paper; |
| 60 g/m2to 80 g/m2: 100 Sheets |
| 80.1 g/m2to 81.4 g/m2: 80 Sheets |
| 81.5 g/m2to 105 g/m2: 60 Sheets |
| 105.1 g/m2to 200 g/m2: 20 Sheets |
| Over 200 g/m2: Front/Back Cover Sheet only |
| Coated Paper; |
| 70 g/m2to 200 g/m2: 15 Sheets |
| Over 200 g/m2: Front/Back Cover Sheet only |
| R/A3 Size: |
| Plain Paper; |
| 60 g/m2to 80 g/m2: 50 Sheets |
| 80.1 g/m2to 81.4 g/m2: 50 Sheets |
| 81.5 g/m2to 105 g/m2: 30 Sheets |
| 105.1 g/m2to 200 g/m2: 10 Sheets |
| Over 200 g/m2: Front/Back Cover Sheet only |
| Coated Paper; |
| 70 g/m2to 200g/m2: 10 Sheets |
| Over 200g/m2: Front/Back Cover Sheet only |
If cover/back sheet is more than 300g / m^2 or body is glossy coated paper on A4 size, number should be subtracted by 10.
| Power Source / Maximum Power Consumption | 120-240 V AC, 50/60 Hz, 8 A/500 W or less |
| Dimensions (W x D x H) 800 mm x 792 mm x 1,239 mm | |
| Weight Approximately 132 kg (Including die) | |
| Installation Space Including the Main Unit (W x D) | 3,391 mm x 1,152 mm (When the Duplex Color Image Reader Unit-K1 and the Upright Control Panel-F1 are attached) |
Item Specifications
Paper Size/Weight/Type Finisher
Size:
A3, A4R, A4, A5, 330 mm x 483 mm, 320 mm x 450 mm (SRA3), 305 mm x 457 mm
Custom Size (148.0 mm x 182.0 mm to 330.2 mm x 762.0 mm)
A3, A4R, A4, 330 mm x 483 mm, 320 mm x 450 mm (SRA3), 305 mm x 457 mm
Custom Size (182.0 mm x 182.0 mm to 330.2 mm x 762.0 mm)
- No neat in case of shifting with width 178.5 mm or less
Weight:
Plain Paper: 60g / m^2 to 350g / m^2 , Coated Paper: 70g / m^2 to 350g / m^2
Plain Paper: 60g / m^2 to 350g / m^2 Coated Paper: 70g / m^2 to 350g / m^2
Type:
All paper type engines supports
All paper type engines supports
Saddle Stitch
Size:
A3,A4,330 mm x 483 mm, 320 mm x 450 mm (SRA3), 305 mm x 457 mm, Custom Size
(210.0 mm x 279.4 mm to 330.2 mm x 487.7 mm)
Weight:
Body Paper: 60g / m^2 to 220g / m^2 , Cover Paper: 64g / m^2 to 300g / m^2
Body Paper: 70g / m^2 to 220g / m^2 , Cover Paper: 70g / m^2 to 300g / m^2
Type:
High Quality Paper, Coated Paper, Plain Paper, Recycle Paper, Bond paper, Textured
paper, Translucent Film (depending on types)
Capacity Per Tray Unlimited, or Max. 30 sets (Depends on size and bunch number)
Max. Stapling Capacity / Available Staple Size Plain Paper
2 to 25 Sheets (60g / m^2 to 63.9g / m^2)
2 to 25 Sheets (64g / m^2 to 80g / m^2)
2 to 15 Sheets (80.1g / m^2 to 105g / m^2)
2 to 5 Sheets (105.1g / m^2 to 209g / m^2)
2 to 4 Sheets (209.1 g/m² to 220 g/m²) including cover sheet
Coated Paper:
2 to 10 Sheets (70g / m^2 to 128g / m^3
2 to 5 Sheets (128.1 g/m² to 209 g/m²)
2 to 4 Sheets (209.1 g/m² to 220 g/m²) including cover sheet
Use the paper whose weight is more than body paper's weight for cover sheet.
Item Specifications
Available Saddle Stitch Capacity / Size Saddle Stitch:
25 sheets (80g / m^) (including 1 cover sheet)
Saddle Folding:
5 sheets (80g / m^2)
Size:
330 mm x 483 mm, 320 mm x 450 mm (SRA3), 305 mm x 457 mm, A3, A4R, and Custom
Size (210.0 mm x 279.4 mm to 330.2 mm x 487.7 mm)
Cover Weight:
Requires the paper weight of the main document (more than 64g / m^2 ) or more.
- Available Saddle Stitch capacity may vary, depending on the paper type and weight.
Power Source / Maximum Power
120-240 V AC, 50/60 Hz, 8 A/500 W or less
Consumption
Dimensions (W x D x H) 800 mm x 792 mm x 1,239 mm
Weight Approximately 184 kg (Including die)
Installation Space Including the Main Unit
3,391 mm x 1,152 mm
(WxD)
(When the Duplex Color Image Reader Unit-K1 and the Upright Control Panel-F1 are attached)
endFunction
ScanFeatures
| Item Specifications | |
| Communication Protocol FTP (TCP/IP), SMB (TCP/IP), WebDAV | |
| Data Format TIFF, JPEG, PDF, XPS, OO | XML (PowerPoint) |
| Resolution 100 x 100 dpi, 150 x 150 dpi, 200 x 100 dpi, 200 x 200 dpi, 200 x 400 dpi, 300 x 300 dpi, 400 x 400 dpi, 600 x 600 dpi | |
| System Environment Windows Server 2003 R2 SP2, Windows Vista SP2, Windows Server 2008 R2, Windows 7, Windows 8, Windows 8.1, Windows Server 2012, Windows Server 2012 R2, Red Hat Linux 9*, Solaris10*! * Available on FTP and WebDAV | |
| Interface 1000BASE-T, 100BASE-TX, 10BASE-T | |
| Color Mode Automatic-Color Select (Full Color/Grayscale), Automatic-Color Select (Full Color/Black-and-White), Full Color, Grayscale, Black-and-White | |
| Original Type Text, Text/Photo, Photo | |
| Other Preview, Browse Windows (SMB) File Server | |
| Optional PDF / XPS / OOXML Functions | PDF Compact, Trace and Smooth, Limited Color, Encryption, OCR, Device Signature, Optimization for Web*, PDF/A-1b, Policy Applied XPS Compact, OCR, Device Signature OOXML PowerPoint, Word, OCR * PDF files optimized for Web viewing. |
E-Mail and I-Fax Features
| Item Specifications | |
| Communication Protocol SMTP, POP3 | |
| I-Fax Communication Mode | Simple, Full |
| Resolution For Sending E-mail | 100 x 100 dpi, 150 x 150 dpi, 200 x 100 dpi, 200 x 200 dpi, 200 x 400 dpi, 300 x 300 dpi, 400 x 400 dpi, 600 x 600 dpi |
| For Sending I-Fax (Black-and-White) | |
| 200 x 100 dpi, 200 x 200 dpi, 200 x 400 dpi*, 300 x 300 dpi*, 400 x 400 dpi*, 600 x 600 dpi* | |
| For Sending I-Fax (Color) | |
| 100 x 100 dpi*, 200 x 200 dpi*, 300 x 300 dpi*, 400 x 400 dpi*, 600 x 600 dpi* | |
| Format | |
| TIFF, JPEG, PDF, XPS, OOXML (PowerPoint) | |
| I-Fax (Black-and-White) | |
| TIFF (MH, MR*, MMR*) | |
| I-Fax (Color) | |
| TIFF (Profile-C)* | |
Item Specifications
Original Size E-mail
A3,A4,A4R,A5,A5R
IFax
A3,A4,A4R,A5*2,A5R*2
Server Software Microsoft Exchange 2003 SP2, Microsoft Exchange 2007 SP3, Sendmail 8.14.4, Microsoft
Exchange 2010, Lotus Domino R7.0
Other Searches a destination via the LDAP Server, Preview
Optional PDF / XPS / OOXML Functions
Compact, Trace and Smooth, Limited Color, Encryption, OCR, Device Signature
Optimization for Web*; PDF/A-1b, Policy Applied
XPS
Compact,OCR,Device Signature
OOXML
PowerPoint, Word, OCR
Available after setting RX conditions of the destination.
Sent as A4.
PDF files optimized for Web viewing.
NetworkEnvironment
- HardwareSpecifications
Item Specifications
Network Interface 10Base-T/100Base-TX/1000Base-T (RJ-45)
ProductName
Safety regulations require the product's name to be registered. In some regions where this product is sold, the following name(s) in parenthesis may be registered instead. imagePRESS C10000VP/C8000VP (F164400)
EMC requirements of EC Directive
This equipment conforms with the essential EMC requirements of EC Directive. We declare that this product conforms with the EMC requirements of EC Directive at nominal mains input 400V,50Hz although the rated input of the product is 380 to 415 V, 50/60 Hz. Use of shielded cable is necessary to comply with the technical EMC requirements of EC Directive.
Equipment complying with IEC 61000-3-12

WARNING
This is a Class A product. In a domestic environment this product may cause radio interference in which case the user may be required to take adequate measures.
LaserSafety
This product is confirmed as a Class 1 laser product in IEC60825-1:2014 and EN60825-1:2014.
CLASS 1 LASER PRODUCT
LASER KLASSE 1
APPAREIL A LASER DE CLASSE 1
APPARECCHIO LASER DI CLASSE 1
PRODUCTO LASER DE CLASE 1
APARELHO ALASER DE CLASSE 1
LUOKAN 1 LASER-TUOTE
LASERPRODUKT KCLASS 1
The laser beam can be harmful to human bodies. Since radiation emitted inside the product is completely confined within protective housings and external covers, the laser beam cannot escape from the machine during any phase of user operation. Read the following remarks and instructions for safety.
- Never open covers other than those instructed in the manuals for this machine.
If the laser beam should escape and enter your eyes, exposure may cause damage to your eyes.
Use of controls, adjustments, or performance of procedures other than those specified in this manual may result in hazardous radiation exposure.
WEEDEDirective


Only for European Union and EEA (Norway, Iceland and Liechtenstein)
These symbols indicate that this product is not to be disposed of with your household waste, according to the WEEE Directive (2012/19/EU), the Battery Directive (2006/66/EC) and/or national legislation implementing those Directives.
If a chemical symbol is printed beneath the symbol shown above, in accordance with the Battery Directive, this indicates that a heavy metal (Hg = Mercury, Cd = Cadmium, Pb = Lead) is present in this battery or accumulator at a concentration above an applicable threshold specified in the Battery Directive.
This product should be handed over to a designated collection point, e.g., on an authorized one-for-one basis when you buy a new similar product or to an authorized collection site for recycling waste electrical and electronic equipment (EEE) and batteries and accumulators. Improper handling of this type of waste could have a possible impact on the environment and human health due to potentially hazardous substances that are generally associated with EEE. Your cooperation in the correct disposal of this product will contribute to the effective usage of natural resources.
For more information about the recycling of this product, please contact your local city office, waste authority, approved scheme or your household waste disposal service or visit www.canon-europe.com/weee, or www.canon-europe.com/battery.
WEEE Directive / Rule
-European Union (and EEA) only
This symbol attached on the product is according to the WEEE Directive (2002/96/EC).

-India only
This product is not to be disposed of with your household waste, according to the E-Waste (Management) Rules, 2016. This product should be handed over to a designated collection point, e.g., to an authorized collection site for recycling waste electrical and electronic equipment (EEE). Improper handling of this type of waste could have a possible negative impact on the environment and human health due to potentially hazardous substances that are generally associated with EEE. At the same time, your cooperation in the correct disposal of this product will contribute to the effective usage of natural resources. For more information regarding return and recycling of WEEE products, please visit http://www.canon.co.in/environment or write to us at customer.delight@canon.co.in.
Also, this product complies with the "E-Waste (Management) Rules, 2016" and prohibits use of lead, mercury,
hexavalent chromium, polybrominated biphenyls or polybrominated diphenyl ethers in concentrations
exceeding 0.1 % by weight and 0.01 % by weight for Cadmium, except for the exemptions set in Schedule II of the Rule.

Copyright
Copyright CANON INC. 2015
No part of this publication may be reproduced or transmitted in any form or by any means, electronic or mechanical, including photocopying and recording, or by any information storage or retrieval system without the prior written permission of Canon Inc. This product includes software and/or software modules that are licensed by Canon Inc. or its licensors from third parties. Use and distribution of this software and/or software modules are subject to conditions (a) through (f) below.
(a)
Copyright (C) 1999, 2000, 2002 Aladdin Enterprises. All rights reserved.
(b)
UFST: Copyright © 1989 - 1996, 1997, 2003, 2004, 2008, all rights reserved, by Monotype Imaging Inc.
(c)
Copyright © Unpublished Work of Novell, Inc. All Rights Reserved.
(d)
Portions of this software are copyright © 2007 The FreeType Project (www.freetype.org). All rights reserved.
(e)
Copyright 2012 jQuery Foundation and other contributors http://jquery.com/
(f)
Copyright(C) 1995-2003 Adobe Systems Inc. All rights reserved.
Disclaimers
The information in this document is subject to change without notice.
CANON INC. MAKES NO WARRANTY OF ANY KIND WITH REGARD TO THIS MATERIAL, EITHER EXPRESS OR IMPLIED, EXCEPT AS PROVIDED HEREIN, INCLUDING WITHOUT LIMITATION, THEREOF, WARRANTY AS TO MARKETABILITY, MERCHANTABILITY, FITNESS FOR A PARTICULAR PURPOSE OR USE, OR NON-INFRINGEMENT. CANON INC. SHALL NOT BE LIABLE FOR ANY DIRECT, INCIDENTAL, OR CONSEQUENTIAL DAMAGES OF ANY NATURE, OR LOSSES OR EXPENSES RESULTING FROM THE USE OF THIS MATERIAL.
Legal Limitations on the Usage of Your Product and the Use of Images
Using your product to scan, print or otherwise reproduce certain documents, and the use of such images as scanned, printed or otherwise reproduced by your product, may be prohibited by law and may result in criminal and/or civil liability. A non-exhaustive list of these documents is set forth below. This list is intended to be a guide only. If you are uncertain about the legality of using your product to scan, print or otherwise reproduce any particular document, and/or of the use of the images scanned, printed or otherwise reproduced, you should consult in advance with your legal advisor for guidance.
- Paper Money
Money Orders
Certificates of Deposit
Postage Stamps (cancelled or uncancelled)
Identifying Badges or Insignias - Selective Service or Draft Papers
- Checks or Drafts Issued by Governmental Agencies
- Motor Vehicle Licenses and Certificates of Title
Travelers Checks
Food Stamps
Passports
- Immigration Papers
- Internal Revenue Stamps (cancelled or uncancelled)
- Bonds or Other Certificates of Indebtedness
Stock Certificates
Copyrighted Works/Works of Art without Permission of Copyright Owner
Trademarks
"MEAP" is a trademark of CANON Inc., referring to an "application platform" for Canon multifunction and single function printers. This product contains the Universal Font Scaling Technology or UFST under license from Monotype Imaging, Inc. UFST is a trademark of Monotype Imaging, Inc. registered in the United States Patent and Trademark Office and may be registered in certain jurisdictions.
Apple, AppleTalk, EtherTalk, LocalTalk, Mac, Mac OS, and Safari are trademarks of Apple Inc. Microsoft, Windows, Windows Vista, Windows Server, Internet Explorer, Excel and PowerPoint are either registered trademarks or trademarks of Microsoft Corporation in the United States and/or other countries.

Adobe PostScript 3TM
Adobe, PostScript, and the PostScript logo are either registered trademarks or trademarks of Adobe Systems Incorporated in the United States and/or other countries.
Copyright © 2007 -08 Adobe Systems Incorporated. All rights reserved.
Protected by U.S. Patents 5,737,599; 5,781,785; 5,819,301; 5,929,866; 5,943,063; 6,073,148; 6,515,763; 6,639,593; 6,754,382; 7,046,403; 7,213,269; 7,242,415; Patents pending in the U.S. and other countries.
All instances of the name PostScript in the text are references to the PostScript language as defined by Adobe Systems Incorporated unless otherwise stated. The name PostScript also is used as a product trademark for Adobe Systems' implementation of the PostScript language interpreter.
Except as otherwise stated, any reference to a "PostScript printing device," "PostScript display device," or similar item refers to a printing device, display device or item (respectively) that contains PostScript technology created or licensed by Adobe Systems Incorporated and not to devices or items that purport to be merely compatible with the PostScript language.
Adobe, the Adobe logo, PostScript, the PostScript logo, and PostScript 3 are either registered trademarks or trademarks of Adobe Systems Incorporated in the United States and/or other countries.
Linux is a registered trademark of Linus Torvalds. Microsoft and Windows are either registered trademarks or trademarks of Microsoft Corporation in the United States and/or other countries.
All other trademarks are the property of their respective owners.

The PDF logo is a trademark or registered trademark of Adobe Systems Incorporated in the United States and other countries.
Copyright © 2008 Adobe Systems Incorporated. All rights reserved.
Protected by U.S. Patents 6,185,684; 6,205,549; 7,213,269; 7,272,628; 7,278,168; Patents pending in the U.S. and other countries.
All instances of the name PostScript in the text are references to the PostScript language as defined by Adobe Systems Incorporated unless otherwise stated. The name PostScript also is used as a product trademark for Adobe Systems' implementation of the PostScript language interpreter.
Except as otherwise stated, any reference to a "PostScript printing device," "PostScript display device," or similar item refers to a printing device, display device or item (respectively) that contains PostScript technology created or licensed by Adobe Systems Incorporated and not to devices or items that purport to be merely compatible with the PostScript language.
Adobe, the Adobe logo, PostScript, the PostScript Logo, and PostScript 3 are either registered trademarks or trademarks of Adobe Systems Incorporated in the United States and/or other countries.
All other trademarks are the property of their respective owners.
Other product and company names herein may be the trademarks of their respective owners.
Third Party Software
This Canon product (the "PRODUCT") includes third-party software modules. Use and distribution of these software modules, including any updates of such software modules (collectively, the "SOFTWARE") are subject to license conditions (1) through (9) below.
(1) You agree that you will comply with any applicable export control laws, restrictions or regulations of the countries involved in the event that this PRODUCT including the SOFTWARE is shipped, transferred or exported into any country.
(2) Rights holders of the SOFTWARE retain in all respects the title, ownership and intellectual property rights in and to the SOFTWARE.
Except as expressly provided herein, no license or right, expressed or implied, is hereby conveyed or granted by rights holders of the SOFTWARE to you for any intellectual property of rights holders of the SOFTWARE.
(3) You may use the SOFTWARE solely for use with the PRODUCT.
(4) You may not assign, sublicense, market, distribute, or transfer the SOFTWARE to any third party without prior written consent of rights holders of the SOFTWARE.
(5) Notwithstanding the foregoing, you may transfer the SOFTWARE only when (a) you assign all of your rights to the PRODUCT and all rights and obligations under the license conditions to transferee and (b) such transferee agrees to be bound by all these conditions.
(6) You may not decompile, reverse engineer, disassemble or otherwise reduce the code of the SOFTWARE to human readable form.
(7) You may not modify, adapt, translate, rent, lease or loan the SOFTWARE or create derivative works based on the SOFTWARE.
(8) You are not entitled to remove or make separate copies of the SOFTWARE from the PRODUCT.
(9) The human-readable portion (the source code) of the SOFTWARE is not licensed to you.
Notwithstanding (1) through (9) above, the PRODUCT includes third-party software modules accompanying the other license conditions, and these software modules are subject to the other license conditions.
Please refer to the other license conditions of third-party software modules described in Appendix of Manual for the corresponding the PRODUCT. This Manual is available at http://canon.com/oip-manual.
By using the PRODUCT, you shall be deemed to have agreed to all applicable license conditions. If you do not agree to these license conditions, please contact your service representative.
imagePRESSC10000VP/C8000VP
Fonctions pratiques
CANON
Genuine
TONER, CARTRIDGE & PARTS
Dépannage
CLASS 1 LASER PRODUCT
LASER KLASSE 1
APPAREL A LASER DE CLASSE 1
APPARECCHIO LASER DI CLASSE 1
PRODUCTO LASER DE CLASE 1
APARELHO ALASER DE CLASSE 1
LUOKAN 1 LASER-TUOTE
LASERPRODUKT KCLASS 1
www.canon-europe.com/battery.
Copyright
Copyright CANON INC. 2015
Copyright (C) 1999, 2000, 2002 Aladdin Enterprises. All rights reserved.
(b)
UFST: Copyright © 1989 - 1996, 1997, 2003, 2004, 2008, all rights reserved, by Monotype Imaging Inc.
(c)
Copyright © Unpublished Work of Novell, Inc. All Rights Reserved.
(d)
Portions of this software are copyright © 2007 The FreeType Project (www.freetype.org). All rights reserved.
(e)
Copyright 2012 jQuery Foundation and other contributors http://jquery.com/
(f)
Copyright(C) 1995-2003 Adobe Systems Inc. All rights reserved.
Copyright © 2007 -08 Adobe Systems Incorporated. All rights reserved.
Protected by U.S. Patents 5,737,599; 5,781,785; 5,819,301; 5,929,866; 5,943,063; 6,073,148; 6,515,763; 6,639,593; 6,754,382; 7,046,403; 7,213,269; 7,242,415; Patents pending in the U.S. and other countries.
All instances of the name PostScript in the text are references to the PostScript language as defined by Adobe Systems Incorporated unless otherwise stated. The name PostScript also is used as a product trademark for Adobe Systems' implementation of the PostScript language interpreter.
Except as otherwise stated, any reference to a "PostScript printing device," "PostScript display device," or similar item refers to a printing device, display device or item (respectively) that contains PostScript technology created or licensed by Adobe Systems Incorporated and not to devices or items that purport to be merely compatible with the PostScript language.
Adobe, the Adobe logo, PostScript, the PostScript logo, and PostScript 3 are either registered trademarks or trademarks of Adobe Systems Incorporated in the United States and/or other countries.
Linux is a registered trademark of Linus Torvalds. Microsoft and Windows are either registered trademarks or trademarks of Microsoft Corporation in the United States and/or other countries.
All other trademarks are the property of their respective owners.

Copyright © 2008 Adobe Systems Incorporated. All rights reserved.
Protected by U.S. Patents 6,185,684; 6,205,549; 7,213,269; 7,272,628; 7,278,168; Patents pending in the U.S. and other countries.
All instances of the name PostScript in the text are references to the PostScript language as defined by Adobe Systems Incorporated unless otherwise stated. The name PostScript also is used as a product trademark for Adobe Systems' implementation of the PostScript language interpreter.
Except as otherwise stated, any reference to a "PostScript printing device," "PostScript display device," or similar item refers to a printing device, display device or item (respectively) that contains PostScript technology created or licensed by Adobe Systems Incorporated and not to devices or items that purport to be merely compatible with the PostScript language.
Adobe, the Adobe logo, PostScript, the PostScript Logo, and PostScript 3 are either registered trademarks or trademarks of Adobe Systems Incorporated in the United States and/or other countries.
All other trademarks are the property of their respective owners.
CLASS 1 LASER PRODUCT
LASER KLASSE 1
APPAREL A LASER DE CLASSE 1
APPARECCHIO LASER DI CLASSE 1
PRODUCTO LASER DE CLASE 1
APARELHO A LASER DE CLASSE 1
LUOKAN 1 LASER-TUOTE
LASERPRODUKT KCLASS 1
www.canon-europe.com/wee,oder www.canon-europe.com/battery
Copyright CANON INC. 2015
Copyright (C) 1999, 2000, 2002 Aladdin Enterprises. All rights reserved.
(b)
UFST: Copyright © 1989 - 1996, 1997, 2003, 2004, 2008, all rights reserved, by Monotype Imaging Inc.
(c)
Copyright © Unpublished Work of Novell, Inc. All Rights Reserved.
(d)
Portions of this software are copyright © 2007 The FreeType Project (www.freetype.org). All rights reserved.
(e)
Copyright 2012 jQuery Foundation and other contributors http://jquery.com/
(f)
Copyright(C) 1995-2003 Adobe Systems Inc. All rights reserved.
Copyright © 2007-08 Adobe Systems Incorporated. All rights reserved.
Protected by U.S. Patents 5,737,599; 5,781,785; 5,819,301; 5,929,866; 5,943,063; 6,073,148; 6,515,763; 6,639,593; 6,754,382; 7,046,403; 7,213,269; 7,242,415; Patents pending in the U.S. and other countries.
All instances of the name PostScript in the text are references to the PostScript language as defined by Adobe Systems Incorporated unless otherwise stated. The name PostScript also is used as a product trademark for Adobe Systems' implementation of the PostScript language interpreter.
Except as otherwise stated, any reference to a "PostScript printing device," "PostScript display device," or similar item refers to a printing device, display device or item (respectively) that contains PostScript technology created or licensed by Adobe Systems Incorporated and not to devices or items that purport to be merely compatible with the PostScript language.
Adobe, the Adobe logo, PostScript, the PostScript logo, and PostScript 3 are either registered trademarks or trademarks of Adobe Systems Incorporated in the United States and/or other countries.
Linux is a registered trademark of Linus Torvalds. Microsoft and Windows are either registered trademarks or trademarks of Microsoft Corporation in the United States and/or other countries.
All other trademarks are the property of their respective owners.

Copyright © 2008 Adobe Systems Incorporated. All rights reserved.
Protected by U.S. Patents 6,185,684; 6,205,549; 7,213,269; 7,272,628; 7,278,168; Patents pending in the U.S. and other countries.
All instances of the name PostScript in the text are references to the PostScript language as defined by Adobe Systems Incorporated unless otherwise stated. The name PostScript also is used as a product trademark for Adobe Systems' implementation of the PostScript language interpreter.
Except as otherwise stated, any reference to a "PostScript printing device," "PostScript display device," or similar item refers to a printing device, display device or item (respectively) that contains PostScript technology created or licensed by Adobe Systems Incorporated and not to devices or items that purport to be merely compatible with the PostScript language.
Adobe, the Adobe logo, PostScript, the PostScript Logo, and PostScript 3 are either registered trademarks or trademarks of Adobe Systems Incorporated in the United States and/or other countries.
All other trademarks are the property of their respective owners.
Premere Anything to do.
6Tasti numerici
POD Deck-D1/Secondary POD Deck-D1
CLASS 1 LASER PRODUCT
LASER KLASSE 1
APPAREL A LASER DE CLASSE 1
APPARECCHIO LASER DI CLASSE 1
PRODUCTO LASER DE CLASE 1
APARELHO ALASER DE CLASSE 1
LUOKAN 1 LASER-TUOTE
LASERPRODUKT KCLASS 1
www.canon-europe.com/battery.
Copyright
Copyright CANON INC. 2015
Copyright (C) 1999, 2000, 2002 Aladdin Enterprises. All rights reserved.
(b)
UFST: Copyright © 1989 - 1996, 1997, 2003, 2004, 2008, all rights reserved, by Monotype Imaging Inc.
(c)
Copyright © Unpublished Work of Novell, Inc. All Rights Reserved.
(d)
Portions of this software are copyright © 2007 The FreeType Project (www.freetype.org). All rights reserved.
(e)
Copyright 2012 jQuery Foundation and other contributors http://jquery.com/
(f)
Copyright(C) 1995-2003 Adobe Systems Inc. All rights reserved.
Esonerodiresponsabilita
Le informazioni del presente documento sono soggette a modifica ricerca preavviso. CANON INC. NON FORNISCE ALCUNA GARANZIA DI ALCUN TIPO RELATIVAMENTE AL PRESENTE MATERIALE, SIA ESSA ESPLICITA O IMPLICITA, TRANNE CHE PER QUANTO DISPOSTO DI SEGuito, INCLUSE, SENZA ESCLUSIONE ALCUNA, LE GARANZIE DI COMMERCIABILITA, IDONEITA A UN PARTICOLARE SCOPO O USO O LA NON VIOLAZIONE. CANON INC. NON SARÀ RITENUTA RESPONSABILE PER DANNI DIRETTI, INCIDENTALI O CONSEQUENZIALI DI QUALSIASI NATURA O PERDITE O COSTI RISULTANTI DALL'UTILIZZO DEL PRESENTE MATERIALE.
Copyright © 2007 -08 Adobe Systems Incorporated. All rights reserved.
Protected by U.S. Patents 5,737,599; 5,781,785; 5,819,301; 5,929,866; 5,943,063; 6,073,148; 6,515,763; 6,639,593; 6,754,382; 7,046,403; 7,213,269; 7,242,415; Patents pending in the U.S. and other countries.
All instances of the name PostScript in the text are references to the PostScript language as defined by Adobe Systems Incorporated unless otherwise stated. The name PostScript also is used as a product trademark for Adobe Systems' implementation of the PostScript language interpreter.
Except as otherwise stated, any reference to a "PostScript printing device," "PostScript display device," or similar item refers to a printing device, display device or item (respectively) that contains PostScript technology created or licensed by Adobe Systems Incorporated and not to devices or items that purport to be merely compatible with the PostScript language.
Adobe, the Adobe logo, PostScript, the PostScript logo, and PostScript 3 are either registered trademarks or trademarks of Adobe Systems Incorporated in the United States and/or other countries.
Linux is a registered trademark of Linus Torvalds. Microsoft and Windows are either registered trademarks or trademarks of Microsoft Corporation in the United States and/or other countries.
All other trademarks are the property of their respective owners.

Copyright © 2008 Adobe Systems Incorporated. All rights reserved.
Protected by U.S. Patents 6,185,684; 6,205,549; 7,213,269; 7,272,628; 7,278,168; Patents pending in the U.S. and other countries.
All instances of the name PostScript in the text are references to the PostScript language as defined by Adobe Systems Incorporated unless otherwise stated. The name PostScript also is used as a product trademark for Adobe Systems' implementation of the PostScript language interpreter.
Except as otherwise stated, any reference to a "PostScript printing device," "PostScript display device," or similar item refers to a printing device, display device or item (respectively) that contains PostScript technology created or licensed by Adobe Systems Incorporated and not to devices or items that purport to be merely compatible with the PostScript language.
Adobe, the Adobe logo, PostScript, the PostScript Logo, and PostScript 3 are either registered trademarks or trademarks of Adobe Systems Incorporated in the United States and/or other countries.
All other trademarks are the property of their respective owners.
CANON
Genuine
TONER, CARTRIDGE & PARTS
100-240 V CA, 50/60 Hz, 1,0 A/120 Womens
Dimensiones (An x Prf x Al) 746 mm x 793 mm x 1.407 mm
CLASS 1 LASER PRODUCT
LASER KLASSE 1
APPAREIL A LASER DE CLASSE 1
APPARECCHIO LASER DI CLASSE 1
PRODUCTO LASER DE CLASE 1
APARELHO ALASER DE CLASSE 1
LUOKAN 1 LASER-TUOTE
LASERPRODUKT KCLASS 1
www.canon-europe.com/battery.
Copyright
Copyright CANON INC. 2015
Copyright (C) 1999, 2000, 2002 Aladdin Enterprises. All rights reserved.
(b)
UFST: Copyright © 1989 - 1996, 1997, 2003, 2004, 2008, all rights reserved, by Monotype Imaging Inc.
(C)
Copyright © Unpublished Work of Novell, Inc. All Rights Reserved.
(d)
Portions of this software are copyright © 2007 The FreeType Project (www.freetype.org). All rights reserved.
(e)
Copyright 2012 jQuery Foundation and other contributors http://jquery.com/
(f)
Copyright(C) 1995-2003 Adobe Systems Inc. All rights reserved.
Copyright © 2007 -08 Adobe Systems Incorporated. All rights reserved.
Protected by U.S. Patents 5,737,599; 5,781,785; 5,819,301; 5,929,866; 5,943,063; 6,073,148; 6,515,763; 6,639,593; 6,754,382; 7,046,403; 7,213,269; 7,242,415; Patents pending in the U.S. and other countries.
All instances of the name PostScript in the text are references to the PostScript language as defined by Adobe Systems Incorporated unless otherwise stated. The name PostScript also is used as a product trademark for Adobe Systems' implementation of the PostScript language interpreter.
Except as otherwise stated, any reference to a "PostScript printing device," "PostScript display device," or similar item refers to a printing device, display device or item (respectively) that contains PostScript technology created or licensed by Adobe Systems Incorporated and not to devices or items that purport to be merely compatible with the PostScript language.
Adobe, the Adobe logo, PostScript, the PostScript logo, and PostScript 3 are either registered trademarks or trademarks of Adobe Systems Incorporated in the United States and/or other countries.
Linux is a registered trademark of Linus Torvalds. Microsoft and Windows are either registered trademarks or trademarks of Microsoft Corporation in the United States and/or other countries.
All other trademarks are the property of their respective owners.

El logotipo PDF es unamarca commercial omarca commercial registrar de Adobe Systems Incorporated en Estados Unidos yotiros pañses.
Copyright © 2008 Adobe Systems Incorporated. All rights reserved.
Protected by U.S. Patents 6,185,684; 6,205,549; 7,213,269; 7,272,628; 7,278,168; Patents pending in the U.S. and other countries.
All instances of the name PostScript in the text are references to the PostScript language as defined by Adobe Systems Incorporated unless otherwise stated. The name PostScript also is used as a product trademark for Adobe Systems' implementation of the PostScript language interpreter.
Except as otherwise stated, any reference to a "PostScript printing device," "PostScript display device," or similar item refers to a printing device, display device or item (respectively) that contains PostScript technology created or licensed by Adobe Systems Incorporated and not to devices or items that purport to be merely compatible with the PostScript language.
Adobe, the Adobe logo, PostScript, the PostScript Logo, and PostScript 3 are either registered trademarks or trademarks of Adobe Systems Incorporated in the United States and/or other countries.
All other trademarks are the property of their respective owners.
30-2, Shimomaruco 3-chome, Ohta-ku, Tokyo 146-8501, Japan
CANON U.S.A., INC.
One Canon Park, Melville, NY 11747, U.S.A.
CANON CANADA INC.
8000 Mississauga Road Brampton ON L6Y 5Z7, Canada
CANON EUROPA N.V.
Bovenkerkerweg 59, 1185 XB Amstelveen, The Netherlands
(See http://www.canon-europe.com/ for details on your regional dealer)
CANON AUSTRALIA PTY. LTD
Building A, The Park Estate, 5 Talavera Road, Macquarie Park, NSW 2113, Australia
CANON CHINA CO., LTD
2F Jinbao Building No.89 Jinbao Street, Dongcheng District, Beijing 100005, China
CANON SINGAPORE PTE. LTD.
1 Fusionopolis Place, #15-10, Galaxis, Singapore 138522