imagePRESS C165 - Controller CANON - Free user manual and instructions
Find the device manual for free imagePRESS C165 CANON in PDF.

User questions about imagePRESS C165 CANON
0 question about this device. Answer the ones you know or ask your own.
Ask a new question about this device
Download the instructions for your Controller in PDF format for free! Find your manual imagePRESS C165 - CANON and take your electronic device back in hand. On this page are published all the documents necessary for the use of your device. imagePRESS C165 by CANON.
USER MANUAL imagePRESS C165 CANON
image PRESS C170/C165
Quick Guide
Read this guide first.
Please read "Important Safety Instructions" before operating this product. After you finish reading this guide, store it in a safe place for future reference. The information in this document is subject to change without notice.
Guide rapide
Auto Gradation Adjustment for Various Paper Types
The Auto Adjust Gradation function adjusts the gradation, density, and color tone of images, and only requires you to scan the test page. This function can be used for various weights of paper so that a high quality print result can be obtained in different paper types.

"Maintenance" > "Adjusting Print and Finish Quality" in the User's Guide

natural_image
Illustration of a paintbrush resting on an artist's palette with five colored dots (no text or symbols)Achieve High Quality Color Reproduction with Auto Color Tone Correction
Compared to the Auto Adjust Gradation function, which adjusts CMYK, the Auto Correct Color Tone function adjusts mixed colors that are expressed with multiple toner. By using these functions together, you can perform more stable color adjustment.

"Maintenance" > "Adjusting Print and Finish Quality" in the User's Guide

natural_image
Six-panel grid showing six identical panels of balloons with varying grayscale shading and black outlines, arranged in a 2x2 grid (no text or symbols)Optimum Print Result for Each Paper Type
Paper information, which includes the basis weight, finish, and curl correction level, can be registered as the paper characteristics. As the detailed information can be specified for each different paper type, you can obtain the fine print result with considering the paper characteristics. This function is also effective for improving paper conveyance and print quality.

"Maintenance" > "Paper Type Management Settings" in the User's Guide

natural_image
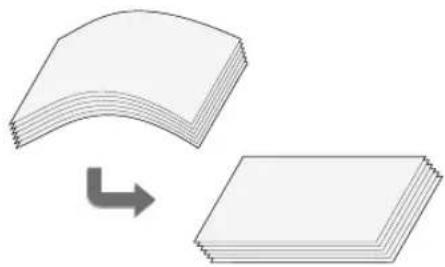
Stack of four overlapping sheets of paper with distinct gray and white surfaces (no text or symbols)Curl Correction for Stable Paper Conveyance
The machine constantly corrects the paper curl which occurs due to the pressure applied when toner is fixed. Moreover, by correcting the paper curl during outputting, the machine reduces the risk of a paper jam, and achieves the stable paper conveyance. The curl correction can be specified for each paper type you want to use.

- "Maintenance" > "Adjusting Print and Finish Quality" in the User's Guide
- "Maintenance" > "Paper Type Management Settings" in the User's Guide
natural_image
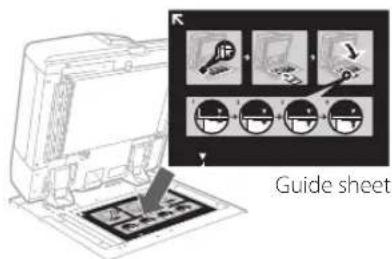
Diagram showing a curved stack of papers transforming into a single sheet of paper, with an arrow indicating the process (no text or symbols present)Easy Operation for Adjusting Image Position
You can use a guide sheet to quickly perform image position adjustment. This is convenient because it is not necessary to take measurements and enter values.

"Maintenance" > "Paper Type Management Settings" > "Adjusting the Image Position" in the User's Guide
text_image
Guide sheetQuick Access to Frequently Used Settings
Different settings are required, depending on the printing purpose or paper types, but accessing setting items located in various menus every time is a quite complicated operation. In this case, register frequently used settings in "Settings/Registration Shortcut" button. You can directly access to the setting screen with this button and save the effort to search necessary setting items.
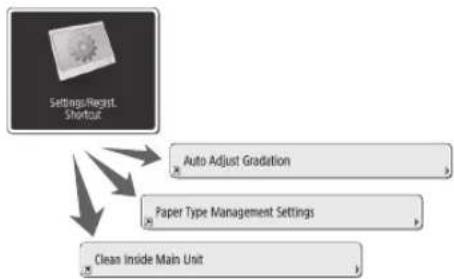
flowchart
graph TD
    A["Settings/Regist Shortcut"] --> B["Auto Adjust Graduation"]
    A --> C["Paper Type Management Settings"]
    A --> D["Clean Inside Main Unit"]

"Basic Operations" > "Customizing the Touch Panel Display" > "Registering Shortcuts for Frequently Used Settings/Registered Items" in the User's Guide
Contents
Thank you for purchasing this Canon product. Please read this manual thoroughly before operating the machine to familiarize yourself with its capabilities, and to make the most of its many functions. For more information on the detailed settings for the functions, see the User's Guide. After reading this manual, store it in a safe place for future reference.
Parts and Their Functions....6
External View (Front Side)....6
External View (Back Side) 8
Internal View 9
Control Panel....10
Status Monitor Screen 12
How to Turn ON the Main Power....13
Turning ON the Main Power 13
Shutting Down the Machine....13
Loading Paper 14
Paper Source....14
Registering Paper Types to the Machine....16
Loading Paper into the Paper Deck/Paper Drawer ....18
Registering Custom Paper Types ....20
Cleaning and Maintenance 22
Cleaning the Platen Glass....22
Cleaning the Original Scanning Area .....22
Cleaning the Feeder 23
Automatic Feeder Cleaning 25
Cleaning the Inside of the Main Unit ....25
Cleaning the Touch Panel Display....26
Inspection of the Breaker 27
Consumables 28
Troubleshooting 30
Clearing Paper Jams and Staple Jams ....30
Reducing the Frequency of Paper Jams ....30
When an Error Message Is Displayed ....31
Contacting Your Local Authorized Canon Dealer 32
If Memory Becomes Full .... 33
If the Main Power Does Not Turn ON....33
Appendix 34
Symbols Used in This Manual
IMPORTANT
NOTE


OPTION
Indicates operational requirements and restrictions. Be sure to read these items carefully to operate the machine correctly, and avoid damage to the machine or property.
Indicates a clarification of an operation, or contains additional explanations for a procedure. Reading these notes is highly recommended.
Indicates useful functions or tips for using the machine.
You can find further information from the online manual site (https://oip.manual.canon/).
A detailed explanation is described on the specified page of this manual.
Indicates an optional product which can be used with this machine.
Keys and Buttons Used in This Manual
The followings are examples of how keys and buttons are expressed in this manual.
- Buttons on the touch panel display:

→
Close
→
• Control Panel Keys: Key Icon


- Buttons on Computer Operation Screens: [Button Name]
[OK], [Add], [Cancel]

You can access https://oip.manual.canon/ to read the User's Guide that describes all functions of this machine.

Parts and Their Functions
This section provides you with the names and functions of all the parts of the machine. The keys and display on the control panel are also described. Read this section to use the machine's various functions smoothly.

"Appendix" > "Options" in the User's Guide
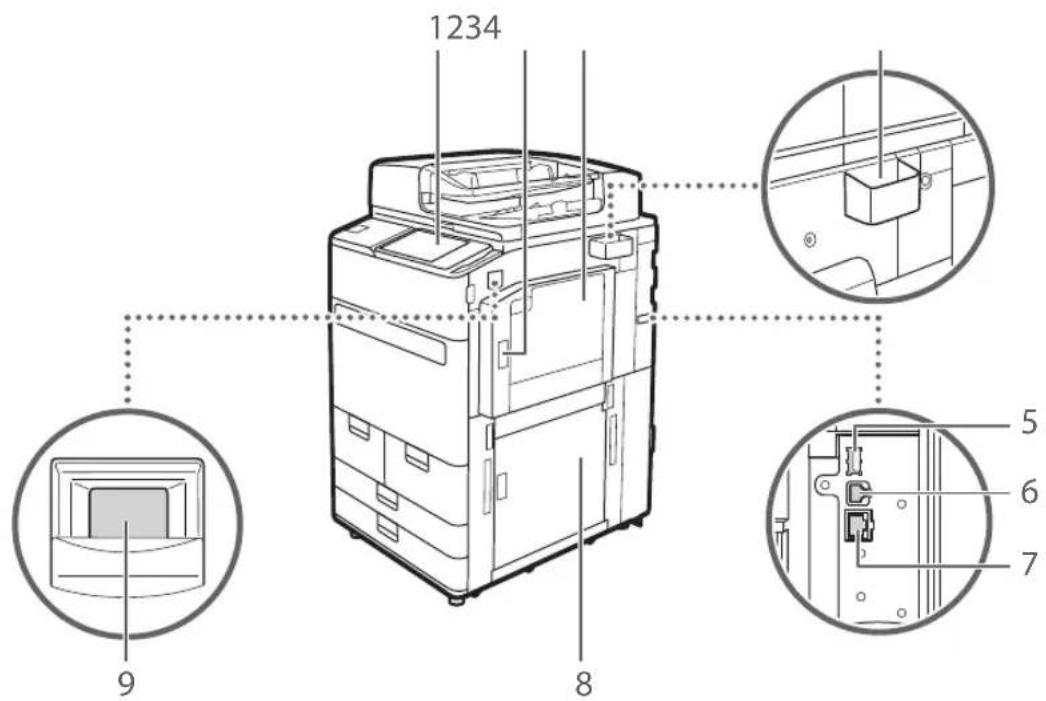
External View (Front Side)
text_image
1234 9 8 5 6 71 Control panel
The control panel consists of the numeric keys, indicators, touch panel display, etc. You can perform all the operations and specify settings from the control panel.
2 Upper-right cover of the main unit
Open this cover when clearing a paper jam inside the machine.
3 Multi-purpose tray
Load paper into the multi-purpose tray when you want to use a type of paper different from that which is loaded in the paper deck/drawer.
4 Glass cleaning cloth storage box
Use this box to store the cloth for cleaning the platen glass.
5 USB port (Rear-right side of the machine)
You can connect devices such as an external hard disk to the machine.
6 USB connector
Connect a USB cable when connecting the machine and a computer.
7 LAN port
Connect a LAN cable when connecting the machine to a wired LAN router, etc.
8 Lower-right cover of the main
Open this cover when clearing a paper jam inside the machine.
9 Power switch
Press the power switch when turning ON or OFF the machine.
text_image
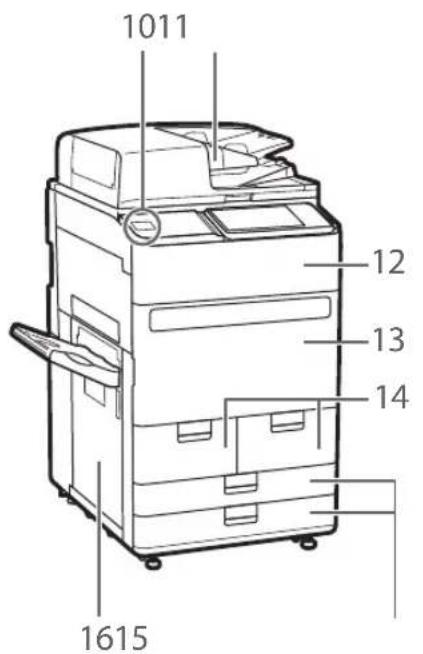
1011 12 13 14 161510 USB port (Front side of the machine)
You can connect devices such as a USB memory device to the machine.
11 Feeder
Automatically feeds originals into the machine for scanning. When two or more sheets are loaded in the feeder, originals can be scanned continuously.
12 Toner replacement cover
Open this cover when replacing the toner cartridge.
13 Front cover of the main unit
Open this cover when clearing a paper jam.
14 Paper deck 1/paper deck 2
Load the type of paper that you frequently use.
15 Paper drawer 1/paper drawer 2
Load the type of paper that you frequently use. You can load paper that cannot be loaded in the paper decks.
16 Left cover of the main unit
Open this cover when clearing a paper jam.
External View (Back Side)

text_image
Technical diagram of a device with labeled parts and zoomed-in views, showing internal components and structural details.1 Telephone line jack (LINE 1)
Connect a telephone cable when connecting the machine to a telephone line.
2 Breaker
Detects excess current or leakage current.
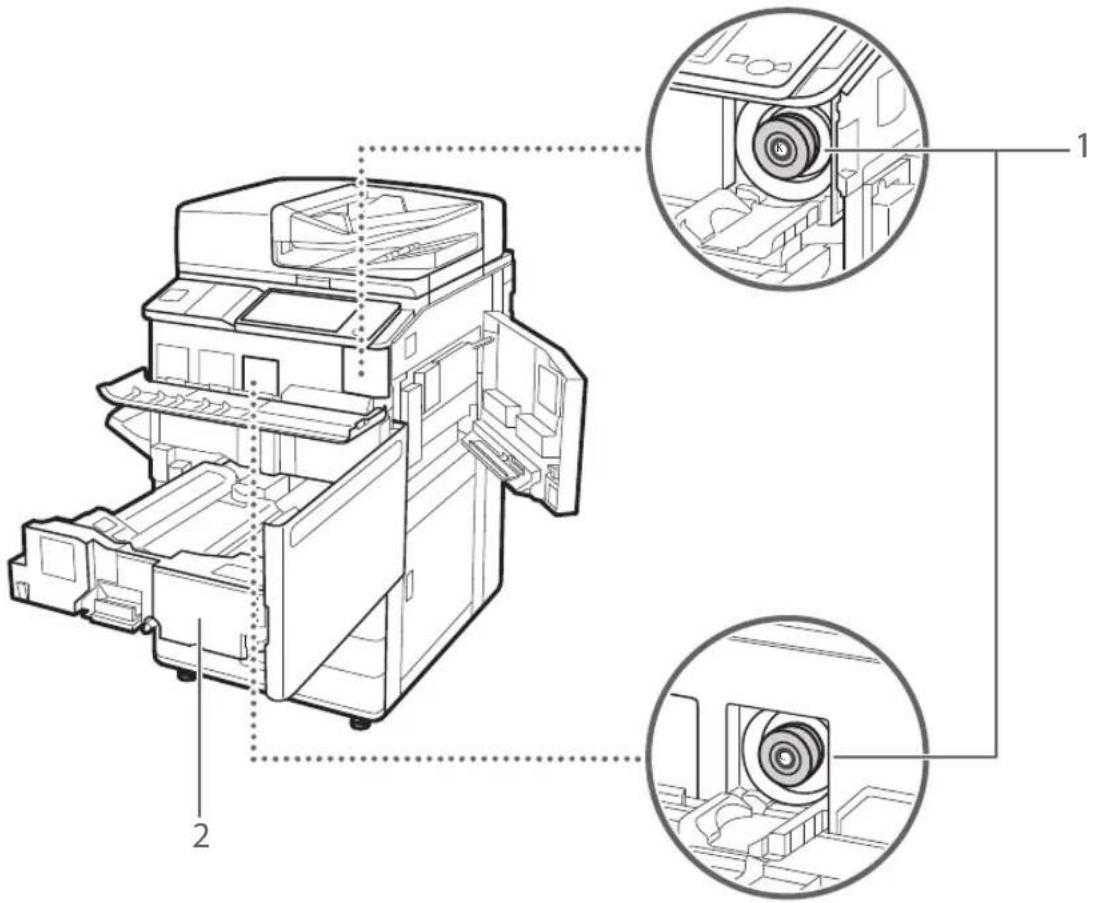
Internal View
text_image
Technical diagram of a printer internal structure with labeled components and zoomed-in insets for assembly or inspection.1 Toner cartridge
Replace the toner cartridge when the toner runs out.
2 Fixing transport unit
Pull the fixing transport unit out when clearing a paper jam inside the machine.
text_image
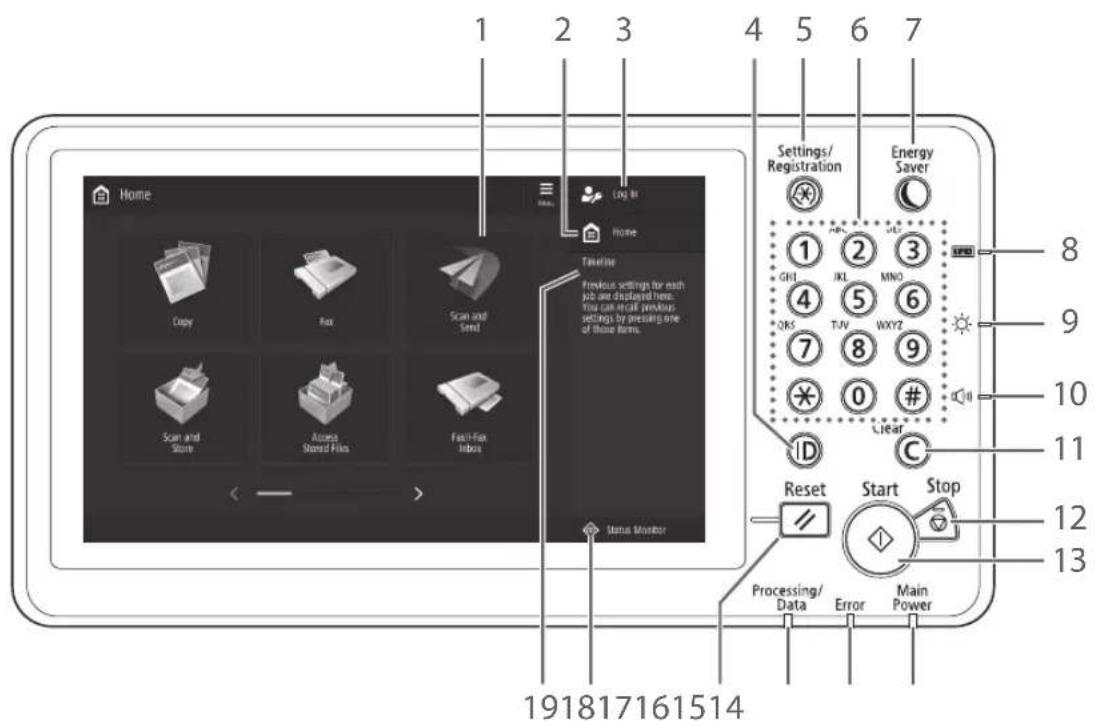
1 2 3 4 5 6 7 Home Log In Home Timeline Previous settings for each job are displayed here. You can install previous settings by pressing one of those items. Scan and Store Access Stored Files Fast-Fax Import Status Monitor Settings/ Registration Energy Saver 1 2 3 GHI JKL MNO 4 5 6 OKS TUV WXY2 7 8 9 0 # Linear ID C Reset Start Stop Processing/ Data Error Main Power 191817161514 8 9 10 11 12 131 Touch panel display
Displays the settings screen and messages. Touch the panel to perform setting and other operations.
2
Press to display the Home screen.
3 Login user name
The user name that is currently logged in is displayed.
4 ID (Log In/Out) key
Press this to log in/out (when a login service has been set).
5 Settings/Registration key
Press to specify settings or make a registration.
6 Numeric keys
Press to enter numerical values.
7 Energy Saver key
Press to set or cancel the Sleep mode.
• Lights when the machine enters Sleep mode.
- Turns off when the machine exits Sleep mode.
8 Counter/Device Information key
Press to display the copy and print count totals on the touch panel display.
9 Brightness Adjustment key
Adjusts the brightness of the screen.
10 Volume Settings key
Press to adjust the sound volume.
11 Clear key
Press to clear the entered values or characters.
12 Stop key
Press to stop the current operation.
13 Start key
Press this to start an operation (or data reading).
14 Main Power indicator
Lights when the power is turned ON.
15 Error indicator
Flashes or lights if there is an error in the machine. ※When the Error indicator maintains a steady red light, contact your local authorized Canon dealer.
16 Processing/Data indicator
• Flashes when the machine is operating.
- Lights when the machine is waiting for a command.
17 Reset key
Press to cancel the settings and restore the previously specified settings.
18
Press to check the status of a job or cancel a job.
19
Displays a log for settings specified in Copy/Scan and Send.

Setting the Energy Saver mode/Sleep mode to minimize energy consumption
You can save energy consumption by using the Energy Saver mode/Sleep mode when the machine is not being used for a prolonged period of time, such as a lunch time. To use these modes, simply press on the control panel. If the machine is idle for a certain period of time, the machine will enter the Sleep mode (Auto Sleep mode). For more information on the mode which activates after is pressed, and detailed information on the Auto Sleep mode, see the User's Guide.

"Basic Operations" > "Entering Sleep Mode" in the User's Guide
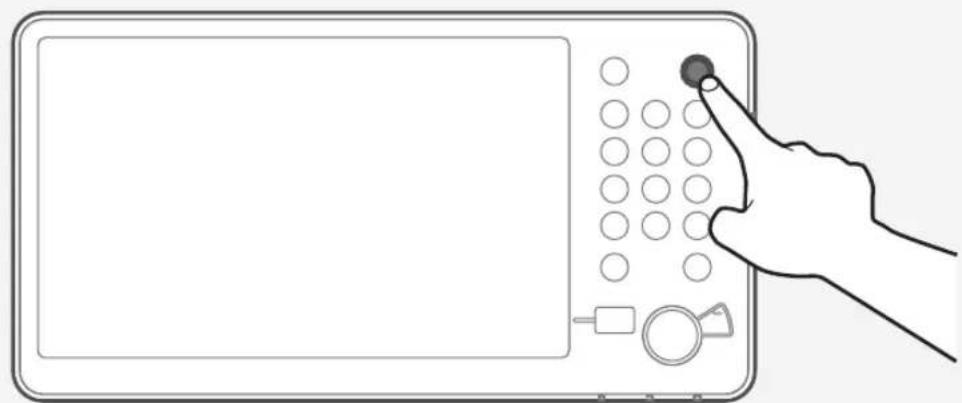
natural_image
Line drawing of a hand pressing a button on a device panel with circular buttons and a magnifying glass (no text or symbols)Status Monitor Screen
If you press 📄 Status Monitor Monitor screen appears, and you can confirm the status of jobs and consumables on this screen. By obtaining information, such as the completion time of the current job or the amount of paper remaining, you can perform smooth printing operation without interruption.

Useful situations
- When you want to know the completion time of jobs
- When you want to check the amount of paper remaining for efficient paper loading
- When you want to cancel a job which is registered by mistake
, , , screen
The
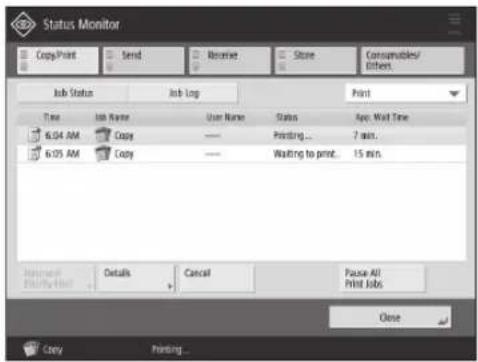
text_image
Status Monitor Copy/Print Send Receive Store Consumables/Other Job Status Job Log Print Time Job Name User Name Status Ago: Wait Time 6:04 AM Copy —— Printing... 7 min. 6:05 AM Copy —— Waiting to print... 15 min. Information Details Cancel Pause All File By Help Pause All Close Copy Printing ... screen
You can check the paper information and the remaining amount of paper in all paper sources.
You can also check the memory usage, remaining toner, remaining staples, and amount of punch waste.
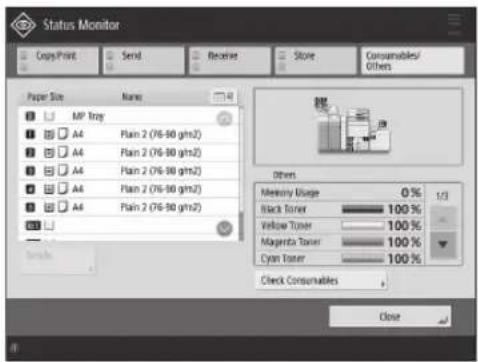
text_image
Status Monitor Copy/Print Send Receive Store Consumables/ Others Paper Size Name MP Tray A4 Plain 2 (76-90 gm32) A4 Plain 2 (76-90 gm32) A4 Plain 2 (76-90 gm32) A4 Plain 2 (76-90 gm32) A4 Plain 2 (76-90 gm32) ... ... ... Others Memory Usage 0% 1/3 Black Toner 100% Velage Toner 100% Magnets Toner 100% Cyan Toner 100% Check Consumables CloseHow to Turn ON the Main Power
This section explains how to turn ON the main power.
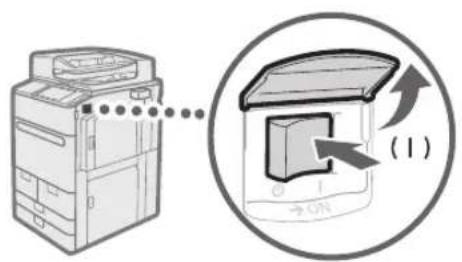
Turning ON the Main Power
Make sure that the power plug is firmly inserted into the power outlet, and the breaker is turned ON.
text_image
Diagram showing a printer with a close-up view of its internal component, labeled with directional arrows and Chinese character (1)1 Open the main power switch cover.
2 Press the main power switch to the "|" side.
• The main power indicator on the control panel lights.
IMPORTANT
If you want to turn ON the main power again, wait for at least 10 seconds after the main power and the main power indicator are turned OFF. However, when
NOTE
The response of the keys and buttons may not be optimal immediately after turning ON the main power of the machine.
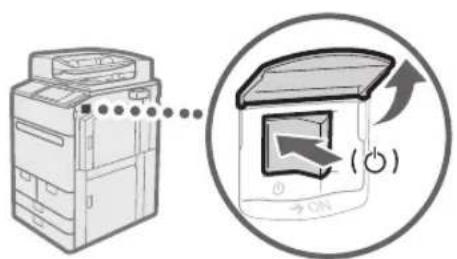
Shutting Down the Machine

Do not turn OFF the main power in the following situations
- When using the I-Fax function
- When the message
is displayed - When operating scan or print function
text_image
Diagram showing a printer with a close-up view of its open door, indicating press operation or status change.1 Open the main power switch cover.
2 Press the main power switch to the "side.
• The main power indicator on the control panel turns OFF.
Loading Paper
Load paper by following the procedure below. In this section, A4 custom size paper is used as an example.

flowchart
graph TD
    A["Confirmation"] --> B[""Appendix" > "Hardware Specifications" > "Available Paper" in the User's Guide"]
    B --> C["To use a paper type not registered in the machine, register it in advance."]
    C --> D[""Registering Paper Types to the Machine," on p. 16"]
    D --> E["Operation"]
    E --> F["Load paper in the paper drawer."]
    F --> G[""Loading Paper into the Paper Deck/Paper Drawer," on p. 18"]
    G --> H["Registration"]
    H --> I["Specify the loaded paper size and type for the paper drawer."]
    I --> J[""Registering Custom Paper Types," on p. 20"]
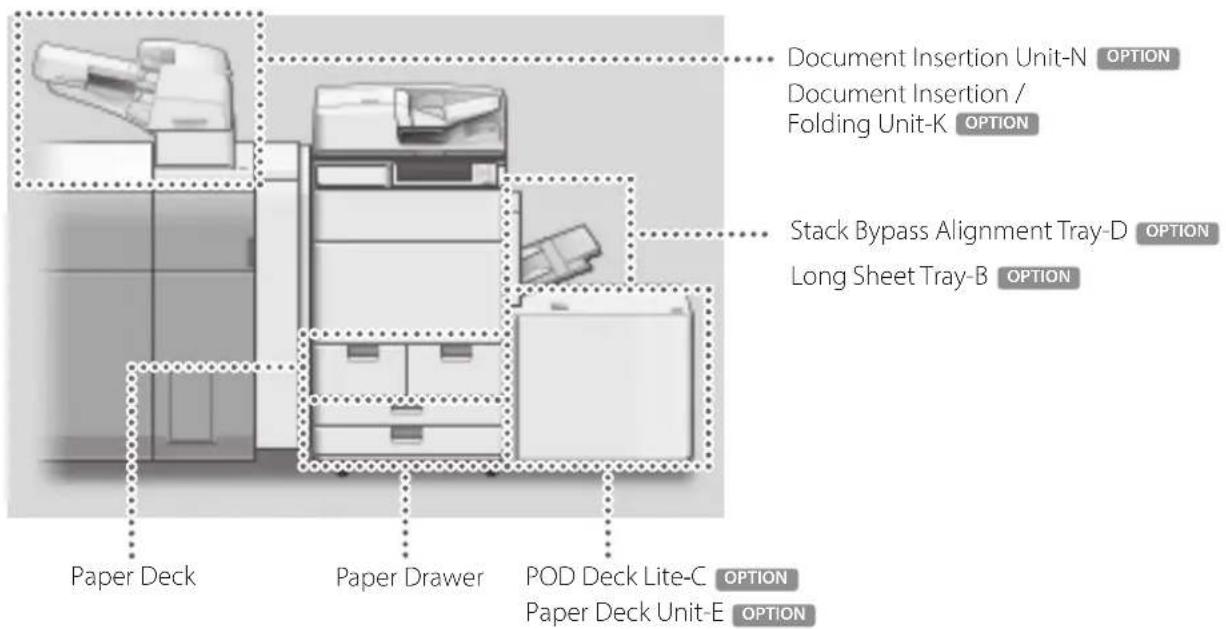
Paper Source
This section describes available paper sources. Paper that can be loaded differs, depending on the paper sources. The following description includes the optional products as well as the standard paper deck/paper drawers. The optional products are indicated with OPTION.
text_image
Document Insertion Unit-N OPTION Document Insertion / Folding Unit-K OPTION Stack Bypass Alignment Tray-D OPTION Long Sheet Tray-B OPTION Paper Deck Paper Drawer POD Deck Lite-C OPTION Paper Deck Unit-E OPTIONNOTE
For details on paper that can be loaded, see the User's Guide.

"Appendix" > "Hardware Specifications" > "Available Paper" in the User's Guide
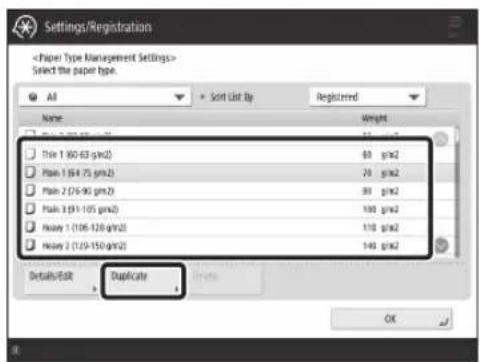
Registering Paper Types to the Machine
Register all paper types you are going to use with this machine.
NOTE
- If you load paper which is already registered in the machine, such as plain or recycled paper, this step is not necessary. Proceed to the next step "Loading Paper into the Paper Deck/Paper Drawer".
- You cannot change the settings of the default paper types registered in the machine. If you edit the settings, make sure to duplicate and register them as a new one beforehand.
1 Press
2 Press
3 Select a paper type from the list that closely matches the characteristics of the paper type you want to register → press
text_image
Settings/Registration4 Enter a name → press
NOTE
When you register the custom paper, make sure to change its name. You cannot change the settings of the paper types that are registered in the machine as default.
5 Select the paper type duplicated in steps 3 and 4 from the list → press
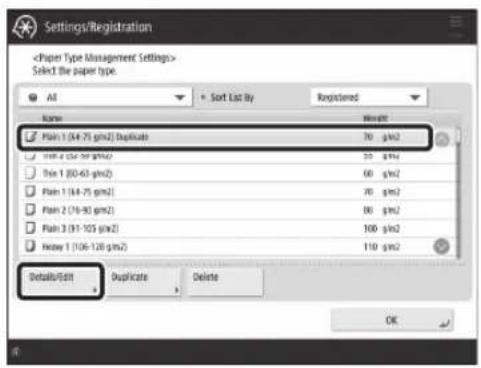
text_image
Settings/Registration6 Press for the item you want to change.

"Maintenance" > "Paper Type Management Settings" in the User's Guide
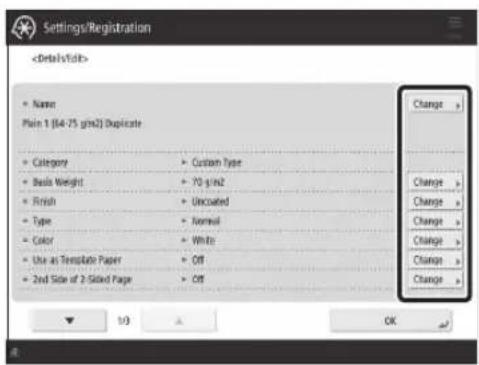
text_image
Settings/Registration7 Change the settings → press .
• If there are other items you want to set, repeat steps 6 and 7.
8 Press .

text_image
Settings/Registration9 Press .

text_image
Settings/RegistrationNOTE
Of the A4 size, you can load the preset size of paper in the paper deck. natural_image
Diagram of a mechanical component with an arrow indicating direction (no text or symbols present)text_image
The print side face down1 Open the paper deck.
2 Load the paper stack into the paper deck.
1 Load the paper stack against the wall of the paper deck. 2 Push the paper deck back into the machine until it clicks into place in the closed position.Loading Paper into the Paper Drawer
natural_image
Diagram of a mechanical component with internal channels and an arrow indicating direction (no text or symbols)1 Open the paper drawer.
• Gently pull out the paper drawer until it stops. natural_image
Diagram of a vehicle interior showing engine compartment and directional arrows indicating rotation (no text or labels)2 Loosen the fixing screws.
text_image
Diagram showing a device interior with labeled parts and directional arrows, including hand positioning and component insertion.3 Adjust the position of the paper guides.
\- Slide each guide while squeezing it on the top to align for the desired paper size. natural_image
Diagram of a vehicle interior with gear shift indicators (no text or symbols)4 Tighten the fixing screws.
Make sure that this line is not exceeded. text_image
Paper Envelope The print side face down5 Load the paper stack into the paper drawer.
1 Load the paper stack against the right wall of the paper drawer. 2 Push the paper drawer back into the machine until it clicks into place in the closed position.NOTE
• Make sure to fan the paper stack, and align the edges before loading paper. - Curled paper must be straightened out prior to use. - Make sure that the height of the paper stack does not exceed the loading limit mark (\_\_\_\_). - When loading pre-punched paper, transparencies/clear film, tab paper, and envelopes, make sure to load paper in an appropriate orientation as the paper orientation differs, depending on the paper source.  "Basic Operations" > "Loading Paper" in the User's GuideRegistering Custom Paper Types
You can register the paper size and type for each paper source.1 Press
2 Presstext_image
Settings/Registrationtext_image
Settings/Registrationtext_image
Settings/Registrationtext_image
Settings/RegistrationCleaning and Maintenance
For optimum operation of the machine, we recommend to clean and check the machine regularly.Cleaning the Platen Glass
If originals cannot be scanned properly, follow the cleaning procedure below. Clean with a cloth which is wrung after being dampened in water, and then clean with a soft and dry cloth. Use the provided glass cleaning cloth for simple cleaning. 1 Shutting down the machine. "Shutting Down the Machine," on p. 13 natural_image
Line drawing of an open industrial machine with a screen and baseplate (no text or symbols)Cleaning the Original Scanning Area
If originals which are fed from the feeder cannot be scanned properly, follow the procedure below. 1 Press 2 PressCleaning the Feeder
Clean the feeder when originals become dirty or jam frequently. Clean with a cloth which is wrung after being dampened in water, and then clean with a soft and dry cloth. Use the provided glass cleaning cloth for simple cleaning. 1 Shutting down the machine. "Shutting Down the Machine," on p. 13 natural_image
Diagram showing a laptop with a screen and a magnified view of a small object, no text or symbols present.natural_image
Diagram of a car rear vent with labeled component (no text or symbols present)IMPORTANT
Make sure that no trash such as pieces of paper gets into the groove of the multiple sheet feed detection sensor. If trash does get in, remove it using a soft cloth. text_image
Technical diagram showing a device's internal structure with labeled components and numbered annotationnatural_image
Technical line drawing of a vehicle chassis with a magnified inset showing internal components (no text or symbols)natural_image
Line drawing of a hand inserting a component into an open device (no text or symbols)5 Clean the original scanning area.
\- Open the feeder and clean the original scanning area (thin glass strip). text_image
Diagram showing a printer's internal structure with labeled parts and an arrow indicating assembly or process flow.6 Open the document scan cover.
1 Pull the lever above the feeder. 2 Open the document scan cover. natural_image
Technical line drawing of a printer or scanner with an inset close-up showing internal components (no text or symbols)7 Open the inside cover.
text_image
long glass area8 Clean the original scanning area of the feeder.
9 Close the inside cover and document scan cover in order, and then close the feeder
10 Turning on the main power.
"Turning ON the Main Power," on p. 13■Automatic Feeder Cleaning
If originals which are fed from the feeder become dirty, follow the procedure below. 1 Place 10 sheets of blank paper into the feeder. \- Use A4 plain paper. 2 Press 3 PressNOTE
Similarly performCleaning the Touch Panel Display
Wipe the touch panel display with a cloth dampened in water or a mild cleaning agent, and then wipe with a soft, dry cloth. natural_image
Illustration of a hand cleaning a clean appliance on a microwave (no text or symbols)Inspection of the Breaker
This machine has a breaker that detects excess current or leakage current. Make sure to test the breaker once a month by following the procedure below. text_image
Diagram showing a printer with a close-up view of its open door mechanism, labeled with Chinese characters and directional arrows.1 Turn OFF the main power.
• Make sure that the main power is turned OFF, before inspecting the breaker. natural_image
Diagram showing a door opening and a printer with a paper airplane, connected by dotted lines (no text or symbols)2 Push the test button located on the rear of the machine.
\- Push the test button with the tip of a ball-point pen or a similar object. Briefly push the test button. natural_image
Illustration of a printer emitting sound waves to a printer, with no visible text or symbols.3 Confirm that the breaker lever is switched to the OFF position.
\- If the breaker lever is not switched to the OFF position, repeat step 2. If the breaker lever is not switched to the OFF position, despite carrying out the above procedure two or three times, contact your local authorized Canon dealer. text_image
Diagram showing a printer icon being inserted into a printer, with an arrow indicating the process and a dotted line suggesting connection or alignment.4 Switch the breaker lever to ON.
text_image
Diagram showing a printer with a close-up view of its internal structure, labeled with directional arrows and a circled number 1.5 Turn ON the main power.
Consumables
The following consumables are available for this machine. For more information, contact your local authorized Canon dealer. For information on using and storing consumables, see "Consumables," on p. 36.Paper
In addition to plain paper, other types of paper stock are available, such as recycled paper, color paper, transparencies/clear film (recommended for this machine), vellums, and labels. For high-quality printouts, use paper recommended by Canon.Toner
If a message prompting you to replace the toner cartridge appears on the touch panel display, replace the used toner cartridge with a new one. For information on how to replace the toner cartridge, see the User's Guide. For optimum print quality, using Canon genuine toner is recommended.  "Maintenance" > "Replacing the Toner Cartridge" in the User's GuideSupported Canon Genuine Toner
Canon imagePRESS Toner T07 Black Canon image PRESS Toner T07 Cyan Canon imagePRESS Toner T07 Magenta Canon imagePRESS Toner T07 Yellow   Black Toner Cartridge Cyan, Magenta, or Yellow Toner Cartridge Be careful of counterfeit toners
Please be aware that there are counterfeit Canon toners in the marketplace. Use of counterfeit toner may result in poor print quality or machine performance. Canon is not responsible for any malfunction, accident or damage caused by the use of counterfeit toner. For more information, see global.canon/ctc.Staple Cartridge for the Stapler Unit
The Staple-N1/Staple Cartridge-X1 can be attached to the Staple Finisher-W PRO/Booklet Finisher-W PRO/Staple Finisher-AC/Booklet Finisher-AC for stapling. For information on how to replace the staple cartridge, see the User's Guide.  "Maintenance" > "Loading Staples (Optional)" > "Replacing the Staple Case in the Stapler Unit (Staple Finisher-W PRO/Booklet Finisher-W PRO)", "Replacing the Staple Case in the Stapler Unit (Staple Finisher-AC/Booklet Finisher-AC)" in the User's Guide. natural_image
Technical line drawings of two mechanical components (no text or symbols)Staple Cartridge for the Saddle Stitcher Unit
The Staple-P1/Staple Cartridge-Y1 can be attached to the Booklet Finisher-W PRO/Booklet Finisher-AC for saddle stitching. For information on how to replace the staple cartridge, see the User's Guide.  "Maintenance" > "Loading Staples (Optional)" > "Replacing the Staple Case in the Saddle Stitcher Unit (Booklet Finisher-W PRO)", "Replacing the Staple Case in the Saddle Stitcher Unit (Booklet Finisher-AC)" in the User's Guide. natural_image
Technical line drawings of two mechanical housing components (no text or symbols)Genuine Consumables
Canon continuously develops technology innovations in Canon manufactured Toner, Cartridge, and Parts, specifically designed for use in Canon Multi-Functional machines. Experience the benefits of optimal print performance, print volume and high quality outputs, achieved through Canon's new advanced technologies. Therefore, the use of Canon genuine consumables is recommended for your Canon Multi-Functional machines.  CANON GENUINE TONER, CARTRIDGE & PARTSTroubleshooting
This section explains how to solve problems when paper jam occurs frequently or error messages are displayed. For information on the detailed procedures and precautions, see the User's Guide.  "Troubleshooting" in the User's GuideClearing Paper Jams and Staple Jams
If a paper jam or staple jam occurs, follow the instructions displayed on the touch panel display to clear the jam. If you presstext_image
Remove Document Paper 04/16/1 Close Remove all the paper from the multi-purpose copy and the paper that is jumped. Paper is jumped.Paper Jam screen
The location of a paper jam and procedures for clearing the jam are displayed. text_image
Remove Document Samples 021301 Clear Remove the paper inserted in the shaping area. Styles are joined.Staple Jam screen
The location of a staple jam and procedures for clearing the jam are displayed.■Reducing the Frequency of Paper Jams
If paper jams occur frequently, the following reasons may be the cause.There are torn pieces of paper left inside the machine.
As a result of pulling jammed paper out by force, torn pieces of paper may be left inside the machine. \- Remove all of the torn pieces.Paper which does not match with the setting is loaded.
\- Make sure that the paper loaded in the paper drawer matches the paper size and type registered inPaper jams occur frequently only when using the specific custom paper.
The paper information may be registered incorrectly. \- Confirm the paper information settings for the paper you are using.  "Maintenance" > "Paper Type Management Settings" in the User's GuideWhen an Error Message Is Displayed
If a malfunction occurs and the machine cannot operate normally, a screen shown on the right appears. If the machine cannot operate normally after turning the main power OFF and then ON, contact your local authorized Canon dealer.  "Contacting Your Local Authorized Canon Dealer," on p. 32 text_image
Turn the main power OFF and ON (using the switch on the right side of the main unit). • If the device still does not operate normally, contact your service representative with the error code below. Error Code: E001674-0000If a key for the Limited Functions mode is displayed:
Iftext_image
Turn the main power OFF and ON using the switch on the right side of the main unit. • If the device still does not operate normally, contact your service representative with the error code below. Error Code: E000548-0001 The finisher output tray cannot move up or down. Make sure that objects are not placed in the range of tray movement. Press (Limited Function Mode) to continue operation using limited functions if the device is not functioning correctly even after the main power was turned (using the switch on the right side of the main unit OFF, then ON again. Limited Function Mode >If a message is displayed on the bottom of the screen:
If an error message appears on the bottom of the screen, printing and scanning functions are restricted, but some functions may still be available.  "Troubleshooting" > "A Message or a Number Starting with "#" (an Error Code) Is Displayed" > "A Message Saying to Contact a Local Authorized Canon Dealer Is Displayed" in the User's Guide text_image
Home Copy Fax Scan and Send Scan and Store Access Stored Files Raw/Raw Index The adapter needs to be checked. (Call service representatives.)Contacting Your Local Authorized Canon Dealer
If you cannot operate the machine normally after turning the main power OFF and then ON, contact your local authorized Canon dealer by following the procedure below.1 Note the error code.
\- Write down the error code "EXXXXXX-XXXX". text_image
Turn the mains power OFF and ON (using the switch on the right side of the mains unit). • If the device dll does not operate normally, contact your service representative with the error code below. Error Code: E000674-00002 Turn OFF the main power.
\- Press the main power switch to the "⏻" side. text_image
Diagram showing a printer with a close-up view of its open door mechanism, indicating press operation or status change.3 Remove the power plug from the power outlet.
4 Confirm the product name, and contact your local authorized Canon dealer.If Memory Becomes Full
If memory becomes full during scanning, the following messages appear on the touch panel display. Follow the procedures on the screen, and then delete unnecessary files stored in the Mail Box and Fax/I-Fax Inbox to make more memory available. Scanning will be canceled because the memory is full. Do you want to print (send, store)\* the scanned pages? \* A part of the message differs, depending on the function used.If the Main Power Does Not Turn ON
If the machine cannot operate when the main power is turned ON, check the breaker. If the breaker is switched to the OFF position, do not attempt to turn ON the breaker yourself, and be sure to contact your local authorized Canon dealer. text_image
OFF (○)Appendix
Important Safety Instructions
This chapter describes important safety instructions for the prevention of injury to users of this machine and others, and damage to property. Read this chapter before using the machine, and follow the instructions to use the machine properly. Do not perform any operations not described in this manual. Canon will not be responsible for any damages resulting from operations not described in this manual, improper use, or repair or changes not performed by Canon or a third party authorized by Canon. Improper operation or use of this machine could result in personal injury and/or damage requiring extensive repair that may not be covered under your Limited Warranty. WARNING
Indicates a warning concerning operations that may lead to death or injury to persons if not performed correctly. To use the machine safely, always pay attention to these warnings. CAUTION
Indicates a caution concerning operations that may lead to injury to persons if not performed correctly. To use the machine safely, always pay attention to these cautions. IMPORTANT
Indicates operational requirements and restrictions. Be sure to read these items carefully to operate the machine correctly, and avoid damage to the machine or property.Installation
To use this machine safely and comfortably, carefully read the following precautions and install the machine in an appropriate location. WARNING
Do not install in a location that may result in a fire or electrical shock
- A location where the ventilation slots are blocked (too close to walls, beds, sofas, rugs, or similar objects) - A damp or dusty location - A location exposed to direct sunlight or outdoors • A location subject to high temperatures • A location exposed to open flames • Near alcohol, paint thinners or other flammable substancesOther warnings
- Do not connect unapproved cables to this machine. Doing so may result in a fire or electrical shock. - Do not place necklaces and other metal objects or containers filled with liquid on the machine. If foreign substances come in contact with electrical parts inside the machine, it may result in a fire or electrical shock. - If any foreign substance falls into this machine, unplug the power plug from the AC power outlet and contact your local authorized Canon dealer. CAUTION
Do not install in the following locations
The machine may drop or fall, resulting in injury. • An unstable location • A location exposed to vibrationsOther cautions
- Do not connect any unauthorized optional products to the outlet for connecting optional products, as this could result in a fire or smoke. - When disconnecting the power cord, wait at least 5 seconds before connecting the power cord again. - Excessive voltage drop may cause a malfunction or loss of data in the machine and computers.Leveling feet (only for products with leveling feet)
Do not remove the machine's leveling feet after the machine has been installed, as this may cause the machine to fall or tip over, resulting in personal injury. IMPORTANT
Do not install in the following locations
Doing so may result in damage to the machine. • A location subject to temperature and humidity extremes, whether low or high • A location subject to dramatic changes in temperature or humidity • A location near equipment that generates magnetic or electromagnetic waves • A laboratory or location where chemical reactions occur • A location exposed to corrosive or toxic gases - A location that may warp from the weight of the machine or where the machine is liable to sink (a carpet, etc.)Avoid poorly ventilated locations
This machine generates a slight amount of ozone and other emissions during normal use. These emissions are not harmful to health. However, they may be noticeable during extended use or long production runs in poorly ventilated rooms. To maintain a comfortable working environment, it is recommended that the room where the machine operates be appropriately ventilated. Also avoid locations where people would be exposed to emissions from the machine.Do not install in a location where
condensation occurs
Water droplets (condensation) may form inside the machine when the room where the machine is installed is heated rapidly, and when the machine is moved from a cool or dry location to a hot or humid location. Using the machine under these conditions may result in paper jams, poor print quality, or damage to the machine. Let the machine adjust to the ambient temperature and humidity for at least 2 hours before use.Avoid installing the machine near computers or other precision electronic equipment.
Electrical interference and vibrations generated by the machine while printing can adversely affect the operation of such equipment.Avoid installing the machine near televisions, radios, or similar electronic equipment.
The machine might interfere with sound and picture signal reception. Insert the power plug into a dedicated power outlet, and maintain as much space as possible between the machine and other electronic equipment.In altitudes of above sea level 3,000 m or higher
Machines with a hard disk may not operate properly when used at high altitudes of about 3,000 meters above sea level, or higher.Connecting the Telephone Line
This machine conforms to an analog telephone line standard. The machine can be connected to the public switched telephone network (PSTN) only. If you connect the machine to a digital telephone line or a dedicated telephone line, it might impede proper operation of the machine and could be the cause of damage. Make sure to confirm a type of telephone line before connecting the machine. Contact your optical fiber line or IP telephone line service providers if you want to connect the machine to those telephone lines.When using wireless LAN
• Install the machine at a distance of 50 meters or less from the wireless LAN router. - As far as possible, install in a location where communication is not blocked by intervening objects. The signal may be degraded when passing through walls or floors. - Keep the machine as far as possible from digital cordless phones, microwave ovens, or other equipment that emits radio waves. - Do not use near medical equipment. Radio waves emitted from this machine may interfere with medical equipment, which may result in malfunctions and accidents.If the operating noise concerns you
Depending on the use environment and operating mode, if the operating noise is of concern, it is recommended that the machine be installed in a place other than the office.Moving the Machine
If you intend to move the machine, even to a location on the same floor of your building, contact your local authorized Canon dealer beforehand. Do not attempt to move the machine yourself.Power Supply
WARNING
- Use only a power supply that meets the specified voltage requirements. Failure to do so may result in a fire or electrical shock. - The machine must be connected to a socket-outlet with grounding connection by the provided power cord. - Do not use power cords other than the one provided, as this may result in a fire or electrical shock. - The provided power cord is intended for use with this machine. Do not connect the power cord to other devices. - Do not modify, pull, forcibly bend, or perform any other act that may damage the power cord. Do not place heavy objects on the power cord. Damaging the power cord may result in a fire or electrical shock. - Do not plug in or unplug the power plug with wet hands, as this may result in an electrical shock. - Do not use extension cords or multi-plug power strips with the machine. Doing so may result in a fire or electrical shock. - Do not wrap the power cord or tie it in a knot, as this may result in a fire or electrical shock. - Insert the power plug completely into the AC power outlet. Failure to do so may result in a fire or electrical shock. - Remove the power plug completely from the AC power outlet during a thunder storm. Failure to do so may result in a fire, electrical shock, or damage to the machine. • Make sure that the power supply for the machine is safe, and has a steady voltage. - Keep the power cord away from a heat source; failure to do this may cause the power cord coating to melt, resulting in a fire or electrical shock.Avoid the following situations:
If excessive stress is applied to the connection part of the power cord, it may damage the power cord or the wires inside the machine may disconnect. This could result in a fire. - Connecting and disconnecting the power cord frequently. - Tripping over the power cord. • The power cord is bent near the connection part, and continuous stress is being applied to the power outlet or the connection part. - Applying excessive force on the power plug.CAUTION
Install this machine near the power outlet and leave sufficient space around the power plug so that it can be unplugged easily in an emergency.IMPORTANT
When connecting power
- Do not connect the power cord to an uninterruptible power source. Doing so may result in malfunction of or damage to the machine at power failure. - If you plug this machine into an AC power outlet with multiple sockets, do not use the remaining sockets to connect other devices. - Do not connect the power cord to the auxiliary AC power outlet on a computer.Other precautions
Electrical noise may cause this machine to malfunction or lose data.Handling
WARNING
- Immediately unplug the power plug from the AC power outlet and contact an authorized Canon dealer if the machine makes an unusual noise, emits an unusual smell, or emits smoke or excessive heat. Continued use may result in a fire or electrical shock. - Do not disassemble or modify this machine. There are high-voltage and high-temperature components inside the machine. Disassembly or modification may result in a fire or electrical shock. - Place the machine where children will not come in contact with the power cord and other cables or gears and electrical parts inside the machine. Failure to do so may result in unexpected accidents. - Do not use flammable sprays near this machine. If flammable substances come into contact with electrical parts inside this machine, it may result in a fire or electrical shock. - When moving this machine, be sure to turn OFF the power of this machine, and then unplug the power plug and interface cables. Failure to do so may damage the power cord or interface cables, resulting in a fire or electrical shock. \- When plugging or unplugging a USB cable when the power plug is plugged into an AC power outlet, do not touch the metal part of the connector, as this may result in an electrical shock.If you are using a cardiac pacemaker
This machine generates a low level magnetic flux and ultrasonic waves. If you use a cardiac pacemaker and feel abnormalities, please move away from this machine and consult your physician immediately.CAUTION
- Do not place heavy objects on this machine as they may fall, resulting in injury. - For safety, unplug the power plug if the machine will not be used for a long period of time. - Use caution when opening and closing covers to avoid injury to your hands. - Keep hands and clothing away from the rollers in the output area. If the rollers catch your hands or clothing, this may result in personal injury. - The inside of the machine and the output slot are very hot during and immediately after use. Avoid contact with these areas to prevent burns. Also, printed paper may be hot immediately after being output, so use caution when handling it. Failure to do so may result in burns.Feeder
- Do not press down hard on the feeder when using the platen glass to make copies of thick books. Doing so may damage the platen glass and result in personal injury. - Close the feeder gently to avoid catching your hands, as this may result in personal injury. - Be careful not to put your hands or fingers into the feeder. Otherwise, you may be injured. natural_image
Illustration of a hand placing two cards into a box with a warning symbol (no text or labels)Finisher
\- Do not place your hands in the part of the tray where stapling is performed (near the rollers), especially pay careful attention to the sharp staples, as this may result in personal injury.Paper drawer
\- Do not insert your hand into the machine while the paper drawer is removed, as this may result in personal injury.Energy Saver key
\- Press (Energy Saver) for safety when the machine will not be used for a long period of time, such as overnight. Also, turn OFF the main power switch, and disconnect the power cord for safety when the machine will not be used for an extended period of time, such as during consecutive holidays.Laser Safety
This product is confirmed as a Class 1 laser product in IEC60825-1:2014 and EN60825-1:2014. CLASS 1 LASER PRODUCT LASER KLASSE APPAREIL À LASER DE CLASSE 1 APPARECCHIO LASER DI CLASSE 1 PRODUCTO LÁSER DE CLASE 1 APARELHO A LASER DE CLASSE 1 LUOKAN 1 LASER-TUOTE LASERPRODUKT KLASS 1 The laser beam can be harmful to human bodies. Since radiation emitted inside the product is completely confined within protective housings and external covers, the laser beam cannot escape from the machine during any phase of user operation. Read the following remarks and instructions for safety. - Never open covers other than those instructed in the manuals for this machine. - If the laser beam should escape and enter your eyes, exposure may cause damage to your eyes. - Use of controls, adjustments, or performance of procedures other than those specified in this manual may result in hazardous radiation exposure. Laser Safety Caution text_image
DANGER CAUTION ATTENTION VORCHT PRECAUTION WARNING VARDITUS 注意:无异常、误导性陈述或误导性陈述,严重危害投资者 注意:严重危害投资者的后果及后果,严重危害投资者的后果。 注意:无异常、误导性陈述或误导性陈述,严重危害投资者的后果。 注意:无异常、误导性陈述或误导性陈述,严重危害投资者的后果。text_image
WARNING: "Caterpillar" (or "Caterpillar") is required to install the printer's internal structure. The printer's internal structure is designed to be an open, fully enclosed machine. The printer's internal structure is designed to be an open, fully enclosed machine. The printer's internal structure is designed to be an open, fully enclosed machine. The printer's internal structure is designed to be an open, fully enclosed machine. The printer's internal structure is designed to be an open, fully enclosed machine. The printer's internal structure is designed to be an open, fully enclosed machine. The printer's internal structure is designed to be an open, fully enclosed machine. The printer is designed to install the printer's internal structure, specifically for the printer's internal structure. The printer's internal structure is designed to be an open, fully enclosed machine. The printer's internal structure is designed to be an open, fully enclosed machine. The printer's internal structure is designed to be an open, fully enclosed machine. The printer's internal structure is designed to be an open, fully enclosed machine. The printer's internal structure is designed to be an open, fully enclosed machine. The printer's internal structure is designed to be an open, fully closed machine. The printer's internal structure is designed to be an open, fully closed machine. The printer's internal structure is designed to be an open, fully closed machine. The printer's internal structure is designed to be an open, fully closed machine. The printer's internal structure is designed to be an open, fully closed machine. The printer's internal structure is designed to be an open, fully closed machine. The printer's internal structure is designed to be an open, fully closed machine. The paper is not shown in the image.Fixing Unit
When removing jammed paper or when inspecting the inside of the machine, do not expose yourself to the heat emitted from the fixing unit and its surroundings for a prolonged period of time. Doing so may result in low temperature burns, even though you did not touch the fixing unit and its surroundings directly. text_image
CAUTION Limiting the power and thermal inductors. High-temperature Altered Parts ATTENTION Power and thermal conductivity of a device, per the outstanding voltage, low-temperature, high- voltage, low-current, high-current, and high-current voltage. VERSICING Voltage is not allowed for any connection to the outstanding voltage. The circuit is not allowed for any connection to the outstanding voltage. ATTENTION: Voltage is not allowed for any connection to the outstanding voltage. The circuit is not allowed for any connection to the outstanding voltage. OUTABOVE Voltage is not allowed for any connection to the outstanding voltage. The circuit is not allowed for any connection to the outstanding voltage. 注意: 注意:注意的电路将不同时连接到人、设备等。 注意: 注意的电路将不同时连接到人、设备等。 注意: 注意:注意的电路将不同时连接到人、设备等。IMPORTANT
• Follow the caution instructions on labels and the like found on this machine. - Do not subject the machine to strong shocks or vibration. - Do not forcibly open and close doors, covers, and other parts. Doing so may result in damage to the machine. - Do not turn the main power switch OFF or open the covers while the machine is in operation. This may result in paper jams. - Use a modular cable that is shorter than 3 meters. - Use a USB cable that is shorter than 3 meters.Safety-Related Symbols
Power switch: "ON" position Power switch: "OFF" position Power switch: "STAND-BY" position ① Push-push switch "ON" "OF" Protective earthing terminal Dangerous voltage inside. Do not open covers other than instructed. CAUTION: Hot surface. Do not touch. Class II equipment Moving parts: Keep body parts away from moving parts CAUTION: An electrical shock may occur. Remove all the power plugs from the power outlet. There are sharp edges. Keep body parts away from sharp edges.[NOTE]
Some of symbols shown above may not be affixed depending on the product.Maintenance and Inspections
Clean this machine periodically. If dust accumulates, the machine may not operate properly. When cleaning, be sure to observe the following. If a problem occurs during operation, see "Troubleshooting" in the User's Guide.WARNING
- Before cleaning, turn OFF the power and unplug the power plug from the AC power outlet. Failure to do so may result in a fire or electrical shock. - Unplug the power plug periodically and clean with a dry cloth to remove dust and grime. Accumulated dust may absorb humidity in the air and may result in a fire if it comes into contact with electricity. - Use a damp, well wrung-out cloth to clean the machine. Dampen cleaning cloths with water only. Do not use alcohol, benzine, paint thinner, or other flammable substances. Do not use tissue paper or paper towels. If these substances come into contact with electrical parts inside the machine, they may generate static electricity or result in a fire or electrical shock. - Check the power cord and plug periodically for damage. Check the machine for rust, dents, scratches, cracks, or excessive heat generation. Use of poorly-maintained equipment may result in a fire or electrical shock.CAUTION
• The inside of the machine has high-temperature and high-voltage components. Touching these components may result in burns. Do not touch any part of the machine that is not indicated in the manual. - When loading paper or removing jammed paper, be careful not to cut your hands with the edges of the paper.Consumables
WARNING
- Do not throw toner cartridges or waste toner containers into open flame, or do not store them or printing/copy paper in a place exposed to open flame. This may cause them to ignite, resulting in burns or fire. - If you accidentally spill or scatter toner, carefully gather the toner particles together or wipe them up with a soft, damp cloth in a way that prevents inhalation. Never use a vacuum cleaner that does not have safeguards against dust explosions to clean up spilled toner. Doing so may cause a malfunction in the vacuum cleaner, or result in a dust explosion due to static discharge.CAUTION
- Keep toner and other consumables out of the reach of small children. If these items are ingested, consult a physician immediately. - If toner touches your clothes or skin, wash it away with water immediately. Do not use warm water, as this may cause toner to fix, resulting in a permanent stain. - Do not dismantle the toner cartridge, as doing so may cause toner to fly out and enter your eyes or mouth. If toner gets into your eyes or mouth, wash them immediately with cold water and immediately consult a physician. - If toner escapes from the toner cartridge, make sure not to ingest the toner or allow it to directly touch your skin. If toner touches your skin, wash it away with soap and water. If your skin still feels irritated after washing it or you ingest toner, consult a physician immediately. \- When pulling out the waste toner container, be careful not to let it fall. This may result in injury.IMPORTANT
\- Store toner cartridges in a cool location, away from direct sunlight.Telephone Equipment
WARNING
When using your telephone equipment, basic safety precautions should always be followed to reduce the risk of fire, electric shock and injury to persons, including the following: 1. Do not use this product near water, for example, near a bath tub, wash bowl, kitchen sink, or laundry tub, in a wet basement or near swimming pool. 2. Avoid using a telephone during an electrical storm. There may be remote risk of electric shock form lightning. 3. Do not use the telephone to report a gas leak in the vicinity of the leak.Notice
Product Name
Safety regulations require the product's name to be registered. In some regions where this product is sold, the following name(s) in parentheses () may be registered instead. imagePRESS C170 (F168600) imagePRESS C165 (F168603)EMC requirements of EC Directive
This equipment conforms with the essential EMC requirements of EC Directive. We declare that this product conforms with the EMC requirements of EC Directive at nominal mains input 230 V, 50 Hz although the rated input of the product is 220 to 240 V, 50/60 Hz. Use of shielded cable is necessary to comply with the technical EMC requirements of EC Directive.EU WEEE and Battery Directives
You can see the WEEE and Battery Directives information in the latest User's Guide (HTML manual) from the Canon website (https://oip.manual.canon/).Wireless LAN Regulatory Information
Regulatory information for users in Jordan imagePRESS C170/C165 includes approved Wireless LAN Module (Model name: FM1M944). Contains Wireless LAN Module approved by TRC/LPD/2015/5 Regulatory information for users in UAE imagePRESS C170/C165 includes approved Wireless LAN Module (Model name: FM1M944).TRA
REGISTERED No: ER38576/15 DEALER No: DA39360/15 Regulatory information for users in Argentina Incluye módulo Wireless LAN Module Marca Canon Inc., Modelo FM1M944, CNC C-20793 COMISIÓN NACIONAL DE COMUNICACIONES
Regulatory information for users in Uruguay imagePRESS C170/C16S contains URSEC approved Wireless LAN Module (Model name: FM1M944 or FM1M948). Regulatory information for users in Singapore Complies with IMDA Standards DB00671 Regulatory information for users in Vietnam imagePRESS C170/C165 includes approved Wireless LAN Module (Model name: FM1M944). RE Directive
(Only for European radio equipment)RE Declaration of Conformity
English (EN) Hereby, Canon Inc. declares that this equipment is in compliance with Directive 2014/53/EU. The full text of the EU declaration of conformity is available at the following internet address: http://www.canon-europe.com/ce-documentation Wireless LAN Specifications Frequency band(s):2412-2472MHz Maximum radio-frequency power:18.21dBm Czech (CS) Tímto společnost Canon Inc. prohlášuje, že toto zařízení je v souladu se směrnící 2014/53/EU. Úplné znění EU prohlášení o shodě je k dispozící na této internetové adrese: http://www.canon-europe.com/ce-documentation Technické údaje bezdrátové LAN Pásmo(a) frekvence: 2412-2472 MHz Maximální výkon rádiové frekvence: 18.21 dBm Danish (DA) Hermed erklærer Canon Inc., at dette udstyr er i overensstemmelse med direktiv 2014/53/EU. EU-overensstemmelseserklæringens fulde tekst kan findes på følgende internetadresse: http://www.canon-europe.com/ce-documentation Trådløs LAN specofikationer Frekvensbånd: 2412-2472 MHz Maks. radio-frekvenseffekt: 18.21 dBm German (DE) Hiermit erklärt Canon Inc, dass diese Anlage der Richtlinie 2014/53/EU entspricht. Der vollständige Text der EU-Konformitätserklärung ist unter der folgenden Internetadresse verfügbar: http://www.canon-europe.com/ce-documentationWLAN-Spezifikationen Frequenzbereich(e): 2412-2472 MHz Maximale Funkfrequenzleistung: 18.21 dBm Estonian (ET) Käesolevaga deklareerib Canon Inc., et käesolev seade vastab direktiivi 2014/53/EL nöuetele. EL i vastavusdeklaratsiooni täielik tekst on kättesaadav järgmisel internetiaadressil: http://www.canon-europe.com/ce-documentation Juhtmevaba I AN-i spetsifikatsioonid Sagedusriba(d): 2412-2472 MHz Maksimaalne raadiosageduslik võimsus: 18.21 dBm Spanish (ES) Por la presente, Canon Inc. declara que este equipo es conforme con la Directiva 2014/53/UE. El texto completo de la declaración UE de conformidad está disponible en la dirección de Internet siguiente: http://www.canon-europe.com/ce-documentation Especificaciones LAN inalámbrica Banda(s) de frecuencia: 2412-2472 MHz Potencia máxima de radiofrecuencia: 18.21 dBm Greek (EL) Με την παρούσα, η Canon Inc. δηλώνει ότι ο παρών εξοπλισμός συμμορφώνεται με την Οδηγία 2014/53/ΕΕ. Το πλήρες κείμενο της δηλωσης συμμόρφωσης της ΕΕ διατίθεται στην ακόλουθη διεύθυνοη στο διαδίκτυο: http://www.canon-europe.com/ce-documentation Προδιαγραφές ασύρματου LAN (WLAN) Ζώνες συχνότητας: 2412-2472 MHz Μέγιστη ισχύς ραδιοσυχνότητας: 18.21 dBm French (FR) Le soussigné, Canon Inc., déclare que le présent équipement est conforme à la Directive 2014/53/UE. Le texte complet de la déclaration UF de conformité est disponible à l'adresse internet suivante : http://www.canon-europe.com/ce-documentation Spécifications LAN sans fil Bande(s) de fréquence: 2412-2472 MHz Puissance maximale de radiofréquence: 18.21 dBm Italian (IT) Con la presente, Canon Inc. dichiara che questa apparecchiatura è conforme alla direttiva 2014/53/UE. Il testo completo della dichiarazione di conformità UE è disponibile al seguente indirizzo Internet: http://www.canon-europe.com/ce-documentation Caratteristiche LAN wireless Banda/e di frequenza: 2412-2472 MHz Potenza massima a radiofrequenza: 18.21 dBm Latvian (LV) Canon Inc. ar šo deklarė, ka ši iekārta atbilst Direktīvai 2014/53/ES. Pilns ES atbilstības deklarācijas teksts ir pieejams šādā interneta vietnē: http://www.canon-europe.com/ce-documentation Bezvadu LAN specifikācijas Frekvences josla(s): 2412-2472 MHz Maksimalā radiofrekvences jauda: 18.21 dBm Lithuanian (LT) Šiuo dokumentu „Canon Inc.“ patvirtina, kad ši jranga atitinka direktyvą 2014/53/ES. Visas FS atitikties deklaracijos tekstas prieinamas Šiuo interneto adresu: http://www.canon-europe.com/ce-documentation Belaidžio LAN specifikacijos Dažnio diapazonas (-ai): 2412-2472 MHz Maksimali radijo ryšio dažnio galia: 18.21 dBm Dutch (NL) Hierbij verklaar ik, Canon Inc., dat deze apparatuur conform is met Richtlijn 2014/53/EU. De volledige tekst van de EU-conformiteitsverklaring kan worden geraadpleegd op het volgende internetadres: http://www.canon-europe.com/ce-documentation Draadloos LAN specificaties Frequentieband(en): 2412-2472 MHz Maximaal radiofrequentievermogen: 18.21 dBm Maltese (MT) B'dan, Canon, qed tiddikjara li dan it-tip ta' tagñmir huwa konformi mad-Direttiva 2014/53/UE. It-test kollu tad-dikjarazzjoni ta' konformità tal-UE huwa disponibbli f'dan is-sit fuq l-internet: http://www.canon-europe.com/ce-documentation Specifikazzjonijiet tal-Wireless LAN Band(i) tal-Frekwenza: 2412-2472 MHz Qawwa ta' frekwenza tar-radju massima: 18.21 dBm Hungarian (HU) A Canon Inc. igazolja, hogy ez a berendezés megfelel a 2014/53/FU irányelvnek. Az FU-megfelelőségi nyilatkozat teljes szövege elérhető a következő internetes címen: http://www.canon-europe.com/ce-documentation Vezeték nélküli LAN műszaki adatai Frekvenciasáv(ok): 2412-2472 MHz Maximális rádiofrekvenciás teljesítmény: 18.21 dBm Polish (PL) Canon Inc. niniejszym oświadcza, że niniejsze urządzenie jest zgodne z dyrektywą 2014/53/UE. Pelny tekst deklaracji zgodności UE jest dostępny pod następującym adresem internetowym: http://www.canon-europe.com/ce-documentation Specyfikacja bezprzewodowej sieci LAN Pasmo(-a) częstotliwości: 2412-2472 MHz Maksymalna moc na częstotliwościach radiowych: 18.21 dBm Portuguese (PT) Por este meio, a Canon Inc. declara que o presente equipamento está em conformidade com a Diretiva 2014/53/UE. O texto integral da declaração de conformidade da UE está disponível no seguinte endereço de Internet: http://www.canon-europe.com/ce-documentation Especificações de LAN Sem Fios Banda(s) de frequências: 2412-2472 MHz Potência máxima de radiofrequência: 18.21 dBm Slovene (SL) Canon Inc. potrjuje, da je ta oprema v skladu z Direktivo 2014/53/EU. Celotno besedilo izjave EU o skladnosti je na voljo na naslednjem spletnem naslovu: http://www.canon-europe.com/ce-documentation Specifikacije za brezžični LAN Frekvenčna območja: 2412-2472 MHz Največja radiofrekvenčna moč: 18.21 dBm Slovak (SK) Spoločnost Canon Inc. týmto vyhlasuje, že toto zariadenie je v súlade so smernicou 2014/53/FÚ. Úplné znenie FÚ vyhlásenia o zhode je k dispozícii na tejto internetovej adrese: http://www.canon-europe.com/ce-documentation Technické údaje bezdrótovej LAN Pásmo (a) frekvencia: 2412-2472 MHz Maximálny výkon rádiovej frekvencie: 18.21 dBm Finnish (FI) Canon Inc. vakuuttaatäten, että tämä laite on direktiivin 2014/53/EU mukainen. EU-vaatimustenmukaisuusvakuutuksen täysimittainen teksti on saatavilla seuraavassa internetosoitteessa: http://www.canon-europe.com/ce-documentation Langattoman LAN:in tekniset ominaisuudet Taajuuskaista(t): 2412-2472 MHz Suurin radiotaajuusteho: 18.21 dBm Swedish (SV) Härmed försäkrar Canon Inc. att denna utrustning överensstämmer med direktiv 2014/53/EU. Den fullständiga texten till EU-försäkran om överensstämmelse finns tillgånglig på följande webbadress: http://www.canon-europe.com/ce-documentation Specifikationer för trådlöst LAN Frekvensband: 2412-2472 MHz Maximal radiofrekvenseffekt: 18.21 dBm Romanian (RO) Prin prezenta, Canon Inc. declară că acest echipament este în conformitate cu Directiva 2014/53/UE. Textul integral al declarației UF de conformitate este disponibil la următoarea adresă internet: http://www.canon-europe.com/ce-documentation Specificații wireless LAN Benzi de frecvență: 2412-2472 MHz Putere maximă a frecvenței radio: 18,21 dBm Bulgarian (BG) С настоящото Canon Inc. декларира, че това съоръжение е в съответствие с Директива 2014/53/EC. Цялостният текст на ЕС декларацията за съответствие може да се намери на следния интернет адрес: http://www.canon-europe.com/ce-documentation Спецификация на безжичната LAN Честотна лента(и): 2412-2472 MHz Максимална радиочестотна мощност: 18.21 dBm Croatian (HR) Canon Inc. ovime izjavljuje da je oprema u skladu s Direktivom 2014/53/EU. Cjeloviti tekst EU izjave o sukladnosti dostupan je na sljedećoj internetskoj adresi: http://www.canon-europe.com/ce-documentation Specifikacije bežičnog LAN-a Frekvencijski pojas(evi): 2412-2472 MHz Maksimalna snaga radijske frekvencije: 18.21 dBm Irish (GA) Dearbhaíonn Canon Inc., leis seo, go bhfuil an trealamh seo i gcomhlionadh leis an Treoir 2014/53/AE. Tá an téacs iomlán de Dhearbhú Comhréireachta AF ar fáil ag seoladh an láithreáin ghréasáin mar seo a leanas: http://www.canon-europe.com/ce-documentation Sonraíochtaí LAN Gan Sreang Banda(i) minicíochta: 2412-2472 MHz Uaschumhacht radaimhínicíochta: 18.21 dBm Norwegian (NO) Herved erklærer Canon Inc. at dette utstyret er i overensstemmelse med direktiv 2014/53/EU. Den fulle teksten til EUs samsvarserklæring er tilgjengelig på følgende Internett-adresse: http://www.canon-europe.com/ce-documentation Trådløs LAN-spesifikasjoner Bølgelengde: 2412-2472 MHz Maks radiofrekvensstyrke: 18.21 dBm Icelandic (IS) Hér með lýsir Canon Inc pví yfir að pessi búnaður er í samræmi við tilskipun 2014/53/ESB. Allur texti ESB-samræmisyfirlýsingar er í boði á eftirfarandi veffangi: http://www.canon-europe.com/ce-documentation Tæknilýsingar fyrir práðlausa nettengingu Tlönisvið: 2412-2472 MHz Hámarksstyrkur útvarpstöbnibylgja: 18.21 dBmE-Waste Rules -India only-
 This product is not to be disposed of with your household waste, according to the E-Waste (Management) Rules, 2016. This product should be handed over to a designated collection point, e.g., to an authorized collection site for recycling waste electrical and electronic equipment (EEE). Improper handling of this type of waste could have a possible negative impact on the environment and human health due to potentially hazardous substances that are generally associated with EEE. At the same time, your cooperation in the correct disposal of this product will contribute to the effective usage of natural resources. For more information regarding return and recycling of WEEE products, please visit http://www.canon.co.in/environment or write to us at customer.delight@canon.co.in. Also, this product complies with the "E-Waste (Management) Rules, 2016" and prohibits use of lead, mercury, hexavalent chromium, polybrominated biphenyls or polybrominated diphenyl ethers in concentrations exceeding 0.1% by weight and 0.01% by weight for Cadmium, except for the exemptions set in Schedule II of the Rule.Legal Limitations on the Usage of Your Product and the Use of Images
Using your product to scan, print or otherwise reproduce certain documents, and the use of such images as scanned, printed or otherwise reproduced by your product, may be prohibited by law and may result in criminal and/or civil liability. A non-exhaustive list of these documents is set forth below. This list is intended to be a guide only. If you are uncertain about the legality of using your product to scan, print or otherwise reproduce any particular document, and/or of the use of the images scanned, printed or otherwise reproduced, you should consult in advance with your legal advisor for guidance. • Paper Money - Travelers Checks - Money Orders - Food Stamps • Certificates of Deposit - Passports - Postage Stamps (canceled or uncanceled) - Immigration Papers • Identifying Badges or Insignias - Internal Revenue Stamps (canceled or uncanceled) - Selective Service or Draft Papers • Bonds or Other Certificates of Indebtedness - Checks or Drafts Issued by Governmental Agencies • Stock Certificates • Motor Vehicle Licenses and Certificates of Title • Copyrighted Works/Works of Art without Permission of Copyright OwnerDisclaimers
• The information in this document is subject to change without notice. • CANON INC. MAKES NO WARRANTY OF ANY KIND WITH REGARD TO THIS MATERIAL, EITHER EXPRESS OR IMPLIED, EXCEPT AS PROVIDED HEREIN, INCLUDING WITHOUT LIMITATION, THEREOF, WARRANTIES AS TO MARKETABILITY, MERCHANTABILITY, FITNESS FOR A PARTICULAR PURPOSE OF USE, OR NON-INFRINGEMENT. CANON INC. SHALL NOT BE LIABLE FOR ANY DIRECT, INCIDENTAL, OR CONSEQUENTIAL DAMAGES OF ANY NATURE, OR LOSSES OR EXPENSES RESULTING FROM THE USE OF THIS MATERIAL.About This Manual
Screens
Screens of the touch panel display used in this manual are those taken when the imagePRESS C165 has the following optional equipment attached to it: \- Booklet Trimmer-F • Booklet Finisher-W PRO \- Puncher Unit-BT • Paper Folding Unit-J • Document Insertion Unit-N \- POD Deck Lite-C • Super G3 FAX Board Note that functions that cannot be used depending on the model or options do not appear on the touch panel display.Illustrations
Illustrations used in this manual are those displayed when the imagePRESS C165 has the following optional equipment attached to it: • Copy Tray-R natural_image
Line drawing of a generic electronic device with multiple ports and a scroll wheel (no text or symbols)Trademarks
Mac is a trademark of Apple Inc. Microsoft, Windows, Windows Vista, Windows Server, Internet Explorer, Excel, and PowerPoint are either registered trademarks or trademarks of Microsoft Corporation in the United States and/or other countries. Other product and company names herein may be the trademarks of their respective owners.Third Party Software
This Canon product (the "PRODUCT") includes third-party software modules. Use and distribution of these software modules, including any updates of such software modules (collectively, the "SOFTWARE") are subject to license conditions (1) through (9) below. (1) You agree that you will comply with any applicable export control laws, restrictions or regulations of the countries involved in the event that this PRODUCT including the SOFTWARE is shipped, transferred or exported into any country. (2) Rights holders of the SOFTWARE retain in all respects the title, ownership and intellectual property rights in and to the SOFTWARE. Except as expressly provided herein, no license or right, expressed or implied, is hereby conveyed or granted by rights holders of the SOFTWARE to you for any intellectual property of rights holders of the SOFTWARE. (3) You may use the SOFTWARE solely for use with the PRODUCT. (4) You may not assign, sublicense, market, distribute, or transfer the SOFTWARE to any third party without prior written consent of rights holders of the SOFTWARE. (5) Notwithstanding the foregoing, you may transfer the SOFTWARE only when (a) you assign all of your rights to the PRODUCT and all rights and obligations under the license conditions to transferee and (b) such transferee agrees to be bound by all these conditions. (6) You may not decompile, reverse engineer, disassemble or otherwise reduce the code of the SOFTWARE to human readable form. (7) You may not modify, adapt, translate, rent, lease or loan the SOFTWARE or create derivative works based on the SOFTWARE. (8) You are not entitled to remove or make separate copies of the SOFTWARE from the PRODUCT. (9) The human-readable portion (the source code) of the SOFTWARE is not licensed to you. Notwithstanding (1) through (9) above, the PRODUCT includes third-party software modules accompanying the other license conditions, and these software modules are subject to the other license conditions. Please check Platform Version of the PRODUCT and refer to the other license conditions of third-party software modules described in Appendix of Manual for the corresponding Platform Version. This Manual is available at https://oip.manual.canon/. By using the PRODUCT, you shall be deemed to have agreed to all applicable license conditions. If you do not agree to these license conditions, please contact your service representative. V\_191204 imagePRESS C170/C165Fonctions pratiques
Réglage automatique des demi-teintes pour divers types de papier
La fonction Régl. auto demi-teintes règle les demi-teintes, la densité et la quadrichromie des images, et ne nécessite que la lecture de la page de test. Cette fonction, disponible pour divers grammages de papier, permet d'obtenir une qualité d'impression de haute qualité sur divers types de papier.  "Entretien" > "Réglage de la qualité de l'impression et de la finition" dans le Guide de l'utilisateur natural_image
Illustration of a paintbrush resting on an artist's palette with five colored dots (no text or symbols)Obtention d'une accentuation des couleurs de haute qualité avec la correction automatique de la quadrichromie
Comparée à la fonction Régl. auto demi-teintes qui règle les valeurs CMJN, la fonction Corriger auto. Quadrichromie règle le mélange des couleurs créées par plusieurs toners. En combinant ces fonctions, vous pouvez régler les couleurs avec plus de stabilité.  "Entretien" > "Réglage de la qualité de l'impression et de la finition" dans le Guide de l'utilisateur natural_image
Six-panel grid showing six identical panels of stacked balloons, each with a different grayscale shade (no text or symbols)Qualité d'impression optimale sur chaque type de papier
Les informations sur le papier, qui incluent le grammage de base, la finition et le niveau de correction de l'enroulement, peuvent être enregistrées dans les caractéristiques du papier. Puisque les informations détaillées peuvent être spécifiées pour chaque type de papier, il est possible d'obtenir une qualité d'impression fine en appliquant les caractéristiques du papier. Cette fonction améliore également le transfert du papier et la qualité d'impression. natural_image
Stack of four overlapping sheets of paper with distinct shading and texture (no text or symbols)Correction du bouclage pour un transfert stable du papier
La machine corrige constamment le bouclage du papier qui se produit lorsqu'une pression est appliquée lors de la fixation du toner. En outre, en corrigeant le bouclage du papier à la sortie, la machine permet de réduire le risque de bourrage papier et d'obtenir un transfert stable du papier. La correction du bouclage peut être indiquée pour chaque type de papier utilisé. natural_image
Diagram showing a curved stack of papers transforming into a single sheet of paper, with an arrow indicating the process (no text or symbols present)Opération facile pour régler la position d'image
Vous pouvez utiliser une feuille guide pour régler rapidement le positionnement de l'image. Cela s'avère pratique car il n'est pas nécessaire de prendre des mesures et de saisir des valeurs.  "Entretien" > "Réglages de la gestion du type de papier" > "Ajustement de la position de l'image" dans le Guide de l'utilisateur text_image
Feuille guideAccès rapide aux réglages fréquemment utilisés
Plusieurs réglages sont nécessaires selon le type d'impression ou le type de papier. Toutefois, l'accès aux options des réglages situées dans différents menus est à chaque fois une opération laborieuse. Dans ce cas, mémoriser les réglages fréquemment utilisés dans le bouton "Raccourci des réglages/enregistrement". Ce bouton permet d'accéder directement à l'écran des réglages et de gagner du temps en évitant de rechercher les options de réglage nécessaires. flowchart
graph TD
    A["Rettouci Régages/Enreg."] --> B["Régl. auto dégradés"]
    A --> C["Réglages papier"]
    A --> D["Nettoyage interne machine"]
Sommaire
Merci d'avoir porté votre choix sur cette machine Canon. Nous invitons l'utilisateur à lire attentivement ce guide avant toute manipulation, afin de tirer le meilleur parti des avantages offerts par la machine. Pour plus d'informations sur les réglages des fonctions décrites dans ce guide, voir le Guide de l'utilisateur. Nous vous prions également de conserver ce guide avec soin pour pouvoir le consulter en cas de besoin.Nomenclature....6
Vue externe (Avant)....6 Vue externe (Face arrière)....8 Vue interne....9 Panneau de commande....10Ecran Suivi statut....12
Mise sous tension de la machine ..... 13
Mise sous tension....13 Fermeture de la machine....13Chargement du papier....14
Source papier....14 Enregistrement des types de papier sur l'appareil....16 Chargement du papier dans le magasin papier/la cassette à papier....18 Mémorisation des types de papier personnalisés .....20Nettoyage et maintenance 22
Nettoyage de la vitre d'exposition 22 Nettoyage de la zone de lecture de l'original .....22 Nettoyage du chargeur....23 Nettoyage automatique du chargeur....25 Nettoyage de l'intérieur de la machine .....25 Nettoyage de l'afficheur tactile 26 Inspection du disjoncteur....27Consommables 28
Dépannage 30
Elimination de bourrages papier et d'agrafes ....30 Réduction de la fréquence de bourrages papier ....30 Lorsqu'un message d'erreur s'affiche ....31 Contact avec le revendeur agréé Canon local ....32 Si la mémoire est saturée ....33 Si la machine ne peut pas être mise sous tension .....33Annexe....34
Conventions adoptées
IMPORTANT
REMARQUE
   OPTION Point important concernant le fonctionnement. A lire attentivement pour bien utiliser la machine et éviter de l'endommager ou de causer des dommages matériels. Informations complémentaires concernant le fonctionnement ou les procédures. Il est conseillé de lire ces informations. Indique des fonctions ou des conseils utiles pour l'utilisation de la machine. Vous trouverez de plus amples informations sur le site du manuel en ligne (https://oip.manual.canon/). Une explication détaillée est donnée dans la page spécifiée de ce manuel. Indique un produit en option utilisable avec cette machine.Touches et boutons utilisés dans ce guide
Voici des exemples qui illustrent la manière dont les touches et les boutons sont indiqués dans ce guide. \- Boutons sur l'afficheur tactile :Nomenclature
Cette section présente les noms et les fonctions de tous les éléments de la machine. Les touches et l'affichage du panneau de commande sont également présentés. Lire cette section pour utiliser correctement les différentes fonctions de la machine.  "Annexe" > "Options" dans le Guide de l'utilisateurVue externe (Avant)
text_image
1234 9 8 5 6 71 Panneau de commande
Le panneau de commande comprend, entre autres, des touches numériques, Ⓞ, des voyants et un afficheur tactile. Vous pouvez exécuter toutes les opérations et faire des réglages depuis le panneau de commande.2 Capot supérieur droit de l'unité principale
Ouvrez ce capot pour éliminer un bourrage papier à l'intérieur de l'appareil.3 Plateau multifonctions
Chargez le papier dans le plateau multifonctions si vous souhaitez utiliser un type de papier différent de celui qui figure dans le magasin ou la cassette.4 Boîte de rangement du chiffon de nettoyage de la vitre
Utilisez cette boîte pour stocker le chiffon afin de nettoyer la vitre d'exposition.5 Port USB (partie arrière droite de la machine)
Vous pouvez connecter à l'appareil des périphériques comme un disque dur externe.6 Connecteur USB
Connectez un câble USB lorsque vous connectez l'appareil et un ordinateur.7 Port LAN
Connectez un câble réseau pour rattacher l'appareil à un routeur réseau local filaire, etc.8 Capot inférieur droit de l'unité principale
Ouvrez ce capot pour éliminer un bourrage papier à l'intérieur de l'appareil.9 Interrupteur d'alimentation
Actionnez l'interrupteur d'alimentation pour mettre l'appareil sous ou hors tension. text_image
1011 12 13 14 161510 Port USB (partie avant de l'appareil)
Vous pouvez connecter à l'appareil des périphériques comme un périphérique mémoire USB.11 Chargeur
Charge automatiquement les originaux dans l'appareil pour la numérisation. Lorsque deux ou plusieurs feuilles sont placées dans le chargeur, les originaux peuvent être numérisés en continu.12 Capot de remplacement du toner
Ouvrez ce capot pour remplacer la cartouche.13 Capot avant de la machine
Ouvrez ce capot pour éliminer un bourrage papier.14 Magasin 1/magasin 2
Chargez le type de papier que vous utilisez fréquemment.15 Cassette 1/cassette 2
Chargez le type de papier que vous utilisez fréquemment. Vous pouvez charger du papier incompatible dans les magasins.16 Capot gauche de l'unité principale
Ouvrez ce capot pour éliminer un bourrage papier. Vue externe (Face arrière) text_image
Technical diagram of a device with labeled parts and zoomed-in views, showing internal components and structural details.1 Prise téléphonique (LIGNE 1)
Connectez un câble téléphonique pour rattacher l'appareil à une ligne téléphonique.2 Disjoncteur
Détecte les surintensités et les courants de fuite.Vue interne
text_image
Technical diagram of a printer with labeled parts and zoomed-in insets showing internal components1 Cartouche d'encre
Remplacez la cartouche lorsque le toner est épuisé.2 Unité de transport de fixation
Extrayez l'unité de transport de fixation pour éliminer un bourrage papier à l'intérieur de l'appareil. text_image
Accueil Copie Rux Line et envojen Grie et memorier Accis fich envojedris Bolle Fau Fus 191817161514 Cherologie Les règles privésideres de chaquer latique sont affect, les règles privésent d'eire roupées en appuyant, aur l'un de ces éléments. Accueil Suisse statut 4 5 6 7 ① ② ③ GHI JKL MNO ④ ⑤ ⑥ QKS TUV WXYZ ⑦ ⑧ ⑨ ⑩ ⑪ # ID C 8 9 10 11 12 131 Afficheur tactile
Cet afficheur présente les écrans de réglage et les messages. Touchez cet afficheur pour effectuer un réglage ou exécuter une commande.2
Appuyez sur cette touche pour afficher l'écran d'accueil.
3 Nom d'utilisateur
Le nom de l'utilisateur connecté s'affiche.4 Touche (Log In/Out) ID
Appuyez sur cette touche pour vous connecter ou vous déconnecter (si un service d'authentifi cation a été déployé).5 Touche Réglages/Enregistrement
Appuyez sur cette touche pour eff ectuer des réglages ou un enregistrement.6 Clavier numérique
Utilisez ce clavier pour saisir des valeurs numériques.7 Touche d'économie d'énergie
Appuyez sur cette touche pour défi nir ou annuler le mode veille. - Cette touche s'allume lorsque l'appareil passe en mode veille. - Cette touche s'éteint lorsque l'appareil quitte le mode veille.8 Touche Informations du compteur/périphérique
Appuyez sur cette touche pour obtenir sur l'afficheur tactile le décompte des opérations de copie et d'impression.9 Touche de réglage de la luminosité
Utilisez cette molette pour régler la luminosité de l'écran.10 Touche de réglage du volume
Appuyez sur cette touche pour régler le volume.11 Touche Correction
Appuyez sur cette touche pour supprimer les valeurs ou caractères saisis.12 Touche Arrêt
Appuyez sur cette touche pour arrêter l'opération en cours.13 Touche Démarrer
Appuyez sur cette touche pour démarrer une opération (ou une lecture de données).14 Témoin d'alimentation
Ce témoin s'allume lorsque l'appareil est en marche.15 Témoin d'erreur
Ce témoin clignote ou s'allume si l'appareil rencontre une erreur. ※Si le témoin d'erreur émet une lumière rouge fixe, prenez contact avec votre revendeur agréé Canon.16 Témoin Traitement/Données
- Ce témoin clignote lorsque l'appareil fonctionne. - Ce témoin s'allume lorsque l'appareil attend une commande.17 Touche Restauration
Appuyez sur cette touche pour annuler les réglages et rétablir les réglages précédents.18
Appuyez sur cette touche pour consulter le statut d'une tâche ou annuler une tâche.
19
Appuyez sur cette touche pour consulter le statut d'une tâche ou annuler une tâche.

Configuration du mode Économie d'énergie/Veille pour réduire la consommation trique
Il est possible de réduire la consommation électrique grâce au mode Économie d'énergie/Veille lorsque la machine est inutilisée pendant une durée prolongée (l'heure du déjeuner par exemple). Pour utiliser ces modes, appuyer simplement sur la touche Ⓐ du panneau de commande. Au terme d'une certaine période d'inactivité, la machine passe automatiquement en mode Veille. Pour plus d'informations sur le mode activé après l'appui sur la touche Ⓐ et sur le mode Veille automatique, voir le Guide de l'utilisateur.  "Fonctionnement de base" > "Activation du mode de veille" dans le Guide de l'utilisateur natural_image
Line drawing of a hand pressing a button on a device panel with circular buttons and a handle (no text or symbols)Ecran Suivi statut
Si l'utilisateur appuie sur la touche Suivi statut, l'écran Suivi statut s'affiche dans lequel il peut vérifier le statut des tâches et des consommables. Grâce aux informations indiquées telles que la durée d'exécution de la tâche en cours ou le nombre de feuilles de papier restantes, l'utilisateur peut imprimer en toute fluidité sans interruption. Situations utiles
• Pour savoir la durée d'exécution des tâches - Pour vérifier le nombre de feuilles restantes pour un chargement de papier efficace • Pour annuler une tâche mémorisée par erreur Écrantext_image
Suivi statut Copie/Impression Email Réception Méroniser Conservis/Autres Statut fâches Journal des fâches Impression Hneur 20:01 Copie 20:02 Copie Rou et al. Administratior Administration... Administration Atente Impor... 12 min 20 min Interactions Rou et al. Details Annulier Toutes fâches Impor. en place Ferriertext_image
Suivi statut Couple Impression Envoil Réception Métenorier Consérés./Autres Font papier Nurs Plat. MF A4 Ordinaire 2 (26-90 gm/2) A4 Ordinaire 2 (26-90 gm/2) A4 Ordinaire 2 (26-90 gm/2) A4 Ordinaire 2 (26-90 gm/2) A4 Ordinaire 2 (26-90 gm/2) A4 Ordinaire 2 (26-90 gm/2) Altus Utilisation min. 0% 1/3 Toner size 100% Toner jeune 100% Toner magenta 100% Toner cyan 100% Vérifier les consommables FerrierMise sous tension de la machine
Cette section explique comment mettre la machine sous tension.Mise sous tension
S'assurer que la fiche du cordon d'alimentation est bien enfichée dans la prise secteur et que le disjoncteur est allumé. text_image
Diagram showing a printer with a close-up view of its internal component, labeled with directional arrows and Chinese character (1)IMPORTANT
Après avoir mis la machine hors tension, lorsque le témoin d'alimentation s'éteint, attendre au moins 10 secondes avant de la remettre sous tension. Toutefois, siREMARQUE
Les touches et boutons n'ont pas nécessairement une réactivité optimale juste après la mise sous tension de la machine.Fermeture de la machine
Ne pas mettre hors tension la machine dans les situations ci-dessous
- Pendant l'utilisation de la fonction I-Fax - A l'affichage du messagetext_image
Diagram showing a printer with a close-up view of its open door, indicating press operation or status change.Chargement du papier
Charger le papier en suivant la procédure ci-dessous. Dans cette section, le format de papier personnalisé A4 est utilisé comme exemple.Confirmation
Confirmer les types de papier pouvant être chargés.  "Annexe" > "Caractéristiques matérielles" > "Papier disponible" dans le Guide de l'utilisateurPréparation
Pour utiliser un type de papier non enregistré dans l'appareil, enregistrez-le au préalable. "Enregistrement des types de papier sur l'appareil," page 16Opération
Charger le papier dans la cassette. "Chargement du papier dans le magasin papier/la cassette à papier," page 18Enregistrement
Spécifier le format et le type de papier chargés dans la cassette. "Mémorisation des types de papier personnalisés," page 20Source papier
Cette section décrit les sources de papier disponibles. Le papier pouvant être chargé diffère en fonction des sources de papier. La description suivante comprend les produits facultatifs, ainsi que les magasins papier/cassettes à papier standard. Les produits en option sont indiqués à l'aide de l'OPTION. text_image
Unité d'insertion de Document-N OPTION Unité d'insertion / Pli de document-K OPTION Réceptacle d'alignement du plateau d'alimentation-D OPTION Plateau d'alimentation manuelle pour l'impression bannière B OPTION Magasin Cassette à papier Magasin grande capacité A3-C OPTION Magasin Papier Lateral-E OPTIONREMARQUE
Pour plus de détails sur les formats de papier pouvant être chargés, consulter le Guide de l'utilisateur.  "Annexe" > "Caractéristiques matérielles" > "Papier disponible" dans le Guide de l'utilisateurEnregistrement des types de papier sur l'appareil
Mémoriser tous les types de papier à utiliser avec cette machine.REMARQUE
- Cette étape est inutile si le type de papier est déjà mémorisé dans la machine, tel que le papier ordinaire ou recyclé. Passer alors à la prochaine étape "Chargement du papier dans le magasin papier/la cassette à papier". - Il n'est pas possible de modifier les types de papier par défaut mémorisés dans la machine. Si vous modifiez les réglages, veillez à les dupliquer et à les enregistrer en tant que nouveaux réglages. 1 Appuyer sur 🔒 2 Appuyer surtext_image
Réglages/EnregistrementREMARQUE
Lorsque vous mémorisez le papier personnalisé, veillez à modifier son nom. Il est impossible de modifier les réglages des types de papier par défaut enregistrés sur l'appareil. 5 Sélectionnez le type de papier dupliqué aux étapes 3 et 4 dans la liste → appuyez surtext_image
Réglages/Entregistrement6 Appuyez sur pour l'élément à modifier.

"Entretien" > "Réglages de la gestion du type de papier" dans le Guide de l'utilisateur

text_image
Réglages/Enregistrement7 Modifiez les réglages → appuyez sur .
\- Si vous souhaitez régler d'autres éléments, répétez les étapes 6 et 7.
8 Appuyez sur .

text_image
Régages/Enregistrement9 Appuyez sur .

text_image
Réglopes/EnregistrementREMARQUE
Jusqu'au format A4, vous pouvez charger le format papier prédéfini dans le magasin. natural_image
Diagram of a mechanical component with an arrow indicating direction (no text or symbols present)text_image
Face à imprimer vers le hautChargement du papier dans la cassette à papier
natural_image
Diagram of a mechanical component with internal channels and an arrow indicating direction (no text or symbols)natural_image
Diagram of a vehicle interior showing engine compartment and gear shift mechanism (no text or labels)text_image
Diagram showing a device with labeled components and hand tool application, including arrows and circular annotations.3 Réglez la position du guide papier.
\- Faire glisser chaque guide tout en le réglant en haut de façon à l'aligner sur le repère du format de papier souhaité. natural_image
Diagram of a mechanical device with internal components and two circular insets showing rotational or mechanical mechanisms (no text or symbols)4 Serrez les vis de fixation.
Veillez à ne pas dépasser cette ligne. text_image
Papier Enveloppe5 Charger la pile de papier dans la cassette.
1 Placer la pile de papier contre le bord droit de la cassette. 2 Poussez doucement la cassette à papier dans l'appareil jusqu'à ce que vous entendiez un déclic.REMARQUE
\- S'assurer de bien aérer la pile de papier et égaliser les bords avant le chargement du papier. • Le papier bouclé doit être aplani avant utilisation. \- S'assurer que la hauteur de la pile de papier ne dépasse pas le repère de capacité ( ). \- Lors du chargement de papier préperforé, transparents/films transparents, papier à onglets et enveloppes, s'assurer de charger le papier dans l'orientation voulue puisqu'elle varie selon la source papier.  "Fonctionnement de base" > "Chargement du papier" dans le Guide de l'utilisateur Mémorisation des types de papier personnalisés Il est possible de mémoriser le type et le format de papier de chacune des sources d'alimentation. 1 Appuyer sur 2 Appuyer surtext_image
Repligen/Enregistrementtext_image
Réglages/Enregistrementtext_image
Réglages/Enregistrementtext_image
Réglages/EnregistrementNettoyage et maintenance
Pour maintenir son fonctionnement optimal, il est conseillé de nettoyer et de vérifier la machine régulièrement.Nettoyage de la vitre d'exposition
Si les originaux ne peuvent pas être lus correctement, suivre la procédure de nettoyage ci-dessous. Nettoyer à l'aide d'un chiffon humecté d'eau et essuyer avec un chiffon doux et sec. Utiliser le chiffon de nettoyage de la vitre fourni pour effectuer un nettoyage simple. natural_image
Line drawing of an open printer with a screen and baseplate (no text or symbols)Nettoyage de la zone de lecture de l'original
Si les originaux prélevés du chargeur ne peuvent pas être lus correctement, suivre la procédure ci-dessous. 1 Appuyer sur 2 Appuyer surNettoyage du chargeur
Nettoyez le chargeur si les originaux se tachent ou se coincent fréquemment. Nettoyer à l'aide d'un chiffon humecté d'eau et essuyer avec un chiffon doux et sec. Utiliser le chiffon de nettoyage de la vitre fourni pour effectuer un nettoyage simple. natural_image
Diagram showing a device with a highlighted component and an inset image of a triangular object (no text or symbols)natural_image
Technical line drawing of a vehicle rear compartment showing vent slots and doorways (no text or symbols)IMPORTANT
Assurez-vous qu'il n'y ait pas de saletés comme des morceaux de papier qui s'insinuent dans la rainure du capteur de détection de chargement de feuilles multiples. Si c'est le cas, retirez-les à l'aide d'un chiffon doux. text_image
Technical diagram showing a mechanical assembly with labeled components and numbered calloutsnatural_image
Technical line drawing of a mechanical component with an inset close-up showing circular features (no text or symbols)natural_image
Line drawing of a hand inserting a component into an open device (no text or symbols)5 Nettoyer la zone de lecture de l'original.
\- Ouvrir le chargeur et nettoyer la zone de lecture de l'original (vitre fine). text_image
Diagram showing a printer's internal structure with labeled parts and an arrow indicating assembly or process flow.6 Ouvrir le capot de numérisation de documents.
1 Tirer sur le levier au-dessus du chargeur. 2 Ouvrir le capot de numérisation de documents. natural_image
Line drawing of a printer with an open lid and internal compartments, showing a close-up inset of the device (no text or symbols present)7 Ouvrir le capot intérieur.
text_image
vitrée allong et fine.8 Nettoyer la zone de lecture de l'original du chargeur.
9 Fermer successivement le capot intérieur et le capot de numérisation de document, puis fermer le chargeur.
10 Mise sous tension
"Mise sous tension," p. 13.Nettoyage automatique du chargeur
Si les originaux prélevés du chargeur deviennent sales, suivre la procédure ci-dessous. 1 Introduire 10 feuilles vierges dans le chargeur. • Utiliser du papier ordinaire A4. 2 Appuyer sur 3 Appuyer surNettoyage de l'intérieur de la machine
Si le papier imprimé est sale, suivre la procédure ci-dessous. 1 Appuyer sur 2 Appuyer surREMARQUE
Exécuter de la même façonNettoyage de l'afficheur tactile
Essuyer l'afficheur tactile à l'aide d'un chiffon humecté d'eau ou de détergent et l'essuyer avec un chiffon doux et sec. natural_image
Illustration of a hand cleaning a microwave oven with a cloth (no text or symbols)Inspection du disjoncteur
Cette machine est équipée d'un disjoncteur qui détecte les surtensions ou les fuites de courant. S'assurer de tester le disjoncteur une fois par mois en suivant la procédure ci-dessous. text_image
Diagram showing a printer with a fan blade and a circular icon indicating the open device's rotation.1 Mettre l'interrupteur principal sur Arrêt.
\- S'assurer que l'interrupteur principal est sur Arrêt avant d'inspecter le disjoncteur. natural_image
Diagram showing a door opening and a printer with arrows indicating movement (no text or symbols)2 Appuyer sur le bouton de test situé à l'arrière de la machine.
\- Appuyer sur le bouton test avec la pointe d'un stylo ou un objet similaire. Appuyer brièvement sur le bouton test. natural_image
Illustration of a printer emitting sound waves to a printer, with no visible text or symbols.3 Vérifier que le levier du disjoncteur est en position d'arrêt.
\- Si le levier du disjoncteur ne permute pas en position d'arrêt, recommencer l'étape 2. Si la situation reste inchangée après deux ou trois tentatives de la procédure ci-dessus, contacter le revendeur Canon agréé local. text_image
Diagram showing a printer icon and a printer with a dotted connection line, illustrating the process of file transfer or scanning.4 Placer le levier du disjoncteur en position de marche.
text_image
Diagram showing a printer with a close-up view of its internal structure, labeled with directional arrows and a circled number 1.5 Mettre l'interrupteur principal sur Marche.
Consommables
Les consommables suivants sont disponibles pour cette machine. Pour plus d'informations, contacter le revendeur Canon agréé. Pour plus d'informations sur l'utilisation et le stockage des consommables, voir la section "Consommables", p. 37.Papier
Outre le papier ordinaire, d'autres supports sont disponibles tels que du papier recyclé, du papier couleur, des transparents/films transparents (recommandés pour cette machine), du papier Vélin et des étiquettes. Pour des impressions de haute qualité, utiliser le papier recommandé par Canon.Toner
Si un message invitant à remplacer la cartouche de toner s'affiche, remplacer la cartouche usagée par une neuve. Pour plus d'informations sur le changement d'une cartouche de toner, voir le Guide de l'utilisateur. Pour une qualité d'impression optimale, il est recommandé de n'utiliser que de l'encre de marque Canon.  "Entretien" > "Remplacement des cartouches de toner" dans le Guide de l'utilisateurEncre de marque Canon prise en charge
Canon imagePRESS Toner T07 Black (Noir) Canon imagePRESS Toner T07 Cyan (Cyan) Canon imagePRESS Toner T07 Magenta (Magenta) Canon imagePRESS Toner T07 Yellow (Jaune)   Cartouche de toner noir Cartouche de toner cyan, magenta ou jaune Toners : attention aux contrefaçons
Il existe des toners Canon contrefaites sur le marché. Leur utilisation risque d'affecter la qualité de l'impression ainsi que les performances de la machine. Canon ne pourra être tenu responsable d'aucun dysfonctionnement, accident ou dommage causé par l'utilisation de contrefaçons. Pour plus d'informations, consulter global.canon/ctc.Cartouche d'agrafes dans l'ensemble d'agrafage
Le produit Agrafes-N1/Agrafes-X1 peut être installé sur le Module de Finition agrafage-W PRO/Module de Finition P.A.C.-W PRO/Module de Finition agrafage-AC/Module de Finition P.A.C.-AC pour l'agrafage. Pour plus d'informations sur le changement de la cartouche d'agrafes, voir le Guide de l'utilisateur. natural_image
Line drawing of a mechanical component with no text or symbolsnatural_image
Technical line drawing of a mechanical housing or enclosure component (no text or symbols)Cartouche d'agrafes pour l'agrafeuse avec piqûre à cheval
Le produit Agrafes-P1/Agrafes-Y1 peut être installé dans le Module de Finition P.A.C.-W PRO/Module de Finition P.A.C.-AC pour la piqûre à cheval. Pour plus d'informations sur le changement de la cartouche d'agrafes, voir le Guide de l'utilisateur. natural_image
Line drawing of a mechanical housing or enclosure component (no text or symbols)natural_image
Technical line drawing of a mechanical component with no visible text or symbolsConsommables Canon
Canon ne cesse de proposer des innovations technologiques en ce qui concerne les toners, cartouches et pièces fabriqués par Canon, spécialement conçus pour être utilisés sur les machines multifonctions de Canon. Les nouvelles technologies avancées de Canon permettent d'obtenir des performances et des volumes d'impression optimaux, ainsi que des tirages de qualité. Par conséquent, l'utilisation des consommables Canon est recommandée pour les machines Canon multifonctions.  CANON GENUINE TONER, CARTRIDGE & PARTSDépannage
Cette section explique comment résoudre les problèmes en cas de bourrages papier fréquents ou de l'affichage de messages d'erreur. Pour plus d'informations sur les procédures détaillées et les précautions à prendre, voir le Guide de l'utilisateur.  "Dépannage" dans le Guide de l'utilisateurElimination de bourrages papier et d'agrafes
Si un bourrage papier ou d'agrafes se produit, suivre les instructions affichées sur l'afficheur tactile pour éliminer le bourrage. En appuyant surtext_image
Routfall du papier bloque 000001 Fenner Routter tout le papier du planta multifunctions et le papier bloque. Bourage paper.Ecran d'un bourrage papier
L'emplacement d'un bourrage papier et les procédures de résolution du bourrage s'affichent. text_image
Routant des agrains bloquées 01/09 Routant Routant le paper install dans la zone d'agrapage. Sourage digrées.Ecran d'un bourrage d'agrafes
L'emplacement d'un bourrage d'agrafes et les procédures pour éliminer ce bourrage s'affichent.Réduction de la fréquence de bourrages papier
Si des bourrages papier se produisent fréquemment, les raisons suivantes peuvent en être la cause.Des morceaux de papier déchirés peuvent se trouver dans la machine.
Suite au retrait forcé des feuilles bloquées, des morceaux de papier déchirés peuvent toujours se trouver dans la machine. • Retirer les morceaux déchirés restants.Le papier chargé ne correspond pas au réglage.
\- S'assurer que le papier chargé dans la cassette correspondant au format et type de papier mémorisé sousLes bourrages papier se produisent fréquemment uniquement avec un certain papier personnalisé.
Les informations sur le papier ont peut-être été mal mémorisées. \- Confirmer les réglages des informations sur le papier utilisé.  "Entretien" > "Réglages de la gestion du type de papier" dans le Guide de l'utilisateurLorsqu'un message d'erreur s'affiche
En cas de dysfonctionnement ou si la machine ne fonctionne pas normalement, un écran illustré à droite s'affiche. Si la machine ne peut pas fonctionner normalement après la mise hors puis sous tension, contacter le revendeur agréé Canon local.  "Contact avec le revendeur agréé Canon local," p. 32 text_image
Mettie Tistensupieur principal (Cote droit de la machine) sur Amét, puis sur Marche. • Si le problème n'est pas nicely, contenter le SAV Canon en notant le code parne ci-dessus. Code parne : E000674-0000Si une clé pour le mode Fonctions limitées s'affiche :
Sitext_image
Mettre l'Intempteur principal (ifié droit de la machine) sur Amelt, puis sur Marche. • Si le problème n'est pas siècle, contender la SAV Canon en sortant le code panne ci-dessus. Code panne: • 6001540-8001 Déplacement vertical du acceptable de sortie du module de friction impossible. Lessever qu'unon objet m'interave le mouvement du acceptable. • Appuyer sur [Mode Inchts limiters] pour poursuivre les opérations dans ce mode lorsque le péripétique ne fonctionne pas correctement, même après aux mis l'intempteur principal (ifié droit de la machine) sur Amelt, puis sur Marche. Mode Inchts LimitesSi un message s'affiche au bas de l'écran :
Si un message d'erreur s'affiche au bas de l'écran, les fonctions d'impression et de lecture sont limitées, mais certaines fonctions sont toutefois disponibles.  "Dépannage" > "Un message ou un numéro précédé de « # » (code d'erreur) s'affiche" > "Si le message demandant de contacter votre revendeur agréé Canon local s'affiche" dans le Guide de l'utilisateur text_image
Accueil Copie Fax Line et arragier Line et compteur Arclo-fich enraquants Suite Fax 6-Fax Impérations dont être versée. (Contacter le Sable)Contact avec le revendeur agréé Canon local
Si la machine ne peut pas fonctionner normalement après la mise hors puis sous tension, contacter le revendeur agréé Canon local en suivant la procédure ci-dessous.1 Noter le code d'erreur.
\- Ecrire le code d'erreur "EXXXXXX-XXXX". text_image
Mettie l'interrupteur principal (Côté droit de la machine) sur Amét, puis sur Marche. • Si le probléseer mient pas réduite, contender le SAV Coton en notant le code panne ci-dessous. Code panne : E500674-00002 Mettre l'interrupteur principal sur Arrêt.
\- Positionner l'interrupteur principal sur "○". text_image
Diagram showing a printer with a close-up of its open door mechanism, illustrating the process of moving or exiting.3 Débrancher la fiche du cordon d'alimentation de la prise secteur.
4 Confirmer le nom de produit, puis contacter le revendeur agréé Canon local.Si la mémoire est saturée
Si la mémoire se sature pendant la lecture, les messages ci-dessous s'affichent sur l'afficheur tactile. Suivre les procédures à l'écran, puis supprimer tout fichier inutile enregistré dans la Boîte aux lettres et la Boîte Fax/I-Fax pour libérer de la mémoire. La lecture peut être annulée par manque de mémoire. Voulez-vous Imprimer (envoyer, stocker)\* les pages lues ? \* Une partie du message varie selon la fonction utilisée.Si la machine ne peut pas être mise sous tension
Si la machine ne fonctionne pas après sa mise sous tension, vérifier le disjoncteur. Si le disjoncteur est en position d'arrêt, essayer de le placer en position de marche, puis contacter le revendeur agréé Canon local. text_image
ARRET (○)Annexe
Consignes de sécurité importantes
Ce chapitre décrit des consignes de sécurité importantes pour la prévention des blessures des utilisateurs de cette machine et autres personnes, et des dommages matériels. Lire ce chapitre avant d'utiliser la machine, et suivre les instructions pour l'utiliser correctement. N'effectuez pas d'opérations qui ne sont pas décrites dans ce manuel. Canon décline toute responsabilité en cas de dommages résultant d'une opération qui ne serait pas décrite dans ce manuel, d'une mauvaise utilisation, ou de modifications ou d'une réparation non effectuées par Canon ou un tiers autorisé par Canon. Toute opération ou utilisation inappropriée de cette machine peut entraîner des blessures physiques et/ou des dommages nécessitant une réparation majeure qui peut ne pas être couverte par la garantie limitée.AVERTISSEMENT
Indique un avertissement concernant des opérations qui peuvent entraîner la mort ou des blessures physiques si elles ne sont pas effectuées correctement. Pour utiliser la machine en toute sécurité, observez toujours ces avertissements.ATTENTION
Indique une mise en garde concernant des opérations qui peuvent entraîner la mort ou des blessures physiques si elles ne sont pas effectuées correctement. Pour utiliser la machine en toute sécurité, observez toujours ces mises en garde.IMPORTANT
Indique des exigences et des restrictions concernant le fonctionnement. À lire attentivement pour être sûr d'utiliser la machine correctement et éviter d'endommager la machine ou le matérielInstallation
Pour utiliser l'appareil en toute sécurité et sans difficulté, lisez soigneusement les précautions suivantes et installez-le dans un endroit approprié.AVERTISSEMENT
Ne l'installez pas dans un endroit où un incendie ou un choc électrique pourrait survenir
- Un endroit où les fentes de ventilation sont bloquées (trop proche de murs, lits, canapés, tapis ou objets semblables) - Un endroit humide ou poussiéreux - Un endroit exposé à la lumière directe du soleil ou à l'extérieur - Un endroit soumis à des températures élevées - Un endroit exposé à des flammes découvertes - A proximité d'alcool, de diluants pour peinture ou d'autres substances inflammablesAutres avertissements
\- Ne pas brancher de câbles non homologués sur cette machine. Cela pourrait provoquer un incendie ou un choc électrique. - Ne pas poser de chaînes, colliers et autres objets métalliques ou des récipients contenant un liquide sur la machine. Si des substances étrangères entrent en contact avec des pièces électriques à l'intérieur de la machine, cela peut provoquer un incendie ou un choc électrique. - Si une substance étrangère tombe à l'intérieur de l'appareil, débranchez la fiche d'alimentation de la prise secteur et contactez votre distributeur agréé Canon.ATTENTION
Ne procédez pas l'installation dans les endroits suivants
L'appareil pourrait tomber et provoquer des blessures. - Un endroit instable - Un endroit soumis à des vibrationsAutres précautions
- Ne pas brancher de produits optionnels non autorisés sur la prise, car cela peut provoquer un incendie ou générer de la fumée. - Lorsque le cordon d'alimentation est débranché, attendre au moins 5 secondes avant de le brancher à nouveau. - Une chute de tension excessive risque de provoquer un dysfonctionnement ou une perte de données de la machine et des ordinateurs.Pieds de mise à niveau (uniquement pour les produits avec pieds de nivellement)
Ne pas retirer les pieds de nivellement de la machine après l'avoir installée, car cela risque de faire tomber la machine ou de la renverser, et d'entraîner des blessures physiques.IMPORTANT
Ne procédez pas l'installation dans les endroits suivants
Cela pourrait endommager l'appareil. - Un endroit soumis à des températures et une humidité extrêmes, basses ou élevées - Un endroit soumis à d'importantes variations de température ou d'humidité - Un endroit à proximité d'un équipement générant des ondes magnétiques ou électromagnétiques - Un laboratoire ou un endroit où des réactions chimiques se produisent - Un endroit exposé à des gaz corrosifs ou toxiques - Un endroit qui pourrait se déformer sous le poids de l'appareil ou un endroit où l'appareil est susceptible de s'enfoncer (un tapis, etc.)Evitez les endroits mal aérés
Cette machine génère une faible quantité d'ozone et d'autres émissions durant une utilisation normale. Ces émissions n'ont pas d'effets nocifs pour la santé. Cependant, ces effets peuvent être perceptibles durant une utilisation prolongée ou une production en grande série dans des pièces mal aérées. Pour maintenir un environnement de travail confortable, il est recommandé de bien aérer la pièce où la machine fonctionne. Éviter également les endroits où les personnes seraient exposées aux émissions de la machine. Ne procédez pas à l'installation dans un endroit où se forme de la condensation Des gouttelettes d'eau (de la condensation) peuvent se former à l'intérieur de la machine lorsque la pièce où la machine est installée est chauffée rapidement et, lorsque la machine est déplacée d'un endroit frais ou sec vers un endroit chaud ou humide. L'utilisation de la machine dans ces conditions peut entraîner des bourrages papier, une impression de mauvaise qualité, ou des dommages de la machine. Laisser la machine s'adapter à la température et à l'humidité ambiantes pendant au moins 2 heures avant utilisation.Éviter d'installer la machine à proximité d'ordinateurs ou d'un autre équipement électronique de précision.
Les interférences électriques et les vibrations générées par la machine lors de l'impression peuvent avoir des effets négatifs sur le fonctionnement de ces appareils.Éviter d'installer la machine à proximité d'une télévision, d'une radio ou d'un équipement électronique similaire.
La machine peut interférer avec la réception du signal d'image et de son. Insérer la fiche d'alimentation dans la prise secteur adéquate, en veillant à maintenir autant d'espace que possible entre la machine et les autres équipements électroniques.A des altitudes d'au moins 3000 m au-dessus du niveau de la mer
Les appareils comportant un disque dur pourrait ne pas fonctionner correctement lorsqu'ils sont utilisés à des altitudes élevées d'environ 3000 m (ou plus) au-dessus du niveau de la mer.Connexion de la ligne téléphonique (Uniquement pour les produits avec une fonction fax)
Cet appareil est conforme aux normes des lignes téléphoniques analogiques, et peut être raccordé à un réseau téléphonique public commuté (RTPC). Raccordez l'appareil à une ligne téléphonique numérique ou à une ligne téléphonique dédiéepourrait nuire au fonctionnement normal de l'appareil et l'endommager. Veillez à vérifi er le type de ligne téléphonique avant de raccorder l'appareil. Avant de raccorder l'appareil sur une ligne en fi bres optiques ou une ligne de téléphonie IP, contactez le fournisseur de services.Si vous utilisez une connexion réseau (LAN) sans fil (uniquement pour les produits avec une fonction réseau sans fi l)
- Placez l'appareil à une distance de 50 m au plus du routeur sans fil. - Dans la mesure du possible, installez l'appareil dans un lieu où aucun objet ne bloque les communications. Le signal peut être aff aibli s'il doit traverser des murs ou des sols. - Tenez l'appareil éloigné autant que possible des téléphones numériques sans fil, des microondes ou de tout autre équipement qui émet des ondes radio. - N'utilisez pas ce produit près d'un équipement médical. Les ondes radio qu'il émet peuvent perturber cet équipement médical, ce qui peut provoquer des dysfonctionnements et des accidents.Si le bruit du fonctionnement vous inquiète (uniquement pour les produits avec une fonction réseau sans fi I)
Selon l'environnement d'utilisation et le mode de fonctionnement, si le bruit de fonctionnement représente un souci, il est recommandé d'installer l'appareil dans un autre endroit que le bureau.Déplacement de la machine
Si vous avez l'intention de déplacer la machine, même si elle reste au même étage du bâtiment, contactez au préalable votre revendeur local agréé Canon. Ne pas tenter de déplacer la machine soi-même.Alimentation
AVERTISSEMENT
- Utiliser uniquement une source d'alimentation adaptée à la tension requise. Le non-respect de cette consigne pourrait provoquer un incendie ou un choc électrique. - L'appareil doit être connecté à une prise de courant dotée d'une mise à la terre à l'aide du cordon d'alimentation fourni. - N'utilisez pas un autre cordon d'alimentation que celui fourni, car cela pourrait provoquer un incendie ou un choc électrique. \- Le cordon d'alimentation fourni est conçu pour être utilisé avec cette machine. Ne pas brancher le cordon d'alimentation à d'autres appareils. \- Ne pas modifier, ne pas tirer, ne pas plier ou ne pas effectuer d'autre action susceptible d'endommager le cordon d'alimentation. Ne pas placer d'objets lourds sur le cordon d'alimentation. Un cordon d'alimentation endommagé peut provoquer un incendie ou un choc électrique. \- Ne branchez et ne débranchez pas la fiche d'alimentation avec les mains humides, car cela pourrait provoquer un choc électrique. \- Ne pas utiliser de rallonge ou de blocs multiprises avec la machine. Cela pourrait provoquer un incendie ou un choc électrique. \- N'enroulez pas le cordon d'alimentation et n'y faites pas de noeud, car cela pourrait provoquer un incendie ou un choc électrique. \- Insérer complètement la fiche d'alimentation dans la prise d'alimentation CA. Le non-respect de cette consigne pourrait provoquer un incendie ou un choc électrique. \- Retirer complètement la fiche d'alimentation de la prise de courant CA, lors d'un orage. Le non-respect de cette consigne pourrait provoquer un incendie, un choc électrique ou des dommages de la machine. \- Assurez-vous que l'alimentation de l'appareil est sûre et que sa tension est stable. \- Tenez le cordon d'alimentation à l'écart de toute source de chaleur ; sinon, cela pourrait faire fondre le revêtement du cordon d'alimentation et provoquer un incendie ou un choc électrique.Evitez les situations suivantes :
Si une tension excessive est appliquée sur l'élément de connexion du cordon d'alimentation, cela pourrait endommager le cordon ou les fils à l'intérieur de la machine pourraient se débrancher. Cela pourrait provoquer un incendie. \- Branchements et débranchements fréquents du cordon d'alimentation. \- Trébucher sur le cordon d'alimentation. - Le cordon d'alimentation est courbé à proximité de la partie branchée et un stress continu est appliqué sur la prise secteur ou la partie branchée. - Application d'une force excessive sur la fiche d'alimentation.ATTENTION
Installer cet appareil à proximité de la prise d'alimentation et laisser suffisamment d'espace autour de la fiche d'alimentation afin de pouvoir la débrancher facilement en cas d'urgence.IMPORTANT
Raccordement de l'alimentation
- Ne pas brancher le cordon d'alimentation sur une source d'alimentation permanente. Le non-respect de cette consigne pourrait provoquer un dysfonctionnement ou des dommages de la machine en cas d'une panne de courant. - Si vous branchez cet appareil sur une prise secteur à plusieurs entrées, n'utilisez pas les prises restantes pour raccordez d'autres appareils. - Ne branchez pas le cordon d'alimentation sur la prise secteur auxiliaire d'un ordinateur.Autres précautions
Des perturbations électriques pourraient provoquer un dysfonctionnement ou une perte de données au niveau de cet appareil.Manipulation
AVERTISSEMENT
- Débrancher immédiatement la fiche d'alimentation de la prise secteur CA et contacter un revendeur agréé Canon si la machine émet des bruits ou une odeur inhabituels, ou si elle génère de la fumée ou une chaleur excessive. Une utilisation continue pourrait provoquer un incendie ou un choc électrique. - Ne pas démonter ni modifier la machine. Il y a des composants de haute tension et de température élevée à l'intérieur de la machine. Un démontage ou une modification risque de provoquer un incendie ou un choc électrique. - Placer la machine dans un endroit où les enfants ne peuvent pas être en contact avec le cordon d'alimentation et les autres câbles ou engrenages et pièces électriques à l'intérieur de la machine. Le non-respect de cette consigne pourrait entraîner des accidents inattendus. - Ne pas utiliser d'aérosols inflammables à proximité de cette machine. Si des substances inflammables entrent en contact avec des pièces électriques à l'intérieur de la machine, cela peut provoquer un incendie ou un choc électrique. - Lors du déplacement de la machine, s'assurer de couper l'alimentation de la machine, puis débrancher le cordon d'alimentation et les câbles d'interface. Le non-respect de cette consigne pourrait endommager le cordon d'alimentation ou les câbles d'interface, ce qui peut entraîner un incendie ou un choc électrique. - Lors du branchement ou du débranchement d'un câble USB alors que la fiche d'alimentation est branchée sur une prise secteur, ne touchez pas la partie métallique du connecteur car vous pourriez subir un choc électrique.Si vous utilisez un stimulateur cardiaque
Cette machine génère un flux magnétique de bas niveau et des ondes ultrasonores. Si vous portez un stimulateur cardiaque et ressentez quelque chose d'anormal, éloignez-vous de la machine et consultez votre médecin immédiatement.ATTENTION
- Ne posez pas d'objets lourds sur cet appareil car ils pourraient tomber et provoquer des blessures. - Par mesure de sécurité, débrancher le cordon d'alimentation si la machine ne doit pas être utilisée pendant une période prolongée. - Soyez prudent lorsque vous ouvrez et fermez les capots afin d'éviter de vous blesser les mains. - Ne pas approcher les mains ou les vêtements des rouleaux dans la zone de sortie. Si les rouleaux coincent vos mains ou vos vêtements, cela peut présenter un risque de blessures physiques. - L'intérieur de la machine et la fente de sortie sont brûlants pendant et immédiatement après l'utilisation. Éviter tout contact avec ces zones pour éviter les brûlures. De plus, le papier imprimé risque d'être brûlant immédiatement après sa sortie, il faut donc faire attention lors de sa manipulation. Le non-respect de cette consigne pourrait provoquer des brûlures.Chargeur
- Ne pas appuyer trop fort sur le chargeur lors de l'utilisation de la vitre d'exposition pour effectuer des copies de livres épais. Sinon, cela peut endommager la vitre d'exposition et causer des blessures physiques. - Fermez doucement le chargeur afin d'éviter de vous coincer les mains, car cela pourrait provoquer des blessures corporelles. - Faire attention de ne pas placer les mains ou les doigts dans le chargeur. Sinon, vous risquez de vous blesser. natural_image
Illustration of a hand pressing a stack of cards into a tray with a prohibition symbol (no text or labels)Finisseur
\- Ne pas placer les mains dans la partie du bac où l'agrafage est effectué (près des rouleaux), en particulier faire bien attention aux agrafes pointues, car cela risque d'entraîner des blessures physiques.Cassettes
\- Ne pas introduire la main dans la machine lors du retrait de la cassette, car cela risque d'entraîner des blessures physiques.Touche Économie d'énergie
\- Appuyer sur la touche (Économie d'énergie) par mesure de sécurité si la machine n'est pas utilisée pendant une longue période de temps, comme par exemple la nuit. En outre, éteindre l'interrupteur principal d'alimentation, puis débrancher le cordon d'alimentation par mesure de sécurité lorsque la machine n'est pas utilisée pendant une longue période de temps, par exemple pendant des vacances.Sécurité relative au laser
Ce produit est confirmé comme produit laser de classe 1, conformément aux normes IEC60825-1:2014 et EN60825-1:2014.CLASS 1 LASER PRODUCT
LASER KLASSE 1 APPAREIL À LASER DE CLASSE 1 APPARECCHIO LASER DI CLASSE 1 PRODUCTO LÁSER DE CLASE APARELHO A LASER DE CLASSE 1 LUOKAN 1 LASER-TUOTE LASERPRODUKT KLASS 1 Le faisceau laser peut être dangereux pour le corps humain. Étant donné que les rayonnements émis à l'intérieur de la machine sont entièrement confinés dans des boîtiers protecteurs et des capots extérieurs, le faisceau laser ne peut pas s'échapper de la machine durant n'importe quelle opération de l'utilisateur. L'ire attentivement les remarques et instructions suivantes pour la sécurité. • N'ouvrez jamais de capots autres que ceux indiqués dans les manuels de cet appareil. - Vous pourriez vous blesser les yeux si le faisceau laser s'échappait et y pénétrait. - Utiliser d'autres commandes, réglages ou procédures que celles spécifiées dans le présent manuel pourrait entraîner un risque d'exposition au rayonnement. Consignes de sécurité du laser text_image
DANGER CAUTION ATTENTION VORSICHT PRECAUCION VORNING VARDITUS 注意: 注意: 注意: 注意: 注意: 注意: 注意: 注意: 注意: 注意: 注意: 注意: 注意: 注意: 注意: 注意: 注意: 注意: 注意: 注意: 注意: 注意: 注意: 注意: 注意: 注意: 注意: 注意: 注意: 注意: 注意: 注意: 注意: 注意: 注意: 注意: 注意: 注意: 注意: 注意: 注意: 注意: 注意: 注意: 注意: 注意: 注意: 注意: 注意: 注意: 注意:text_image
注意警告:"请在电脑上查看一个新打印机,如图片、图片、图片、图片、图片、图片、图片、图片、图片、图片、图片、图片、图片、图片、图片、图片、图片、图片、图片、图片、图片、图片、图片、图片、图片、图片、图片、图片、图片、图片、图片、图片、图片、图片、图片、图片、图片、图片、图片、图片、图片、图片、图片、图片、图片、图片、图片、图片、图片、图片、图片 WARNING: "请在电脑上查看一个新打印机,如图片、图片、图片、图片、图片、图片、图片、图片、图片、图片、图片、图片、图片、图片、图片、图片、图片、图片、图片、图片、图片、图片、图片、图片、图片、图片、图片、图片、图片、图片、图片、图片、图片、图片、图片、图片、图片、图片、图片、图片、图片、图片、图片、图片、图片 WARNING: "请在电脑上查看一个新的打印机,如图片、图片、图片、图片、图片、图片、图片、图片、图片、图片、图片、图片、图片、图片、图片、图片、图片、图片、图片、图片、图片、图片、图片、图片、image WARNING: "请在电脑上查看一个新打印机,如照片、图片、图片、图片、图片、图片、图片、图片、image, 请在电脑上查看一个新打印机,如照片, 请在电脑上查看一个新打印机, 请在电脑上查看一个新打印机, 请在电脑上查看一个新打印机, 请在电脑上查看一个新打印机, 请在电脑上查看一个新打印机, 请在电脑上查看一个新打印机, 请在电脑上查看一个新打印机, 请在电脑上查看一个新打印机, 请在电脑上查看一个新打印机, 请在电脑上查看一个新打印机, 请在电脑上查看一个新计算机, 请在电脑上查看一个新计算机, 请在电脑上查看一个新计算机, 请在电脑上查看一个新计算机, 请在电脑上查看一个新计算机, 请在电脑上查看一个新计算机, 请在电脑上查看一个新计算机, 请在电脑上查看一个新计算机, 请在电脑上查看一个新计算机, 请在电脑上查看一个新计算机, 请在电脑上查看一个新 computer, 请在电脑上查看一个新 computer, 请在电脑上查看一个新 computer, 请在电脑上查看一个新 computer, 请在电脑上查看一个新 computer, 请在电脑上查看一个新 computer, 请在电脑上查看一个新 computer, 请在电脑上查看一个新计算机, 请在电脑上查看一个新计算机, 请在电脑上查看一个新计算机, 请在电脑上查看一个新计算机, 请在电脑上查看一个新计算机, 请在电脑上查看一个新计算机, 请在电脑上查看一个新计算机, 请在电脑上查看一个新计算机, 请在电脑上查看一个新计算机, 请在电脑上查看一个新 Computer, 请在电脑上查看一个新 Computer, 请在电脑上查看一个新 Computer, 请在电脑上查看一个新 Computer, 请在电脑上查看一个新 Computer, 请在电脑上查看一个新 Computer, 请在电脑上查看一个新 Computer, 请在电脑上查看一个新 Computer, 请在电脑上查看一个新 Computer, 请在电脑上查看一个新 Computer, 请在电脑上查看一个新 computer, 请在电脑上查看一个新 computer, 请在电脑上查看一个新 computer, 请在电脑上查看一个新 computer, 请在电脑上查看一个新 computer, 请在电脑上查看一个新 computer, 请在电脑上查看一个新 computer, 请在电脑上查看一个新 computer, 请在电脑上查看一个新 computer, 请在电脑上查看一个新 computer, 请在电脑上查看一个新 Computer, 请在电脑上查看一个新 Computer, 请在电脑上查看一个新 Computer, 请在电脑上查看一个新 Computer, 请在电脑上查看一个新 Computer, 请在电脑上查看一个新 Computer, 请在电脑上查看一个新 Computer, 请在电脑上查看一个新 Computer, 请在电脑上查看一个新 Computer, 请在电脑上查看一个新计算机, 请在电脑上查看一个新计算机, 请在电脑上查看一个新计算机, 请在电脑上查看一个新计算机, 请在电脑上查看一个新计算机, 请在电脑上查看一个新计算机, 请在电脑上查看一个新计算机, 请在电脑上查看一个新计算机, 请在电脑上查看一个新计算机, 请在电脑上查看一个新computer, 请在电脑上查看一个新 computer, 请在电脑上查看一个新 computer, 请在电脑上查看一个新 computer, 请在电脑上查看一个新 computer, 请在电脑上查看一个新 computer, 请在电脑上查看一个新 computer, 请在电脑上查看一个新 computer, 请在电脑上查看一个新 computer, 请在电脑上查看一个新 computer, 请在电脑上查看一个新computer, 请在电脑上查看一个新 computer, 请在电脑上查看一个新 computer, 请在电脑上查看一个新 computer, 请在电脑上查看一个新 computer, 请在电脑上查看一个新 computer, 请在电脑上查看一个新 computer, 请在电脑上查看一个新 computer, 请在电脑上查看一个新 computer, 请在电脑上查看一个新computer, 请在电脑上查看一个新computer, 请在电脑上查看一个新computer, 请在电脑上查看一个新computer, 请在电脑上查看一个新computer, 请在电脑上查看一个新computer, 请在电脑上查看一个新computer, 请在电脑上查看一个新computer, 请在电脑上查看一个新computer, 请在电脑上查看一个新computer, 请在电脑上查看一个新 computer, 请在电脑上查看一个新 computer, 请在电脑下Unité de fixation
Lors de la suppression d'un bourrage papier ou d'une inspection à l'intérieur de la machine, ne pas s'exposer à la chaleur émise par l'unité de fixation et son environnement pendant une période de temps prolongée. Le non-respect de cette consigne peut entraîner des brûlures à basse température, même si vous n'avez pas touché l'unité de fixation et son pourtour directement. text_image
CAUTION Attencio VIRSUCHI ATTENCIO CANDADO 注意: 注意: 注意: 注意: 注意:IMPORTANT
- Suivre les instructions de mise en garde sur les étiquettes et et autres avertissements similaires sur cette machine. - Ne soumettez pas l'appareil à des chocs ou des vibrations violents. - Ne pas forcer pour ouvrir et fermer les portes, les capots et les autres pièces. Cela pourrait endommager l'appareil. - Ne pas couper l'interrupteur principal d'alimentation ni ouvrir les capots lorsque la machine est en cours de fonctionnement. Cela peut entraîner des bourrages papier. - Utilisez un câble modulaire d'une longueur inférieure à 3 mètres. - Utilisez un câble USB d'une longueur inférieure à 3 mètres.Symboles relatifs à la sécurité
Interrupteur d'alimentation : position«ON» ○ Interrupteur d'alimentation : position «OFF» Interrupteur d'alimentation : position «STAND-BY» ① Interrupteur-poussoir ON « O F » Borne de protection avec mise à la terre Tension dangereuse à l'intérieur. Ne pas ouvrir les capots autres que ceux indiqués. ATTENTION : surface brûlante. Ne pas toucher. □ Equipement de classe II Pièces mobiles : tenir les parties du corps à l'écart des pièces mobiles ATTENTION : Il existe un risque d'électrisation. Retirez toutes les fiches de la prise électrique. L'appareil présente des arêtes coupantes. Tenez-vous à l'écart des arêtes coupantes.[REMARQUE]
Il est possible que certains des symboles ne soient pas apposés en fonction du produit.Maintenance et inspections
Nettoyer la machine régulièrement. Si de la poussière s'accumule, la machine risque de ne pas fonctionner correctement. Lors du nettoyage, veiller à bien respecter les points suivants. Si un problème survient pendant le fonctionnement, consulter la section « Dépannage » dans le Guide de l'utilisateur.AVERTISSEMENT
- Avant le nettoyage, mettre la machine hors tension et débrancher la fiche d'alimentation de la prise d'alimentation CA. Le non-respect de cette consigne pourrait provoquer un incendie ou un choc électrique. - Débrancher périodiquement la fiche d'alimentation et nettoyer avec un chiffon sec pour enlever la poussière et la saleté. L'accumulation de poussières peut absorber l'humidité dans l'air et provoquer un incendie si elle entre en contact avec l'électricité. - Utiliser un chiffon humide bien essoré pour nettoyer la machine. Imprégner les chiffons avec de l'eau uniquement. N'utiliser aucune substance inflammable telle que de l'alcool, de la benzine ou du diluant à peinture. Ne pas utiliser de mouchoirs ou de serviettes en papier. Si ces substances entrent en contact avec les pièces électriques à l'intérieur de la machine, elles peuvent générer de l'électricité statique ou provoquer un incendie ou un choc électrique. - Vérifier périodiquement si le cordon et la fiche d'alimentation ne sont pas endommagés. Vérifier la machine pour détecter des signes de rouille, bosses, éraflures, fissures ou une émission de chaleur excessive. L'utilisation d'un équipement mal entretenu peut provoquer un incendie ou un choc électrique.ATTENTION
- L'intérieur de la machine renferme des composants haute tension et de température élevée. Un contact avec ces composants présente un risque de brûlures. Ne toucher aucune pièce de la machine qui n'est pas mentionnée dans ce manuel. - Lors du chargement du papier ou de l'élimination d'un bourrage de papier, veillez à ne pas couper les mains avec les bords du papier.Consommables
AVERTISSEMENT
- Ne pas jeter les cartouches de toner ou les réceptacles de toner usagé dans une flamme nue, ou ne pas entreposer ces éléments ainsi que le papier d'impression dans un endroit où ils seraient exposés à une flamme nue. Ils risquent de s'enflammer et provoquer ainsi des brûlures ou un incendie. - Si du toner est répandu accidentellement, recueillir soigneusement les particules de toner et les essuyer avec un chiffon doux et humide afin d'éviter une inhalation. Ne jamais utiliser d'aspirateur qui n'est pas muni d'une protection contre les explosions de poussière pour aspirer le toner déversé. Cela pourrait entraîner un dysfonctionnement de l'aspirateur ou provoquer une explosion de poussière due à une décharge statique.ATTENTION
- Conserver le toner et les autres consommables hors de la portée des enfants en bas âge. En cas d'ingestion de ces éléments, consulter immédiatement un médecin. - Si du toner entre en contact avec la peau ou les vêtements, rincer immédiatement avec de l'eau. Ne pas utiliser d'eau chaude, car le toner risque d'adhérer, résultant en une tache permanente. - Ne pas démonter la cartouche de toner, car le toner risque de s'échapper et de pénétrer dans les yeux ou la bouche. Si du toner pénètre dans les yeux ou la bouche, laver immédiatement avec de l'eau froide et consulter immédiatement un médecin. - Si du toner s'échappe de la cartouche, faire attention de ne pas ingérer le toner et éviter tout contact direct avec la peau. Si votre peau entre en contact avec du toner, lavez-la avec du savon et de l'eau. Si votre peau reste irritée après avoir été lavée ou si vous ingérez du toner, consultez immédiatement un médecin. - Lors du retrait du réceptacle de toner usagé, faire attention de ne pas le faire tomber. Cela pourrait entraîner des blessures physiques.IMPORTANT
\- Conserver les cartouches de toner dans un endroit frais, à l'abri de la lumière directe du soleil.Équipement téléphonique
AVERTISSEMENT
Lorsque vous utilisez l'équipement téléphonique, appliquez toujours les consignes de sécurité de base pour réduire les risques d'incendie, d'électrocution et de blessure, notamment : 1. N'utilisez pas ce produit près de l'eau, par exemple, près d'une baignoire, d'un lavabo, d'un évier ou d'un baquet à linge, dans un sous-sol humide ou près d'une piscine. 2. Évitez d'utiliser le téléphone en cas d'orage, car il existe un faible risque d'électrocution due à la foudre. 3. N'utilisez pas le téléphone pour signaler une fuite de gaz si vous êtes dans le voisinage de cette fuite.Notice
Nom du produit
Les réglementations relatives à la sécurité nécessitent l'enregistrement du nom du produit. Dans certaines régions où ce produit est vendu, le ou les noms suivants entre parenthèses () peuvent être enregistré à la place. imagePRESS C170 (F168600) imagePRESS C165 (F168603)Exigences CEM de la directive CE
Cet appareil est conforme aux exigences essentielles EMC de la directive CE. Nous déclarons que ce produit est conforme aux exigences EMC de la directive CE pour une alimentation secteur nominale 230 V, 50 Hz, bien que l'alimentation nominale du produit soit de 220 à 240 V, 50/60 Hz. L'utilisation de câbles blindés est nécessaire pour être en conformité avec les exigences techniques EMC de la directive CE.Directives sur les batteries et DEEE de l'UE
Vous pouvez consulter des informations sur la réglementation DEEE et les batteries dans le dernier Guide de l'utilisateur (manuel HTML) sur le site Internet de Canon (https://oip.manual.canon/).Informations sur la réglementation en vigueur pour le réseau sans fil
Regulatory information for users in Jordan imagePRESS C170/C165 includes approved Wireless LAN Module (Model name: FM1M944). Contains Wireless LAN Module approved by TRC/LPD/2015/5 Regulatory information for users in UAE imagePRESS C170/C165 includes approved Wireless LAN Module (Model name: FM1M944).TRA
REGISTERED No: ER38576/15 DEALER No: DA39360/15 Regulatory information for users in Argentina Incluye módulo Wireless LAN Module Marca Canon Inc., Modelo FM1M944, CNC C-20793  COMISIÓN NACIONAL DE COMUNICACIONES Regulatory information for users in Uruguay imagePRESS C170/C165 contains URSEC approved Wireless LAN Module (Model name: FM1M944 or FM1M948). Regulatory information for users in Singapore Complies with IMDA Standards DB00671 Regulatory information for users in Vietnam imagePRESS C170/C165 includes approved Wireless LAN Module (Model name: FM1M944). RE Directive
(Only for European radio equipment)RE Declaration of Conformity
French (FR) Le soussigné, Canon Inc., déclare que le présent équipement est conforme à la Directive 2014/53/UE. Le texte complet de la déclaration UE de conformité est disponible à l'adresse internet suivante : http://www.canon-europe.com/ce-documentation Spécifications LAN sans fil Bande(s) de fréquence: 2412-2472 MHz Puissance maximale de radiofréquence: 18.21 dBmRèglement relatif aux déchets
électroniques -Uniquement en Inde-  Conformément au règlement relatif aux déchets électroniques (E-Waste [Management] Rules, 2016), ce produit ne doit en aucun cas être jeté avec vos ordures ménagères. Il doit être déposé dans un point de collecte désigné, à savoir une déchetterie agrée pour le recyclage des déchets d'équipements électriques et électroniques (EEE). Le traitement inadéquat de ce type de déchet peut avoir un impact négatif sur l'environnement et la santé humaine à cause des substances potentiellement dangereuses généralement associées aux EEE. Par ailleurs, votre coopération à l'élimination appropriée de ce produit contribuera à l'utilisation efficiente des ressources naturelles. Pour davantage d'informations concernant le retour et le recyclage des DEEE, rendez-vous sur http://www.canon.co.in/environment ou écrivez-nous à customer.delight@canon.co.in. En outre, ce produit est conforme à la réglementation "E-Waste (Management) Rules, 2016" et interdit l'utilisation de plomb, de mercure, de chrome hexavalent, de polybromobiphényles ou de polybromodiphényléthers à des concentrations supérieures à 0,1 % en poids et à 0,01 % en poids pour le cadmium, à l'exception des exemptions prévues à l'annexe II de la réglementation.Legal Limitations on the Usage of Your Limitations légales quant à l'utilisation de votre produit et à l'utilisation des images
L'utilisation de votre machine pour numériser, imprimer ou reproduire certains documents, et l'usage de ces images numérisées, imprimées ou reproduites par votre machine, peut être interdite par la loi, et peut entraîner une responsabilité civile et/ou pénale. Une liste non exhaustive de ces documents est donnée ci-dessous. Cette liste est donnée à titre de référence seulement. En cas de doute sur la légalité de l'utilisation de votre machine pour numériser, imprimer ou reproduire un document particulier, et/ou de l'usage des images numérisées, imprimées ou reproduites, il convient de consulter au préalable un conseiller juridique pour obtenir de l'aide. • Papier-monnaie - Chèques de voyage - Mandats postaux • Bons de nourriture • Certificats de dépôt - Passeports • Timbres postaux (annulés ou non) • Documents d'immigration • Badges ou insignes d'identification • Timbres de revenus internes (annulés ou non) • Papiers de traite ou de Selective Service - Obligations ou autres certifications de dette - Chèques ou traites émis par les organismes gouvernementaux • Certificats d'actions - Permis de véhicule motorisé et certificats de titres - Œuvres sous droits d'auteur/œuvre d'art sans autorisation du propriétaire des droits d'auteurAvis de non-responsabilité
- Les informations contenues dans le présent document sont soumises à modifications sans préavis. - CANON INC. N'OFFRE AUCUNE GARANTIE D'AUCUNE SORTE À L'ÉGARD DE CE PRODUIT, EXPRESSE OU IMPLICITE, SAUF DISPOSITION CONTRAIRE, Y COMPRIS SANS S'Y LIMITER, DES GARANTIES DE VALEUR MARCHANDE, COMMERCIALIZATION, ADÉQUATION A UN USAGE PARTICULIER OU DE NON-INFRACTION. CANON INC. NE PEUT ÊTRE TENU RESPONSABLE DES DOMMAGES DIRECTS, ACCIDENTELS OU CONSÉCUTIFS DE QUELQUE NATURE QUE CE SOIT, NI DES PERTES OU DÉPENSES RÉSULTANT DE L'UTILISATION DE CE MATÉRIEL.À propos du présent manuel
Écrans
Les écrans de l'afficheur tactile utilisés dans ce manuel sont ceux capturés lorsque l'équipement en option suivant est raccordé à l'imagePRESS C165 : - Massicot-F - Module de Finition P.A.C.-W PRO - Module de perforation-BT - Module de pli en C et en Z-J • Unité d'insertion de Document-N - Magasin grande capacité A3-C - Carte FAX (Super G3) Noter que les fonctions qui ne peuvent pas être utilisées selon le modèle ou les options n'apparaissent pas sur l'afficheur tactile.Illustrations
Les illustrations utilisées dans ce manuel sont celles affichées lorsque l'équipement en option suivant est raccordé à l'imagePRESS C165 : • Réceptacle-R natural_image
Line drawing of a multi-tiered electronic device with control panel and scroll (no text or symbols)Marques commerciales
Mac est une marque commerciale d'Apple Inc. Microsoft, Windows, Windows Vista, Windows Server, Internet Explorer, Excel et PowerPoint sont des marques déposées ou des marques commerciales de Microsoft Corporation aux États-Unis et/ou dans d'autres pays. Les autres noms de produits et de sociétés cités ici peuvent être des marques commerciales de leurs propriétaires respectifs.Logiciels tiers
Ce produit Canon (le « PRODUIT ») inclut des modules de logiciels tiers. L'utilisation et la distribution de ces modules logiciels, y compris toutes les mises à jour de ces modules logiciels (collectivement, le « LOGICIEL ») sont soumises aux conditions de licence (1) à (9) ci-dessous. (1) Vous acceptez de vous conformer à toutes les lois, restrictions ou réglementations applicables relatives au contrôle d'exportation des pays impliqués, dans le cas où le PRODUIT comprenant les LOGICIELS est expédié, transféré ou exporté dans un autre pays. (2) Les titulaires des droits du LOGICIEL conservent à tous égards le titre, la propriété et les droits de propriété intellectuelle du LOGICIEL. Sauf stipulation contraire expresse dans le présent document, aucun droit ou licence, expresse ou implicite n'est communiqué ou accordé par les détenteurs de droits du LOGICIEL pour toute propriété intellectuelle des détenteurs de droits du LOGICIEL. (3) Vous ne devez utiliser le LOGICIEL qu'aux fins d'une utilisation du PRODUIT. (4) Vous ne pouvez pas attribuer, concéder en sous-licence, commercialiser, distribuer ou transférer les LOGICIELS à un tiers sans l'accord écrit préalable des détenteurs des droits des LOGICIELS. (5) Nonobstant ce qui précède, vous pouvez transférer les LOGICIELS uniquement si (a) vous attribuez tous vos droits à l'égard du PRODUIT et tous les droits et obligations soumis aux conditions de licence au cessionnaire et (b) ce cessionnaire accepte par écrit d'être lié par ces conditions. (6) Vous n'êtes pas autorisé à décompiler, faire de l'ingénierie inverse, désassembler ou réduire le code des LOGICIELS sous une forme lisible par une personne. (7) Vous n'êtes pas autorisé à modifier, adapter, traduire, louer, louer à bail ou prêter les LOGICIELS ni à créer des travaux dérivés basés sur les LOGICIELS. (8) Vous n'êtes pas autorisé à supprimer des LOGICIELS du PRODUIT, ni à en faire des copies. (9) La partie lisible par une personne (le code source) des LOGICIELS ne vous est pas octroyée par la licence. Nonobstant les clauses (1) à (9) ci-dessus, le PRODUIT comprend des modules logiciels tiers qui accompagnent les autres conditions de licence, et ces modules logiciels sont soumis à d'autres conditions de licence. Veuillez vérifi er la version plateforme du PRODUIT et vous référer aux autres conditions de licence des modules logiciels tiers décrits dans l'annexe du manuel pour la version de plateforme correspondante. Ce manuel est disponible sur https://oip.manual.canon/. En utilisant ce PRODUIT, vous êtes considéré comme ayant accepté toutes les conditions applicables à la licence. Si vous n'acceptez pas ces conditions de licence, contactez votre représentant de service. V\_191204 imagePRESS C170/C165Praktische Merkmale
Automatische Gradationsjustage für verschiedene Papiertypen
Die Funktion Gradation automatisch justieren justiert die Gradation, Dichte und den Farbton von Bildern, und erfordert nur, die Testseite zu scannen. Diese Funktion kann für verschiedene Papiergewichte verwendet werden, so dass ein Druckergebnis mit hoher Qualität auf verschiedenen Papiertypen erzielt werden kann.  "Wartung" > "Anpassen der Druck- und Endbearbeitungsqualität" in der Anwenderhandbuch natural_image
Illustration of a paintbrush resting on an artist's palette with five circular paint blobs (no text or symbols)Erzielen Sie qualitativ hochwertige Farbreduktion mit automatischer Farbton-Korrektur
Im Vergleich zu der Funktion automatische Gradationsjustage, die CMYK einstellt, justiert die Funktion Auto Korrektur Vollfarbe gemischte Farben, die mit mehreren Tonern ausgedrückt werden. Durch die gemeinsame Verwendung dieser Funktionen können Sie gleichmäßigere Justagen der Farbgebung vornehmen.  "Wartung" > "Anpassen der Druck- und Endbearbeitungsqualität" in der Anwenderhandbuch natural_image
Six-panel grid showing six identical panels of stacked balloons, each with a different grayscale shade (no text or symbols)Optimales Druckergebnis für jeden Papiertyp
Papierinformationen, zu denen Basisgewicht, Endverarbeiten und Level Glättungskorrektur gehören, können als Papiereigenschaften gespeichert werden. Da die detaillierten Informationen für jeden Papiertyp festgelegt werden können, können Sie ein feines Druckergebnis unter Berücksichtigung der Papiereigenschaften erzielen. Diese Funktion ist auch zur Verbesserung des Papiertransports und der Druckqualität wirksam.  "Wartung" > "Papiertyp-Verwaltungseinstellungen" in der Anwenderhandbuch natural_image
Stack of four overlapping sheets of paper with distinct shading (no text or symbols)Glättungskorrektur für stabilen Papiertransport
Das System korrigiert ständig die Papierverwellung, die durch den angewendeten Druck beim Fixieren des Toners auftritt. Des Weiteren verringert das System durch Korrigieren der Papierverwellung bei der Ausgabe das Risiko eines Papierstaus und erzielt stabilen Papiertransport. Die Glättungskorrektur kann für jeden gewünschten Papiertyp festgelegt werden.  - "Wartung" > "Anpassen der Druck- und Endbearbeitungsqualität" in der Anwenderhandbuch - "Wartung" > "Papiertyp-Verwaltungseinstellungen" in der Anwenderhandbuch natural_image
Diagram showing a curved stack of papers transforming into a single sheet of paper, with an arrow indicating the process (no text or symbols present)Leichte Bedienung zum Justieren der Bildposition
Die Bildposition lässt sich ganz einfach per Testseite justieren. Dies ist besonders praktisch, denn damit ist es nicht nötig, Abmessungen vorzunehmen und dann die gemessenen Werte einzugeben.  "Wartung" > "Papiertyp-Verwaltungseinstellungen" > "Justieren der Bildposition" in der Anwenderhandbuch text_image
RichtblattSchneller Zugang zu häufig verwendeten Einstellungen
Verschiedene Einstellungen sind erforderlich, je nach dem Druckzweck oder den Papiertypen, aber der wiederholte Zugriff auf Einstellpunkte in verschiedenen Menüs ist etwas kompliziert. Deshalb können Sie häufig verwendete Einstellungen unter der Taste "Einstellungen/Speicherung Kürzel" speichern. Sie können mit dieser Taste direkt auf das Display zur Funktionseinstellung zugreifen und sich den Aufwand, erforderliche Einstellpunkte zu suchen, sparen.  "Grundfunktionen" > "Anpassen des Sensordisplays" > "Registrieren von Schnelltasten für häufig verwendete Einstellungen/registrierte Elemente" in der Anwenderhandbuch flowchart
graph TD
    A["Einstellungen/Sorh.Katzwehl"] --> B["Gradation automatisch justieren"]
    A --> C["Einstellungen Verwaltung Fapiertyp"]
    A --> D["Das Innere der Haupteinheit reinigen"]
Inhalt
Herzlichen Glückwunsch zum Kauf dieses Canon-Produkts. Lesen Sie diese Anleitung sorgfältig durch, bevor Sie mit dem System arbeiten. So können Sie sich mit seinen Möglichkeiten vertraut machen und seine vielfältigen Funktionen optimal nutzen. Weitere Informationen zu den Einzelheiten der Einstellungen der Funktionen finden Sie in der Anwenderhandbuch. Bewahren Sie die Anleitung als Nachschlagewerk in der Nähe des Systems auf.Teile und Funktionen 6
Außenansicht (Vorderseite)....6 Außenansicht (Rückseite) 8 Innenansicht 9 Bedienfeld....10Bildschirm Status Monitor....12
Einschalten des Systems am Hauptschalter ..... 13
Einschalten der Hauptstromversorgung ....13 Das Ausschalten der Einheit ....13Einlegen von Papier 14
Papierquelle....14 Speichern von Papiertypen im System ....16 Einlegen von Papier in das Papiermagazin oder die Papierkassette ....18 Speichern anwenderdefinierter Papiertypen .....20Reinigung und Wartung 22
Reinigung des Vorlagenglases ....22 Reinigung des Originalscanbereichs....22 Reinigung der Zufuhr 23 Automatisches Reinigen des Einzugs....25 Reinigen der Haupteinheit innen ....25 Reinigung des Sensordisplays 26 Überprüfung des Schutzschalters....27Verbrauchsmaterialien 28
Fehlersuche 30
Beheben von Papierstaus und Heftklammernstaus .....30 Verringern der Häufigkeit von Papierstaus ....30 Wenn eine Fehlermeldung angezeigt wird ....31 Kontaktaufnahme mit Ihrem Canon-Vertriebspartner .....32 Wenn der Speicher voll wird 33 Wenn die Hauptstromversorgung nicht einschaltet .....33Anhang 34
Markierungen und Symbole in dieser Anleitung
WICHTIG
HINWEIS
   OPTION So werden Warnungen zur Bedienung und Einschränkungen angezeigt. Bitte lesen Sie diese Hinweise unbedingt, damit Sie das System richtig bedienen und Beschädigungen an der Maschine oder der Umgebung vermeiden. So sind Hinweise zur Bedienung und zusätzliche Erläuterungen gekennzeichnet. Das Beachten solcher Hinweise ist empfehlenswert, damit die Funktionen optimal genutzt werden können. Weist auf nützliche Funktionen oder Tipps für die Nutzung des Geräts hin. Weitere Informationen finden Sie in der Online-Anleitung (https://oip.manual.canon/). Eine detaillierte Beschreibung finden Sie auf der angegebenen Seite dieser Anleitung. Zeigt ein Zusatzprodukten an, das mit diesem System verwendet werden kann.Tasten- und Schaltflächendarstellung in dieser Anleitung
Im folgenden einige Beispiele, wie Tasten und Schaltflächen (Displaytasten) in diesem Handbuch dargestellt werden. \- Schaltflächen im Sensordisplay:Teile und Funktionen
In diesem Abschnitt werden die Namen und Funktionen der Teile des Systems beschrieben. Die Bedientasten und Anzeigen auf dem Bedienfeld werden ebenfalls beschrieben. Lesen Sie diesen Abschnitt gründlich durch, um problemlose Verwendung der verschiedenen Funktionen des Systems zu erlauben.  "Anhang" > "Optionen" in der AnwenderhandbuchAußenansicht (Vorderseite)
text_image
1234 9 8 5 6 71 Bedienfeld
Das Bedienfeld enthält die Zahlentasten, ⭕, Statusanzeigen, ein Sensordisplay usw. Sie können über das Bedienfeld alle Funktionen ausführen und Einstellungen vornehmen.2 Obere rechte Abdeckung der Haupteinheit
Öffnen Sie diese Abdeckung zum Beheben von Papierstau im Geräteinneren.3 Mehrzweckfach
Legen Sie das Papier in das Mehrzweckfach ein, wenn Sie vorübergehend einen anderen als den in das Papiermagazin oder die Papierkassette eingelegten Papiertyp verwenden möchten.4 Behälter für Glasreinigungstuch
Verwenden Sie diesen Behälter zum Aufbewahren des Reinigungstuchs für das Vorlagenglas.5 USB-Anschluss (rechte Rückseite des Geräts)
Sie können Geräte wie beispielsweise eine externe Festplatte am Gerät anschließen.6 USB-Buchse
Schließen Sie hier ein USB-Kabel an, wenn Sie das Gerät mit einem Computer verbinden.7 LAN-Anschluss
Schließen Sie hier ein LAN-Kabel an, wenn Sie das Gerät über Kabel mit einem LAN-Router o. Ä. verbinden.8 Untere rechte Abdeckung in der Haupteinheit
Öffnen Sie diese Abdeckung zum Beheben von Papierstau im Geräteinneren.9 Netzschalter
Drücken Sie den Netzschalter zum Ein- oder Ausschalten des Geräts. text_image
1011 12 13 14 161510 USB-Anschluss (Frontseite des Geräts)
Sie können Geräte wie beispielsweise ein USB-Speichergerät am Gerät anschließen.11 Zufuhr
Führt dem Gerät automatisch Dokumente für das Scannen zu. Wenn zwei oder mehr Blätter in die Zufuhr eingelegt werden, können die Dokumente fortlaufend gescannt werden.12 Tonerersatzabdeckung
Öffnen Sie diese Abdeckung zum Ersetzen der Tonerpatrone.13 Vordere Abdeckung der Haupteinheit
Öffnen Sie diese Abdeckung zum Beheben von Papierstau.14 Papiermagazin 1/Papiermagazin 2
Legen Sie einen häufig verwendeten Papiertyp ein.15 Papierkassette 1/Papierkassette 2
Öffnen Sie diese Abdeckung zum Beheben von Papierstau.16 Linke Abdeckung der Haupteinheit
Open this cover when clearing a paper jam. Außenansicht (Rückseite) text_image
Technical diagram of a device with labeled parts and zoomed-in views, showing internal components and structural details.1 Telefonleitungsbuchse (Leitung 1)
Schließen Sie hier ein Telefonkabel an, wenn Sie das Gerät mit einer Telefonleitung verbinden.2 Schutzschalter
Erkennt übermäßige Stromspitzen und Kriechströme.Innenansicht
text_image
Technical diagram of a printer with labeled parts and zoomed-in insets showing internal components1 Tonerpatrone
Ersetzen Sie die Tonerpatrone, wenn der Toner zur Neige geht.2 Fixiertransporteinheit
Ziehen Sie die Fixiertransporteinheit heraus, wenn ein Papierstau im Geräteinneren behoben wird. text_image
Startseite Kopie Fax Scanen und Senden Scanen und Speichem Zusagen zu gasp Daten Facil-Fax Eingampbox Login Startseite Timeline vortierige Einstellungen für jedem Auftrag werden bei angegeben. Vorheriger Einstellungen können zu- spickgrassen werden, durch betrangen oder dieser Punkte. Statuscontrol 191817161514 4 5 6 7 ① ② ③ GHI JKL MNO ④ ⑤ ⑥ QKS TUV WXYZ ⑦ ⑧ ⑨ ⑩ ⑪ ⑫ ID C 8 9 10 11 12 131 Sensor- display
Zeigt den Einstellungsbildschirm und die Meldungen an. Berühren Sie den Bildschirm, um Einstellungen und andere Bedienvorgänge durchzuführen.2
Mit dieser Taste zeigen Sie den Bildschirm Hauptmenü an.
3 Login-Benu tzername
Der Anwendername des aktuell angemeldeten Anwenders wird angezeigt.4 ID-Taste (Log In/Out)
Mit dieser Taste melden Sie sich an/ab (sofern ein Anmeldedienst festgelegt worden ist).5 Taste Einstellungen/Speicherung
Mit dieser Taste legen Sie Einstellungen fest oder Sie führen eine Registrierung durch.6 Zahlentasten
Mit diesen Tasten geben Sie die numerischen Werte ein.7 Energiespartaste
Mit dieser Taste stellen Sie den Schlafmodus ein oder brechen ihn ab. - Leuchtet auf, sobald das Gerät in den Schlafmodus wechselt. - Schaltet aus, sobald das Gerät den Schlafmodus beendet.8 Taste Zähler-/Geräte-Informationen
Mit dieser Taste zeigen Sie den Kopien- und Druckgesamtzähler am Sensordisplay an.9 Helligkeitsregler
Stellt die Helligkeit des Bildschirms ein.10 Taste Lautstärkeeinstellung
Mit dieser Taste stellen Sie die Lautstärke ein.11 Korrekturtaste
Mit dieser Taste löschen Sie eingegebene Werte oder Zeichen.12 Stopptaste
Mit dieser Taste stoppen Sie den aktuellen Vorgang.13 Starttaste
Mit dieser Taste starten Sie einen Vorgang (oder die Datenauslesung).14 Bereitschaftsanzeige
Leuchtet, wenn die Stromversorgung eingeschaltet ist.15 Fehleranzeige
Blinkt oder leuchtet auf, wenn ein Fehler am Gerät vorhanden ist. ※Wenden Sie sich an Ihren autorisierten Canon Händler vor Ort, wenn die Fehleranzeige ständig rot aufl euchet.16 Verarbeitungs-/Datenanzeige
- Blinkt, sobald das Gerät in Betrieb ist. - Leuchtet auf, wenn das Gerät auf einen Befehl wartet.17 Rückstelltaste
Mit dieser Taste können Sie Einstellungen verwerfen und die zuvor festgelegten Einstellungen wiederherstellen.18
Mit dieser Taste prüfen Sie den Status eines Auftrags oder brechen einen Auftrag ab.
19
Mit dieser Taste prüfen Sie den Status eines Auftrags oder brechen einen Auftrag ab.

Einstellen des Energiesparmodus/Schlafmodus, um den Stromverbrauch zu imieren
Sie können den Energieverbrauch verringern, indem Sie den Energiesparmodus/Schlafmodus verwenden, wenn das System längere Zeit nicht verwendet wird, wie etwa während der Mittagspause. Um diese Modi zu verwenden, drücken Sie am Bedienfeld. Wenn das System eine gewisse Zeit lang nicht bedient wird, schaltet es in den Schlafmodus (automatischer Schlafmodus). Nähere Informationen zum Modus, der durch Berühren von aktiviert wird, und Einzelheiten zum automatischen Schlafmodus, finden Sie in der Anwenderhandbuch.  "Grundfunktionen" > "Wechseln in den Schlafmodus" in der Anwenderhandbuch natural_image
Line drawing of a hand pressing a button on a device panel with circular buttons and a magnifying glass (no text or symbols)Bildschirm Status Monitor
Durch Betätigen der Taste 📄 Söhshahar as Display Status Monitor auf und können dort den Status von Aufträgen und Ressourcen auf diesem Bildschirm bestätigen. Indem Sie Informationen erhalten, wie die Fertigstellungszeit des aktuellen Auftrags oder die restliche Papiermenge, können Sie glatten Druckbetrieb ohne Unterbrechungen sicherstellen. Nützliche Situationen
- Wenn Sie die Fertigstellungszeit von Aufträgen wissen wollen - Wenn Sie die restliche Papiermenge zum effizienten Papiereinlegen prüfen wollen - Wenn Sie einen Auftrag löschen wollen, der versehentlich gespeichert wurdeBildschirm , , ,
Der text_image
Statusmonitor Koplenesi Drücken Sendere Empfang Spichern Reservatzeri Andere Auftragstatus Auftragzug Druck Zoll Auftragware Severd. case Status Marcell cu. 12:06 Kopie Administrator Drucken... 12 Mln. 12:06 Kopie Administrator Auf Deck war ... 20 Mln. Details Abbrevien Alle Druckau- dige sonstern Schellen Kopie 00:00 05:00 ca. 012 Mln.Bildschirm
Sie können auch die Papierinformationen und die restliche Papiermenge in allen Papierzufuhren prüfen.
Sie können auch den Prozentsatz der Speichernutzung, die Restmenge von Toner und Heftklammern sowie die Menge des Locherabfalls prüfen.

text_image
Statusmonitor Replendent Drücken Sendem Empfang Spichem Resourser/Andere Pop-Format None MP-Fach A4 Normal 2 (76-90 g/m^2) A4 Normal 2 (76-90 g/m^2) A4 Normal 2 (76-90 g/m^2) A4 Normal 2 (76-90 g/m^2) A4 Normal 2 (76-90 g/m^2) A4 Normal 2 (76-90 g/m^2) Andere Speich,verwend. 0% Toner (Schwarz) 100% Toner (Gelb) 100% Toner (Magenta) 100% Toner (Cyan) 100% Verbrauchsmaterisiken prüfen SchikelenEinschalten des Systems am Hauptschalter
Hier finden Sie Informationen zum Einschalten der Stromzufuhr für das System.Einschalten der Hauptstromversorgung
Vergewissern Sie sich, dass der Netzstecker vollständig in der Netzsteckdose ist, und dass der Schutzschalter auf EIN gestellt ist. text_image
Diagram showing a printer with a close-up view of its internal component, labeled with (1) and 'ON' indicating open position.WICHTIG
Wenn Sie die Stromversorgung wieder einschalten möchten, warten Sie mindestens 10 Sekunden nach dem Ausschalten der Hauptstromversorgung und der Bereitschaftsanzeige. Wenn jedochHINWEIS
Eventuell reagieren die Tasten unmittelbar nach dem Einschalten des Systems nicht wie erwartet.Das Ausschalten der Einheit
Schalten Sie die Netzstromversorgung in den folgenden Situationen nicht AUS
- Bei Verwendung der I-Fax-Funktion - Wenn die Meldungtext_image
Diagram showing a printer with a close-up of its open lid and a circular arrow indicating rotation or action.Einlegen von Papier
Legen Sie Papier wie unten beschrieben ein. In diesem Abschnitt wird Papier des Formats A4 anwenderdefiniert als Beispiel genommen.Bestätigung
Bestätigen Sie die Papiertypen, die eingelegt werden können.  "Anhang" > "Technische Daten der Hardware" > "Verfügbare Papiertypen" in der AnwenderhandbuchVorbereitung
Wenn ein Papiertyp verwendet werden soll, der nicht im System gespeichert ist, speichern Sie diesen zunächst.  "Speichern von Papiertypen im System" auf S. 16Bedienung
Legen Sie das Papier in die Papierkassette.  "Einlegen von Papier in das Papiermagazin oder die Papierkassette" auf S. 18Speicherung
Legen Sie das Papierformat und den Typ des in der Papierkassette eingelegten Papiers fest.  "Speichern anwenderdefinierter Papiertypen" auf S. 20Papierquelle
Dieser Abschnitt beschreibt die verfügbaren Papierquellen. Die folgende Beschreibung deckt neben den Standard-Papierkassetten und dem Standard-Papiermagazin auch die optionalen Produkte ab. Die folgende Beschreibung deckt neben den Standard-Papierkassetten auch die optionalen Produkte ab. Die optionalen Produkte werden mit OPTION bezeichnet. text_image
Zuschiesseinheit N OPTION Zuschiess- und Falzeinheit K OPTION Zufuhreinheit für die Stapelanlage D OPTION Banner Tray B OPTION Papiermagazin Papierkassette POD Lite A3-Papiermagazin C (1x3.500) OPTION A4-Papiermagazin E (1x3.500) OPTIONHINWEIS
Einzelheiten zu den Papieren, die geladen werden können, finden Sie im Anwenderhandbuch.  "Anhang" > "Technische Daten der Hardware" > "Verfügbare Papiertypen" in der AnwenderhandbuchSpeichern von Papiertypen im System
Speichern Sie alle Papiertypen, die Sie mit diesem System verwenden möchten.HINWEIS
- Wenn Sie Papier einlegen, das bereits im System gespeichert ist, wie Normalpapier oder Recycling-Papier, ist dieser Schritt nicht erforderlich. Weiter zum nächsten Schritt "Einlegen von Papier in das Papiermagazin oder die Papierkassette". - Sie können die Einstellungen für den Standard-Papiertyp im Gerät nicht ändern. Wenn Sie die Einstellungen bearbeiten, denken Sie daran, sie zuvor zu duplizieren und als neu zu registrieren.1 Drücken Sie
2 Drücken Sietext_image
Einstell /SpeichenerungHINWEIS
Achten Sie beim Registrieren des benutzerdefinierten Papiers darauf, dass Sie den Namen ändern. Sie können die Einstellungen der im System als Standard gespeicherten Papiertypen nicht ändern. 5 Wählen Sie den in Schritt 3 und 4 duplizierten Papiertyp aus der Liste aus → drücken Sietext_image
Einstell /Speicherungtext_image
Einstell /Speicherungtext_image
Einstell /Speicherungtext_image
Einstell./SpeicherungHINWEIS
Ab Papiergröße A4 können Sie die vordefinierte Papiergröße in das Papiermagazin einlegen. natural_image
Diagram of a mechanical component with an arrow indicating direction (no text or symbols present)text_image
Technical diagram showing a mechanical assembly with labeled components and directional arrows indicating motion or flow.1 Öffnen Sie das Papiermagazin.
2 Legen Sie den Papierstapel in das Papiermagazin ein.
1 Richten Sie den Papierstapel an der Wand des Papiermagazins aus. 2 Schieben Sie das Papiermagazin in das Gerät zurück, bis es in geschlossener Position hörbar einrastet.Einlegen von Papier in die Papierkassette
natural_image
Diagram of a mechanical component with internal channels and an arrow indicating direction (no text or symbols)1 Öffnen Sie die Kassette.
\- Ziehen Sie die Papierkassette vorsichtig bis zum Anschlag heraus. natural_image
Diagram of a vehicle interior showing dashboard and steering wheel (no text or symbols)2 Lösen Sie die Befestigungsschrauben.
text_image
Diagram showing a device interior with labeled parts and directional arrows, including hand positioning and close-ups of mechanical components.3 Richten Sie die Position der Führungsschienen der Kassette ein.
\- Schieben Sie jede Führung, während Sie sie oben drücken, um die Ausrichtung mit dem gewünschten Papierformat vorzunehmen. natural_image
Diagram of a mechanical device with two circular insets showing rotational components (no text or symbols)4 Ziehen Sie die Befestigungsschrauben an.
Veillez à ne pas dépasser cette ligne. text_image
Papier Briefumschlag5 Legen Sie den Papierstapel in die Papierkassette ein.
Legen Sie den Papierstapel bündig an der rechten Seite der Papierkassette ein. 2 Schieben Sie die Papierkassette in das Gerät zurück, bis sie in geschlossener Position hörbar einrastet.HINWEIS
- Fächern Sie den Papierstapel immer auf und richten Sie die Kanten aus, bevor Sie Papier einlegen. - Verwelltes Papier muss vor der Verwendung geglättet werden. - Achten Sie darauf, dass die Höhe des Papierstapels nicht die Markierung (XXX) übersteigt. - Beim Einlegen von vorgelochtem Papier, Folien/Klarsichtfilm, Registerpapier und Briefumschlägen stellen Sie sicher, dass Sie Papier mit richtiger Ausrichtung einlegen, da sich die Papierausrichtung je nach Zufuhr unterscheidet.  "Grundfunktionen" > "Einlegen von Papier" in der AnwenderhandbuchSpeichern anwenderdefinierter Papiertypen
Sie können das Papierformat und den Papiertyp für die einzelnen Zufuhrmedien registrieren.1 Betätigen Sie die Taste
2 Berühren Sie nacheinander die Tastentext_image
Einstell /Speicherungtext_image
Einstell /Speicherungtext_image
Einstell./Speicherungtext_image
Einstell /SpeicherungReinigung und Wartung
Für optimale Funktion des Systems empfehlen wir, das System regelmäßig zu reinigen und zu prüfen.■ Reinigung des Vorlagenglases
Wenn Originale nicht richtig gescannt werden können, führen Sie das unten beschriebene Reinigungsverfahren aus. Reinigen Sie mit einem Tuch, das Sie vorher mit Wasser befeuchtet haben, und wischen Sie mit einem trockenen weichen Tuch nach. Verwenden Sie das mitgelieferte Glasreinigungstuch zur einfachen Reinigung. natural_image
Line drawing of an open industrial machine with a screen and base (no text or symbols)■ Reinigung des Originalscanbereichs
Wenn von der Zufuhr zugeführte Originale nicht richtig gescannt werden können, verfahren Sie wie folgt. 1 Betätigen Sie die Taste 2 Berühren Sie nacheinander die Tasten■ Reinigung der Zufuhr
Reinigen Sie die Zufuhr, wenn die Originale schmutzig werden oder sich häufig stauen. Reinigen Sie mit einem Tuch, das Sie vorher mit Wasser befeuchtet haben, und wischen Sie mit einem trockenen weichen Tuch nach. Verwenden Sie das mitgelieferte Glasreinigungstuch zur einfachen Reinigung. natural_image
Diagram showing a device with a magnified view of a triangular component, no text or symbols presentnatural_image
Diagram of a car rear vent with labeled component (no text or symbols present)WICHTIG
Achten Sie darauf, dass keine Abfälle, beispielsweise Papierstücke, in die Nut des Zufuhrerkennungssensors für mehrere Seiten gelangen. Falls Abfälle eindringen, entfernen Sie diese mit einem weichen Tuch. text_image
Diagram showing a device with labeled components, including a top panel and internal compartments with numbered annotation.natural_image
Technical line drawing of a mechanical component with an inset close-up showing circular features (no text or symbols)natural_image
Line drawing of a hand inserting a component into an open computer case (no text or symbols)5 Reinigen Sie den Originalscanbereich.
\- Öffnen Sie die Zufuhr und reinigen Sie den Originalscanbereich (schmaler Glasbereich). text_image
Diagram showing a printer's internal structure with labeled parts and an inset diagram illustrating mechanical assembly or processing.6 Öffnen Sie die Dokumenten-Scanabdeckung.
1 Ziehen Sie den Hebel über der Zufuhr. 2 Öffnen Sie die Dokumenten-Scanabdeckung. natural_image
Technical line drawing of a printer or scanner with an inset close-up showing internal components (no text or symbols)7 Öffnen Sie die innere Abdeckung.
text_image
Wischen Sie den dünnen und langen Glasstreifen ab.8 Reinigen sie den Originalscanbereich der Zufuhr.
9 Schließen Sie die innere Abdeckung und die Dokumenten-Scanabdeckung nacheinander und anschließend die Zufuhr.
10 Einschalten der Hauptstromversorgung.
"Einschalten der Hauptstromversorgung" auf S. 13Automatisches Reinigen des Einzugs
Wenn von der Zufuhr zugeführte Originale verschmutzt werden, verfahren Sie wie folgt. 1 Legen Sie 10 Blatt unbedrucktes Papier in die Zufuhr. • Verwenden Sie A4 Normalpapier. 2 Betätigen Sie die Taste 3 Berühren Sie nacheinander die Tasten■ Reinigen der Haupteinheit innen
Wenn das ausgegebene Papier verschmutzt wird, verfahren Sie wie folgt. 1 Betätigen Sie die Taste 2 Berühren Sie nacheinander die TastenHINWEIS
Führen Sie entsprechendReinigung des Sensordisplays
Wischen Sie das Sensordisplay mit einem Tuch, das Sie vorher mit Wasser oder einem milden Reinigungsmittel befeuchtet haben ab, und wischen Sie mit einem weichen, trockenen Tuch nach. natural_image
Illustration of a hand cleaning a clean appliance on a microwave (no text or symbols)Überprüfung des Schutzschalters
Dieses System ist als Maßnahme gegen Überspannungen und Spannungsverlusten mit einem Schutzschalter ausgestattet. Prüfen Sie den Schutzschalter unbedingt einmal im Monat und gehen Sie dabei folgendermaßen vor. text_image
Diagram showing a printer with a close-up view of its open door, indicating battery status change.1 Schalten Sie den Hauptschalter AUS.
\- Vor dem Prüfen des Schutzschalters vergewissern Sie sich, dass die Stromzufuhr für die Haupteinheit ausgeschaltet ist. natural_image
Diagram showing a door opening and a printer with a dotted line indicating connection (no text or symbols)2 Drücken Sie den Testknopf an der Rückseite des Systems.
\- Drücken Sie den Testknopf mit der Spitze eines Kugelschreibers oder einem ähnlichen Gegenstand. Drücken Sie kurz den Testknopf. natural_image
Illustration of a device with a fan emitting sound waves, connected to a printer (no text or symbols present)3 Vergewissern Sie sich, dass der Schutzschalter auf AUS steht.
\- Wenn der Schutzschalter nicht auf AUS gestellt ist, wiederholen Sie Schritt 2. Wenn der Schutzschalter nicht auf AUS gestellt wird, obwohl Sie das obige Verfahren zwei oder drei Mal ausgeführt haben, benachrichtigen Sie Ihren lokalen Canon-Vertriebspartner. text_image
Diagram showing a device with an open lid and a printer, connected by dotted lines to indicate connection or disconnection.4 Stellen Sie den Schutzschalter auf EIN.
text_image
Diagram showing a printer with a close-up view of its cover and a magnified view highlighting the cover area.5 Schalten Sie den Hauptschalter EIN.
Verbrauchsmaterialien
Die folgenden Ressourcen sind für dieses System verfügbar. Für weitere Informationen wenden Sie sich an Ihren lokalen Canon-Vertriebspartner. Nähere Informationen zur Verwendung und Lagerung von Ressourcen finden Sie im Abschnitt "Verbrauchsmaterial" auf Seite 37.Papier
Außer Normalpapier stehen andere Papiertypen zur Verfügung, wie Recyclingpapier, farbiges Papier, Folien/Klarsichtfilme (empfohlen für dieses System), Pergament und Etiketten. Bitte verwenden Sie für Drucke und Kopien in gleich bleibend hoher Qualität nur von Canon empfohlenes Kopiermaterial.Toner
Wenn eine Meldung auf dem Display Sie auffordert, eine neue Tonerpatrone einzusetzen, ersetzen Sie die verbrauchte Tonerpatrone durch eine neue. Nähere Informationen zum Ersetzen der Tonerpatrone vgl. Anwenderhandbuch. Für eine optimale Druckqualität wird empfohlen, den Original-Canon-Toner zu verwenden.  "Wartung" > "Auswechseln der Tonerpatrone" in der AnwenderhandbuchUnterstützter Original-Canon-Toner
Canon imagePRESS Toner T07 Black (Schwarz) Canon imagePRESS Toner T07 Cyan (Cyan) Canon imagePRESS Toner T07 Magenta (Magenta) Canon imagePRESS Toner T07 Yellow (Gelb)   Schwarze Tonerpatrone Tonerpatrone (Cyan, Magenta oder Gelb) Vorsicht vor gefälschten Toner
Wir weisen Sie darauf hin, dass gefälschte Toner auf dem Markt ist. Wenn Sie gefälschte Toner verwenden, kann darunter die Druckqualität und die Leistung des Systems leiden. Canon ist nicht für irgendwelche Fehlfunktionen, Unfälle oder Schäden verantwortlich, die durch die Verwendung von gefälschten Toner verursacht werden. Nähere Informationen finden Sie unter global.canon/ctc.Heftpatrone für die Hefteinheit
Der Heftklammern N1/Heftklammern X1 kann zum Heften am Finisher W PRO/Broschüren Finisher W PRO/Finisher AC/Broschüren Finisher AC angebracht werden. Nähere Informationen zum Ersetzen der Heftpatrone vgl. Anwenderhandbuch.  "Wartung" > "Einlegen der Heftklammern (optional)" > "Ersetzen des Heftklammernbehälters in der Heftereinheit (Finisher W PRO/Broschüren Finisher W PRO)", "Ersetzen des Heftklammernbehälters in der Heftereinheit (Finisher AC/Broschüren Finisher AC)" in der Anwenderhandbuch. natural_image
Technical line drawing of a mechanical component with no visible text or symbolsnatural_image
Technical line drawing of a mechanical housing or enclosure component (no text or symbols)Heftpatrone für die Sattelheftungseinheit
Der Heftklammern P1/Heftklammern Y1 kann zum Sattelheften am Broschüren Finisher W PRO/Broschüren Finisher AC angebracht werden. Nähere Informationen zum Ersetzen der Heftpatrone vgl. Anwenderhandbuch.  "Wartung" > "Einlegen der Heftklammern (optional)" > "Ersetzen des Heftklammernbehälters in der Sattelsticheinheit (Broschüren Finisher W PRO)", "Ersetzen des Heftklammernbehälters in der Sattelsticheinheit (Broschüren Finisher AC)" in der Anwenderhandbuch. natural_image
Line drawing of a mechanical housing or enclosure with cutouts and mounting holes (no text or symbols)natural_image
Technical line drawing of a mechanical component with no visible text or symbolsOriginal-Verbrauchsmaterialien
Canon entwickelt fortlaufend technische Neuerungen für Toner, Patronen/Magazine und Teile, die von Canon gefertigt und genau auf die Verwendung in multifunktionalen Systemen von Canon abgestimmt sind. Nutzen Sie die Vorteile optimaler Druckleistungen, maximalen Druckvolumens und qualitativ hochwertiger Druckausgaben, wie sie mit Canons neuer zukunftsorientierter Technologie möglich werden. Aus diesem Grund empfehlen wir die Verwendung von Original-Verbrauchsmaterialien von Canon für Ihr multifunktionales System von Canon.  CANON GENUINE TONER, CARTRIDGE & PARTSFehlersuche
Dieser Abschnitt erläutert, wie Probleme gelöst werden, wenn häufig Papierstau auftritt oder Fehlermeldungen angezeigt werden. Weitere Informationen zu den Einzelheiten der Funktionen und Vorsichtsmaßregeln finden Sie in der Anwenderhandbuch.  "Fehlersuche" in der AnwenderhandbuchBeheben von Papierstaus und Heftklammernstaus
Befolgen Sie beim Auftreten von Papierstaus oder Heftklammernstaus die Anleitungen auf dem Sensordisplay, um den Stau zu beseitigen. Durch Berühren der Tastetext_image
Gesetzern Paper entfernen 04:00 PM Schlierien Alles Paper aus dem "Antizierungstät" und gesetzern Paper entfernen. Papier ist gestauttext_image
Gesamtte WebIttoeform erfaszen 01:001 Solutions Papier, engleptet an WebIttoeform, erfaszen. WebIttoeform und gestaut:Verringern der Häufigkeit von Papierstaus
Wenn Papierstaus häufig auftreten, können die folgenden Gründe dafür vorliegen.Es befinden sich abgerissene Papierfetzen innerhalb des Systems.
Wenn gestautes Papier gewaltsam herausgerissen wird, können abgerissene Papierfetzen im System zurückbleiben. \- Nehmen Sie alle abgerissenen Papierfetzen heraus.Papier, das nicht zu der Einstellung passt, ist eingelegt.
\- Stellen Sie sicher, dass das im Papierfach eingelegte Papier zu dem inPapierstaus treten nur bei Verwendung des spezifischen eigenen Papier häufig auf.
Die Papierinformation kann falsch gespeichert sein. Bestätigen Sie die Papierinformation-Einstellungen für das verwendete Papier.  "Wartung" > "Papiertyp-Verwaltungseinstellungen" in der AnwenderhandbuchWenn eine Fehlermeldung angezeigt wird
Bei Auftreten einer Störung, aufgrund derer das System nicht einwandfrei funktioniert, erscheint ein Display wie das rechts gezeigte. Wenn das System immer noch nicht normal funktioniert, nachdem der Hauptschalter AUS und dann EIN geschaltet wurde, wenden Sie sich an Ihren lokalen Canon-Vertriebspartner.  "Kontaktaufnahme mit Ihrem Canon-Vertriebspartner" auf S. 32 text_image
Hauptschafter (auf der redited Seite der Haupteinheit) AUS und Eßschaften. • Weise das Gmbt weiterhin nicht normal arbeitet. Serviziend bestimmlichen und umten stehenden Folhercode aufholen. 2000574-0000 Folhercode: - 2000574-0000Wenn eine Taste für den Modus Funktionsbeschränkung angezeigt wird:
Wenntext_image
Hauptschafter (auf der rechten Seite der Hauptbeinheit) AUS und Einkohalten. - Waren das Gerät weiterhin nicht normal arbeitet, Servicenteil kreditaktoren und unten stehenden Foltsercode materiais. ■ Folkscode: - E000540-8001 Das Ausgabenach des Finishers kann nicht nach oben oder süben bewert werden. Früllen, zu ich Gegenstände in Bereich der Fachanvergung befinden. ■ [Modus Funkt.-Beschreibung.] beizügen, um mit dem Vorgung mit beschriebene Funktionären fortzufahren. Falls das Gerät nicht korndt funktioniert, nachdem der Hauptchafter (mit dem Schalter rechte Sei Hauptbeinheit) AUS und weder Einkohalten wurde.Wenn eine Meldung unten in der Anzeige erscheint:
Wenn eine Fehlermeldung unten in der Anzeige erscheint, sind die Druck- und Scanfunktionen begrenzt, aber manche Funktionen sind immer noch verfügbar.  "Fehlersuche" > "Eine Meldung oder eine Zahl, die mit "#" beginnt (ein Fehlercode), wird angezeigt" > "Eine Meldung mit der Aufforderung, den autorisierten Canon-Händler vor Ort zu kontaktieren, wird angezeigt" in der Anwenderhandbuch text_image
Startseite Kopie Fox Scramen und Senden Scramen und Speichere Zugang zu groß Dosenen Fawl-Fax Ergangaben Ges Dräcker muss gesollf änders. Derivateiert worden 1Kontaktaufnahme mit Ihrem Canon-Vertriebspartner
Wenn Sie das System immer noch nicht normal bedienen können, nachdem der Hauptschalter AUS und dann EIN geschaltet wurde, wenden Sie sich an Ihren lokalen Canon-Vertriebspartner wie unten beschrieben.1 Notieren Sie den Fehlercode.
• Schreiben Sie den Fehlercode "EXXXXXX-XXXX" auf. text_image
Hauptschafter (auf der rechten Seite der Hauptkehrheit) AUS und EINochalten. • Wenn das Gerät weiterhin nicht normal arbeiter, Serviziend kontaktenen und unten stehenden Fahiercode aktiver. Foltercode: E000574-00002 Schalten Sie den Hauptschalter AUS.
\- Kippen Sie den Hauptschalter in die Stellung "☐". text_image
Diagram showing a printer with a close-up view of its internal device, indicating press operation or status change.3 Ziehen Sie den Netzstecker aus der Steckdose.
4 Bestätigen Sie den Produktnamen und nehmen Sie bitte Kontakt zu Ihrem lokalen Canon-Vertriebspartner auf.Wenn der Speicher voll wird
Wenn die Speicherkapazität beim Scannen erschöpft wird, werden auf dem Sensordisplay die folgenden Meldungen angezeigt. Folgen Sie den Verfahren auf der Anzeige und löschen Sie dann unnötige Dateien aus der Mailbox und der Fax/I-Fax Eingangsbox, um mehr Speicher verfügbar zu machen. Der Scanvorgang wird abgebrochen, weil der Speicher voll ist. Möchten Sie die gescannten Seiten drucken (senden, speichern)\*? \* Ein Teil der Meldung ist je nach der verwendeten Funktion unterschiedlich.■Wenn die Hauptstromversorgung nicht einschaltet
IWenn das System nicht arbeiten kann, wenn die Hauptstromversorgung eingeschaltet ist, prüfen Sie den Schutzschalter. Wenn der Schutzschalter auf AUS-Stellung gestellt ist, versuchen Sie nicht, den Schutzschalter selber auf EIN zu stellen, sondern benachrichtigen Sie Ihren lokalen Canon-Vertriebspartner. text_image
AUS (○)Anhang
Wichtige Sicherheitsvorschriften
Dieses Kapitel beschreibt wichtige Sicherheitshinweise zur Verhütung von Verletzungen der Anwender dieses Geräts und anderer, sowie von Sachschäden. Lesen Sie dieses Kapitel, bevor Sie das Gerät benutzen, und folgen Sie den Anweisungen, um das Gerät ordnungsgemäß zu benutzen. Führen Sie keine Bedienschritte aus, die nicht in diesem Handbuch beschrieben sind. Canon haftet nicht für Schäden, die durch Bedienschritte entstehen, die nicht in diesem Handbuch beschrieben sind, durch unsachgemäßen Gebrauch, oder durch Reparaturen oder Umbauten, die nicht von Canon oder von durch Canon autorisierten Dritten vorgenommen wurden. Die unsachgemäße Bedienung oder Verwendung dieses Geräts könnte zu Verletzungen und/oder zu Schäden führen, die umfangreiche Reparaturarbeiten erfordern, welche nicht durch Ihre Begrenzte Garantie abgedeckt sind.WARNING
Wenn Sie eine so gekennzeichnete Warnung nicht beachten, können ernsthafte oder tödliche Verletzungen die Folge sein. Bitte beachten Sie diese Warnungen unbedingt, um den sicheren Betrieb zu gewährleisten.VORSICHT
So wird ein Vorsichtshinweis in Bezug auf Bedienvorgänge gekennzeichnet, die zu Personenschäden führen können, wenn sie nicht korrekt ausgeführt werden. Bitte beachten Sie diese Vorsichtshinweise unbedingt, um den sicheren Betrieb zu gewährleisten.WICHTIG
So werden Anforderungen und Einschränkungen im Betrieb gekennzeichnet. Lesen Sie diese Punkte unbedingt sorgfältig durch, um das Gerät ordnungsgemäß zu bedienen und Geräte- oder Sachschäden zu vermeiden.Installation
Lesen Sie die folgenden Sicherheitshinweise sorgfältig durch, und stellen Sie das Gerät an einem geeigneten Ort auf, sodass Sie es sicher und komfortabel verwenden können.A WARNUNG
Zur Vermeidung von Feuer oder einem Stromschlag nicht an folgenden Orten aufstellen
- Orte, an denen die Lüftungsschlitze blockiert sind (zu nahe an Wänden, Betten, Sofas, Teppichen oder ähnlichen Gegenständen) - Orte, die Feuchtigkeit oder Staub ausgesetzt sind - Orte, die direktem Sonnenlicht ausgesetzt sind, oder im Freien - Orte, die hohen Temperaturen ausgesetzt sind - Orte in der Nähe offener Flammen • In der Nähe von Alkohol, Farbverdünnern oder anderen entzündlichen SubstanzenSonstige Warnungen
- Schließen Sie keine nicht zugelassenen Kabel an dieses Gerät an. Das könnte zu einem Brand oder Stromschlag führen. - Legen Sie keine Halsketten oder andere Metallgegenstände oder mit Flüssigkeit gefüllte Behälter auf das Gerät. Wenn Fremdstoffe mit den elektrischen Teilen im Innern des Geräts in Kontakt kommen, kann das zu einem Brand oder Stromschlag führen. - Trennen Sie den Netzstecker von der Netzsteckdose, und wenden Sie sich an Ihren autorisierten Canon Händler vor Ort, wenn Fremdkörper in das Gerät gelangt sind.AVORSICHT
Nicht an folgenden Orten aufstellen
Das Gerät könnte herunterfallen und Verletzungen verursachen. - Instabile Flächen - Orte, die Vibrationen ausgesetzt sindSonstige Vorsichtsmaßnahmen
- Schließen Sie keine nicht zugelassenen Zubehörgeräte an den Zubehöranschluss an, dies könnte zu einem Brand oder zu Rauchentwicklung führen. - Warten Sie nach dem Abziehen des Netzsteckers mindestens 5 Sekunden, bevor Sie das Netzkabel wieder anschließen. - Ein starker Spannungsabfall kann eine Fehlfunktion oder Datenverlust im Gerät und in Computern verursachen.Ausgleichsfüße (nur für Produkte mit Ausgleichsfüßen)
Entfernen Sie nach dem Aufstellen des Geräts nicht dessen Ausgleichsfüße; dies könnte dazu führen, dass das Gerät herunterfällt oder umkippt, was zu Verletzungen führen kann.WICHTIG
Nicht an folgenden Orten aufstellen
Andernfalls besteht die Gefahr von Schäden am Gerät. - Orte, die extremen Temperaturen und extremer Luftfeuchtigkeit, ob niedrig oder hoch, ausgesetzt sind - Orte mit stark schwankender Temperatur oder Luftfeuchtigkeit - Orte in der Nähe von Geräten, die magnetische oder elektromagnetische Wellen erzeugen • Labore oder andere Orte, an denen chemische Reaktionen stattfinden - Orte, die korrosiven oder toxischen Gasen ausgesetzt sind - Orte, die sich unter dem Gewicht des Geräts verformen könnten oder an denen das Gerät einsinken könnte (z. B. auf einem Teppich o. Ä.)Schlecht belüftete Aufstellorte vermeiden
Dieses Gerät erzeugt während des normalen Betriebs eine kleine Menge Ozon und andere Emissionen. Diese Emissionen sind nicht gesundheitsschädlich. Sie können jedoch bei längerem Gebrauch oder langen Produktionsläufen in schlecht belüfteten Räumen bemerkbar sein. Um ein angenehmes Arbeitsumfeld zu gewährleisten, ist es empfehlenswert, dass der Raum, in dem das Gerät betrieben wird, angemessen belüftet wird. Vermeiden Sie auch Aufstellungsorte, an denen Menschen den Emissionen des Geräts ausgesetzt sein können.Nicht an Orten mit Feuchtigkeitskondensation aufstellen
Es können sich im Geräteinneren Wassertropfen (Kondensation) bilden, wenn der Raum, in dem das Gerät aufgestellt ist, schnell aufgewärmt wird und wenn das Gerät von einem kühlen oder trockenen Ort an einen heißen oder feuchten Ort umgesetzt wird. Wenn das Gerät unter diesen Umständen genutzt wird, kann es zu Papierstaus, schlechter Druckqualität oder Schäden am Gerät kommen. Lassen Sie das Gerät sich mindestens 2 Stunden an die Umgebungstemperatur und -feuchtigkeit anpassen, bevor Sie es benutzen.Stellen Sie das Gerät nicht in der Nähe von Computern oder anderen elektronischen Präzisionsgeräten auf.
Elektrische Störungen und Vibrationen, die dieses Gerät während des Druckens verursacht, können den Betrieb solcher Geräte beeinträchtigen.Stellen Sie das Gerät nicht in der Nähe von Fernsehern, Radios oder ähnlichen elektronischen Geräten auf.
Das Gerät könnte den Empfang von Ton- und Bildsignalen stören. Stecken Sie den Stecker in eine Netzsteckdose und lassen Sie so viel Platz wie möglich zwischen dem Gerät und anderen elektronischen Geräten.In Höhen von 3.000 m oder höher über dem Meeresspiegel
Geräte mit einer Festplatte funktionieren möglicherweise nicht ordnungsgemäß, wenn sie an Orten, die ca. 3.000 Meter oder höher über dem Meeresspiegel liegen, verwendet werden.Anschließen an die Telefonleitung (Nur bei Produkten mit Faxfunktion)
Dieses Gerät entspricht den Standards analoger Telefonleitungen und kann nur an ein öffentliches Festnetz (PSTN) angeschlossen werden. Der Anschluss des Geräts an eine digitale oder dedizierte Telefonleitung kann den korrekten Betrieb des Geräts behindern und zu Beschädigungen führen. Überprüfen Sie vor dem Anschluss des Geräts unbedingt den Telefonleitungstyp. Bevor Sie das Gerät an eine Glasfaserleitung oder IP-Telefonleitung anschließen, wenden Sie sich zunächst an den Dienstanbieter.Bei Verwendung einer Wireless LANVerbindung (nur bei Produkten mit einer Wireless LAN-Funktion)
- Stellen Sie das Gerät in einem Abstand von maximal 50 m vom Wireless LAN-Router auf. - Stellen Sie das Gerät, sofern möglich, an einem Ort auf, an dem keine Hindernisse die Kommunikation blockieren. Wände oder Böden können das Signal abschwächen. - Halten Sie das Gerät möglichst weit von digitalen schnurlosen Telefonen, Mikrowellenherden oder anderen Geräten fern, die Radiowellen abstrahlen. - Verwenden Sie das Gerät nicht in der Nähe von medizinischen Geräten. Die von diesem Gerät abgestrahlten Funkwellen können Störungen bei medizinischen Geräten verursachen, was zu Fehlfunktionen und Unfällen führen kann.Wenn das Betriebsgeräusch Probleme bereitet
Wenn das Betriebsgeräusch je nach Nutzungsumgebung und Betriebsmodus ein Problem darstellt, empfiehlt es sich, das Gerät nicht am Arbeitsplatz, sondern an einem anderen Ort aufzustellen.Transportieren des Geräts
Wenn Sie das Gerät transportieren möchten, auch nur zu einem Ort im selben Stockwerk des Gebäudes, wenden Sie sich vorher an Ihren autorisierten Canon-Händler vor Ort. Versuchen Sie nicht, das Gerät selbst zu transportieren.Stromversorgung
A WARNUNG
- Schließen Sie das Gerät ausschließlich an einen Netzanschluss mit der angegebenen Netzspannung an. Andernfalls besteht die Gefahr eines Brandes oder Stromschlags. - Das Gerät muss über das mitgelieferte Netzkabel an eine Steckdose mit Erdungsanschluss angeschlossen werden. - Verwenden Sie ausschließlich das mitgelieferte Netzkabel. Andernfalls besteht Feuergefahr oder die Gefahr eines Stromschlags. - Das mitgelieferte Netzkabel ist für den Gebrauch mit diesem Gerät bestimmt. Schließen Sie das Netzkabel nicht an andere Geräte an. - Verändern Sie das Netzkabel nicht, ziehen Sie nicht daran, verbiegen Sie es nicht gewaltsam und tun Sie nichts, was es beschädigen könnte. Stellen Sie keine schweren Gegenstände auf das Netzkabel. Eine Beschädigung des Netzkabels kann einen Brand oder einen Stromschlag verursachen. - Berühren Sie den Netzstecker beim Anschließen und Trennen nicht mit feuchten Händen. Andernfalls besteht die Gefahr eines Stromschlags. - Verwenden Sie keine Verlängerungskabel oder Mehrfachsteckdosen für das Gerät. Das könnte zu einem Brand oder Stromschlag führen. - Wickeln Sie das Netzkabel nicht auf, und verknoten Sie es nicht. Andernfalls besteht Feuergefahr oder die Gefahr eines Stromschlags. - Stecken Sie den Netzstecker vollständig in die Wechselstrom-Netzsteckdose. Andernfalls besteht die Gefahr eines Brandes oder Stromschlags. - Ziehen Sie den Netzstecker bei Gewitter vollständig aus der Wechselstrom-Netzsteckdose. Sonst kann es zu einem Brand, Stromschlag oder Schäden am Gerät kommen. - Vergewissern Sie sich, dass die Stromversorgung für das Gerät sicher ist und die Spannung konstant ist. - Halten Sie das Netzkabel von Wärmequellen fern; andernfalls kann die Beschichtung des Netzkabels schmelzen. In diesem Fall besteht Feuergefahr oder die Gefahr eines Stromschlags.Vermeiden Sie die folgenden Situationen:
Durch übermäßiges Belasten des Netzkabelanschlusses kann das Netzkabel beschädigt werden oder die Drähte im Geräteinneren werden möglicherweise abgetrennt. Dies könnte zu einem Brand führen. - Häufiges Anschließen und Abtrennen des Netzkabels. • Stolpern über das Netzkabel. - Das Netzkabel wird am Anschluss gebogen, und die Netzsteckdose oder der Anschluss werden dauerhaft belastet. - Übermäßige Gewaltanwendung im Umgang mit dem Netzstecker.VORSICHT
Stellen Sie dieses System in der Nähe einer Steckdose auf, und lassen Sie ausreichend freien Platz um den Netzstecker, damit er im Notfall leicht abgezogen werden kann.WICHTIG
Bei Anschluss an den Netzstrom
- Schließen Sie das Netzkabel nicht an eine unterbrechungsfreie Stromversorgung an. Das kann zu einer Fehlfunktion oder zu Schäden am Gerät bei Stromausfall führen. - Wenn Sie das Gerät an eine Netzsteckdose mit mehreren Steckdosen anschließen, schließen Sie an die übrigen Steckdosen keine weiteren Geräte an. - Verbinden Sie das Netzkabel nicht mit dem Hilfsstromausgang eines Computers.Sonstige Sicherheitshinweise
Elektrische Störstrahlung kann bei diesem Gerät zu Fehlfunktionen oder Datenverlust führen.Handhabung
A WARNUNG
- Trennen Sie umgehend den Netzstecker von der Netzsteckdose, und wenden Sie sich an einen autorisierten Canon-Händler, wenn von dem Gerät ungewöhnliche Geräusche oder Gerüche ausgehen oder es zu Rauch- oder übermäßiger Wärmeentwicklung kommt. Bei fortgesetztem Betrieb besteht Feuergefahr oder die Gefahr eines Stromschlags. - Zerlegen oder verändern Sie dieses Gerät nicht. Es befinden sich Hochspannung führende und heiße Bauteile im Innem des Geräts. Ein Zerlegen oder eine Veränderung kann zu einem Brand oder Stromschlag führen. - Stellen Sie das Gerät an einen Ort, an dem Kinder nicht in Kontakt mit dem Netzkabel und den sonstigen Kabeln sowie den Zahnrädern und elektrischen Teilen im Innern des Geräts kommen. Wird dies nicht beachtet, kann es zu unerwarteten Unfällen kommen. - Verwenden Sie keine entflammbaren Sprays in der Nähe dieses Geräts. Wenn entflammbare Substanzen mit den elektrischen Teilen im Innern des Geräts in Kontakt kommen, kann es zu einem Brand oder Stromschlag kommen. - Schalten Sie beim Transport des Geräts dieses unbedingt AUS und ziehen Sie anschließend den Netzstecker und die Schnittstellenkabel ab. Andernfalls können das Netzkabel oder die Schnittstellenkabel beschädigt werden, was zu einem Brand oder Stromschlag führen kann. - Berühren Sie beim Anschließen oder Trennen eines USB-Kabels nicht den Metallteil des Steckers, wenn der Netzstecker in eine Netzsteckdose eingesteckt ist. Andernfalls besteht die Gefahr eines Stromschlags.Für Personen mit Herzschrittmacher
Dieses Gerät erzeugt einen geringen magnetischen Fluss und Ultraschallwellen. Wenn Sie einen Herzschrittmacher haben und etwas Ungewöhnliches feststellen, entfernen Sie sich von dem Gerät und konsultieren Sie unverzüglich Ihren Arzt.VORSICHT
- Stellen Sie keine schweren Gegenstände auf das Gerät. Diese könnten herunterfallen und Verletzungen verursachen. - Ziehen Sie aus Sicherheitsgründen den Netzstecker ab, wenn Sie das Gerät längere Zeit nicht verwenden wollen. - Gehen Sie beim Öffnen und Schließen von Abdeckungen vorsichtig vor, damit Sie sich nicht an den Händen verletzen. - Halten Sie Hände und Kleidung fern von den Walzen im Ausgabebereich. Wenn Ihre Hände oder Kleidung in die Walzen geraten, kann das zu Verletzungen führen. - Das Innere des Geräts und der Ausgabeschacht sind während und direkt nach dem Gebrauch sehr heiß. Vermeiden Sie den Kontakt mit diesen Berelchen, um Verbrennungen zu vermeiden. Auch das bedruckte Papier kann unmittelbar nach der Ausgabe heiß sein, seien sie daher im Umgang damit vorsichtig. Andernfalls kann es zu Verbrennungen kommen.Zufuhr
- Drücken Sie die Zuführung nicht zu fest herunter, wenn Sie Kopien von dicken Büchern über das Vorlagenglas machen. Andernfalls besteht die Gefahr von Schäden am Vorlagenglas und von Verletzungen. - Schließen Sie die Zufuhr vorsichtig, damit Sie nicht Ihre Hände einklemmen, da dies zu Verletzungen führen kann. - Achten Sie darauf, dass Sie mit Ihren Händen oder Fingern nicht in die Zuführung geraten. Andernfalls besteht Verletzungsgefahr. natural_image
Illustration of a hand placing two cards into a box with a warning symbol (no text or labels)Finisher
\- Halten Sie Ihre Hände fern von dem Teil des Fachs, in dem das Heften durchgeführt wird (in der Nähe der Walzen) und achten Sie besonders auf die scharfen Heftklammern, da Sie sich durch diese verletzen können.Papierkassette
\- Stecken Sie niemals Ihre Hand in das Gerät, wenn die Papierkassette entfernt ist, dies kann zu Verletzungen führen.Taste Stromsparmodus
\- Drücken Sie aus Sicherheitsgründen (Energie sparen), wenn die Maschine längere Zeit nicht benutzt wird, z. B. über Nacht. Schalten Sie außerdem aus Sicherheitsgründen das Gerät über den Hauptnetzschalter AUS, und trennen Sie das Netzkabel ab, wenn das Gerät über einen längeren Zeitraum, z. B. während aufeinanderfolgender Feiertage, nicht verwendet wird.Lasersicherheit
Dieses Produkt ist als Laserprodukt der Klasse 1 nach IEC60825-1:2014 und EN60825-1:2014 eingestuft.CLASS 1 LASER PRODUCT
LASER KLASSE 1 APPAREIL À LASER DE CLASSE 1 APPARECCHIO LASER DI CLASSE 1 PRODUCTO LÁSER DE CLASE APARELHO A LASER DE CLASSE 1 LUOKAN 1 LASER-TUOTE LASERPRODUKT KLASS 1 Der Laserstrahl kann schädlich für den menschlichen Körper sein. Da die im Inneren des Produkts emittierte Laserstrahlung durch Schutzgehäuse und äußere Abdeckungen vollständig abgeschirmt wird, kann der Laserstrahl zu keinem Zeitpunkt während der Bedienung des Geräts durch den Benutzer aus dem Gerät entweichen. Lesen Sie die folgenden Anmerkungen und Sicherheitshinweise. - Öffnen Sie nur die Abdeckungen, die Sie laut den Handbüchern für dieses Gerät öffnen dürfen. - Wenn der Laserstrahl aus dem Gerät austritt, kann eine Bestrahlung der Augen schwere Sehschäden zur Folge haben. - Bei nicht in diesem Handbuch beschriebener Verwendung von Steuerelementen oder bei nicht in diesem Handbuch beschriebenen Justierungen sowie bei Nichteinhaltung der in diesem Handbuch beschriebenen Verfahren kann gefährliche Strahlung freigesetzt werden. Hinweis zur Lasersicherheit text_image
DANGER CAUTION ATTENTION VORISCHT PRECAUTION VARIOTUS 注意:不安全,不要求正确操作,避免因错误而发生。 注意:不安全,不要求正确操作,避免因错误而发生。 注意:不安全,不要求正确操作,避免因错误而发生。 注意:不安全,不要求正确操作,避免因错误而发生。 注意:不安全,不要求正确操作,避免因错误而发生。 注意:不安全,不要求正确操作,避免因错误而发生。 注意:不安全,不要求正确操作,避免因错误而发生。 注意:不全 注意:不全 注意:不全 注意:不全 注意:不全 注意:不全 注意:不全 注意:不全 注意:不全 注意:不全 注意:不全 注意:不全 注意:不全 注意:不全 注意:不全 注意:不全 注意:不全 注意:不全 注意:不全 注意:不全 注意:不全text_image
注意警告:"请在电脑上查看一个新打印机,如打印机、打印机、打印机、打印机、打印机、打印机、打印机、打印机、打印机、打印机、打印机、打印机、打印机、打印机、打印机、打印机、打印机、打印机、打印机、打印机、打印机、打印机、打印机、打印机、打印机、打印机、打印机、打印机、打印机、打印机、打印机、打印机、打印机、打印机、打印机、打印机、打印机、打印机、打印机、打印机、打印机、打印机、打印机、打印机、打印机、打印机、打印机、打印机、打印机、打印机、打印机 安全提示:本广告是关于使用本广告的广告,包括但不限于以下内容: 1. 本广告是基于广告设计和制作的广告,由本广告人负责。 2. 本广告是基于广告设计和制作的广告,由本广告人负责。 3. 本广告是基于广告设计和制作的广告,由本广告人负责。 4. 本广告是基于广告设计和制作的广告,由本广告人负责。 5. 本广告是基于广告设计和制作的广告,由本广告人负责。 6. 本广告是基于广告设计和制作的广告,由本广告人负责。 7. 本广告是基于广告设计和制作的广告,由本广告人负责。 8. 本广告是基于广告设计和制作的广告,由本广告人负责。 9. 本广告是基于广告设计和制作的广告,由本广告人负责。 10. 本广告是基于广告设计和制作的广告,由本广告人负责。 注意警告:"请在电脑上查看一个新打印机,如打印机、打印机、打印机、打印机、打印机、打印机、打印机、打印机、打印机、打印机、打印机、打印机、打印机、打印机、打印机、打印机、打印机、打印机、打印机、打印机、打印机、打印机、打印机、打印机、打印机、打印机、打印机、打印机、打印机、打印机、打印机、打印机、打印机、打印机、打印机、打印机、打印机、打印机、打印机、打印机、打印机、打印机、打印机 安全提示:本广告是基于广告设计和制作的广告,由本广告人负责。 1. 本广告是基于广告设计和制作的广告,由本广告人负责。 2. 本广告是基于广告设计和制作的广告,由本广告人负责。 3. 本广告是基于广告设计和制作的广告,由本广告人负责。 4. 本广告是基于广告设计和制作的广告,由本广告人负责。 5. 本广告是基于广告设计和制作的广告,由本广告人负责。Fixiereinheit
Setzen Sie sich beim Beseitigen von Papierstaus oder bei der Überprüfung des Geräteinneren nicht über längere Zeit der Hitze aus, die von der Fixiereinheit und ihrer Umgebung ausgeht. Das kann zu Verbrennungen bei niedriger Temperatur führen, auch wenn Sie die Fixiereinheit und ihre Umgebung nicht direkt berührt haben. text_image
CAUTION Caution of air and personal Air is turned by: - Air is normally closed. ATTENTION Air is normally closed, but the air is in the air. The air is normally closed. WBS/SHC Winds out to the weathering and winds out to the air. The air is normally closed. ATTENTION Air is normally closed, but the air is normally closed. OUTSIDE Air is normally closed, but the air is normally closed. 注意: 注意:小企业或内部有可控制的人员,请勿使用 注意:小企业或内部有可控制的人员,请勿使用 注意:不使用,请勿使用 注意:不使用,请勿使用WICHTIG
- Beachten Sie die Vorsichtshinweise auf Etiketten o. Ä. an diesem Gerät. - Setzen Sie das Gerät keinen starken Erschütterungen oder Vibrationen aus. - Öffnen und schließen Sie Klappen, Abdeckungen und andere Teile nicht mit Gewalt. Andernfalls besteht die Gefahr von Schäden am Gerät. - Schalten Sie den Hauptnetzschalter nicht AUS und öffnen Sie keine Abdeckungen, während das Gerät in Betrieb ist. Dies kann Papierstaus verursachen. - Verwenden Sie ein Modularkabel mit einer Länge von maximal 3 Metern. - Verwenden Sie ein USB-Kabel mit einer Länge von maximal 3 Metern.Sicherheitsbedingte Symbole
| Netzschalter: Stellung „EIN“ Netzschalter: Stellung „AUS“ Netzschalter: Stellung „STANDBY“ ① Druckschalter FIN" "AU" Schutzerdungsschiene Gefährliche Spannung im Inneren. Abdeckungen nur nach Anleitung öffnen. VORSICHT: Oberfläche heiß. Nicht berühren. Gerät der Klasse II Bewegliche Teile: Halten Sie Körperteile von den beweglichen Teilen fern VORSICHT: Gefahr eines elektrischen Schlags. Ziehen Sie alle Netzstecker aus der Steckdose. Es gibt scharfe Kanten. Halten Sie Körperteile von den scharfen Kanten fern.[HINWEIS]
Einige der oben aufgeführten Symbole sind je nach Produkt möglicherweise nicht angebracht.Wartung und Überprüfung
Reinigen Sie das Gerät regelmäßig. Wenn sich Staub ansammelt, funktioniert das Gerät möglicherweise nicht einwandfrei. Achten Sie beim Reinigen auf Folgendes. Wenn während des Betriebs ein Problem auftritt, sehen Sie im Abschnitt „Fehlersuche“ im Anwenderhandbuch nach.WARNING
- Schalten Sie das Gerät vor dem Reinigen AUS, und ziehen Sie den Netzstecker aus der Netzsteckdose. Andernfalls besteht die Gefahr eines Brandes oder Stromschlags. - Ziehen Sie den Netzstecker regelmäßig ab und reinigen Sie ihn mit einem trockenen Tuch von Staub und Schmutz. Angesammelter Staub kann Feuchtigkeit aus der Luft aufnehmen und einen Brand verursachen, wenn er in Kontakt mit Elektrizität kommt. - Reinigen Sie das Gerät mit einem feuchten, gut ausgewrungenen Tuch. Verwenden Sie zum Reinigen ausschließlich Wasser. Verwenden Sie weder Alkohol, Benzin, Farbverdünner oder andere entzündliche Substanzen. Verwenden Sie keine Papiertaschentücher oder Papiertücher. Wenn solche Substanzen mit den elektrischen Teilen im Gerät in Kontakt kommen, kann sich statische Elektrizität bilden, und es besteht Feuergefahr oder die Gefahr eines Stromschlags. - Überprüfen Sie das Netzkabel und den Stecker regelmäßig auf Beschädigungen. Prüfen Sie das Gerät auf Rost, Dellen, Kratzer, Risse und übermäßige Hitzeentwicklung. Die Benutzung von schlecht gewarteten Geräten kann zu einem Brand oder Stromschlag führen.VORSICHT
- Im Inneren des Geräts befinden sich heiße Bauteile, die unter Hochspannung stehen. Das Berühren dieser Bauteile kann zu Verbrennungen führen. Berühren Sie keine Teile der Maschine, die nicht in der Anleitung angegeben sind. - Achten Sie beim Einlegen von Papier oder beim Beseitigen von Papierstau darauf, sich nicht an den Papierkanten zu schneiden.Verbrauchsmaterial
A WARNUNG
- Werfen Sie Tonerkassetten oder leere Tonerbehälter nicht ins offene Feuer und bewahren Sie diese oder Druck-/Kopierpapier nicht an Orten auf, die offenen Flammen ausgesetzt sind. Dies kann dazu führen, dass sie sich entzünden, was zu Verbrennungen oder einem Brand führen kann. - Wenn Sie versehentlich Toner verschütten oder verstreuen, sammeln Sie die Tonerpartikel sorgfältig ein oder wischen Sie sie mit einem weichen, feuchten Tuch auf und achten Sie darauf, diese nicht einzuatmen. Verwenden Sie niemals einen Staubsauger ohne Schutzvorrichtung gegen Staubexplosionen, um den verschütteten Toner zu beseitigen. Das kann zu einer Fehlfunktion im Staubsauger oder einer Staubexplosion aufgrund statischer Entladung führen.VORSICHT
- Bewahren Sie Toner und andere Verbrauchsmaterialien außerhalb der Reichweite von kleinen Kindern auf. Wenn Sie diese Gegenstände verschluckt haben, suchen Sie sofort einen Arzt auf. - Wenn Toner auf Ihre Kleidung oder Haut gelangt, waschen Sie ihn sofort mit Wasser ab. Verwenden Sie kein warmes Wasser, da dies zu einer Fixierung des Toners und dauerhaften Flecken führen kann. - Nehmen Sie die Tonerkassette nicht auseinander, weil dann der Toner austreten und in Ihre Augen oder Ihren Mund gelangen kann. Wenn der Toner in Ihre Augen oder in den Mund gelangt, waschen Sie diese sofort mit kaltem Wasser aus und suchen Sie sofort einen Arzt auf. - Wenn Toner aus der Tonerkassette austritt, achten Sie darauf, den Toner nicht zu verschlucken oder ihn direkt Ihre Haut berühren zu lassen. Wenn Ihre Haut mit Toner in Berührung kommt, waschen Sie ihn mit Seife und Wasser ab. Wenn die Hautreizung auch nach dem Waschen weiterbesteht oder Sie Toner eingeatmet oder verschluckt haben, konsultieren Sie umgehend einen Arzt. - Wenn Sie den leeren Tonerbehälter herausziehen, achten Sie darauf, ihn nicht fallen zu lassen. Dies kann zu einer Verletzung führen.WICHTIG
\- Bewahren Sie die Tonerkassetten an einem kühlen Ort auf, der vor direktem Sonnenlicht geschützt ist.Telefonanlage
WARNING
Beachten Sie bei der Benutzung Ihrer Telefonanlage nachfolgende grundlegende Sicherheitsmaßnahmen, um das Risiko eines Brandes, elektrischen Schlags oder von Personenschäden zu mindern. 1. Verwenden Sie dieses Produkt nicht in der Nähe von Wasser, z. B. Badewanne, Waschbecken, Spüle, Waschschüssel, einem feuchten Keller oder in der Nähe eines Pools. 2. Verwenden Sie das Telefon möglichst nicht während eines Gewitters, da das Risiko eines elektrischen Schlags bei Blitzeinschlag besteht. 3. Verwenden Sie das Telefon nicht in der Nähe von austretendem Gas, um ein Gasleck zu melden.Hinweis
Produktname
Gemäß den Sicherheitsbestimmungen muss der Produktname registriert werden. In einigen Regionen, in denen dieses Produkt verkauft wird, können stattdessen die folgenden Namen in Klammern () registriert werden. imagePRESS C170 (F168600) imagePRESS C165 (F168603)EMV-Anforderungen der EU-Richtlinie
Dieses Gerät entspricht den wesentlichen EMV-Anforderungen der EG-Richtlinie. Wir erklären, dass dieses Produkt den EMV-Anforderungen der EG-Richtlinie bei einem Nenn-Eingangswert von 230 V, 50 Hz entspricht, wobei der Nenneingang für dieses Produkt 220 bis 240 V, 50/60 Hz beträgt. Die Verwendung eines geschirmten Kabels ist erforderlich, um den technischen EMV-Anforderungen der EG-Richtlinie zu entsprechen.WEEE- und Batterien-Richtlinien der EU
Informationen zu den WEEE- und Batterien-Richtlinien finden Sie im neuesten Anwenderhandbuch (HTML-Anleitung) auf der Canon-Website (https://oip.manual.canon/).Umweltzeichen Blauer Engel
Information nur für Deutschland Wenn Sie mehr über Canon Produkte und den Blauen Engel erfahren wollen, gehen Sie bitte auf unsere Canon Home Page. Hier finden Sie mit dem Blauen Engel ausgezeichnete Canon Produkte und deren Nutzerinformationen.Informationen zu Verordnungen für Wireless LAN
Regulatory information for users in Jordan imagePRESS C170/C165 includes approved Wireless LAN Module (Model name: FM1M944). Contains Wireless LAN Module approved by TRC/LPD/2015/5 Regulatory information for users in UAE imagePRESS C170/C165 includes approved Wireless LAN Module (Model name: FM1M944).TRA
REGISTERED No: ER38576/15 DEALER No: DA39360/15 Regulatory information for users in Argentina Incluye módulo Wireless LAN Module Marca Canon Inc., Modelo FM1M944, CNC C-20793  COMISIÓN NACIONAL DE COMUNICACIONES Regulatory information for users in Uruguay imagePRESS C170/C165 contains URSEC approved Wireless LAN Module (Model name: FM1M944 or FM1M948).Regulatory information for users in Singapore
Complies with IMDA Standards DB00671 Regulatory information for users in Vietnam imagePRESS C170/C165 includes approved Wireless LAN Module (Model name: FM1M944). RE Directive
(Only for European radio equipment)RE Declaration of Conformity
German (DE) Hiermit erklärt Canon Inc, dass diese Anlage der Richtlinie 2014/53/EU entspricht. Der vollständige Text der EU-Konformitätserklärung ist unter der folgenden Internetadresse verfügbar: http://www.canon-europe.com/ce-documentationWLAN-Spezifikationen Frequenzbereich(e): 2412-2472 MHz Maximale Funkfrequenzleistung: 18.21 dBmEntsorgungsvorschriften für
Elektroschrott - nur in Indien  Dieses Produkt darf gemäß den Vorschriften für die Entsorgung von Elektroschrott (E-Waste-Managementregeln 2016) nicht mit dem Hausmüll entsorgt werden. Vielmehr sollte dieses Produkt an einer ausgewiesenen Sammelstelle abgegeben werden, wie beispielsweise an einer autorisierten Sammelstelle für das Recycling von Elektro- und Elektronik-Altgeräten (EEE). Eine unsachgemäße Handhabung dieser Art von Abfall könnte aufgrund potenziell gefährlicher Substanzen, die häufig in Elektro- und Elektronikgeräten vorhanden sind, eine mögliche negative Auswirkung auf die Umwelt und die Gesundheit von Menschen haben. Ihre Mitwirkung bei der korrekten Entsorgung dieses Produkts trägt wesentlich zur effektiven Nutzung der natürlichen Ressourcen bei. Weitere Informationen zur Rücknahme und zum Recycling von WEEE-Produkten finden Sie unter http://www.canon.co.in/environment, oder kontaktieren Sie uns schriftlich unter customer. delight@canon.co.in. Außerdem entspricht dieses Produkt den "E-Waste-Managementregeln 2016", welche die Verwendung von Blei, Quecksilber, sechswertigem Chrom, polybromierten Biphenylen oder polybromierten Diphenylethern in Konzentrationen von mehr als 0,1 Gewichtsprozent und 0,01 Gewichtsprozent für Cadmium verbieten, mit Ausnahme der in Anhang II dieser Regel festgelegten Ausnahmen.Rechtliche Beschränkungen bei der Verwendung dieses Produkts und der Verwendung von Bildern
Die Verwendung Ihres Produkts zum Scannen, Drucken oder anderweitigen Reproduzieren von bestimmten Dokumenten, sowie die Verwendung solcher mit Ihrem Produkt gescannter, gedruckter oder anderweitig reproduzierter Bilder kann gesetzlich verboten sein und zu einer straf- und/oder zivilrechtlichen Haftbarkeit führen. Eine nicht erschöpfende Liste solcher Dokumente finden Sie im Folgenden. Diese Liste ist nur als Anhaltspunkt gedacht. Wenn Sie bezüglich der Legalität der Verwendung Ihres Produkts zum Scannen, Drucken oder anderweitigen Reproduzieren eines bestimmten Dokuments unsicher sind, und/oder bezüglich der Verwendung der gescannten, gedruckten oder anderweitig reproduzierten Bilder, sollten Sie sich zuvor bei Ihrem Rechtsberater einen Rat einholen. - Papiergeld - Reiseschecks • Zahlungsanweisungen • Lebensmittelmarken - Einlagenzertifikate - Reisepässe - Briefmarken (gestempelt oder ungestempelt) • Einwanderungspapiere - Erkennungsmarken oder Ehrenabzeichen - Steuermarken (gestempelt oder ungestempelt) - Bestimmte Dienst- oder Entwurfspapiere • Anleihen oder andere Schuldverschreibungen - Ausgestellte Schecks oder Wechsel von Regierungsbehörden - Aktienzertifikate • Fahrzeugscheine und Fahrzeugbriefe - Urheberrechtlich geschützte Werke/Kunstwerke ohne Genehmigung der UrheberrechtinhaberAndere Warnhinweise
Das Gerät ist nicht für die Benutzung im unmittelbaren Gesichtsfeld am Bildschirmarbeitsplatz vorgesehen. Um störende Reflexionen am Bildschirmarbeitsplatz zu vermeiden, darf dieses Produkt nicht im unmittelbaren Gesichtsfeld platziert werden.Haftungsausschluss
• Die Angaben in diesem Dokument können ohne vorherige Ankündigung geändert werden. - CANON INC. GIBT BEZÜGLICH DIESES MATERIALS KEINE GEWÄHRLEISTUNGEN BELIEBIGER ART, WEDER VERTRAGLICH NOCH GESETZLICH, AUSSER DEN HIER ANGEGEBENEN, EINSCHLIESSLICH, JEDOCH NICHT BESCHRÄNKT AUF, GEWÄHRLEISTUNGEN FÜR MARKTFÄHIGKEIT, HANDELSÜBLICHE QUALITÄT, EIGNUNG FÜR EINEN BESTIMMTEN ZWECK UND PATENTFREIHEIT. CANON INC. HAFTET NICHT FÜR DIREKTE UND BEILÄUFIG ENTSTANDENE SCHÄDEN ODER FOLGESCHÄDEN BELIEBIGER ART ODER FÜR VERLUSTE ODER KOSTEN, DIE DURCH DIE NUTZUNG DIESES MATERIALS ENTSTEHEN.Über dieses Handbuch
Bildschirme
Die in diesem Handbuch verwendeten Bildschirmdarstellungen des Touch-Panels wurden mit folgendem optionalen Zubehör am imagePRESS C165 erstellt: • Broschüren-Trimmer F • Broschüren Finisher W PRO - Locheinheit BT - Falzeinheit J • Zuschiesseinheit N • POD Lite A3-Papiermagazin C (1x3.500) - Super G3 Faxkarte Beachten Sie bitte, dass Funktionen, die aufgrund des Modells oder der Optionen nicht verwendet werden können, nicht auf dem Touch-Panel angezeigt werden.Abbildungen
Die in diesem Handbuch verwendeten Abbildungen wurden mit folgendem optionalen Zubehör am imagePRESS C165 erzeugt: \- Kopienauffang R natural_image
Line drawing of a multi-tiered printer or scanner device with no visible text or symbolsWarenzeichen
Mac ist ein Warenzeichen von Apple Inc. Microsoft, Windows, Windows Vista, Windows Server, Internet Explorer, Excel und PowerPoint sind Warenzeichen oder eingetragene Warenzeichen der Microsoft Corporation in den USA und/oder anderen Ländern. Andere Firmen- oder Produktnamen, die in dieser Anleitung verwendet werden und nicht in dieser Liste erwähnt sind, können Warenzeichen der entsprechenden Firmen sein.Software von Drittanbietern
Dieses Canon-Produkt (das „PRODUKT“) enthält Software-Module von Drittanbietern. Die Nutzung und Weitergabe dieser Software-Module, einschließlich etwaiger Aktualisierungen dieser Software-Module (zusammen die „SOFTWARE“) unterliegen den nachfolgenden Lizenzbedingungen (1) bis (9). (1) Sie erklären sich damit einverstanden, dass Sie alle geltenden Exportkontrollgesetze, Einschränkungen oder Vorschriften der beteiligten Länder in dem Fall einhalten, dass dieses PRODUKT einschließlich der SOFTWARE in ein anderes Land versandt, überführt oder exportiert wird. (2) Die Rechteinhaber der SOFTWARE behalten in jeder Hinsicht den Rechtsanspruch, das Eigentum und die Geistigen Eigentumsrechte an und für die SOFTWARE. Sofern hier nicht ausdrücklich vorgesehen, wird seitens der Rechteinhaber der SOFTWARE keine Lizenz oder Recht, ausdrücklich oder implizit, auf etwaige Eigentumsrechte der Rechteinhaber der SOFTWARE an Sie übertragen oder gewährt. (3) Sie dürfen die SOFTWARE ausschließlich mit dem PRODUKT verwenden. (4) Sie dürfen die SOFTWARE nicht ohne vorherige schriftliche Einverständniserklärung der Rechteinhaber der SOFTWARE an Dritte zuweisen, unterlizenzieren, vermarkten, verteilen oder übertragen. (5) Ungeachtet des Vorstehenden dürfen Sie die SOFTWARE nur übertragen, wenn Sie (a) alle Ihre Rechte an dem PRODUKT und alle Rechte und Verpflichtungen unter den Lizenzbedingungen an den Übertragungsempfänger übertragen und (b) dieser Übertragungsempfänger zustimmt, an alle diese Bedingungen gebunden zu sein. (6) Sie dürfen den Code der SOFTWARE nicht dekompilieren, auflösen, disassembledieren oder anderweitig in eine für den Menschen lesbare Form zurückentwickeln. (7) Es ist Ihnen nicht gestattet, die SOFTWARE zu ändern, anzupassen, zu übersetzen, zu vermieten oder zu verleihen oder andere Werke auf der Grundlage der SOFTWARE abzuleiten. (8) Sie sind nicht berechtigt, die SOFTWARE von dem PRODUKT zu trennen oder separate Kopien zu erstellen. (9) Der für den Menschen lesbare Teil (der Quellcode) der SOFTWARE wird nicht an Sie lizenziert. Ungeachtet der obigen Punkte (1) bis (9) gilt Folgendes: das PRODUKT beinhaltet Softwaremodule von Drittanbietern, denen andere Lizenzbedingungen beiliegen, und diese Softwaremodule unterliegen den anderen Lizenzbedingungen. Überprüfen Sie die Plattformversion des PRODUKTS und beziehen Sie sich bezüglich der entsprechenden Plattformversion auf die im Anhang des Handbuchs beschriebenen anderen Lizenzbedingungen der Softwaremodule Dritter. Das Handbuch kann von der Canon Website https://oip.manual.canon/heruntergeladen werden. Durch die Nutzung des PRODUKTS gelten für Sie alle geltenden Lizenzbedingungen als vereinbart. Wenden Sie sich an unseren Kundendienstvertreter, wenn Sie diesen Lizenzbedingungen nicht zustimmen. V\_191204Aantekeningen
 imagePRESS C170/C165Funzioni pratiche
Regolazione automatica della gradazione per diversi tipi di carta
La Funzione Regolazione automatica gradazione regola la gradazione, la densità e il tono di colore delle immagini e necessita solo la scansione della pagina di test. Questa funzione può essere utilizzata per diverse grammature di carta in modo da ottenere risultati di stampa di alta qualità con diversi tipi di carta.  "Manutenzione" > "Regolazione della qualità di stampa e di finitura" nella Guida per l'utente natural_image
Illustration of a paintbrush resting on an artist's palette with five circular paint blobs (no text or symbols)Riproduzione dei colori di alta qualità con la correzione automatica del tono colore
Rispetto alla funzione Regolazione automatica gradazione, che regola i colori CMYK, la funzione Correzione automatica colore regola i colori miscelati espressi con più toner. Utilizzando queste funzioni insieme, è possibile eseguire una regolazione del colore più stabile.  "Manutenzione" > "Regolazione della qualità di stampa e di finitura" nella Guida per l'utente natural_image
Six-panel grid showing six identical panels of stacked balloons, each with varying grayscale shading and black outlines (no text or symbols)Risultato di stampa ottimale per ciascun tipo di carta
Le informazioni sulla carta, come il peso base, la finitura e il livello di correzione dell'arricciatura possono essere registrate come caratteristiche della carta. Poiché tali informazioni dettagliate possono essere specificate per ogni tipo di carta differente, è possibile ottenere risultati di stampa raffinati in considerazione delle caratteristiche della carta. Questa funzione è efficace anche per il miglioramento del trasporto della carta e della qualità di stampa. natural_image
Stack of four overlapping sheets of paper with distinct gray and white surfaces (no text or symbols)Correzione della curvatura per un'alimentazione stabile della carta
La macchina corregge continuamente la curvatura della carta che si verifica a causa della pressione applicata durante il fissaggio del toner. Inoltre correggendo la curvatura della carta durante la stampa la macchina riduce il rischio di inceppamenti e ottiene un trasporto stabile della carta stessa. La correzione della curvatura può essere specificata per ogni tipo di carta desiderato. natural_image
Diagram showing two stacked paper sheets with a curved arrow indicating rotation (no text or symbols)Funzionamento semplice per la regolazione della posizione dell'immagine
È possibile utilizzare un foglio guida per regolare rapidamente la posizione dell'immagine. Si tratta di una funzione comoda perché non occorre effettuare misurazioni e immettere valori.  "Manutenzione" > "Impostazioni per la gestione del tipo di carta" > "Regolazione della posizione dell'immagine" nella Guida per l'utente text_image
Diagram showing a printer with a tool interacting with a grid-based interface, alongside a close-up of the device's screen and toolbar buttons.Accesso rapido alle impostazioni utilizzate di frequente
Sono necessarie impostazioni differenti a seconda dello scopo della stampa o dei tipi di carta, ma l'accesso alle voci di impostazione presenti nei diversi menu ogni volta è un'operazione piuttosto complicata. In questo caso, registrare le impostazioni utilizzate di frequente nel pulsante "Collegamento a Impostazioni/Registrazione". È possibile accedere direttamente alla schermata delle impostazioni con questo pulsante, risparmiando lo sforzo richiesto per la ricerca delle voci di impostazione necessarie. flowchart
graph TD
    A["Collegamento a Importazione Reg"] --> B["Regolazione automatica gradazione"]
    A --> C["Impostazioni gestione tipo di carta"]
    A --> D["Palizia nell'unità principale"]
Contenuto
Grazie per aver acquistato questo prodotto Canon. Leggere attentamente il manuale prima di utilizzare la macchina, in modo da familiarizzare con l'apparecchiatura e poter sfruttare al meglio le sue molteplici funzioni. Per informazioni dettagliate sulle impostazioni relative alle funzioni, vedere la Guida per l'utente. Terminata la lettura, conservare il manuale per eventuali consultazioni future.Parti e relative funzioni....6
Vista esterna (Lato anteriore)....6 Vista esterna (Lato posteriore)....8 Parti interne....9 Pannello di controllo....10Schermata Monitoraggio stato ....12
Come accendere la macchina con l'interruttore principale....13
Accendere la macchina con l'interruttore principale .....13 Arresto della macchina....13Caricamento della carta....14
Fonte della carta....14 Registrazione dei tipi di carta nella macchina .....16 Caricamento della carta nel paper deck/cassetto della carta..18 Registrazione dei tipi di carta personalizzati ....20Pulizia e manutenzione 22
Pulizia del vetro di lettura....22 Pulizia dell'area di scansione degli originali .....22 Pulizia dell'alimentatore....23 Pulizia automatica dell'alimentatore....25 Pulizia della parte interna dell'unità principale .....25 Pulizia del pannello digitale....26 Controllo dell'interruttore di sicurezza....27Materiali di consumo 28
Risoluzione dei problemi .... 30
Rimozione di inceppamenti carta e punti....30 Riduzione della frequenza degli inceppamenti .....30 Quando viene visualizzato un messaggio di errore .....31 Come contattare il rivenditore autorizzato Canon locale .....32 Se la memoria è esaurita .... 33 Se la macchina non si accende con l'interruttore principale . .33Appendice....34
Simboli utilizzati nel manuale
IMPORTANTE
NOTA     Indica avvertimenti e limitazioni relativi al funzionamento dell'apparecchiatura. Leggere attentamente tali avvisi per utilizzare l'apparecchiatura correttamente ed evitare di danneggiare il sistema o altri beni. Riporta la spiegazione di una determinata operazione o una spiegazione supplementare relativa ad una procedura. Si consiglia vivamente di leggere queste note. Indica funzioni o suggerimenti utili per l'utilizzo della macchina. Ulteriori informazioni sono reperibili dal sito del manuale online (https://oip.manual.canon/). Una spiegazione dettagliata è presentata nella pagina specificata del presente manuale. Indica un prodotto opzionale che può essere utilizzato con la macchina.Tasti e pulsanti utilizzati nel manuale
Di seguito sono riportati esempi di come i tasti e i pulsanti sono raffigurati all'interno del manuale: \- Pulsanti sul pannello digitale:Parti e relative funzioni
In questa parte del manuale vengono riportati i nomi e le funzioni di tutti i componenti della macchina. Vengono descritti anche i tasti e le schermate del pannello di controllo. Leggere questa sezione per utilizzare le diverse funzioni della macchina senza problemi.  "Appendice" > "Opzioni" nella Guida per l'utente Vista esterna (Lato anteriore) text_image
1234 9 8 5 6 71 Pannello comandi
Il pannello comandi è composto da tasti numerici, ◎, indicatori, pannello digitale, ecc. È possibile eseguire tutte le operazioni e specificare le impostazioni dal pannello comandi.2 Pannello superiore destro dell'unità principale
Aprire questo pannello per rimuovere la carta inceppata all'interno della macchina.3 Vassoio multiuso
Caricare la carta nel vassoio multiuso quando si desidera utilizzare un tipo di carta diverso da quello caricato nel paper deck/cassetto della carta.4 Custodia dei panni per la pulizia del vetro di lettura
Usare questa scatola per conservare i panni per la pulizia del vetro di lettura.5 Porta USB (lato posteriore destro della macchina)
Alla macchina è possibile collegare dei dispositivi come dischi rigidi esterni.6 Connettore USB
Collegare un cavo USB quando si collega la macchina a un computer.7 Porta LAN
Collegare un cavo LAN quando si collega la macchina a un router LAN via cavo, e così via.8 Pannello inferiore destro dell'unità principale
Aprire questo pannello per rimuovere la carta inceppata all'interno della macchina.9 Interruttore di alimentazione
Premere l'interruttore di alimentazione per accendere o spegnere la macchina. text_image
1011 12 13 14 161510 Porta USB (lato anteriore della macchina)
È possibile collegare alla macchina dispositivi come ad esempio periferiche di memoria USB.11 Alimentatore
Consente di alimentare automaticamente gli originali nella macchina per la scansione. Quando si caricano due o più fogli nell'alimentatore, è possibile sottoporre a scansione gli originali senza interruzione.12 Coperchio per la sostituzione del toner
Aprire questo pannello per sostituire la cartuccia del toner.13 Pannello anteriore dell'unità principale
Aprire questo pannello per rimuovere la carta inceppata.14 Paper deck 1/paper deck 2
Caricare il tipo di carta che si utilizza più di frequente.15 Cassetto 1/Cassetto 2
Caricare il tipo di carta utilizzato normalmente. È possibile caricare la carta che non può essere caricata nei paper deck.16 Coperchio sinistro dell'unità principale
Aprire questo pannello per rimuovere la carta inceppata. Vista esterna (Lato posteriore) text_image
Technical diagram of a device with labeled parts and zoomed-in views, showing internal components and structural details.1 Presa per linea telefonica (LINEA 1)
Collegare un cavo telefonico quando si collega la macchina a una linea telefonica.2 Interruttore
Rileva la corrente in eccesso o la corrente di dispersione.Parti interne
text_image
Technical diagram of a printer with labeled parts and zoomed-in insets showing internal components1 Cartuccia di toner
Sostituire la cartuccia del toner quando il toner si esaurisce.2 Unità di fissaggio per il trasporto
Per eliminare della carta inceppata all'interno della macchina, estrarre l'unità di fissaggio per il trasporto. text_image
Home Copia Rox Scansione e mail Scansione e mail Accesso a file menerozati Macbox Fast-Fox 191817161514 Agendi Home Takatine Le importazioni precedenti di ogni lavoro data visualizzati qui per riformere importazioni precedenti, premori uso degli elementi. Mantor state 1 2 3 GHI JKL MNO OKS TUV WXYZ 7 8 9 0 # ID C 8 9 10 11 12 131 Pannello digitale
Visualizza la schermata delle impostazioni e i messaggi. Toccare il pannello per eseguire le impostazioni e altre operazioni.2
Premere per visualizzare la schermata iniziale (Home).
3 Nome utente per l'accesso
Viene visualizzato il nome dell'utente che ha attualmente effettuato l'accesso.4 Tasto ID (Log In/Out)
Premere questo tasto per accedere/disconnettersi (quando è stato impostato un servizio di registrazione).5 Tasto Impostazioni/Registrazione
Premere questo tasto per specifi care le impostazioni o eff ettuare una registrazione.6 Tasti numerici
Premere per inserire i valori numerici.7 Tasto risparmio energetico
Premere questo tasto per impostare o disattivare la modalità di riposo. - Si illumina quando la macchina passa alla modalità di riposo. - Si spegne quando la macchina esce dalla modalità di riposo.8 Tasto Contatore/Informazioni sul dispositivo
Premere questo tasto per visualizzare il conteggio totale di copie e stampe sul pannello digitale.9 Selettore di regolazione della luminosità
Regola la luminosità dello schermo.10 Tasto Impostazioni volume
Premere per regolare il volume audio.11 Tasto Azzera
Premere questo tasto per cancellare i valori o i caratteri inseriti.12 Tasto Stop
Premere questo tasto per arrestare l'operazione in corso.13 Tasto Avvio
Premere questo tasto per cominciare un'operazione (o la lettura dei dati).14 Indicatore di accensione
Si illumina quando si accende la macchina.15 Indicatore di errore
Lampeggia o si illumina in caso di errore nella macchina. ※Se l'indicatore di errore emette una luce rossa costante, contattare un rivenditore Canon autorizzato.16 Indicatore di elaborazione/dati
• Lampeggia quando la macchina è in funzione. - Si illumina quando la macchina è in attesa di un comando.17 Tasto Ripristino
Premere per annullare le impostazioni e ripristinare quelle specifi cate in precedenza.18
Premere per controllare lo stato di un lavoro o
annullare un lavoro.
19
Premere per controllare lo stato di un lavoro o
annullare un lavoro.

Impostazione del modo Risparmio energetico/Riposo per ridurre il consumo rgetico
È possibile limitare il consumo energetico tramite Modo risparmio energetico/Modo riposo quando la macchina non viene utilizzata per un lungo periodo di tempo, ad esempio durante la pausa pranzo. Per utilizzare questi modi, è sufficiente premere 📄 sul pannello di controllo. Se la macchina rimane inutilizzata per un determinato periodo di tempo, entrerà in Modo riposo (modo Riposo automatico). Per ulteriori informazioni sul modo che viene attivato quando viene premuto 📄 e informazioni più dettagliate sul modo Riposo automatico, vedere la Guida per l'utente.  "Operazioni di base" > "Attivazione della modalità di riposo" nella Guida per l'utente natural_image
Line drawing of a hand pressing a button on a device panel with circular buttons and a handle (no text or symbols)Schermata Monitoraggio stato
Se si preme Meràraggio ilizzato lo schermo Monitoraggio stato ed è possibile confermare lo stato dei lavori e dei consumabili. Grazie alle informazioni quali il tempo di completamento del lavoro attuale o la quantità di carta rimanente è possibile eseguire operazioni di stampa regolari senza interruzioni. Situazioni utili
• Per sapere il tempo di completamento dei lavori - Per controllare la quantità residua di carta per un caricamento carta efficiente • Per annullare un lavoro registrato per erroreSchermata , , ,
La schermata text_image
Monitoraggio stato Copia/ Stampa Brink Ricuzione Memorizio Consumo/ Altro Slato lavori Registro lavori Stampa One Name name Name status Status Donita japonic 0:17 Copia — Stampa... 2 min. 0:39 Copia — in attesa stampa... 4 min. International Fattore info Dettagli Anvella In pausa tutti i Av. di stampa ChidiSchermata
È possibile controllare le informazioni carta e la quantità rimanente di carta in tutte le fonti di alimentazione carta. È anche possibile controllare l'uso della memoria, il toner residuo, i punti rimanenti e la quantità di scarti di perforazione.

text_image
Monitoraggio stato Cupia/ Startups Innis Riscolone Metrorizza Consumab./Altro Form, catta Name Vans. m. A4 Conure 2 (76-90 g/m2) A4 Conure 2 (76-90 g/m2) A4 Conure 2 (76-90 g/m2) A4 Conure 2 (76-90 g/m2) A4 Conure 2 (76-90 g/m2) Altro Utilizzo memorrisis 0% 1/3 Tener stroo 100% Tener glallo 100% Tener macrata 100% Tener dano 100% Controllo consumabili ChudiCome accendere la macchina con l'interruttore principale
Questa parte del manuale spiega come accendere la macchina con l'interruttore principale.Accendere la macchina con l'interruttore principale
Assicurarsi che il cavo di alimentazione sia collegato a fondo nella presa di corrente e che l'interruttore di sicurezza sia acceso. text_image
Diagram showing a printer with a close-up view of its internal device labeled (1), indicating a zoom or adjustment mechanism.IMPORTANTE
Prima di riaccendere l'interruttore principale, attendere almeno 10 secondi dopo averlo spento. Tuttavia seNOTA
La risposta dei pulsanti e dei tasti potrebbe non essere ottimale subito dopo l'accensione della macchina.Arresto della macchina
Non spegnere la macchina con l'interruttore principale nelle seguenti situazioni
• Durante l'utilizzo della funzione I-Fax - Quando viene visualizzato il messaggiotext_image
Diagram showing a printer with a close-up view of its internal device, illustrating the process of moving or exiting.Caricamento della carta
Caricare la carta come indicato nella procedura seguente. In questa sezione viene utilizzato come esempio carta di formato personalizzato A4.Conferma
Verificare i tipi di carta che è possibile caricare.  "Appendice" > "Specifiche hardware" > "Carta disponibile" nella Guida per l'utentePreparazione
Per utilizzare un tipo di carta non registrato nella macchina, registrarlo in anticipo. "Registrazione dei tipi di carta nella macchina" a pag. 16Funzionamento
Caricare la carta nel cassetto. "Caricamento della carta nel paper deck/cassetto della carta" a pag. 18Registrazione
Specificare il formato e il tipo di carta caricata nel cassetto. "Registrazione dei tipi di carta personalizzati" a pag. 20Fonte della carta
Questa sezione descrive le fonti della carta disponibili. La carta che è possibile caricare varia a seconda delle fonti della carta. La seguente descrizione include i prodotti opzionali e il paper deck/cassetti carta standard. I prodotti opzionali sono indicati con OPZIONE. text_image
Document Insertion Unit-N OPTION Document Insertion / Folding Unit-K OPTION Stack Bypass Alignment Tray-D OPTION Vassoio per l'alimentazione del Banner-B OPTION Paper Deck Cassetto della carta POD Deck Lite-C OPTION Paper Deck Unit-E OPTIONNOTA
Per i dettagli sulla carta caricabile, consultare la Guida per l'utente.  "Appendice" > "Specifiche hardware" > "Carta disponibile" nella Guida per l'utente■Registrazione dei tipi di carta nella macchina
Registrare tutti i tipi di carta che si utilizzeranno con questa macchina.NOTA
Se si carica carta già registrata nella macchina, ad esempio carta comune o riciclata, questo passaggio non è necessario. Continuare al passaggio successivo "Caricamento della carta nel paper deck/cassetto della carta". - Non è possibile modificare le impostazioni dei tipi di carta predefiniti registrati nella macchina. Se si modificano le impostazioni, assicurarsi di duplicarle e memorizzarle come nuove in anticipo.1 Premere
2 Premeretext_image
Impostazioni/RegistrazioneNOTA
Quando si registra la carta personalizzata, accertarsi di modificarne il nome. Non è possibile modificare le impostazioni dei tipi di carta predefiniti registrati nella macchina. 5 Selezionare il tipo di carta duplicato ai punti 3 e 4 dall'elenco → premeretext_image
Impostazioni/Registrazionetext_image
Impostazioni/Registrazionetext_image
Importazioni/Registrazionetext_image
Importazioni/RegistrazioneNOTA
Per il formato A4, è possibile caricare la carta di formato predefinito nel paper deck. natural_image
Diagram of a mechanical component with an arrow indicating direction (no text or symbols present)text_image
Lato di stampa rivolto verso il bassoCaricamento della carta nel cassetto della carta
natural_image
Cross-sectional diagram of a mechanical component with internal channels and an arrow indicating direction (no text or symbols)natural_image
Diagram of a vehicle interior showing gear shift and gear movement (no text or labels)text_image
Diagram showing a device interior with labeled parts and directional arrows, including hand positioning and component insertion.3 Regolare la posizione delle guide della carta.
\- Fare scorrere ciascuna guida stringendola nella parte superiore per allinearla al formato di carta desiderato. natural_image
Diagram of a mechanical device with two circular insets showing internal components (no text or symbols)text_image
Carta Buste ① ②5 Caricare i fogli nel cassetto.
1 Caricare i fogli facendoli aderire alla parete destra del cassetto. 2 Inserire nuovamente il cassetto della carta nella macchina finché uno scatto non ne segnala l'aggancio nella posizione chiusa.NOTA
- Smazzare i fogli diverse volte, quindi pareggiare i bordi prima di caricare la carta. - Prima dell'uso raddrizzare la carta incurvata. • Non superare il simbolo di capienza massima (\*\*\*). - Quando si carica carta preferata, lucidi/pellicola trasparente, fogli rubrica e buste, assicurarsi che i supporti siano caricati con l'orientamento corretto, poiché questo varia a seconda della fonte alimentazione carta.  "Operazioni di base" > "Caricamento della carta" nella Guida per l'utente ■Registrazione dei tipi di carta personalizzati È possibile registrare il formato e il tipo di carta per ogni fonte di alimentazione carta. 1 Premere 2 Premeretext_image
Impostazioni/Reginrazionetext_image
Impostazioni/Registrazionetext_image
Impostazioni/Registrazionetext_image
Impostazioni/RegistrazionePulizia e manutenzione
Per un funzionamento ottimale della macchina si consiglia di pulirla e controllarla regolarmente.Pulizia del vetro di lettura
Se gli originali non possono essere acquisiti correttamente, attenersi alla procedura di pulizia seguente. Pulirlo con un panno inumidito e strizzato, quindi con un panno morbido e asciutto. Utilizzare il panno per la pulizia del vetro per semplificare la procedura. natural_image
Line drawing of an open industrial machine with a screen and base (no text or symbols)Pulizia dell'area di scansione degli originali
Se non è possibile acquisire correttamente gli originali alimentati dall'alimentatore, osservare la procedura seguente. 1 Premere 2 PremerePulizia dell'alimentatore
Pulire l'alimentatore quando gli originali si sporcano o si inceppano frequentemente. Pulirlo con un panno inumidito e strizzato, quindi con un panno morbido e asciutto. Utilizzare il panno per la pulizia del vetro per semplificare la procedura. 1 Arresto della macchina. "Arresto della macchina" a pag. 13 natural_image
Diagram showing a device with a heat sink and a magnified view of the heat sink (no text or symbols)natural_image
Diagram of a vehicle rear compartment showing internal compartments and ventilation slots (no text or labels)IMPORTANTE
Verificare che nessun residuo, ad esempio pezzi di carta, sia entrato nelle scanalature del sensore di rilevamento dell'alimentatore a fogli multipli. In caso contrario, pulire con un panno morbido. text_image
Technical diagram showing a device's internal structure with labeled components and numbered annotationnatural_image
Technical line drawing of a mechanical component with a magnified inset showing circular features (no text or symbols)natural_image
Line drawing of a hand inserting a component into an open computer case (no text or symbols)5 Pulire l'area di scansione originali.
\- Aprire l'alimentatore e pulire l'area di scansione degli originali (striscia di vetro sottile). text_image
Diagram showing a printer's internal structure with labeled parts and an inset diagram illustrating mechanical assembly or processing.6 Aprire il coperchio di scansione documenti.
① Tirare la leva sopra l'alimentatore. ② Aprire il coperchio di scansione documenti. natural_image
Technical line drawing of a mechanical device with an inset close-up showing internal components (no text or symbols)7 Aprire il coperchio interno.
text_image
Pulire l'area in vetro sottile e lunga.8 Pulire l'area di scansione degli originali dell'alimentatore.
9 Chiudere il coperchio interno e il coperchio di scansione documenti in quest'ordine, quindi chiudere l'alimentatore.10 Accendere la macchina con l'interruttore principale.
"Accendere la macchina con l'interruttore principale" a pag. 13Pulizia automatica dell'alimentatore
Se gli originali alimentati dall'alimentatore sono sporchi, osservare la procedura seguente. 1 Posizionare 10 fogli bianchi nell'alimentatore. • Utilizzare carta comune A4. 2 Premere 3 PremerePulizia della parte interna dell'unità principale
Se la carta stampata è sporca, attenersi alla procedura seguente. 1 Premere 2 PremereNOTA
In modo simile, eseguirePulizia del pannello digitale
Pulire il pannello digitale con un panno inumidito con acqua o un detergente delicato, quindi asciugarla con un panno morbido e asciutto. natural_image
Illustration of a hand cleaning a clean appliance on a microwave (no text or symbols)Controllo dell'interruttore di sicurezza
Questa macchina è dotata di un interruttore di sicurezza che rileva la corrente in eccesso o la corrente di dispersione. Testare l'interruttore di sicurezza una volta al mese seguendo la procedura descritta di seguito. text_image
Diagram showing a printer with a close-up view of its internal device, indicating press operation or cooling mechanism.1 Spegnere la macchina con l'interruttore principale.
\- Prima di controllare l'interruttore di sicurezza, verificare che la macchina sia spenta. natural_image
Diagram showing a door opening and a printer with a dotted line indicating connection (no text or symbols)2 Premere il pulsante di test nella parte posteriore della macchina.
\- Premere il pulsante di test con la punta di una penna a sfera o un oggetto simile. Premere brevemente il pulsante di test. natural_image
Illustration of a device with a fan and control panel connected to a printer (no text or symbols)3 Confermare che la leva dell'interruttore di sicurezza sia in posizione OFF.
\- Se la leva dell'interruttore di sicurezza non si sposta su OFF ripetere il passaggio 2. Se ciò nonostante, pur avendo eseguito la procedura riportata sopra due o tre volte, la leva non si sposta su OFF, rivolgersi al rivenditore autorizzato Canon locale. text_image
Diagram showing a device with an arrow pointing to a folder, connected to a printer with a dotted line indicating connection.4 Portare la leva dell'interruttore di sicurezza su ON.
5 Accendere la macchina con l'interruttore principale.
text_image
Diagram showing a printer with a close-up view of its cover and a magnified view highlighting the cover area.Materiali di consumo
Sono disponibili i seguenti materiali di consumo per questa macchina. Per maggiori informazioni al riguardo, contattare un rivenditore autorizzato Canon. Per informazioni sull'utilizzo e la conservazione dei materiali di consumo, vedere "Materiali di consumo" a p. 36.Carta
Oltre alla carta comune sono disponibili altri supporti, come la carta riciclata, la carta colorata, i lucidi/la pellicola trasparente (consigliata per questa macchina), le pergamene e le etichette. Per ottenere stampe di qualità, utilizzare carta del tipo consigliato da Canon.Toner
Quando viene visualizzato il messaggio che chiede di sostituire la cartuccia di toner, sostituire la cartuccia con una cartuccia nuova. Per informazioni su come sostituire la cartuccia toner, consultare la Guida per l'utente. Per ottenere sempre la qualità di stampa ottimale, si consiglia di usare solo il toner Canon originale.  "Manutenzione" > "Sostituzione della cartuccia del toner" nella Guida per l'utenteToner Canon originale supportato
Canon imagePRESS Toner T07 Black (Nero) Canon imagePRESS Toner T07 Cyan (Ciano) Canon imagePRESS Toner T07 Magenta (Magenta) Canon imagePRESS Toner T07 Yellow (Giallo)   Cartuccia toner nero Cartuccia toner ciano, magenta o giallo Attenzione ai toner contraffatti
Richiamiamo l'attenzione sulla presenza in commercio di toner Canon contraffatte. L'uso di toner contraffatte può causare un peggioramento della qualità di stampa o ridurre le prestazioni della macchina. Canon non è responsabile di difetti di funzionamento, incidenti o danni causati dall'uso di toner contraffatte. Per maggiori informazioni al riguardo, vedere global.canon/ctc.Cartuccia dei punti per l'unità di pinzatura
Il dispositivo Staple-N1/Staple Cartridge-X1 può essere collegato al Staple Finisher-W PRO/Booklet Finisher-W PRO/Staple Finisher-AC/ Booklet Finisher-AC per la pinzatura. Per informazioni sulla sostituzione della cartuccia dei punti, consultare la Guida per l'utente.  "Manutenzione" > "Caricamento dei punti (Opzionale)" > "Sostituzione della confezione di punti nel fascicolatore (Staple Finisher-W PRO/Booklet Finisher-W PRO)", "Sostituzione della confezione di punti nel fascicolatore (Staple Finisher-AC/Booklet Finisher-AC)" nella Guida per l'utente. natural_image
Technical line drawing of a mechanical component with no visible text or symbolsnatural_image
Technical line drawing of a mechanical housing or enclosure component (no text or symbols)Cartuccia dei punti per l'unità di pinzatura a sella
Il dispositivo Staple-P1/Staple Cartridge-Y1 può essere collegato al Booklet Finisher-W PRO/Booklet Finisher-AC per la pinzatura a sella. Per informazioni sulla sostituzione della cartuccia dei punti, consultare la Guida per l'utente.  "Manutenzione" > "Caricamento dei punti (Opzionale)" > "Sostituzione della confezione di punti nell'unità di pinzatura centrale (Booklet Finisher-W PRO)", "Sostituzione della confezione di punti nell'unità di pinzatura centrale (Booklet Finisher-AC)" nella Guida per l'utente. natural_image
Line drawing of a mechanical housing or enclosure component (no text or symbols)natural_image
Technical line drawing of a mechanical component with no visible text or symbolsConsumabili originali
Canon sviluppa costantemente innovazioni tecnologiche per i toner, tamburi e cartucce che produce, appositamente studiati per essere utilizzati nelle macchine multifunzione Canon. Assicuratevi i vantaggi di prestazioni, volume e qualità di stampa ottimali, resi possibili dalle nuove e avanzate tecnologie Canon. Si raccomanda di utilizzare consumabili originali per le macchine multifunzione Canon.  CANON GENUINE TONER, CARTRIDGE & PARTSRisoluzione dei problemi
Questa sezione descrive come risolvere i problemi di inceppamento frequenti o dei messaggi di errore visualizzati. Per ulteriori informazioni sulle procedure e sulle precauzioni, vedere la Guida per l'utente.  "Soluzione dei problemi" nella Guida per l'utenteRimozione di inceppamenti carta e punti
Se si verifica un inceppamento di carta o punti, seguire le istruzioni visualizzate sul pannello digitale per rimuoverlo. Se si premetext_image
RenameName / Topi Importo 00:00 PM Chad RenameName hadd / Topi Sel vssicio i nflusio i Topi Importo Recompartmenta carta.Schermata Inceppamento carta
Vengono visualizzate la posizione di un inceppamento della carta e le procedure per eliminare l'inceppamento. text_image
Remusione i punti di procunta imposto 07:00! Clust Remusione i punti inseriti nell'area di piocatura. Incoppamento punti di piocatura.Schermata Inceppamento punti
Viene visualizzato il luogo dell'inceppamento punti e le procedure per la rimozione dell'inceppamento.Riduzione della frequenza degli inceppamenti
Se si verificano degli inceppamenti di frequente, i motivi seguenti potrebbero esserne la causa.Sono rimasti dei pezzi di carta strappati nella macchina.
Se si tira con forza la carta inceppata, dei pezzi di carta strappati potrebbero rimanere all'interno della macchina. Estrarre tutti i pezzi strappati.È stata caricata della carta non corrispondente all'impostazione.
\- Accertarsi che la carta caricata nel cassetto carta corrisponda al formato e al tipo di carta registrato in■ Quando viene visualizzato un messaggio di errore
Se si presenta un problema di funzionamento e la macchina non è in grado di funzionare in modo corretto, viene visualizzata la schermata illustrata a destra. Se la macchina non funziona normalmente dopo aver spento e riacceso l'interruttore principale, rivolgersi al rivenditore autorizzato Canon locale.  "Come contattare il rivenditore autorizzato Canon locale" a pag. 32 text_image
Sperriere e facciendere utilizzando l'interruttore sul sito destro dell'unità principale. • Se la perfettiva non funzioni ancora correttamente, mettore in contato con il responsabile dell'assistenza e comunicati il codice di attivi indicato. Codice erone: E001674-0000Se viene visualizzato un tasto per il modo Funzioni limitate:
Se viene visualizzatotext_image
Sperriere e facciendere utilizzando l'interruttore sul lato destro dell'unità principale. • Se la perfettica non funzione ancora correttamente, afferies in contatto con il responsabile dell'assistenza e comunicare il codice di error indicato. Codice error: E001540-8001 Il varzo di consegno del finifernote si sposto verso falto o verso il basso. Controllare se sono previsti parti estrower nel percorso del vasso. Prem. [Modo funzioni limitate] per continuare con l'operazione utilizzando le funzioni limitate se la perfettica non funzione correttamente anche dopo spegimento e facciendere (con interruzione sul lato destro dell'unità principale). Modo funzioni limitateNella parte inferiore della schermata viene visualizzato un messaggio:
Se viene visualizzato un messaggio di errore nella parte inferiore dello schermo, le funzioni di stampa e scansione sono limitate ma alcune funzioni potrebbero essere comunque disponibili.  "Soluzione dei problemi" > "Viene visualizzato un messaggio o un numero preceduto da "#" (un codice di errore)" > "Viene visualizzato un messaggio che dice di contattare un rivenditore autorizzato locale Canon" nella Guida per l'utente text_image
Home Copia Fax Scamione e Info Scamione e memorizzatore Accordo a file: memorizzato Mailbox Ian? Fax Doczone contribuite la disponente (€)izzare responsabile in this!Come contattare il rivenditore autorizzato Canon locale
Se la macchina non funziona normalmente dopo aver spento e riacceso l'interruttore principale, rivolgersi al rivenditore autorizzato Canon locale come indicato dalla procedura seguente.1 Prendere nota del codice di errore.
\- Annotare il codice di errore "EXXXXXX-XXXX". text_image
Soggetti e ricondero utilizzando l'interruttore sul sito destro dell'unità principole). • Se la periferenza non funziera ancora convolvamente, aedenti in contratto con il responsabile dell'assistenza e comunicazione il codice di errore indicato. Codice entori: E000674-00002 Spegnere la macchina con l'interruttore principale.
\- Accendere la macchina con l'interruttore principale sulla posizione "☐". text_image
Diagram showing a printer with a close-up of its open door mechanism, indicating press operation or status change.3 Estrarre la spina dalla presa di corrente.
4 Verificare il nome del prodotto e contattare il rivenditore autorizzato Canon locale.Se la memoria è esaurita
Se la memoria si riempie durante la scansione, vengono visualizzati i messaggi seguenti sul pannello digitale. Attenersi alle procedure a schermo ed eliminare i file non necessari memorizzati nella Mailbox e nella Mailbox fax/I-fax per rendere disponibile maggiore memoria.La scansione verrà annullata poiché la memoria è esaurita. Stampare (inviare, salvare)\* le pagine acquisite?
\* Una parte del messaggio varia a seconda della funzione utilizzata.La scansione sarà annullata perché la memoria è esaurita. Attendere alcuni istanti e riprovare.
L'operazione non è stata possibile perché la memoria è esaurita.
Se la macchina non si accende con l'interruttore principale
Se la macchina non funziona quando viene acceso l'interruttore principale, controllare l'interruttore di sicurezza. Se questo interruttore è in posizione OFF, non cercare di riaccenderlo di persona ma contattare il rivenditore autorizzato Canon locale. text_image
OFF (○)Appendice
Importanti istruzioni per la sicurezza
Questo capitolo descrive importanti istruzioni di sicurezza per la prevenzione di lesioni agli utenti di questa macchina e ad altri e di danni alle cose. Leggere questo capitolo prima di utilizzare la macchina e seguire le istruzioni per l'uso corretto della macchina. Non effettuare altre operazioni non descritte nel presente manuale. Canon non si assume alcuna responsabilità per eventuali danni derivanti da operazioni non descritte nel presente manuale, uso improprio o riparazioni o modifiche non eseguite da Canon o da terzi autorizzati da Canon. Un funzionamento o un uso scorretto di questa macchina potrebbero provocare lesioni personali e/o danni che richiedono riparazioni complesse che potrebbero non essere coperte dalla garanzia limitata.AVVERTIMENTO
Indica un avvertimento che riguarda operazioni che, se non eseguite correttamente, sono potenzialmente pericolose o addirittura letali per le persone. Per utilizzare la macchina in sicurezza, prestare sempre attenzione a questi avvertimenti.ATTENZIONE
Indica un avviso che riguarda operazioni che, se non eseguite correttamente, sono potenzialmente pericolose per le persone. Per utilizzare la macchina in sicurezza, prestare sempre attenzione a questi avvisi.IMPORTANTE
Indica requisiti e limitazioni operative. Leggere queste indicazioni con attenzione per utilizzare correttamente la macchina ed evitare danni alla macchina o alle cose.Installazione
Per utilizzare la macchina in modo sicuro e comodo, leggere attentamente le precauzioni seguenti e installare la macchina in una posizione appropriata.AVVERTIMENTO
Non installare in luoghi in cui potrebbe verificarsi un incendio o una scossa elettrica
- In una posizione dove le prese d'aria siano ostruite (troppo vicino a una parete, su un letto, divano, tappeti o oggetti simili) • In un luogo umido o polveroso - In un luogo esposto direttamente alla luce del sole o all'esterno • In un luogo soggetto a temperature elevate • In un luogo esposto a fiamme aperte - Nelle vicinanze di alcol, solventi per vernici o altre sostanze infiammabiliAltre avvertenze
\- Non collegare cavi non approvati a questa macchina. Farlo potrebbe provocare un incendio o scosse elettriche. - Non collocare collane e altri oggetti di metallo o contenitori riempiti di liquidi sulla macchina. Se sostanze estranee vengono a contatto con le parti elettriche all'interno della macchina, ciò potrebbe causare un incendio o scosse elettriche. - In caso di ingresso di sostanze estranee nella macchina, scollegare la spina di alimentazione dalla presa di corrente e rivolgersi al rivenditore Canon autorizzato di zona.ATTENZIONE
Non installare nei luoghi seguenti
La macchina può cadere, ferire le persone e causare danni. - Una posizione instabile - Un luogo esposto a vibrazioniAltri avvisi
- Non collegare prodotti opzionali non autorizzati alla presa per il collegamento di prodotti opzionali, perché ciò potrebbe provocare un incendio o fumo. - Quando si scollega il cavo di alimentazione, attendere almeno 5 secondi prima di collegare nuovamente il cavo di alimentazione. - Un eccessivo abbassamento di tensione potrebbe causare malfunzionamenti o perdite di dati nella macchina e nei computer.Piedini di livellamento (solo per prodotti con piedini di livellamento)
Non rimuovere i piedini di livellamento della macchina dopo l'installazione della macchina, in quanto ciò potrebbe causare la caduta o il ribaltamento della macchina, provocando lesioni personali.IMPORTANTE
Non installare nei luoghi seguenti
che possono danneggiare la macchina. - Luoghi soggetti a valori estremi, sia alti che bassi, di temperatura e umidità - Luoghi soggetti a cambiamenti repentini e significativi di temperatura e umidità - Luoghi situati in prossimità di apparecchiature che generano onde magnetiche o elettromagnetiche - Laboratori o strutture in cui si verificano reazioni chimiche • Luoghi esposti a gas tossici o corrosivi - Luoghi che possono deformarsi con il peso della macchina o in cui la macchina può affondare (tappeti, cuscini e così via)Evitare i luoghi scarsamente ventilati
Questa macchina genera una piccola quantità di ozono e altre emissioni durante il normale utilizzo. Queste emissioni non sono nocive per la salute. Tuttavia, potrebbero essere avvertibili durante l'uso prolungato o cicli di produzione lunghi in ambienti poco ventilati. Per mantenere un ambiente lavorativo confortevole, è consigliabile che il locale in cui la macchina funziona sia adeguatamente ventilato. Evitare anche posizioni in cui le persone sarebbero esposte a emissioni dalla macchina.Non installare nei luoghi in cui possa verificarsi della condensa
Goccioline d'acqua (condensa) potrebbero formarsi all'interno della macchina quando l'ambiente in cui è installata la macchina viene riscaldato rapidamente e quando si sposta la macchina da un luogo fresco o secco a un luogo caldo o umido. Utilizzare la macchina in queste condizioni potrebbe provocare inceppamento della carta, qualità di stampa scadente o danni alla macchina. Lasclare che la macchina si adegui alla temperatura e all'umidità dell'ambiente per almeno 2 ore prima dell'uso.Evitare di installare la macchina in prossimità di computer o altre apparecchiature elettroniche di precisione.
Interferenze elettriche e vibrazioni generate dalla macchina durante la stampa possono compromettere il corretto funzionamento di tali apparecchi.Evitare di installare la macchina in prossimità di televisori, radio o apparecchiature elettroniche simili.
La macchina potrebbe interferire con la ricezione del segnale del suono e dell'immagine. Inserire la spina di alimentazione in una presa di corrente apposita e mantenere quanto più spazio possibile tra la macchina e altre apparecchiature elettroniche.Ad altitudini di 3.000 m o più sul livello del mare
Le macchine con un hard disk potranno non funzionare correttamente quando vengono usate ad altitudini elevate, quali 3.000 metri sul livello del mare o superiori.Connessione della linea telefonica (solo per prodotti con funzione fax)
La macchina è conforme agli standard di linea telefonica analogica e può essere collegata solo a una rete telefonica pubblica di tipo PSTN. Collegando la macchina a una linea telefonica digitale o a una linea dedicata può impedirne il corretto funzionamento e persino danneggiarla. Verifi care il tipo di linea telefonica prima di collegare la macchina. Prima di collegare la macchina a una linea in fi bra ottica o a una linea telefonica IP, contattare il service provider.Quando si utilizza la LAN wireless (solo per prodotti con funzione LAN wireless)
- Installare la macchina ad almeno 50 m dal router LAN wireless. - Laddove possibile, installare la macchina in luoghi in cui eventuali oggetti non possano interferire con la comunicazione. Pareti o pavimenti possono determinare il deterioramento del segnale. - Tenere la macchina il più lontano possibile da telefoni cordless, forni a microonde o altre apparecchiature che emettono onde radio. - Non utilizzare in prossimità di apparecchiature medicali. Le onde radio emesse da questa macchina potrebbero interferire con le apparecchiature medicali e provocarne il malfunzionamento e provocare potenziali conseguenze. Se il rumore di funzionamento è fastidioso In base all'ambiente d'uso e alla modalità operativa, se il rumore di funzionamento è un problema si consiglia di installare la macchina in un luogo diverso dall'ufficio.Spostamento della macchina
Se si desidera spostare la macchina, anche in una posizione sullo stesso piano dell'edificio, contattare in anticipo il rivenditore di zona autorizzato Canon. Non tentare di spostare la macchina da soli.Alimentazione
AVVERTIMENTO
\- Utilizzare solo una fonte di alimentazione che soddisfi i requisiti specificati di tensione. In caso contrario, si potrebbe causare un incendio o scosse elettriche. \- La macchina dev'essere collegata a una presa dotata di messa a terra utilizzando il cavo di alimentazione fornito a corredo. \- Non utilizzare cavi di alimentazione diversi da quello fornito a corredo, in quanto potrebbe verificarsi un incendio o una scossa elettrica. \- Il cavo di alimentazione in dotazione è progettato per essere utilizzato con questa macchina. Non collegare il cavo di alimentazione ad altri dispositivi. \- Non modificare, tirare, piegare forzatamente, o eseguire altre azioni che potrebbero danneggiare il cavo di alimentazione. Non posizionare oggetti pesanti sul cavo di alimentazione. Danni al cavo di alimentazione potrebbero provocare incendi o scosse elettriche. \- Non inserire o staccare la spina con le mani bagnate, in quanto potrebbero verificarsi scosse elettriche. \- Non utilizzare cavi di prolunga o prese multiple con la macchina. Farlo potrebbe provocare un incendio o scosse elettriche. \- Non avvolgere il cavo di alimentazione né annodarlo, in quanto potrebbero verificarsi incendi o scosse elettriche. \- Inserire completamente la spina di alimentazione nella presa di alimentazione CA. In caso contrario, si potrebbe causare un incendio o scosse elettriche. \- Rimuovere completamente la spina di alimentazione dalla presa di alimentazione CA durante un temporale. In caso contrario, si potrebbe causare un incendio, scosse elettriche o danni alla macchina. \- Assicurarsi che l'alimentazione della macchina sia sicura e che la tensione sia stabile. \- Tenere il cavo di alimentazione lontano dalle fonti di calore; in caso contrario il rivestimento del cavo di alimentazione potrebbe fondere e causare incendi e scosse elettriche.Evitare le seguenti situazioni:
Se viene applicata una forza eccessiva al punto di collegamento del cavo di alimentazione, questo potrebbe danneggiare il cavo o i fili conduttori all'interno della macchina potrebbero scollegarsi. Ciò potrebbe provocare un incendio. \- Collegare e scollegare il cavo di alimentazione con troppa frequenza. \- Inciampare sul cavo di alimentazione. \- Il cavo di alimentazione è piegato nel punto di collegamento ed è applicata una forza continua alla presa di corrente o al punto di collegamento. \- Applicare una forza eccessiva alla spina.ATTENZIONE
Installare la macchina vicino a una presa di corrente e lasciare uno spazio sufficiente attorno alla spina in modo da poterla scollegare facilmente in caso di emergenza.IMPORTANTE
Quando si collega l'alimentazione
- Non collegare il cavo di alimentazione a un gruppo di continuità (UPS). In caso contrario, si potrebbero provocare anomalie di funzionamento o danni alla macchina in caso di interruzione dell'alimentazione. - Se si collega la macchina a una presa di corrente CA multipla, non utilizzare le prese rimanenti per collegare altri dispositivi. - Non collegare il cavo di alimentazione al connettore di alimentazione CA ausiliario di un computer.Altre precauzioni
Il rumore elettrio può causare il malfunzionamento della macchina o la perdita di dati.Gestione
AVVERTIMENTO
- Scollegare immediatamente la spina dalla presa di corrente CA e contattare un rivenditore autorizzato Canon se la macchina produce un rumore insolito, emette un odore inusuale o se emette fumo o calore eccessivo. Continuare a usarla potrebbe provocare un incendio o scosse elettriche. - Non smontare o modificare questa macchina. Sono presenti componenti ad alta tensione e ad alta temperatura all'interno della macchina. Lo smontaggio o la modifica potrebbero causare incendi o scosse elettriche. - Posizionare la macchina in luoghi in cui i bambini non verranno a contatto con il cavo di alimentazione e con altri cavi o ingranaggi e parti elettriche all'interno della macchina. In caso contrario si potrebbero causare incidenti imprevisti. • Non usare spray inflammabili nei pressi della macchina. Se sostanze inflammabili vengono a contatto con le parti elettriche all'interno di questa macchina, ciò potrebbe causare un incendio o scosse elettriche. - Quando si sposta la macchina, assicurarsi di averla spenta, quindi scollegare il cavo di alimentazione e i cavi di interfaccia. In caso contrario il cavo di alimentazione o i cavi di interfaccia potrebbero danneggiarsi e causare incendi o scosse elettriche. - Quando si collega/scollega un cavo USB mentre il cavo di alimentazione è collegato a una presa elettrica CA, non toccare la parte metallica del connettore poiché c'è il rischio di una scossa elettrica.Se si usa un pacemaker cardiaco
Questa macchina genera un flusso magnetico e onde a ultrasuoni di basso livello. Se si utilizza un pacemaker cardiaco e si avvertono delle anomalie, allontanarsi dalla macchina e consultare immediatamente un medico.ATTENZIONE
• Non appoggiare oggetti pesanti sulla macchina perché potrebbero cadere, causando infortuni. - Per sicurezza, scollegare la spina di alimentazione se la macchina non verrà utilizzata per un periodo di tempo prolungato. - Fare attenzione quando si aprono/chiudono i pannelli per evitare infortuni alle mani. - Tenere le mani e gli indumenti lontani dai rulli nell'area di uscita. Se i rulli si impigliano con le mani o gli indumenti, ciò potrebbe causare lesioni personali. • L'interno della macchina e la fessura di uscita sono molto caldi durante o immediatamente dopo l'uso. Evitare il contatto con queste aree per evitare ustioni. Inoltre, la carta stampata potrebbe essere molto calda immediatamente dopo l'uscita, pertanto prestare attenzione quando la si maneggia. In caso contrario, si potrebbero causare ustioni.Alimentatore
• Non esercitare una pressione eccessiva sull'alimentatore quando si utilizza il vetro di lettura per fare copie di libri spessi. In caso contrario, si potrebbe danneggiare il vetro di lettura e provocare lesioni personali. - Chiudere l'alimentatore delicatamente per evitare di farsi male alle mani. - Fare attenzione a non mettere le mani o le dita all'interno dell'alimentatore. In caso contrario, si potrebbero subire lesioni. natural_image
Illustration of a hand placing two cards into a box with a 'no' symbol (no text or labels)Finitrice
\- Non mettere le mani nella parte del vassoio in cui viene eseguita la pinzatura (vicino al rulli), in particolare prestare attenzione ai punti metallici appuntiti, in quanto potrebbero causare lesioni personali.Cassetto della carta
\- Non mettere la mano all'interno della macchina mentre il cassetto della carta è rimosso, perché ciò potrebbe causare lesioni personali.Tasto Risparmio energetico
\- Premere (Risparmio energetico) per garantire la sicurezza quando la macchina non verrà utilizzata per un lungo periodo di tempo, per esempio per tutta la notte. Inoltre, spegnere l'interruttore di alimentazione principale e scollegare il cavo di alimentazione per sicurezza quando la macchina non verrà utilizzata per un lungo periodo di tempo, per esempio durante festività di più giorni.Sicurezza laser
Questo prodotto è certificato come apparecchio laser di Classe 1 secondo le direttive IEC60825-1:2014 e EN60825-1:2014. CLASS 1 LASER PRODUCT LASER KLASSE 1 APPAREIL À LASER DE CLASSE 1 APPARECCHIO LASER DI CLASSE 1 PRODUCTO LÁSER DE CLASE 1 APARELHO A LASER DE CLASSE 1 LUOKAN 1 LASER-TUOTE LASERPRODUKT KLASS 1 Il fascio laser può essere dannoso per il corpo umano. Poiché la radiazione emessa all'interno del prodotto è completamente confinata in un alloggiamento protettivo e coperchi esterni, il fascio laser non può uscire dalla macchina in nessun momento durante l'uso da parte dell'utente. Leggere le seguenti osservazioni e istruzioni per la sicurezza. - Mai aprire i coperchi oltre a quelli indicati nei manuali per la macchina. - Se il fascio laser dovesse uscire e entrare negli occhi, l'esposizione potrebbe causare danni agli occhi. - L'utilizzo di controlli, regolazioni o l'esecuzione di procedure diverse da quelle specificate in questo manuale può provocare l'esposizione a radiazioni pericolose. Avviso sicurezza laser text_image
DANGER - CAUTION - ATTENTION - VORSICHT - PRECAUCIÓN - WARNING - VAROTUS - 注意: 注意: 注意: 注意: 注意: 注意: 注意: 注意: 注意: 注意: 注意: 注意: 注意: 注意: 注意: 注意: 注意: 注意: 注意: 注意: 注意: 注意: 注意: 注意: 注意: 注意: 注意: 注意: 注意: 注意: 注意: 注意: 注意: 注意: 注意: 注意: 注意: 注意: 注意: 注意: 注意: 注意: 注意: 注意: 注意: 注意: 注意: 注意: 注意: 注意: 注意:text_image
注意: 本图中可见的打印机是通过以下方式来使用计算机和打印机。 请勿使用此计算机或打印机。您可随时使用计算机或打印机,否则可以使用该计算机或打印机。 注意: 本图中可见的打印机是通过以下方式来使用计算机和打印机。 请勿使用此计算机或打印机。您可随时使用计算机或打印机,否则可以使用该计算机或打印机。 注意: 本图中可见的打印机是通过以下方式来使用计算机和打印机。 请勿使用此计算机或打印机。您可随时使用计算机或打印机,否则可以使用该计算机或打印机。Unità di fissaggio
Quando si rimuove la carta inceppata o si controlla l'interno della macchina, evitare il contatto con il calore emesso dall'unità di fissaggio e dall'area circostante per un periodo di tempo prolungato. In caso contrario, si potrebbero provocare ustioni a bassa temperatura, anche senza toccare l'unità di fissaggio e l'area circostante direttamente. text_image
CAUTION Caution: 100% Sensitivity to 100% Appearance: Normal Part ATTENTION ATTENTION TO THE VIRUSIGHT ATTENTION TO THE VIRUSIGHT VIRUSIGHT TO THE VIRUSIGHT ATTENTION TO THE VIRUSIGHT ATTENTION TO THE VIRUSIGHT OUTSIDE OUTSIDE TO THE OUTSIDE TO THE OUTSIDE TO THE OUTSIDE TO THE 注意: 小孔或内孔相对应有警告,但注意 小孔或内孔应有警告,但注意 小孔或内孔应有警告,但注意 注意: 注意: 注意: 注意: 注意: 注意: 注意: 注意: 注意: 注意: 注意: 注意: 注意: 注意: 注意: 注意: 注意: 注意: 注意: 注意: 注意: 注意: 注意: 注意: 注意: 注意: 注意: 注意: 注意: 注意: 注意: 注意: 注意: 注意: 注意: 注意: 注意: 注意: 注意: 注意: 注意: 注意: 注意: 注意: 注意: 注意: 注意: 注意: 注意: 注意: 注意:IMPORTANTE
- Seguire le istruzioni di avviso sulle etichette e simili posizionate sulla macchina. - Non sottoporre la macchina a urti o vibrazioni di elevata entità. • Non aprire o chiudere in modo forzato sportelli, coperchi e altre parti. che possono danneggiare la macchina. - Non spegnere l'interruttore di alimentazione principale né aprire i coperchi quando la macchina è in funzione. La carta potrebbe incepparsi. - Utilizzare un cavo modulare di massimo 3 metri. - Utilizzare un cavo USB di massimo 3 metri.Simboli correlati alla sicurezza
Interruttore di alimentazione: posizione "ACCESO" Interruttore di alimentazione: posizione "SPENTO" Interruttore di alimentazione: posizione "STAND-BY" ① Interruttore a pulsante "ACCESO" "SPEATO" Terminal di messa a terra di protezione Tensione elettrica pericolosa all'interno. Non aprire coperchi diversi da quelli indicati. ATTENZIONE: superficie molto calda. Non toccare. Apparecchiatura di Classe II Parti in movimento: tenere il corpo lontano dalle parti in movimento ATTENZIONE: Si può verificare una scossa elettrica. Rimuovere tutte le spine di alimentazione dalla presa di corrente. Sono presenti bordi taglienti. Tenere il corpo lontano dai bordi taglienti.[NOTA]
Alcuni dei simboli mostrati sopra possono non essere presenti in base al prodotto.Manutenzione e ispezioni
Pulire periodicamente questa macchina. Se si accumula della polvere, la macchina potrebbe non funzionare correttamente. Durante la pulizia, assicurarsi di attenersi a quanto segue. Se si verifica un problema durante il funzionamento, vedere "Soluzione dei problemi" nella Guida per l'utente.AVVERTIMENTO
\- Prima di pulirla, spegnere la macchina e scollegare la spina di alimentazione dalla presa di alimentazione CA. In caso contrario, si potrebbe causare un incendio o scosse elettriche. - Scollegare la spina di alimentazione periodicamente e pulire con un panno asciutto per rimuovere polvere e sporcizia. La polvere accumulata potrebbe assorbire l'umidità dell'aria e provocare un incendio se entra in contatto con l'elettricità. - Utilizzare un panno umido e ben strizzato per pulire la macchina. Inumidire il panno di pulizia solo con acqua. Non utilizzare alcol, benzina, solvente per vernici o altre sostanze infiammabili. Non utilizzare carta velina o tovagliolini di carta. Se queste sostanze vengono a contatto con le parti elettriche all'interno della macchina potrebbero generare elettricità statica o causare un incendio o scosse elettriche. - Controllare la spina e il cavo di alimentazione periodicamente in caso di danni. Controllare la macchina per ruggine, ammaccature, graffi, incrinature o eccessiva generazione di calore. L'uso di apparecchiature con manutenzione insufficiente potrebbe provocare un incendio o scosse elettriche.ATTENZIONE
- L'interno della macchina contiene componenti ad alta temperatura e alta tensione. Il contatto con tali componenti potrebbe causare ustioni. Non toccare parti della macchina che non sono indicate nel manuale. - Quando si carica carta o si rimuove carta inceppata, fare attensione a non tagliarsi le mani con i bordi dei fogli.Materiali di consumo
AVVERTIMENTO
- Non gettare le cartucce di toner o i contenitori di toner di scarto nel fuoco, né conservare questi articoli o la carta per stampa/copia in un luogo esposto a fliamme libere. Ciò potrebbe causare la loro accensione, provocando ustioni o incendi. - In caso di spargimento accidentale del toner, raccogliere con attenzione le particelle di toner o ripulirle con un panno morbido e umido in modo da impedire che vengano inalate. Non utilizzare mai un aspiratore che non è dotato di protezioni contro esplosioni di polvere per pulire il toner versato. In caso contrario si potrebbe causare un malfunzionamento dell'aspiratore o si potrebbe provocare un esplosione di polvere a causa di scariche di elettricità statica.ATTENZIONE
- Tenere il toner e gli altri materiali di consumo lontano dalla portata dei bambini piccoli. Se questi articoli sono ingeriti, consultare immediatamente un medico. - Se il toner viene a contatto con i vestiti o la pelle, lavarlo via immediatamente con acqua. Non usare acqua calda, in quanto ciò potrebbe causare il fissaggio del toner, provocando una macchia permanente. - Non smontare la cartuccia del toner, perché così facendo si potrebbe far si che il toner si proietti verso l'esterno ed entri negli occhi o nella bocca. Se il toner viene a contatto con gli occhi o la bocca, lavarli immediatamente con acqua fredda e consultare immediatamente un medico. - Se il toner fuoriesce dalla cartuccia del toner, assicurarsi di non ingerire il toner e di non consentire che venga direttamente a contatto con la pelle. Se il toner entra a contatto con la pelle, risciacquarla con acqua e sapone. Se la pelle è ancora irritata dopo il risciacquo o se si ingerisce il toner, consultare immediatamente un medico. - Quando si estrae il contenitore del toner di scarto, fare attenzione a non farlo cadere. Ciò potrebbe causare lesioni.IMPORTANTE
\- Conservare le cartucce di toner in un luogo fresco, lontano dalla luce diretta del sole.Apparecchi telefonici
AVVERTIMENTO
Quando si utilizzano apparecchi telefonici, rispettare sempre le seguenti precauzioni di sicurezza per ridurre il rischio di incendi, scosse elettriche e infortuni personali: 1. Non utilizzare il prodotto in prossimità dell'acqua, per esempio vicino a una vasca, una bacinella, un lavabo, un lavatoio, in un seminterrato umido o vicino a una piscina. 2. Evitare l'uso del telefono durante una tempesta elettrica. Vi è un remoto rischio di scosse elettriche dovute ai fulmini. 3. Non utilizzare il telefono per segnalare una fuga di gas in prossimità della fuga.Avviso
Nome del prodotto
Le normative di sicurezza impongono la registrazione del nome del prodotto. In alcune regioni, potrebbero essere registrati i seguenti nomi alternativi, indicati fra parentesi (). imagePRESS C170 (F168600) imagePRESS C165 (F168603)Requisiti di compatibilità elettromagnetica (EMC) della Direttiva CE
Questa apparecchiatura è conforme ai requisiti essenziali EMC della Direttiva CE. Dichiariamo che questo prodotto è conforme ai requisiti EMC della direttiva CE con ingresso nominale della rete elettrica di 230 V, 50 Hz, sebbene la potenza nominale del prodotto sia di 220-240 V, 50/60 Hz. L'utilizzo di un cavo schermato è necessario per la conformità ai requisiti tecnici EMC della Direttiva CE.Direttive su WEEE e batterie
Le informazioni sulle direttive su WEEE e batterie sono consultabili nella Guida per l'utente più recente (manuale in formato HTML) sul sito web di Canon (https://oip.manual.canon/).Informazioni sulle normative in materia di reti LAN wireless
Regulatory information for users in Jordan imagePRESS C170/C165 includes approved Wireless LAN Module (Model name: FM1M944). Contains Wireless LAN Module approved by TRC/LPD/2015/S Regulatory information for users in UAE imagePRESS C170/C165 includes approved Wireless LAN Module (Model name: FM1M944).TRA
REGISTERED No: ER38576/15
DEALER No: DA39360/15
Regulatory information for users in Argentina Incluye módulo Wireless LAN Module Marca Canon Inc., Modelo FM1M944, CNC C-20793 COMISIÓN NACIONAL DE COMUNICACIONES
Regulatory information for users in Uruguay imagePRESS C170/C165 contains URSEC approved Wireless LAN Module (Model name: FM1M944 or FM1M948). Regulatory information for users in Singapore Complies with IMDA Standards DB00671 Regulatory information for users in Vietnam imagePRESS C170/C165 includes approved Wireless LAN Module (Model name: FM1M944). RE Directive
(Only for European radio equipment)RE Declaration of Conformity
Italian (IT) Con la presente, Canon Inc. dichiarà che questa apparecchiatura è conforme alla direttiva 2014/53/UE. Il testo completo della dichiarazione di conformità UE è disponibile al seguente indirizzo Internet: http://www.canon-europe.com/ce-documentation Caratteristiche LAN wireless Banda/e di frequenza: 2412-2472 MHz Potenza massima a radiofrequenza: 18.21 dBmNormative sui rifiuti elettronici (Solo per l'India)
 Questo prodotto non può essere smaltito con i rifiuti domestici, ai sensi delle "E-waste (Management Rules" del 2016. Il prodotto deve essere conferito a un punto di raccolta designato, ad esempio a un centro di raccolta autorizzato per il riciclaggio di rifiuti di apparecchiature elettriche ed elettroniche (EEE). Un trattamento improprio di questo tipo di rifiuti può avere conseguenze negative sull'ambiente e sulla salute umana a causa delle sostanze potenzialmente nocive solitamente contenute in tali rifiuti. Specularmente, la collaborazione dell'utente per il corretto smaltimento di questo prodotto contribuirà a un utilizzo efficace delle risorse naturali. Per ulteriori informazioni sulla raccolta e sul riciclo di tali prodotti, visitare il sito http://www.canon.co.in/environment or write to us at customer.delight@canon.co.in. Inoltre, questo prodotto è conforme alle "E-waste (Management Rules" del 2016, che proibisce l'uso di piombo, mercurio, cromo esavalente, bifenili polibromurati o polibromodifenileteri in concentrazioni superiori allo 0,1% in termini di peso, nonché il cadmio in concentrazioni superiori allo 0,01% in termini di peso; sono fatte salve le eccezioni definite nell'Allegato II del documento.Limitazioni legali per l'uso del prodotto e per l'uso delle immagini
Utilizzare il prodotto per eseguire la scansione, la stampa o riprodurre in altro modo determinati documenti e l'uso di tall immagini digitalizzate, stampate o altrimenti riprodotte mediante il prodotto potrebbero essere vietati dalla legge e causare responsabilità penale e/o civile. Un elenco non completo di questi documenti viene presentato di seguito. Questo elenco è inteso solo come guida. Se non si è certi rispetto alla legalità dell'uso del prodotto per eseguire la scansione, stampare o riprodurre in altro modo un documento particolare, e/o riguardo all'uso delle immagini digitalizzate, stampate o riprodotte in altro modo, è necessario consultare in anticipo il proprio consulente legale per ricevere assistenza. - Banconote - Travel-check • Vaglia postali - Buoni pasto • Certificati di deposito • Passaporti • Francobolli (annullati o non annullati) - Permessi di soggiorno - Badge di identificazione o onoreficenze - Valori bollati interni (annullati o non annullati) • Coscrizioni o cartoline di precetto - Obbligazioni o altri certificati di debito - Assegni o cambiali emessi da pubblica amministrazione • Certificazioni di azioni • Patenti e certificazioni di titolo - Opere protette da copyright/opere d'arte senza il permesso del proprietario del copyrightEsonero di responsabilità
- Le informazioni contenute in questo documento sono soggette a modifiche senza preavviso. • CANON INC. NON FORNISCE GARANZIE DI ALCUN TIPO, ESPLICITE O IMPLICITE, IN MERITO AL PRESENTE DOCUMENTO, A ECCEZIONE DI QUANTO ESPRESSAMENTE INDICATO NEL DOCUMENTO STESSO, INCLUSE, SENZA LIMITAZIONI, GARANZIE DI COMMERCIABILITÀ, IDONEITÀ PER UNO SCOPO PARTICOLARE O NON VIOLAZIONE, CANON INC. NON È RESPONSABILE DI EVENTUALI DANNI DIRETTI, ACCIDENTALI, CONSEQUENZIALI O DI ALTRO GENERE, NÉ DI PERDITE O SPESE CAUSATE DERIVANTI DALL'USO DI QUESTO MATERIALE.Informazioni su questo manuale
Schermate
Le schermate del display del pannello touch in questo manuale sono quelle illustrate quando imagePRESS C165 è dotato della seguente attrezzatura opzionale installata: - Booklet Trimmer-F • Booklet Finisher-W PRO - Puncher Unit-BT • Paper Folding Unit-J - Document Insertion Unit-N - POD Deck Lite-C • Super G3 FAX Board Si noti che le funzioni che non possono essere utilizzate a seconda del modello o delle opzioni non appaiono sul display del pannello touch.Illustrazioni
Le illustrazioni utilizzate in questo manuale sono quelle visualizzate quando imagePRESS C165 è dotato della seguente attrezzatura opzionale installata: • Copy Tray-R natural_image
Line drawing of a generic electronic device with multiple ports and control panels (no text or symbols)Marchi
Mac è un marchio commerciale di Apple Inc. Microsoft, Windows, Windows Vista, Windows Server, Internet Explorer, Excel e PowerPoint sono marchi di fabbrica o marchi registrati di Microsoft Corporation negli Stati Uniti e/o in altri Paesi. Gli altri nomi di prodotto e di azienda indicati nel manuale possono essere marchi di fabbrica dei rispettivi proprietari.Software di terzi
Questo prodotto Canon (il "PRODOTTO") comprende moduli di software di terzi. L'uso e la distribuzione di tali moduli software, incluso qualsiasi aggiornamento di tali moduli software (collettivamente, il "SOFTWARE") sono soggetti alle condizioni di licenza da (1) a (9) fornite di seguito. (1) Si accetta di conformarsi a qualunque legge vigente sul controllo dell'esportazione e a restrizioni o normative dei Paesi interessati nel caso in cui questo PRODOTTO, incluso il SOFTWARE, sia spedito, trasferito o esportato in un altro Paese. (2) I titolari dei diritti del SOFTWARE mantengono a tutti gli effetti il titolo, il possesso e i diritti di proprietà intellettuale correlati al SOFTWARE. Se non diversamente indicato in questo documento, nessuna licenza o diritto, espresso o implicito, viene quindi fornito o assegnato dai titolari dei diritti del SOFTWARE all'utente in merito alla proprietà intellettuale dei titolari di diritti del SOFTWARE. (3) Il SOFTWARE può essere utilizzato esclusivamente con il PRODOTTO. (4) Non è consentito assegnare, concedere in sublicenza, commercializzare, distribuire o trasferire il SOFTWARE a terze parti senza previo consenso scritto dei titolari dei diritti del SOFTWARE. (5) Ciò nonostante, il SOFTWARE può essere trasferito solo nel caso in cui (a) si assegnano tutti i propri diritti sul PRODOTTO e tutti i diritti e gli obblighi previsti dalle condizioni della licenza al cessionario e (b) il cessionario accetta di essere vincolato da tutte queste condizioni. (6) Non è consentito decompilare, decodificare, disassemblare o in altro modo semplificare il codice del SOFTWARE a un formato umanamente leggibile. (7) Non è consentito modificare, adattare, tradurre, affittare, noleggiare o prestare il SOFTWARE o creare lavori derivati sulla base del SOFTWARE. (8) Non è consentito rimuovere o creare copie separate del SOFTWARE dal PRODOTTO. (9) La parte umanamente leggibile (il codice sorgente) del SOFTWARE non è concessa in licenza all'utente. Nonostante quanto indicato a punti da (1) a (9), il PRODOTTO include moduli software di terze parti che seguono le altre condizioni di licenza, pertanto tali moduli software sono soggetti alle altre condizioni di licenza. Verificare la versione di piattaforma del PRODOTTO e fare riferimento alle altre condizioni di licenza dei moduli software terze parti descritti nell'Appendice del manuale per la versione di piattaforma corrispondente. Questo manuale è disponibile su https://oip.manual.canon/. L'utilizzo del PRODOTTO comporta l'accettazione di tutte le condizioni di licenza applicabili. Se non si accettano queste condizioni di licenza, contattare il rappresentante di assistenza. V\_191204 imagePRESS C170/C165Funciones prácticas
Ajuste automático de gradación para varios tipos de papel
La función Ajuste automático de gradación ajusta la gradación, la densidad y el tono de color de las imágenes, y solamente requiere que se lea la página de prueba. Esta función puede utilizarse para varios gramajes de papel a fin de obtener un resultado de impresión de alta calidad en diferentes tipos de papel.  "Mantenimiento" > "Ajustar la calidad de impresión y de acabado" en la Guía de usuario natural_image
Illustration of a paintbrush resting on an artist's palette with five colored circles (no text or symbols)Lograr reproducción de color de alta calidad con la corrección automática de tono de color
En comparación con la función Ajuste automático de gradación, que ajusta CMYK, la función Corrección automática de tono de color ajusta colores mezclados que se expresan con tóner múltiple. Al usar estas funciones juntas, puede realizar un ajuste de color más estable.  "Mantenimiento" > "Ajustar la calidad de impresión y de acabado" en la Guía de usuario natural_image
Six-panel grid showing six identical panels of a row of balloons, each with different shading and line patterns (no text or symbols)Resultado óptimo de impresión para cada tipo de papel
Información del papel, que incluye el gramaje, el acabado y el nivel de corrección de doblado, pueden registrarse como características del papel. Como la información detallada puede especificarse para cada tipo de papel diferente, se puede obtener el resultado de impresión fina teniendo en cuenta las características del papel. Esta función también es eficaz para mejorar el transporte del papel y calidad de impresión. natural_image
Stack of four overlapping sheets of paper or document paper, no text or symbols visibleCorrección de curvatura para transporte estable del papel
El equipo corrige constantemente la curvatura del papel que se produce debido a la presión aplicada al fijar el tóner. Por otra parte, mediante la corrección de la curvatura del papel durante la salida, el equipo reduce el riesgo de atascos de papel y logra el transporte estable del papel. La corrección de curvatura puede especificarse para cada tipo de papel que desee utilizarse. natural_image
Diagram showing a curved stack of papers transforming into a single sheet of paper, with an arrow indicating the process (no text or symbols present)Operación fácil para ajustar la posición de la imagen
Puede utilizar una hoja guía para llevar a cabo rápidamente el ajuste de posición de imagen. Esto resulta conveniente porque no es necesario tomar medidas ni introducir valores. text_image
Hoja de guíaAcceso rápido a opciones frecuentemente utilizadas
Dependiendo de la finalidad de la impresión o los tipos de papel, se requieren diferentes opciones, pero el acceso cada vez a los elementos de ajuste situados en varios menús es una operación bastante complicada. En este caso, registre las opciones frecuentemente utilizadas en el botón "Acceso directo a configuración". Con este botón podrá acceder directamente a la pantalla de configuración y ahorrarse el esfuerzo de buscar los elementos de ajuste necesarios. flowchart
graph TD
    A["Acceso directo Configuración"] --> B["Ajuste auto de gradación"]
    A --> C["Opciones de gestión de tipos de papel"]
    A --> D["Limpiar interior de la unidad principal"]