
NAC 332 - Receiver NAIM - Free user manual and instructions
Find the device manual for free NAC 332 NAIM in PDF.
User questions about NAC 332 NAIM
0 question about this device. Answer the ones you know or ask your own.
Ask a new question about this device
Download the instructions for your Receiver in PDF format for free! Find your manual NAC 332 - NAIM and take your electronic device back in hand. On this page are published all the documents necessary for the use of your device. NAC 332 by NAIM.
USER MANUAL NAC 332 NAIM
FIRST STEPS
WITH NAC 332


English 2
Français 14
Deutsch 26
Nederlands 38
Español 50
Italiano 62
Polski 74
Русский 86
中文 98
繁體中文 110
한국어 122
ภาษาไทย 134
64445
Introduction
Please Note: Full safety warnings can be found in the Statutory Safety Manual.
Welcome to your new Naim preamplifier. Like all Naim Audio products, the NAC 332 puts musical performance first. To help realise its full potential, it is important to follow the simple installation and usage guidelines covered in this manual. We start with some product and setup essentials, before moving onto more detailed information in Section 5.
1. What's in the box
natural_image
Side view of a black audio device with a circular head and 'naim' logo, connected to a control panel (no readable text beyond branding)1x NAC 332

1x Document pack

natural_image
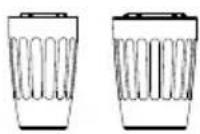
Solid dark rectangle with a scalloped border (no text or symbols)1x Cleaning cloth

natural_image
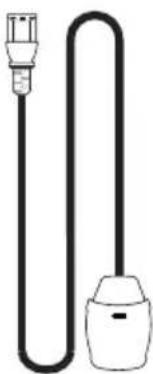
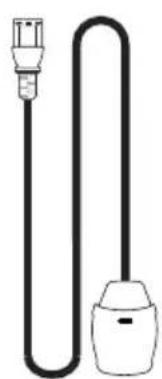
Simple line drawing of a plug and bulb (no text or symbols)1x Power-Line Lite
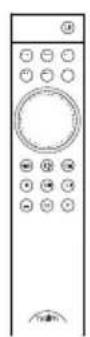
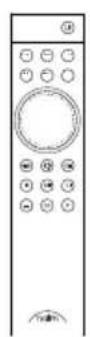
1x Remote control

2x Link plugs
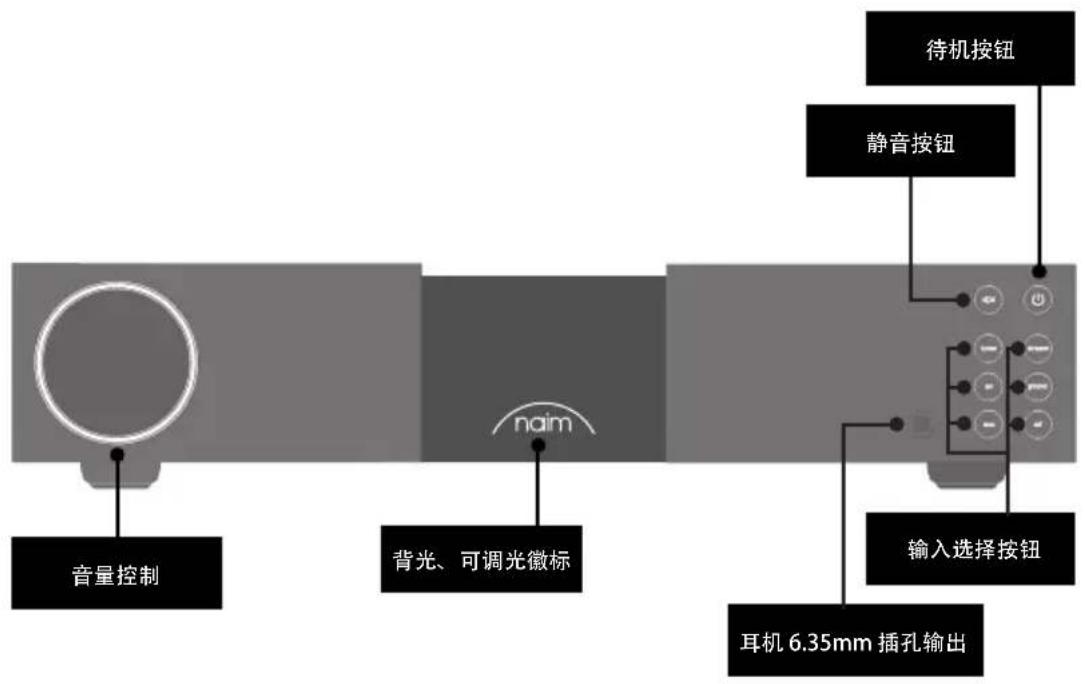
2. Getting to know your NAC 332
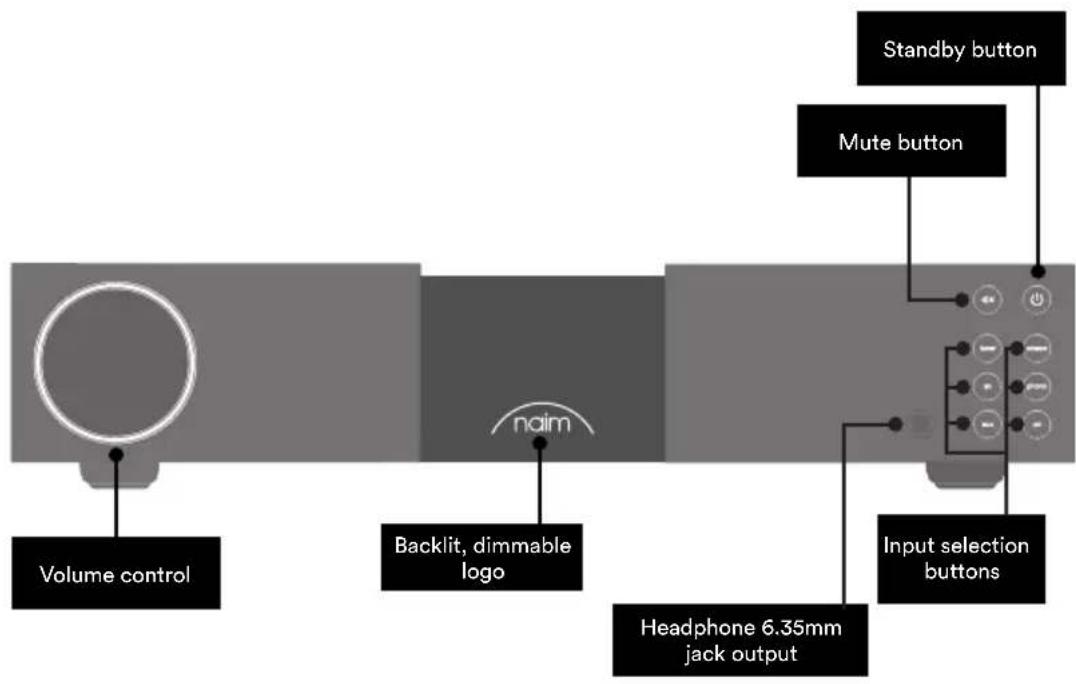
flowchart
graph LR
    A["Volume control"] --> B["Backlit, dimmable logo"]
    B --> C["naim"]
    C --> D["Headphone 6.35mm jack output"]
    D --> E["Input selection buttons"]
    E --> F["Mute button"]
    F --> G["Standby button"]
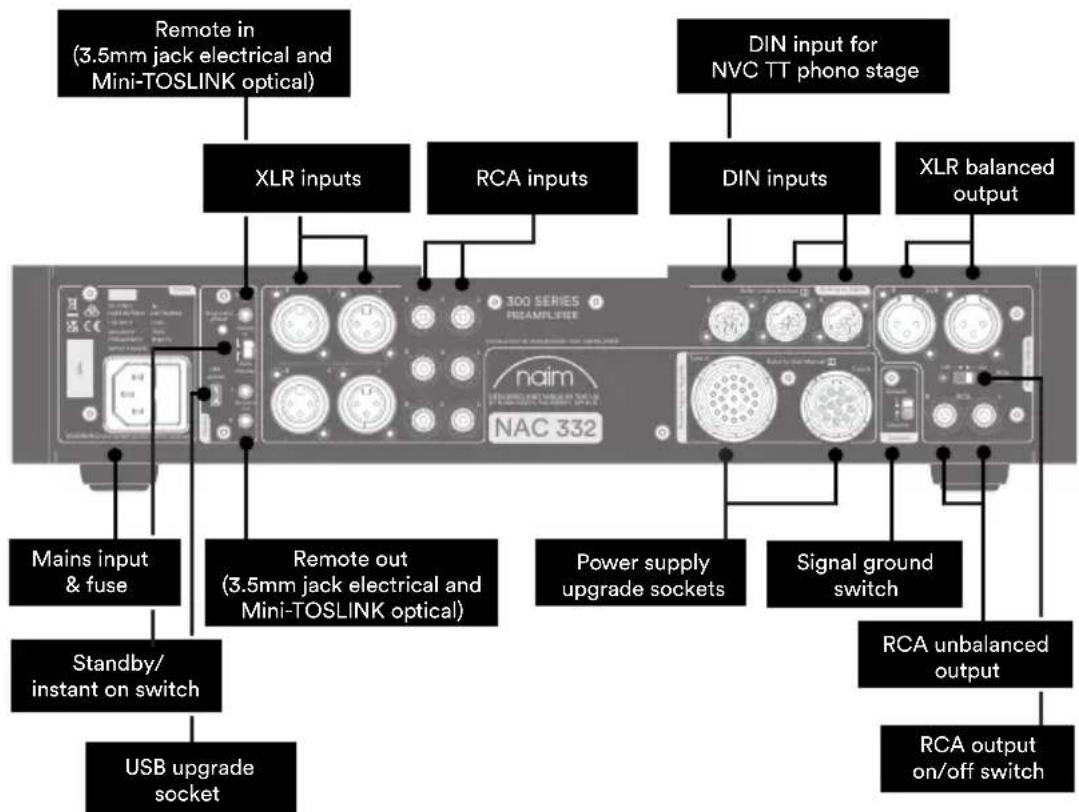
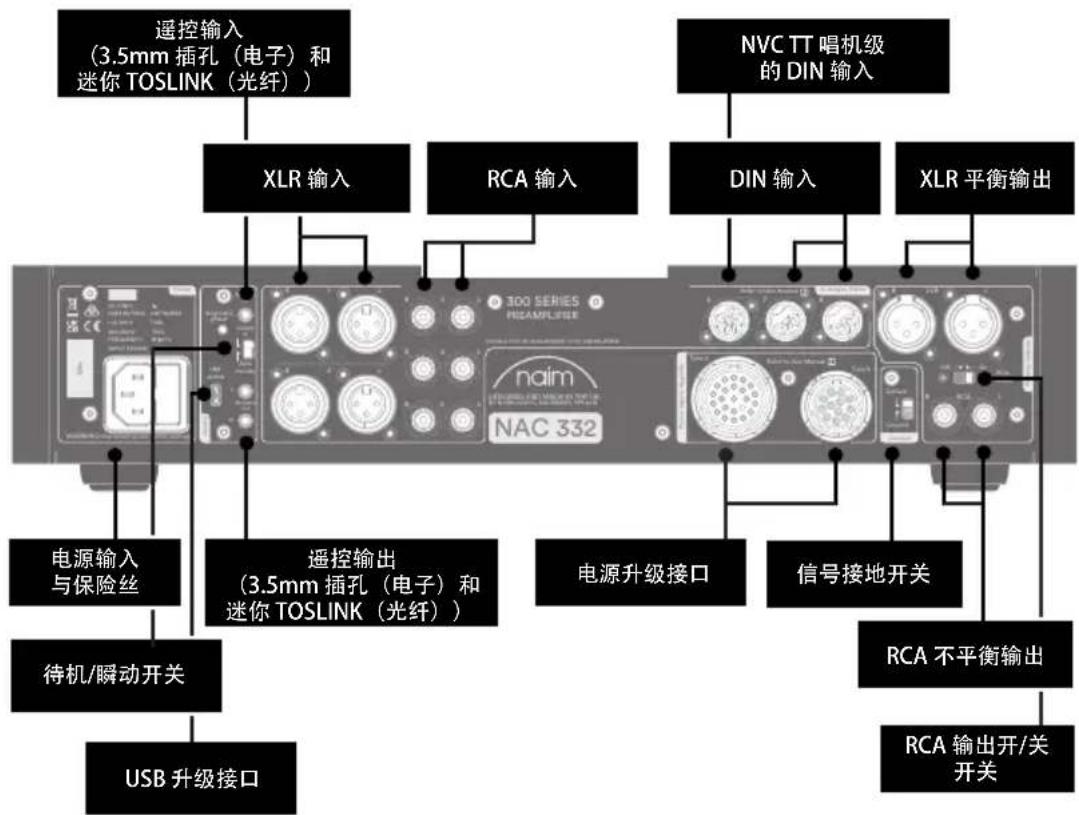
flowchart
graph TD
    A["Remote in (3.5mm jack electrical and Mini-TOSLINK optical)"] --> B["XLR inputs"]
    C["DIN input for NVC TT phono stage"] --> D["DIN inputs"]
    E["Mains input & fuse"] --> F["Standby/ instant on switch"]
    G["USB upgrade socket"] --> H["Remote out (3.5mm jack electrical and Mini-TOSLINK optical)"]
    I["RCA outputs"] --> J["Power supply upgrade sockets"]
    K["Signal ground switch"] --> L["RCA unbalanced output"]
    M["XLR balanced output"] --> N["RCA output on/off switch"]
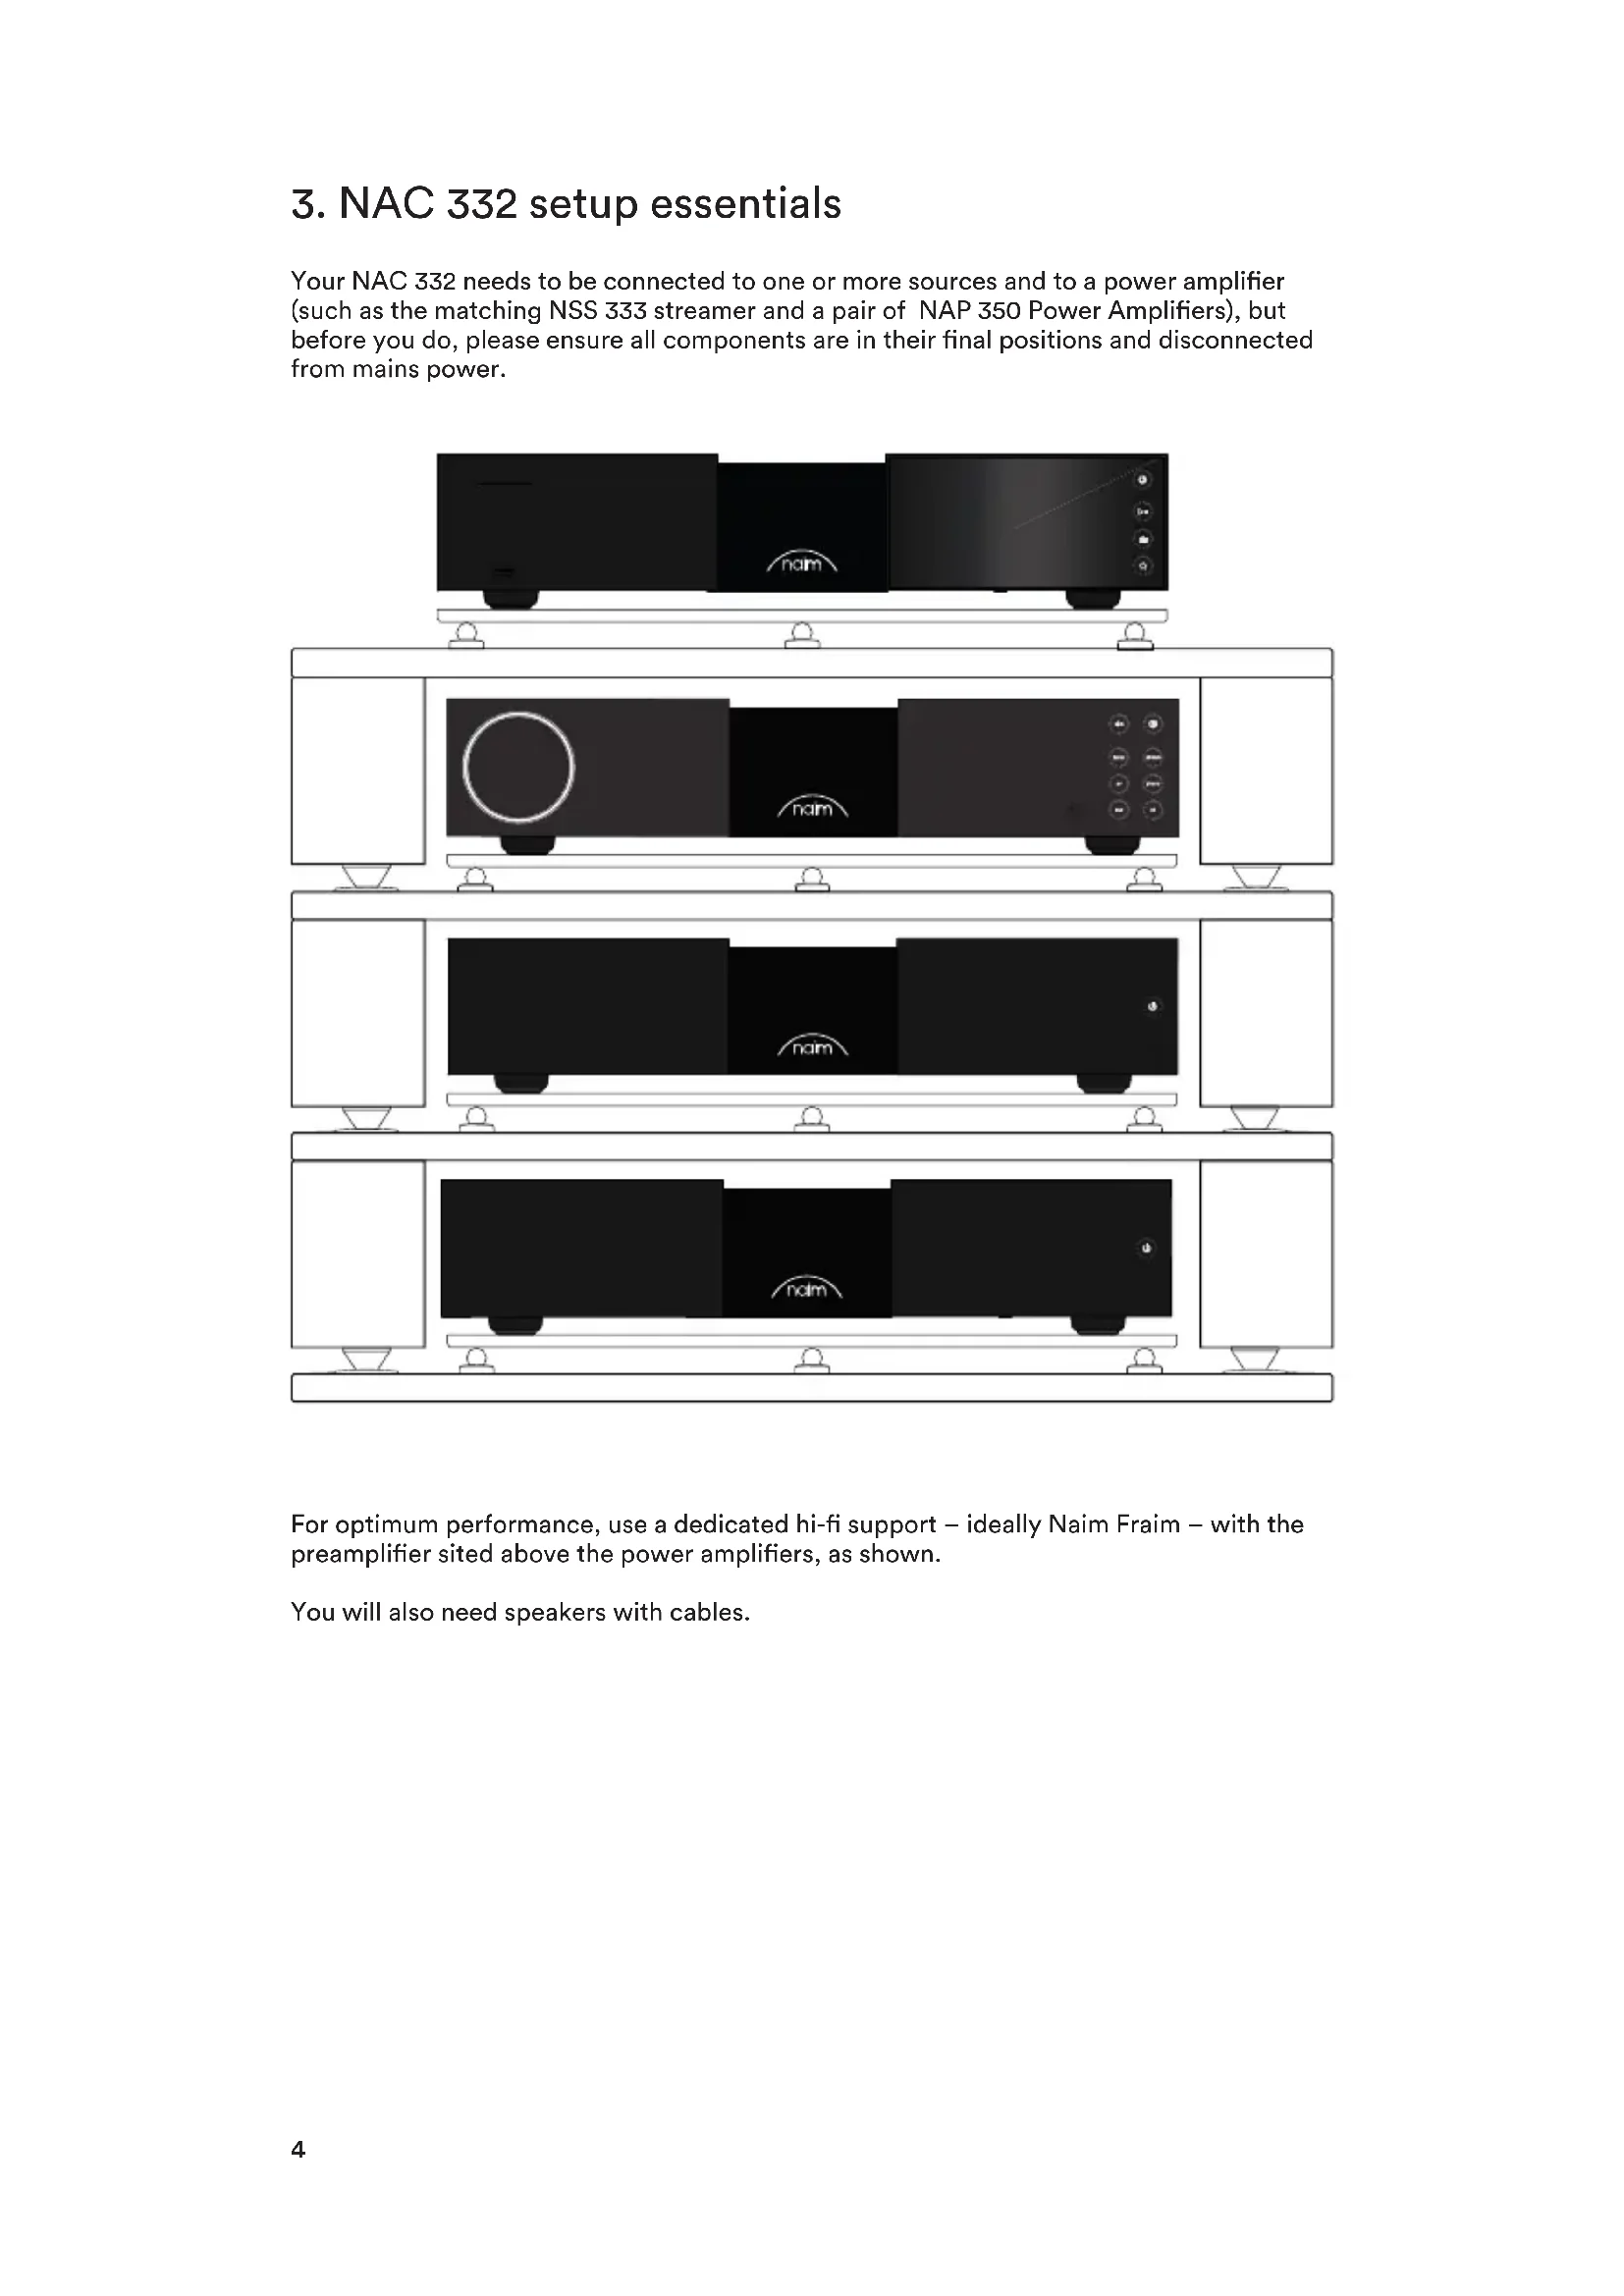
3. NAC 332 setup essentials
Your NAC 332 needs to be connected to one or more sources and to a power amplifier (such as the matching NSS 333 streamer and a pair of NAP 350 Power Amplifiers), but before you do, please ensure all components are in their final positions and disconnected from mains power.
natural_image
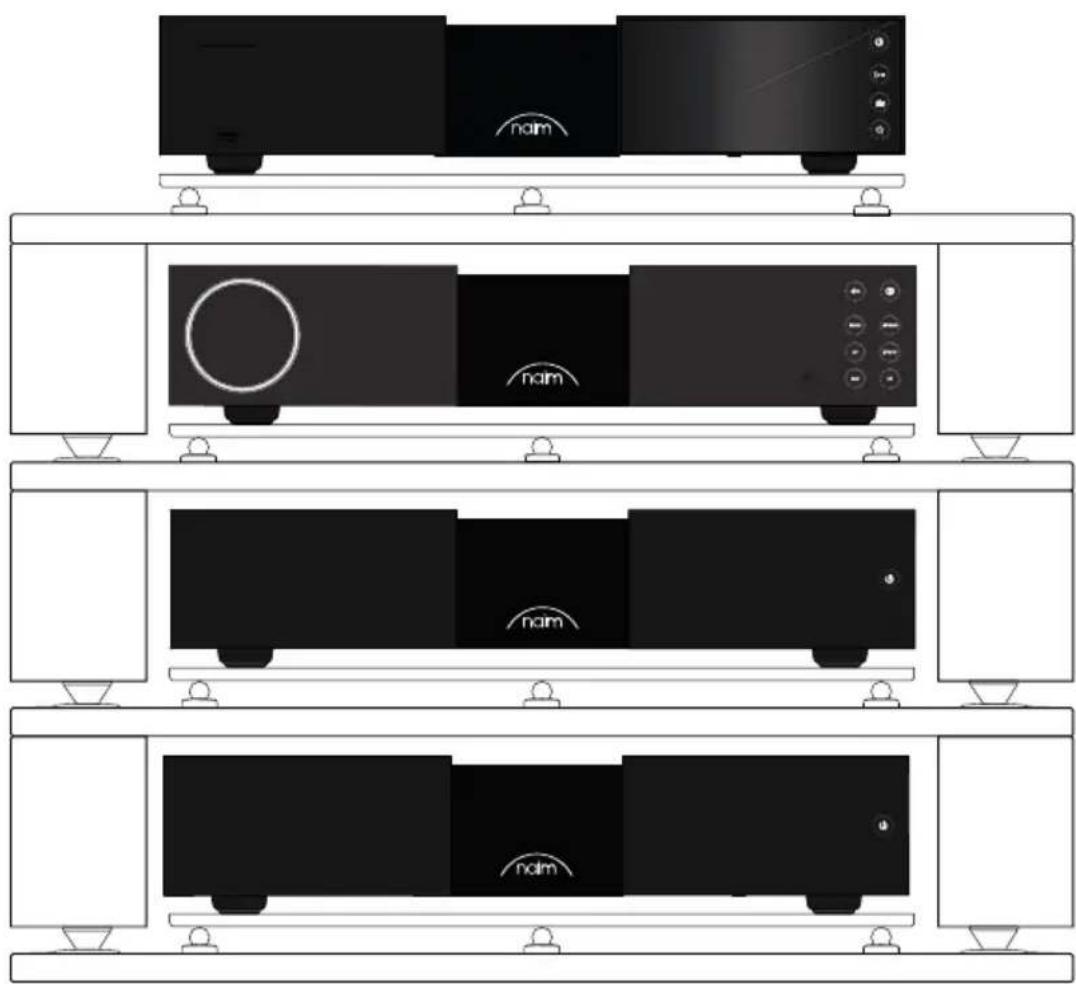
Diagram of a multi-tiered rack-mounted TV unit with black and white panels, no text or symbols present.For optimum performance, use a dedicated hi-fi support – ideally Naim Fraim – with the preamplifier sited above the power amplifiers, as shown.
You will also need speakers with cables.
3.1 Connecting your NAC 332 to the NAP 350 power amplifiers
Connect two XLR cables (supplied with the NAP 350) from the XLR outputs of the NAC 332 to the XLR inputs of each NAP 350. Ensure the cables are channel-matched: the pre-amplifier left output is connected to the power amplifier driving the left speaker and the same for the right. Please ensure that the XLR plugs are inserted correctly, which is achieved with the Naim logo on the plug facing upwards.
Connect the system automation cables (supplied with the NAP 350) between the NAC 332 Remote Out terminals and the Remote In terminals on the NAP 350.
3.2 Connect your source components
Connect your source components to the NAC 332 inputs as required. The front panel buttons may be assigned to select any input, see section 4.2
The factory default assignments are:
| Tuner Input 3 | RCA | |
| Stream Input 7 | 5 pin DIN | |
| AV Input 4 RCA | ||
| Phono Input 6 | 8 pin DIN | |
| AUX Input 1 XLR | ||
| CD Input 8 5 pin DIN | ||
3.3 Powering up
Once you have connected your sources and the NAC 332 to the power amplifiers, there are just a few more simple steps to take before you can power up your NAC 332 and start playing music.
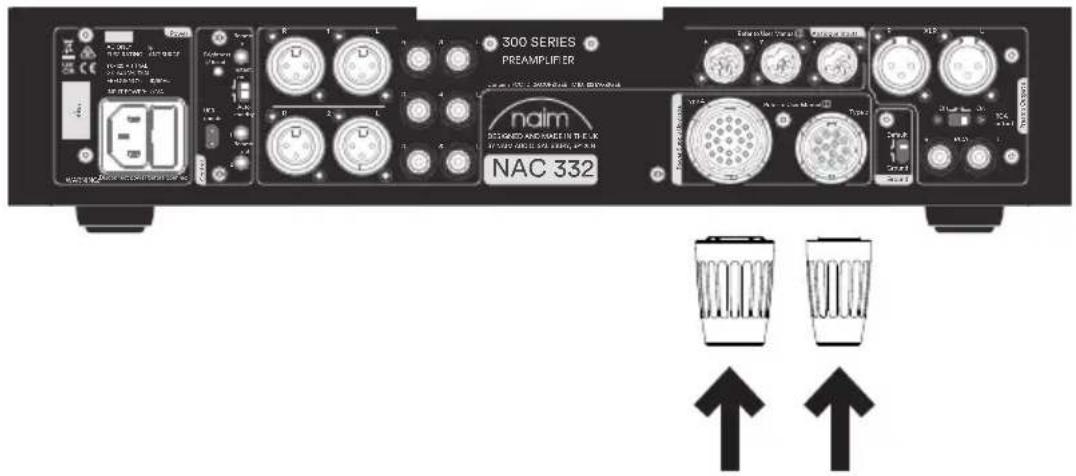
Connect the two supplied link plugs to the NAC 332 power supply upgrade sockets.
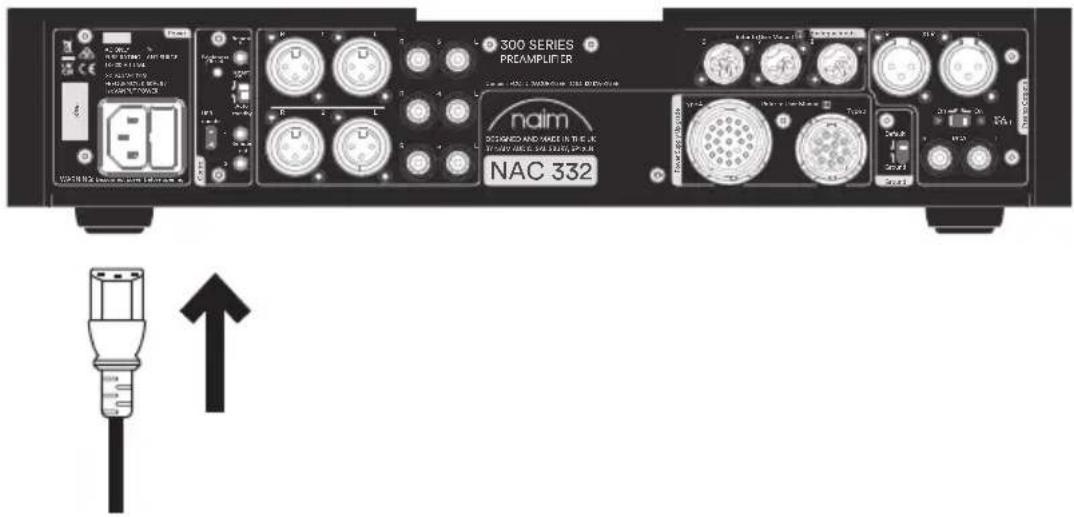
Connect the power cable to the NAC 332's power socket and then to mains power.
Switch on your NAC 332 by pressing the standby button on the top right side of the front panel.

3.4 Pairing the remote control
Once your NAC 332 is switched on, you will need to pair the remote control.
Insert the provided batteries into the remote control handset.
Pressing any of the front panel input buttons (except standby) will enable remote pairing mode for 30 seconds.

Press and hold the brightness button on the remote control handset for 3 seconds.
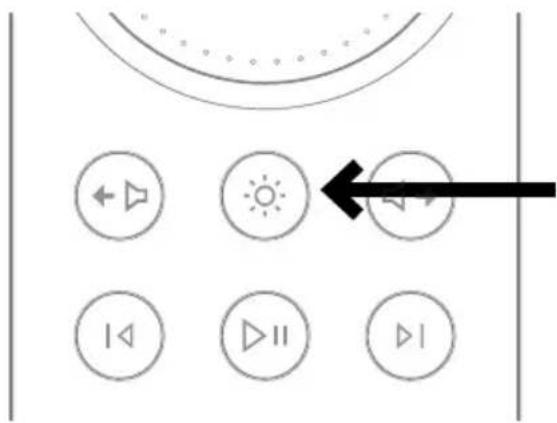
The volume ring on the remote will chase when in pairing mode and then stop at the current volume setting when paired.
The remote is now paired to the unit and ready to use.
4. NAC 332 detailed setup
4.1 Using Naim power ampilfiers without balanced inputs
If an older Naim power amplifier is being used a set of appropriately wired cables will be required.
If the RCA unbalanced outputs are to be used (for example to connect a sub woofer) the rear panel "RCA output" switch should be set to the "On" position.
4.2 Input re-assignment
Any combination of six of the eight physical inputs can be directly selected from the front panel or remote control buttons. A setup mode is used to change the assignment of the physical inputs to the buttons.
To enter setup mode press the front panel button of the first input to be adjusted until the button starts to flash.
The volume knob leds show segments indicating the possible input assignment, with the currently selected input shown by brighter LEDs.
While in setup mode the selected source shown by the volume knob LEDs will be heard playing.
Turning the volume knob changes the input assigned to the flashing input.
While in setup mode press any other source button to adjust the assignment for that input.
To exit setup mode press the flashing input button until it stops flashing. The mute button continues to work as normal while in setup mode.
4.3 Input trim adjustment
The relative level of each input can be adjusted over a range of -10dB to +10dB to equalise the volume level between sources.
This is adjusted while in setup mode, so first press the input button to be adjusted until the button flashes.
A second press of the button will change to trim setting mode. The LEDs on the volume control will indicate the current trim setting.
Turning the volume knob will change the trim setting; the source being adjusted will be playing so you can decide on the level required.
When satisfied with the setting, a press of the button will return to the input mapping display, or a long press will exit setup mode.
4.4 AV fixed gain (unity gain)
This mode is only applicable to the AV input. The input trim, headroom and balance settings will be ignored while AV fixed gain mode is active.
Volume control changes cannot be made using the remote or the volume dial of the NAC 332 when in this mode. The output signal will be at the same volume as the input signal.
Fixed gain is set while in setup mode, so first press and hold the front panel AV input button until the button flashes.
A second press of the button will change to trim setting mode. The LEDs on the volume control will indicate the current trim setting.
Then, using the volume control turn the dial to maximum (far right) until a solid LED block is present.
To exit setup mode press the AV input button until it stops flashing.
4.5 Maximum volume function
This mode allows the user to set the overall maximum volume level to prevent accidental selection of high-volume levels.
This is adjusted while in maximum volume setup mode, so first press and hold the front panel mute button. The mute button will flash and the volume dial LED will change when activated.
Then, turn the volume control dial either left or right to edit the Maximum Volume value.
To set the maximum volume for headphones, insert the headphone jack, the volume dial will change to show the headphone maximum allowed volume, then use the volume control to select the desired maximum volume.
Removing the headphone jack will revert the volume dial to showing the main maximum volume.
When satisfied with the setting, exit setup mode by pressing the mute button until it stops flashing.
Type 1: 8 pin DIN
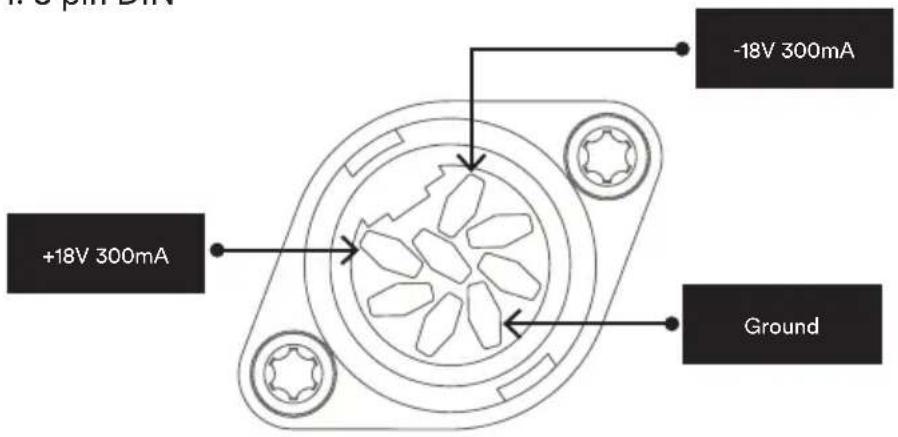
4.6 Extra DIN input functions
Input 6 (8 pin DIN) is compatible with 5 pin DIN leads and can also directly power a Naim NVC TT phono stage.
Input 8 (5 pin DIN) has line level outputs mirroring the currently selected source. Note that when this input is selected the source connected will be mirrored, so beware of feedback loops if using a recording source.
4.7 Using headphones
The headphone output is capable of driving most headphones to very high volume levels. While the headphone's plug is inserted the preamp's main outputs will be muted.
The headphone output has a separate volume setting. When headphones are inserted the volume will be set to the level last used with headphones. When they are removed the volume will be set back to the level last used with speakers.
5. Tips on installing and using your NAC 332
We know you are eager to enjoy your new NAC 332, but we promise it will sound even better once you have followed these guidelines, all designed to help you experience your preamplifier without compromise.
5.1 Unboxing and positioning
Your NAC 332 uses high-quality components, including a substantial power transformer and durable aluminium casing. That means the NAC 332 weighs in at 11kg, so please take care when lifting or moving it, and ensure the surface you plan to place it on is stable and can support its weight.
For optimum performance, use your Naim products on a dedicated hi-fi equipment rack – ideally the Naim Fraim or Fraim Lite – to minimise vibrations that can affect sound. No room for a rack? Consider placing your NAC 332 on a Fraim glass shelf on a suitable piece of furniture, to provide solid but discreet support.
Never stack Naim products on top of each other, and if you are placing them side-by-side, please leave some distance between the units.
To reduce the risk of audible hum from the loudspeakers do not place power supplies or power amplifiers close to source or preamplifier components.
5.2 Input connection details
The NAC 332 features several source connection options. For the best sound quality, we recommend you use the DIN inputs.
5.3 System automation
When using the NAC 332 with a compatible streamer and power amplifier – such as the NSS 333 and NAP 350 – you can synchronise power on/off and logo brightness across your system by connecting the NAC 332 with the optical system automation cables supplied with the NAP 350.
The NSS 333 and NAC 332 use the Zigbee system to synchronise their functions. Press any button (except standby) on the front panel of the NSS 333 and NAC 332 to pair them together.
Use the ‘Remote Out’ terminals on the NAC 332 to link the ‘Remote in’ terminals on the NAP 350. It is possible to link further power amplifiers using the ‘Remote out’ terminals of the NAP 350.
If you require a longer distance between your NAC 332 and the NAP 350 than the supplied cable allows for, you can use a replacement 3.5mm to 3.5mm optical cable to the required length. It is also possible to use standard analogue cables with 3.5mm connectors, but an optical cable offers the best performance.
5.4 Powering up/down
Once all your input and output connections are made, connect the supplied mains lead to your NAC 332 and to mains power.
You can now power up the NAC 332 by pressing the standby button.
If the NSS 333, NAC 332 and a pair of NAP 350 units is connected via System Automation they will switch on in sequence.
It is the same procedure to switch off your NAC 332: turn off your NSS 333, NAC 332 and NAP 350 connected via System Automation, by simply pressing the standby button on the front panel of the NSS 333 or NAC 332, which will put your complete system into standby. Avoid using a mains outlet switch to turn your amplifiers off.
5.5 Standby power settings
The NAC 332 has three power levels: standby, standby with instant on and powered for normal use.
'Standby' mode has an overall power consumption of less than 0.5W. The NAC 332 can be woken up by pressing the standby button or from the remote control.
'Standby with instant on' leaves the NAC 332 fully powered, but with the logo turned off.
'Powered for normal use' In this mode the NAC 332 uses about 20W.
By default, the NAC 332 rear panel switch is set to 'auto standby' - it automatically enters standby mode after a period not exceeding 20 minutes of inactivity. For the optimum sound quality set the switch to the "instant on" position. This will keep the NAC 332 permanently powered up. With the switch in this position, if the standby button is pressed, the NAC 332 will remain powered up, but the logo will turn off.
5.6 Naim logo brightness settings
You can choose the brightness level of the LED indicators and Naim logo on your NAC 332 using the brightness buttons on the rear panel and the remote control. If you are using Naim NAC 332 and NAP 350 amplifiers connected via System Automation the brightness of all logos will be synchronised.
5.7 Using the NPX 300 power supply
The NPX 300 power supply is an optional system upgrade. If adding the NPX 300 power supply to the NAC 332, first turn the whole system off. Remove the mains cable from the NAC 332 – it is not required when the unit is powered by the NPX 300.
Add the NPX 300 to the equipment stand and remove the two link plugs from the NAC 332 rear panel.
Connect the un-banded end of the two Burndy cables to the NPX 300. Connect the two banded ends to the NAC 332. Ensure all the locking rings are tightened fully. Try to “dress” the cables so they hang as loosely as possible and without touching the stands or the wall – this will be easier if they are formed to roughly the required shape before connecting either end.
Connect the power lead to the NPX 300's power socket and then to mains power. Turn the rest of the system back on.
Turn the NAC 332 back on by pressing the standby button.
6. Mains power, earthing and more
Use only the mains leads and plugs supplied with your NAC 332, or the upgrade Naim Power-Line mains cable. Where fused plugs are used, 13-Amp fuses should be fitted. Do not wire voltage dependent resistors or noise suppressors into mains plugs; they degrade the mains supply and the sound.
6.1 Earthing
In order to avoid hum loops, the signal ground of the whole system should be connected to the mains earth in one place. Typically, this is at the primary source. The NAC 332 preamplifier has a ground lift switch. Set this to "Default" if the primary source connects mains earth to signal ground. If no source connects mains earth to signal ground set it to the "Ground" position.
6.2 Non-rewirable mains plugs
If a non-rewirable plug is cut from a mains lead (for whatever purpose) the plug MUST be disposed of in a way to render it totally useless. Considerable shock hazard exists if the cut-off plug is inserted into a mains outlet.
6.3 Mains circuits and interference
A hi-fi system usually shares a mains power circuit with other household equipment, some of which can cause distortion that may manifest as mechanical hum from mains transformers, including the large transformer in your NAC 332.
Transformer hum is not transmitted through the speakers and has no effect on the performance of the system; however, careful positioning of your Naim system may reduce it, as may a separate, dedicated mains circuit. Such a circuit (ideally with a 30 or 45-Amp rating) will also generally improve system performance. Only seek advice on the installation of a separate mains circuit from a qualified electrician.
6.4 Lightning precautions
Your Naim system should be turned off and fully disconnected from mains power when there is a risk of a lightning strike, to protect from potential damage.
7. Further tips and advice
Now you have all the essentials sorted, let us move onto a few more things that you can do to optimise the performance of your new NAC 332.
7.1 Running in
Naim products are hand-crafted from a carefully selected range of high-quality components. Your NAC 332 will sound superb out of the box, but its performance may improve further still as all these various components power up and interact in their first few weeks of use. Keeping your system powered up will assist this process.
7.2 Cleaning your product and connections
Naim recommends using only the supplied cleaning cloth to lightly dust any product surfaces. Cleaning products may contain ingredients that can adversely affect cosmetic surface treatments and coatings.
Keep interconnect plugs and sockets clean and free from corrosion. The easiest way to achieve this is to fully power off your Naim product (and any connected equipment), unplug all connections from their sockets and firmly push them in again. Contact cleaners and so-called ‘enhancers’ should not be used, as they can leave deposits that can degrade the sound of your system.
7.3 Resetting your NAC 332
To reset your NAC 332 to the factory default settings press and hold the "Brightness/Reset" button on the rear panel for at least 3 seconds. The NAC 332 with return to a standby state and all settings will be returned to the factory defaults. Note that this will include unpairing the remote control and Zigbee System Automation device.
8. Support
In the event of any non-compliant equipment, it must be sent to the dealer, in its original packaging, who will analyse it and determine where the breakdown comes from. If the equipment is under warranty and conditions are met, the equipment will be repaired or replaced according to the conditions applicable to the legal warranty on the date of purchase of the device. Otherwise, a repair estimate will be submitted. The legal guarantee does not cover damage from a misuse or a wrong connection (burnt mobile coils for instance). Naim equipment is covered by a warranty whose conditions are locally set or carried out by the official Naim dealer of each country, in compliance with the laws of the concerned territory. In France, every Naim equipment is covered by a two-year legal guarantee from the date of purchase.
A defect can be caused by a failure of the system or by the installation, contact your dealer.
Online support resources are also available on our website, please visit www.naimaudio.com If you are still unable to resolve your issue, or have any questions, please contact support@naimaudio.com
9. Service and updates
Any repairs or hardware updates should only be made by an authorised Naim service centre or at the Naim HQ itself. Many components are custom made, tested or matched and appropriate replacements are often unobtainable from other sources. Please contact your local Naim retailer with any service or repair queries.
10. Specifications
| 300 Series Preamplifier - NAC 332 | |
| Audio inputs: | 3 x DIN2 x XLR pair3 x RCA pair |
| Audio outputs: | 1 x XLR pair1 x RCA pair1 × 6.35mm headphone jack1 x Line level output on Input 8 (5 pin DIN) |
| Update: Micro USB | |
| Remote In: 1 × 3.5mm jack – electrical and Mini-TOSLINK optical | |
| Remote Out: 2 × 3.5mm jack – electrical and Mini-TOSLINK optical | |
| Power consumption: | Typical use: 20WStandby: <0.5W |
| Dimensions (H x W x D): 91 | 5 × 432 × 317.5 mm (including feet) |
| Weight: 11kg | |
| Mains supply: 115V or 230V | 50/60Hz |
11. Product recycling
This marking indicates that within the EU this product should not be disposed of with other household wastes. To prevent any risk to the environment or human health, please recycle them responsibly to encourage the reuse of material resources. To return your used device, please use the return and collection systems available, or contact the retailer where you purchased the product. They can recycle this product safely.

Introduction
natural_image
Exterior view of a modern office building (no signage)1x NAC 332

1x Documentation

natural_image
Solid dark rectangle with a scalloped border (no text or symbols)natural_image
Simple line drawing of a plug and socket connected by a curved wire (no text or symbols)1x Power-Line Lite

1x Télécommande

2x Fiches cavalier
natural_image
Diagram of a multi-level rack-mounted TV unit with labeled 'nam' branding, showing front and rear views (no text or symbols beyond branding)natural_image
Front view of a black electronic device with a circular speaker and 'naim' logo, connected to a control panel (no readable text beyond branding)1x NAC 332

natural_image
Solid dark gray rectangle with a thin white border (no text or symbols)1x Reinigungstuch
natural_image
Simple line drawing of a plug and bulb (no text or symbols)1x Power-Line Lite
1x Fernbedienung
natural_image
Diagram of a multi-tiered rack-mounted TV unit with black and white panels, no text or symbols present.natural_image
Diagram of a black audio device with a circular head and 'naim' logo, showing front panel and control buttons (no readable text or symbols beyond branding)1. Wat is meegeleverd?

natural_image
Front view of a black audio workstation with a circular speaker and 'naim' branding (no readable text beyond branding)1x NAC 332

natural_image
Solid dark gray rectangle with a thin white border (no text or symbols)1x Reinigingsdoek

natural_image
Simple line drawing of a plug and bulb (no text or symbols)1x Power-Line Lite
natural_image
Diagram of a multi-tiered rack-mounted air conditioner unit with labeled ambient lighting (no text or symbols beyond branding)4.4 AV vaste versterking (unity gain)
natural_image
Front view of a black audio workstation with a circular speaker and 'naim' logo (no text or symbols on main body)1x NAC 332

natural_image
Solid dark rectangle with a scalloped border (no text or symbols)1x Paño de limpieza

natural_image
Simple line drawing of a plug and socket connected by a curved wire (no text or symbols)1x Power-Line Lite
natural_image
Diagram of a multi-tiered rack-mounted air conditioner unit with labeled ambient lighting (no text or symbols beyond branding)natural_image
Front view of a black audio workstation with a circular speaker and 'naim' branding (no readable text beyond branding)1x NAC 332

1x Documentazione

natural_image
Solid dark gray rectangle with a thin white border (no text or symbols)1x Panno di pulizia

natural_image
Simple line drawing of a plug and bulb (no text or symbols)1x Power-Line Lite
natural_image
Diagram of four identical black-framed air purifiers mounted on white shelves, each with a circular dial indicator (no text or symbols)natural_image
Front view of a black electronic device with a circular speaker and 'naim' logo, no visible text or symbols beyond the brand name.1x NAC 332

natural_image
Solid dark rectangle with a scalloped border (no text or symbols)natural_image
Simple line drawing of a plug and bulb (no text or symbols)natural_image
Diagram of a multi-level rack-mounted TV unit with multiple monitors and indicator lights (no text or symbols)natural_image
Front view of a black audio device with a circular head and 'naim' logo, showing front panel, back panel, and control buttons (no readable text beyond branding)1x NAC 332

natural_image
Solid dark gray rectangle with a thin white border (no text or symbols)natural_image
Simple line drawing of a plug and bulb (no text or symbols)1шт. Power-Line Lite

1шт. Пульт ДУ
2шт. Перемычки
natural_image
Diagram of a multi-level rack-mounted TV unit with black and white panels, no text or symbols present.natural_image
Front view of a black audio player with a circular head and 'naim' logo, connected to a control panel (no readable text beyond branding)1x NAC 332

1x 文件包

natural_image
Solid dark rectangle with a scalloped border (no text or symbols)1x 清洁布

natural_image
Simple line drawing of a cable with two connectors (no text or symbols)1x 电源线
1x 遥控器

2x链接插头
2. 了解您的 NAC 332
flowchart
graph LR
    A["音量控制"] --> B["背光、可调光徽标"]
    B --> C["naim"]
    C --> D["待机按钮"]
    C --> E["静音按钮"]
    C --> F["输入选择按钮"]
    F --> G["耳机 6.35mm 插孔输出"]
flowchart
graph TD
    A["遥控输入 (3.5mm 插孔(电子)和迷你 TOSLINK(光纤)"] --> B["XLR 输入"]
    C["NVC TT 唱机级的 DIN 输入"] --> D["DIN 输入"]
    E["电源输入与保险丝"] --> F["遥控输出 (3.5mm 插孔(电子)和迷你 TOSLINK(光纤))"]
    G["待机/瞬动开关"] --> H["USB 升级接口"]
    I["电源升级接口"] --> J["信号接地开关"]
    K["RCA 不平衡输出"] --> L["RCA 输出开/关开关"]
    M["PCB NAC 332"] --> N["三相电源模块"]
    O["无线接口"] --> P["无线接口"]
3. NAC 332 设置要点
natural_image
Diagram of three identical black-framed electronic devices with 'noim' branding, arranged in a row (no text or symbols beyond branding)natural_image
Front view of a modern audio device with a circular head and 'naim' logo, no visible text or symbols on the device itself.臺 NAC 332

1 個文件包

natural_image
Solid dark rectangle with a scalloped border (no text or symbols)1 塊清潔布

natural_image
Simple line drawing of a plug and socket connected in a U-shaped tube (no text or symbols)natural_image
Diagram of a multi-level rack-mounted TV unit with black and white panels, no text or symbols presentnatural_image
Side view of a black audio player with a circular head and 'naim' logo, connected to a control panel (no readable text or symbols beyond branding)NAC 332 1개

문서 팩 1개

natural_image
Solid dark rectangle with a scalloped border (no text or symbols)청소용 천 1개

natural_image
Simple line drawing of a cable with two connectors (no text or symbols)전원 공급 케이블 1개
리모콘 1개
링크 플러그 2개
2. NAC 332 제품 설명

natural_image
Diagram of three stacked electronic devices with no visible text or symbols on the devices themselves.natural_image
Side view of a black audio device with a circular head and 'naim' logo, connected to a control panel (no readable text beyond branding)1×NAC 332

1x ขุดเอกสาร

natural_image
Solid dark rectangle with a scalloped border (no text or symbols)1x ผ้าทำความสะอาด
natural_image
Simple line drawing of a plug and bulb (no text or symbols)natural_image
Diagram of a multi-level rack-mounted air conditioner unit with no visible text or symbolsnatural_image
Front view of a modern audio workstation with a circular head and 'naim' logo on the front panel (no readable text beyond branding)1 NAC 332

عدد 1 حزمة الكتاب

natural_image
Solid dark rectangle with a scalloped border (no text or symbols)natural_image
Simple line drawing of a plug and bulb (no text or symbols)natural_image
Diagram of a multi-level rack-mounted TV unit with labeled 'nom' branding, showing front and side views (no text or symbols beyond branding)
- Introduction
- What's in the box
- Getting to know your NAC 332
- NAC 332 setup essentials
- Connecting your NAC 332 to the NAP 350 power amplifiers
- Connect your source components
- Powering up
- Pairing the remote control
- NAC 332 detailed setup
- Using Naim power ampilfiers without balanced inputs
- Input re-assignment
- Input trim adjustment
- AV fixed gain (unity gain)
- Maximum volume function
- Extra DIN input functions
- Using headphones
- Tips on installing and using your NAC 332
- Unboxing and positioning
- Input connection details
- System automation
- Powering up/down
- Standby power settings
- Naim logo brightness settings
- Using the NPX 300 power supply
- Mains power, earthing and more
- Earthing
- Non-rewirable mains plugs
- Mains circuits and interference
- Lightning precautions
- Further tips and advice
- Running in
- Cleaning your product and connections
- Resetting your NAC 332
- Support
- Service and updates
- Specifications
- Product recycling
- Wat is meegeleverd?
- AV vaste versterking (unity gain)
- 了解您的 NAC 332
- NAC 332 设置要点
- NAC 332 제품 설명
Brand : NAIM
Model : NAC 332
Category : Receiver