Dessert Whip Plus Mini - Food Processor ISI - Free user manual and instructions
Find the device manual for free Dessert Whip Plus Mini ISI in PDF.
Frequently Asked Questions - Dessert Whip Plus Mini ISI
User questions about Dessert Whip Plus Mini ISI
0 question about this device. Answer the ones you know or ask your own.
Ask a new question about this device
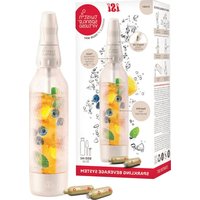
Download the instructions for your Food Processor in PDF format for free! Find your manual Dessert Whip Plus Mini - ISI and take your electronic device back in hand. On this page are published all the documents necessary for the use of your device. Dessert Whip Plus Mini by ISI.
USER MANUAL Dessert Whip Plus Mini ISI
www.isi.com/culinary/de
Imported and distributed by
iSi North America, Inc
Fairfield, NJ 07004
Phone+1(973)227-2426
Phone +1 (800) 447-2426
sinorthamerica@isi.com
www.isl.com/culinary/us

Inspiring food.
Easy Whip. PLUS
Easy Whip PLUS Mini.
Instructions for Use
Gebeancnansfaltung / No. 100/Publication / Idelizikan: per "ina" / Studio-robotico / Handie.ding / Strksanplaning / Instrucces de Uso / Инструкция по эксплуатации / Esinfrakaja i/y. Icanania

text_image
0.25 L / 0,5 USPT 0.5 L / 1 USPT 3.10.9.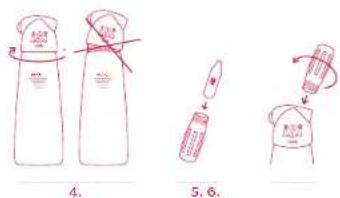
text_image
4. 5. 6.
text_image
>5 x 7.8.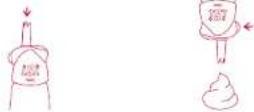
Cleaning
Reiniging / Nettoyage / Eul/er/1 - upc:9a / Reiniging / Berging / Injepa/ / Ouretia / Cysvoceniu
text_image
1. 2.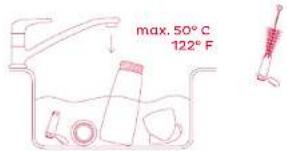
text_image
max. 50° C 122° F
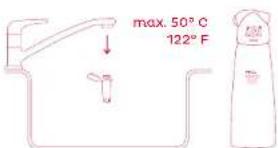
Interim Cleaning
Zahlserreinigung / Kol. ogang in der interdite / Pudia verrneitis / Limpeza intermedia / Tussenreinigung / Enkel rengoring / Limpeza/mermediaria / Pronekuytachna echnika / Dyservizio police?ne
text_image
max. 50° C 122° FExpanded Drawing
Explosionszeichnung / Vase-estatee / Furpoco / Visco-stokulinko / Ospengukakhti teken. ng / Sorangskiss / Vista.exp.co.da / Покомпонентное изображение / Кустуне risiko/zenkowy
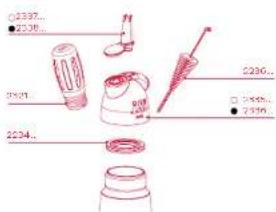
text_image
2337.. 2338.. 2921.. 2230.. 2552.. 2339..isi®
Inspiring food.
EN
English 2
ES
Español 46
PT
Português 80
DE
Deutsch 12
NL
Nederlands 58
RU
Русский 92
FR
Français 22
SE
Suenska 70
PL
Polski 104
IT
Italiano 34
EN
EN
Thank you for choosing an iSi product.
Please read the Whipper instructions carefully before first-time use.
Discover the world of iSi:
Visit the iSi website and learn more about our extensive range of products: Our comprehensive collection of recipes from simply yummy to creatively sophisticated combinations offers you access to the entire culinary world of iSi. Let yourself be inspired!
Want to speak directly with a cooking professional? No problem! Our head chef is happy to answer your questions on our iSi blog, where you can find up-todate, interesting information all about iSi. Take a look!
The iSi website provides detailed product information about all iSi Whippers/Siphons and iSi Accessories.
The detailed online instructions provide information about first-time use, cleaning, and troubleshooting iSi Whippers and Siphons.
www.isi.com/culinary
www.isi.com/culinary/us
If you have any further questions
please contact info@isi.com
For the US: isinorthamerica@isi.com
Guaranteed quality:
Every iSi Whipper and Siphon is thoroughly inspected before leaving the factory. iSi offers a two-year warranty for materials and machining, as long as faults are not determined to be the result of improper use. The warranty is effective from the date on the purchase receipt.
Register online now and we will extend your warranty!
Enjoy the benefits of a three-year warranty for materials and machining.
The warranty is only valid when original whipper parts from iSi are used, as given in the list of product components. The perfect function of your Whipper/Siphon can only be guaranteed if you exclusively use iSi chargers with it. No warranty or liability claim will be upheld for faults, damage, or consequential damage particularly determined to be the result of non-compliance and/or ignorance of the user instructions and the safety information therein.

Simply register online and take advantage of the extended benefits: www.isi.com/warranty

For the US please refer to www.isi.com/warranty/us
EN
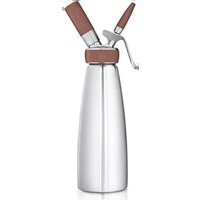
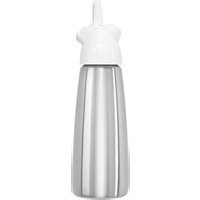
Whipper Data.
| Max. service pressure PS | 20 bar / 290 psig |
| Min. operating temperature | 1°C / 34°F |
| Max. operating temperature | 30 °C / 86 °F |
| Max. filling volume 0,25 L | / half US pint0,5 L / 1 US pint |
| Max. number of chargers to be used | 1 iSi cream charger |
| Usage Not approved for | commercial use.For fresh, pure cream.Suitable for cold preparations only. |
Material List.
| Description Material | |
| Bottle Stainless steel | |
| Head PBT, POM, NBR, | silicone, PU, Messing, brass, nickel-plated brass, stainless steel |
| Head gasket TPE | |
| Decorator Tip POM, NBR | |
| Charger holder PA |
Technical data is subject to change without prior notice.

Safety Information.
Failure to follow this safety instructions or any recommendation for use and care constitutes misuse of iSi products and could result in malfunction of the system and possible personal injury and/or property damage.
— Do not exceed minimum or maximum pressure, minimum or maximum temperature, maximum filling volume, number of chargers or usage of the iSi Whipper shown in the Whipper Data! Do not use for any purposes not indicated in these instructions!
— Please read the instructions for use carefully to avoid operating errors and keep a copy on hand!
— Do not use force when screwing on or off the head, using the whipper and during any operation described in these instructions!
— Store the iSi Whipper out of the reach of children!
— Only charge a whipper that is filled!
— Neuer store or use the iSi Whipper outside of the min. and max. operating temperatures. Do not store in a freezer!
— Only use a head and bottle of the same iSi Whipper model together!
— Never combine iSi components with components from another brand or manufacturer!
— The head and the charger holder should always be screwed on straight and completely tight, never crooked or incompletely tightened!
— Only use original i5i cream chargers!
EN
— When screwing on the charger, do so away from others and keep face away from the whipper; do not bend over the whipper!
— The whipper is a pressure equipment. If it is dropped or damaged (e.g., cracked or dented), do not use again because it poses a risk of injury. Please have the whipper checked by the iSi service center!
— Never unscrew the head when the whipper is pressurized!
— Proper cleaning is a mandatory requirement in order to avoid the whipper becoming blocked and leaking. Check that the iSi Whipper has been properly cleaned before use!
— Only dismantle the iSi Whipper for cleaning in accordance with the illustration!
— Only clean by hand using lukewarm water and domestic hand dishwashing detergent. The iSi Whipper is not dishwasher safe! Cleaning the head of the whipper in the dishwasher may damage the plastic head and the charger holder, which ultimately puts your safety when using your iSi Whipper at risk!
— Do not make any modifications to the ISI Whipper. This will void the warranty and exempt the company from any liability!
— Never use more chargers than specified and never overfill the whipper. This will ensure that the specified maximum operating pressure is not exceeded!
— If the pressure will not release, please contact iSi or your service center!
NOTE: Before using the iSi Whipper for the first time, carry out thorough cleaning as shown in the Cleaning illustration
NOTE: To avoid the formation of lumps, you should completely dissolve powdered ingredients such as sugar, etc., in some liquid before filling. To sweeten, we recommend using liquid flavouring syrup.
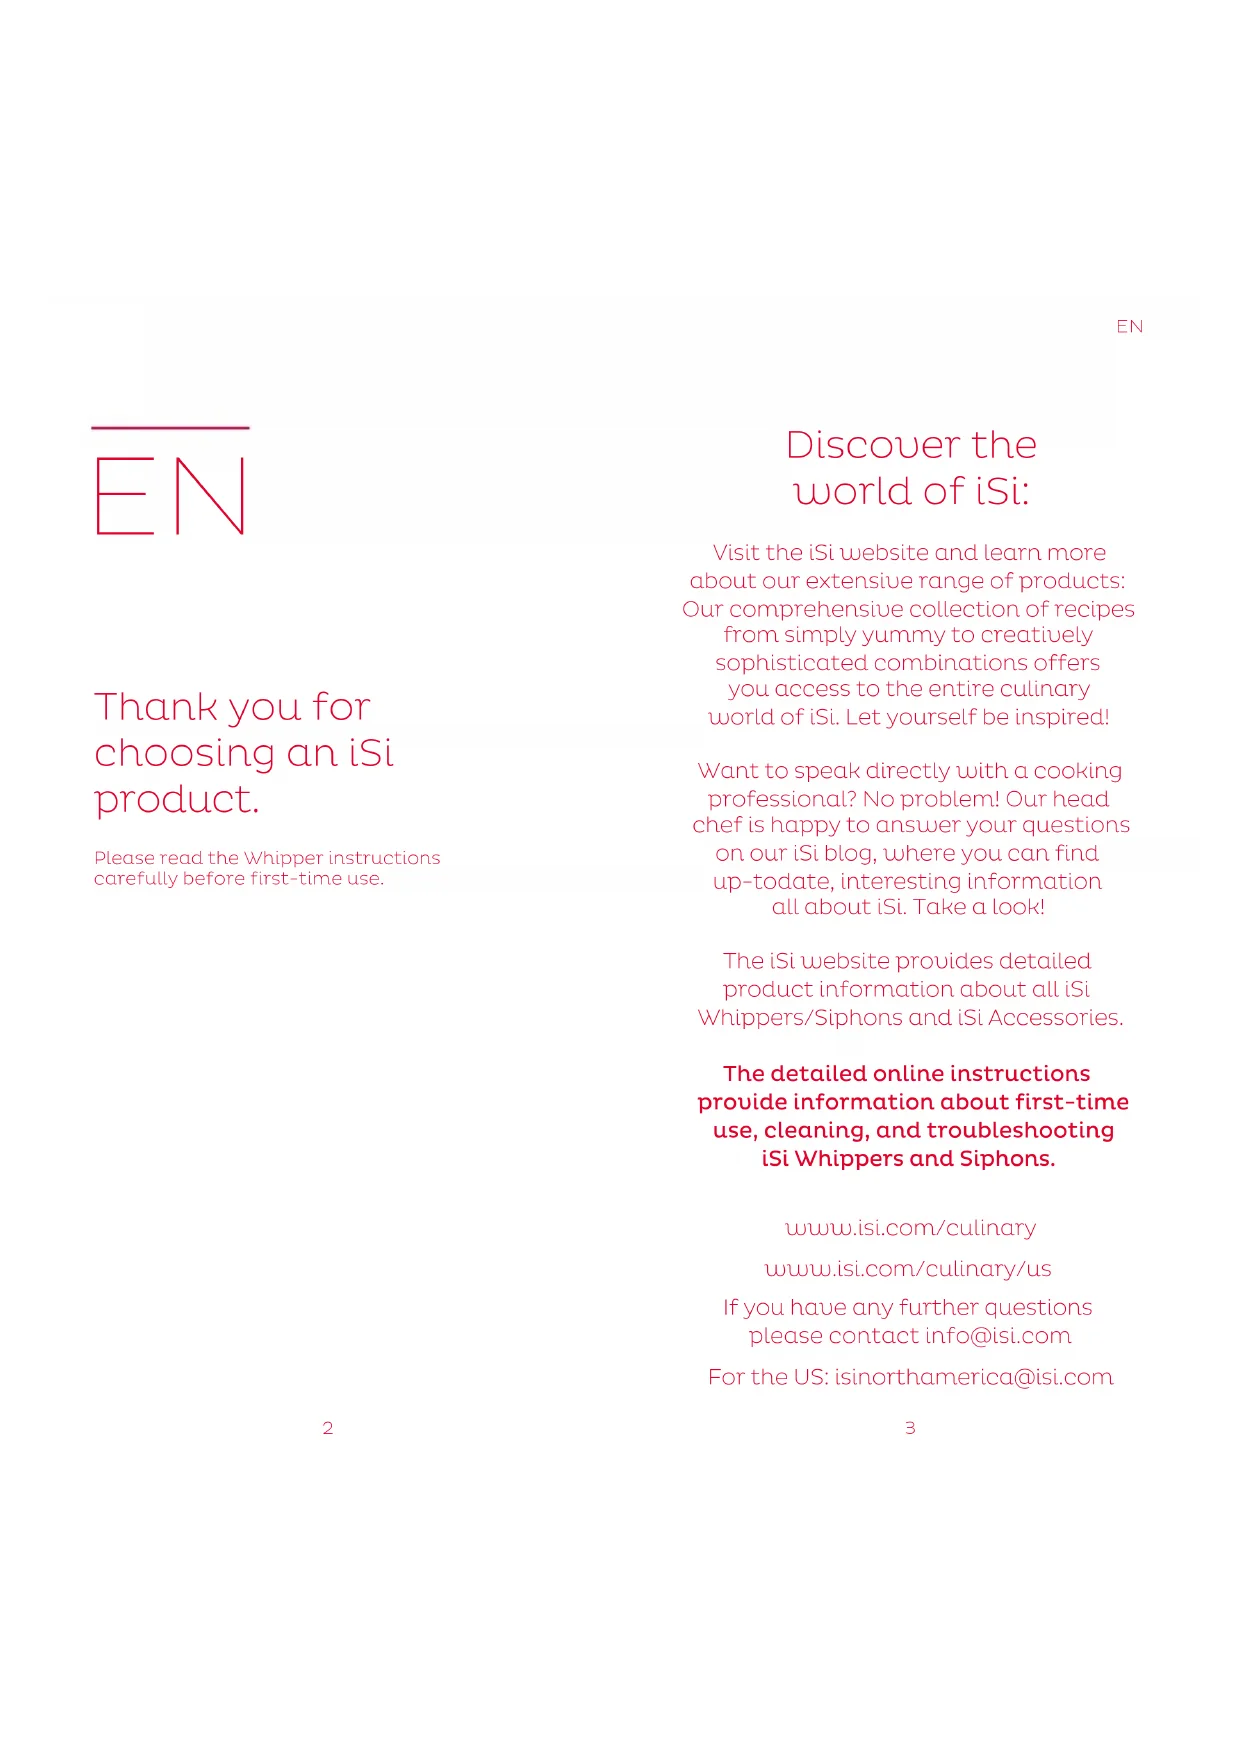
Instructions for Use.
NOTE: Please observe the illustrations "instructions for use"!
Cream should be cold when filled. Dispense cream from the iSi Whipper shortly before eating.
Preparation
- Remove the decorator tip from the head.
- Make sure that the head gasket is inserted into the head.
- Pour the whipping cream into the bottle.
NOTE: Please note the fill line and marking on the bottom of the bottle. Do not overfill! The remaining empty space is required for optimal whipping results. Use a measuring cup.
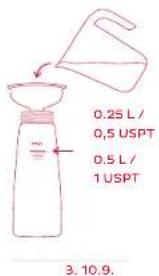
Equipment Setup.
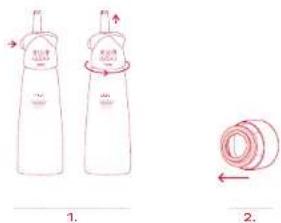
- Screw the head onto the bottle so that it is straight and tighten by hand.
- Insert the original iSi cream charger into the charger holder.
- Screw the charger holder with the inserted charger onto the head until you can hear that all of the charger contents have flowed into the whipper.
⚠ WARNING:The whipper is now pressurized!
- Shake the whipper vigorously > 5.
- Unscrew the charger holder and recycle the empty charger.
NOTE: A slight hissing noise may be heard when removing the charger holder. This is normal.
- Attach decorator tip to the head.
Operation
- When dispensing, the device must be held "headfirst" (decorator tip vertical!). Gently press the button.
NOTE: Test the consistency of the contents when the whipper is first used. Shake the whipper again if the consistency is still too runny.
EN
Cleaning.
NOTE: Please observe the illustrations on cleaning!
- Press the button until the device is completely empty and there is no pressure left. Remove the head from the bottle and pull off the decorator tip.
- Remove the head gasket for basic cleaning.
- Clean all product components by hand using warm (not hot) tap water along with a standard cleaning agent. Clean the decorator tip using the cleaning brush. Completely remove any fat and egg white residue.
NOTE: Do not use scouring agents or abrasive sponges/brushes.
NOTE: Do not put in the dishwasher and do not wash in boiling water.
NOTE: The decorator tip can be removed at any time for cleaning - simply rinse it with warm water.
Storage.
If the iSi Whipper is not going to be filled again immediately, leave the components to air dry in a clean place and store the iSi Whipper in a dismantled condition. Neuer store the whipper with the head screwed on!
Troubleshooting.
Release the pressure:
Place the device upright, place a towel or cloth over the tip and gently press the button until the pressure is gone from the iSi Whipper. Now the head can be removed from the bottle. If the pressure will not release, please contact iSi or your service center.
I cannot remove the content and/or the iSi Whipper sprays.
- There is a blockage due to undissolved ingredients such as sugar:
EN
— „Release the pressure“ and then carry out „Cleaning“.
— Make sure that the sugar is dissolved completely. To sweeten, we recommend using liquid flavouring syrup.
- The cream has become too stiff;
— Next time decrease the intensity and frequency of the shaking cycles.
— For information on the frequency of the shaking cycles, refer to www.isi.com/home-edition/whippedcream.
- Content is too firm due to over-cooling:
— Leave the whipper to stand at room temperature for around 5-10 minutes.
— Avoid freezing the content.
- No pressure/not enough pressure in the device:
— Only use original iSi cream chargers.
— Do not reuse empty chargers. They should be recycled immediately.
— Only operate the whipper „headfirst" with a vertical decorator tip because otherwise there could be a loss of pressure.
- Too many chargers were used:
— Pay attention to the maximum number of chargers to be used indicated in the Whipper Data.
— „Release the pressure“ and then set-up again.
The content being dispensed is too runny.
- The whipper was overfilled:
— „Release the pressure“, pour out the excess liquid and then set-up the whipper again.
— Observe the maximum filling amounts.
- The Whipper was not shaken or not shaken enough:
— For information on the frequency of the shaking cycles, refer to www.isi.com/home-edition/whippedcream.
- The content is not cold enough:
— Place a filled and prepared iSi whipper in the refrigerator for at least 1-2 hours. Please observe the instructions on the cream packaging regarding optimal preparation temperature.
- An unsuitable charger was used:
— Only use original iSi cream chargers.
It is difficult to screw on the charger holder
- The charger being used is not suitable — Only use original iSi cream chargers.
The cream charger will not puncture.
-
The charger being used is not suitable: — Only use original iSi cream chargers.
-
The charger was inserted backwards: — Insert the charger correctly (see diagram: Instructions for Use).
-
The puncturing unit has been damaged: — Send the whipper to iSi or to a service center.
During operation, gas is leaking between the bottle and the head.
- The head gasket is missing:
— "Release the pressure" and insert the head gasket into the head.
- The head gasket has been damaged:
— „Release the pressure.“ The head gasket needs to be replaced and is available as an original iSi spare part.
- The head was not tightened securely:
— "Release the pressure" — Tighten the head on to the bottle by hand as per the instructions.
- The bottle has been damaged on the upper edge:
— "Release the pressure" and send the whipper to iSi or a service center.
Service.
Replacement parts are available individually and at an affordable price.
See your specialist dealer for the availability of replacement parts. In Austria, you can also get in contact via info@isi.com. In the US contact isinorthamerica@isi.com
Only send in the complete whipper for repairs. Replacement parts can be seen in greater detail on the expanded drawing.
DE