
58HL632 - Cooker PYRAMIS - Free user manual and instructions
Find the device manual for free 58HL632 PYRAMIS in PDF.

| Product type | Induction hob (built-in cooktop) |
| Brand | Pyramis |
| Model | 58HL632 |
| Number of cooking zones | 4 zones (including one dual zone) |
| Control type | Touch Control with digital slider |
| Dimensions (W x D) | 590 x 520 mm (approximate) |
| Weight | Approximately 8 kg (approximate) |
| Electrical supply | Permanent connection, cable cross-section ≥ 2.5 mm² (up to 6400 W), or 4 mm² beyond |
| Maximum power | Up to 7200 W (approximate) |
| Fast Heat-up function | Yes, maintains max power then reduces to programmed level |
| Timer | Yes, programmable from 1 min to 4 h per zone |
| Integrated clock | Yes, with automatic reset after power cut |
| Countdown timer (Minute Minder) | Yes, without affecting active zones |
| Child safety lock (Key function) | Yes, full control lock |
| Residual heat indicator | Yes, 'H' symbol on the zone display |
| Ceramic glass surface | With pan detection and overheating protection |
| Maintenance and cleaning | Use a special scraper and non-abrasive products (SIDOL, STAHLFIX) |
| Installation | Built-in into worktop, with fixing brackets |
| Electrical connection | By a professional, with mandatory grounding |
| Spare parts and repairability | Contact Pyramis after-sales service (parts available) |
| Environmental standards | Conforms to WEEE directive 2002/96/EC |
Frequently Asked Questions - 58HL632 PYRAMIS
User questions about 58HL632 PYRAMIS
0 question about this device. Answer the ones you know or ask your own.
Ask a new question about this device
Download the instructions for your Cooker in PDF format for free! Find your manual 58HL632 - PYRAMIS and take your electronic device back in hand. On this page are published all the documents necessary for the use of your device. 58HL632 by PYRAMIS.
USER MANUAL 58HL632 PYRAMIS
natural_image
Three identical cooking pots with crossed-out handles, placed on a heating scale (no text or symbols)Fig.2
natural_image
Illustration of a hand holding a tool interacting with a curved object (no text or symbols present)Fig.3
flowchart
graph TD
    P["Input P"] --> Timer["Timer"]
    Timer --> N["Output N"]
    Timer --> O["Output O"]
    Timer --> S["Output S"]
    S --> OutputS["Output S1"]
    S --> OutputS2["Output S2"]
    S --> OutputS3["Output S3"]
    S --> OutputS4["Output S4"]
    S --> OutputS5["Output S5"]
    S --> OutputS6["Output S6"]
    S --> OutputS7["Output S7"]
    S --> OutputS8["Output S8"]
    S --> OutputS9["Output S9"]
    S --> OutputS10["Output S10"]
    S --> OutputS11["Output S11"]
    S --> OutputS12["Output S12"]
    S --> OutputS13["Output S13"]
    S --> OutputS14["Output S14"]
    S --> OutputS15["Output S15"]
    S --> OutputS16["Output S16"]
    S --> OutputS17["Output S17"]
    S --> OutputS18["Output S18"]
    S --> OutputS19["Output S19"]
    S --> OutputS20["Output S20"]
Fig.4
220-240V 1N \~ H05V2V2-F 3G
text_image
L N220-240V 2\~ H05V2V2-F 3G
text_image
L1 L2380-415V 2N\~ H05V2V2-F 4G
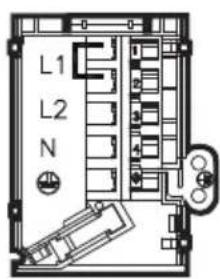
text_image
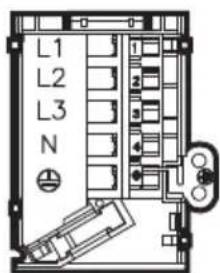
L1 L2 N220-240V 3\~ H05V2V2-F 4G
text_image
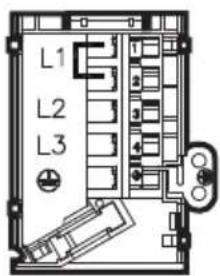
L1 L2 L3380-415V 3N\~ H05V2V2-F 5G
text_image
L1 L2 L3 NGENERALITÀ
O.S.D.(Overflow Safety Device)
O.S.D. (Overflow Safety Device)
O.S.D. (Overflow Safety Device).
O.S.D. (Overflow Safety Device).
Carefully read the contents of this leaflet since it provides important instructions regarding safety of installation, use and maintenance. Keep the leaflet for possible future consultation. All the operations relating to installation/replacement (electrical connections) must be carried out by specialised personnel in conformity with the regulations in force.
SAFETY PRECAUTION
It is recommended to use flat-bottom pans with a diameter equal to or slightly larger than that of the heated area. Do not use pans with a rough base to prevent scratching the heat surface of the cooktop (Fig.2). This appliance is not suitable for use by children or persons requiring supervision. Do not let children play with the appliance.
Before connecting the appliance to the electricity supply:
- Check that the voltage and power values listed on the data plate (positioned on the lower part of the appliance) are compatible with the electricity supply and socket. If you have any doubts, please consult a qualified electrician for assistance.
Important
- Avoid spilling liquid, therefore to boil or heat liquids, reduce the heat.
- Do not leave the heating elements on with empty pots and pans or without receptacles.
- When you have finished cooking, switch off the relevant heating element with the control indicated below.
Attention:
- Steam cleaners must not be used.
- If the surface is cracked, switch off the appliance to prevent electric shock.
- This appliance is not intended for use by young children or infirm persons without supervision
- Young children should be supervised to ensure they do not play with the appliance
This appliance conforms to the European Directive EC/2002/96, Waste Electrical and Electronic Equipment (WEEE). By making sure that this appliance is disposed of in a suitable manner, the user is helping to prevent potential damage to the environment or to public health.
The symbol on the product or on the accompanying paperwork indicates that the appliance should not be treated as domestic waste, but should be delivered to a suitable electric and electronic appliance recycling collection point. Follow local guidelines when disposing of waste. For more information on the treatment, re-use and recycling of this product, please contact your local authority, domestic waste collection service or the shop where the appliance was purchased.
INSTALLATION INSTRUCTIONS
These instructions address specialised installers and serve as a guide for installation, adjustment and maintenance in conformity with the laws and regulations in force.
If a built-in oven or any other appliance that generates heat must be fitted directly under the glass-ceramic cooktop, THIS APPLIANCE (oven) AND THE GLASS-CERAMIC COOKTOP MUST BE SUITABLY INSULATED in such a way that the heat generated by the oven, measured on the bottom right of the cooktop, does not exceed 60°C. Failure to respect this precaution may determine improper functioning of the TOUCHCONTROL system.
Positioning (Fig.1)
The domestic appliance is designed to be built into a worktop as illustrated in the specific figure. Apply sealant around the entire perimeter (cut-out dimensions Fig.1B).
Fix the domestic appliance on the worktop by means of the 4 brackets provided, taking the thickness of the worktop into account (Fig.1A). If the lower part of the appliance, after installation, is accessible via the lower part of the cabinet then it is necessary to mount a separator panel respecting the distances indicated (Fig.1C). If the appliance is installed with an oven underneath then the separator is not necessary.
Electrical connections
before making the electrical connections, check that:
- the ground cable is 2 cm longer than the other cables;
- the system ratings meet the ratings indicated on the identification plate fixed on the lower part of the worktop;
- the system is fitted with efficient earthing compliant to the laws and regulations in force.
Earthing is obligatory by law.
If the appliance is not fitted with a cable, use type:
"H05V2V2-F" for a power level of up to 6400 Watts. The cross-section of the cable should be at least 2.5mm^2 , or 4mm^2 for greater power levels.
The cable should never reach a temperature which is 50^ C above the temperature of the room in which it is installed.
The appliance is designed for permanent connection to the electricity supply and should therefore be fitted with an omnipolar switch which has a minimum opening of 3 mm between contacts. The switch should be suitable for the charge indicated on the appliance data plate and must conform to all current legislation (the yellow/green earth wire must not be interrupted by the switch).
The omnipolar switch must be easy to reach once the installation process has been completed.
USE AND MAINTENANCE
Maintenance
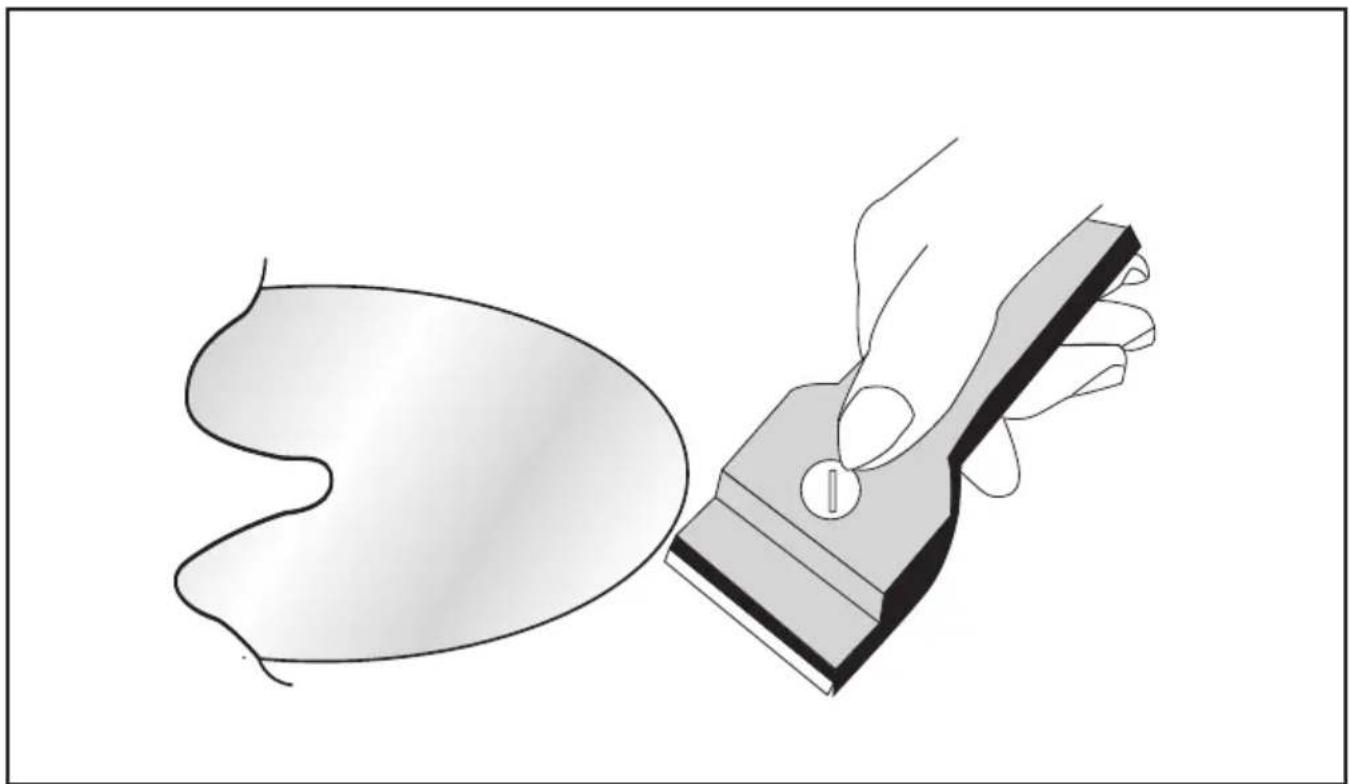
Remove any residues of food and drops of grease from the cooking surface using the special scraper supplied on request (Fig.3)
Clean the heated area as thoroughly as possible using SIDOL, STAHLFIX or similar products and a cloth/paper, then rinse with water and dry with a clean cloth.
Using the special scraper (optional) immediately remove any fragments of aluminium and plastic material that have unintentionally melted on the heated cooking area or residues of sugar or food with a high sugar content (Fig.3). In this way, any damage to the cooktop surface is prevented.
Under no circumstances use abrasive sponges or irritating chemical detergents such as oven sprays or stain removers.
Use
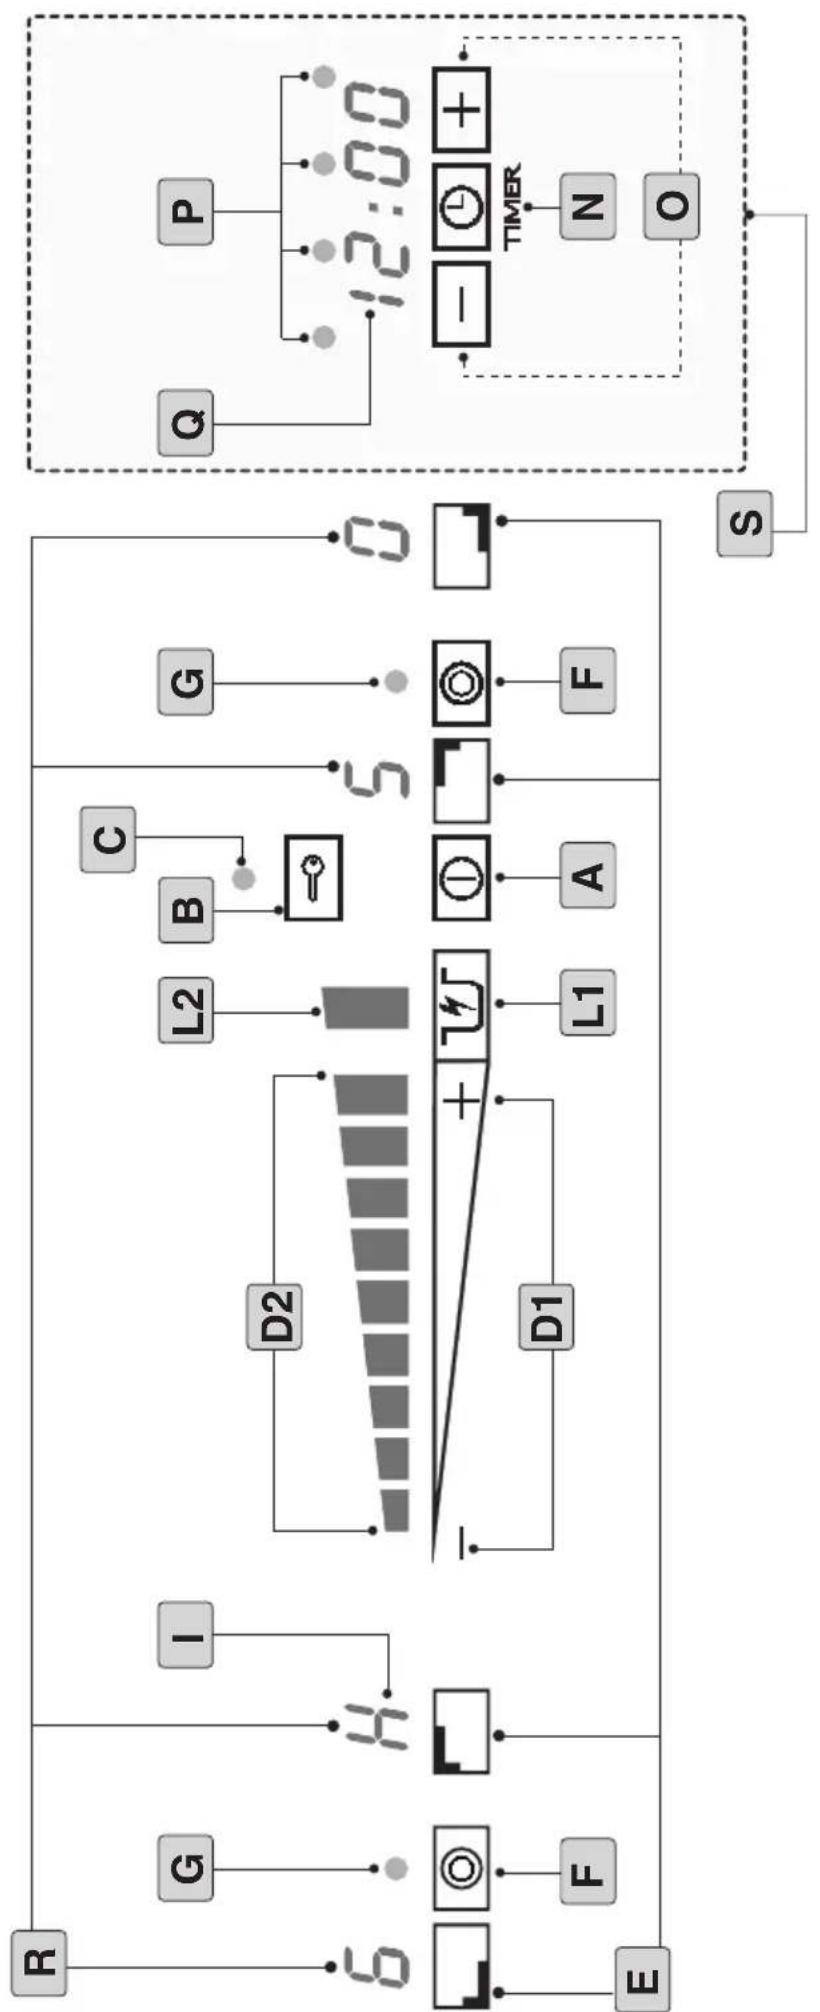
Use the touch control system in the corresponding position relative to the individual cooking needs. Keep in mind that the higher the number, the more heat that it is produced.
Operation
A=ON/OFF button
B=Lock button
C= Lock button ON/OFF indicator light
D1= Slider control
D2= Cooking level indicator
E= Cooking zone selector button
F= Double zone selector button
G= Double cooking zone ON/OFF indicator light
I="H" residual heat indicator symbol
L1= Rapid Heat up function ON/OFF button
L2= Heat up function active indicator light
N=Timer button
O= Timer adjustment (+ / -) buttons and Clock adjustment buttons (+ / -)
P= Hotplates with timer function enabled indicator light
Q= Clock and Timer display
R= Cooking zone display
S= Timer and Clock area
Warning:
The first time the hob is switched on it will be in safety mode, i.e. the "Lock button indicator light" (C) will be switched on.
To use the hob, press and hold the Lock button (B) for 3 seconds, until the indicator light switches off.
Note: the Lock function is activated automatically every time the power supply is cut off.
- The appliance can be switched on by selecting start-up button A. A zero will appear on all displays for 10 seconds. If no command is made within 10 seconds, the hob will switch off again.
- Any of the cooking zones may be switched on by selecting one of the corresponding 4 buttons (E). Once a cooking zone has been selected, "0" will begin to flash on the display; set the desired cooking level within 5/6 seconds using the SLIDER control (D1).
- To set the cooking level, simply run your finger over the SLIDER control.
Moving from "-" towards "+" will increase the temperature level (D2) (from 1 to 9); to decrease it simply run your finger from "+" towards "−".
The cooking level (e.g. 6) will appear on the cooking zone display (R).
Note: you may also directly press any point on the SLIDER control without running your finger along it; in this case the temperature level corresponding to the point at which the control was touched will be activated directly.
- To select the double cooking zone, where applicable, first press button (E), then adjust the cooking level (D1) and press the double zone selector button (F).
To deactivate the double zone, press button (E) followed by button (F).
- There are several different ways of switching off a cooking zone:
1- Select it and run your finger over the SLIDER control until
you reach "0".
2- Select it and directly press the “-” symbol on the SLIDER control.
3- Press and hold the cooking zone selector button E for 3/4 seconds; it will then switch off automatically.
Note: when the hob is in operation and you press the SLIDER control (D1), it will emit a sound alert (BEEP).
This sound alert informs the user that none of the cooking zones (E) have been selected and therefore the temperature level may not be altered.
- When a cooking zone (E) is switched to the OFF setting and the temperature of the glass surface remains above approximately 50°, the display (R) corresponding to that zone will show a luminous signal alternating between "0" and "H". If the hob is switched to the OFF setting (A), the luminous signal will display the letter "H" in a fixed manner.
Warning:
To prevent damage being inflicted on the electronic circuits, the hob is fitted with an overheating safety system.
In situations where cooking at a high power level has taken place for an extended period of time, the hob may enter safety mode and switch off automatically with no warning.
Once the temperature has returned to a safe level, the hob may be switched on again.
Lock function
To prevent the hob from being used by children, all functions may be locked by pressing the Lock button (B); this function is active when the indicator light (C) is illuminated.
- The Lock function may be activated while the hob is switched on or off.
- To activate or deactivate it, press and hold button (B) for approximately two seconds.
- If the hob is switched on and the Lock function is enabled, button A will still work.
O.S.D. (Overflow Safety Device)
- If any object has been placed on top of the control panel, the hob will automatically revert to OFF mode.
Heat up L1 (Rapid heating)
The Heat up function can be used to set the cooking zone to its maximum temperature for a specified period of time, after which the temperature will return to a lower value set previously.
To activate the Heat up function, select one of the cooking zones (E).
Set the cooking level to "9" using the SLIDER control (D1) and press the Heat up button (L1); the indicator light (L2) will switch on and the letter "A" will appear on the cooking zone, indicating that the Heat up function has been activated.
Set the desired cooking level (between 1 and 8); the cooking zone display will now show the letter "A" and the desired cooking level (e.g. 5) alternately.
- If the cooking level is not altered, the indicator light (D2) will switch off and a BEEP will be emitted.
Note: the cooking level set previously may be increased or decreased:
1- Select the cooking zone (E) for which the Heat up function has been activated.
2- Set the desired temperature by running your finger over the SLIDER control (D1).
When the Heat up function has finished running, the hob
will emit a sound signal or BEEP; the relevant cooking zone will continue to operate and the cooking level set previously, e.g. 4.
Note: the area (S) serves a double purpose:
1- Timer
2- Clock
Timer (N)
This function can be used to set an amount of time (between 1 minute and 4 hours) after which the selected cooking zone will switch off automatically.
Note: The Timer may be activated for all 4 cooking zones simultaneously.
Operation:
- Select the cooking zone (E) (including the double zone F, if desired).
- Set the desired cooking level (between 1 and 9) using the SLIDER control (D1).
- Press the Timer button (N); 0:00 will appear on the display (Q). At this point the Hotplates with timer function enabled indicator light (P) will begin to flash.
- Adjust the time as desired using the "+" and "-" buttons (O).
- Once the set time has elapsed, the indicator light (P) will begin to flash and a sound alert will be emitted.
To deactivate the sound alert, simply press the relevant cooking zone selector button (E), otherwise it will be deactivated automatically after 20 seconds.
Note: 3/4 seconds after the cooking time has been set, the display (Q) will enter standby mode and the clock will reappear.
To display the cooking time remaining, simply press the relevant cooking zone selector button (E).
Clock
The first time the hob is switched on, or after the power supply has been cut off, you will need to set the time.
Adjustment
While the hob is switched off, press the Timer button (N) until the numbers on the display (Q) begin to flash; use the "+" and "-" buttons (O) to set the correct time.
Once you have finished, press the Timer button (N) again until the numbers on the display (Q) stop flashing.
Minute Minder (Countdown)
This function can be used to start a countdown timer.
When the set time has elapsed, the hob will emit a sound alert without altering any other active functions.
Operation:
- select a cooking zone (E) and make sure the cooking level remains set to "0".
Press the Timer button (N); 0:00 will appear on the display (Q). At this point the Hotplates with timer function enabled indicator light (P) will begin to flash.
- Adjust the time as desired using the "+" and "-" buttons (O)
- Once the set time has elapsed, the indicator light (P) will begin to flash and a sound alert will be emitted.
To deactivate the sound alert, simply press the relevant cooking zone selector button (E), otherwise it will be deactivated automatically after 20 seconds.
Note: 3/4 seconds after the time has been set, the display (Q) will enter standby mode and the clock will reappear.
To display the time remaining, simply press the relevant
cooking zone selector button (E).
- If the cooking zone for which the Minute Minder has been set is adjusted to a level higher than "0", the remaining time period will be transferred to the cooking timer.
- If all four cooking zones are switched on, it will not be possible to activate the Minute Minder function
- The timer and Minute Minder functions may, however, be activated simultaneously (using different cooking zones).
THE MANUFACTURER DECLINES ALL RESPONSIBILITY FOR EVENTUAL DAMAGES CAUSED BY BREACHING THE ABOVE WARNINGS.
ALGEMEEN
INSTALLATIE INSTRUCTIES
O.S.D. (Overflow Safety Device)
O.S.D.(Overflow Safety Device)
O.S.D.(Overflow Safety Device)
R= Display for kogestone
O.S.D. (Overflow Safety Device)
O.S.D. (Overflow Safety Device)
O.S.D.(Overflow Safety Device)
O.S.D. (Overflow Safety Device)
Oppvarming L1 (hurtig oppvarming)
D1= Regulator Slider
O.S.D. (Overflow Safety Device).
O.S.D.(Overflow Safety Device)
O.S.D. (Overflow Safety Device).
O.S.D.(Overflow Safety Device)
natural_image
Abstract black-and-white graphic with a stylized plant and star-like shapes (no text or symbols)
natural_image
Black-and-white map of Europe showing countries in Europe with some outside, no text or labels present3LIP0176