VCCJS71 - Battery charger VOLTCRAFT - Free user manual and instructions
Find the device manual for free VCCJS71 VOLTCRAFT in PDF.
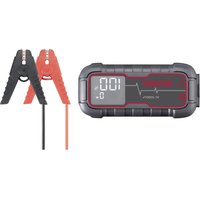
| Product type | 4-in-1 emergency jump starter with air compressor and external battery |
| Brand | Voltcraft |
| Model | VCCJS71 |
| Dimensions (L x W x H) | 207 x 170 x 86 mm |
| Weight | 1.5 kg |
| Internal battery | Li-ion 14.8 V / 59.2 Wh / 16000 mAh (non-removable) |
| Power supply (charging input) | USB-C™ 5 V / 2.0 A |
| Internal battery charging time | Approximately 8 to 9 hours |
| External battery output (USB-A) | Output 1: 5 V / 3 A, 9 V / 2 A, 12 V / 1.5 A (max. 18 W); Output 2: 5 V / 3 A |
| Jump start system | 12 V DC, peak current 600 A (1200 A), max. 15 starts |
| Engines suitable for starting | Gasoline (≤ 8.0 L), Diesel (≤ 6.0 L) |
| Air compressor | Max pressure 10 bar (150 psi), cycle 8 min on / 5 min off |
| LED lighting | White (4000K, 200 lm, 2 W) and red (80 lm, 2 W); modes: steady white, white SOS, steady red, red strobe |
| Operating conditions | -20 °C to +60 °C, 40 to 85 % RH (non-condensing) |
| Protection | Over-discharge (< 13 V), overheat (≥ 65 °C), reverse polarity (≥ 12.6 V), short circuit |
| Package contents | Product, USB-C to USB-A cable, air hose with 3 valve adapters, Smart jump cables, instruction manual |
| Care and cleaning | Clean with a dry, lint-free cloth; do not use harsh products, do not immerse |
| Disposal | Comply with WEEE regulations; remove non-integrated batteries before disposal |
Frequently Asked Questions - VCCJS71 VOLTCRAFT
User questions about VCCJS71 VOLTCRAFT
0 question about this device. Answer the ones you know or ask your own.
Ask a new question about this device
Download the instructions for your Battery charger in PDF format for free! Find your manual VCCJS71 - VOLTCRAFT and take your electronic device back in hand. On this page are published all the documents necessary for the use of your device. VCCJS71 by VOLTCRAFT.
USER MANUAL VCCJS71 VOLTCRAFT
Charging: Ladeeingang (USB-CTM)
Copyright by Conrad Electronic SE.
*2436040_V3_0323 dh_mh_de 18014398881457931-1 I3/O3 en
VOLTCRAFT
Operating Instructions
VC-CJS71 4 in 1 Jump Starter System with Air Compressor
(20
日
Item no: 2436040
1 Intended use
The product is a jump starter for petrol (max. 8L) and diesel (max. 6L) engines. Other features include:
LED light
Power bank
Air compressor
Contact with moisture must be avoided under all circumstances.
If you use the product for purposes other than those described, the product may be damaged.
Improper use can result in short circuits, fires, electric shocks or other hazards.
The product complies with the statutory national and European requirements.
For safety and approval purposes, you must not rebuild and/or modify the product.
Read the operating instructions carefully and store them in a safe place. Make this product available to third parties only together with the operating instructions.
All company names and product names are trademarks of their respective owners. All rights reserved.
2 Delivery contents
Product
Air hose
"Smart" starter cables
USB-CTM to USB-A charging cable
3x valve connectors
Operating instructions
3 Latest product information
Download the latest product information at www.conrad.com/downloads or scan the QR code shown. Follow the instructions on the website.
4 Description of symbols

The symbol with the exclamation mark in the triangle is used to indicate important information in this document. Always read this information carefully.

Read the operating instructions carefully.
5 Safety instructions

Read the operating instructions carefully and especially observe the safety information. If you do not follow the safety instructions and information on proper handling, we assume no liability for any resulting personal injury or damage to property. Such cases will invalidate the warranty/guarantee.
5.1 General
The product is not a toy. Keep it out of the reach of children and pets.
Do not leave packaging material lying around carelessly. This may become dangerous playing material for children.
If you have questions which remain unanswered by this information product, contact our technical support service or other technical personnel.
- Maintenance, modifications and repairs must only be completed by a technician or an authorised repair centre.
5.2 Handling
- Handle the product carefully. Jolts, impacts or a fall even from a low height can damage the product.
5.3 Operating environment
Do not place the product under any mechanical stress.
- Protect the appliance from extreme temperatures, strong jolts, flammable gases, steam and solvents.
Protect the product from high humidity and moisture.
Protect the product from direct sunlight.
- Do not switch the product on after it has been taken from a cold to a warm environment. The condensation that forms might destroy the product. Allow the product to reach room temperature before you use it.
5.4 Operation
Consult an expert when in doubt about the operation, safety or connection of the appliance.
If it is no longer possible to operate the product safely, take it out of operation and protect it from any accidental use. DO NOT attempt to repair the product yourself. Safe operation can no longer be guaranteed if the product:
- is visibly damaged,
is no longer working properly, - has been stored for extended periods in poor ambient conditions or
has been subjected to any serious transport-related stresses.
5.5 Li-ion battery
Never damage the rechargeable battery. Damaging the casing of the rechargeable battery might cause an explosion or a fire!
- Never short-circuit the contacts of the rechargeable battery. Do not throw the battery or the product into fire. There is a danger of fire and explosion!
Charge the rechargeable battery regularly, even if you do are not using the product. Due to the rechargeable battery technology being used, you do not need to discharge the rechargeable battery first.
Never charge the rechargeable battery of the product unattended.
- When charging, place the product on a surface that is not heat-sensitive. It is normal that a certain amount of heat is generated during charging.
5.6 LED light
Do not look directly into the LED light!
Do not look into the beam directly or with optical instruments!
5.7 Connected devices
- Also observe the safety and operating instructions of any other devices which are connected to the product.
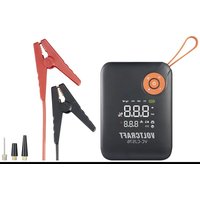
6 Product overview
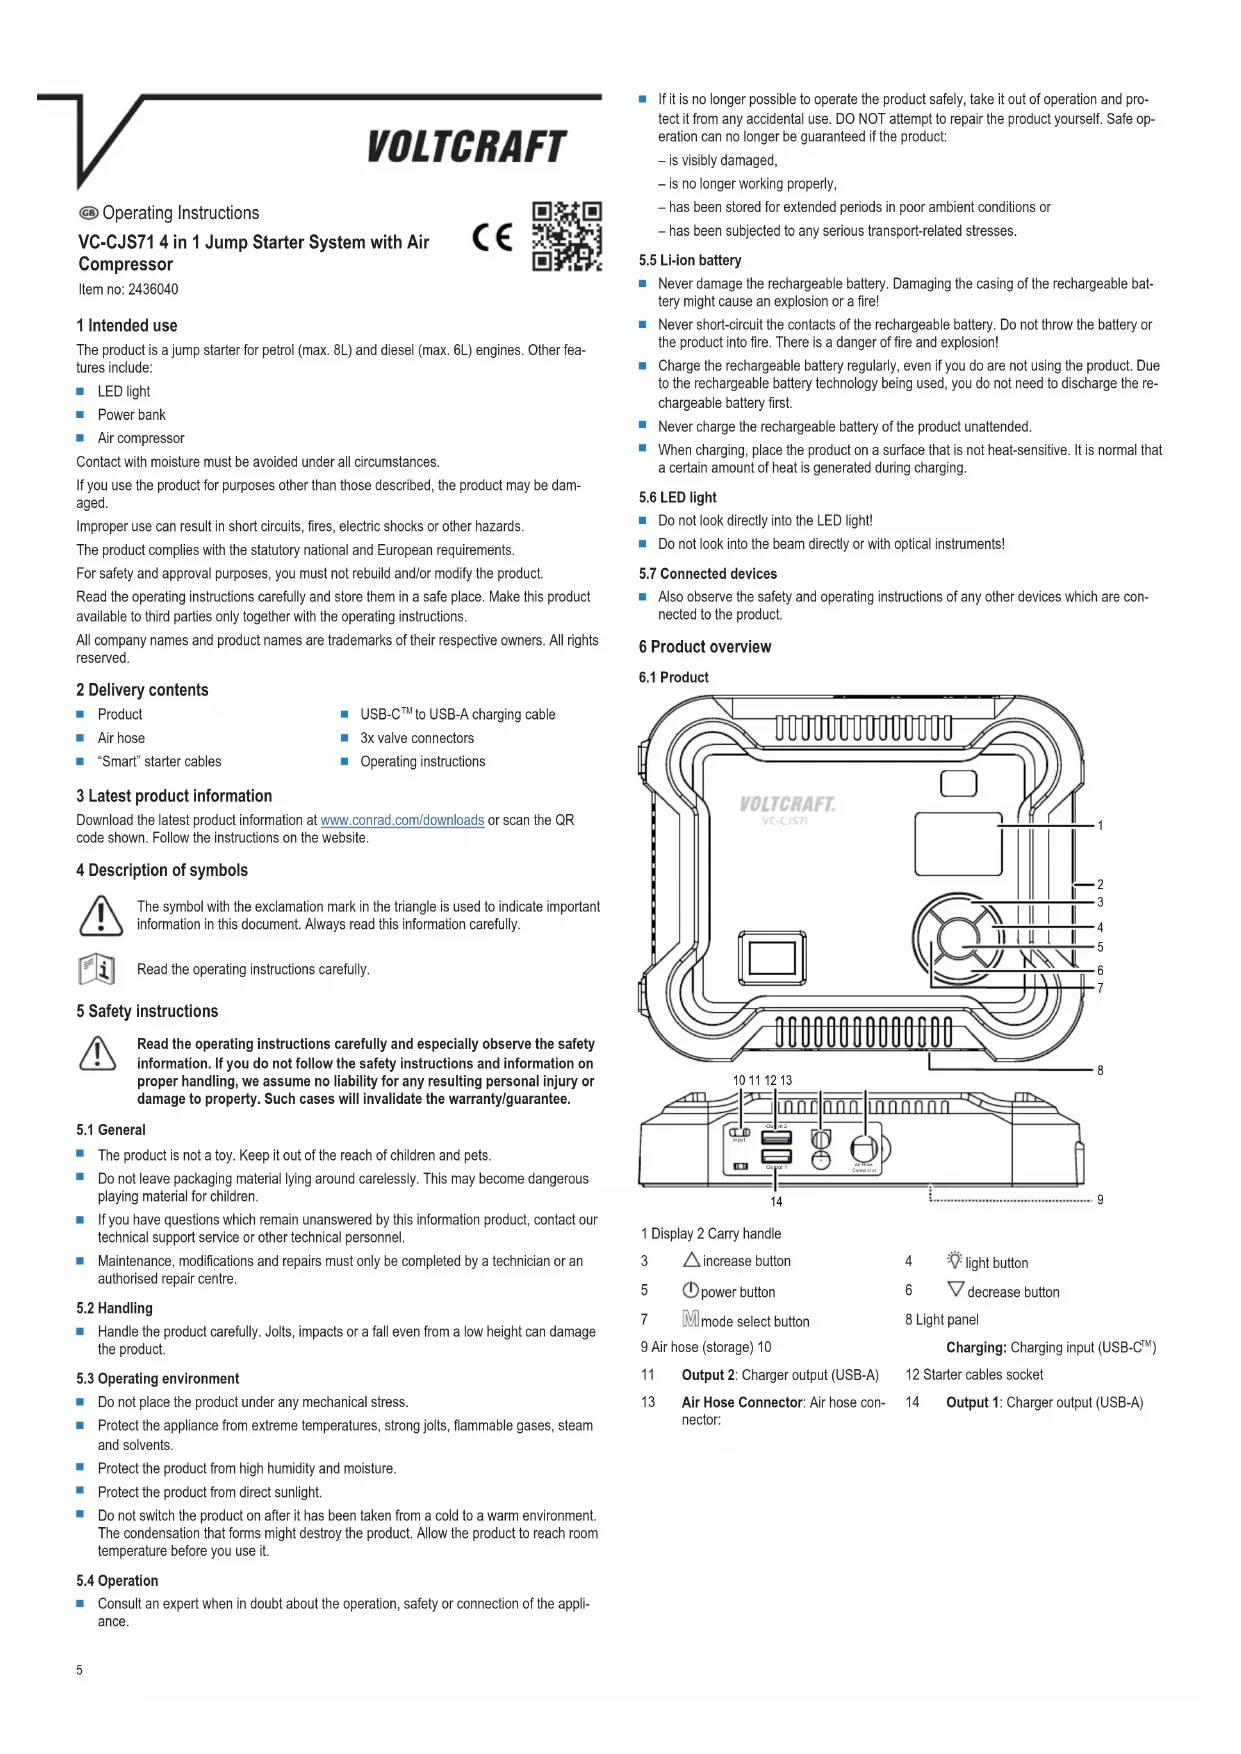
6.1 Product
1 Display 2 Carry handle
3 △increase button
5 ① power button
7 mode select button
4 light button
6 decrease button
8 Light panel
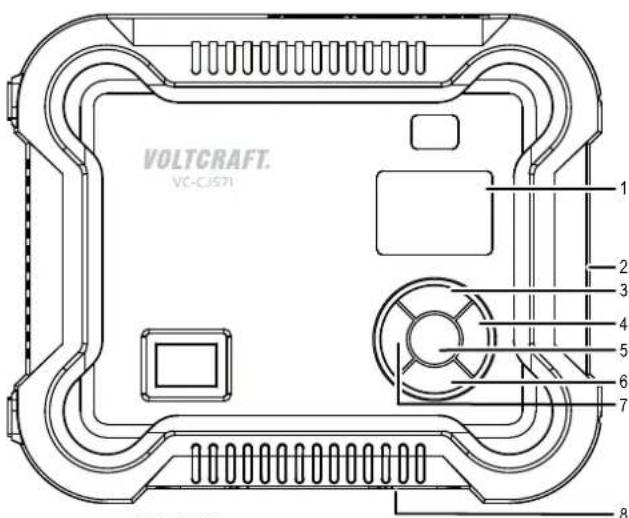
9 Air hose (storage) 10
Charging: Charging input (USB-C™)
11 Output 2: Charger output (USB-A)
12 Starter cables socket
13 Air Hose Connector: Air hose connector
14 Output 1: Charger output (USB-A)
6.2 Starter cables
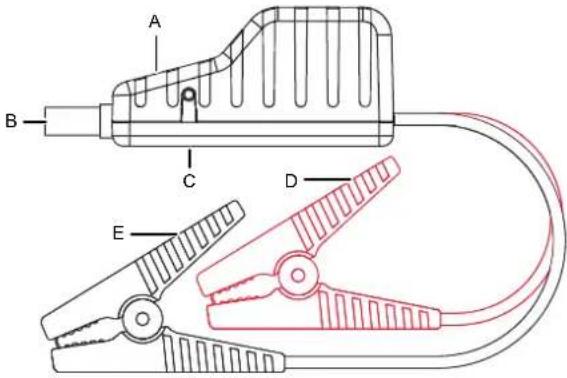
A Starter status indicator B Starter cables plug
C Force start button D Red starter clip (+)
E Black starter clip (-)
7 Charge the product battery
Important:
- Do not charge the power bank using the USB-A ports on a computer. The current supplied by these ports may not be sufficient and can damage the computer.
- To prolong the battery life, it is recommended to fully charge the battery every 3 - 6 months.
- Do not jump start the vehicle while charging the batteries!
The battery level indicators will indicate the level of charge:
( = 25%, = 50%, = 75%, = 100%)
To recharge the battery, connect one end of the charging cable to a power supply and the other end to the USB-C™ charging input Input on the product.
Battery level indicators flashing: charging in progress
Battery level indicators constant on: fully charged.
8 Power bank
Preconditions:
To use this product as a power bank you will need a suitable charging cable.
1. Connect one end of the charging cable to your mobile device, and the other end to a charger output on the product.
2. Long press the button to start charging.
9 LED light
Long press the button to switch the light ON/OFF.
Press the button repeatedly to cycle through modes: ON (white) SOS (white) ON (red) Strobe (red).
10 Air compressor
10.1 Settings
| Button Action Description | |
| M | Short press Press repeatedly to toggle through pressure pre-sets: (car), motorcycle), (bicycle), (ball) to icon manual setting mode). |
| M | Press and hold When the pressure unit flashes, press repeatedly to select a pressure unit: PSI, BAR, KPA, Kg/cm². |
| △/√ | Short press Increase / decrease the air pressure level. |
| Short press Start/stop the compressor. | |
Tip:
Select a pressure pre-set, then press to the tune the air pressure level.
10.2 Inflation
Important:
Inspect the product before inflating. Check the valve and the air hose is not damaged.
Do not bend or restrict the air hose while the compressor is in use.
Risk of damage due to water ingress Do not use in rain or wet conditions.
In case of an electrical or mechanical fault, immediately switch OFF and disconnect the product.
Only use on inflatable items (e.g. tires, balls, air bed). Take extra care not to over-inflate.
Please refer to your vehicle handbook for the correct tire pressure required for your vehicle.
- Carefully observe the tire pressure and air pressure units when using "manual setting mode". Over inflating can cause an object to burst.
- Allow a vehicle tire to cool down before inflating.
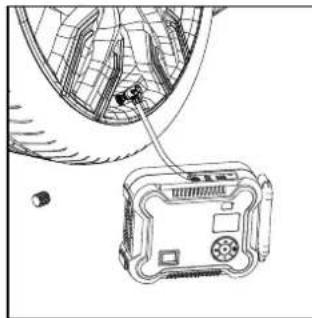
Preconditions:
You have read all the safety information and know the correct inflation pressure for the task.
- Press and hold switch the power ON.
- Make sure the correct pressure unit is selected.
- Select a pressure level pre-set and/or manually adjust the air pressure level.
- (If needed) attach a valve connector to the end of the air hose.
- Connect the air hose to the air hose connector Air Hose Connector outlet on the product.
- Connect the air hose to the valve on the object you are inflating.
The object's pressure level will show on the display.
- Press start/stop the compressor.
- Press and hold switch the power OFF.
- Disconnect the air hose.
Important:
Prevent overheating. For every 8 minutes of continuous use, the product must cool down for 5 minutes before using again.
11 Quick starting system
Important:
Only use the included starter cables.
Clean corroded or dirty vehicle battery terminals before connecting the cables.
Do not use if a cable or clip is damaged.
To prevent damage to the product, only use with 12V vehicle onboard systems.
- Never short circuit the two pole terminals e.g. Do not clamp both cables together or to the same piece of conductive material.
11.1 Before jump starting the vehicle
Prepare vehicle for ignition. Place gear in park/neutral and engage the emergency brake.
Switch off all vehicle electronics e.g. air conditioner, heater, radio, and lights.
Make sure there is at least 50% charge in the starter.
11.2 Normal starting method
Important:
If ignition fails after 3 attempts, disconnect the quick start system, wait 5 mins then try the Force starting method [7].
- Connect the starter cables plug to the starter cables socket.
- Clip the red and black cables to the electrodes of the vehicle battery in the following sequence.
Red clamp to positive (+).
- Black clamp to negative (-).
-
Check the starter status indicator:
-
Alternating red/green flashing (normal) proceed to step 4.
-
Other LED status: see section Status indicators [7].
-
Attempt to start the vehicle.
-
Do not start the ignition for more than 3 secs at a time.
-
Allow the starter to cool down for 30 secs between each start attempt.
Maximum 3 attempts within 2 mins. -
If the engine starts, disconnect the black terminal followed by the red terminal. Replace the sockets cover.

Let the vehicle run for approx. 30 mins to recharge the battery.
11.3 Force starting method
Important:
Use this method if the normal starting method fails. If ignition fails after 3 attempts, disconnect the quick start system and contact a specialist workshop.
- Connect the starter cables plug to the starter cables socket.
- Clip the red and black cables to the electrodes of the vehicle battery in the following sequence.
Red clamp to positive (+)
- Black clamp to negative (-)
-
Check the starter status indicators:
-
Alternating red/green flashing (normal) proceed to step 4.
-
Other LED status: see section Status indicators [7].
-
Press and hold the Force Start Button for 3 secs until the status LED lights solid green.
-
Start the vehicle within 30 seconds after the LED lights solid green.
- Attempt to start the vehicle. Do not start ignition for more than 3 secs at a time.
-
Allow the starter to cool down for 30 secs between each start attempt.
Maximum 3 attempts within 2 mins. -
If the engine starts, disconnect the quick start system and replace the sockets cover.

Let the vehicle run for approx. 30 mins to recharge the battery.
12 Status indicators
12.1 Normal
| Status indicator Status | |
| Alternating red/green flashing Quick start system is ready/starting in progress. | |
| Green steady on Force start mode is activated. | |
12.2 Protection mode
| Status indicator Status | |
| Red steady/red flashing | Connection error. Please check all contacts. |
| Red on/alarm sound on | ■ Reversed polarity: check if the clamps are connected the wrong way around. ■ Short-circuit: Both cables are clamped together or clamped to the same piece of conductive metal. |
| Red steady on | ■ Reverse charging protection is triggered. Voltage of the con- nected battery is >12.6 V. ■ The jump starter is not needed as the vehicle battery is enough to start the vehicle. |
| Red flashing quickly Over | temperature: Clamp >65 (±5) °C. Remove the clips until the starter status indicator returns to normal (alternating red/green flashing). |
| Green flashing slowly Quick | Quick start battery charge is too low, recharge it. |
13 Cleaning and care
Important:
- Do not use aggressive cleaning agents, rubbing alcohol or other chemical solutions. They damage the housing and can cause the product to malfunction.
-
Do not immerse the product in water.
-
Disconnect the product from the power supply.
- Clean the product with a dry, fibre-free cloth.
14 Disposal

This symbol must appear on any electrical and electronic equipment placed on the EU market. This symbol indicates that this device should not be disposed of as unsorted municipal waste at the end of its service life.
Owners of WEEE shall dispose of it separately from unsorted municipal waste. Spent batteries and accumulators, which are not enclosed by the WEEE, as well as lamps that can be removed from the WEEE in a non-destructive manner, must be removed by end users from the WEEE in a non-destructive manner before it is handed over to a collection point.
Distributors of electrical and electronic equipment are legally obliged to provide free takeback of waste. Conrad provides the following return options free of charge (more details on our website):
in our Conrad offices
at the Conrad collection points
at the collection points of public waste management authorities or the collection points set up by manufacturers or distributors within the meaning of the ElektroG
End users are responsible for deleting personal data from the WEEE to be disposed of. It should be noted that different obligations about the return or recycling of WEEE may apply in countries outside of Germany.
15 Technical data
15.1 General
Charging input (USB-CTM) 5 V/DC 2.0 A
Battery pack (rechargeable) 14.8 V 59.2 Wh, Li-ion (non-removable), 16000 mAh
Battery pack (recharge time) approx. 8-9 hours
Protection Short circuit, overload, low voltage, over voltage, over charge, over temperature, reverse charging, reverse polarity
Over-discharge protection .≤13 V ±0.3 V
Over-temperature protection. >65^ ± 5^
Reverse charging protection. ≥ (12.6V± 0.3V)
Operating / storage conditions. -20 to +60^ , 40 - 85% RH (non-condensing)
Dimensions (L x W x H) 207 x 170 x 86 mm
Weight 1.5 kg
15.2 Power bank
Charger output (USB-A) Output 1:5 V/DC3A,9V/DC2A,12V/DC1.5A max.18W Output 2:5V/DC3A
15.3 Jump starter
Vehicle on-board system. 12 V/DC
Start current (peak value) 600 A (1200 A)
Jump starts.. approx. 15 (affected by factors such as ambient temperature, size, and mechanical condition of the engine)
Suitable engine types.. Gasoline (displacement ≤ 8.0L )Diesel (displacement ≤ 6.0L
15.4 Air compressor
Duty cycle. 8 minutes ON, 5 minutes OFF
Air pressure max. 10 bar (150 psi)
15.5 LED light
Light. White: 4000 K, 200 lm, 2 W
Red: 80 Im, 2 W
Light modes. ON (white) SOS (white) ON (red) Strobe (red)
This is a publication by Conrad Electronic SE, Klaus-Conrad-Str. 1, D-92240 Hirschau (www.conrad.com).
All rights including translation reserved. Reproduction by any method (e.g. photocopying, microfilming or the capture in electronic data processing systems) requires prior written approval from the editor. Reprinting, also in part, is prohibited. This publication reflects the technical status at the time of printing.
Copyright by Conrad Electronic SE.
*2436040_V3_0323 dh_mh_en 18014398881457931-2 I3/O3 en
VOLTCRAFT
Mode d'emploi
(= 25%, = 50%, = 75%, = 100%)
Protection . Court-circuit, surcharge,asse tension, surtension, surcharge, surchauffe, inversion de charge, inversion de polarité
Copyright by Conrad Electronic SE.
*2436040_V3_0323_dh_mh_fr 18014398881457931-3 I3I03 en
VOLTCAFT
Gebruiksaanwijizing
Laedingang (USB-CTM) 5 V/DC 2,0 A