
AT910006 - Food Processor KENWOOD - Free user manual and instructions
Find the device manual for free AT910006 KENWOOD in PDF.
| Product type | Food processor accessory (fresh pasta and cookies) |
| Brand | Kenwood |
| Model | AT910006 |
| Dimensions (approx.) | 20 x 15 x 30 cm |
| Weight (approx.) | 1 kg |
| Power supply | Not applicable (mechanical accessory for food processor) |
| Main functions | Making fresh pasta (multiple shapes), cutting, making cookies (with accessory AT910014) |
| Included dies | 1 Maccheroni rigati die |
| Optional dies | Available separately for different pasta shapes |
| Die material | Bronze (rough surface to hold sauce) |
| Recommended food processor speed | Speed 2-3 |
| Maintenance and cleaning | Disassemble and clean immediately after use; wash in warm soapy water; do not immerse the spiral |
| Safety | Do not insert fingers into the tube; use the provided pusher; do not attach/remove the accessory while running; sharp blade |
| Included accessories | Pusher, cleaning tool, Maccheroni rigati die, user manual |
| Compatible accessories | Cookie maker AT910014 (sold separately) |
| Country of origin | Not specified (Kenwood brand, likely China or UK) |
| Warranty | Not specified in the manual |
| Manual available | French and several other languages (downloadable PDF) |
Frequently Asked Questions - AT910006 KENWOOD
User questions about AT910006 KENWOOD
0 question about this device. Answer the ones you know or ask your own.
Ask a new question about this device
Download the instructions for your Food Processor in PDF format for free! Find your manual AT910006 - KENWOOD and take your electronic device back in hand. On this page are published all the documents necessary for the use of your device. AT910006 by KENWOOD.
USER MANUAL AT910006 KENWOOD
- Pasta mix made too dry or fed through too quickly can break your pasta maker and/or mixer.
- Do not place your fingers or any other item, except the spanner/pusher supplied, down the feed tube.
- Only use the spanner/pusher handle to push dough down the feed tube. And don't push too hard.
- Never attach or remove the pastamaker whilst the mixer is in operation.
- Feed the dough small amounts at a time and at a steady rate. Don't allow the feed tube to fill up.
- Take care when handling or cleaning as the cutting assembly blade will be sharp.
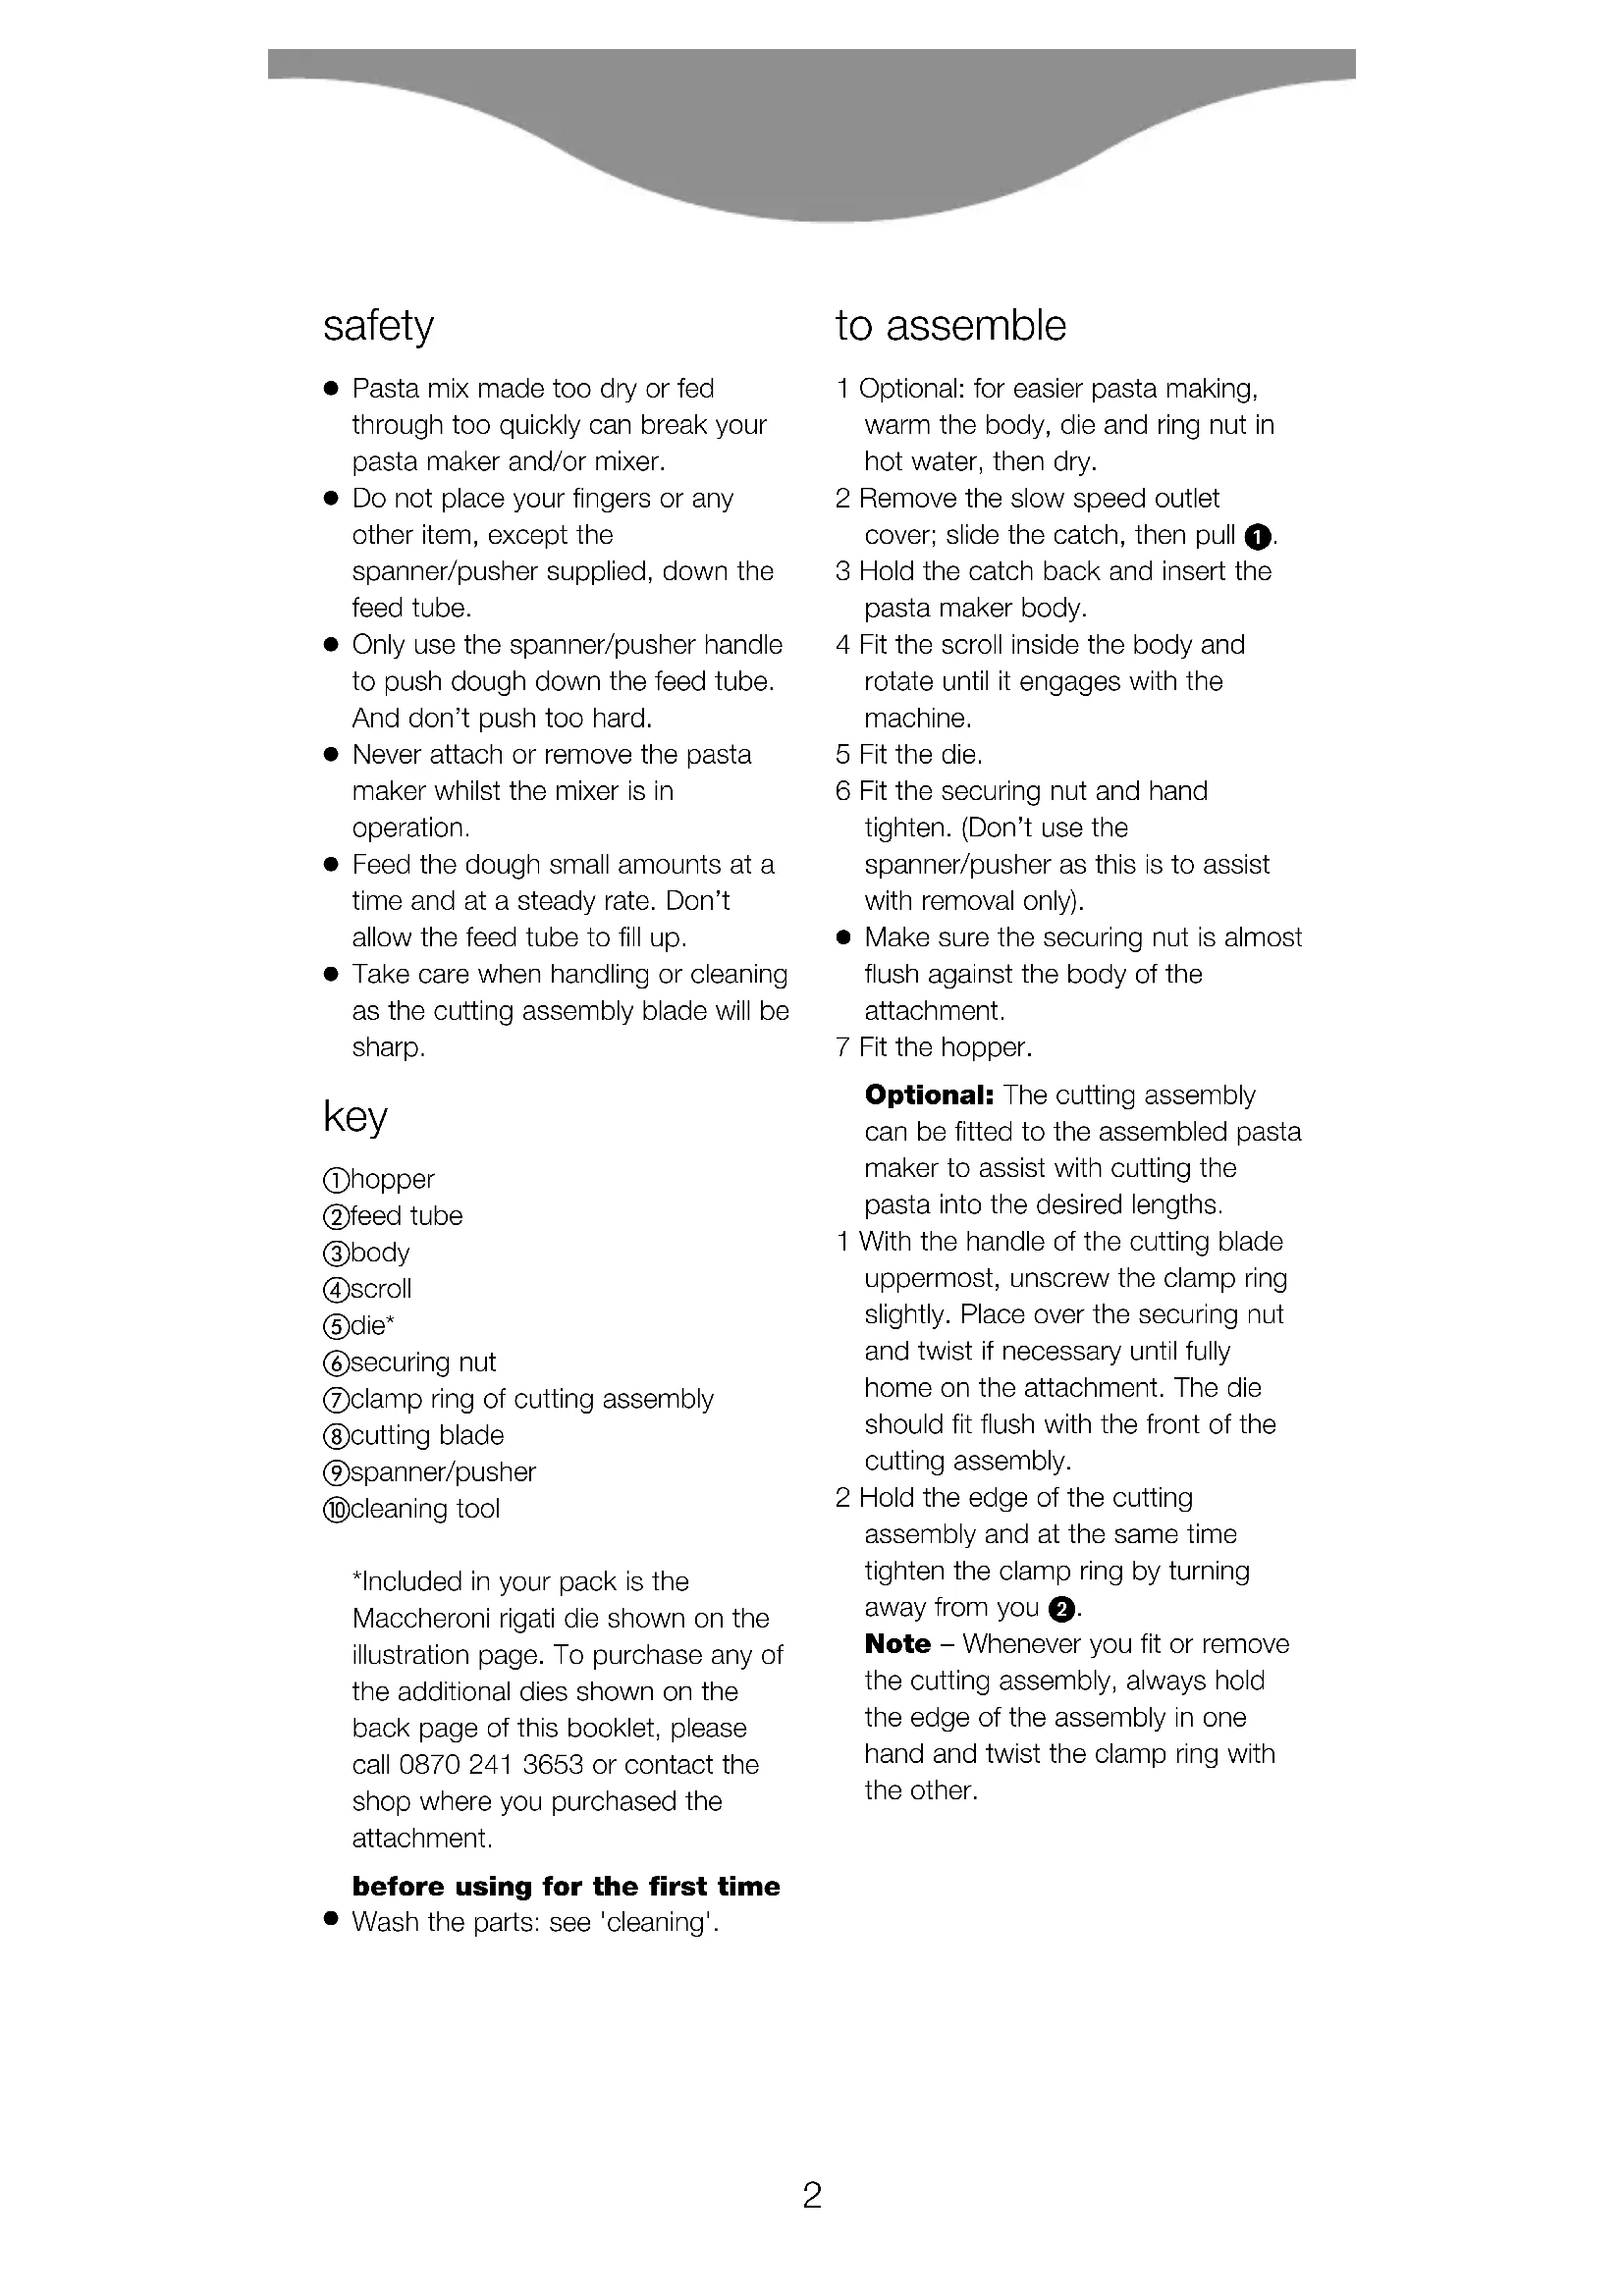
key
①hopper
②feed tube
③ body
④scroll
⑤die*
⑥ securing nut
⑦clamp ring of cutting assembly
⑧cuttingblade
⑨spanner/pusher
⑩ cleaning tool
*Included in your pack is the Maccheroni rigati die shown on the illustration page. To purchase any of the additional dies shown on the back page of this booklet, please call 0870 241 3653 or contact the shop where you purchased the attachment.
before using for the first time
- Wash the parts: see 'cleaning'.
to assemble
1 Optional: for easier pasta making, warm the body, die and ring nut in hot water, then dry.
2 Remove the slow speed outlet cover; slide the catch, then pull 1.
3 Hold the catch back and insert the pasta maker body.
4 Fit the scroll inside the body and rotate until it engages with the machine.
5 Fit the die.
6 Fit the securing nut and hand tighten. (Don't use the spanner/pusher as this is to assist with removal only).
- Make sure the securing nut is almost flush against the body of the attachment.
7 Fit the hopper.
Optional: The cutting assembly can be fitted to the assembled pasta maker to assist with cutting the pasta into the desired lengths.
1 With the handle of the cutting blade uppermost, unscrew the clamp ring slightly. Place over the securing nut and twist if necessary until fully home on the attachment. The die should fit flush with the front of the cutting assembly.
2 Hold the edge of the cutting assembly and at the same time tighten the clamp ring by turning away from you 2.
Note - Whenever you fit or remove the cutting assembly, always hold the edge of the assembly in one hand and twist the clamp ring with the other.
to use your pasta maker
1 Make your pasta mix following a recipe supplied.
- Don't make the mix too dry as it could break your pasta maker or mixer. It should resemble coarse breadcrumbs or a coarse crumble texture. The particles should be separate but if squeezed together it should form a clump which bonds together.
2 Switch the mixer onto speed 2-3.
3 Place some of the mix onto the hopper. Feed a small amount of mix into the feed tube at a time. Allow the scroll to clear before continuing. If the feed tube becomes clogged use the end of the spanner/pusher handle to push the mix onto the scroll (don't use anything other than the spanner handle and don't push too hard). Never let the feed tube fill up.
4 When the pasta is long enough, move the handle on the cutting assembly back and forth to cut the pasta into the desired length. Alternatively if the cutting assembly is not fitted use a knife to cut the pasta.
- To change dies remove the cutting assembly. Always hold the edge of the cutting assembly in one hand and twist the clamp ring towards you and remove. Remove the securing nut (use the spanner/pusher to loosen the securing nut if necessary) and switch briefly to speed 1 to eject the die. Remove the die and any visible excess pasta and then fit the desired die. Replace the securing nut and cutting assembly.
warning
The pasta maker will get hot in use - this is normal and is caused by the pasta being compressed in the attachment.
NOTE
The dies are specially made from a bronze material to give the pasta a rough textured surface to hold pasta sauce for an authentic full flavour.
cleaning
dismantle the attachment
Always hold the edge of the cutting assembly in one hand and twist the clamp ring towards you and remove. Remove the securing nut, use the spanner/pusher to loosen the securing nut if necessary. Remove the attachment from the mixer by sliding the catch and pulling off the attachment. Dismantle the parts.
#
The Maccheroni rigati, Maccheroni Iisci and Bucatini dies can be pulled apart to assist with the cleaning process 3.
Clean immediately after use, otherwise the pasta will dry and be extremely difficult to remove. Use the cleaning tool to remove all the pasta from the dies. The thicker end of the tool is ideal for cleaning the larger holes on the Maccheroni rigati die, whilst the thinner end is suitable for cleaning other dies. Wash in hot soapy water, then dry thoroughly.
scroll
- Do not immerse in water.
- Wipe clean, then dry.
hopper, ring nut, body, spanner, cutting assembly.
- Remove any pasta dough and if necessary wash in hot soapy water, then dry thoroughly.
recipe for plain pasta mix
We recommend using 00 flour, but if this is not available, use All Purpose Plain Flour. Measure the ingredients carefully as too dry a mix could break your attachment and/or mixer. However, if the mixture forms a ball of dough then too much liquid has been added.
200g 00 flour
100g beaten egg (approximately 2 medium sized eggs)
Method
Place the flour into the bowl and with the K beater fitted, gradually add the beaten egg on minimum speed increasing to 1. Mix for 30 - 45 seconds, then scrape down. Switch on and continue mixing for approximately a further 30 seconds. The mixture should resemble coarse breadcrumbs or a coarse crumble texture. The particles should be separate but if a small amount is squeezed together it should form a clump which remains bonded together.
to make flavoured pasta
herb pasta
Use the above recipe but add 20ml washed and finely chopped herbs such as parsley to the beaten egg,
wholemeal - replace the flour with ordinary plain wholemeal flour
tomato - Replace 15ml beaten egg with 15ml tomato puree
verdi - Replace 30ml beaten egg with 30ml finely pureed spinach.
eggless pasta
200g 00 flour
pinch salt
25ml virgin olive oil
approximately 100ml water
Follow the method for plain pasta mix adding the salt to the flour and replacing the egg with the oil and water.
Japanese Soba Buckwheat Noodles
- Ideal for people who require a gluten free diet.
300g buckwheat flour
150g beaten egg
Follow the method for plain pasta mix.
Pass the mix through the pasta maker fitted with the Bigoli screen and cut into suitable lengths. Cook in boiling water.
udon noodles
350g All Purpose Plain flour
140ml cold water
20g salt
Stir the salt into the water until dissolved.
Follow the method for plain pasta mix replacing the beaten egg with the salt water.
Pass the mix through the pasta maker fitted with the Bigoli screen and cut into suitable lengths. Cook in unsalted boiling water for approximately 5 minutes, the noodles should be firm but tender. Drain immediately and rinse in cold water. Serve immediately with a sauce of your choice.
to cook your pasta
Before cooking, pasta can be dried for short periods - up to an hour before cooking. This will vary according to the type of pasta produced.
1 Bring a pan three quarters full of water to the boil. Add salt to taste.
2 Add your pasta and boil stirring occasionally. Cook until the pasta is al dente. It should be tender but yet still firm to bite. As a guide this will take 1 - 10 minutes but will vary on the type of pasta and the texture desired. Always check the texture regularly as the pasta will continue to cook a little after being removed from the heat.
- Never add oil to your water as it makes the pasta slippery, preventing the sauce from sticking properly.
choosing a sauce for pasta
Selecting the pasta to the sauce can make a difference. Tubular shapes trap bits of food in thick sauces, whereas long strands are good for absorbing juices of tomato sauces and seafood sauces without going soft, whilst thicker pasta usually goes with strong flavoured sauces.
biscuit maker (AT910014)
See back page for illustration of the biscuit maker.
1 Make up one of the following biscuit recipes and chill in the fridge to allow the mix to firm.
- Use small eggs otherwise the mix will be too soft.
2 Remove the shaper from the bisuit die. Assemble the pasta maker with the biscuit die, making sure the slots in the die end up on either side. Fit the attachment to the mixer. (The cutting assembly should not be fitted.)
3 Slide the shaper into the slots either side of the die and move until the desired shape is in the centre of the hole.
plain biscuits
150g softened butter
150g caster sugar
2 small eggs, beaten
300g plain flour, sieved lemon essence optional
Cream the butter and the sugar in the bowl using the K beater until the mixture is light and fluffy. Beat in the egg, then fold in the sifted flour and essence. Pass the mixture through the attachment, having selected the desired shape and cut into suitable lengths. Place onto a greased baking sheet and bake in the centre of a hot oven 190^ , 375^ , gas mark 5 for approximately 10 minutes or until cooked. Cool on a wire rack.
chocolate biscuits
125g softened butter
200g caster sugar
2 small eggs, beaten
250g plain flour
25g cocoa powder
sieved together
Follow the method for plain biscuits, replacing the essence with the cocoa powder.
After the biscuits have cooled, they
can be decorated by dipping in
melted chocolate or dusted with
icing sugar.
trouble shooting
| Question Answer/Hint | |
| The appearance of the pasta is rough | ·The screens/dies are specifically made of bronze. A feature of the bronze die is that it gives the pasta a rough surface which is preferred as it allows any accompanying sauce to stick |
| The quality of the extruded pasta varies throughout the mix by:- | ·This is normal, but can be minimised -ensuring the mix is of a fairly even consistency to start with. -adding the mix to the pasta maker at a steady rate. -ensuring that all the mix is extruded in one batch. -ensuring the mix is not allowed to dry out. |
| Pasta doesn’t come out the holes | ·Ensure the dies are clean before starting, any dried pasta in the holes will prevent extrusion. ·Check that the feed tube is not blocked. ·Use the spanner/pusher to help feed the pasta onto the scroll. |
| The dies are difficult to clean | ·Always clean immediately after use, do not allow the mix to dry onto the die. ·Use the tool provided. The thicker end of the tool is ideal for cleaning the larger holes on the Maccheroni rigati die, whilst the thinner end is suitable for cleaning other dies. |
| Pasta shapes are ragged | ·Sometimes the first pasta extruded is slightly ragged. Add the pasta mix in a constant steady rate, try adjusting the rate at which the mix is added. Warm the body, die and ring nut in hot water and dry thoroughly before using. |
| The die doesn’t fit onto the scroll | ·Check that the centre hole in the die is cleared of any dry mix from previous tests. ·Check that if you are changing dies during operation, there is no mix between the die and scroll preventing it from fitting flush. |
| The feed tube keeps blocking | ·Add small amounts of pasta at a time in a steady rate and only add more when the feed tube is clear. ·The mix is too wet. ·Use the end of the spanner/pusher to push the mix down the feed tube. (Removing the hopper will enable the spanner to reach lower down the feed tube). ·Vary the speed of adding the mix. |
| The cutting assembly is difficult to remove for approximately 30 minutes. | ·Leave the attachment to cool down |
| The cutting assembly is difficult to fit partially unscrewed from the plastic | ·Make sure the metal clamp ring is inner before pushing onto the attachment. |
koekjesmaker (AT910014)
in gesmolten chocolade te dopen of
grundrecept for smakakor
150 g mjukt matfett
150 g socker
2 smä agg, uppvispade
300 g vetemjol, siktat
ev. citronessens
BbIMoIteJeTaJIH:cm.pa3JeI OuNCtKa'.
c6opka
1 CoBET:ДЯ obIeHEnia
ПрИ�OTOBJIeHЯ MaKapOHHbIX
ИЗдeЛин HarpeiTe KOpNyc, ГОВКу
И КOLьцeByU rAryu B rOрaЧeɪ
ВоDE, a 3aTeM BblCyuNTe.
2 CHIMITE KpbIkwky C rHe3da npINbOa Hn3KOJ CKOpOCTN;ДЯ 3TOrO OTBeIDNTe B CTOPOHy fIKCaTOP IN CHIMITE DeTaNb 1
3 YdepnBaa QnKcaTOp B OTBeHHom NIOXeHN, BCTaBbTe KOpnyc MaKapOHNuIb I RHe3do npuBoJa.
4 BCTaBbTe B KOpNyc MaKapOHHuCbI UHeK N BpaUaYTe erO Do Tex nop, NOKa OH He BOiDeT B 3aCenPHeHne C PnIBoDOM MaunHbl.
5 YcTaHOBnte RoNObKy.
6 HaedeHbTe qKcnpuyuoyraKy u 3aTAHNTe ee pyko. (He nOb3yITEcb npn 3OM raeYhbIM KIOUcOM/TOJkaTeJeM, KOtOpbie npedHa3HaueHbI TOJbKO dJa DEMoHTaJa DeTaJe).
- Y6eIITecb B TOM, yTO
ФИКСИРУЮДА RAИKA
pacnoJaraeTcR IpaKTNUeCKN
3aNoDJIHcO C KOpNycOM HacaIKN.
7 YctaHOBInTe 3arpy3OHyIO BPOHKy.
DOnonHnTeNbHO:Ha co6paHHyO MaKapOHnUy MoKeT 6bITb yCTaHOBHeH HOKeBOY y3eN, C NOMoUbIO KOTOpORo MOxHO OTpe3aTB MaKapOHHbIe N3dJIINr HyXHOJ DnHbI.
1 YcTaHOBnTe pyKy HOKeBOrO y3Ja B KpaHHee BepxHee NIOJoxHeNe HEMHO Ocna6bTe 3aXIMHOe KOJIbO. HAKINbTe QIKCnpyUoYIO raIKy I, npI HeOBxOdMocTn, NOJHOCTbIO HaBepHnTe ee Ha HacadKy. TOnOBKa DoJnxHa paCnOlaRaTbcra 3aNoDnIoC c nepeJdHei CTOPOHOH JOKeBOrO y3Ja.
2 YdepxBaHoxeBoy y3eJ 3a Kpa, 3aTAHnTe 3axmHoe KOJbUo, NOBepHyB erO OT c68 ②. PnpmeaHne -Ppi ycTaHOBKe nIIN CHaTm HOxEBOrO y3Ja BCerDa yDepxBaIte OndHou pyKoHoxeBOy y3eJ 3a Kpa, a npYroI pyKo3abopauBaIte/OTbopaunBaIte 3axmHoe KOJIbUo.
Kak NOlb3OBaTbCMAkapOHNuCei
1 PnroToBbTe TcTo dJa MaKapOHbIX N3deJIn, NcNoJIb3yJ dJa 3TOrO npNBeDeHHbIe HNKe peuentbl.
- Tecto He DoJHKHO 6bITb CnUHKOM KpyTbIM, NockOJIbKY TaKoe Tecto MOXeT NOBpeDInb MaKapOHNuCy H/IN MINKCEP. Tecto DoJHXo IMeTB TeKCTypy rpy6oro XJe6HOro MAKNsa HJIN PAnHPOBOuHOc Mecn. YactuIbTeCTa DoJxHbI 6bITb OTDeJIeHbI dpyr OT dpyra, HO npCCKMAMHN OHI DoJNXHbI CKJEINBaTbcR.
2 BkIIOUHTe MmKcep Ha ckOpocTn 2-3.
3ПOMeCTnTe He6oJbIooe KOINueCTBO TeCTa B 3arpy3OuHyIO BOPOHky. IOnaBaIte TeCTo B IOnaIOUyIO Tpy6Ky He6oJIbIuMMN NOpzmaM.IpeE TEM KAK NoTaB CNeDyIOUyIO NOPuIO DaIte WHeKy OuaCTnTbcr.Ecnn POnaUoAra Tpy6ka 3a6nIacb, npOTOnKHITe TECTO K WHeKy C NOMoUbIO pyKoRTKn raeHOrO KInOua/ToIkaTeIa (He nolb3yITeCb
ДЯЗТOrO HnKaKIMM DpyrIMN
IpeDMeTAMN, KpOme pyKOaTKn
raeHoro KInOuya, И He npInaraiTe
Iprn 3ToM Upe3MepNbIx ycINi).He
dOnyckaIte 3aONHeHnI
NoaHoue Tpy6Kn Do KpaEB.
4Iocne BbIaBJIbAHnMaKapOH Ha DOCTaTOUHyIOIINHy IepemecNTe pyuKyHa HOKeBOM y3Ne Ha3aN IBpePei DnTOrO, YTO6bI OTpe3aTb MaKapOnbHa HuxHoI dInHe.EcIIHOxBeoY3eJHa yCTaHOBJeH, MaKapOnbIO6pe3aHTcHoxOM.
- IpepeI TeM KAK CMEHHTB rONOBky, CHIMITE HOKeBOY y3eI. YdepKINBAJ ODNHO pyKOH HOKeBOY y3eI 3a KpaI, NOBepHInTe dpyroI pyKOJ 3axmHoe KOJIbO Ha c6eI n CHIMITE erO. OTBepHInTe fIKCnpyUOyIO raKy (B cnuyae Heo6xOdNMOCTn DnI Ocna6NeHnraRkn NcNoJIb3yIte Raeyhbl KNIOU/TOkAteJIb) IN BKNIOUHTe MaUNHy HA KOPOTKoe BpEMHa CKOpOCTn 1 DnI BbITaNKBaHnra rOJOBKn. CHIMITE rONOBky n UdaJIte BBICTyINBWeE HApXky TECTO, a 3aTEM yCTaHOBInTe Tpe6yeMyIO rONOBky. YCTaHOBInTe Ha HacaIKy fIKCnpyUOyIO raKy n HOKeBOY y3eI.
npeynpexdene
BoBpempa6oTbMaKapOHnua 6ydtHaPBeBaTbcra-3TO HOpMaJIbHoe JaJIeHne, CBr3aHHoe CTeM, YTO TECTO CXKImaeTcR B HaCaIKe.
ПРИМЕЧАNH经
TOnOBKnIJIaBbIaBJIuBaHnMaKapOH N3rTOBJIeHbI N3 6pOH3bl,HTO oBeCneUBAeT NOJyHeHMeKapOH C rpy6oN TEKCTypoINOBepXHOCTN,KOTopA yDEpXnBaETHa Hx COyc N COxpaHReT eRoHEIOBTOPmbl apOMaT.
OuNTka
CHMNTe Hacaiky
- Ydeprkmba OdHOb pyko HOKeBOB
y3eJ 3a Kpa, NOBepHnte dpyroj pyko 3axmHoe KOJIbUo Ha c6bI n CHMnTe erO. OTBepHnte fHKCnpuyuoyu rayKy, B Cnyae Heo6xOIMOCTN NcNoJb3yIte raeyhbl kIOU/TOKATEIb Ira TORO, TTO6bl OCLa6NtB 3aTJkKy fHKCnpuyouei raiKn. CHMnTe HacaKy C MInKcepA, IINr 3TOrO OTBeNTe B CTOpOHy fNKCaTOP IN CHMnTe HacaKy. Pa36epnte HacaKy.
TOJIOBKN
TOnOBKn DnB BbIaBJIbHaHn MaKapOHhblx n3denn Maccheroni rigati, Maccheroni Isci u Bucatini MOryTp a3bupaTbcra, 3To o6JercaeT IX OChCTky 3.
BbINHnIe ONUCTky RoIOBOK
cpa3y JKe NocJe Ix
NCIOJB3OBAHNA, INaYe
MaKApOHHe TECTO 3acoXHET n erO
6ydet OueHb TpydHO ydaNITb.ДЯ
YdaJIeHNr TECTa N3 RoIOBOK
NCIOJB3yIte NHCTpymeHT dJa
OuHCTKn. BoJee TOJIcTbIK KOHeU
HCTpymeHTa NdeaIbHO NOxOJT
dJa OUYCTKn BOJee KpyNHbIX
OTBepCTn B rOJOBKe Maccheroni
rigati, a 6oJee ToHKn KOHeU
HCTpymeHTa MOXET
HCNOJB3OBaTBcR DJa ONUCTKn
DpyrIx rONOBok. BbIMoTe B
rOpJYe MblbHoB OBe, a 3aTEM
TuIaTeJIbHO BbICyWNTe.
UHeK
He norpykaTe B Body.
TtataTeJIbHO npOTpNTe, a 3aTEM BBICyWHTE.
3arpy30uHaB OPOHka, KOJIbueBaIraKa, KOpNyc, RaeyHbI KJIou, HOKeBOy y3eJ.
- YdaJIte MaKapOHHOe TECTO, B Cnyae Heo6xOIMOCTN, BBIMOnTE B Tropyey MblbHOB OBe, a 3aTeM TuaTeJbHO BbICyUHrTe.
peCNTДЯ MaKapOHHOro Tecta 6e3 Cdo6bl
PekomeHdyetc HcnoIb3OBaTb Myk0,HO ecn y Bac Het TakoMyKN,ncnoJIb3yIte O6blKHOBEHHyo notpe6ntbckyO Myk. TuaTeJbHo OTmepraTe INHpeJeNTbI,TAK KAK CnIuKOM KpyTOe TeCTo MOKeT NOBpeDITb MaKapOHNuY n/INMVKcep. Ondako,ecn B TeCTe o6pa3yOTcra Ny3bIPN,3TO CBnDETeJBCTByET O TOM,yTO 6blIO do6abNeHO CInuKOM 6oJIbWoE KOJIInYeCTBO XIKKOCTN.
200 r mykn 00
100 r B36ntbix nuc (npn5n3.2
na cpeHnx pa3mepOB)
Metod
HacbInbTe Myky B yawy MmKcepa C yctahOBHeHHbIM B hem K- 06pa3HbIM BEHcHKOM, n NOCTeNEHNO Do6abJRA B36ntbIe Rya, nepMeuBaIte B TeueHne 30-45 c, a 3aTeM cockpe6nte Tecto co CTeHOK aA. NaHHTe nepMeuBaTb Ha MNHMaJIbHOckopOCTn I NOCTeNEHNO YBeNHyBaIte ee do ckopocTn 1. ChOBA BKIOUHTe MmKcep n nepMeuBaIte B TeueHne np6n3nteJbHo 30 c. Tecto DOJXHO IMetb TeKCTpy rpy6oro XNe6HOrO MAnuHa nn HnHPOBOUHO CMecn. YactNUbl DOJXHbI 6bTb OTDeJeHbI Dpyr OT dpyra, Ho pRcCKImaHm OHN DOJXHbI CKLeNBaTbcr.
Kak npuroTOBtB apomatn3npoBaHHbIe MaKapOHHbIe N3dJIInJ
MaKapOHHbIe N3dEJIINc 3eJIeHbIO
IcnoJb3yIte npBVeDeHHbI BblIepeIeT,IO6aBvB K B3bITbIM RaIcAm20Mn BbIMbIToN MeJIKOHape3aHHo3eHeH,HaNPmEp,neTpUKN
Mka n3 cenbHoro 3epHa- 3aMeHnTe Myky obkHOBeHHoM MyKoN u3 cenbHorO 3epHa
TOMaTbI - 3aMeHnTe 15 MJI B36ntbIX RaNc Ha 15 MJI TOMaTHoI NaCTbl
3eJIeHb-3aMeHnTe 30 Ml B36ntbIX RaIc Ha 30 Ml NIOpe N3 UHHaTa.
MaKapOHHbIe N3dJIIny 6e3 YnC
200 rmykn 00
JENOTKa COJIIN
25 MЛ OJINKBOKOBOro MacJIa NepBOrO OTKIMA
100 Mn BOdbi (npimepho)
IcnoJb3yIte MeToD JnI
IOnyuHnMaKapOHnHO TeCTa 6e3
Cdobl,doabNB B MyKy CoJIb n
3aMeHnB Rua MaCJOM N BOIo
Tapexetain Eikovoyapnon
ασφάλεια
Eav to iiyua zumapikov eivai TOnu OTeyvo n To TpooOeOeTnAoU ynpyoa mTOpei va OTAOETe Tov TapaokEuaoTn zumapikov n/Kai To miEp.
Mny toTOnoTheTeIe Ta daxTuia oac n aALo avTIkeiuevo, EKToc aTO TO kAei/ToV wOtnpa Tnou TApexetai, eOa OTov OAnvTaPpOdoioic.
Xpnoiopoioite mvo tn aan tou kaiou/woTnpa yia va ottpwEte Tn 2mu n meo a tov oAnva tropoobosiaç. Mny aokite μeyaaln duvaun.
- Noté μην προσαρός ἀ φαρείτε
Tov παρακειαστή ζμαρικών εύω
Tο μέφ βρίσκεται σέλειουργία.
- PpooTeTc Tn CUn Oe MIKpeC TIOOTNTc KAcE φopα KAI με Σaθερo puθμo. Mny αφηνεTE Tov σλγα TpoΦOδσiας vα γεμιζει μexpi επáνω.
PooexeTe otav xepiEeTe n KaapieTe To Eaptnma Kaowc n Aenida Tou mXavioou Kottns Eiva Koqtepn.
επεξηγηση συμβόλων
OAIKns aEoews - AVTKataOTnote To aEupi e aTao aEupi OAIKns aEoews
με γεύσηντομάτα-
AvikataoTnOte 15mlyTuTnEv o auyo 15mlvtopatoToAoTo Tpaoiva
ZupiKa-AvtikataoTnOte 30ml XUTNHevo auyo e 30mlIomegaevo OTAVKI.
ZUmuPikα Xwpiç auγα
200ypaakocαεúpi μia πeça aλaπi
25mlnp0evo eAaioAdeltaπepiou 100mlvepo
AkoounoTE Tn eOdo
Tnpaokueu7yia To miyu7a aTla
Zmuapika TpooEtovtacTo aAti
oTo aEupi kai avtikaoiTowvTac
auyo TE to laoi kai to vepo.
IaTwVcIka MaKapovakia (NouvtA) SIAALWCSOuTTa
-15avikayiaautoucTou n biatpoqn Touc 8ev TpeTTeV a TepiexyAoutevn.
300yp aεúpi oikαεωs 150yp xtuπηévo auyo
Akoouohtne tne odo Tnpaokeu ngs yia to miyua ia aanla zmuapikka.
Iepaote to miyau aToTov
Tapaokueaotn zumapiikwV oToV
OTIOIO exTE PPOOAPUoEi To
TTAEyua yia zumapiika Mmivkoai
(BINOJI) kAI KOYTE OTO KAtALNLo
miko. MayeippeyTe OE vepo Tou
bpacEi.
y1y2 且 x,y ≥ 1,0.
5 = 12 = 1.
a
x1 = -b - ^2 - 4ac2a,x2 = -b + ^2 - 4ac2a
( 5) ( 5)
S OBC = S COD + S BOC - S BOC
JIK
a lao jao jaoi.
111 111 111 111 111
Kulli aaii iog aaiiaaai J
a
a jyj yj yj yj yj yj yj
r1 = r2 = 0
g jilai 1. jilai o jilai co ly
Jolal
jolalll
jilll jssg icw y
aiiill liuulg jil g jiei oia
1
· = ·
a1 = 2,an + 1 = 2( a_n + 1)
iL
Jl aldente
aia jiu gwo, Jus. Jgliluiie ijikso
1
Laiu
gssuuljy 1y ygl
Jooe Jaa aai jai jai jai
3.3
J 1
jlll gao Lao jil Jai
Joo
L
1j j j j j j j j j j j j j j j j j j j j j j j j j j j j j j j j j j j j j
J 1
jellal jolao 8 1gall bil
aalalalalalalalal
y
yall kaw jyI liwyl
S OBC = S AOB + S_ BOC
#
中
S_4 = 3 · 2^4 × 10^3
100
aill lal al 1scl a j
a 1
.
(Soba)
Lg
abll no aee
1g
y
gluten)
algebras 2019 x.
33 ÷ ( 21 + 4) = 10
aill llll aal 1
aag laaill Jae jge Jdx
11 1
Jleclay
(udon)
1
S OBC = S BOC + S_ BOC
12L = 0.
y yannnnaa aalll aalld aea
.
aag llll jae jge Jzjzall
jglbl jgl bgs
aJg clll jLcclb.
j 0
a1j1 21 aii k o
- y = kx + b 与 y = kx 且 k z
pSjuiol joiIaloo
aiee
Jl
Joo 1
JSL 1aLJIbIJIbIJI JIJI bIJI IJI
g/gi aaiiaabaiyssj jdyjio
Jll 131.1110g. Jall