
SMP 658CBTIXL - Cooker WHIRLPOOL - Free user manual and instructions
Find the device manual for free SMP 658CBTIXL WHIRLPOOL in PDF.
| Features | Details |
|---|---|
| Product type | Cooker |
| Dimensions (W x D x H) | 60 x 60 x 85 cm |
| Cooking type | Induction |
| Number of burners | 4 burners |
| Total power | 7.4 kW |
| Oven | Multifunction |
| Oven capacity | 73 liters |
| Energy class | A |
| Safety features | Control panel lock |
| Ease of cleaning | Enamelled interior |
| Type of controls | Knobs |
| Warranty | 2 years |
Frequently Asked Questions - SMP 658CBTIXL WHIRLPOOL
User questions about SMP 658CBTIXL WHIRLPOOL
0 question about this device. Answer the ones you know or ask your own.
Ask a new question about this device
Download the instructions for your Cooker in PDF format for free! Find your manual SMP 658CBTIXL - WHIRLPOOL and take your electronic device back in hand. On this page are published all the documents necessary for the use of your device. SMP 658CBTIXL by WHIRLPOOL.
USER MANUAL SMP 658CBTIXL WHIRLPOOL
THANK YOU FOR BUYING A WHIRLPOOL PRODUCT
In order to receive a more complete assistance, please register your product on www.whirlpool.eu/register.

Before using the appliance carefully read the Safety Instruction.
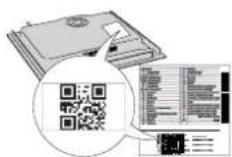
PLEASE SCAN THE QR CODE ON YOUR APPLIANCE IN ORDER TO REACH MORE INFORMATION
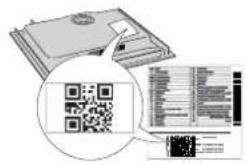
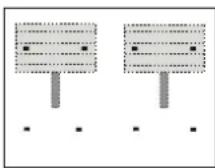
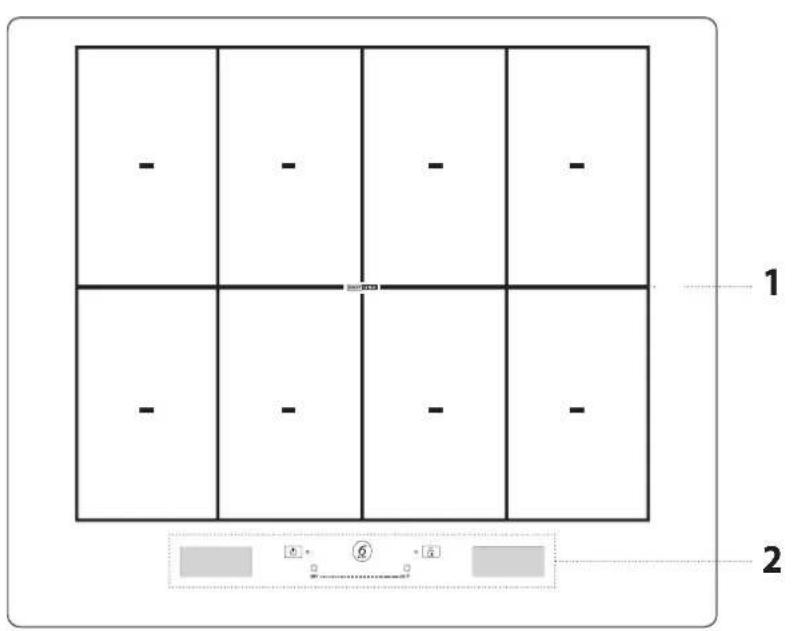
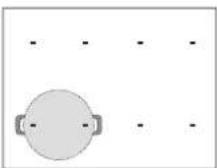
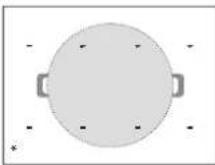
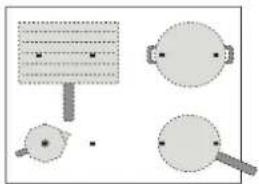
PRODUCT DESCRIPTION
- Cooktop
- Control panel
CONTROL PANEL
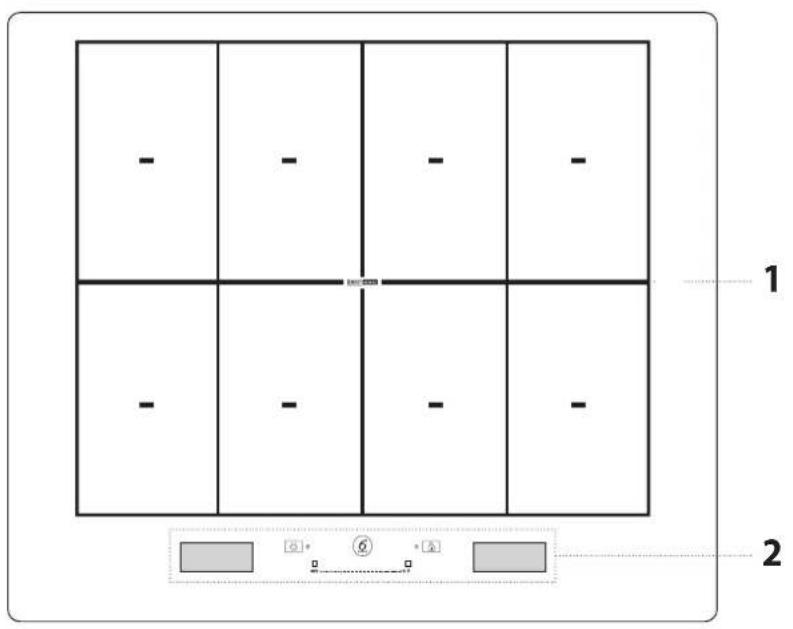
- On/off button
- Indicator light - hob switched on
- 6 ^th Sense button (special functions)
-
Indicator light - key lock active
-
Key lock
- Cooking zone selection display
-
Cooking zone off button
-
Slide touchscreen
- Quick heat button
- "Manage functions" display
ACCESSIONS
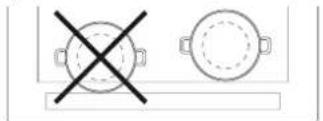
POTS AND PANS
Only use pots and pans made from ferromagnetic material which are suitable for use with induction hobs. To determine whether a pot is suitable, check for the symbol (usually stamped on the bottom). A magnet may be used to check whether pots are magnetic. The quality and
the structure of the pot base can alter cooking performance. Some indications for the diameter of the base do not correspond to the actual diameter of the ferromagnetic surface.
EMPTY POTS OR POTS WITH A THIN BASE
Do not use empty pots or pans when the hob is on.
The hob is equipped with an internal safety system that constantly monitors the temperature, activating the "automatic off" function where high temperatures are detected. When used with empty pots or pots with thin bases, the temperature may rise very quickly, and the "automatic off" function may be triggered with a slight
FIRST TIME USE
The hob settings can be changed at any time. To change the settings, click on the symbol that appears on the manage functions display.
From the settings menu, you can:
- select the language;
adjust the brightness; - adjust the volume of the sound alerts;
- adjust the button tones;
adjust the power of the hob;
DAILYUSE

SWITCHING THE HOB ON/OFF
To switch the hob on, press the on button for approx. 1 second until the displays light up.
The hob will be automatically deactivated after 30 seconds if you do not select a function within this time.
The hob turns off if you press any button for more than 10 seconds.
To switch off, press the same button until the displays switch off. All the cooking zones are deactivated.
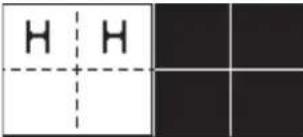
If the hob has been in use, when you switch it off, all cooking zones will be deactivated, and the residual heat indicator "H" will remain lit until the cooking zones have cooled down.
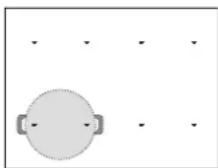
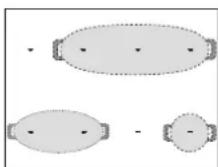
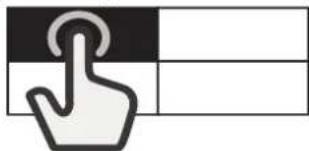
SELECTING THE COOKING ZONE
The desired cooking zone can be selected from the left-hand display, by pressing the corresponding pane. On all the not selected zones a lightly stripe will appear.

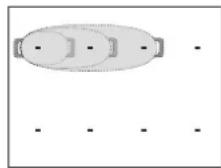
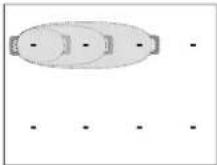
SELECTING THE FLEXIBLE AREA
The flexible area is the area in which several of the cooking zones overlap, and can be used as a single cooking zone.
To create a flexible area:
Select multiple panes or slide your finger across, gradually joining the panes together.

delay, damaging the pot or pan. If this occurs, do not touch anything, and wait for all components to cool down.
If any error messages appear, call the service centre.
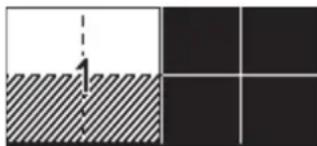
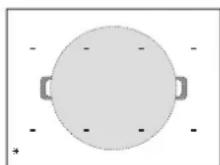
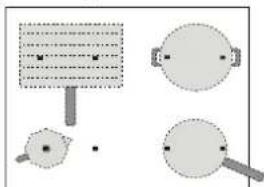
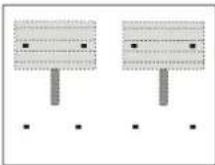
MINIMUM DIAMETER OF POT/PAN BASE FOR THE DIFFERENT COOKING AREAS
To ensure that the hob functions properly, the pot must cover one or more of the reference points indicated on the surface of the hob, and must be of a suitable minimum diameter.
| Positioning of accessory Minimum diameter | |
| centred on 1 point 10 cm | |
| 2 points covered 19 cm | |
| 3 points covers fish kettle/wire rack | |
| 4 points covered (horizontal) fish kettle/wire rack | |
| 4 points (2 + 2) covered (vertical) 24 cm |
- restore the factory settings of the hob;
- check the software version installed.
If a power failure occurs, the settings are maintained.
ADJUSTING THE POWER OF THE HOB
The maximum power level of the hob can be set from the settings menu, in accordance with requirements, or with the timer duration.
The power levels available are: 2.5kW - 4.0kW - 6.0kW - 7.4kW
To divide a flexible area:
Press and hold the pane corresponding to the zone that you want to separate for 3 seconds. Alternatively, press the "divide zone" button that appears in the manage functions display.
When the cooking zone is divided, the same level of power is set for each of the separate zones.
If all the selected cooking zones are not covered by the pot in 30 seconds, a dense striped will appear on the left-hand display. It's possible to reactivate that area with the "Add pot" command using the right-hand display.
ACTIVATING/DEACTIVATING COOKING ZONES AND ADJUSTING POWER
To activate the cooking zones:
- Switch on the hob. If a recipient is already in place, the hob automatically detects it. Select the suggested zone to choose the power.
- Place the pot in the chosen cooking zone, ensuring that it is covering one or more of the reference points on the surface of the hob.
- Using this position will allow you to benefit from maximum power output.
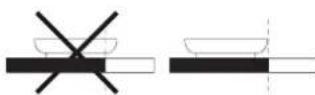
Please note: Do not cover the display or the slide touchscreen with accessories. If a utensil is covering one of the displays, the hob may not function properly. On the right display, the message "CHECKTOUCH AREA, remove the object within one minute" will appear. Remove the object and wait until the message disappears. If the problem persists, disconnect and reconnect the power to the cooktop. In the cooking zones close to the control panel, it is advisable to keep pots and pans inside the markings (taking both the bottom of the pan and the upper edge into consideration, as this tends to be larger).
This prevents excessive overheating of the touchpad. When grilling or frying, please use the rear cooking zones wherever possible.

- Select the cooking zone or flexible area from the left-hand display.
- Set the desired power level by pressing or moving your finger horizontally across the slide touchscreen.

The power level set will appear in the pane of the cooking zone selected.
| 12 | ||
Each cooking zone offers a range of different heat settings, from "1" (minimum power) to "18" (maximum power).
Using the slide touchscreen, you can also select the quick heat function, which will appear on the display with the letter "P".
Please note: If the pot is not suitable for induction cooking, is not positioned correctly or is not of an appropriate size, the cooking zone pane will flash. If no pot is detected within 30 seconds of making the selection, the cooking zone switches off.
To deactivate the cooking zones:
Select the cooking zone in the left-hand display and press the "OFF" button at the top of the slide touchscreen. If the cooking zone is still hot, the residual heat indicator "H" will appear in the corresponding pane.
L+ADDPOT
When using a cooking area composed of several zones, the pot can be placed anywhere on the active area. The hob will automatically recognise the actual positioning of the pot.
If you wish to add an additional pot to the active cooking area, use the "Add pot" command to allow the hob to detect the new pot.
KEY LOCK
To prevent accidental activation of the hob during cleaning, or to prevent the controls from being changed accidentally whilst cooking, press the "Key lock" button for 3 seconds: a beep and a warning light indicate that this function has been activated.
The control panel will be locked, with the exception of the off button. To reactivate the controls, press the "Key Lock" button again for 3 seconds. The warning light switches off and the hob is active again.

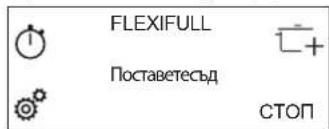
TIMER
When the hob is off, you can use the right-hand display as a timer.
To activate the timer:
- Switch on the hob.
- Press the hourglass icon that appears on the manage functions display.
- Use the " + / " - " buttons to set the time.
- When the set time has elapsed, an acoustic signal sounds.
To change or deactivate the timer:
- Press the hourglass icon that appears on the manage functions display.
- Use the "+" and "-" buttons to reset the desired time, or press the "STOP" button to turn off the timer.

SETTING THE COOKING TIME
The cooking zones can be programmed to switch off automatically.
To set the cooking time:
- Select the cooking zone and set the required power level.
- Press the stopwatch icon that appears on the manage functions display.
- Use the " + / " - " buttons to set the time.
- Once the set time has elapsed, an acoustic signal sounds and the cooking zone switches off automatically.
To change or deactivate the cooking timer:
- Select the active cooking zone.
- Press the stopwatch icon that appears on the manage functions display.
- Use the "+" and "-" buttons to reset the desired time, or press the "STOP" button to cancel the set cooking time.
A cooking time can be set for each zone or flexible area by following the same steps.

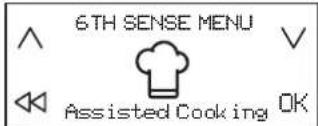
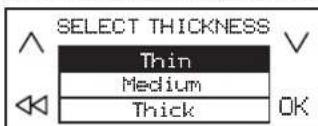
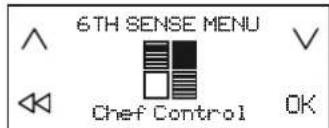
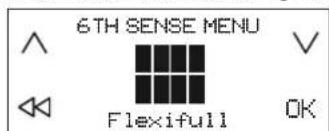
6^th SENSE
The 6^th Sense button allows users to access a number of special features:
Assisted Cooking
-
Chef Control
-
Flexifull
In the right-hand manage functions display, you can navigate between the special functions and select the option you want.
With the arrows, you can scroll through the available options.
Use the button OK to confirm your choice, and the double arrow to return to the previous menu.
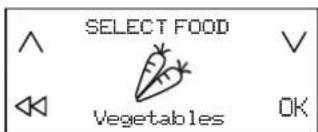
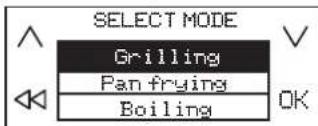
ASSISTED COOKING
This function allows you to select one of the pre-set functions which help you to cook a range of different types of food in the best possible manner. The hob assists the user by providing ideal conditions for heating and seasoning the pot. It also provides instructions to be followed during the different stages of cooking, in order to achieve optimum results.
To activate the Assisted Cooking function:
- Press the 6th Sense button.
- Select "Assisted Cooking" from the manage functions display and confirm.
- Select the category of food that you plan to cook and confirm.
- Select the cooking method and confirm.
- Select the cooking conditions and confirm.
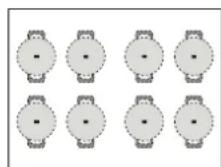
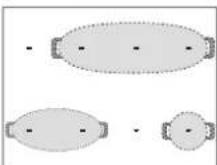
- Four cooking zones will now be available. Place the pot in position, ensuring that it is covering at least two of the reference points on the surface of the hob.
The "Moka" cooking mode is the only one which allows just one reference point to be covered.
Below is an example of positioning for a number of accessories.
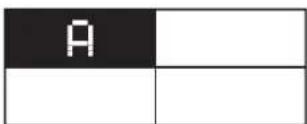
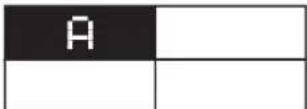
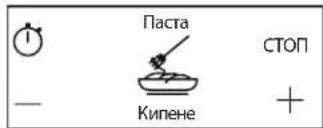
- Select the desired cooking zone from the left-hand display. An "A" will appear in the selected zone.
- In the right-hand display, the instructions to follow will appear (e.g. "Add Oil" or "Add food"). At the end of each stage, the user must confirm in order to proceed with cooking.
- If necessary, the pre-set power level can be changed at any time, using the "+" and "-" buttons.
- When cooking is complete, press the "STOP" button to turn off the cooking zone. If multiple zones have been used during cooking, you must first select the cooking zone you want to switch off.
Please note: The "Assisted Cooking" function can be activated even when one or more cooking zones are already active.
To activate the Assisted Cooking function for more than one cooking zone: After activating the "Assisted Cooking" function for the first cooking zone, press the 6^th Sense button again, and repeat the activation process for a new cooking zone. Zones that are already active cannot be selected.
Please note: You can use up to 4 zones with the "Assisted Cooking" function, provided that the power level setting selected allows for this. The zones cannot be combined to form a larger area.
To cook traditionally when the Assisted Cooking function is active:
When the "Assisted Cooking" function is active, you can select the cooking zone that you wish to activate from the left-hand display, and set the power level for this zone, before proceeding with using this in the normal way.
Selectable options
| FOOD CATEGORY | C | OOKING MEI | |
| Meat Grilling, Pan frying, Boiling | |||
| Fish | Grilling, Pan frying, Boiling | ||
| Vegetables Grilling, Pan frying, Boiling | |||
| Sauces and soups | Sauces (Tomato, Béchamel) Soups (Searing, Simmering, Creamy soups) | ||
| Dessert | Custard, Panna cotta, Melted chocolate, Pancake, Rice pudding | ||
| Eggs | Fried eggs, Omelette, Boiling (Boiled eggs, Soft-boiled), Frittata, Scrambled | ||
| Cheese Grilling, Pan frying, Fondue | |||
| Pasta Boiling, Pan frying, Risotto, Rice pudding | |||
| Beverage Milk, Water, Moka | |||
| Custom Boiling, Grilling, Pan frying, Simmering, Melting | |||
MAIN COOKING METHODS
(Each method may include additional options)

MELTING
To bring food to the ideal temperature for melting and to maintain the condition of the food without risk of burning.
This method does not damage delicate foods such as chocolate, and prevents them from sticking to the pot.
The rate of cooking can be adjusted at any time using the "+" and "-" buttons on the right-hand display.

SIMMERING
For slow-cook dishes and for slowly evaporating liquid, maintaining the condition of the food without risk of burning. This method does not damage food, and prevents it from sticking to the pot.
The quality and type of pot can affect performance or cooking times.
The rate of cooking can be adjusted at any time using the "+" and "-" buttons on the right-hand display.

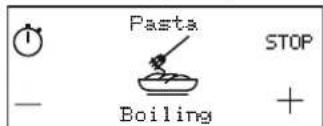
BOILING*
To efficiently heat water and alert the user when it begins to boil, via an audible and visual signal.
While awaiting confirmation from the user, the system keeps the water at a controlled simmer, preventing spills and wasted energy. Whilst this function is active, an audible alarm warns the user if the pot is empty (no water) or if it has boiled dry.
Only add salt after the boiling alert has sounded.

PAN FRYING*
To preheat or season an empty pot or pan. An audible and visual signal indicates that the ideal temperature has been reached for food to be added to the pot or pan. While awaiting confirmation from the user, the system keeps the accessory at a controlled heat, preventing the pan from reaching damaging temperatures and avoiding energy wastage.
For optimum conditions, use this function with pots and seasoning at room temperature.
Dedicated accessories must be used for this function.
Do not use the lid-to protect against splashes, a splash guard is recommended. It is advisable to use oils that are suitable for frying when cooking with this function, such as seed oils of various types. When using different oils, always take extra care to supervise cooking during first use.

GRILLING*
This function allows for optimum grilling of a range of foods, according to their thickness. When the ideal temperature has been reached for food to be added, the hob beeps. The hob then stabilises the temperature throughout cooking, keeping it constant. Once the user has confirmed that food has been added, cooking begins.
It is advisable to prepare the food during the heating stage, adding it as soon as you hear the beep.
For optimum conditions, use this function with pots and seasoning at room temperature.
If you are not using the wire rack designed for this purpose, take extra care when first using the grill function, as the quality of the base may affect heating times. Accessories with very thin bases can reach very high temperatures in a short time.

MOKA*
This function allows "moka" stove-top coffeemakers to be heated automatically. The heating cycle can be activated by selecting the function in the menu, and a beep will sound when the coffee is ready. The function is programmed to switch off automatically, preventing spills. When using for the first time, always check that the conditions described are met. For optimum conditions, use this function with the coffee maker and water at room temperature.
* For these functions, the use of dedicated accessories is recommended:
for boiling: WMFSKU:07.7524.6380
for pan frying:WMFSKU:05.7528.4021
for grilling: WMF SKU:05.7650.4291
for Moka, Bialetti: MOKA INDUZIONE 3TZ ANTRACITE
Please note: Try not to move the pot or pan during the first minute of heating, in order to allow the hob to function optimally.
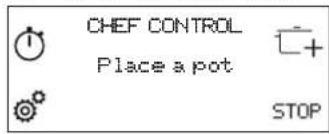
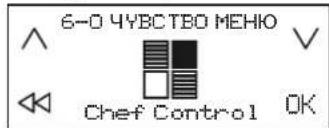
CHEF CONTROL
This function divides the hob into four cooking zones, activating these simultaneously at a pre-set power level. It allows you to move pots from one area to another, to allow you to continue cooking at different temperatures.
To activate the Chef Control function:
- Place the pot in position.
- Press the 6 ^th Sense button.
- Select "Chef Control" from the manage functions display and confirm.
- The four cooking zone panes appear on the left-hand display, with the corresponding power level (low, medium, high).
- If you wish to add more pots, use the "Add pot" command
- To exit this function, press "STOP".
To change the power of a cooking zone:
- Select cooking zone.
- Select the desired power level by dragging your finger across the slide touchscreen, which will remain visible for 1 second.
- The word corresponding to the power level selected (low, medium, high) reappears.
Please note: The changed settings are saved until you change them again or reset them.
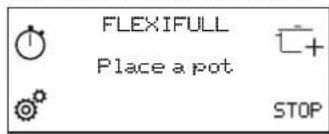
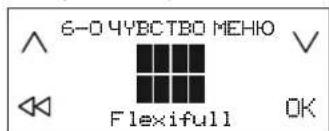
FLEXIFULL
This function allows you to use the entire hob as a single cooking area.
To activate the Flexifull function:
- Place the pot in position.
- Press the 6thSense button.
- Select "Flexifull" from the manage functions display and confirm.
- Set the desired power level from the slide touchscreen. The power level set appears on the left-hand display.
- If you wish to add more pots, use the "Add pot" command.
- To exit this function, press "STOP".
INDICATORS
RESIDUAL HEAT
When the letter "H" appears in one of the cooking zone selection display panes, this means that the corresponding cooking zone is still hot. When the cooking zone has cooled, the "H" disappears..
COOKING TABLE
| POWER LEVEL TYPE | TYPE OF COOKING | RECOMMENDED USE Indicating cooking experience and habits | |
| Max. heat setting | P | Fast heating | Ideal for rapidly increasing the temperature of food to a fast boil (for water) or for rapidly heating cooking liquids. |
| 14-18 | Frying, boiling | Ideal for browning, starting to cook, frying deep-frozen products, bringing liquids to the boil quickly. | |
| Browning, sautéing, boiling, grilling | Ideal for sautéing, maintaining a lively boil, cooking and grilling. | ||
| 10-14 | Browning, cooking, stewing, sautéing, grilling | Ideal for sautéing, maintaining a gentle boil, cooking and grilling, and preheating accessories. | |
| Cooking, stewing, sautéing, grilling, cooking until creamy | Ideal for stewing, maintaining a gentle boil, cooking and grilling (for longer periods). | ||
| 5-9 | Cooking, simmering, thickening, creaming | Ideal for slower-cook recipes (rice,sauces,roast,fish) with liquids (e.g. water, wine, broth, milk), and for creaming pasta. | |
| Ideal for slow-cook recipes (quantities under 1 litre: rice, sauces, roasts, fish) with liquids (e.g. water,wine,broth,milk). | |||
| 1-4 | Melting, thawing | Ideal for softening butter, gently melting chocolate, thawing small items. | |
| Keeping food warm, creaming risotto | Ideal for keeping small portions of just-cooked food or serving dishes warm and for creaming risotto. | ||
| Zero power | Off | - | Hob in stand-by or off mode (possible end-of-cooking residual heat, indicated by an "H"). |
CLEANING AND MAINTENANCE

WARNING
- Do not use steam cleaning equipment.
Before cleaning, make sure the cooking zones are switched off and that the residual heat indicator ("H") is not displayed.
Important:
- Do not use abrasive sponges or scouring pads as they may damage the glass.
- After each use, clean the hob (when it is cool) to remove any deposits and stains from food residue.
- Sugar or foods with a high sugar content can damage the hob and must be immediately removed.
Salt, sugar and sand could scratch the glass surface. - Use a soft cloth, absorbent kitchen paper or a special hob cleaner (follow the Manufacturer's instructions).
- Spills of liquid in the cooking zones can cause the pots to move or vibrate.
After cleaning the hob, dry thoroughly.
If the iXelium™ logo appears on the glass, the hob has been treated with iXelium™ technology, an exclusive Whirlpool finish which ensures perfect cleaning results, as well as keeping the surface of the hob shiny for longer.
To clean iXelium™ hobs, follow these recommendations:
- Use a soft cloth (microfibre is best) dampened with water or with everyday glass cleaning detergent.
- For best results, leave a wet cloth on the glass hob surface for a few minutes.
TROUBLESHOOTING
- Check that the electricity supply has not been shut off.
- If you are unable to turn the hob off after using it, disconnect it from the power supply.
- If alphanumeric codes appear on the display when the hob is switched on, consult the following table for instructions.
Please note: The presence of water, liquid spilled from pots or any objects resting on any of the hob buttons can accidentally activate or deactivate the control panel lock function.
Error code Description Possible causes Cure
| C81, C82 | The control panel switches off because of excessively high temperatures. | The internal temperature of electronic parts is too high. | Wait for the hob to cool down before using it again. |
| F02, F04 | The connection voltage is wrong. | The sensor detects a discrepancy between the appliance voltage and that of the mains supply. | Disconnect the hob from the mains and check the electrical connection. |
| F01, F06, F12, F13, F25, F34, F35, F36, F37, F41, F47, F58, F61, F76 | Disconnect the hob from the power supply. Wait a few seconds then reconnect the hob to the power supply. If the problem persists, call the service centre and specify the error code that appears on the display. | ||
SOUNDS PRODUCED DURING OPERATION
Induction hobs may whistle or creak during normal operation. These noises actually come from the cookware and are linked to the characteristics of the pan bottoms (for example, when the bottoms are made from different layers of material or are irregular).
These noises may vary according to the type of cookware used and to the amount of food it contains and are not the symptom of something wrong.
VERIFIED COOKING
A table below has been created specially to make it possible for inspection bodies to use our products.
| Verified cooking Verified cooking positions | |
| Heat distribution, "Pancakes" test acc. to EN 60350-2 §7.3 | [---] - - - - - - - - - - - - - - - - - - - - - - - - - - - - - - - - - - - - - - - - - - - - - - - - - - - - - - - - - - - - - - - - - - - - - - - - - - - - - - - - - - - - - - - - - - - - - - - - - - - - |
| Heat performance, "French fries" test acc. to EN 60350-2 §7.4 | |
| Melting and keep warm, "chocolate" | |
| Simmering, "rice pudding" |
ECO-DESIGN: The test was carried out in accordance with regulations, by selecting all of the cooking zones on the hob to form a single area, or by using the Flexifull function.
AFTER-SALES SERVICE
In order to receive a more complete assistance, please register your product on www.whirlpool.eu/register.
BEFORE CALLING THE AFTER-SALES SERVICE:
- See if you can solve the problem by yourself with the help of the TROUBLESHOOTING suggestions.
- Switch the appliance off and back on again to see if the fault persists.
IF AFTER THE ABOVE CHECKS THE FAULT STILL OCCURS, GET IN TOUCH WITH THE NEAREST AFTER-SALES SERVICE.
To receive assistance, call the number shown on the warranty booklet or follow the website's instructions on www.whirlpool.eu.
When contacting our Client After sales service, always specify:
a brief description of the fault;
the type and exact model of the appliance;
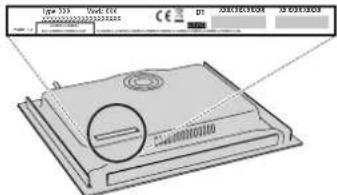
- the serial number (number after the word SN on the rating plate located under the appliance). The serial number is also indicated in the documentation;

Mod. xxxxxx
Ind.C. xxxxxx
SN: XXXX XXXX XXXX
Prod.N.XXXXXXXXXX
- your full address;
- your telephone number.
If any repairs are required, please contact an authorized after-sales service (to guarantee that original spare parts will be used and repairs carried out correctly).
Policies, standard documentation and additional product information can be found by:
- Using QR code in your appliance;
Visiting our website docs.whirlpool.eu; - Alternatively, contact our After-sales Service (See phone number in the warranty booklet). When contacting our After-sales Service, please state the codes provided on your product's identification plate.

MERCI D'AVoir CHOISI UN PRODUIT WHIRLPOOL
-
Chef Control
-
Flexifull
-
Chef Control
-
Flexifull
-
Chef Control
-
Flexifull
DEKOJAME, KAD JSIGJOTE WHIRLPOOL GAMINJ
Kad galétuméte tinkamai pasinaudoti pagalba, užregistruokite gaminj svetainéje www.whirlpool.eu/register.

ADD POT (PILKITE PUODA)
Assisted Cooking (Pagalba Gaminant)
-
Chef Control
-
Flexifull
Desineje puseje esanciame fungcju tvarkymo ekrane galite narstyip specialias fungcjjas ir pasirinkti norima parinktj.
Rodyklemis galite slinkti per pateikiamas parinktis.
Mygtuku OK patvirtinkite pasirinkima, o dviguba rodykle galte grzti j ankstesnj menui.
ASSISTED COOKING (PAGALBA GAMINANT)
-
Chef Control
-
Flexifull
Labas puses fungciju parvaldisanas displeje varat parvietoties starp ipasajam fungcijam un atlasit to iespeju, kuru velaties.
Ar bultinam varat ari ritinat pieejamas iespejas.
Izmantojet pogu OK, lai apstiprinatu savu izveli, bet dubulto bultinu, atgrietztos ieprieksejia izvelne.
ASSISTED COOKING (GATAVOSANAS NORADIJUMI)
VOLBA FLEXIBILNI OBLASTI
VAMULTUMIMCAATIACHIZITIONATUNPRODUS WHIRLPOOL
Pentrua beneficiade serviciicomplete de asistenta,va rugam sa va inregistrati produsul pe www.whirlpool.eu/register.

Inaintede autiliza aparatul, citici cu atentie instructiunile privind siguranta.
SCANATI CODUL QR DE PE APARATUL DUMNEAVOASTRA PENTRU A OBTINE MAI MULTE INFORMATII

DESCRIEREA PRODUSULUI
SELECTAREA ZONEI FLEXIBLE
-
Chef Control
-
Flexifull (Complet Flexi)
Pe afisajul de gestionare a functiilor din drepta, puteti naviga prin functiile speciale si puteti selecta optienea dorita.
Folosind sagetile puteti derula prin optiunile disponibile.
TbBkBaTaHaRpeBaTeHnHa 30Ha OeAnHHa HrKoNtO THaRpeBaTeHnHTe 3OH, KOITOCe N3NON3BaEtHOBPemEHNO.
3a c63d0a8aHe Ha 266Ka8a Ha#peamenHa 3oHa:
136epeTe HAKOKo HarpeBaTeHN 30Hn Nn Pb3HeT npbCTa cn, KaTo nocTeENHO o6eINHBAte CbcedHN 30HN.
n3KIOUbaHe da cpa60n C mAIKO 3aKbCHeHne, KOeTo Ue DOBede Do NOBpeHa Ha cbJa. B TakBb CUYaH ne HnnaIte HnIo U n3uKaAte BCuKo Da ce OxlaDn. Ako ce noBn Cbo6UeHne 3a rpeuKa, CBbpKeTe Ce cbc cepBn3HnueHTbp.
MNHMAJIEN DNAMETbP HA IbHOTO HA CbDA 3A PA3JIuHHTE HArPEBATEJIH 3OHU
3a npabINHO yHKUHOpHaNe H aTBPCKnI pIoTe Heo6xoIMMo CbIbT da NOKPbA eHa nI IN HAKONKo OT TOKHe, HaHEcEH Na IOBbpXHOCTTa Ha IIOToA n Da IMA CbOTBeTHM MHNMaJIe DnAmEeTp.
| Повраваян ha пиондлесноct МИИ | мален диаметьр |
| покрпва 1 TOUka 10 cm | |
| покрпва 2 TOUк 19 cm | |
| покрпва 3 TOUк nbд за варе на риба/peшевен paФТ | |
| покрпва 4 TOUк (хориэнтално) сbl за варе на рибa/peшевен paФТ | |
| покрпва 4 (2 + 2) TOUк (Вертукално) 24 cm |
Bb3CTaHOBAte a6pHHTe HAcTPOKn Ha nIOTA;
- npoBepBaTe BepCnTa Ha INHCTaIIpaHncofTyep.
Hactpoiknte ce 3ana3BAT npnOTnadahe Ha ekeptpupeckoto 3axpaHaBaHe.
HACTPOBBAHE HA MOUHOCTTA HA TOTBAPCKN JIOT
MaKcImaJIHaTaMoUHOCHTHaTOrBapCKnIIOToMKeJaCeOrpaHnUOnMeHIoTO 3a HaCTpoKa B CbOTBeTCTBnE C NpTe6HOCTnTE INI PPOdbJINrTeHOCCTTa Ha TaIMepa.
Bb3MOxHN Ca CnEHNHe CTOnHOCn:2.5kBT-4.0kBT-6.0kBT-7.4kBT.

3a pa3deneHHe Ha 268kaHa HaapeamenHa 30Ha:
HaTnchete n3aDpBkTe 3a 3ceyHnn yuaCTbKa, c0TBetCTBaU Ha 3oHaTa, KOrTO nCKate Da OTenIte. MoKe CbIo Da n3NoN3Bate 6yToHa 3a pa3dienHe Ha HArpeBaTeHnHa 3oHa I3o6pa3eHn Ha dncnEra 3a npapBHeHn Ha fHyHKuInTe. CnE Pa3dienHe OTenHnTe HarpeBaTeHNH 3oHn Ca HAcTpoeHn Ha eHnKaB MaOHCT.
Ako 30cekyHn BCNUHn36paHn 3OHn HcneIIOKprrTcbcB,Te Ce n3O6pa3BaT Na IeBnI DCnIe C nIbTHa UpxNXOBKa. Bb3MOxHO eJa AKTNBpuATE OTHOBo Ta3N 3OHa C KOMaHdTa "Dobabe TcB"KATo IN3NOIBate DecHn DInCIIe.

BKIOUBAHE/IMKIOUBAHE INPEGYIINPAHE HA MOUHOCTTA HA HAPEBATEJHHTE 3OHN
BkIOyBaHe Ha HzpeamEnHa 3OHa:
1.BKIOUOHTe TOrBAPCKNIAIOT.AKO BbPxy IIOTA Beue NMA NOCTaBEH CbD, IIOITbAIBOMATNUHO rpoa3no3HaBa.V36epTe npeJnaraHaTa 3oHa,3a da HAcTPOnte MOUHOCTTa.
2. NocTabeTc BbPyu 36paHaTa HArpeBaTeHHa 30Ha, KaTO BHNMaBaTe ToJa NOKPnBa NOHe eHb TO TOnKIne Ha NOBpbxHOCTTa HAnIOTA.
TataIO3NtIINIO3BOINRAJa INIINONIBaTe MAKCIMMaIIHaTaMOUHOCT.
MOn, mMaIte npEnBnD: He noCTabRMe npEIMTe BbPx dyCnIe Tnn NnB3raay. Ako CbN POKPBA HRAKo OT DnCnIeT, rTOBAPCKNAT Nnot M0ke Da He FyHKUHOHPa HOpMaHNo. Ha DeCHNA DcNNe CE NOBBA CbOSeHne "TIPOBEPETE CEH3OPHATA 3OHA n OTCpaHEt ppeIMeta Do eHa MNHyta" OtcpaHete npEIMeta n N3uakaKe, DOkato CbOSeHMeTo N3ue3He. Ako npOBeLmBt He bDe OTcPaHe, INKIOUeTe NIKIOUeTe OTHOB 3axpaHbHeTo HA Ntota 3a TOTBEHe.
Ako 30HNTe 3a rotBeHe ca pa3nOLOKeHn 6n3o Do KOHTpONHn NaHEn, npenOpbHTeHIO e da bPkNte TcHpeKPeIe N TuaHne B OueptAHnTa Ha 3OHNTe (KaTO Ce CbOpa3BaTE KATo CbHOTo HA RotBapCKn CBd, Taka n C rOpHNMy Ppb, Te KaTO OBKNHOE ToHnactCa No-IIIPOK). Toba npEiNa3Ba CEHOPHNn HnEeI pNePAHEHO HarpBaHe. Pn nepeHe nn IIN PbXCH N10N3BaITc 3aDHNTc 30Hn 3aTOTBCHC, AKO C Bb3MOxHO.
3.ИЗберете endHnHa nI rBkBaHarpeBaTeJIHa 3OHa OT lieBnДиCnnei
4. HactpoTe MOUHOCCTa KATO HAITCHETe CbOTBETHN yHaCTbK OT NtB3rauA nn nIb3HETe npbct No Hero.

3aandeHaTMOUHCTCe N3NcBaHa DnCnner B yAcTBKa,CbOTBETCTBaHn 36paHaTa HarpeBaTeHa 30Ha.
| 12 | ||
MoUHocTHa HBCa HArpeBaTeHa 30Ha MoKe Da ce perynipa ot "1" (MHIMaHa MOuHcT)do"18"(MaKcMajHa MOuHcT).
CnmoaTaHaPiB3raaMoKe Da n36peTe u yHKuYrTa 3a 6bP3o HapraBaHe, KOATc Ce O3HaUaBA Ha DcNpner C"P".
Mon,ImaTepeBnU:YuactbKbTOTDINnne,cbTBeCTBaHn3N03BaHaTa HArpeBatenHa 3OHa,3aIOoBa Da MfA, KOrATo CbDbT He e IIOxOAnu 3a INyKluOHcHOTBapcknIIOt,He e pa3NOIOKeH pApBnHO nHnPa3McpBT My e HenoXoHNu,Akdo 30 cekyni CnE h3bVpaH aHaRpeBHa 3OHa NIOeTbHe peNTpnpa NoCTaBHe Ha cbD,HarpeBatenHaTa 3OHa ce N3KJIQUBA.
N3KIOU4BaHe HaHa2peBamEnHa 3OHa:
N36epeteKemaHataHarpeBaTeHa30HaHaJIeBnIaDCnIeHnHaTNCHe6yToHa 3aI3KnIOuBaHe("OFF"),pa3NOJoxEHNADIIb3raUa.AKOHarpeBaTeHaTa3OHa e BCE OWE RopeUa,BcTOBeTHNaYAcTbK Ha DCnIeCe I3BExJa CMBoTb 3aOCTaTuHa TOnIIHa "H"
| H | H | ||

IO6ABETECbI
Korato HrKOHaRpeBaTeHn30Hc aOeHNHeHbEHa, CbTMOKe da ce noctaB KbDe a e Bbpxy AKTHBHaTApIOU. PNObT aBTOMTuHPOa3No3Haba Kbde Ce HAMIPA CbDt.
Ako jenaete da noctabite Btropn CbBbpxy AKTNBHata HArpeBaTeHa 30ha, nIOn3BaTte KomaHATA "O6abete Cb" 一 _ · 3a Da MoKe IIOToTda OTKPne npCbCTBnETO Ha HOBA.

3AKJIIOUBAHE HA BYTOHHTE
3a npedotbpaTBAHe Ha cnuyaHOBKIOUbaHe Ha nnoTa NO BpeMe H aonCTBaHe nn 3a npedotbpaTBAHe Ha npOMHa Ha hAcptoiKaTa No BpeMe HA rOteBe,HaNTcHeNoE 3a 3ceyHn6yToH "3akIOUbaHe Ha 6yToHnTe" □ nodaBa Ce 3ByKOB CnHAn Ie BkIOUba CBETInHa,CnHAnN3npaA,ye FyHKIIraTa eAKTNBUPaHa.
NaHeBt3aYnpabHeHnece6Ioknpa,CnKIOUeHneHa6yToHa 3aN3KIOUbaHE. 3a DaOTKIOUHTe6yTOHnTe,HaTNCHeTe OTHOBo 6yTOHa 3a3aKIOUBAHe B npOdbJIkeHne Ha 3 cekyHnCirHanHaTa CBETnHa yraCbA,a 6yTOHnTe 3anoBbAT OTHOBO da yHKUOHnPaT.

KXYHEHCKN TAIMEP
Korato roTbapcknT nIOte n3KnIOueH,deCHNAT nICnJIeM MoKe Da Ce n3nON3Ba KaTO TaMep.
Bknouhe Ha maumepa:
1.BknioueTe roTbapckn nnot.
2.HaTnCHETe6yToHaCn3o6paKeHHeHaNpCbueHacOBHnK pa3noJoxHe HApDCnpe3aynpaBHeHneHaFyHKUmTe.
3.C6yToHn"++/--"HaCTpoTe BpeMeTo.
4. Korato 3aadaHOTo Bpeme n3teue, NIObT NOdaBa 3ByKOB CnHan.
3a npomHa Ha 8pememo uu u3KIO4he Ha maumepa:
- HataHcHTe 6byToHa cN3O6paXaeHHe Ha nCbueH yacOBHNK Pa3nOIOxeh HA dncIe 3a ynpabJeHne Ha cyHKUNTe.
2.C6yToHn"“mMOKeJa npOMeHnTe BpeMeTo,a c 6yToH STOP -da nKIOUHTe TaIMepa.

3AABBAHHE HA IPOIbJIIXTEJIHOCTTA HA TOTBEHE
HarpeBaTeHnHte 3OHN MoRat Da ce nporpaMipap 3a abTomAtuHO N3KIOUvaHe.
3adabahe Ha npodbukumenHocmma Ha zombehe:
1.N36peTeXeHaHaTaHarpBeBatenHa30HaN3aJaTeMOUHOCTTa.
2. HATNCHE6byToHa c n3o6paXeHHe Ha xPOHOMeTbp pa3nONoxKeH Ha DmCnJEA 3a ynpabJeHHe Ha dyHKunITE.
3.C6yToHn"++/""HaCtpoTe BpeMeTo.
4.ПиИЗТИЧАЕНИВРЕМTOCEпОДABA3BYKOBСИнHARPEBATeHHaTa 30HA CEИЗКЛIOУБАВТOMATИЧNO.
3a npomraHa Ha 6peMemo u3KIOyBaHe Ha maMepa:
1.N36epeTeaKTNBHaTaHarpeBaTeHa 3OHa.
2.HaTnCHete 6yToHa C n3o6paXeHHe Ha xpoHometbP pa3noJoxeH Ha DnCnner 3a ynpabJeHHe Ha yHKunnte.
3.C6yToHn"++"mMoKeJa npOmeHnTe BpeMeTo,a c 6yToH STOP -da nKJIIOUHTe TaIMepa.
IpoBnKInTeHOCCTHaTOrBeHeMoKeJaCe3aJaTeNOOTdEnHO3aBCKa eINHnHa INI TbBkAba HargBaTeHb 30Ha, KaTO Ce N3NoJ3Ba eHa n Cbua npOeDypa.
CNEUJHNFYHKUN

6th SENSE
Bytoh ^ 6 th Sense"ocnrgypaBdoctbnnoHakonKcneuaaHn yHKm:
-
AcnctnpaHO rotBeHe
-
Chef Control
-
Flexifull
Bdecnna dncnnne 3a ynpabnene Ha fynkunite MoKe da ce npndBnKBaTe Mekdy pa3nnuHNTe cneuaHn fynkUnn da n3bnpate JeenaHnBaPnAHT. Upe3 cTpeKnTE MapKnPaTe JeaHnBaPnAHT.
C 6yToH OK NOTBbPjIaBaTe N36opa Ha MapKpapnHa BapnaHT, a C 6yToHa c BoiHa CTpeJIka Ce BpIaTe KbM IpeXOJHO To MeHIO.
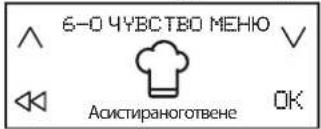
ACNTUPAHO TOTBEHE
Ta3nФyHKJIA Daba Bb3MOXHOCT Da N36Bepete EINH OT 3aNOXKeHNTB nporpaMaTAt MeTOIa 3a RotBeHe, KOEt NO3BOJIra Da npriOTBHTe XpaHaTaN Hau-OBIOYBa B3MOKHe HauHH.
IIObT NOINOMARa rOToBa, KaTo npEeNarA uDeaHIn yCNoBn 3a 3aqrbaHe n OmacBaHe Ha Cbda. Ha BCEkEtAn OT rOBeHTo Ce N3BExKaT yKa3aHn 3a DeiCTBnTa, Heo6xOuMm 3a NoCTnHa HoNTIMaHn pe3yntTa.
BkIoueHa h fyHKuura 3a acumupaHO zombeHe:
- HatncheTe 6yToH "6" Sense".
- Ha nucnne 3a ynpablenHe Na fynkunTe MapKnpaTne "AcntpuHO rotBeHe" nNotBbPte N360pa.
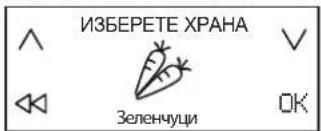
- Mapkpaate buda ha npodykmume, KOTo Ie npriroTBAte I NOTBbpeTe.
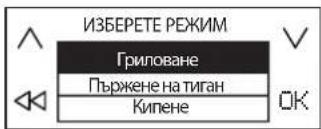
- MapKnpaTe Memoda Ha zombeHe nIOTBbPdTe.
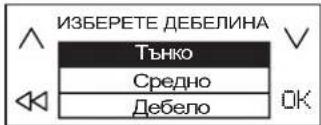
- Mapkpaite ycnoburaHa zombbeH nOTBbpTe.
- Moxe da n3nonBate cheTpnp HarapeBatenH 30Hn. NocTaBeTe cDa Ha JenaHaTataoHa, Takaue da pokpmba nohe DBe OTTOKNTe Ha nobbpxHOCTTa HA Inota.
EINHCTBHeIO npIMeTODa"Moka"ceDOnyoka CbIbT daNokpmba cmoedHaTOka.
IIO-DoIe npBvBeH npImep 3a pa3nOlaRaHe Ha pa3nUHcBdoBe.
7.OTIeBnIINcIIeN36epTeXeNaHATAHarpeBaTeHa3oHa.BcbOTBeTHyUacTbKHaDcIeRceN3PiNCBa6yKBaTa"A".
- Ha DecHn Daicnne Ce N3BexkDat yKa3aHnna 3a HyKHNte DeiCTBnna (HaNPmep "Dobabete Onno" mN "Dobabete npOdyKTME"). B KpaHa BCEKN etan rotBaHT TpA6Ba Da HATNCHE 6yTOHa 3a NOTBbpxkDaBaHe, 3a Da IPODbJKN.
9.YctaHOBeHaTa aBTOMaTmUHO MOUHOCM OKe Da Ce npomeHN IO BCKOBpeMe, aKO Bb3HNKHe Heo6xOIMOCCT, KaTO CE n3NOJ3BaT 6yToHn " + " -". - KOrato npnKIOHcTe C rotBeHcTo, nKIOHcTe HArpeBaTeHAta 3OHa C 6yToH "STOP". Ako no Bpeme Ha rotBeHcTo ca m3NO3BaHN HRAKO HArpeBaTeHn 3OHN, TpBbA pBpBO da n36epeTe 3OHaTa, KOrTO NCKaTe Da CE n3KIOHcN.
Mon, MMaTe npEeBnD: FyHKUraTa 3a acNCTmPapaHO rOToBeHe MoKe Ja Ce BKNKoH, DOpN IN KOrATo cHa HIN HAKO Ko HArpeBaTeHN 3OH NBeCe pa6oTt.
Bknoubahe Ha yhkuuma 3a acumupao zombhe 3a nooeye om edha HaepeamenHa 30Ha:
CneI Kato BKIOUHTe FyHKUNaTApO roTBHe" 3a nPbBaTa HArpeBaTeHnHa 30Ha, HATNCHEt e OTHOBo 6yToH "6th Sense" n NobTopete npouedypata 3a BTOpATA HarpeBaTeHnHa 30Ha. He MoXe da Ce n36upat 30HN, KOITO Beue Ca BKIOUcHn.
MOHMAItePnEBNIO:OyHKUHTA"ACNTnPAHO rTOBHe"MOKeJa paBOTN EHOBpEmHHo C NOETINHaPeBaTeHN30HN,AKOOrpaHnueHneto Ha MAKCNMaHATA MOUHOCTNOBOLBA TOBA.
3OHHTe He MoTaT da ce ObenHbTa 3a NolUyabaHaHe Ha No-TOJIMa TIOU.
Tomehe no oouaunna hauun npu bKIOueHa yHKuaa "Acumupao zomehe":
PnBkIOUeHaФyHKU3aACNCTIpaHO rotBEHe MoKe Da N36epTe 30Ha OT neBnIuCnE, Da 3aJaTe MOUHOCTTa IN Da IPODbNKeTc Da Ra N3NoJ3BaTe NO ObUauHHaHuH.
B63moxku bapuahmu
| КЛAC XPAHA | HAЧИН HA GOTBEHE | |
| Mecо | Грилобан, Пьржени на Тиган, Кпени | |
| Риба | Гriлобан, Пьржени на Тиган, Кпени | |
| Зеленчци | Гriлобан, Пьржени на Тиган, Кпени | |
| Сосove, сун | Сосove (Доматен, Бшамен) Сун (Изсушаве, Къкpehen, Сmetанов) | |
| Дeсят | Яшиен крем, Рална сotta, Радтоеншоколад, Палачинки, Орizuов рундаг | |
| Яиca | Пьржени яиca, Омлет, Кпни(TВарени яиca, Рожко сваени), Фprита, Бърkanя яиca | |
| Сирени | Гriлобан, Пьржени на Тиган, Фондю | |
| Паста | Кишиати, Пьржени на Тиган, Рисото, Орizuов рундаг | |
| Наитки | Мляков, Вoga, Мoka | |
| Персанниизирано | Кпени, Гriлобан, Пьржени на Тиган, Кърени, ТONEHe | |
OCHOBHN METOIM3A FOTBEHE
(EDINMHMETOIMMOKEDAIMHRAKOBApaHaHTa)

TONEHE
Ocnypba HnoDbpka Heo6xOIMMaTe Tempepatya 3a pa3TOnBaHe Ha npodykTN 6e3 onachocOT 3arapHe.
To3n MeTOI NO3B0JBA Da He Ce NOBpeKdT FInHTe XpaHN, HApPIMep WOKOJaA, N Da He 3aJIeNbAT KbM DbHOTo Ha Cba.
MoocTAMoKeJaCepeRyIIPAIOBCaKOBpeMeC6yToHn"++",paNIOJoxHeH Na DecHn DaCnnE.

KbKpeHE
Cnyk3a6abHO rTOBHe HIN 6ABHO N3napBaHe Ha TeHOC, KATO NOIbpxKa cbCTOHNTo HA xpaHaTa 6e3 onachOCT OT 3arapAHe. MetoBt NO3BOJRAxpaHaTa Da He Ce NOBpExJa N da He 3aJIeNBA KbM DbHOTo Ha Cba.
KaueCTBOTO IN BnDbT Ha Cbda OKa3BaT BmHHe BbPxy pe3yIITate n npOdbJNKeTIHOCTTa Ha rotBeHETo.
MoUHOCTaMOKe DaCEpeRyIINpaIOBcKOBbPeMeC6yToHN" + "N"-,paTNOJoxKeHHaDeCHNIAICNIe.

KUNHE*
3a 6bp30 HarpaBaHe Ha BODa N yBEdomBaHe Ha rotBaHa qpe3 3ByKOB nCBETNIHEn CnHaN, KOraTO BoDaTa 3AnOHe Da BpN.
Dokato yaka NOTBbpxdHne OTROBaHa, NIObT KoHTpOJIpa CbCTOHmEto HA BOATA HNe NO3BOJBA NbPcKAHe N3NIuWho N3Pa3xOJaBe Ha eHeprN. Korato fHKUraTe a AKTNBHa, NIObT ppeynpKjaDa BC 3BykOB cRHaI, AOK BcDa HMA BoDA (Pp3eH) INN BCNUKaTo BAo Dce E n3npAIna.
Cne3BkyOBmN CnHn 3a 3abpaHe Ha BODaTa Do6aBnTe cAmo coJ.

TbPKeHE HA TnTAH*
3a npEbaPnteH0 3arpaBaHe mOmacIbAHe Ha Ppa3Ha TeHKepe Wm TnraH.
Pnp DoCTnRa He a ONTImaHnata TemnepaTypa ce Nodaba 3ByKOB n CBETNIHE
CnHnA, 3a de cdoabat npOdyKTIne. OkaTO ouaKaB NOTBbpXdHeNE OTOTBaHa,
NIOBT NoDbpKa Ccbda pR JENaHATA TemnepaTypa, KATO He NtOBaBA
nerpTaBe H NOBpeXdaHe Ha Cbda, KaKTo n IINIMuHO n3pa3xOJaBe HA eHEpTnA.
3a ONTImaHn Pe3yITaTHNIOBBAe Ta3N FyHKUa Cb CbDOBE n Ma3HHa
CbC CTaHa TEMnepaTypa.
Ta3nФyHKUaCe n3non3Ba CbC cneuHaHn npncnocO6JeHn.
He noctabrayte kanak - npenopbyaBa ce npotnB npbcknte da ce n3non3Ba cneuaaneH npedna3nte.
Pn n3n03BaHe Ha Ta3n FyHKuIe e npenOpBvTeHIO da Ce n3n03BaT MaCla, NOxOaU 3a nbpxKe, HApIMep MacnaTa OT pa3NnuHN BNDObE CMeHa. Pn npbPoTo n3n03BaHe Ha HOB BVd Macno pa6oTeTe C NobuHe BOHMaHne n CedeTe npoueca Ha rotBeHe.

TPNIOBAHE*
I03BOJRA Ba neyeHa pa3Hoo6pa3HN npOdyKTn NO ONTImaHe 3a de6eHHaT AHaHIN. NIObT bNODaBA 3ByKOB cNHaI, KORA tCBbT dOCTHne OHTIMaHATA TemepaTypa 3a do6abHHe Ha npOdyKTIne. CnE TOBA nIOrBt NODbPka TempeApTaNoCToHnHa No Bpeme Ha roTBHeTo. KOrAto roTbaTnotBbpDn, ye e no6abHn npOdyKTIne, rOTBeHTo 3aONOyBa.
PepnpbUba ce npOdyKTInTe da ce nIOIroTBA,doKaTO Tpae npEdbapntHOTo 3aRpaBaHe Da ce DoabABT BeDHaRa CnED 3ByKOIBa CnHAn.
3a OTIMAMHn peyIITn INIOTIBaIe TaIIN FyHKuN CbC CbIOBE N Ma3HHa CbC CTaHa TEMpepaTyPA.
Ako He n3nON3BaTe npedHa3HaueHeta 3a ceTtA TeHe h CTOnKa, BHIMaBAte MHORo pN tPBTOI INON3BaHE Ha Ta3n OyHKUInr, Tb Kato KaueCTBOTo Ha IbHOTo HA CbDa OKa3Ba BImAHne Bbpyx CKOpocTa Ha npedBaPntENHO TzARpBAHe. CbOBete mMHORo TBHKO IbHO Morat 6bp3o da ce Harpert DO MHORo BcOKa TempepaTypa.

MOKA*
Cnyk3a ABTomTuHOrHarpaBaHe Ha KafeBapKu TnMoka".HarpaBaHeTo ce BkIOUyBa Upe3 N36bnpaHe Ha yHKUraOT MeHOTo, a NIOToT NODaBA 3ByKO8 CNrHaJI, KORo KAeTe CTAHe TOBO. OYHKUraTe e npOgPAMPaHa Da Ce N3KIOUyBa ABOtOMaTHUHO, KOe TopeDToBpTaRA ba Pa3NbHAKeTo. PnI PbPOTO N3IOJ3BaHE 3aDbXkTeHNO pOBePeTe DaJIc Ma N3PiJHeHN NOOCHeHTE YCOBNI. 3a ONTImaHIn pe3yIaTn N3IOJ3BaIte Ta3N OyHKUraC KaFeBapKa IN BDA CbC CTaHa TEMnepatypa.
^*3a mezu fyHKuuu ce npenopb48a u3non3ehe Ha cneuaanHu npuhndnKnocmu:
3a KInneHe: WMFSKU:07.7524.6380
3a nbpkeHe B TnraH: WMFSKU:05.7528.4021
3a rpinobaHe: WMFSKU:05.7650.4291
- 3a MOKA: Bialetti:MOKA INDUZIONE 3TZ ANTRACITE
Mona, mmaite npedBnD; 3a onTmamHNO yHKUHOHPaHe Ha rotBapckn Pnot ce cTpeMeTe Da He MeCTte Cbda npe3 IIpbTa MHyTa CneJ 3aouBaHe Ha HapraBaHcTo.
CHEF CONTROL
Pn Ta3N FyHKUraTROBAPCKnT PnOT ce pa3dena Ha YeTnpu HargpeBaTeHN 30Hn, KOnTO CE BkIIOuBa TcHOBPeMeHHo HA ONpeJeNa MoUHOCT. ToBa nO3BOJRA Da rTOBtE Pn PA3NIuHa TemNepaTypa, KaTo npocTo npemecBaTe Cbda O TeHNO MAcTo Ha Dpyro.
Bkoueha He ykuuaMa Chef Control:
- NocTaBeTe CbD BbPxy N36paHaTa 3OHa.
- Hatnche6byToH"6" Sense".
- Ha nncnna 3a ynpabneHne Ha fynkunme Mapkpauite "Chef Control" noTbpe n36opa.
4.Ha IeBnI dncIe ne 3o36pa3BaT qTeIpuTe HArpeBaTeHn 30Hn IN TeXHnTe MoUHcOHT (Cna6o, CpeJHo, CunHo).
5.3a do6abHe Ha HOBn CbIOBe n3NON3BaIte KOMaHdaTa "Do6abeTe CbD
6.3a n3KIIIOHTe Ta3n FyHKUHAHtCHte 6yTOH STOP

PpomraHa Ma MOuHocmma Ha Ha2peBaMeHa 30Ha:
1.Ⅰ36epeteHarpeBaTeHata30Ha.
2.ИберетежеланотаMuHOC,КATOпрдвикTe npbCT NO nIb3raHa, KOITOTO OCTaBA BIMM B pOДьЖeHHe Ha 1 cekyHda.
3.O3NaeHHeTo 3a H36paHaTa MoUHoc (Cna6o, CpeHNO, CNHIO) ce npomeHa.
MOnI,IMaIte npedBnH:HObAra HAcTPOKa ce 3ana3Ba,doKato He I npomehnte HmHe Bb3CTaHOBHTe a6pnuHaTa HAcTPOKa.
FLEXIFULL
Tazn yHKun n03BOLBA da n3nON3BaTe cenra TOTbapckn nIOT kato edHa HargBeaHnHa 30Ha.
BknHouBaHe Ha dyHKuaMa Flexifull:
- NocTaBeTe CbD BbPxy 36paHaTa 30Ha.
- Hatnche6ytoh"6"th Sense".
3.Ha nucnner 3a ynpabneHme Ha fynkunTe MapkpauTe "Flexifull" nnotBbpeTe n6opa.
4.CnmouTaHa nIb3raa 3aJaTe HxHata MoHocT. Ha neBna DnCnne Ce u3nncBa u36paHata MoHocT.
5.3a D06abAHe Ha HOBn CbIOBe H3NON3BaITe KOMaHdaTa "D06aBeTe CbI"
6.3a Da N3KJIIOUHTe Ta3n 0yHKJIA, HATNCHEt 6yTOH STOP.

INHANKATOP3A OCTATbHA TOIINHA
Korato B daen yactbKa Ha dncnne 3a n36npaHe Ha HaraBATEHa 30Ha e n3ncaHa 6ykBaTa "H",TOBA O3HaUaBa,Ye cboTBeTHaTa HaraBATEHa 30Ha e BCE oue ropeu. Cte KaTo HaraBATEHa 30Ha n3CTnHe,6ykbata "H" yraCba.
-
Chef Control
-
Flexifull (Fleksifull)
FLEXIFULL (FLEKSIFULL)
RENGJØRING OG VEDLIKEHOLD

ADVARSEL
TACK FÖR ATT DU HAR KöPT EN PRODUKT FRAN WHIRLPOOL
For att f en mer omfattande support, vänligen registraradin produit pa www.whirlpool.eu/register.

-
Chef Control
-
Flexifull
KIITOS SIIT,ETTA OSTIT WHIRLPOOL-TUOTTEEN
KYPSENNYSAJAN ASETTAMINEN
-
Chef Control
-
Flexifull
PAAASIALLISET KYPSENNYSTAVAT
TOIMINNAN AIKANA SYNTYVÄT ÅANET
AD KVEIKJA/SLOKKVA A OG STILLA AFL ELDUNARSVEDA
ASSISTED COOKING (MATREIDSLUADSTOD)
MATREIDSLA MED EFTIRLITI
Taflan her fyir neoan var s隣staklega ger tol a gera eftirlitsstofnunum kleift ao nota vorumar okkar.
| Matreiöslä undir leiösögnt Eftirlit með eldunarstöðum | |
| Hitadreifing, "Pönnukökur", Präfuð samkv. EN 60350-2 §7.3 | |
| Hitunarafkost "Franskar kartöflur" Präfuð samkv. EN 60350-2 §7.4 | |
| BráÖnun og viðhald á hita "súkkulaði" | |
| Að látka krauma "hrisgrjónagrautur" |
VISTVAEN HONNUN: Profunin var framkvæmd i samræmi við reglugeröir, með pví á veljá öll eldunarsvæði á hellubordinu pannig ápau myndi eitt svæði, eəa með pví ánota Flexifull-eiginleikann.
Til aô fá frekari aostó skaltu skra vöruna à www.whirlpool.eu/register.