KB 41 ECO - Oven STEBA - Free user manual and instructions
Find the device manual for free KB 41 ECO STEBA in PDF.
| Technical specifications | Convection oven, 41-liter capacity, 1500 W power |
|---|---|
| Cooking modes | Fan-forced heat, grill, traditional cooking |
| Adjustable temperature | From 100 to 230 °C |
| Usage | Ideal for cooking meats, vegetables, pastries, and pizzas |
| Included accessories | Grill rack, baking tray, rotisserie |
| Maintenance | Enamelled interior, easy to clean, removable door |
| Safety | Overheat protection, non-slip feet |
| Dimensions | External dimensions: 54 x 38 x 36 cm |
| Weight | Approximately 12 kg |
| General information | 2-year warranty, energy consumption rated A |
Frequently Asked Questions - KB 41 ECO STEBA
User questions about KB 41 ECO STEBA
0 question about this device. Answer the ones you know or ask your own.
Ask a new question about this device
Download the instructions for your Oven in PDF format for free! Find your manual KB 41 ECO - STEBA and take your electronic device back in hand. On this page are published all the documents necessary for the use of your device. KB 41 ECO by STEBA.
USER MANUAL KB 41 ECO STEBA
220-240V, 50/60Hz, 2000Watt
Grillbackofen
KB 41 ECO
Instructions for use + Recipes 14
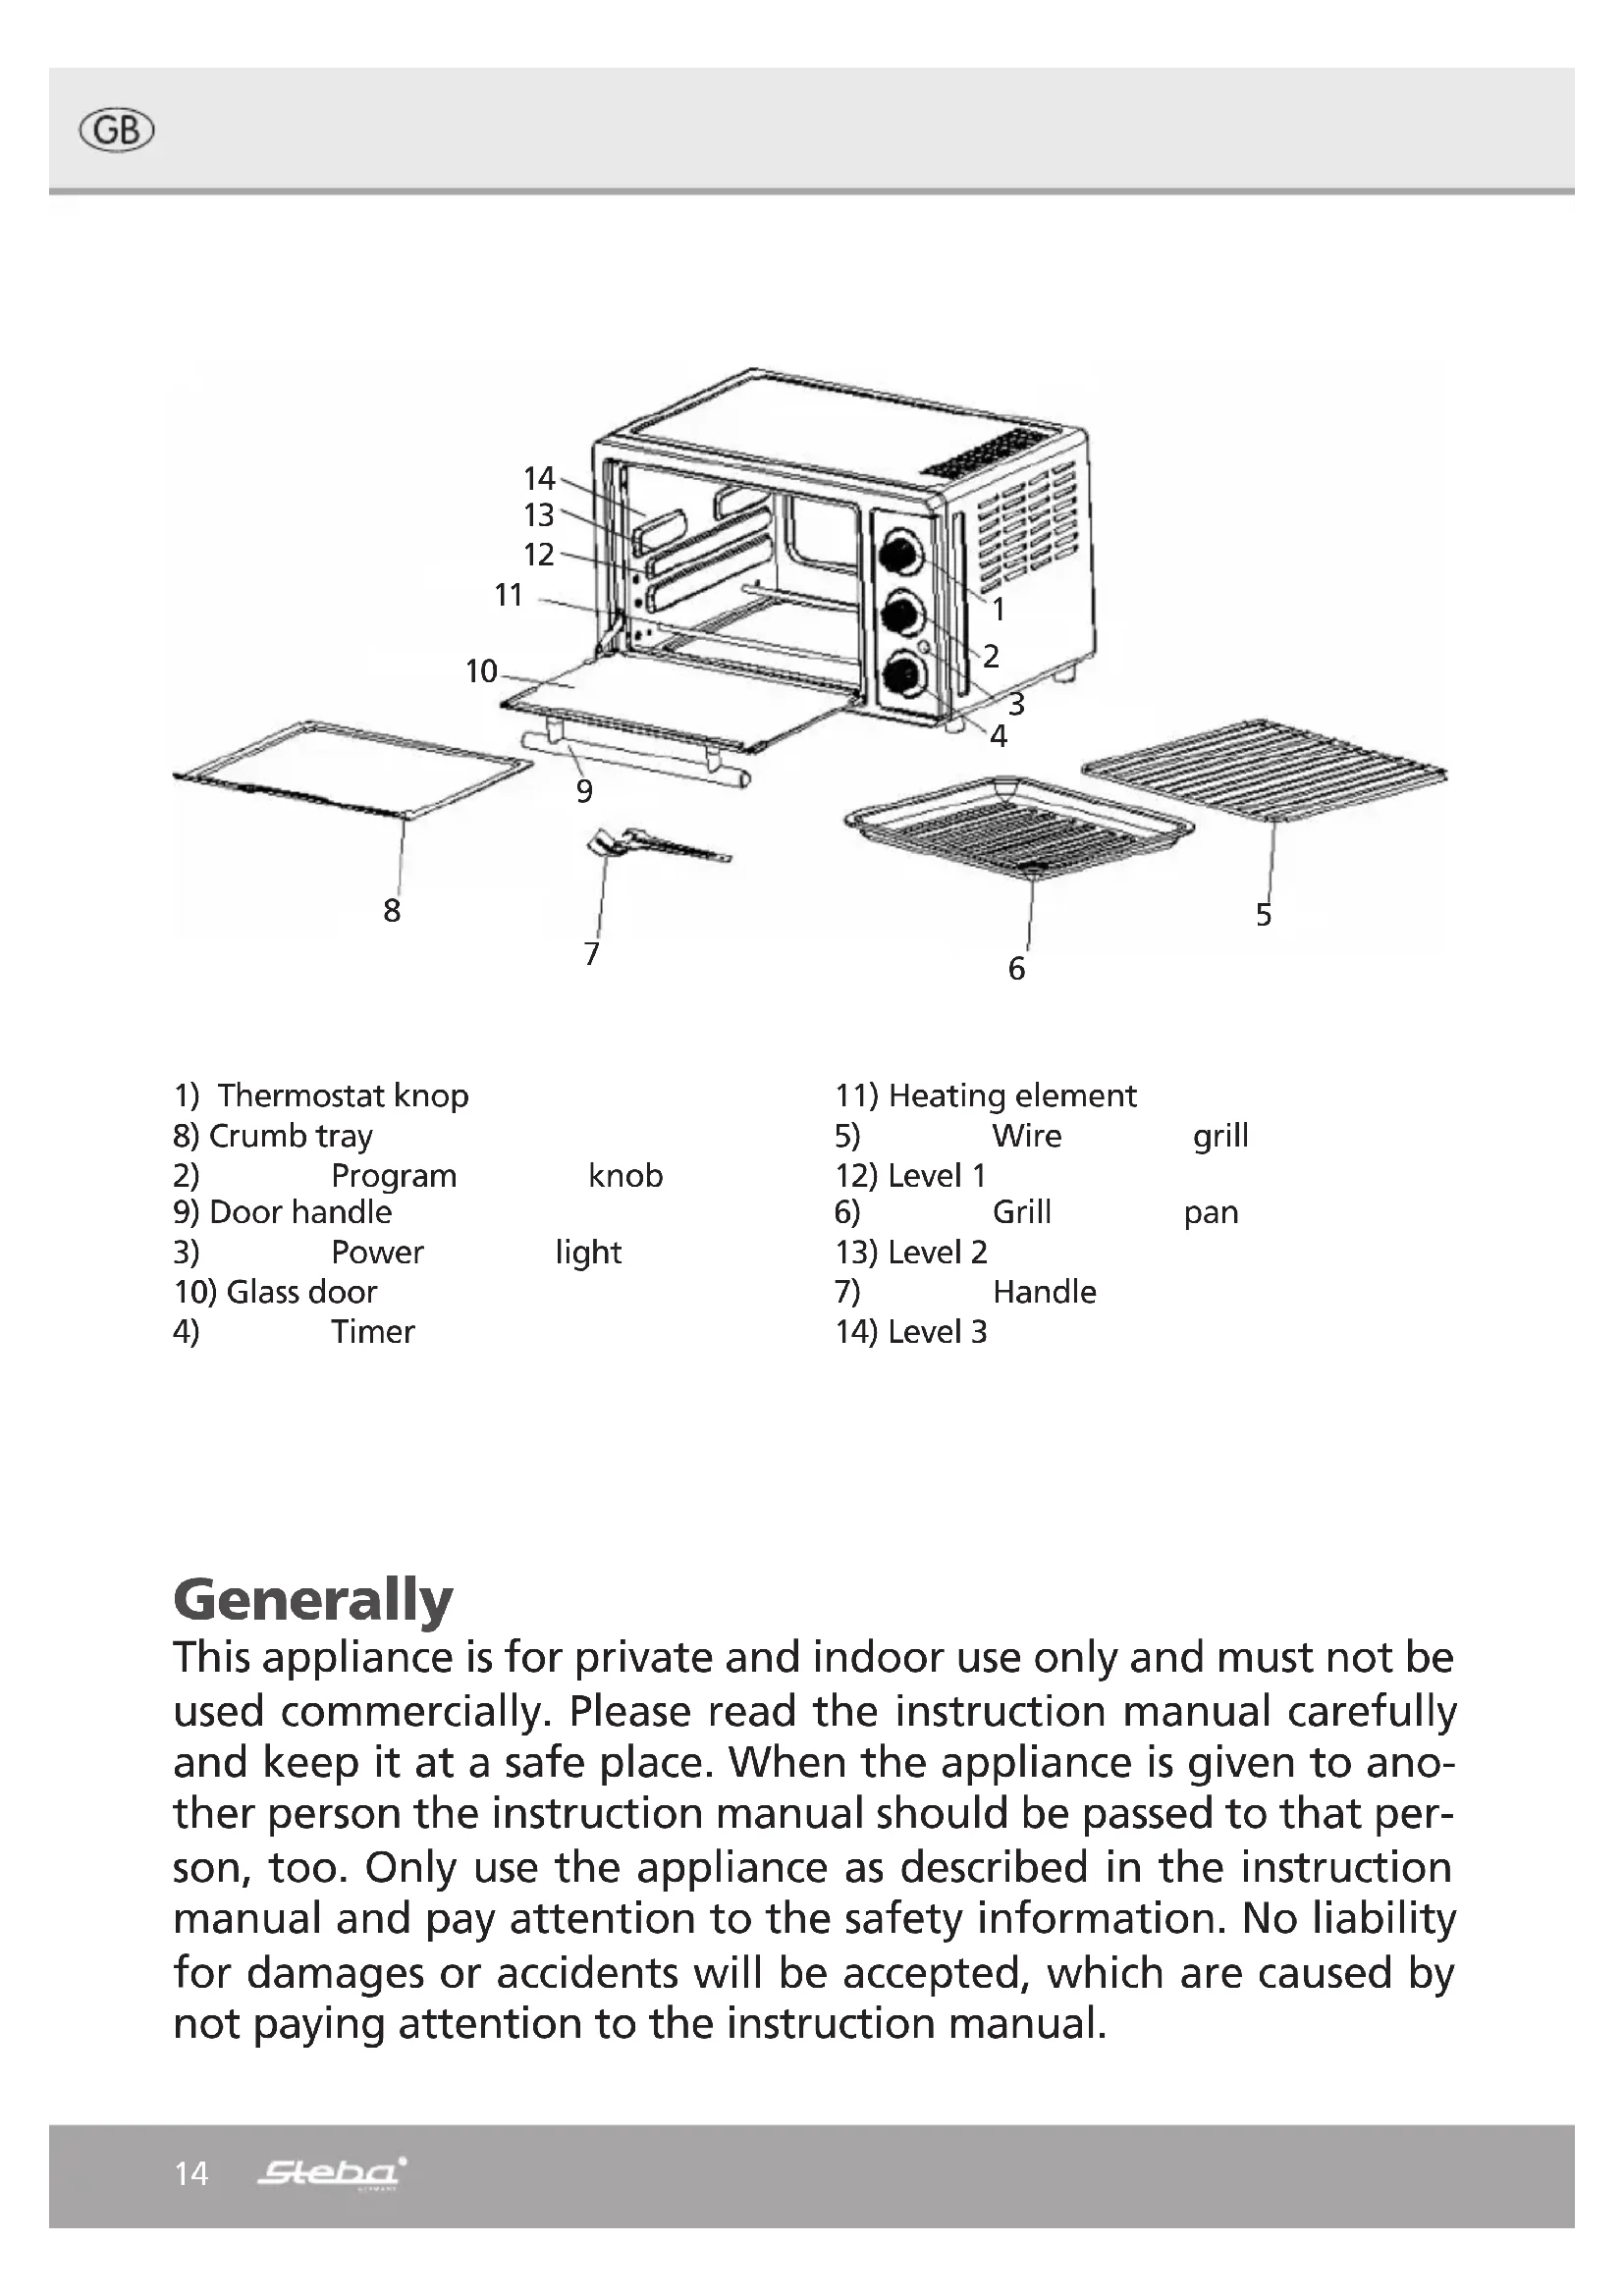
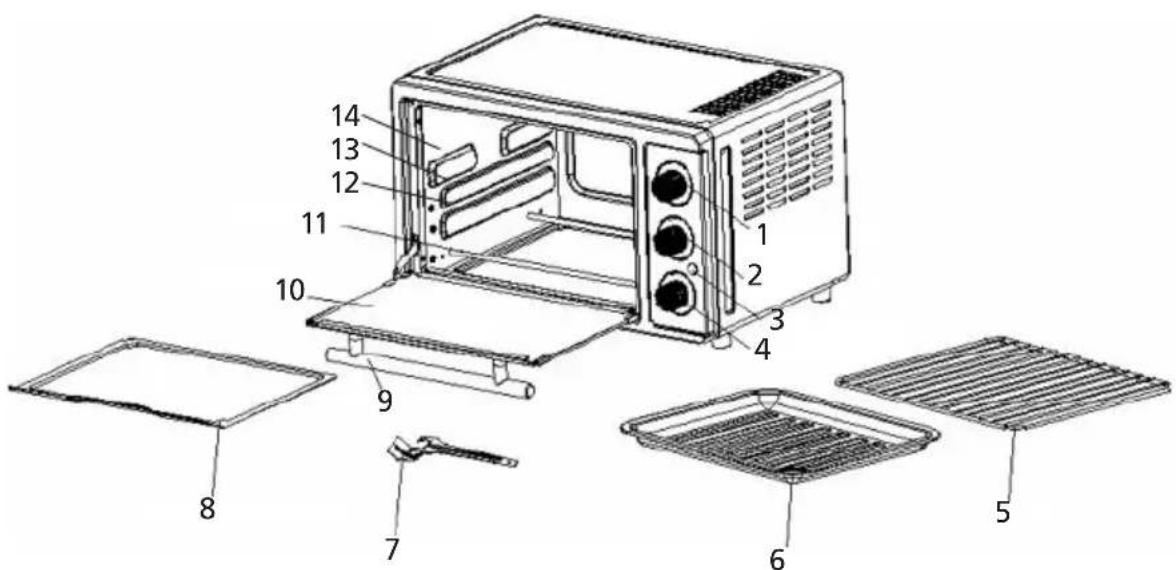
This appliance is for private and indoor use only and must not be used commercially. Please read the instruction manual carefully and keep it at a safe place. When the appliance is given to another person the instruction manual should be passed to that person, too. Only use the appliance as described in the instruction manual and pay attention to the safety information. No liability for damages or accidents will be accepted, which are caused by not paying attention to the instruction manual.
Safety information
Hot surface! There is danger of burning when touching the surface during operation. Set the back of the device to the kitchen wall. Keep children away from the unit.
-
Connect and operate the appliance in accordance with the specifications shown on the rating label
-
Do not plug with wet hands.
-
Do not plug into a socket where several other appliances are plugged in.
-
Do not use if the plug cord is damaged or when the power plug does not fit the socket securely.
-
Do not modify the parts, or repair the unit by yourself.
-
Do not use the unit near a flame or wet places.
-
Do not use where children can easily touch the unit, nor let children use the unit by themselves.
The appliance can be used by children aged 8 and above and persons with limited physical, sensory or mental capabilities or lack of experience/knowledge, provided that are supervised or have been provided with instruction in the safe use of the appliance and have understood the resulting dangers. Children must not use the packaging as a toy. Cleaning and user maintenance must not be carried out by children unless they are 8 years or older and are supervised.
Children under the age of 8 must be kept away from the appliance and the connecting cable.
-
The appliance must not be operated using a timer or a separate remote system!
-
Never pull at the power cord or chafe it over sharp edges.
-
Do not leave the appliance outdoors or in a damp area.
-
Never leave the appliance unattended when in use.
-
Never immerse the unit in water.
-
The manufacturer is not liable for damage which is occurring due to the usage of the appliance in a different way as described or a mistake in the handling has been made.
-
Use the unit with sufficient space around it. Keep the front side and either right or left side of the unit clear.
- Never use the unit on carpet or tablecloth (viny1) or any other low-heat-resistant article.
- To prevent injury, repairs such as replacing a damaged cord, should only be carried out by a customer service
- You must not wrap the grill with tin foil (accumulation of heat).
- You must not put any materials such as paper, cardboard, plastic etc. into the appliance.
- Attention! Housing and glass get hot. Danger of

burns! Do not place the appliance on a sensitive surface (e.g. painted furniture) and keep a distance of at
least 70cm to burnable materials.
- The backside of the appliance must be positioned direct at the kitchen wall.
Cleaning and maintenance:
- Ensure that the plug is pulled out of the socket and the appliance is cooled down completely, before cleaning.
- Never immerse water on the glass door when it is still hot.
- Clean the door, the metal parts in the interior and the surface with soap water. After that dry all washed parts with a dry cloth.
- Don't use abrasive Materials, acid cleaners, or steel wool for cleaning.
- Clean all other parts with a sponge
Put into operation
Plug in the device.
By setting the timer the following light shine:
- the red light to indicate that the device works
- the interior lighting
By setting the temperature the following light shines:
- the blue light
Once the desired temperature is reached, the blue light turns off. After the time runs out a signal can be heard and all lights turn off.
Important: Heat the appliance up for at least 5 min for the first time to eliminate any production oil. The appliance can smoke slightly when used the first time. Never
pu oversized food inside the oven and prevent any contact to the heating elements. Food which contains much fat should be grilled on the wire grill in position 2; the bake pan should be put at position 1. If necessary turn the thermostat a little lower.
Settings
Upper + lower heat + convection
Upper heat + convection + rotisserie spit
Upper + lower heat
Upper heat + rotisserie spit
Lower heat
1. Baking
Turn the Prog. Switch to or and adjust the wished temperature. Turn the Timer to the wished time. Because it is a mechanical timer it is necessary to turn the timer first to 90min and then turn back to the needed time. Please always add 5 min prewarming time. During baking the heating elements can glow in different colours, this is not a malfunction. If the lower side of the food should get more crunchy, then turn the Prog. switch at the end to.
2. Grilling
Put the Prog. switch to and the thermostat to 230^ and adjust the Timer to the wished time. The lower heating elements are getting hot.
Put the food on the wire grill and insert it at shelf level 2 or 3. Always place the baking tray one level below as the wire grill.
To grill inside the baking tray, insert it at shelf level 1 or 2. Do not use level 3 as the food might get burned.
3. Warming - Keeping warm
Turn on the Timer. Turn the Prog. switch to and the thermostat to 100^ . Put the food in the baking pan or on the wire grill and insert it into the oven.
4. Rotisserie grilling
Fix a rotisserie fork at the spit. Put the tied meat or poultry on the spit and fix it with the second rotisserie fork.
Be careful, that the meat is in the middle of the spit. Put the spit with the meat on the rotisserie handle and insert the top of the spit in the spit motor opening on the right side of the inner housing.
The put the other side of the spit on the spit holder.
Place the drip pan on the lowest possible level and turn the switch to and the thermostat to 230^ . Adjust the grilling time with the timer.
5. Convection Air
This program can be used to Bake, Heat up or Defrost.
The switch with the convection air symbol must be switched on to use this function.
Caution:
After baking, grilling or defrosting is finished, turn the thermostat and Prog. switch to "0" and the thermostat to MIN.
Correct Disposal of this product

This marking indicates that this product should not be disposed with other household wastes throughout the EU. To prevent possible harm to the environment or human health from uncontrolled waste disposal, recycle it responsibly to promote the sustainable reuse of material resources. To return
your used device, please use the return and collection systems or contact the retailer where the product was purchased. They can take this product for environmental safe recycling.
Packaging disposal: Do not throw away the package materials. Please put it in the recycling bin.

PS

PP

PE
Gift box: Paper, should be put to the old paper collection point. Plastic packaging material and foils should be collected in the special collection containers.
Service and Repair:
If the appliance must be repaired, please get in touch with your trader or with the manufacturer:
If you grill on the wire grill, always place the grill pan on top of the lower heating elements.
The given times are approximate and depend on size and weight of the food (e.g. 7 + 7 means turn after 7 minutes).
Recipes
Food for flat grilling
Meat for grilling should not be pounded, but it should be pressed flat gently. After that the shape should be restored. Never prick into the meat, as the juice can pour out and the meat can get dry.
When the meat should get more tender or achieve a different flavor then the meat should be placed in a marinade for some time. Frozen meat can be placed in the marinade and be defrosted in it. Before the grilling the marinade should be removed by a kitchen towel.
Grill sausage
Different styles of grill sausages can be grilled according the own taste. Thin sausages are better for a good grilling result. Raw grill sausages should be placed in hot water until the skin is tight. Then the skin of the sausages should be dried with a kitchen towel. Place the sausage then on the wire grill and insert it into the grill.
Flat meatball for 4 persons
150g Tartar, 100gr minced meat, 1 egg yolk, 12 middle sized onion, 12 bunch of parsley, 2 tablespoon of oil, 1 clove of garlic (can be omitted), 1 dry bun, salt, pepper, paprika, nutmeg
The dried bun should be soaked in some water. Then it should be mixed well together with the Tartar, the minced meat and the egg yolk. Then add the chopped onion, small cut parsley, pressed garlic and the oil. Then season the meat with salt, pepper, paprika and some nutmeg. The seasoning should be according to the own taste and spiciness. Meat loafs can be formed from the meat dough. Place them into the bake pan and grill.
Fillet Steak
150-200g per person. The filet should be rubbed with oil on both sides. Place it on the wire grill and insert it into the oven. Turn the steak over after half of the time. The steak can be grilled to rare, medium or well done. The grilling result can be tested by pressing a fork gently on the meat. When the meat can be pressed easily then the steak is still rare. A well-done steak is harder to press. After the finishing of the grill add some salt and pepper. A with herbs seasoned butter can be added to achieve a better taste.
Meat skewer (Shashlik)
Important notice: All ingredients should be cut in the same size, to achieve an evenly result in browning and doneness.
Mixed Skewer
For 4 skewers
200g beef fillet, 200g pork fillet, 100g thick bacon, 3 onion, 2 bell pepper, salt, pepper, paprika powder, curry, oil, shashlik sauce (from the shop)
The onions should be cut in thick slices and the meat in cubes of same size. Put the meat altering with the bell pepper pieces, onion slices and bacon on the skewer and oil the skewers. After grilling the Shashlik can be seasoned and should be offered with different shashlik sauces.
Skewer "Balkan" style
For 4 skewers
400g mixed pork meat, 4 large onion, 200g pickled cucumber, 100g pickled peperoni, salt, pepper, paprika powder, curry, tomato ketchup
The onions should be cut in quarters and then be stewed for a short time. The meat should be cut in pieces of same size and then be pinned on the skewer altering with the onions, cut cucumber and peperoni. After grilling the skewers can be seasoned and witch a ketchup topping.
Shashlik "Caucasian" style
For 4 skewers
400g lamb meat (not fat), 1 clove of garlic, 100-150gr thick bacon, 3 large onion, oil, salt, curry
The meat should be rubbed with the garlic clove and cut into pieces of same size. The onion should be cut into quarters and the bacon in slices. The meat and the other ingredients should be pinned on the skewer altering. Oil the skewer before grilling. After grilling salt and curry should be put on the skewer.
Poultry
Poultry is perfect for the preparation with infrared heat. The skin acts like a protection under which the meat is infused by its on fat.
Important: Poultry can be salted before grilling, as the skin protects the meat from dehydrating. The meat is ready when the skin retracts from the drumstick ends.
When the meat is pricked the leaking juice must be clear.
Frozen poultry must be defrosted completely before grilling. All giblets must be removed before grilling. Especially when the marinade contains paprika powder or curry then the poultry should be marinated with a kitchen brush short before ending the grilling process. Else the skin becomes dark and there can be bitter aroma.
It is important that poultry meat should be consumed only when it is cooked completely.
French chicken
For 2 persons
1 chicken ca. 1000g, some tarragon, 50g butter, 1 teaspoon salt, pepper, paprika powder
The chicken should be rinsed and afterward dried with a paper towel completely. Then it should be seasoned inside with sufficient salt, pepper and paprika powder. Melt the butter and mix it with some tarragon and brush the mixture on the chicken evenly.
Fish
Fish can be prepared with infrared radiation perfectly. It is ready after short time and contains nearly no fat.
Fish must be prepared with a lot of heat, that the protein in the cells coagulate fast and that the tender meat keeps juicy. For this kind of preparation smaller fish are more suitable, like Trout, Mackerel, Herring, Tench, Pike, Eel, Halibut, Salmon, Pieces of Fish.
Gold Bass or Pollack
1 pack of Gold Bass or Pollack fillet from the freezer, lemon juice, salt, tomato, oil The fillet should be removed from the packaging and defrosted. Add some lemon juice on the fish and salt it a little. Put some oil on the bake pan. After grilling please add some tomato for garnish.
Fish sticks
The fish sticks should be placed on the wire grill. Add some flake of butter on them and prepare them.
Trout "Miller" style
1 Trout (ca. 300g) per person, lemon juice, salt, butter
To achieve best results some fresh trout should be used. All intestines must be removed, and dried completely after washing. Put some lemon juice inside and outside of the fish and salt a little. Some herbs can be added inside of the fish.
Place the trout on the wire grill and prepare. When the fish is served pour some melted butter over the trout.
Mackerel
1 Mackerel per Person, lemon juice, salt, butter
For the paste: 2 tablespoon mustard, 2 tablespoon chopped parsley
Remove the intestines of the Mackerel. Then wash and dry the fish. Cut diagonal 3 times on each side into the fish. Then put some salt and lemon juice inside and outside of the fish. Put the paste inside the fish. Place it on the wire grill and prepare.
Toasting
Toast HAWAII
Per Toast: 1 slice of ham (ca. 20g ), 1 slice of pineapple, w slice of melting cheese, 1 slice of toast bread
The bread should be toasted before putting the ingredients on it. Then butter the toasted bread and put the ham then the pineapple and then the cheese on it. After that the toast should be placed on the wire grill and placed in the grill.
Pizza with mushroom and salami
For 4 persons
For the dough: 15g yeast, 2 tablespoon warm water, 1 pinch sugar, 2 cups flour, 12 teaspoon salt, 1 tablespoon olive oil
For the sauce: 1 onion, 12 can of skinned tomato, 1 small can of tomato paste, 12 teaspoon basil, 12 teaspoon of oregano, sugar and salt, 12 clove minced garlic, 1 tablespoon olive oil
For the Topping: 250g Mozzarella cheese, 125g sliced salami, 1 small can of cut mushroom.
The yeast should be mixed together with the water and sugar. Place the mixture at a warm place and cover it with some cloth until the yeast swims on the top of the water. In the meantime, the flour and the salt should be sieved together in a bowl.
Make a deepening in the middle of the flour and pour the yeast with the water and the oil into the deepening. Then mix it completely with a dough hook. Then form the dough to a ball. Put some flour on the ball and put it into a kitchen cloth and place it at a warm place until it reaches about double size (ca. 1 hour).
The onions should be prepared in a pan until they are half transparent. Put the garlic, the tomatoes and the tomato paste to the onions and stir it. Then add the rest sauce ingredients and cook it covered for ca. 30min with low heat. The sauce between the dough and the topping will make the Pizza juicier and more intense flavor. It can be used for many different types of Pizza.
Oil the bake pan with some oil and distribute the dough evenly on the pan. Put the sauce on the dough. Place the topping on the Pizza and add some drops of oil over it.
Then insert the Pizza into the oven.
Cake
Basic recipe
Rectangular baking form (ca 30cm)
200g sugar, 200g flour, 200g soft margarine or butter, 1 pinch salt, 1 small parcel of vanilla sugar, 4 medium size eggs, 112 teaspoon baking powder
Add the butter, sugar and vanilla sugar in a bowl. Then stir it with a mixer on the highest level for ca 5min until the mixture is foamy. Add the eggs and mix it thoroughly. Add now the flour through a sieve into the bowl and add the baking powder and the salt and mix it fast and thoroughly. Butter or oil to the inside walls of the baking form and cover them with some flour. Insert the dough to the form and place the form on the wire grill. Bake it until the crust becomes golden.
Apple pie
Springform pan, ca 20cm
Dough 120g sugar, 200g flour, 200g cold margarine or butter, 1 pinch salt, 1 small parcel of vanilla sugar, 1/4 eggs
Filling: 600g sour apples, 60g raisins, 60g sugar, 2 tablespoon of chopped nuts, 1 teaspoon cinnamon, 1 teaspoon of lemon juice
Glazing: the rest of the egg used for the dough
Put all ingredients of the dough into a bowl and knead it thoroughly to smooth dough. Place the dough at a cool place for some time. Butter and put flour on the bottom and the inside wall of the Springform. Roll out 2/3 of the dough to a thickness of ca 12 cm and put it on the bottom and the sides of the Springform.
Peel and cut the apples into thin slices. Mix the apples with the raisins, sugar, cinnamon and the lemon juice and put them into the form.
The rest of the dough should be rolled out now and cut into stripes. Place the stripes in a cross pattern on the cake. Use a kitchen brush to add the glazing egg on the stripes.
After the baking the cake should be removed from the form when it is still warm.
Gratins: Toast Hawaii
He cTaBbTe Ha yCToPcIcTBo HnKaKnx IpeMToB n He 3aKpbBaIte BEHTNJIaCIOHHbIe OTBepCTnA dyXOBKn.
3aPpeHNO nOpykaTb DuxOBoB uKaΦ B BODy.
HnkOrda He BkHouaTe DuxOBoi 1kaΦ, ecn OH 6blI Do 3TOro NOBpeKdEh, HapnMep, Nocne TORO, KaK OH ypaJI nII INbI INOBpeXdEHNbIM o6pa3OM.
- Пюизворителы духовогошикаife He HeceT OTBETCTBEHHOCTN 3a Heнадлесашпспьзованe устpoиctBa, KOTOPoe 6blno CBra3aHO C Heco6JIHODENHem INHcTpkyKUnn NO ekCpIpyaTaun.
ДяТOrO,TO6bI He IOnyCTnTb BO3HnKHOBeHnЯ PnCKa,Heo6xOJIMO npOBODHTpeMOHT n,HanpIMep,3aMeHNtB IOBpeXdEHHbIK Ka6eJIb TOnbKO B COOTBeTCTByIOUeM CepBnCHOM IpeDnPnAITn,ImeIoUeM Ha 3TO NOJHOMOuYn.
3aPpeSeHo Iepenocntb (TpaHcnpTnpoBaTb) yCTpOiCTBO rOpAIM, PpeBapNTeIbHO OxJaIte DyXOBky.
- IcnoIb3yIte dYXOB0I shkaΦ TOnbKO dIЯ cIeIe, KOTOpbie yKa3aHbI B NaCTOJIeM pyKOBODCTBe NO 3KcIIpyaTauN.
·Духовka He pa6oTaET c TaIeMepOM nII NpIbTOM dNCTaHcNoHOrO ynpabLeHnI!
3aPpeSeHo o6eptbIbTaB rPnIb aIIOMHHeBOI FOJIbROI (dIy aKKymyJauCNI Tepna).
3aIpeueHO NOMEuTaB BOBHyTpB DuxOBOrO uKaΦa TAKHe MaTePnaJIbI KaK, 6ymara, KapToH, PnactNK n dp.
BbIbepnte pexm nnn nn daee yctaHOBTe Heo6xOIMyU Bam TemnepaTpy.
Bpem npiroTOBHeHn yCTaHOHTe c nOmoIbIO TaMepa. B npocece npiroTOBHeHn rpeIoUm 3JeMeHT MoKet NMeTb pa3HbI UBeT, He oBaPauAte Ha 3To HnKaKOro BHMaHn. 3To He YBJIeTcH HeNCnpaBHOCTbIO. Ecn Bam Heo6xOJMo O T06bI KOpOka Xne6a 6bIa Xpyctrauei, B KOHcE BblNeuKN, BkIIOHTe peXIM: HxKnHn HarpeB.
2. Гриль:
BbI6epnte peKIM nnn, TepMoperyJrTOp yCTaHOBtE Ha 230^ . BpeMa npuroTOBHeHnBbI6epTe c nOmoU bIO TaIMepa. HxKnH NJIeMeHT HArpeBa He 6ydet pa6oTaTb.
Ipoodyk T JnJ XapKn Ha rpnne pacnonaraetc H a 2 nn 3 ypOBHe. IpoTINBeH Heo6xOIMO yCTaHOBNTb Ha OOnH ypOBHeH HIXe.
EcnBam Heo6xOIMO npiroTOBnTB Nnuy Ha npOTNBHe, yCTaHOBnTe ero Ha ypOBeHc 1 no 2.3 ypoBeHb Lyuwe He nCnONb3OBaTb, TaK KaK Nnua MoKeT 6bICTpo CROpeTb.
3. Pexim pa3Mop03KN:
YcTaHOBnTe TaIMeP N BkHouHrTe a TaKKe yCTaHOBnTe TepMOpEryIaTOp Ha TeMnepaTy p 100°C. IomeCTnTe npOdyKT Ha npOTnBeHb nIHa rpnIb.
Ha4 wamnpa notpe6yeetc:
200 r. Φиne roBAnHbI, 200 r. CBnHOB bIpe3Kn, 100 r. 6eKoHa, 3 nyKOBuCbI, 2 3eJIeHbIX 6oIrapcknx nepua, coIb, cheHbI nepeu, KpaCHbI nepeu, kappu, MacNo, cNeuaJIbHbI coyc dIra 6ap6ekIO (npOdaETcB npoDyKTOBbIX MaRa3INhax).
JyK HapeXbTe KpynHbIMN DoJIbKaMn. Mco pa3peXbTe Ha OINHaKObIe KpynHbIe KyCKN. Iocbnar KysKn Mca nepzem, HAnxKnte nx Ha 7aMnp, NonepeMeHHo HAn3bBaJ KOJIbUa Jyka n IOMTnKn 6ekOHa. DObabTe npInpAbbl nocJe npriROToBHeHn. PekomeHdyem Bam nCnoJIb3OBaTb cneuaJIbHbI coyc dIg 6ap6ekHo
Балканский грель
Ha4 wamnpa notpe6yetc:
400 r. cBnHov BbIpe3kn (6eDpo, IonaTka), 4 KpynhbIX lykoBnCbI, 200 r. orypoB, 100 r. cnadkoTnepu, coIb, KpaChbI nepeu, YepHbI nepeu, KappN, TOMaTHbI KeTchPn.
YeTBePTHKn Lyka CnErKa NToTuHtB. Mco Hape3aTb Ha paBHomepHbIe KcCKN n HAHN3aTb Ha 7aAMnypbI BmecTe C LykOM, Hape3aHHbIMN orypzAmn I nepZeM. Cma3aTb MaclOM n NoCTaBnTB B DuxOBoi ShkaΦ dIra JxapKn. Pprnpaby n Cmecb cneuN Do6aBnTB NocNe TORo, KaK Maco 6ydeT roTOBO. PeKomeHdyem Bam nCnoJb3OBaTb TOMaTHbI KeTuyn.
Kabka3ckn 7a7lbik
Ha4 7aamnpa notpe6yeTc: 400 r. Mca 6apahnHbI, 1 3y6uK yeChoka, 100-150 r. 6ekoha, 3 KpynhbIX NykoBnCbI, MacNo, pactnteNbHoe coNb, kappn.
BoTpnte YecHok B Maco n pa3peXbTe Maco Ha KpynHbIe Kyckn. IopeXbTe KpynHO 6ekOH. IoouepeDn Ho HauH3bIbAaTe Ha 7aAMnpa Maco, YeTBePtnHKn Lyka, 6ekOH. CmaXbTe KycOuKn Mca Co Bcex cToPOH pAcTHeJIbHbIM MacnOM. Nocne nprirotobHeHn 6JIOda, npinpaBbTe erO coJIbU n 6oJIbUIM KOJIueCTBOM Kappn.