KB 11 - Oven STEBA - Free user manual and instructions
Find the device manual for free KB 11 STEBA in PDF.
| Brand | Steba |
| Model | KB 11 |
| Product type | Tabletop electric oven |
| Usage | Private, non-commercial |
| Power supply | 220-240 V ~ 50 Hz |
| Estimated power | 1500 W |
| Approximate dimensions | 45 x 35 x 30 cm |
| Approximate weight | 5 kg |
| Estimated capacity | 20 L |
| Maximum temperature | 250 °C |
| Timer | Mechanical, 0 to 15 minutes |
| Functions | Baking, grilling, keep warm |
| Glass type | Double glazing |
| Insulation | Special for better heat retention |
| Materials | Steel, tempered glass, non-stick coating |
| Care and cleaning | Clean with a damp cloth and liquid detergent; do not use abrasive products |
| Safety | Automatic shut-off by timer; cooling ventilation after shutdown |
| Included accessories | Rack, drip tray (crumb tray) |
| Repairability | Repairs by professional service only |
| Disposal | Do not dispose of with household waste; recycle via collection points |
Frequently Asked Questions - KB 11 STEBA
User questions about KB 11 STEBA
0 question about this device. Answer the ones you know or ask your own.
Ask a new question about this device
Download the instructions for your Oven in PDF format for free! Find your manual KB 11 - STEBA and take your electronic device back in hand. On this page are published all the documents necessary for the use of your device. KB 11 by STEBA.
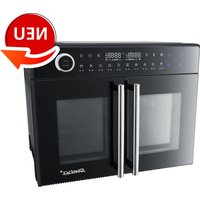
USER MANUAL KB 11 STEBA
Grill + Backofen KB11
Instructions for use 6
Mode d'emploi 10
This appliance is for private and indoor use only and must not be used commercially. Please read the instruction manual carefully and keep it at a safe place. When the appliance is given to another person the instruction manual should be passed to that person, too. Only use the appliance as described in the instruction manual and pay attention to the safety information. No liability for damages or accidents will be accepted, which are caused by not paying attention to the instruction manual.
Safety information
- Connect and operate the appliance only in accordance with the specifications on the rating label. The appliance is not for build-in and must not be used as a build-in oven.
- Do not use if the power cord is damaged. This must be checked before each use. Don't touch the plug with wet hands.
The appliance can be used by children aged 8 and above and persons with limited physical, sensory or mental capabilities or lack of experience/knowledge, provided that are supervised or have been provided with instruction in the safe use of the appliance and have understood the resulting dangers. Children must not use the packaging as a toy. Cleaning and user maintenance must not be carried out by children unless they are 8 years or older and are supervised. - Children under the age of 8 must be kept away from the appliance and the connecting cable.
- The appliance must not be operated using a timer or a separate remote system!
- After each use or in the case of a malfunction the plug must be pulled out of the socket.
-
Never pull at the power cord. Do not chafe it over sharp edges or squeeze it.
-
Keep the power cord away from hot parts.
-
Never leave the appliance unattended when operating.
-
Do not place anything on the top of the appliance or cover the ventilation holes.
-
Never store the appliance outdoors or in a damp area.
-
Never immerse the appliance in water.
-
Do not operate the appliance if it is damaged, e.g. it fell down, or it is damaged in any other way.
- Repairs at the appliance, e.g., exchange of a damaged power cord, must only be done by authorized service persons, to avoid any dangers.
- The appliance becomes hot. Do not move the appliance until it cooled down
-
Always remove the wire grill or handle with an oven glove from the oven to avoid the danger of burns.
-
Befor the first use: Heat up the appliance for about 10 min. before baking or grilling to eliminate any production-oil. The appliance can smoke a little bit in the beginning.

Attention! Housing and glass get hot. Danger of burns! Do not place the appliance on a sensitive surface (e.g. painted furniture) and keep a distance of at
least 70cm to burnable materials. The backside of the appliance must be positioned direct at the kitchen wall.
Always connect the device to a safety socket
- Route connecting cable in such a way as to avoid unintentional contact or pulling during operation.
- Unplug device from socket before moving its location.
- Disconnect mains plug after use and before cleaning.
The cooling fan runs for 5 minutes after switching off the device.
Before the first use:
The appliance must be heated up at 230^ temperature setting for 10 min before using as a bake oven. The appliance can smoke a little bit in the beginning. No over-sized food must be placed inside the cavity to avoid any contact to the heating elements.
Starting up the device
Important: Please note the following points:
Make sure that the crumb flap at the bottom of the device is always closed.
Do not put foil on the crumb cover.
- Set regulator to the required degree setting (e.g. 180^ )
- Set timer to 15 min.
- Please note: Do not put any food into the oven until the oven has been pre-heated.
- Pre-heat device until the heating elements are no longer glowing (i.e. until the regulator switches for the first time)
- You can now put food into the oven. Please note when doing this: It can take several minutes for the thermostat to operate and the heating elements to glow again, since the temperature is stored in the device because of the double pane of glass and the special housing insulation. This is not a defect in the device, and therefore not a cause for complaint. The oven door must be closed!
- Do not put food items are too large into the device; no contact must be made with the heating elements.
- Set the cooking time using the timer. The lamp lights.
- Since the drive of the timer is mechanical, the clock must first be fully wound up (turn to 15 min.) and then set to the required time. Please note that a deviation of 10% from the time setting may be possible.
- If you set the timer to ON the clock runs continuously, i.e. the device does not turn itself off automatically.
- After usage set the appliance to "0" and pull the plug.
- You must not put any materials such as paper, cardboard, plastic, etc. into the appliance.
Tip:
Frozen bread rolls:
Pre-heat device (see above)
Set thermostat to 150 degrees and set timer to 8 minutes.
Shelf height 1
Pizza:
Heat up the appliance (please see above)
Turn thermostat to 140^ and the Timer to 12 min.
Insert level 1
Cleaning and care
- Always pull out the plug and cool down the grilling oven before cleaning or men-ding.
- Do not splash water at the glass door when it is still hot
- Clean the door, the metal parts and the coated surfaces with washing-up-liquid. Let everything get well dry.
- Never use acidic cleaner, things which scotch or steel wool to clean your appliance.
Clean all other parts with a damp cloth.
The appliance has a crump flap at the lower side.
For cleaning purpose the flap must be opened.
Correct Disposal of this product
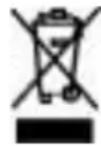
This marking indicates that this product should not be disposed with other household wastes throughout the EU. To prevent possible harm to the environment or human health from uncontrolled waste disposal, recycle it responsibly to promote the sustainable reuse of material resources. To return
your used device, please use the return and collection systems or contact the retailer where the product was purchased. They can take this product for environmental safe recycling.
Packaging disposal: Do not throw away the package materials. Please put it in the recycling bin.

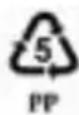
Gift box: Paper, should be put to the old paper collection point. Plastic packaging material and foils should be collected in the special collection containers.
Service and Repair:
If the appliance must be repaired, please get in touch with your trader or with the manufacturer: