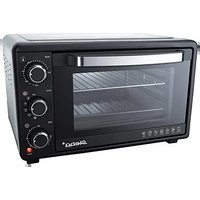
AF 24 TRI-ZONE - Oven STEBA - Free user manual and instructions
Find the device manual for free AF 24 TRI-ZONE STEBA in PDF.


User questions about AF 24 TRI-ZONE STEBA
0 question about this device. Answer the ones you know or ask your own.
Ask a new question about this device
Download the instructions for your Oven in PDF format for free! Find your manual AF 24 TRI-ZONE - STEBA and take your electronic device back in hand. On this page are published all the documents necessary for the use of your device. AF 24 TRI-ZONE by STEBA.
USER MANUAL AF 24 TRI-ZONE STEBA
natural_image
Steba Steba brand microwave oven with digital display and control buttons (no text or symbols on main body)220-240 V\~; 50 Hz; 2400 W
Airfry-Grillbackofen AF 24 TRI-ZONE
Instructions for use 20
Mode d'emploi 36
text_image
Labeled diagram of an oven with numbered parts for identification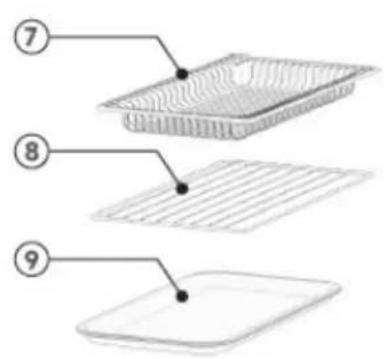
text_image
Diagram showing three labeled components of a woven basket or tray, with numbered callouts pointing to each part.
text_image
Diagram of a three-part plastic tray with numbered labels pointing to different compartments.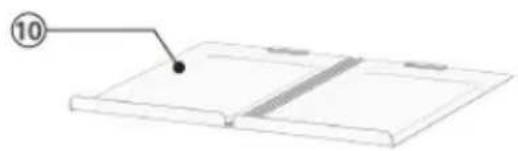
natural_image
Simple line drawing of a rectangular object with a numbered label (10) pointing to its top edge, no text or symbols present.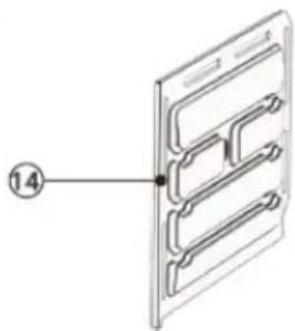
natural_image
Diagram of a device panel with labeled component (14), no text or symbols present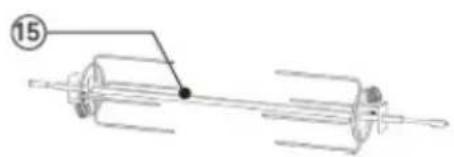
natural_image
Mechanical assembly diagram showing a shaft and housing with a numbered component (15), no text or symbols present.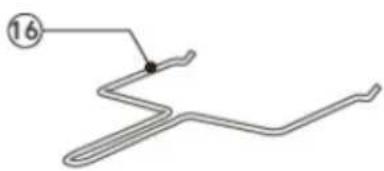
natural_image
Pure electrical circuit lines without any symbolsnatural_image
Diagram of a room interior with heating elements and a door, no text or symbols presentnatural_image
Diagram of an open refrigerator with cooling pipes and ventilation slots (no text or symbols)natural_image
Exterior view of a two-tiered storage unit with two rectangular panels and mesh insulation (no text or symbols visible)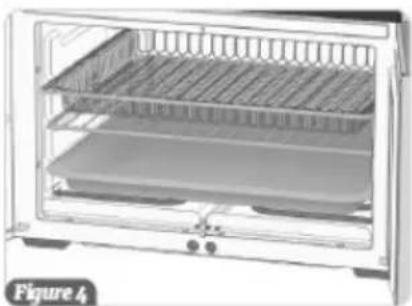
natural_image
Exterior view of a modern kitchen appliance with three-tiered grilles (no text or symbols visible)| Airfry | Toast Pizza | Dehydrate | Roast | Broil | Bake | Re-heat | Fer-ment | Rotis-serie | |
| 1) | X X | ||||||||
| 2) | X X X | ||||||||
| 3) | X X X X X | ||||||||
| 4) | X |
Drehspieß
natural_image
Illustration of a chicken being cut with a knife, showing body and tail (no text or symbols)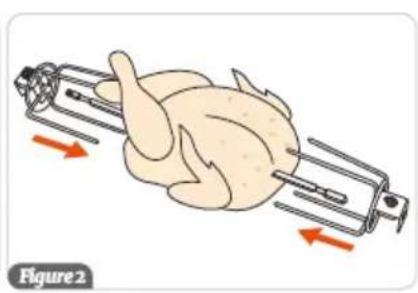
natural_image
Illustration of a chicken being cut with a tool, showing airflow direction (no text or symbols)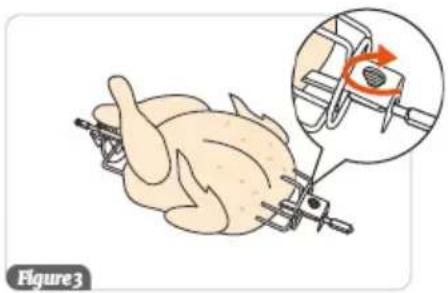
natural_image
Illustration of a chicken being inserted into a clamp, with an inset showing the mechanical component (no text or symbols)natural_image
Illustration of a chicken inside a storage unit with internal components (no text or symbols)text_image
B A C F G H L- Cancel Copy +1Min R- Cancel Sync D E 8:00:00 HR MIN SEC LIGHT DARKA) ON/OFF
text_image
(See Page 13) 88:88 HR MIN SEC DARK LIGHT I J K N START / PAUSE M LI) Rechte Seite
natural_image
Illustration of a food storage tray with green grains and three baked goods on a curved surface (no text or symbols)Choose proper tray or rack, placing food inside cavity slot inside cavity slot.
natural_image
Diagram of a refrigerator interior with red arrows indicating direction, no text or symbols presentInsert Crumb tray into cavity (below lower heater), then insert Divider into cavity (middle of the cavity)
Choose Temp. "or Time" then rotate the knob to set the proper temp. and time.
natural_image
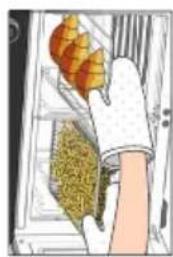
Illustration of hands holding a tray with food items inside an oven, next to a tray of golden mushrooms (no text or symbols visible)Remove food after cooking completed. Use the proper tool (for example oven mitts) to prevent burns.
natural_image
Illustration of a hand pressing a button on a camera (no text or symbols visible)Press the button START/PAUSE to start cooking.
natural_image
Illustration of hands holding a tray with food items inside an oven, next to a tray of golden mushrooms (no text or symbols visible)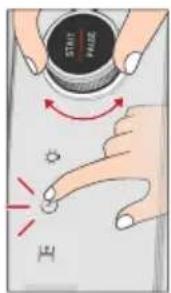
text_image
E F START PAUSE→
Choose Temp. "or Time" then rotate the knob to set the proper temp. and time.
text_image
Cartoon illustration with Chinese characters and symbols, including a hand pointing at a small figure with red lines.→
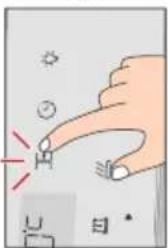
Select "←" to choose Left cavity
text_image
Labeled diagram of an oven with numbered parts for identification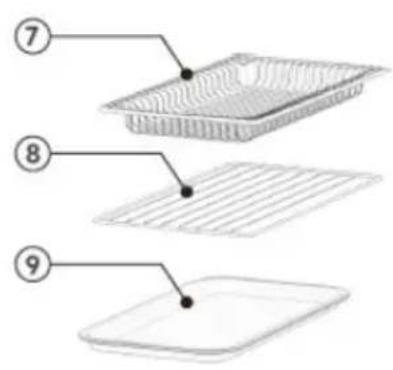
text_image
Diagram showing three labeled components of a food item: tray, side, and lid, with numbered annotations.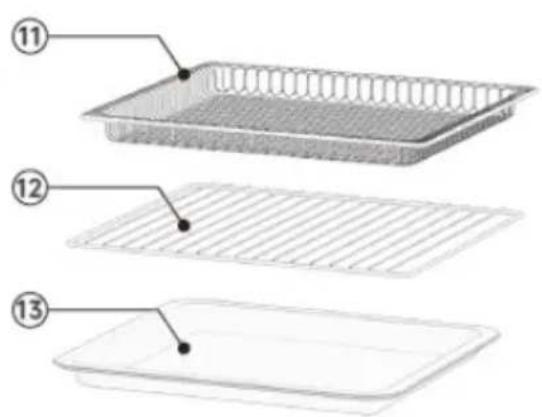
text_image
Diagram of a three-step food tray with labeled parts including a rectangular tray, horizontal slatted tray, and flat tray.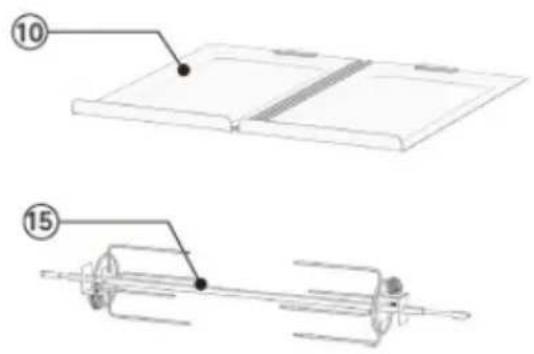
text_image
Technical diagram showing two mechanical assembly components with numbered parts 10 and 15, likely for assembly or maintenance instructions.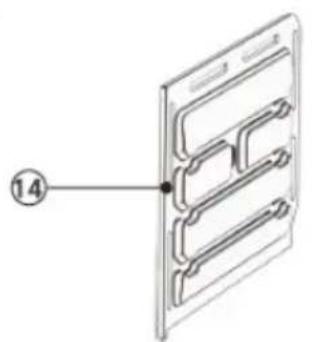
natural_image
Diagram of a 3D panel with internal channels and a numbered label (14), no readable text or symbols present.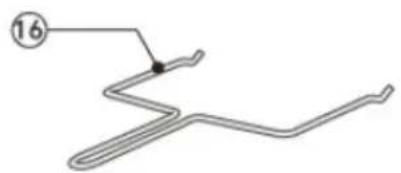
natural_image
Pure electrical circuit lines without any symbols1) Panel
2) Control dial
3) Housing
4) Double glass door
5) Door handle
6) Heating element
7) Airfry-Grid small, 2x
8) Wire grill small, 2x
9) Baking tray small, 2x
10) Crumb tray, 1x
11) Airfry-Grid big
12) Wire grill big
13) Baking tray big
14) Cooking chamber divider
15) Rotisserie spit
16) Spit lifter
Generally
This appliance is for private and indoor use only and must not be used commercially. Please read the instruction manual carefully and keep it at a safe place. When the appliance is given to another person the instruction manual should be passed to that person, too. Only use the appliance as described in the instruction manual and pay attention to the safety information. No liability for damages or accidents will be accepted, which are caused by not paying attention to the instruction manual. Remove all packaging and sticker (except the rating label). Wash up all parts carefully (see cleaning).
Safety information
Hot surface! There is danger of burning when touching the surface during operation. Set the back of the device with a distance of 10cm to the kitchen wall.
- Connect and operate the appliance in accordance with the specifications shown on the rating label.
- This device is no built-in oven and cannot be used like this.
- Do not use if the plug cord is damaged. Verify before every use.
- Do not plug with wet hands.
- Connect the power plug to a properly installed and easily accessible socket only.
- To unplug the power plug, always pull the plug – not the cable.
- Plug off the appliance after each use or in case of failure.
- Do not pull at the cord. Don't pull it over edges and don't bend it too much.
- Keep the cord away from hot parts.
The appliance can be used by children aged 8 and above and persons with limited physical, sensory or mental capabilities or lack of experience/knowledge, provided that are supervised or have been provided with instruction in the safe use of the appliance and have understood the resulting dangers. Children must not use the packaging as a toy. Cleaning and user maintenance must not be carried out by children unless they
are 8 years or older and are supervised.
- Children under the age of 8 must be kept away from the appliance and the connecting cable.
- Children should be supervised to ensure that they do not play with the appliance or packaging material (e.g. Plastic Bags).
- The appliance must not be operated using a timer or a separate remote system!
- Never leave the appliance unattended when in use.
- Do not leave the appliance outdoors or in a damp area.
Never place anything on top of the device and do not cover the ventilation slots.
- Never immerse the unit in water.
- Leave a space of about 10cm around the device.
- Never use the device after a malfunction, e.g. if it felt down or has been damaged in any other manner.
- The manufacturer is not liable for damage which is occurring due to the usage of the appliance in a different way as described or a mistake in the handling has been made.
- To prevent injury, repairs such as replacing a damaged cord, should only be carried out by a customer service. Only original spare parts have to be used.
- The device gets hot, only transport after it cooled down.
- Only use the device as described in this manual.
- You must not wrap the accessories with tin foil (accumulation of heat).
- You must not put any materials such as paper, cardboard, plastic etc. into the appliance.
- This appliance is intended to be used in household and similar applications such as:
o staff kitchen areas in shops, offices and others working environments
o by clients in hotels, motels and other residential type environments
o bed and breakfast type environments.
- Before initial use: clean all parts – except the heating elements - carefully and leave to dry. Heat up the device for about 15 min. to eliminate the smell of newness.
Attention! Housing and glass get hot. Danger of burns! Do not place the appliance on a sensitive surface (e.g. painted furniture) and keep a distance of at
least 70cm to burnable materials.
- During operation steam emerge. Keep hands and face away.
- If an extension cable is used, it has to have a cross-section of 1,5mm^2 . A cable drum must always be unwound.
- If a GS-tested 16 A multi-pin extension is used, it may not be charged with more than 3680 watts due to fire hazard.
- Make sure that children do not tease the cable or that a trip hazard occurs.
- The device must always be disconnected from the power supply if it is not supervised and before assembling, disassembling or cleaning.
- Attention: as dripping fats can easily ignite the radiator, never grill without a pan! When removing the full pan, do not tip any grease on the radiator.
- Clean after every use.
• Always insert the crumb tray under the lower radiator. - To avoid glass breakage, do not open the two doors by force. Do not hit metal parts against the hot glass or splash cold water on it.
Cleaning
Attention! Pull the plug before cleaning and allow the device to cool down.
- Never immerse the unit into water.
- Inadequate cleaning will affect the lifespan of the product.
- Fat residues must be removed for reasons of hygiene and fire hazard.
- Do not use abrasives, oven spray or solvents.
- Clean the housing and the interior with a damp cloth with detergent, clean the glass with glass cleaner and dry.
- The crumb tray can be cleaned in hot water and then dried. Push the crumb tray back in.
- The baking chamber divider must not be immersed in water! Clean it with a damp cloth.
• The remaining accessories are dishwasher suitable.
Workplace
Important:
Never place this device on or next to hot surfaces (e.g. hot stoves). Only use it on a
even, stable and a heat resisting surface. It is important that no inflammable items are
near to the device. Do not place the device on the edge of the table so that it cannot be touched by children or fall down when touched.
Usage of the accessories
Crumb tray
natural_image
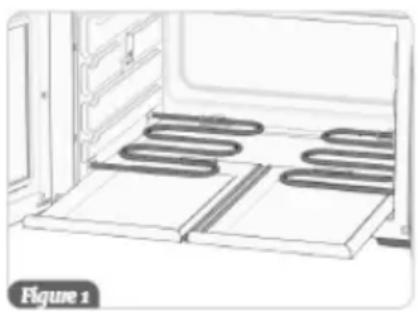
Line drawing of a room interior with heating elements and a door (no text or symbols)For safety reasons, the crumb tray must always be inserted under the radiators.
Cooking chamber divider
natural_image
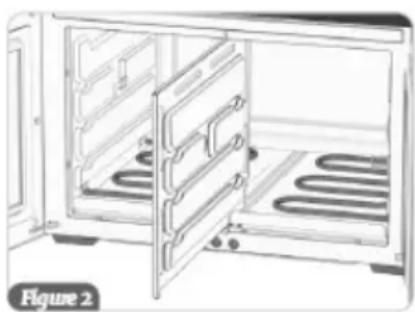
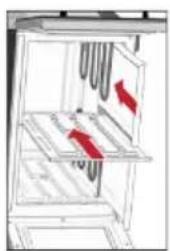
Diagram of an open refrigerator with cooling pipes and ventilation slots (no text or symbols)With the help of the cooking chamber divider, the large baking chamber can be divided into 2 small baking chambers. To do this, slide the divider into the rails provided on the floor and ceiling of the baking chamber.
Airfry-grid, baking tray, wire grill
natural_image
Exterior view of a two-tiered kitchen appliance with two rectangular covers (no text or symbols visible)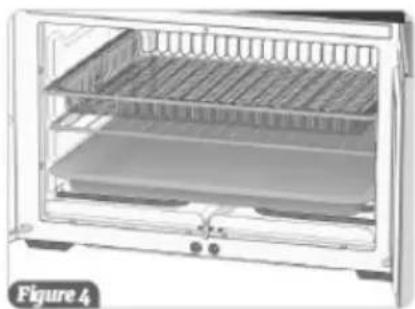
natural_image
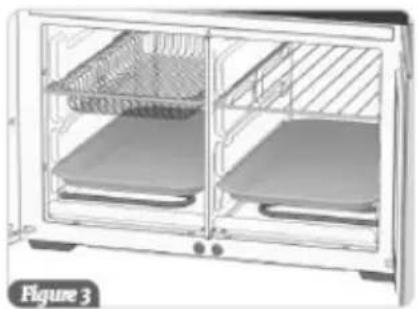
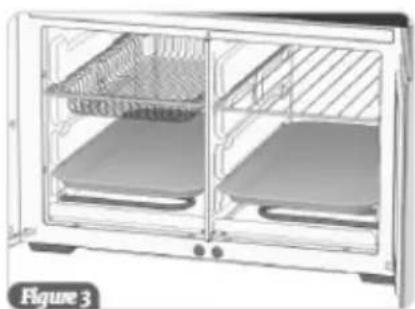
Exterior view of a stainless steel oven with grilles and a flat lid (no text or symbols visible)In order to use the small Airfry grids, baking trays and wire grills, the cooking chamber divider must be pushed in. The large accessories can be used without the divider. Choose a suitable
shelf level. If food is dripping, it is recommended that you insert the baking tray on the lowest level to prevent fat from dripping onto the heating elements.
Important! The temperature difference between the two small baking chambers should not be too large, as the higher temperature in one baking chamber can influence the lower temperature in other baking chambers.
Insertion levels
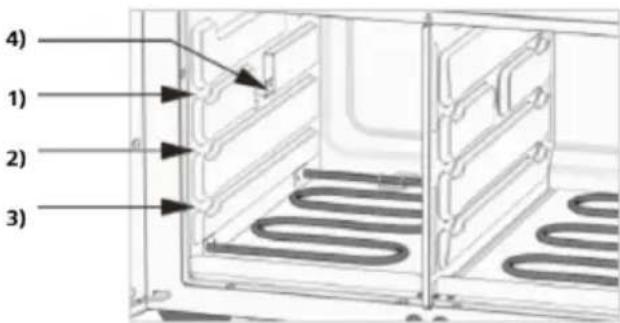
A specific insertion level is recommended for each automatic program:
| Airfry | Toast Pizza | a Dehy- | drate | Roast | Broil | Bake | Re-heat | Fer-ment | Rotis-serie | |
| 1) | X X | |||||||||
| 2) | X X X | |||||||||
| 3) | X X X X X | |||||||||
| 4) | X |
Rotisserie spit
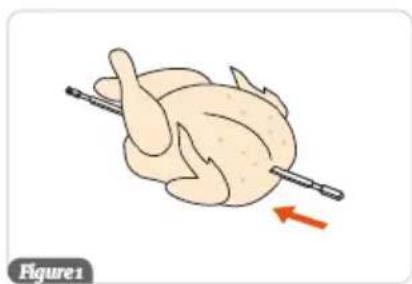
Suitable for grilling poultry or roast pieces of meat on the rotisserie.
natural_image
Illustration of a chicken being pulled with a tool, showing body posture and a red arrow indicating motion (no text or symbols)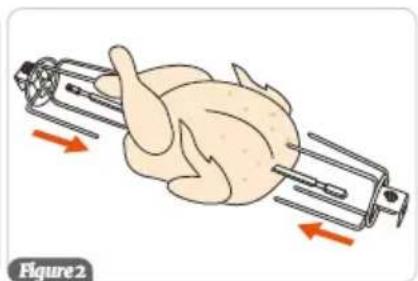
natural_image
Illustration of a chicken being cut with a metal hook, showing motion arrows (no text or symbols)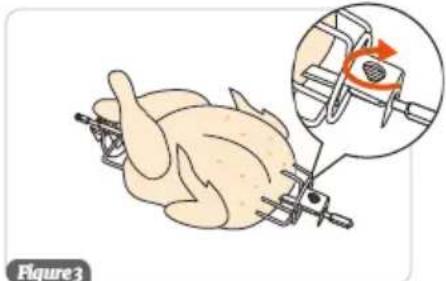
natural_image
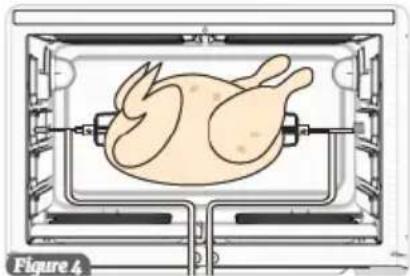
Illustration of a chicken being handled with a clamp, showing a close-up of the blade and handle (no text or symbols)Place the food to be grilled on the spit and insert the skewers on both sides of the food to be grilled. Tighten the screws. If necessary, tie the food together a little so that it does not touch the radiators. Using the spit remover, insert the rotisserie spit into the gear on the right side of the interior. Place the other end of the spit on the support on the left (4).
natural_image
Diagram of a chicken inside a oven with a syringe inserted, labeled Figure 4 (no text or symbols on the diagram itself)Always insert the baking tray on the lowest level and select the desired program. Be sure to use the spit remover to remove the hot rotisserie!
Panel
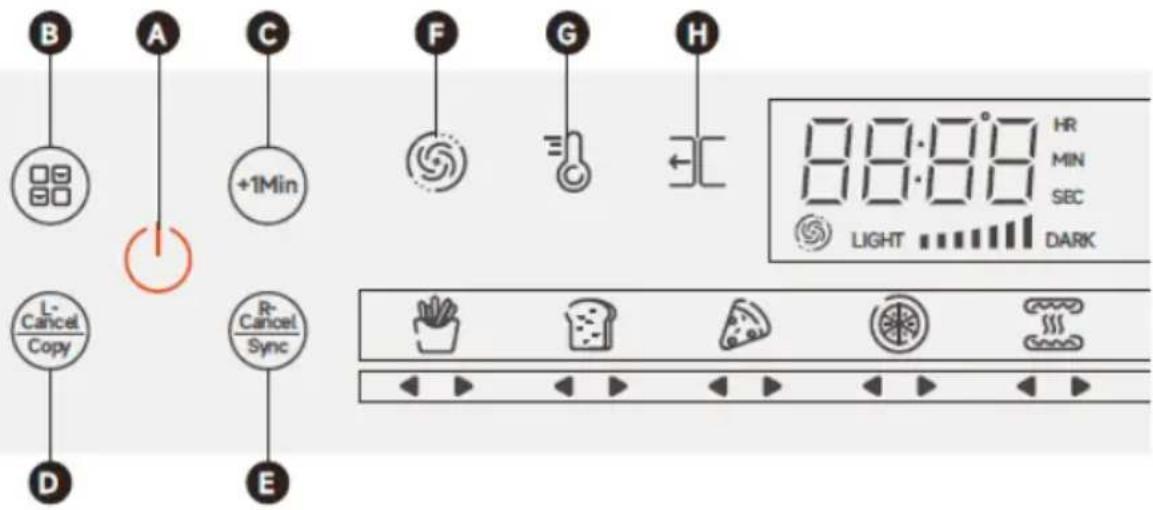
text_image
B A C +1Min F G H 8:0:0:0 HR MIN SEC LIGHT DARK L- Cancel Copy R- Cancel Sync D EA) ON/OFF
To switch the oven on/off with large cokking chamber. If the divided baking space is used, the button H must be touched to get to the main menu.
B) Multi-cook
Combination of up to 3 cooking programs in one program which are carried out one after the other. This means that dishes can be prepared perfectly.
C) +1 min
The cooking time can be extended during the process. Each time you press a button, the time is increased by 1 minute.
D) L-Cancel
Cancel the program for the left or large cooking chamber.
Copy
By pressing and holding for 3 seconds, the settings on the right or left side can be copied and applied to the other cooking chamber.
E) R-Cancel
Cancel the program for the right or large cooking chamber.
Sync
By pressing and holding for 3 seconds, the timers on both sides can be synchronized. This means that both programs will end at the same time.
F) Convection air
To switch the convection function on/off.
G) Temperature
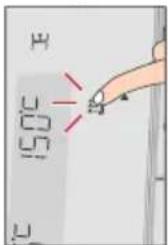
To adjust the temperature. Press the button and then change the temperature using the rotary knob N. The temperature is adjusted in +/- 5 degree increments.
Press and hold the button for 5 seconds to switch between °C and °F.
H) Left side
Press the button to make the settings for the left side.
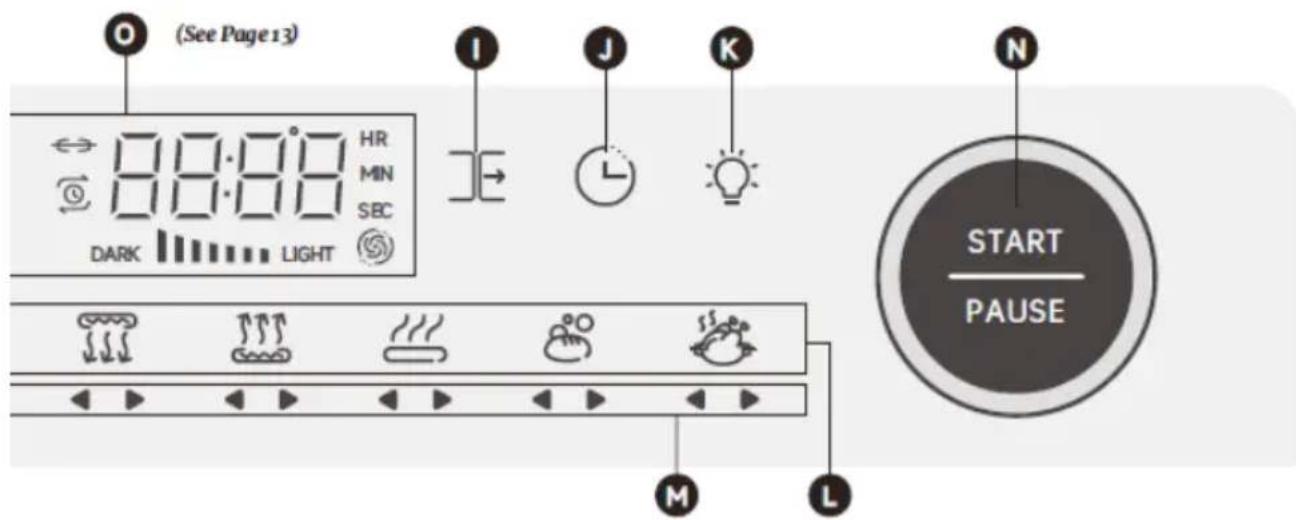
text_image
(See Page 13) 88:88 HR MIN SEC DARK LIGHT I J K N START / PAUSE M LI) Right side
Press the button to make the settings for the right side.
J) Timer
To set the time. Press the button and then change the time using the rotary dial N. The time is changed in steps of +/- 1 minute (under 30 minutes), +/- 5 minutes (from 30 minutes to 2 hours), +/- 10 minutes (from 2 to 12 hours), or +/- 30 minutes (from 12 up to 72 hours).
K) Interior lighting
To switch the interior lighting on/off
L) Program display
Displays the currently selected program
M) Cooking chamber display
Shows in which baking chamber the selected program is operated
N) Rotary control
To select the program
To change temperature
To change time
Start/Pause:
Press to start or pause a program
O) Display
Automatic programs
| Program | Function Accessory De- | fault setting | Adjustable scope | |
 | For foods that require a lot of heat and hot air, e.g. fries, chicken wings | Airfry-Grid Baking tray (as fat collec-tor) | 205°C 20 Min | 100 – 230°C 1 Min – 1 h |
 | · For browning up to 9 slices of bread/toast · Up to 3 slices of toasts in the small baking space | Wire grill big Wire grill small | Level 4 6 Toast Level 4 2 Toast | Degree of browning 1 – 7 Temperature and time are automatic |
 | For melting cheese while forming a crispy crust | Wire grill 205°C | 18 Min | 100 – 230°C 1 Min – 1 h |
 | For drying fruits, vegetables, nuts, etc. | Wire grill Airfry-Grid | 55°C 6 h | 35 – 95°C 1 Min – 72 h |
 | For cooking various meats, juicy on the inside, crispy on the outside | Baking tray Wire grill | 190°C 45 Min | 100 – 230°C 1 Min – 1 h |
 | · For baking sandwiches or casseroles · For grilling thin pieces of meat or fish | Baking tray 210°C | 30 Min | 100 – 210°C 1 Min – 1 h |
 | For baking cakes, muffins, etc. | Wire grill 150°C | 30 Min | 100 – 180°C 1 Min – 1 h |
 | For warming up food Wire grill | 140°C | 20 Min | 100 – 230°C 1 Min – 2 h |
 Ferment Ferment | For making yogurt For letting dough rise | Baking tray 35°C | 50 Min | 30 – 45°C 1 Min – 9 h |
 R...ie R...ie | For grilling whole chickens (max 1.4 kg) or rolled roasts up to approx. 2.3 kg | Rotisserie spit Baking tray (as fat collec-tor) | 210°C 45 Min | 100 – 210°C 1 Min – 1 h |
Particularities
TOAST program:
You want to work with cooking chamber divider No. 14:
- Touch the ON/OFF (A), the symbols H and I light up. If you now want to use the left, right or both baking chambers, touch the H and/or I button to display the main menu.
- Touch the "Toast" symbol, 4-2 appears on the display. By touching the symbol G (temperature), the degree of browning can be adjusted from 1-7 using the rotary control (N).
- By touching the J (timer) symbol, the number of toast slices is determined. In the large baking chamber from 1 to 9 slices of toast and in the 2 small baking chambers from 1 to 3 slices of toast. The time is determined by the device itself.
• The program is started by pressing START/PAUSE (N).
Rotisserie program (rotisserie spit):
- The rotisserie program can only be used in the large baking space.
Important!
- To set the programs, follow the instructions in the quick start guide.
- All programs (except Rotisserie) can be set in both the large and small baking chamber.
Getting started
Single Zone
natural_image
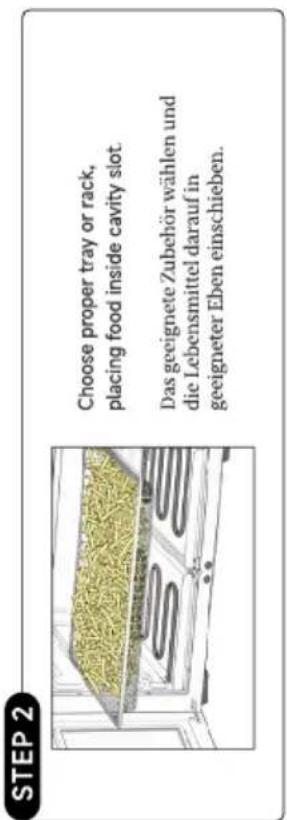
Interior view of an oven with food items inside (no visible text or symbols)Choose proper tray or rack, placing food inside cavity slot inside cavity slot.
natural_image
Diagram of a refrigerator interior with cooling pipes and heat exchangers, showing red directional arrows indicating flow or movement (no text or symbols)Insert Crumb tray into cavity (below lower heater), then insert Divider into cavity (middle of the cavity)
Choose Temp. "or Time" then rotate the knob to set the proper temp. and time.
Choose the menu needed. (Example "###")
text_image
Hand gesture pointing at a button with Chinese characters and icons, likely for navigation or calligraphy instruction.Select " ] [→" to choose Right cavity
natural_image
Illustration of a hand pressing a button on a camera (no text or symbols visible)Press the button START/PAUSE to start cooking.
natural_image
Illustration of a hand holding a tray with grains and three food items on a stove (no text or symbols)Remove food after cooking completed. Use the proper tool (for example oven mitts) to prevent burns.
Lebensmittel nach
Choose Temp. "or Time" then rotate the knob to set the proper temp. and time.
text_image
Hand-drawn sketch with Chinese characters and symbols, including a finger pointing at a target-like object→
Select "←" to choose Left cavity
natural_image
Illustration of a food storage tray with green grains and golden bread rolls inside an oven (no text or symbols)STEP 1
natural_image
Diagram of a refrigerator interior with cooling pipes and heat exchangers, showing red directional arrows indicating flow or movement (no text or symbols)If only the left cooking chamber is to be used, skip step 4. If only the right cooking chamber is to be used, skip step 3.
Multi-Cook
You can combine up to 3 cooking methods in one program and run them one after the other. This helps to meet the demands for different functions, temperatures or cooking times.
- First select the program that is needed first. (e.g. air fry).

- Touch the button . Now you can select the program that is needed second.
- Note: The "Toast" function is not available in the Multi-Cook program.
- In this way, up to 3 programs can be connected in series.
- As soon as all the desired programs have been selected and the start/stop button is pressed, the device starts with the successive programs (the display shows 1-3 if 3 programs have been selected). The respective program symbol is always shown in the display.
+ 1 Min
Large cooking chamber:
- Touch the +1Min button to add 1 minute to the cooking time during cooking. You can add up to 10 minutes this way.
Small cooking chamber:
Select the left or right cooking chamber before using this function.
- Touch the +1Min button to add 1 minute to the cooking time during cooking. You can add up to 10 minutes this way.
Please note: The +1Minute function is not available in the Multi-Cook program.
Copy
This function is suitable for preparing a larger quantity of similar food using the same program, time and temperature.
- Select a cooking chamber, e.g. the left one, the symbol flashes. Then select the desired program. Use the temperature button to set the desired temperature. Then press the time button and set the desired time using the rotary knob.

- Press the button for 3 seconds to copy the left side settings to the right side. Then press the start/stop button to start the cooking process.
- "End" appears in both displays as soon as the cooking process is completed.
Note: It is also possible to copy the program from the right cooking chamber to the left cooking chamber.
SYNC
For foods with different programs, cooking times or temperatures, the Sync program ensures that both cooking chambers are ready at the same time.
- Select the left cooking chamber, the symbol flashes. Then select the desired program. Use the temperature button to set the desired temperature. Then press the time button and set the desired time using the rotary knob.
- Select the right cooking chamber, the symbol flashes. Then select the desired program. Use the temperature button to set the desired temperature. Then press the time button and set the desired time using the rotary knob.

- Press and hold the Sync button for 3 seconds. Then press the Start/Pause button. The cooking chamber with the longest time starts working. The display on the other side shows "Hold". The device will beep and turn on the other side as soon as both sides have the same remaining time.
Note: It is recommended to shake the food during the cooking process. To keep the times synchronized, press the "Start/Pause" button to pause both sides. If you only want to pause one side, select the side and press the "Start/Pause" button. To continue cooking, press this button again.
- When the cooking time is complete, a signal sounds and "End" appears on the display.
Note: If you want to turn off one side before the cooking time is up, select the side and press the "Start/Pause" button.
Tips
- Ready meals that are prepared in the oven can also be cooked in this device to save energy.
- The device is suitable for roasting whole fresh chickens up to 1400g.
- Smaller quantities generally require shorter cooking times.
- The colder a food, the longer the cooking time.
- Turn food halfway through the cooking time.
- Brush breaded foods or fries with a little oil to make them crispier.
- Do not prepare high-fat foods (e.g. sausages) at temperatures that are too high.
- Avoid opening the doors during operation as this will cause loss of temperature.
Correct Disposal of this product
This marking indicates that this product should not be disposed with other household wastes throughout the EU. To prevent possible harm to the environment or human health from uncontrolled waste disposal, recycle it responsibly to promote the sustainable reuse of material resources. To return your used device, please use the return and collection systems or contact the retailer where the product was purchased. They can take this product for environmental safe recycling.
Packaging disposal: Do not throw away the package materials. Please put it in the recycling bin.



Gift box: Paper, should be put to the old paper collection point. Plastic packaging material and foils should be collected in the special collection containers.
Service and Repair:
If the appliance must be repaired, please get in touch with your trader or with the manufacturer:
text_image
Labeled diagram of an oven with numbered parts for identification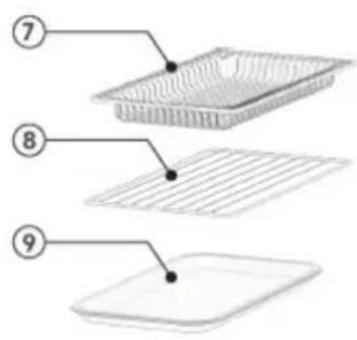
text_image
Diagram showing three labeled components of a layered material or device, with numbered annotations pointing to each component.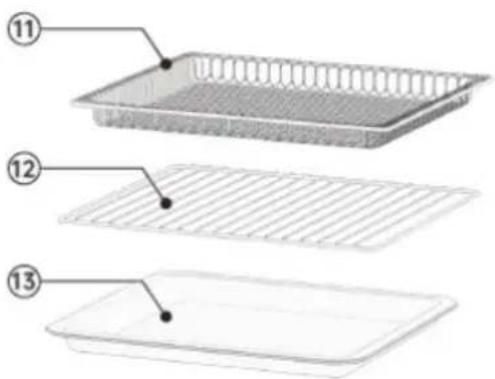
text_image
Diagram of a three-step food tray with labeled parts 11, 12, and 13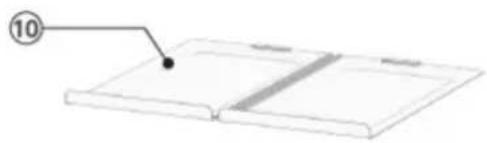
natural_image
Simple line drawing of a closed book with a bookmark and a numbered label (10) pointing to the bookmark (no text or symbols on the book itself)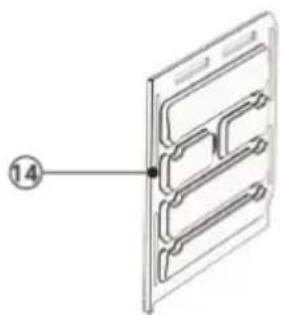
natural_image
Diagram of a door panel with internal compartments and a numbered label (14), no text or symbols present.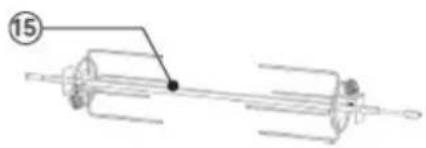
natural_image
Mechanical assembly diagram showing a shaft and housing with a numbered label (15), no readable text or symbols present.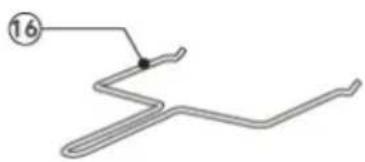
natural_image
Pure electrical circuit lines without any symbols7) Petite grill Airfry, 2x
8) Petite grill, 2x
11) Grande grill Airfry
12) Grande grill
natural_image
Diagram of a room interior with heating elements and a door, no text or symbols presentnatural_image
Line drawing of an open refrigerator with cooling pipes and a door, labeled 'Figure 2' (no text or symbols on the diagram itself)natural_image
Exterior view of a two-tiered kitchen appliance with two rectangular compartments (no text or symbols visible)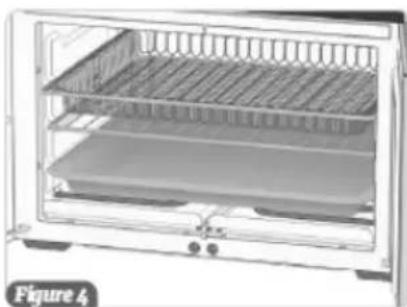
natural_image
Exterior view of a modern kitchen appliance with a rack and side panel (no visible text or symbols)| Airfry | Toast Pizza | Dehydrate | Roast | Broil | Bake | Re-heat | Fer-ment | Rotis-serie | |
| 1) | X X | ||||||||
| 2) | X X X | ||||||||
| 3) | X X X X X | ||||||||
| 4) | X |
Tournebroche
natural_image
Illustration of a chicken being fed with a tool, showing body and leg positioning (no text or symbols)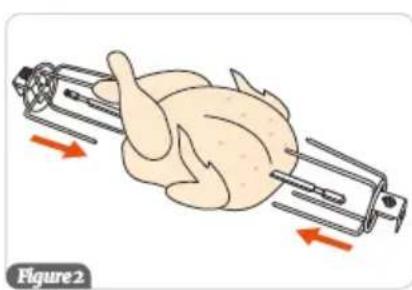
natural_image
Illustration of a chicken being cut with a spring scale, showing motion arrows (no text or symbols)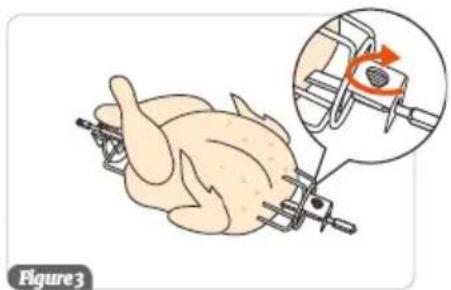
natural_image
Illustration of a chicken being handled with a tool, showing a magnified view of the mechanical component (no text or symbols present)natural_image
Illustration of a chicken inside a rectangular chamber with internal components (no text or symbols)text_image
B A C F G H L- Cancel Copy R- Cancel Sync D E 8:00:00 HR MIN SEC LIGHT DARKA) ON/OFF
text_image
(See Page 13) HR MIN SEC DARK LIGHT I J K N START / PAUSE M LI) Côté droit
natural_image
Illustration of a food storage tray with green grains and three baked goods on a curved surface (no text or symbols)Choose proper tray or rack, placing food inside cavity slot inside cavity slot.
natural_image
Diagram of a refrigerator interior with red arrows indicating direction, no text or symbols presentInsert Crumb tray into cavity (below lower heater), then insert Divider into cavity (middle of the cavity)
Choose Temp. "or Time" then rotate the knob to set the proper temp. and time.
natural_image
Illustration of hands holding a tray with food items inside an oven (no text or symbols visible)STEP 6
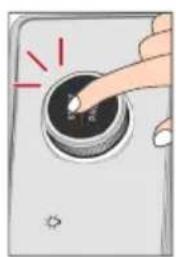
natural_image
Illustration of a hand pressing a button on a camera (no text or symbols visible)Press the button START/PAUSE to start cooking.
Select " ] [→" to choose Right cavity
Choose the menu needed. (Example "###")
Choose Temp. "or Time" then rotate the knob to set the proper temp. and time.
text_image
Cartoon illustration with a pointing hand and floating icons, including a number 2 and Chinese character '工' (work) on the right.→
Select "←" to choose Left cavity
natural_image
Illustration of hands holding a tray with food items inside an oven (no text or symbols visible)text_image
Labeled diagram of an oven with numbered parts for identification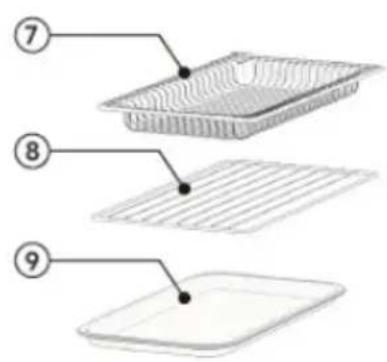
text_image
Diagram showing three labeled components of a food item: tray, side, and lid, with numbered annotations.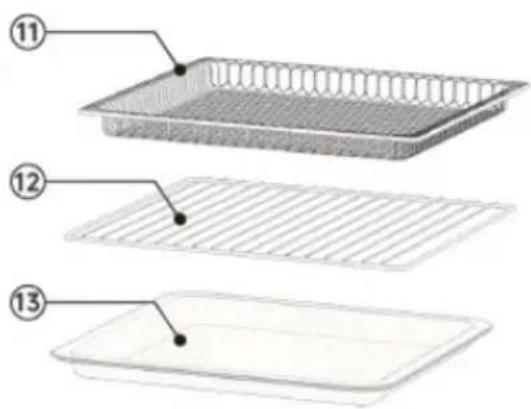
text_image
Diagram of a three-step food tray with labeled parts: tray 11, tray 12, and tray 13.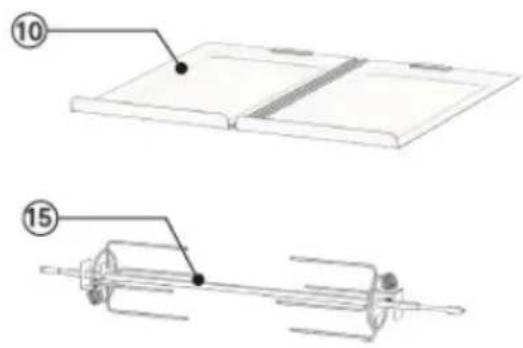
text_image
Technical diagram showing two mechanical assembly steps with numbered annotations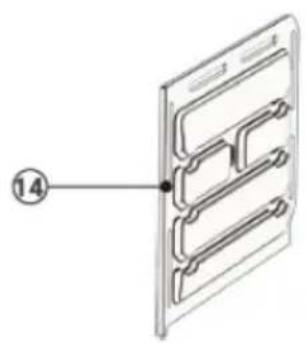
natural_image
Diagram of a 3D panel with internal channels and a numbered label (14), no readable text or symbols present.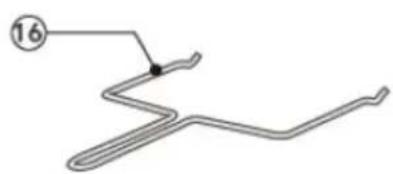
natural_image
Pure electrical circuit lines without any symbols1) Paneel
2) Bedieningsknop
3) Behuizing
4) Dubbele glazen deur
5) Handgreep
6) Verwarmings-element
7) Airfry-grill klein, 2x
8) Draadgrill
klein, 2x
9) Bakplaat
klein, 2x
10) Kruimellade, 1x
11) Airfry-grid
groot
12) Draadgrill groot
13) Bakplaat groot
14) Verdeelschot kookkamer
15) Draaispit
16) Spitheffer
Algemeen
natural_image
Line drawing of a room interior with heating elements and a door (no text or symbols)natural_image
Diagram of an open oven with internal heating elements and cooling pipes (no text or symbols)natural_image
Exterior view of a two-tiered stainless steel oven unit with two rectangular trays (no text or symbols visible)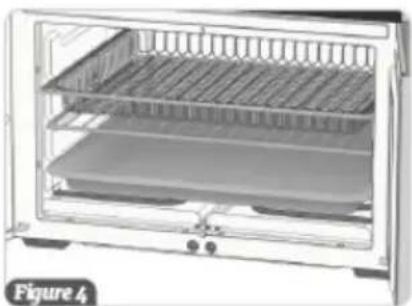
natural_image
Exterior view of a modern stainless steel oven with tiered dish (no text or symbols visible)| Airfry | Toast Pizza | Dehydrate | Roast | Broil | Bake | Re-heat | Fer-ment | Rotis-serie | |
| 1) | X X | ||||||||
| 2) | X X X | ||||||||
| 3) | X X X X X | ||||||||
| 4) | X |
Draaispit
natural_image
Illustration of a chicken being pulled with a stick, showing body posture and a red arrow indicating motion (no text or symbols)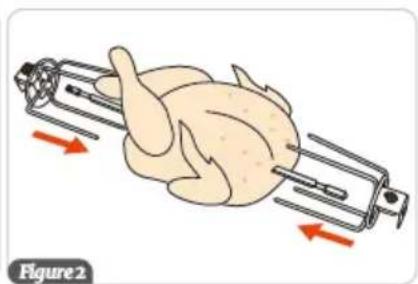
natural_image
Illustration of a chicken being cut with a fork, showing red arrows indicating motion (no text or symbols)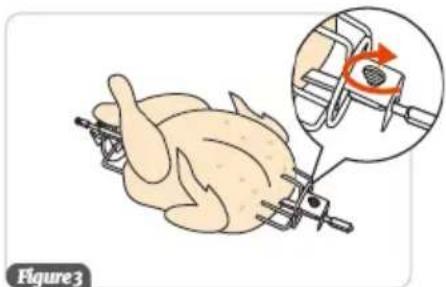
natural_image
Illustration of a chicken being handled with a clamp, showing mechanical components and a magnified view of the tool (no text or symbols)natural_image
Diagram of a chicken inside a storage unit with internal components (no text or labels)text_image
B A C F G H 8:00:00 HR MIN SEC LIGHT DARK L- Cancel Copy R- Cancel Sync D EA) ON/OFF
text_image
(See Page 13) 88:00 HR MIN SEC DARK LIGHT I J K N START / PAUSE M LI) Rechterkant
then rotate the knob to set the
proper temp. and time.
(五)股权分置改革的实施及对价安排
Remove food after cooking
completed. Use the proper tool
(for example oven mitts) to
prevent burns.
[Non-Text]
Lebensmittel nach
Choose proper tray or rack, placing food inside cavity slot
inside cavity slot.
then rotate the knob to set the
proper temp. and time.
Choose the menu needed.
Select " ]→" to choose
Right cavity
Um den rechten Backraum
drücken.
text_image
Labeled diagram of an oven with numbered parts for identification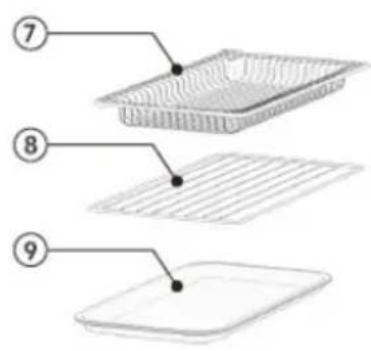
text_image
Diagram showing three labeled layers of a food item: top layer, middle layer, and bottom layer.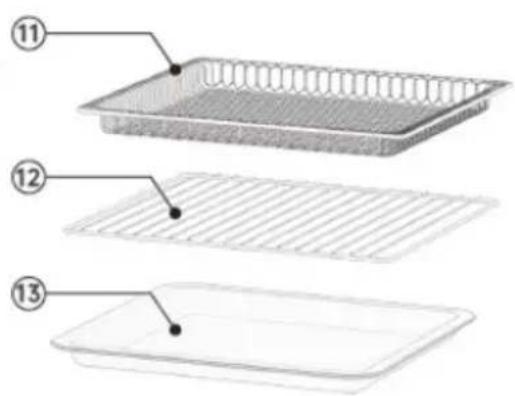
text_image
Diagram of a three-layer plastic tray with numbered parts labeled 11, 12, and 13.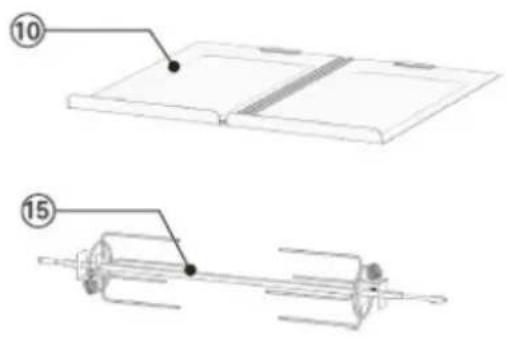
text_image
Technical diagram showing two mechanical assembly steps with numbered annotations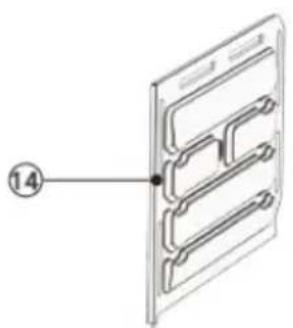
natural_image
Diagram of a door panel with internal compartments and a numbered label (14), no readable text or symbols present.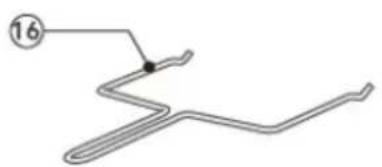
natural_image
Pure electrical circuit lines without any symbols1) Betjeningsfelt
2) Drejebetjening
3) Kabinet
4) Dobbelt glasdør
5) Dørhåndtag
6) Varmeelementer
7) Lille Airfry-rist, 2x
8) Lille rist, 2x
9) Lille bageplade,
2x
10) Krummebakke,
1x
11) Stor Airfry-rist
12) Stor rist
13) Stor bageplade
14) Skillevæg
15) Rotisserie
16) Spyd fjerner
Generelt
natural_image
Line drawing of a kitchen interior with heat exchanger and door panel (no text or symbols)natural_image
Diagram of an open refrigerator with cooling pipes and ventilation slots (no text or symbols)Airfry-rist, bageplade, rist
natural_image
Exterior view of a two-tiered stainless steel oven unit (no signage or text visible)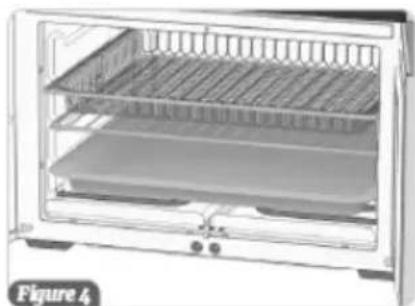
natural_image
Exterior view of a modern stainless steel oven with two grilles and a flat tray (no text or symbols visible)| Airfry | Toast Pizza | Dehydrate | Roast | Broil | Bake | Re-heat | Fer-ment | Rotis-serie | |
| 1) | X | X | |||||||
| 2) | X | X | X | ||||||
| 3) | X | X | X | X | |||||
| 4) | X |
Rotisserie
natural_image
Illustration of a chicken being cut with a tool, showing body and tail (no text or symbols)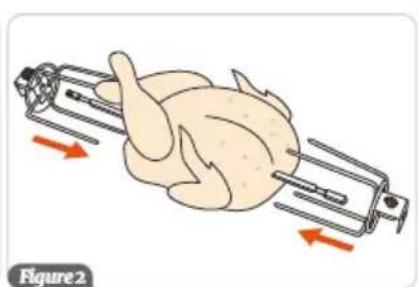
natural_image
Illustration of a chicken being cut with a rooster, showing motion arrows (no text or symbols)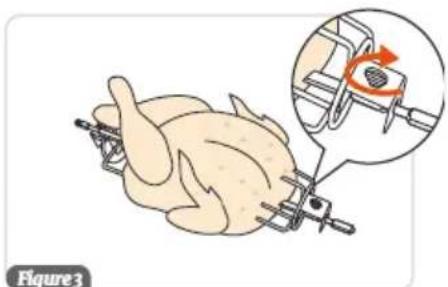
natural_image
Illustration of a chicken being processed with a tool, showing a magnified view of the tool inside (no text or symbols)natural_image
Illustration of a chicken inside an oven with a rotary tool, labeled 'Figure 4' (no text or symbols on the diagram itself)text_image
B A C F G H 80.80 HR MIN SEC LIGHT DARK L- Cancel Copy R- Cancel Sync D EA) ON/OFF
text_image
(See Page 13) 88:88 HR MIN SEC DARK LIGHT I J K N START /- PAUSE M LI) Højre side
natural_image
Illustration of a food oven with two trays of bread and bread rolls, no text or symbols presentnatural_image
Diagram of a refrigerator interior with cooling fans and heat exchangers, showing red directional arrows indicating movement (no text or symbols)text_image
E START PATHS→
text_image
150°C 王→
text_image
Hand typing on a keyboard interface with icons and labelsSTEP 6